Flowers wilt by Wednesday, but a gift you made keeps showing up in her day. These diy mothers day gifts are the kind she’ll reach for again and again: a jewelry dish on her dresser, a scrub by the tub, a bracelet she wears to brunch. Most take an afternoon and supplies you can grab at the craft store, and plenty of them are easy enough for kids to help. Stitch a fruit embroidered tote bag, seal the grandkids into photo resin coasters, shrink your own shrinky dink flower bracelet or fold a flower pop-up card that blooms when she opens it (it gets a gasp every time). Short on time? Wrap grocery store carnations in an easy flower bouquet and call it a win. Perfect for moms, grandmas, stepmoms, aunts and anyone who deserves a handmade thank you.
Table of Contents
- 1. DIY Geometric Wood Trivets
- 2. DIY Leather Envelope Clutch
- 3. DIY Ring Display
- 4. Manicure or Pedicure in a Jar
- 5. DIY Floral Tea Bags
- 6. Child’s Handprint Clay Jewelry Dish
- 7. Fruit Embroidered Tote Bag
- 8. Mini Polaroid Photo Magnets
- 9. Mason Jar Doilies
- 10. Breakfast in a Box
- 11. Heart String Art
- 12. Easy DIY Tea Cup Planter
- 13. Handmade Spa Pack
- 14. Finger Knit Rope Trivet
- 15. DIY Popsicle Stick Photo Bracelet
- 16. Faux Chalkboard Herb Pots
- 17. DIY Photo Resin Coasters
- 18. Flower Bead Bracelet
- 19. Blueberry Sugar Scrub
- 20. Shrinky Dink Flower Bracelet
- 21. Paper Bag Flowers
- 22. Dark Chocolate Mother’s Day Bouquet
- 23. Easy Flower Bouquet for Mom
- 24. Personalized Cutting Board
- 25. Fingerprint Key Chain
- 26. Fun Photo Bookmarks
- 27. Flower Pop-Up Card
- 28. Air-Dry Clay Decoupage Jewelry Dish
- 29. DIY Coffee Body Scrub
- 30. DIY Sharpie Heart Mug
- 31. Citrus Print Tea Towel
- 32. Pressed Flower Resin Coasters
- 33. Mason Jar Fairy Lights With Pressed Flowers
- 34. Air-Dry Clay Jewelry Organizer Using Pebbles
- 35. Decoupage Vase Using Napkin Paper
- 36. Paper Tulips With Chocolate
- 37. Clay Flower Mirror in 1 Hour
- 38. Woven Yarn Mug Cozy
- 39. Air-Dry Clay Jewelry Tray
- 40. DIY Book Flower Vase
- 41. Camper Zipper Pouch
- 42. Air-Dry Clay Ring Holder
- 43. Ferrero Rocher Jewelry Box
- 44. Paper Towel Flower Bouquet
- 45. Daisy Bead Rings
1. DIY Geometric Wood Trivets

Moms who cook will put these to work the same day they open them. Wooden squares (craft store gallery panels) get stained, then strips of iron-on oak veneer tape are cut and pressed into chevrons, stripes and zigzags with a regular iron set to cotton. The pale wood against the dark stain looks like fancy marquetry, minus the fancy price. Press lightly, because too much pressure squeezes the glue out the sides. Make a set of three so they can hang on the kitchen wall between dinners.
Get the full tutorial at A Beautiful Mess.
2. DIY Leather Envelope Clutch

A leather clutch that folds up like an envelope and never sees a sewing machine. You trace a printable template onto leather scraps, line the flap with printed cotton using fusible applique paper and an iron, punch a hole in each corner and close it all with one brass stud screw back. The small 3.5 by 5 inch size is a sweet card or jewelry case, and the larger one fits a phone. Pick a lining fabric in her favorite print and it looks like it came from a boutique.
Get the full tutorial at Alice and Lois.
3. DIY Ring Display

Every mom with a ring habit has a dresser top full of them, plus at least one that rolled under the furniture. This simple pine ring display fixes that. A board gets cut to size, then a table saw set to 30 degrees cuts angled slots halfway through so the rings sit snugly in rows. If you’re comfortable with a table saw, it really is a five minute project. Leave the pine raw for a clean modern look, and set it next to her jewelry dish so everything has a home.
Get the full tutorial at The Merrythought.
4. Manicure or Pedicure in a Jar

Here’s a spa day she can open with one twist of the lid. A smooth quart mason jar gets a flower stencil, then coats of gold and pink glass-safe acrylic paint, and when the stencil comes off it leaves a little window so she can peek inside. Epsom salt goes in first to anchor everything and to use as a soak. Then layer in nail clippers, a file, polish, cuticle cream and hand lotion, or a pumice stone and polish remover for the pedicure version. Tie on a ribbon and a tag, done.
Get the full tutorial at Real Creative Real Organized.
5. DIY Floral Tea Bags

For the mom who drinks tea every single morning, this one takes about five minutes and looks so pretty on a breakfast tray. Snip the brand tag off a tea bag, cut a small flower near its base and tie the string about halfway down the stem so it hangs over the rim of her cup. Baby carnations are the classic pick. If you’re packaging a set to give, plastic flowers keep longer than fresh ones. Pair a few with a new mug and you’ve got a sweet Mother’s Day morning surprise.
Get the full tutorial at The Kipi Blog.
6. Child's Handprint Clay Jewelry Dish

Grab the kids, because this is the gift that makes moms and grandmas cry happy tears. Roll Crayola air-dry clay between parchment to about 1/4 inch, trace around your child’s hand with a pencil and cut it out with an X-Acto knife. Smooth the edges with a wet finger, then dry it in a small glass bowl so the fingers curve up into a dish. A painted heart in the palm finishes it. Thicker clay takes longer to dry but holds up better, so don’t rush it. Those tiny fingers won’t stay tiny.
Get the full tutorial at Simple as That.
7. Fruit Embroidered Tote Bag
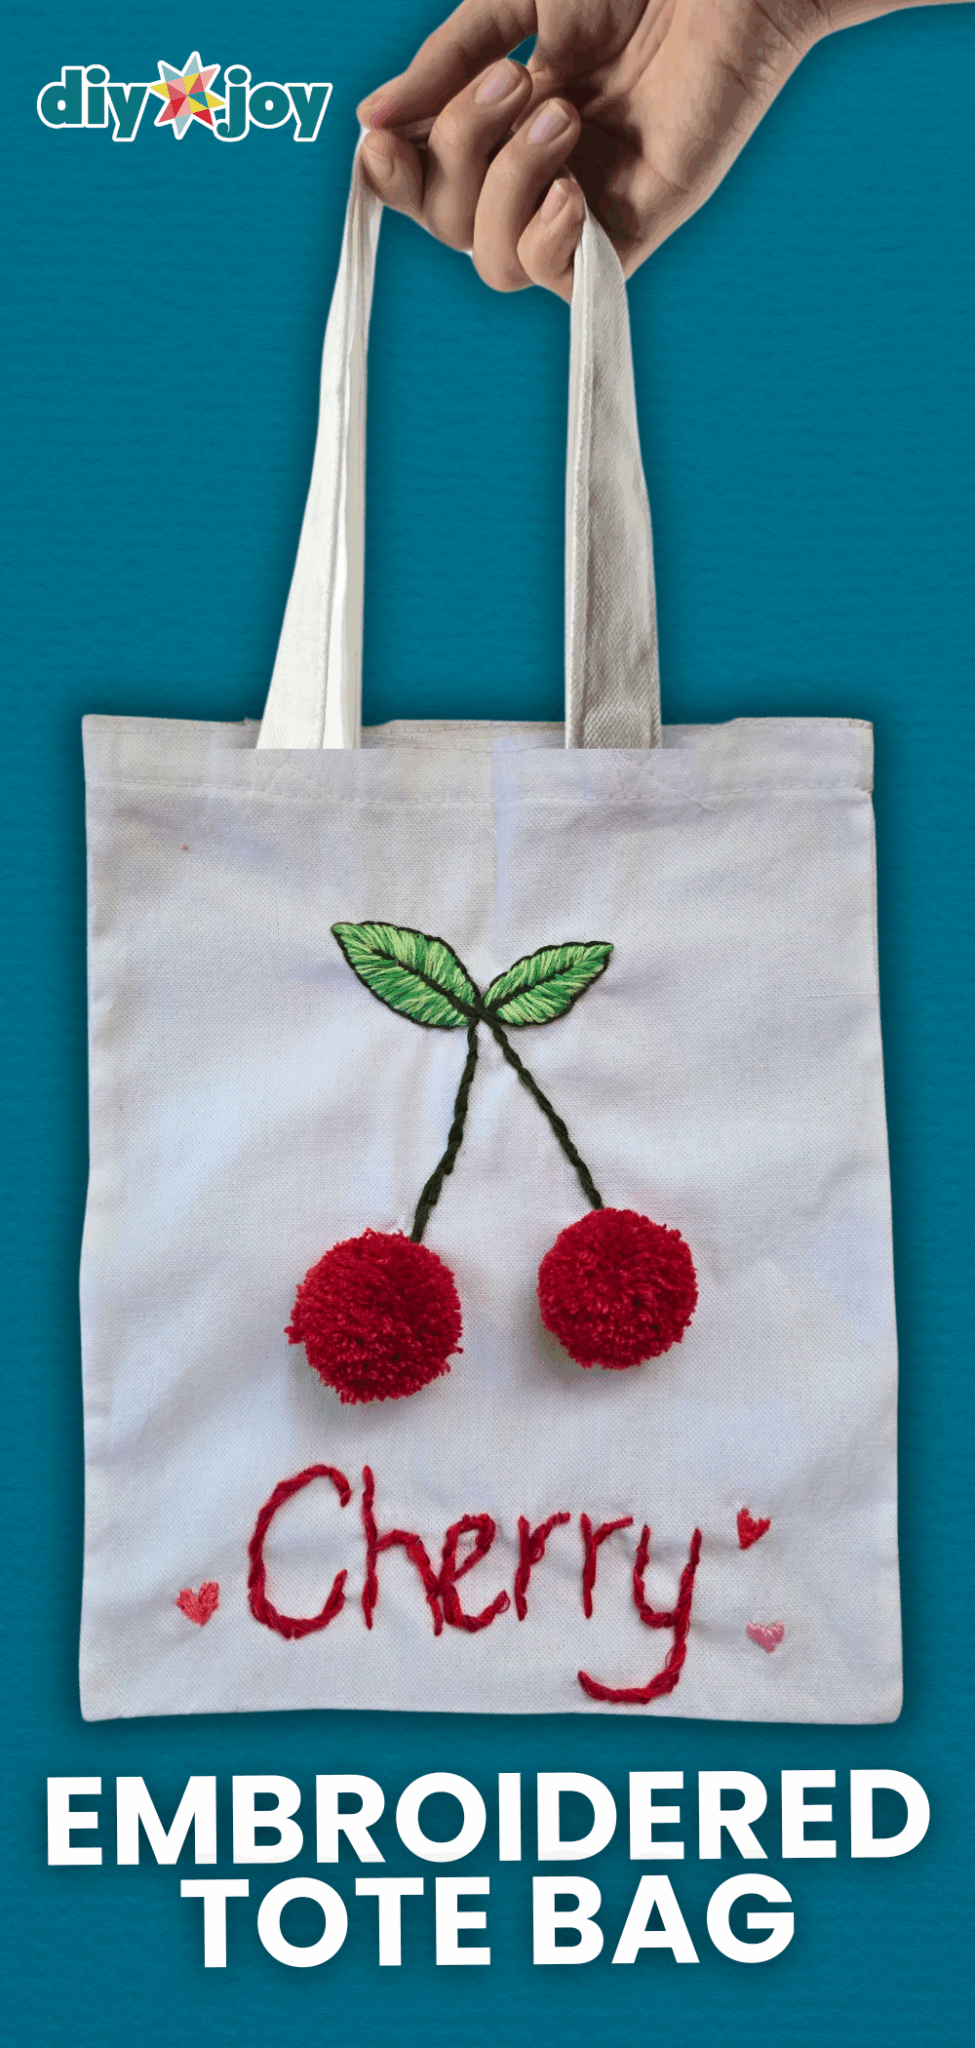
A plain canvas tote becomes the bag she carries to the farmers market every weekend. You sketch a fruit design right on the bag, stitch leaves and lettering with embroidery thread, then make yarn pom poms (wrap about 100 times around three fingers, tie, cut and trim) for the cherries, lemons or oranges. The pom poms give it that fun 3D look you just don’t get from paint. Stitch her name or a little message under the fruit and it’s a gift nobody else will be carrying.
Get the full tutorial at DIY JOY.
8. Mini Polaroid Photo Magnets

Most moms love old photos and never get the albums out of the closet. Put the best ones right on her fridge instead. Print favorite pictures in a Polaroid style frame (the free template is linked in the post), glue them onto mounting board, cut them out and add small magnets on the back. A little white paint and glue along the edges makes them look finished. Pick trips, silly moments and things you two share, and print extras, because the whole family will want a set.
Get the full tutorial at Sundae Sins.
9. Mason Jar Doilies

Quick, cheap and easy, but the finished jar looks like a million bucks once a candle is glowing inside. Spray adhesive goes on a lace doily, the doily wraps around a mason jar and a little ribbon or trim finishes the top. Thrift stores, flea markets and garage sales are full of doilies for pennies. And if you have a few your grandmother made, this is the loveliest way to give them a second life. Drop in a tea light and it’s a soft, vintage lantern for her porch or table.
Get the full tutorial at DIY JOY.
10. Breakfast in a Box

Half homemade and half shopped, this is the gift for the mom who loves her morning routine. A wooden crate gets a jar of homemade grain-free granola with a hand-painted watercolor label, local honey for drizzling, a bag of good coffee, a pretty linen napkin and a small succulent. A handmade mug ties it all together. The trick is building the box around what she actually eats, so swap in her favorite tea or jam. It’s thoughtful, it ships well and she’ll use every bit.
Get the full tutorial at A Cozy Kitchen.
11. Heart String Art

A rainbow heart she’ll hang on the wall and smile at every day. Nails go around the outside edge of a board about 1/2 inch apart, then yarn or baker’s twine stretches from the outer nails to a printed heart template in the center, one color section at a time. The secret that makes string art easy is pre-drilling the nail holes, so every nail goes in straight. Scrap plywood works fine. Swap the rainbow for her favorite colors, or have the kids help with the stringing part.
Get the full tutorial at Sugar Bee Crafts.
12. Easy DIY Tea Cup Planter

Got a pretty teacup without a saucer hiding in the cupboard? Plant a succulent in it. Lift the succulent out of its pot, set it in the cup and fill around it with cactus and succulent soil. Tie a name tag on the handle with rustic twine and it’s ready to give. Thrifted floral cups make it even sweeter, and a row of them makes lovely place settings for a Mother’s Day brunch. Succulents barely need watering, which makes this a great gift even for moms who swear they kill plants.
Get the full tutorial at Curbly.
13. Handmade Spa Pack

Skip the flowers this year and give her permission to take a load off. A wire basket gets a fluffy robe, a soft bath towel, a bath sponge, a jar of homemade lavender bath salts and plenty of dark chocolate to nibble while the tub fills. A little chalkboard tag that says Mom finishes it. The homemade bath salts are the heart of it, and they take minutes to mix. It’s the gift for the mom who works hard and never stops, so tuck in a note telling her to use it today.
Get the full tutorial at Mom 4 Real.
14. Finger Knit Rope Trivet

All you need is rope, tape and your two fingers. Finger knit about 55 rows of soft cotton rope, then coil the strand and thread the tail through the opposite side of each round so it pulls into a tight, flat circle. It takes under half an hour, and it’s easy enough for kids to make for Mom (with a little help on the coiling). Keep the strand flat as you coil so it doesn’t bunch. Make a few in different sizes and she’ll have a matching set for the dinner table.
Get the full tutorial at Flax & Twine.
15. DIY Popsicle Stick Photo Bracelet

Wear the kids on your wrist, literally. Super jumbo craft sticks (1 inch wide and 7.5 inches long) soak in warm water until they bend, then dry curled inside a glass or jar so they keep a cuff shape. A strip of printed photos glued to the outside turns a kid craft into something a mom will actually wear. Choose a glass slightly smaller than her wrist so the cuff fits snugly. It’s cheap, it’s sweet, and grandmas go crazy for one with all the grandkids on it.
Get the full tutorial at It's Always Autumn.
16. Faux Chalkboard Herb Pots

Bright, cheery and useful, this is the gift for the mom who cooks with fresh herbs. Three 4 inch terracotta pots get painted in orange, saffron yellow and citrus green outdoor paint, each with a black painted label band. A silver paint pen writes cilantro, dill or parsley on the label, so it reads like chalkboard but won’t wash off in the rain. Want to change the herbs later? Use real chalkboard paint and chalk markers instead. Plant them up before you give them and they’re ready for her windowsill.
Get the full tutorial at Crafts by Amanda.
17. DIY Photo Resin Coasters
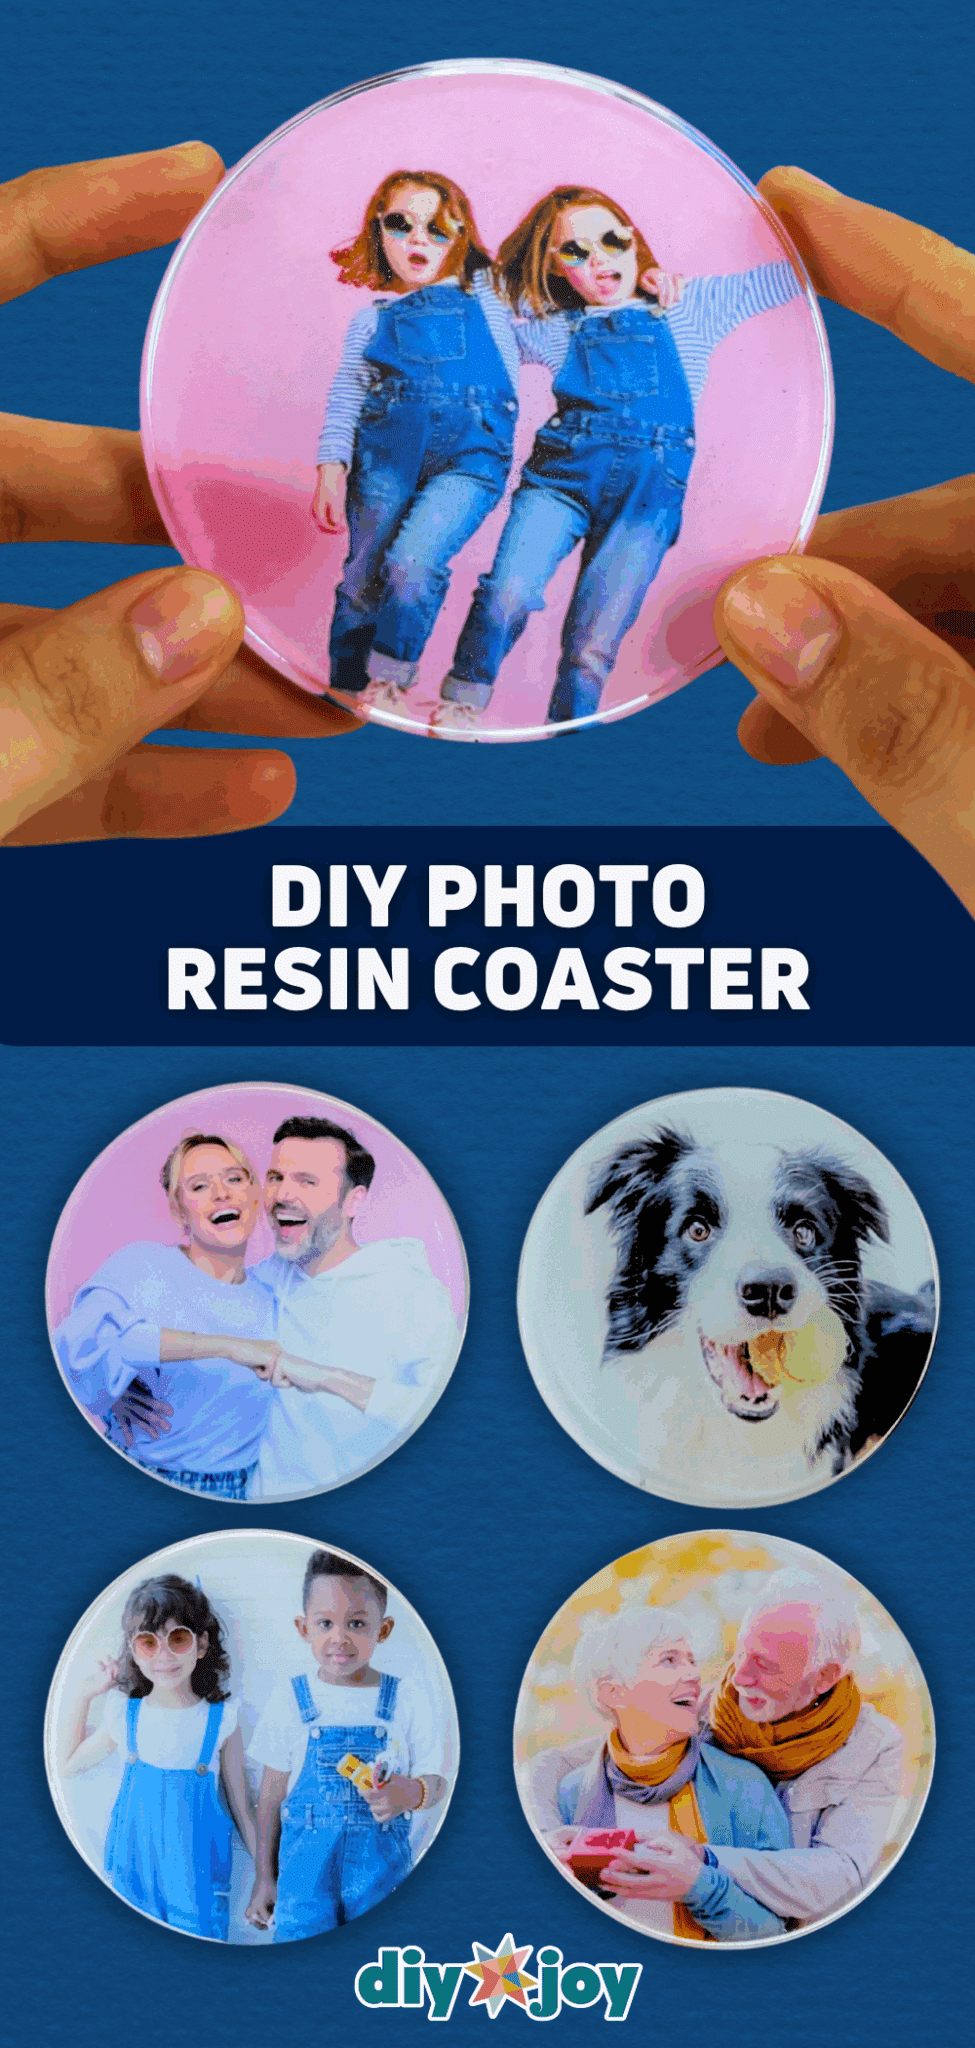
Her favorite people, sealed in shiny resin, right under her coffee cup. Mix epoxy resin and hardener at a 3:1 ratio (about 36 grams to 12) and stir slowly for 5 to 10 minutes, because rushing makes bubbles. Pour a thin layer into a round silicone mold, trace and cut a photo to fit, lay it in and pour the rest on top. After 24 hours it pops out of the mold, done. Use photos of the kids, the grandkids or even the dog, and make a full set for her table.
Get the full tutorial at DIY JOY.
18. Flower Bead Bracelet
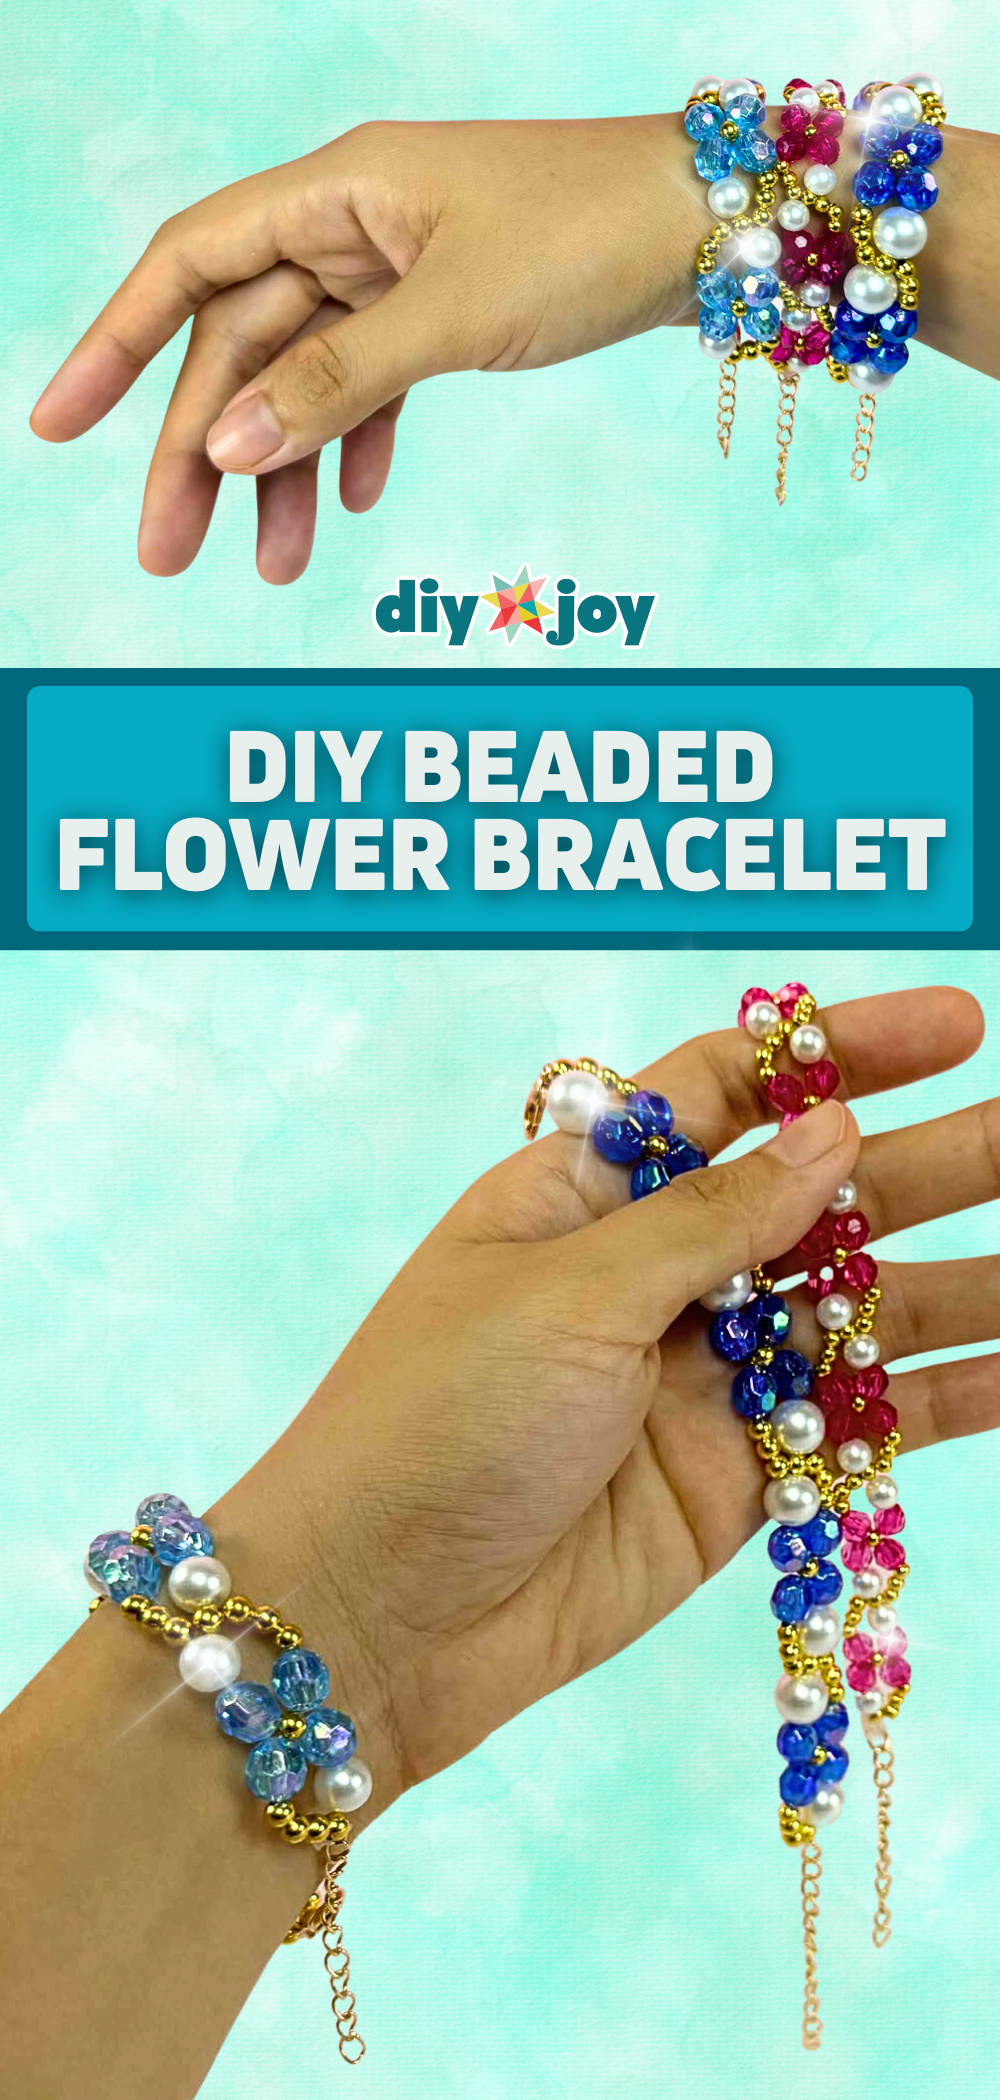
Little bead flowers in blue, pink and gold, linked all the way around her wrist. You tie fishing line to a clasp, then thread gold beads, blue beads and pearls in a simple sequence, crossing both lines through a gold bead each time so a flower forms. Keep the line pulled snug as you go and the flowers stay even. It looks way more complicated than it is. Pick her birthstone colors or her favorite shade and she’ll have a bracelet nobody else owns.
Get the full tutorial at DIY JOY.
19. Blueberry Sugar Scrub
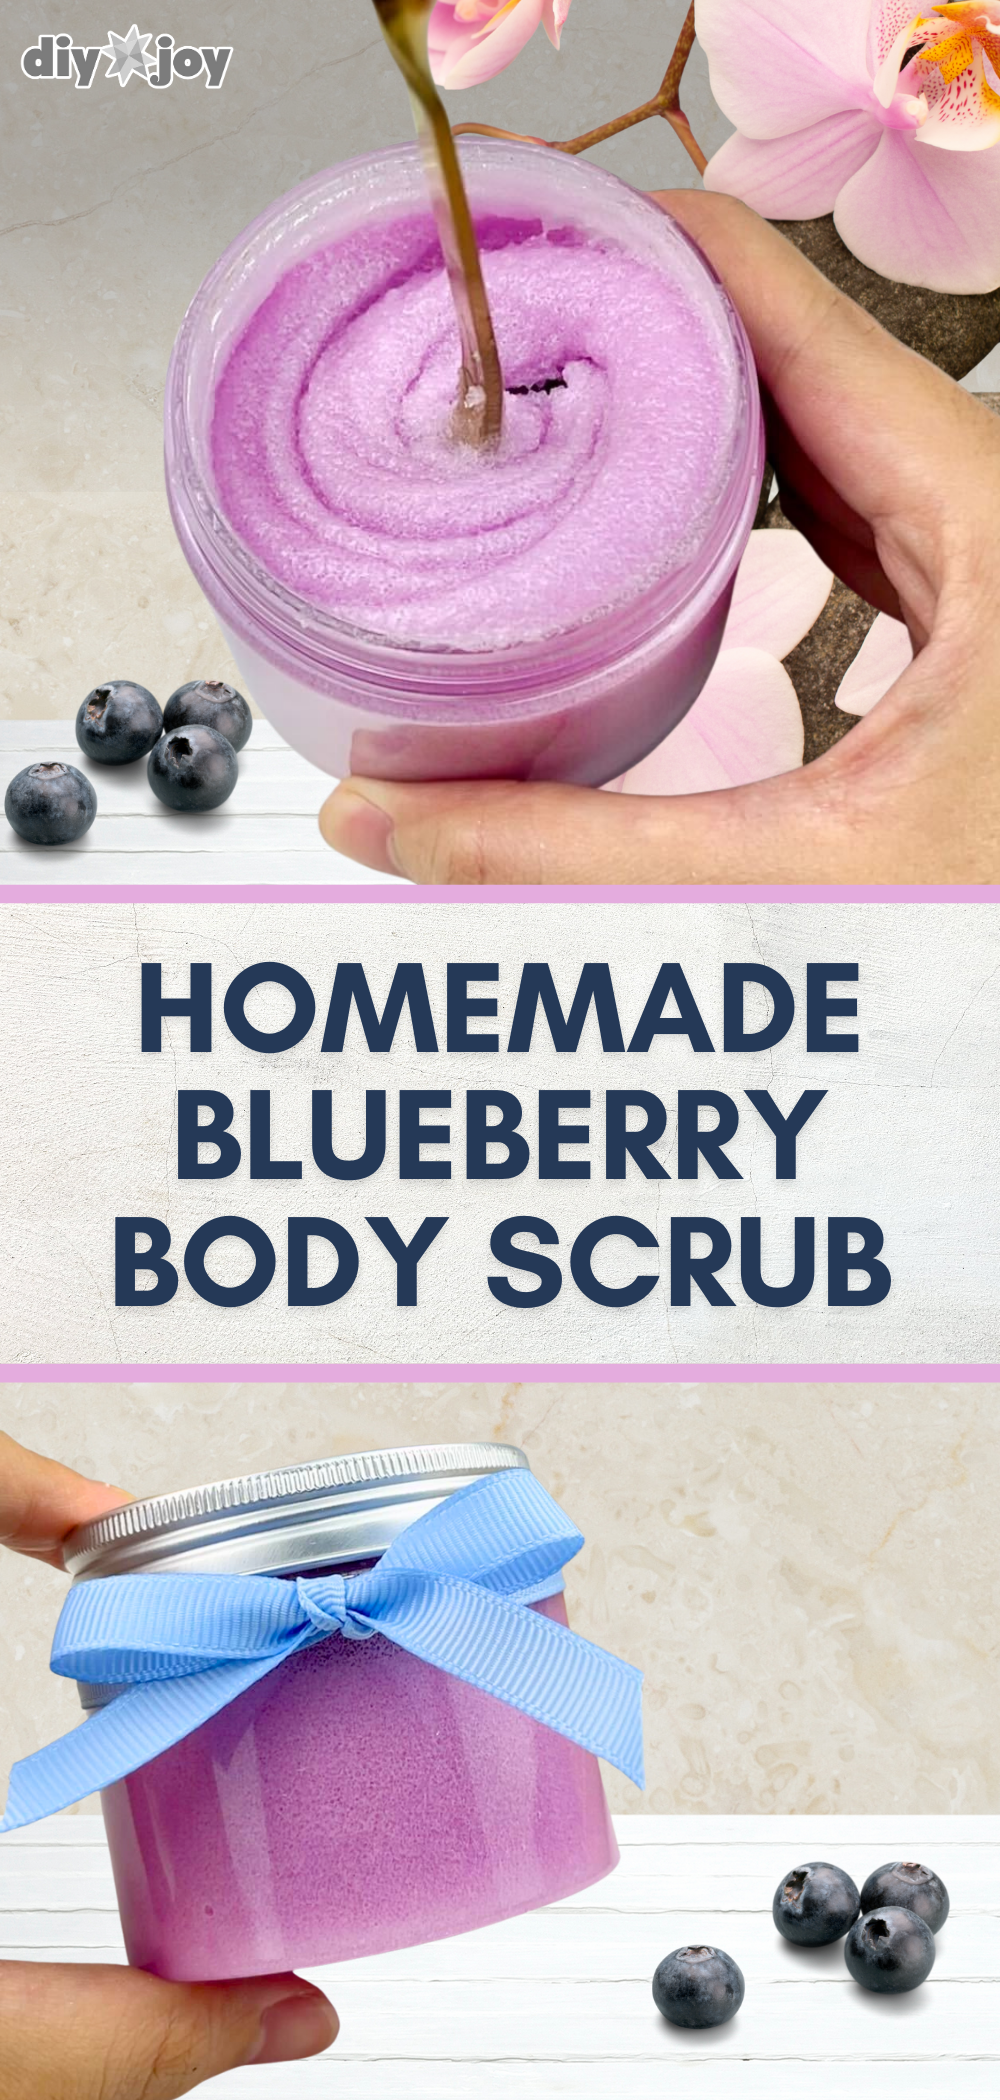
This purple scrub smells like a blueberry muffin, and it takes about five minutes. Stir 1/2 cup fine sugar with a pinch of violet mica powder for color, then add 1/4 cup coconut oil, 10 drops of blueberry oil and 1 tablespoon of castile soap. Mix until it looks like fluffy frosting. Want it coarser? Swap the sugar for Epsom salt. Spoon it into a pretty jar, tie on a ribbon and she’s got a spa night at home. Make a few, because she’ll want to share (or hide them).
Get the full tutorial at DIY JOY.
20. Shrinky Dink Flower Bracelet
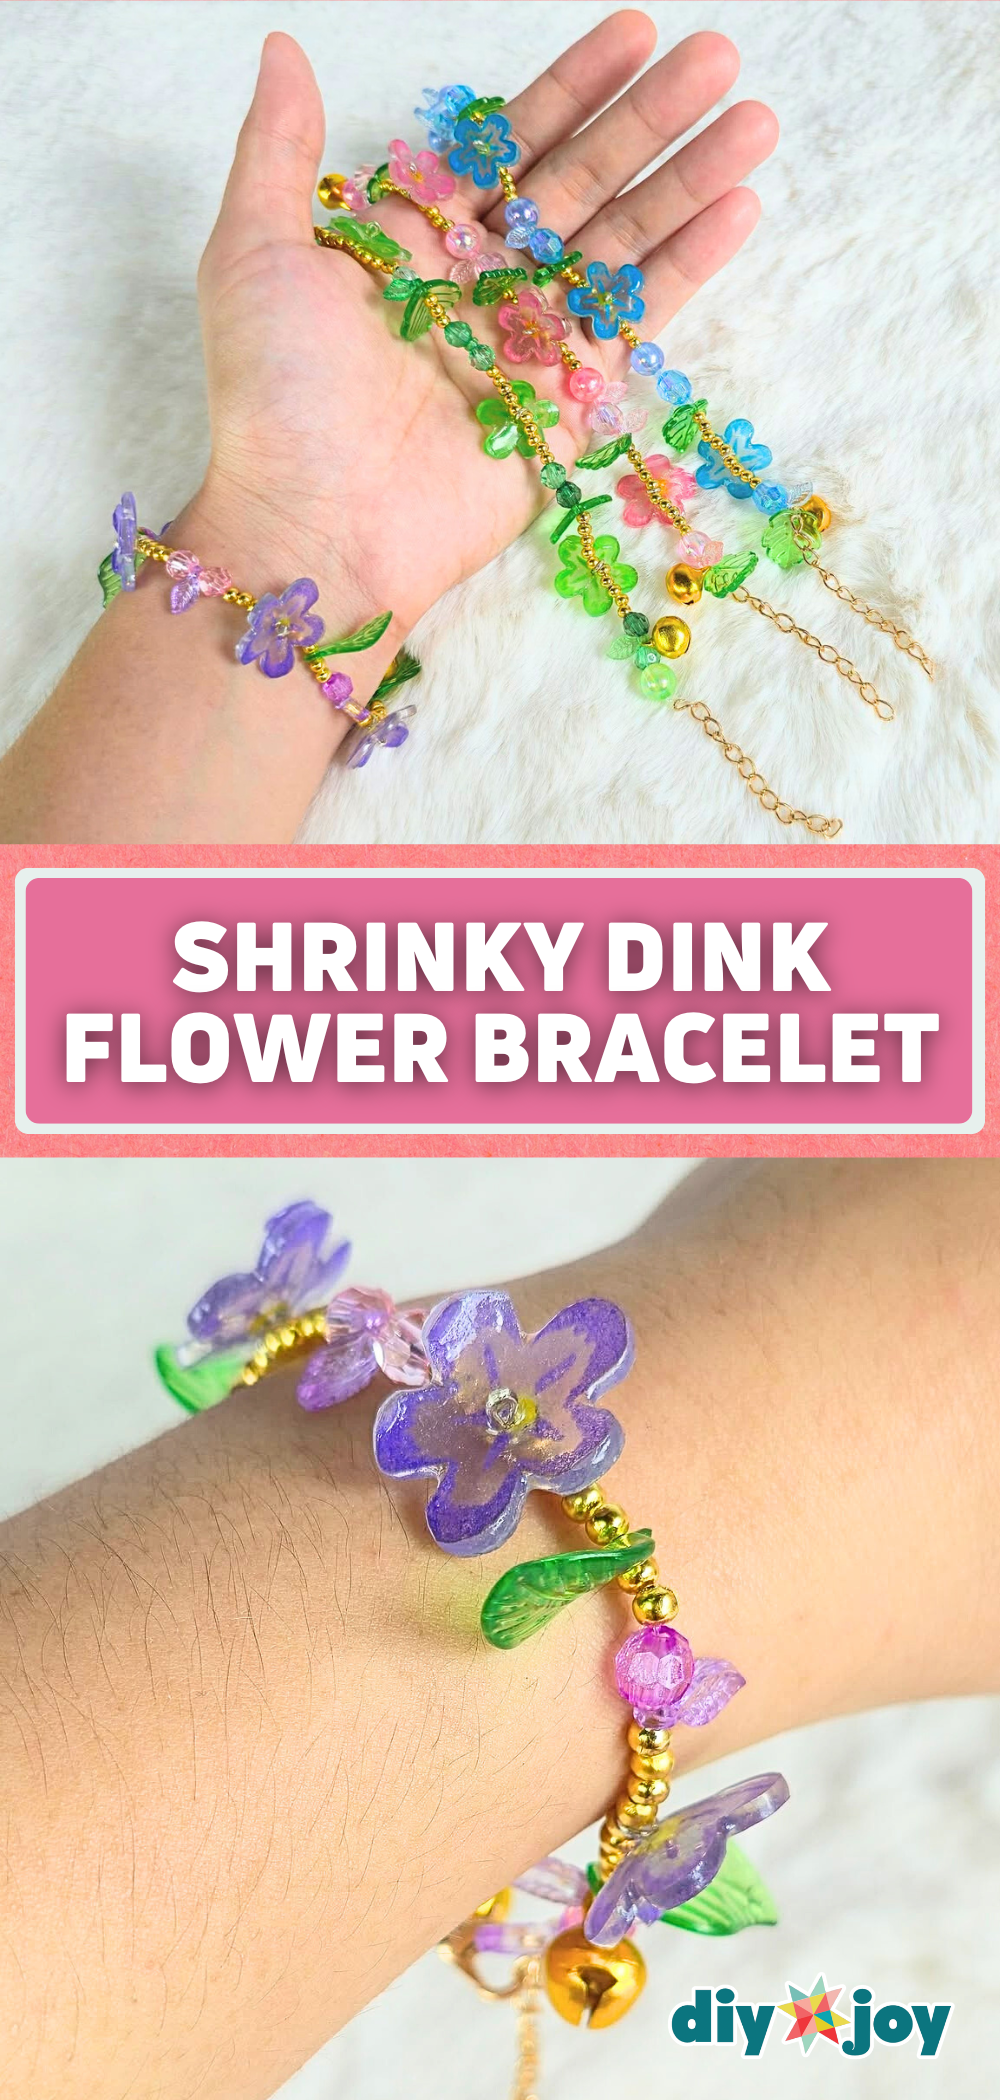
Remember shrink plastic? It grew up. You draw flowers on the rough side, tint them with chalk and add oil pastel at the center (which is a lot of fun in itself), then shrink each one with a heat gun until it’s hard and glossy. Eye pins link the flowers with little beads and green leaves into a bracelet. They come out looking like tiny pressed petals. Each flower turns out a little different, so the finished piece is a bracelet you can pretty much guarantee she won’t see anywhere else.
Get the full tutorial at DIY JOY.
21. Paper Bag Flowers

A potted plant in a plain plastic pot is fine. A potted plant in a polka dot paper bag is a gift. Paint white dots on brown paper lunch bags (take the handles off a gift bag, or leave them on), then tuck in a blooming plant like hyacinth or kalanchoe. Slip the plant into a zip-top bag first so water and dirt don’t soak through the paper. It’s cheap, quick and so cheerful lined up on a porch rail. Kids can do the dots.
Get the full tutorial at House by Hoff.
22. Dark Chocolate Mother's Day Bouquet

Flowers she can eat. Paint bamboo skewers green, cut flower shapes from sturdy cardstock (a flower cookie cutter makes a handy template) and hot glue a skewer to the back of each. Then double-sided tape holds foil-wrapped dark chocolates on as petals, with a contrasting flavor in the center. Stick them in floral foam inside an opaque vase and add paper leaves. Use heavy cardstock, because construction paper won’t hold the chocolate. Kids can do most of this one on their own.
Get the full tutorial at Tikkido.
23. Easy Flower Bouquet for Mom

Grocery store flowers, but make them a gift. Cut two 11 inch squares of wrapping paper and glue them wrong sides together, then fold the square into a cone and glue it closed. Punch a hole on each side for a beaded chain handle and two on the front for a ribbon bow. Trim the bottom to fit the stems and pop in fresh carnations. Gingham paper looks so sweet, but any pattern works. It’s quick, it costs very little and she can hang it right on a door.
Get the full tutorial at DIY JOY.
24. Personalized Cutting Board

A monogrammed cutting board looks like it came from a fancy kitchen shop, and this one started as a bamboo board for about $12 from TJ Maxx. Trace a vinyl monogram onto the bamboo with a pencil, then burn the outline and fill it in with a wood-burning tool. Add a year or an initial for every family member. Wood-burned spoons with words like loved and thankful make a sweet matching set. It may end up too pretty to chop on, so tell her to use the back.
Get the full tutorial at The Moon and Me.
25. Fingerprint Key Chain

Every time she grabs her keys, there’s a little thumbprint waiting. Kids roll out Sculpey, cut a heart with a cookie cutter, press a finger into the middle and poke a hole at the top. Bake it according to the package, add a key ring and that’s it. It’s a great preschool or classroom craft because the kids do the fun parts and an adult only handles the oven. Make one for Grandma too. They don’t stay this small forever (sniffle).
Get the full tutorial at A Girl and a Glue Gun.
26. Fun Photo Bookmarks
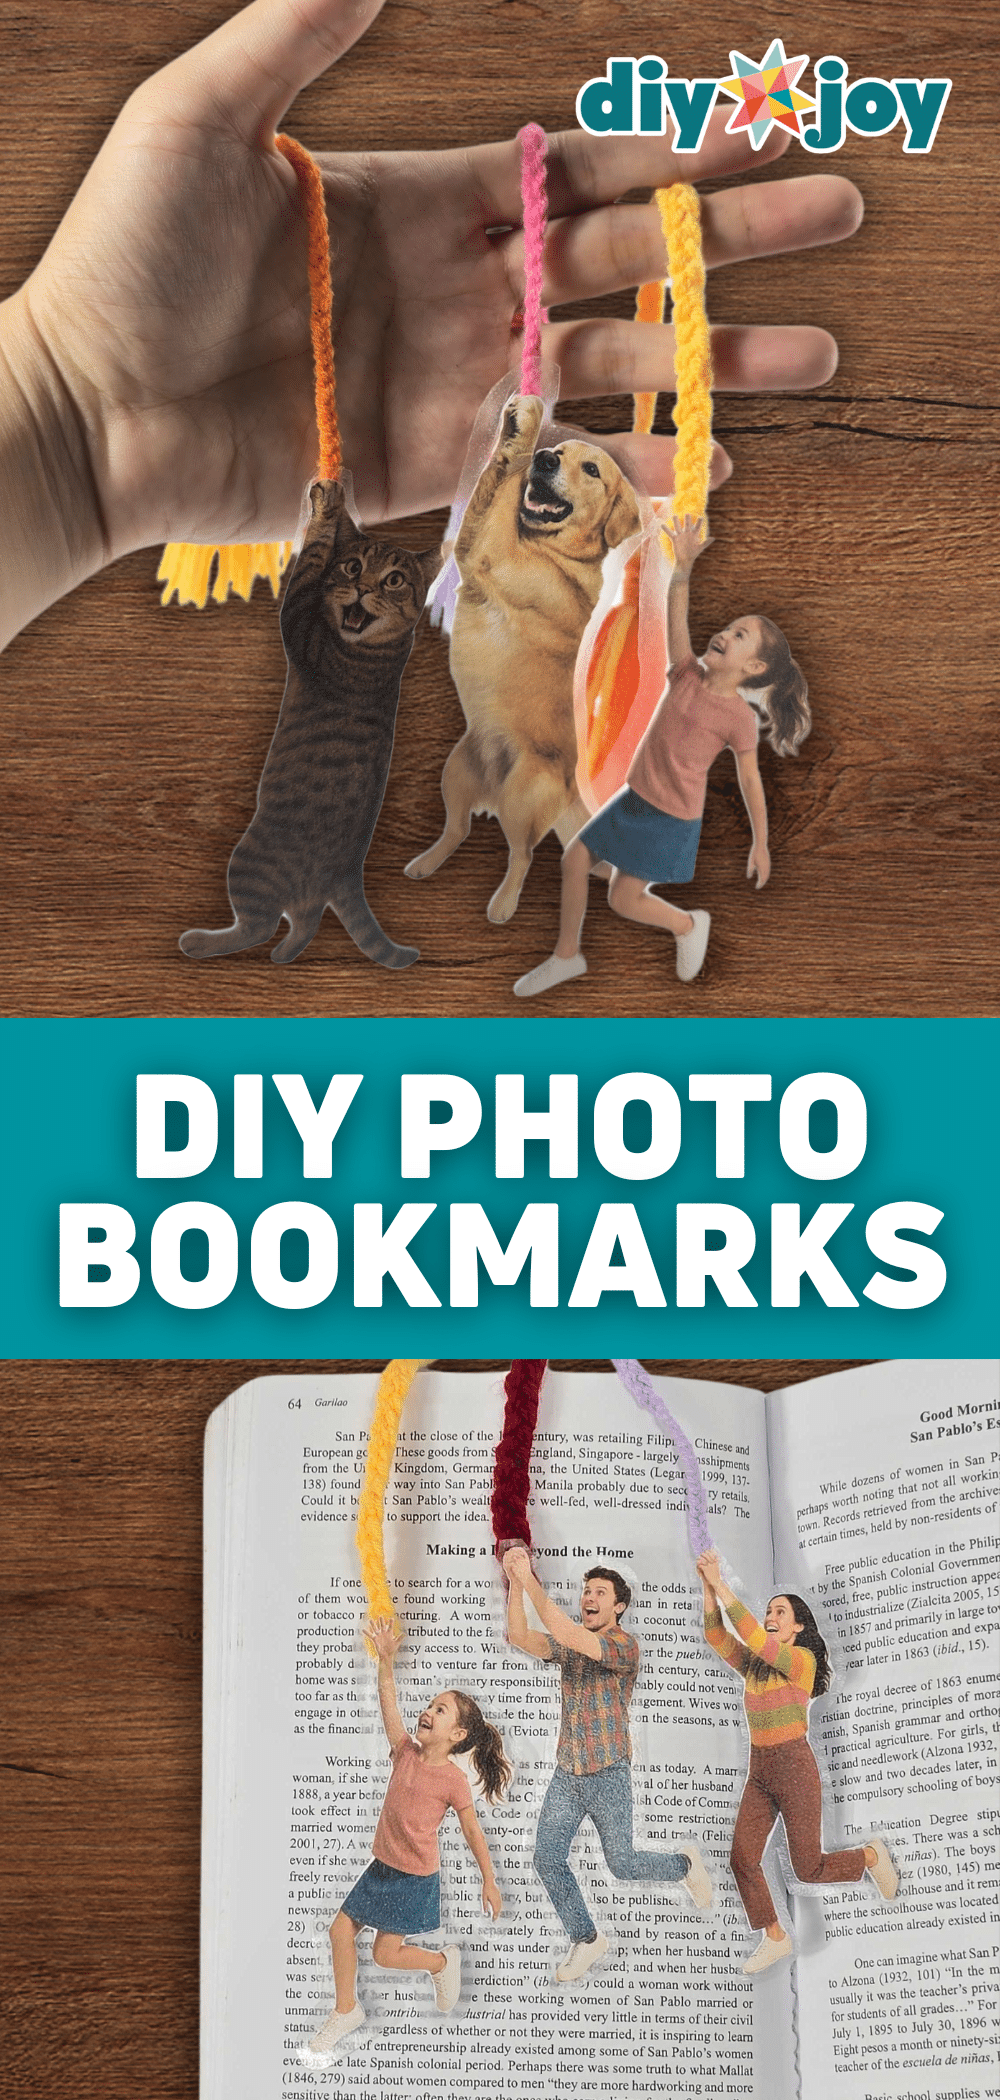
These photo bookmarks look like the people (or the dog) are hanging off the top of the page, and they make every mom laugh. Print a photo, cut closely around the person, glue them to cardstock and tuck a tassel between the layers at the hands. Cover both sides with contact paper and trim, leaving about 1/8 inch. Yarn tassels look like they’re climbing a rope. If she always has a book going, make one of every kid and the cat.
Get the full tutorial at DIY JOY.
27. Flower Pop-Up Card
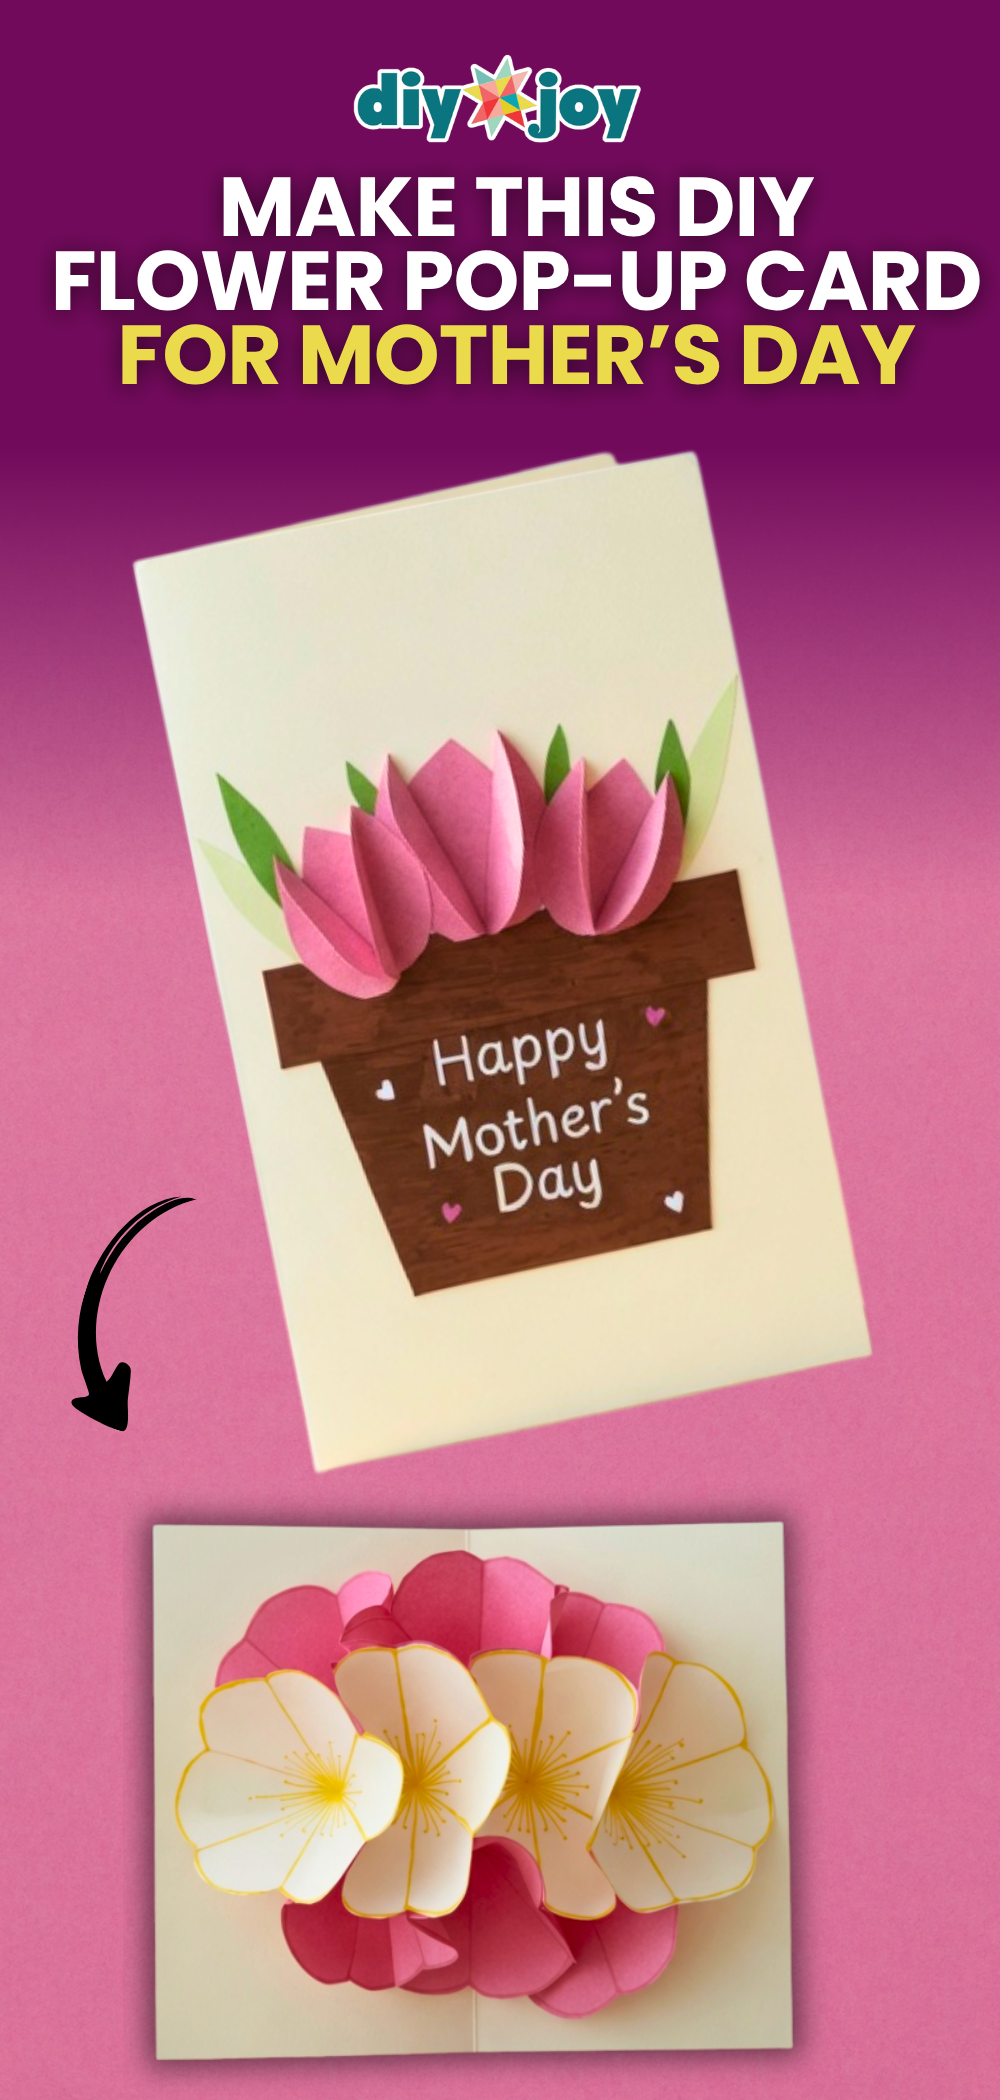
Open the card and a whole bunch of flowers blooms out of a little brown pot. You fold a 6 inch paper square into a triangle three times, cut a curved edge and unfold a perfect flower. Sharpie lines and dots add the details, then you cut out one petal and glue the edges to cup it into 3D. Make 7 to 10 and layer them so they open with the card. It looks way harder than it is, and the reaction when she opens it beats anything from the store.
Get the full tutorial at DIY JOY.
28. Air-Dry Clay Decoupage Jewelry Dish
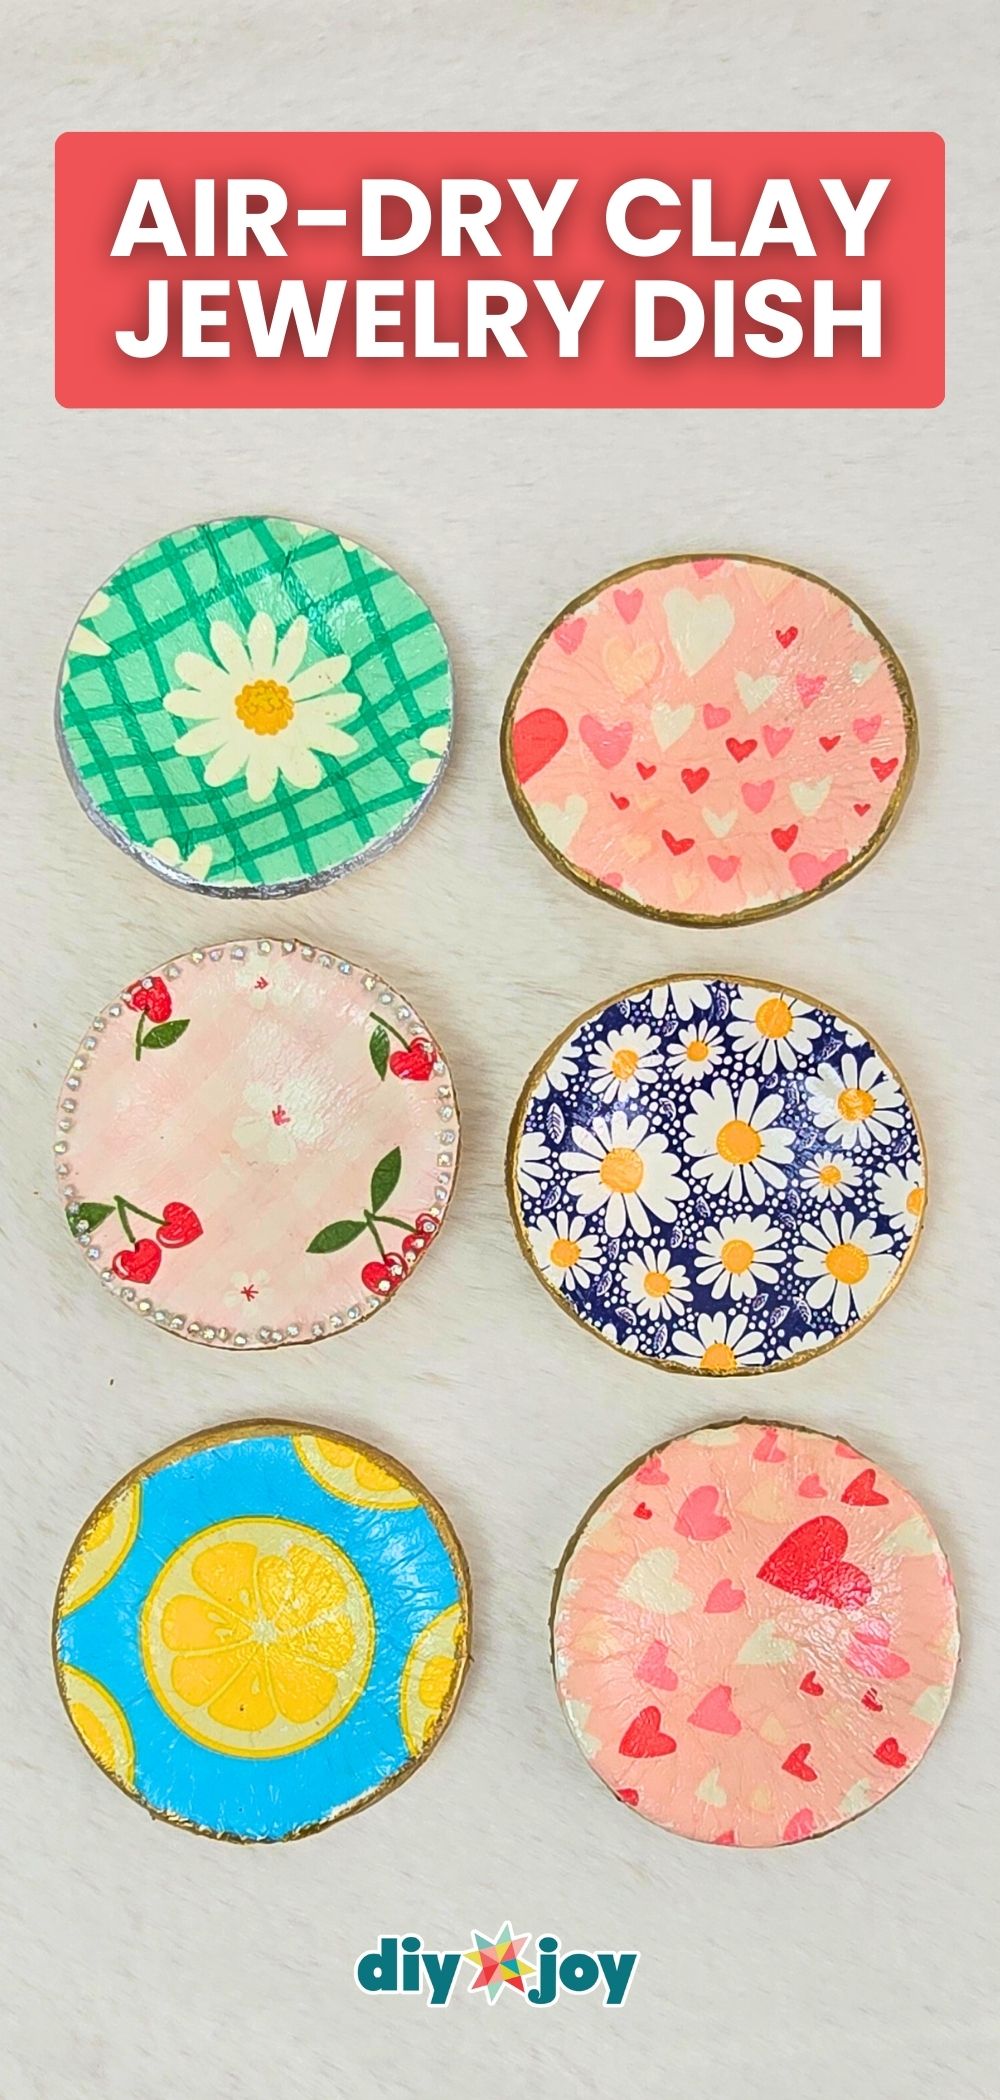
Paper napkins and air-dry clay, that’s the whole secret. Roll out the clay, lay a printed napkin on top (backing peeled off), and cut a circle with a cookie cutter or jar lid. Brush on Mod Podge, then press the dish into a muffin pan so it dries overnight in a shallow bowl shape. Paint the rim gold and seal it with gloss varnish. Daisies, cherries, hearts or lemons, pick a napkin that matches her style and she’ll have somewhere cute to drop her rings at night.
Get the full tutorial at DIY JOY.
29. DIY Coffee Body Scrub

For the mom who runs on coffee, a scrub that smells like her favorite mug. Fine sugar, used coffee grounds, coconut oil, a splash of castile soap and vanilla extract get mixed right in the jar until it’s all combined. No vanilla? Use coffee extract instead. An old jam jar works perfectly once the label comes off, and a bit of twine around the lid makes it look like it came from a boutique. It’s a gentle exfoliator that leaves skin soft, and it takes about five minutes start to finish.
Get the full tutorial at DIY JOY.
30. DIY Sharpie Heart Mug
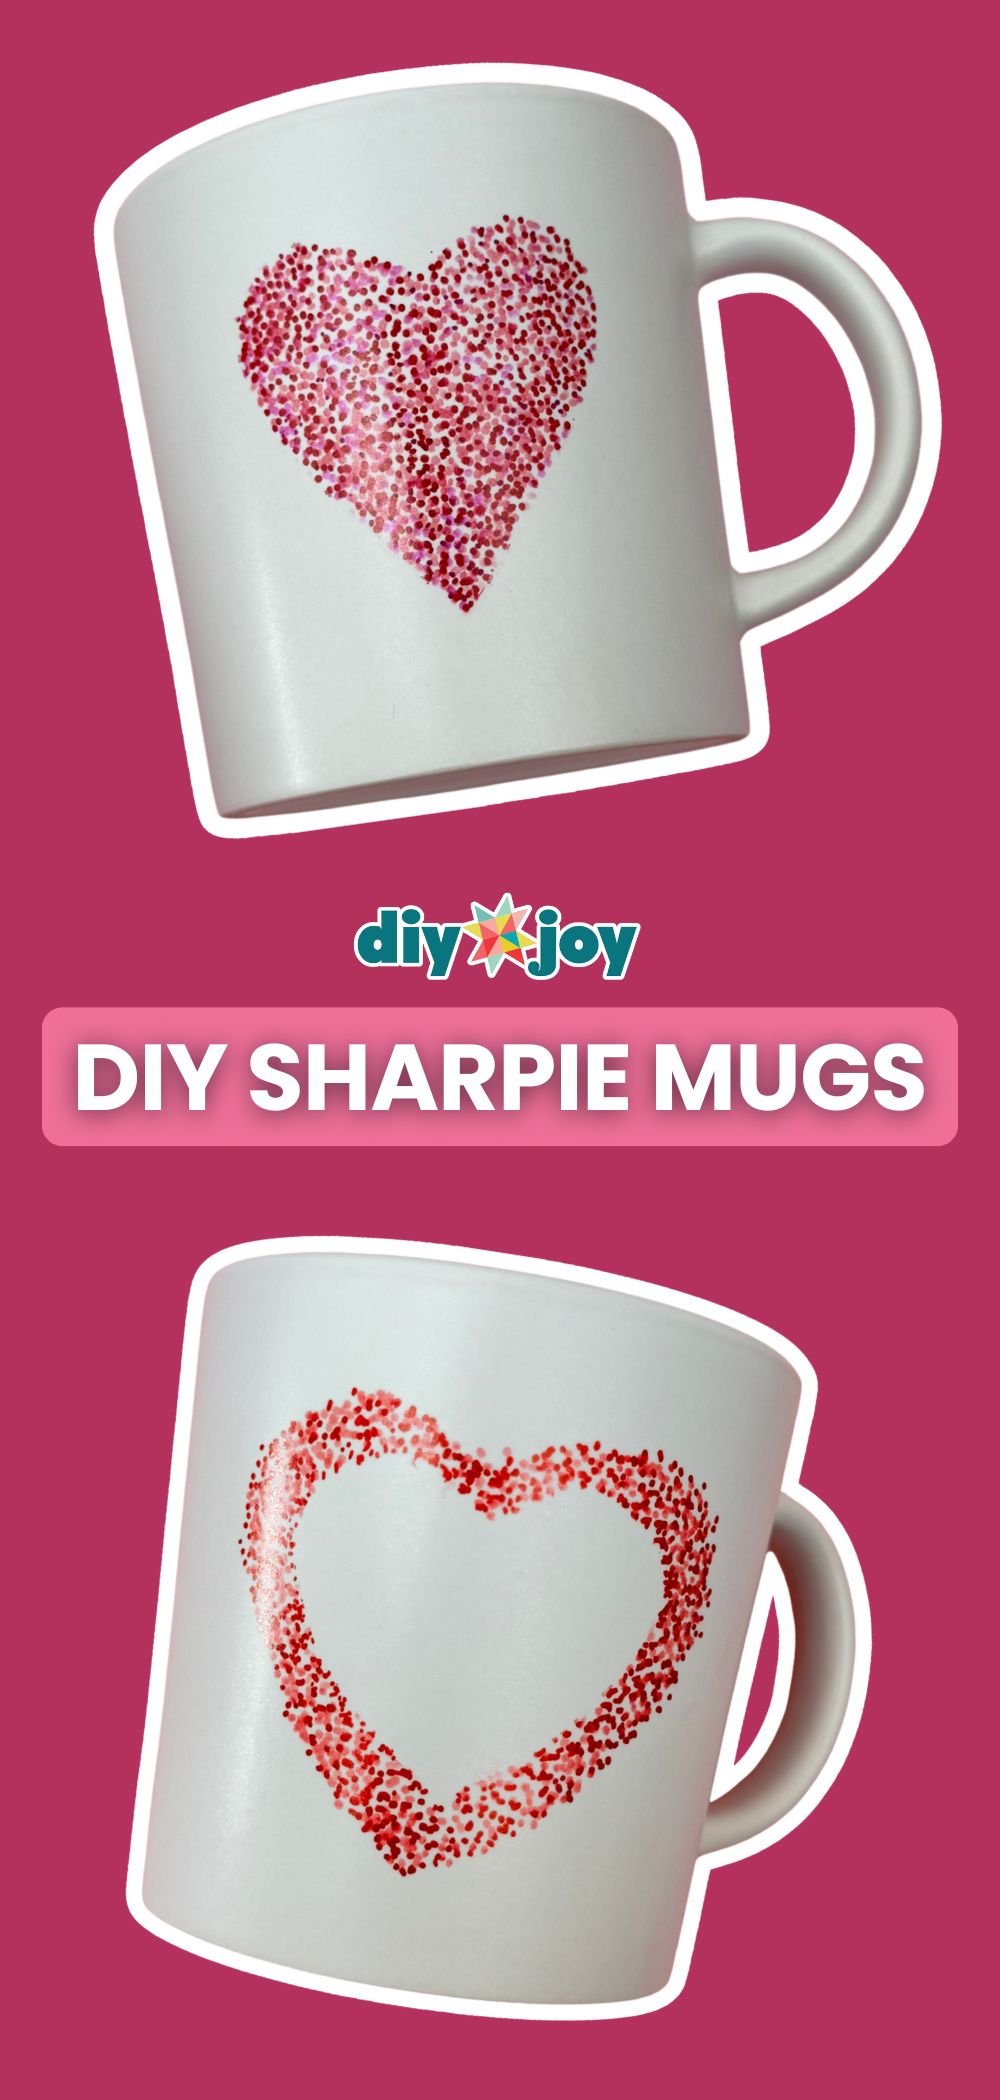
No drawing skills needed, just dots. Cut a paper heart, coat the back with a Zig 2 Way glue pen and let it turn from blue to white so it sticks like a sticky note. Place it on a white mug and dot around it with red and pink Sharpies, letting a few dots creep onto the paper. Peel the heart off and there’s the shape. For a design that survives the dishwasher, use an oil-based paint marker, wait 24 hours and bake it starting from a cold oven.
Get the full tutorial at DIY JOY.
31. Citrus Print Tea Towel
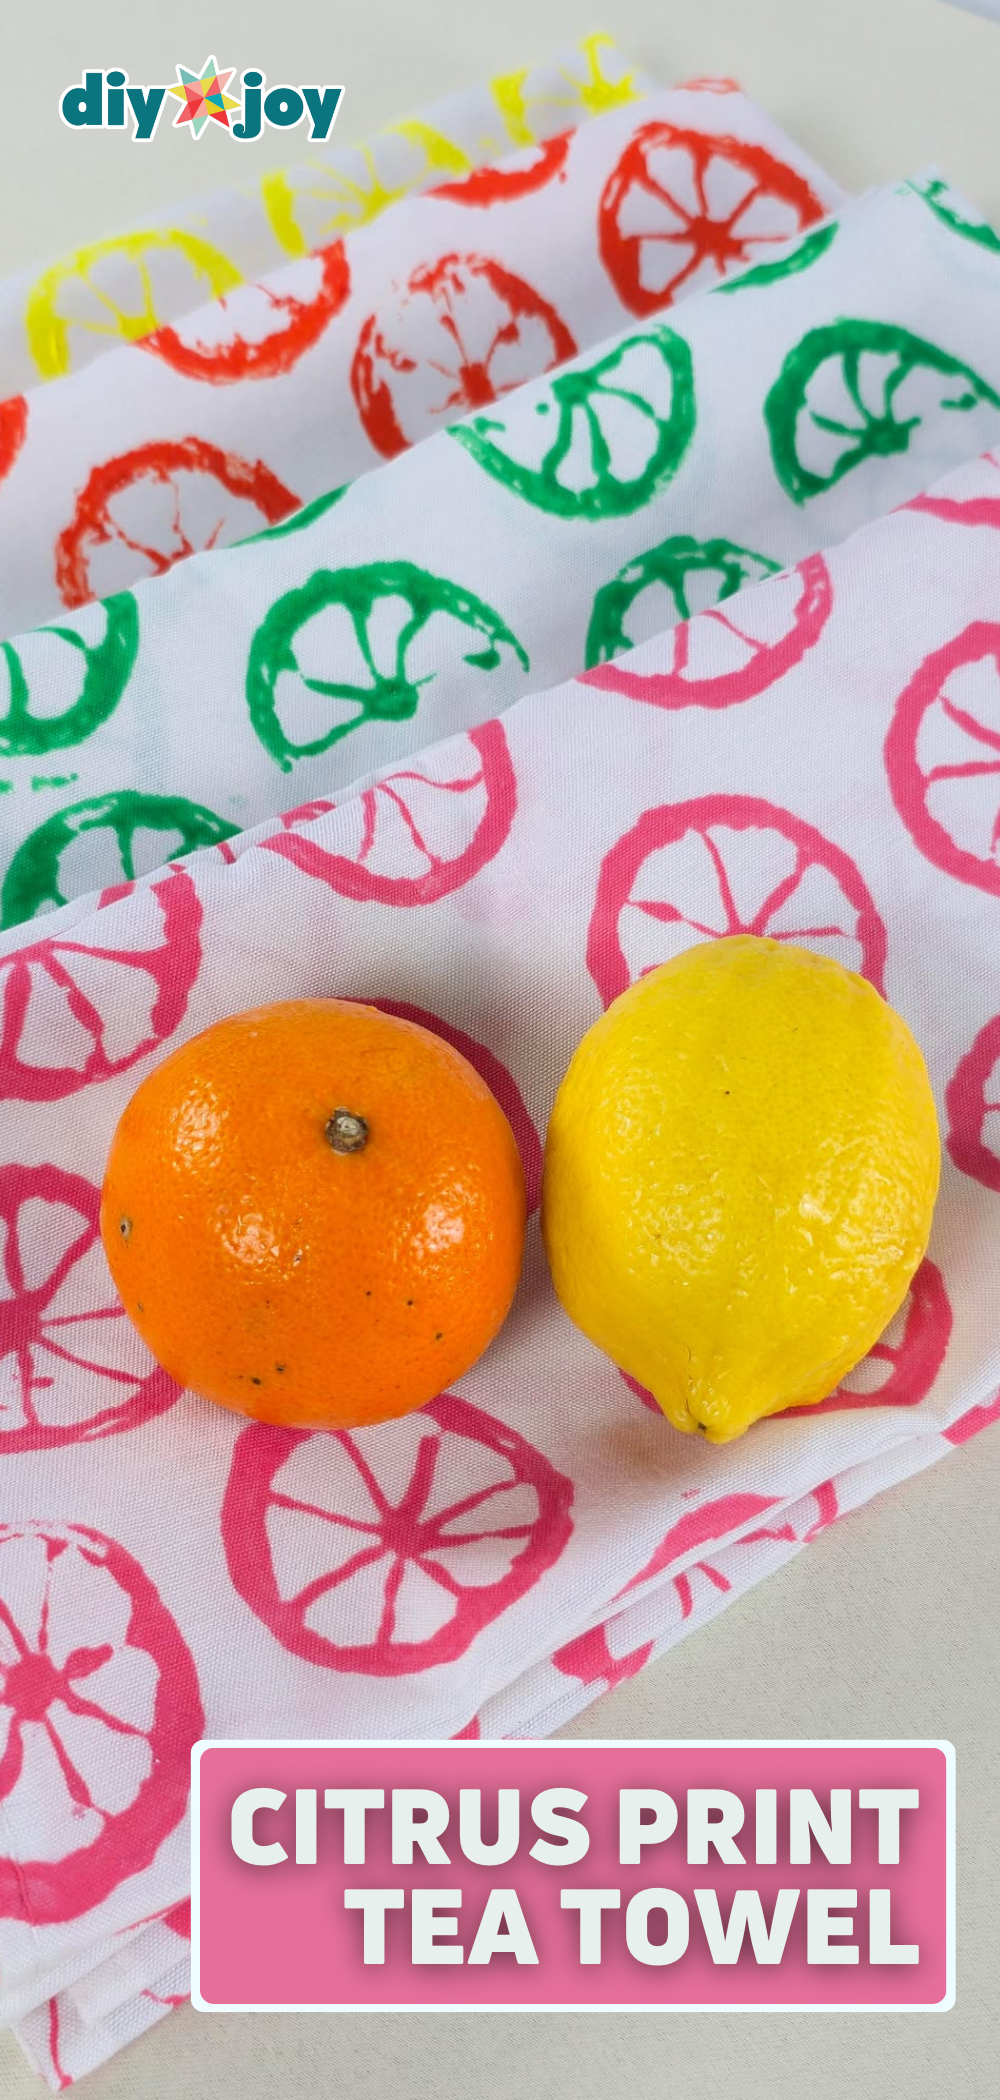
Yes, you stamp it with an actual lemon. Cut a lemon or orange in half, scoop out the pulp without breaking the membrane walls and pat it dry. Mix fabric paint with textile medium, dab it on the membranes and rind, then stamp rows across a plain tea towel, offsetting each row. Cut wedges for smaller prints. Don’t overload the paint or the lines blur. Bright citrus slices on white cotton look so fresh in a kitchen, and a stack of three tied with twine makes a lovely gift.
Get the full tutorial at DIY JOY.
32. Pressed Flower Resin Coasters
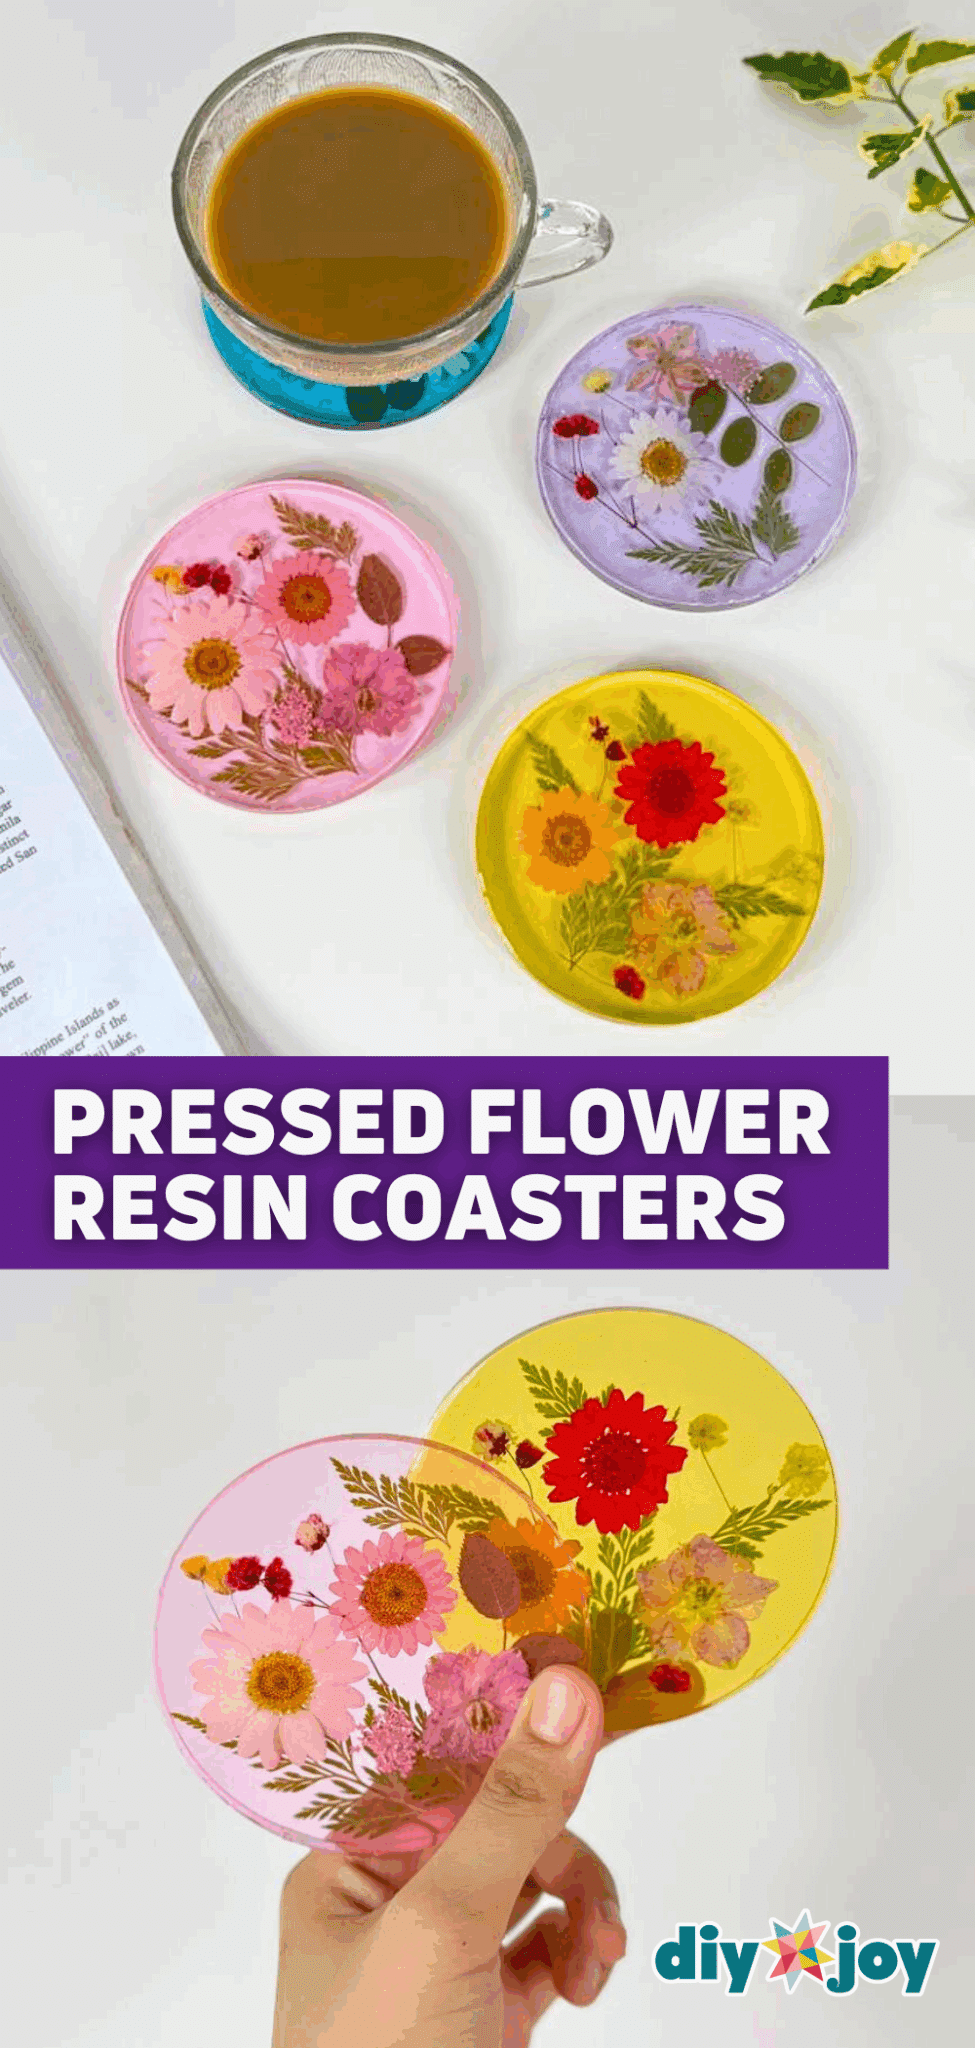
Real flowers that never wilt, sitting right under her tea. Mix epoxy resin and hardener at a 3:1 ratio, add 2 to 3 drops of pigment and pour a thin layer into a round mold. Arrange pressed flowers on top, then pour the rest over them and pop any bubbles with a lighter. Let them set overnight, then finish the front with a thin coat of UV resin for extra shine. Pink, purple and yellow tints with daisies and ferns look like little stained glass windows.
Get the full tutorial at DIY JOY.
33. Mason Jar Fairy Lights With Pressed Flowers
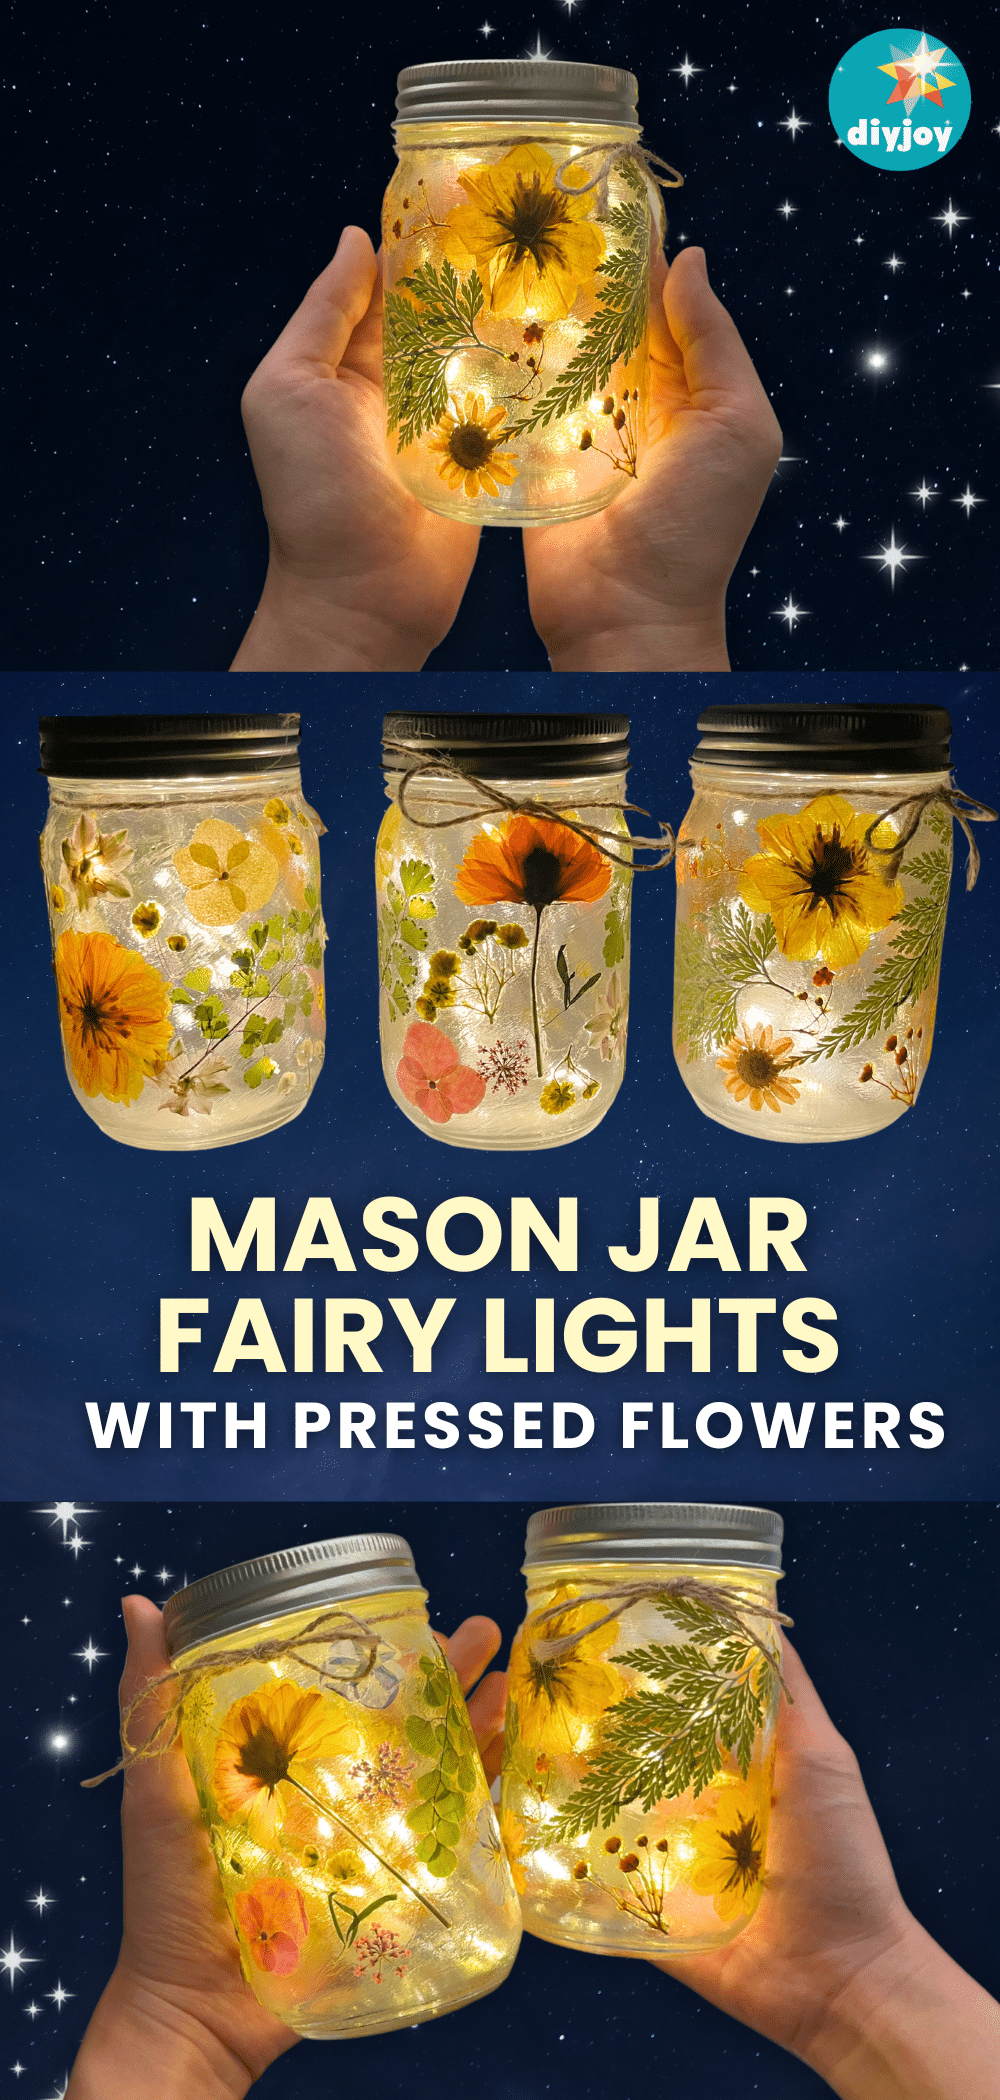
A glowing jar of pressed flowers looks like something out of Tinkerbell’s house. Brush thin layers of Mod Podge onto a clean mason jar, press flowers and leaves into place one section at a time, then seal it all with a second coat. Drop in a string of fairy lights, screw on the lid and tie jute twine in a bow. Thin, delicate flowers work best because they let the most light shine through. It’s a sweet night light for her bedside table, and it’s genuinely hard to make just one.
Get the full tutorial at DIY JOY.
34. Air-Dry Clay Jewelry Organizer Using Pebbles
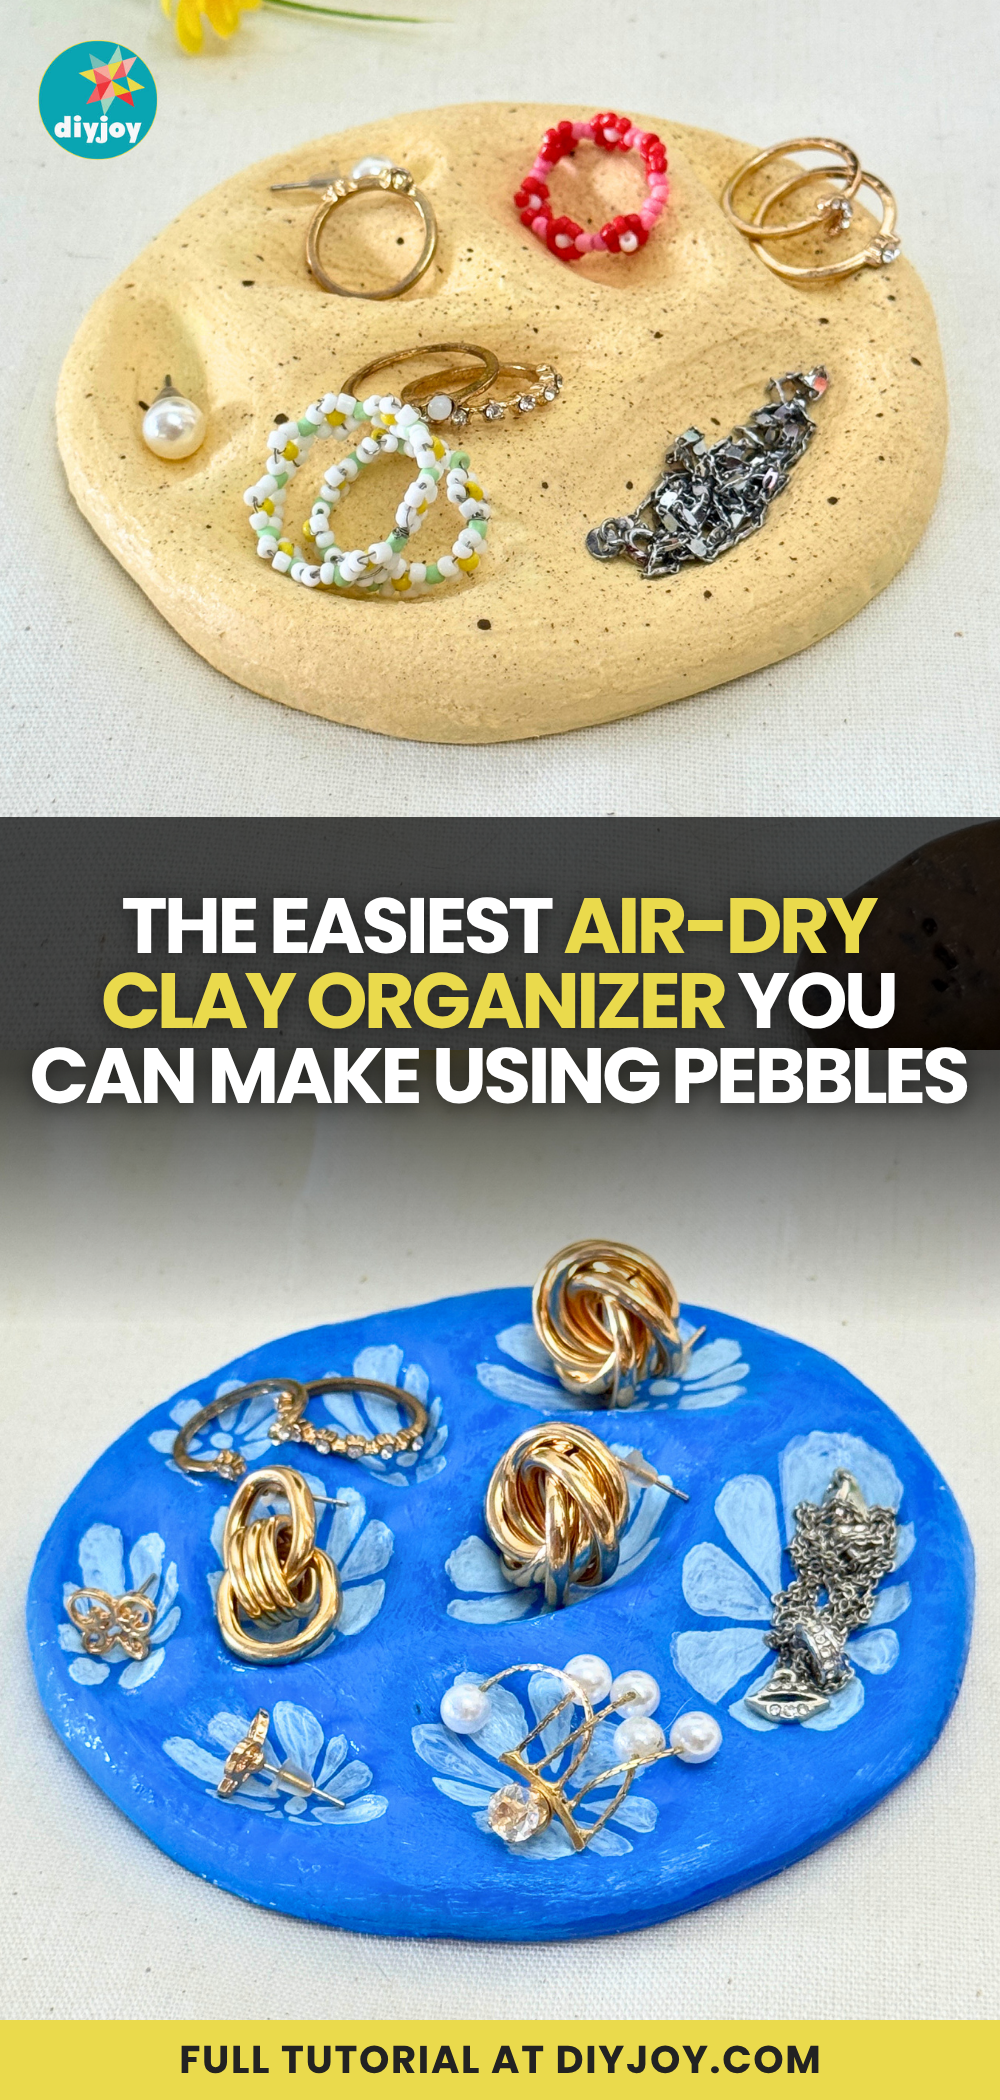
Pebbles from the yard make the molds for this one. Roll air-dry clay into a circle, press smooth stones into it to leave little hollows, then lift them out (wet stones don’t stick) and smooth any cracks with damp fingers. Once it’s dry, prime it, paint a base color and add flowers inside each hollow. A coat of gloss sealer or resin finishes it. Every hollow holds a ring, earring or tangled necklace, so her dresser finally gets organized and it looks like art while it does.
Get the full tutorial at DIY JOY.
35. Decoupage Vase Using Napkin Paper
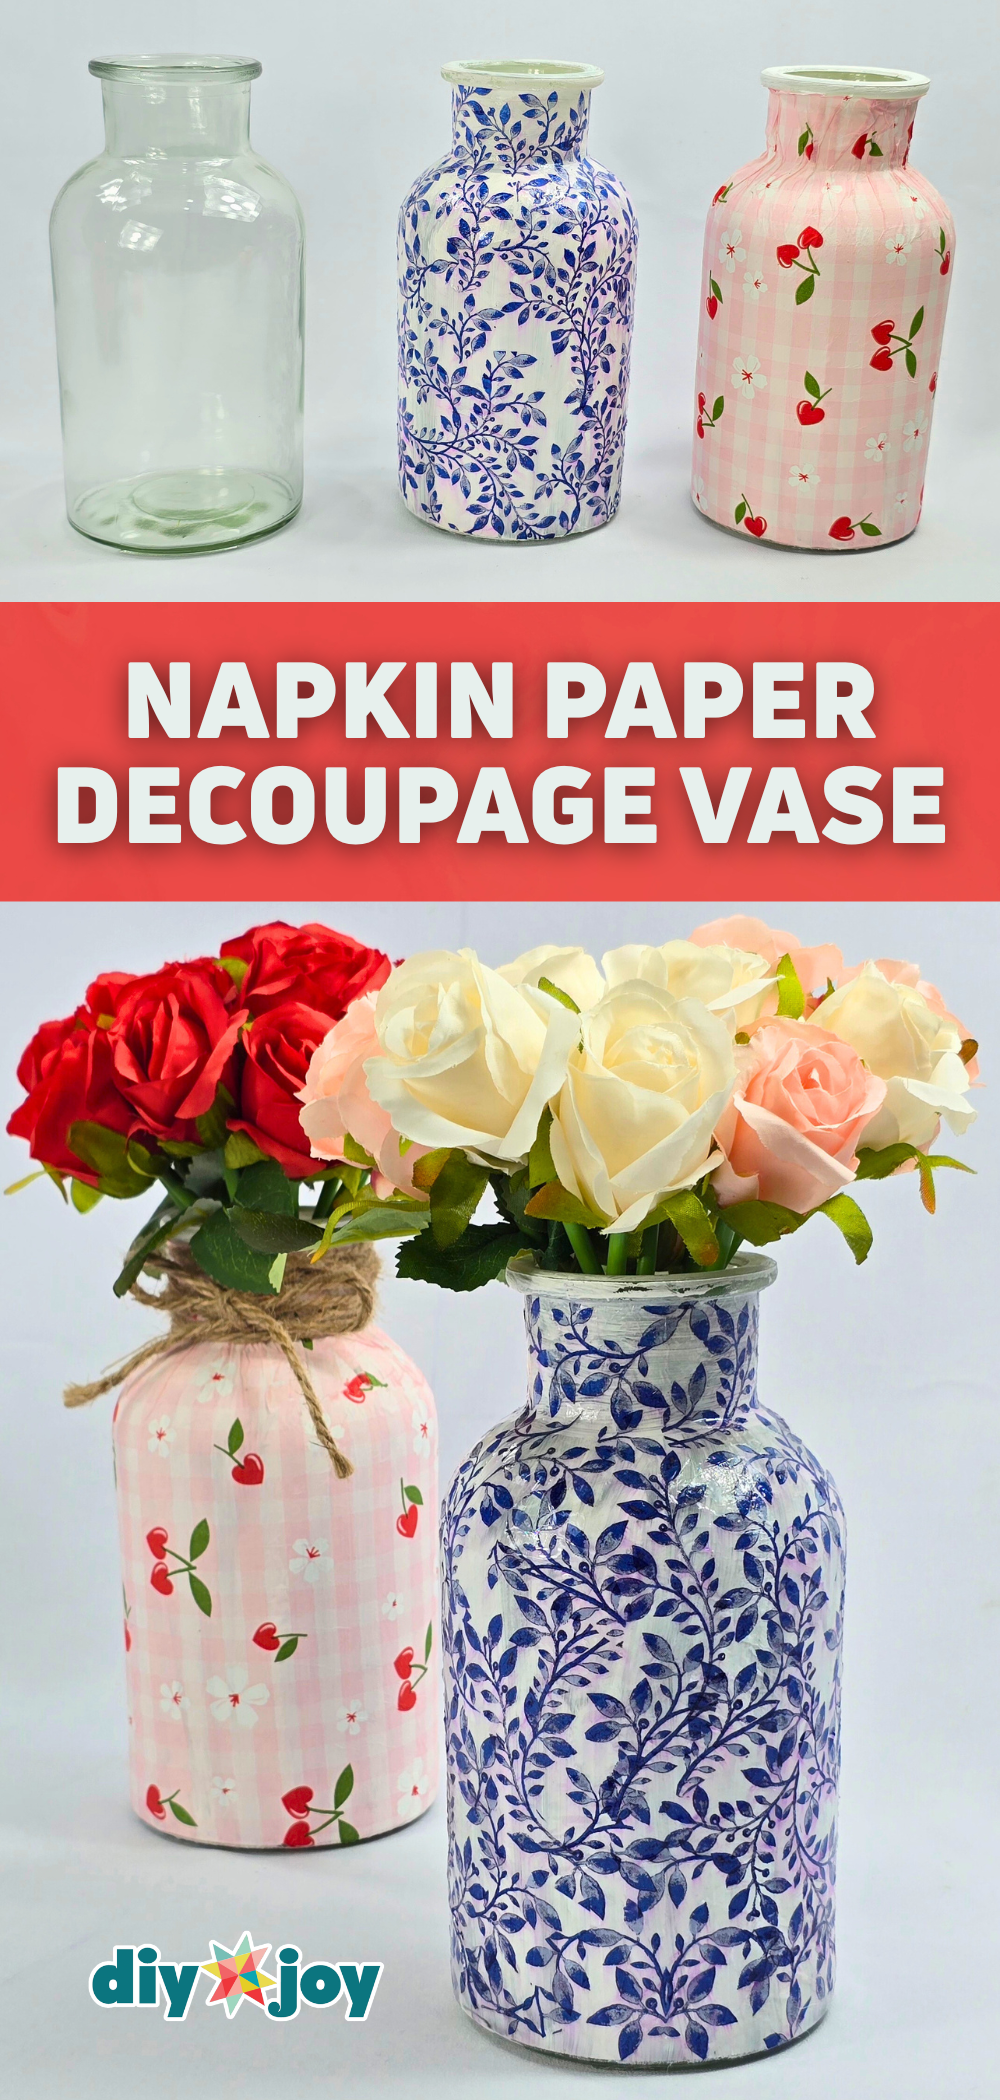
A plain glass bottle plus a pretty paper napkin equals a vase that looks like fine china. Paint the jar white, cut out the napkin motifs close to the edges and peel off the backing layers. Brush on Mod Podge (or white glue mixed with water), smooth the napkin pieces on and coat over the top. A thin coat of UV resin or clear nail polish adds shine and protection. Blue florals look like delft, pink gingham looks like a cottage, and either one is perfect holding her Mother’s Day roses.
Get the full tutorial at DIY JOY.
36. Paper Tulips With Chocolate

There’s a chocolate hiding inside every one of these crepe paper tulips. You wrap a candy in crepe paper and fix it to a skewer, then stretch and shape six petals and glue them around it in two overlapping layers. Leaves and a spiral wrap of green crepe paper down the stem finish each flower. Bunch a few with dried purple statice and you’ve got a bouquet. After the chocolate is gone, the flowers stick around as decor, which makes it two gifts in one.
Get the full tutorial at DIY JOY.
37. Clay Flower Mirror in 1 Hour
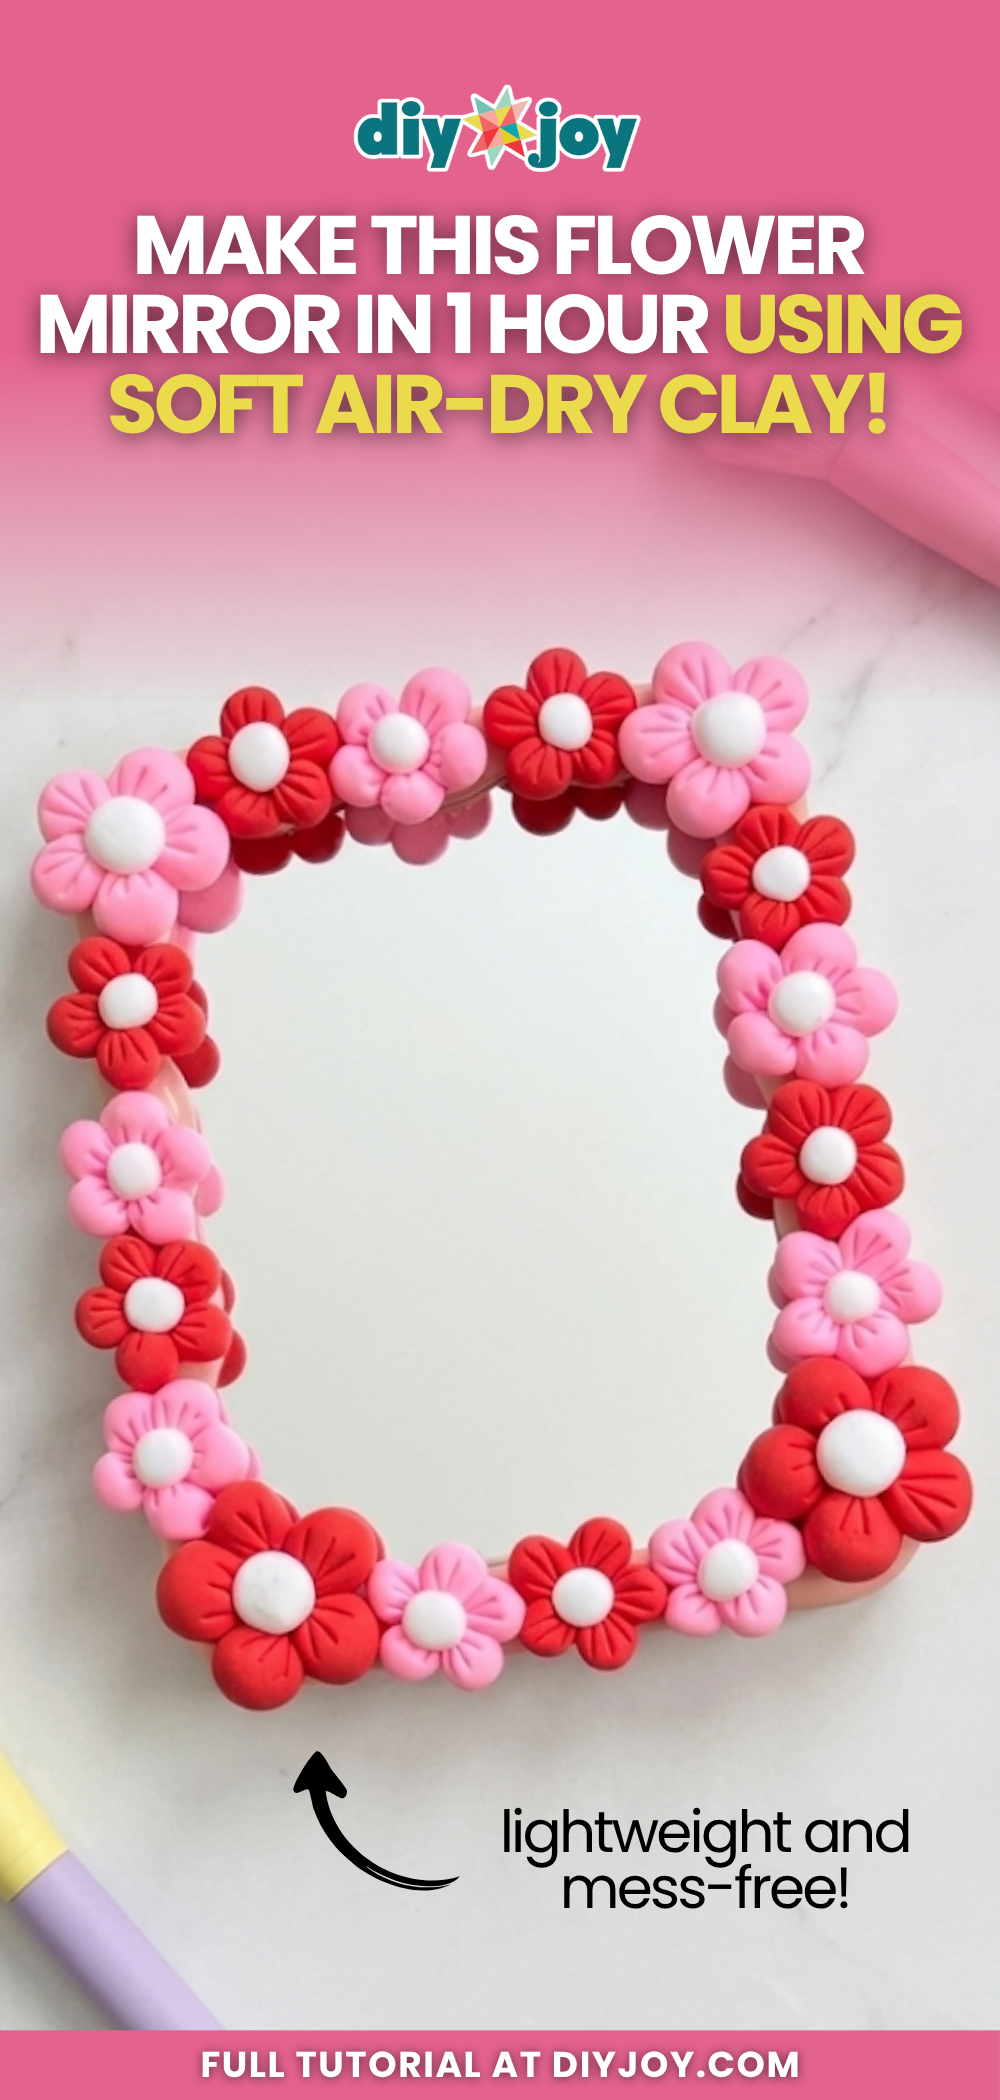
A plain mirror becomes the happiest thing in her bathroom in about an hour. Roll soft air-dry clay into balls, press three lines into each to shape a petal, and set five petals around a little white center. Make a pile of flowers in pinks and reds, let them firm up, then hot glue them around the mirror frame. A coat of gloss varnish helps them last. Soft clay is lightweight and mess free, and you can match the colors to her room exactly.
Get the full tutorial at DIY JOY.
38. Woven Yarn Mug Cozy
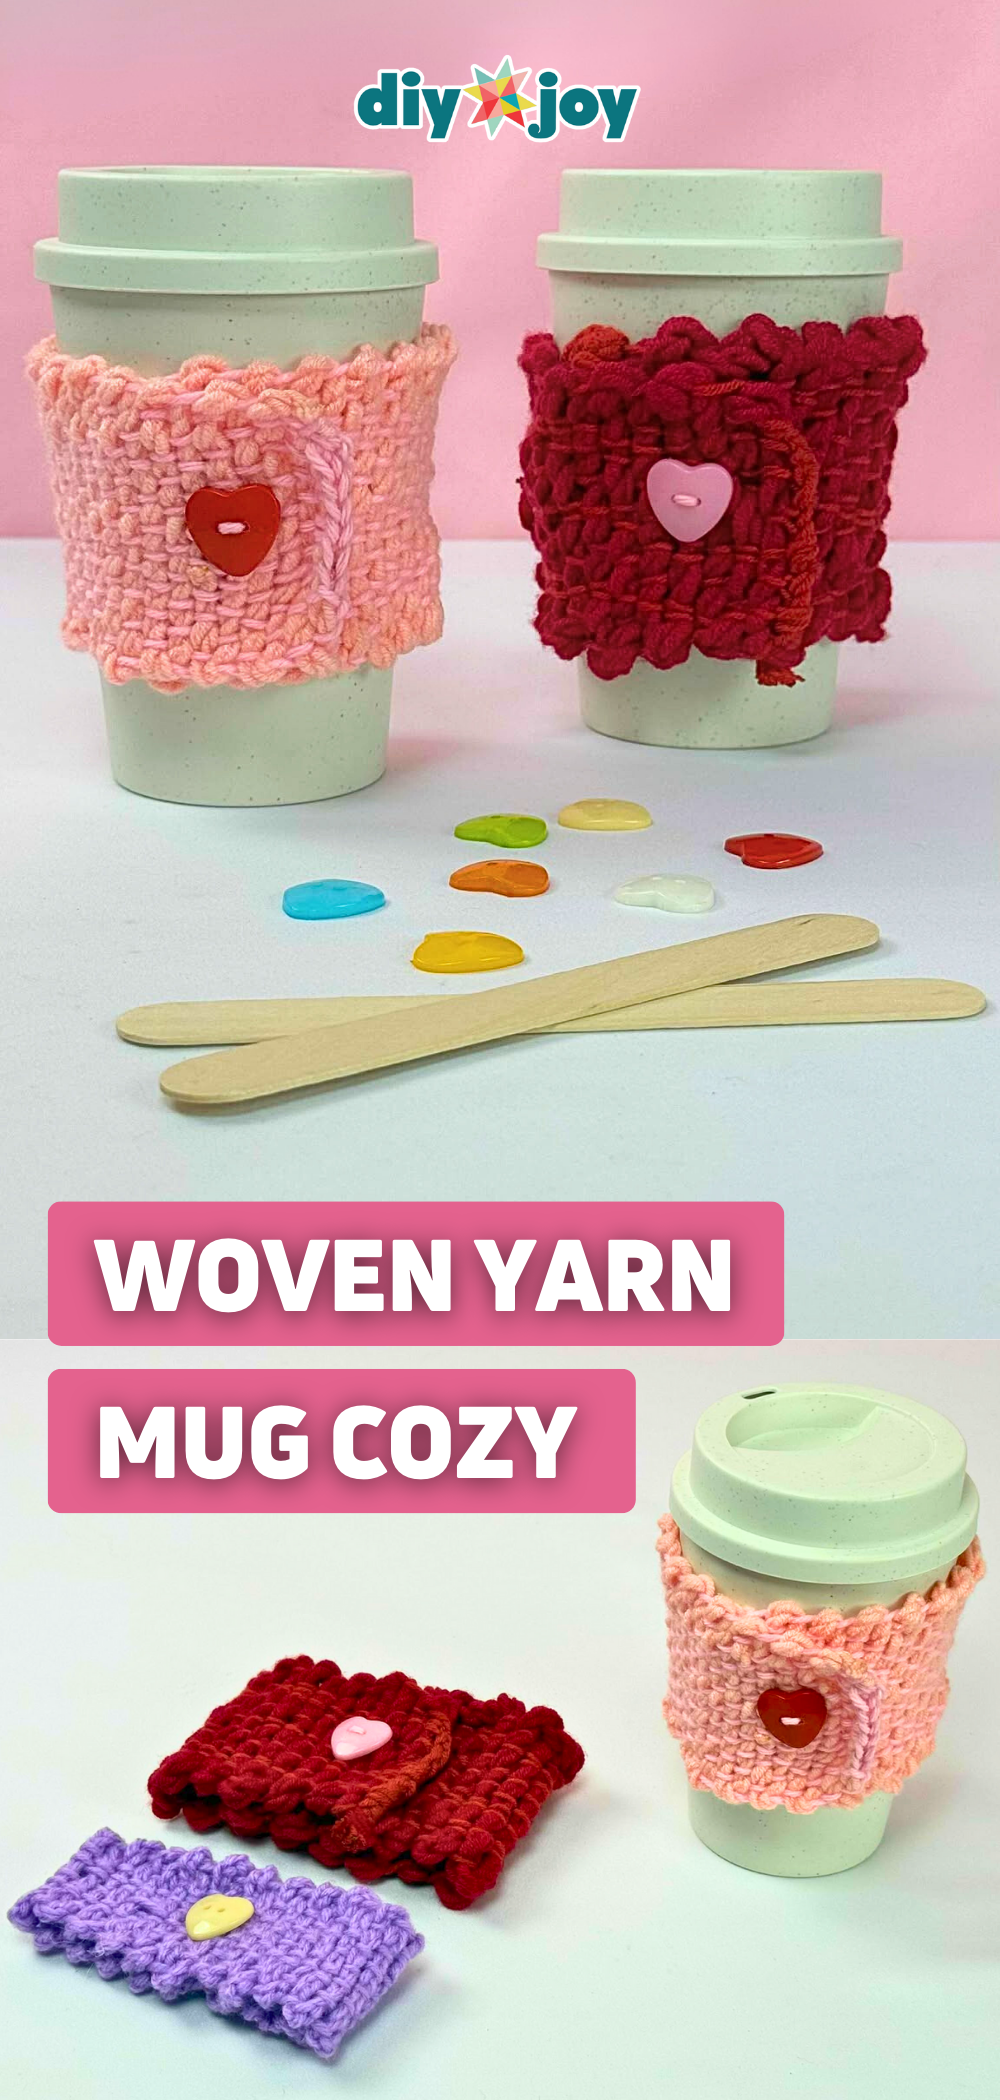
Weaving, but on a piece of cardboard. Cut the cardboard to fit around her cup, notch the ends and string yarn down through the slits. Twist a second yarn for extra texture, thread it through a popsicle stick with a slit cut in the end and weave over and under until it’s full. Chain stitch the ends with a crochet hook and sew on a heart button to close it. It keeps her coffee warm and her fingers cool, and it slips onto a to-go cup too.
Get the full tutorial at DIY JOY.
39. Air-Dry Clay Jewelry Tray
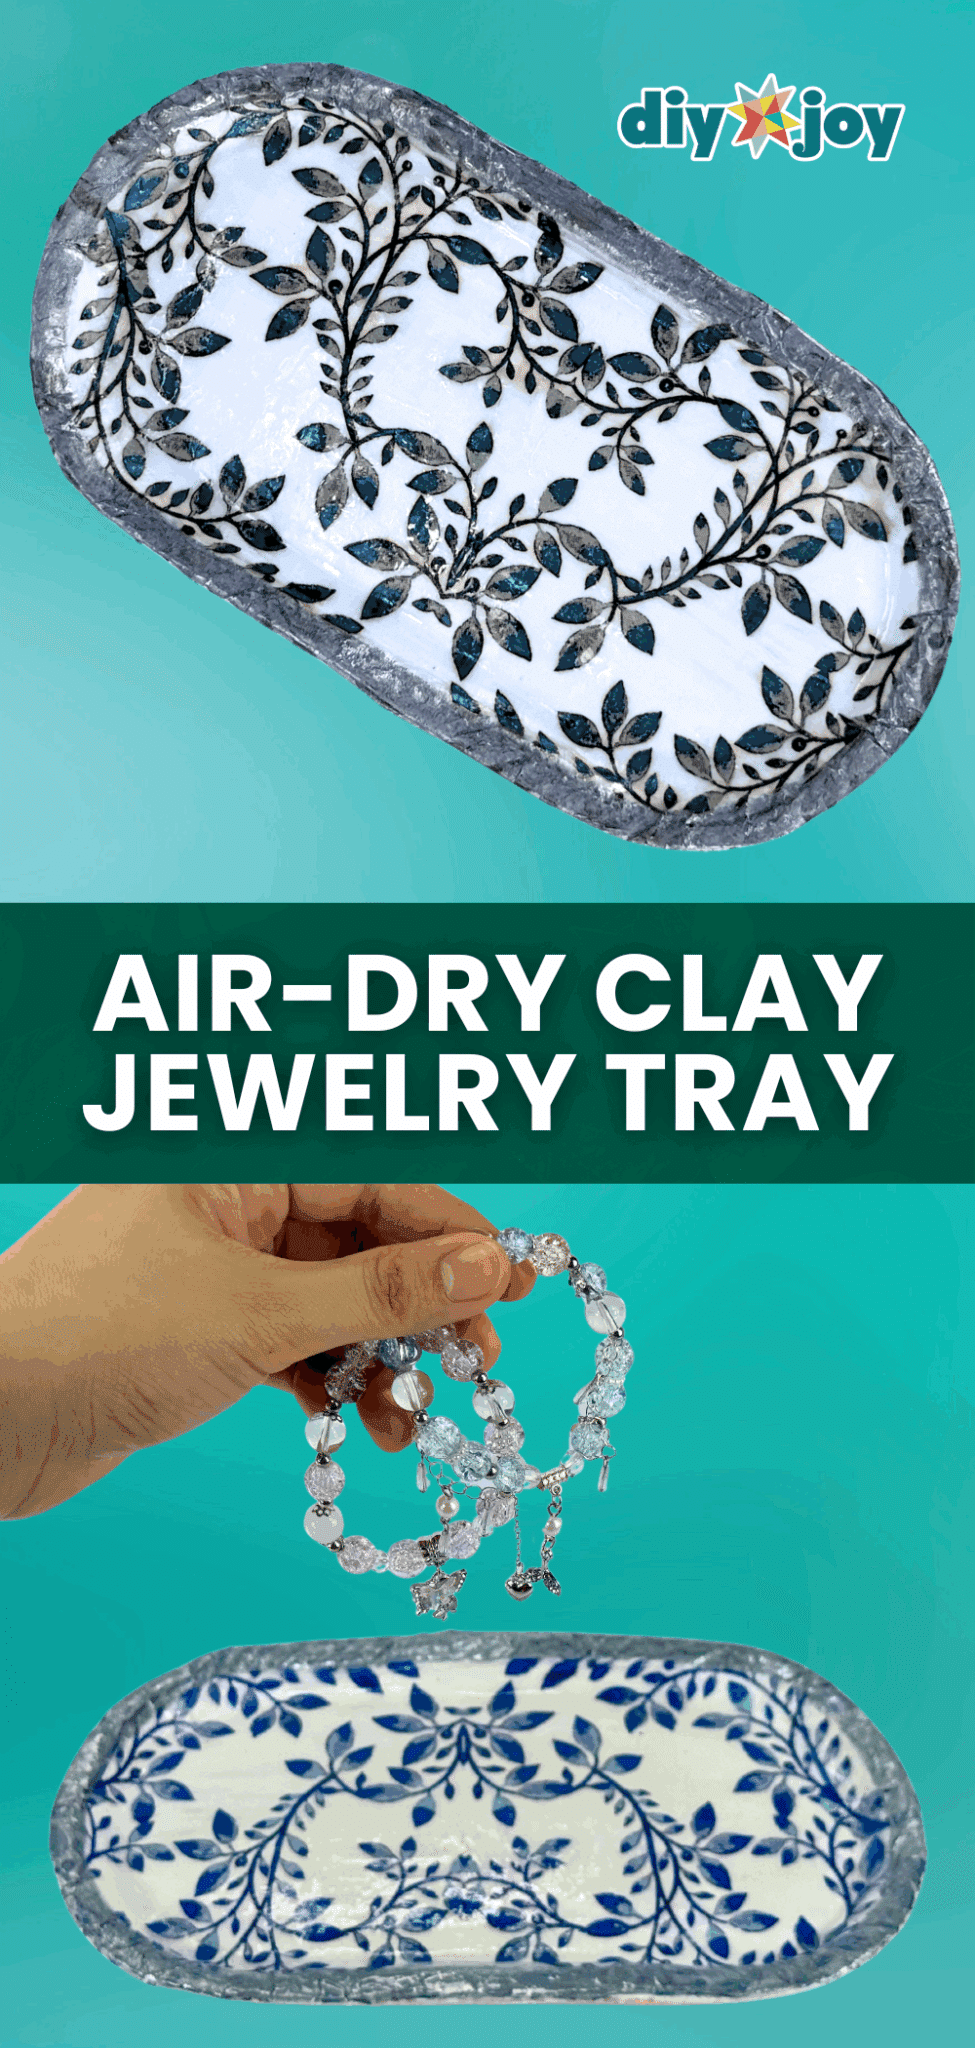
This one looks like store-bought china, but it’s air-dry clay and a paper napkin. Roll the clay flat, dust a tray with powder so nothing sticks, then press the clay into it and smooth it with a damp sponge. Once it’s dry and primed, Mod Podge a patterned napkin on top. A metallic marker on the rim and a thin coat of UV resin make it shine. The leafy vine print looks so elegant on a dresser, and it’s the perfect landing spot for her bracelets.
Get the full tutorial at DIY JOY.
40. DIY Book Flower Vase

For the mom who loves books and flowers equally. Open an old book to the middle, count 12 pages on each side and cut along a center line, then tear the top section away. Tape the pages together three at a time and fold each group toward the middle until the pages fan into a curved vase shape. Pick a well-loved thrift store book you don’t mind cutting. Fill it with dried lavender and paper flowers and it looks lovely on a shelf for years.
Get the full tutorial at DIY JOY.
41. Camper Zipper Pouch
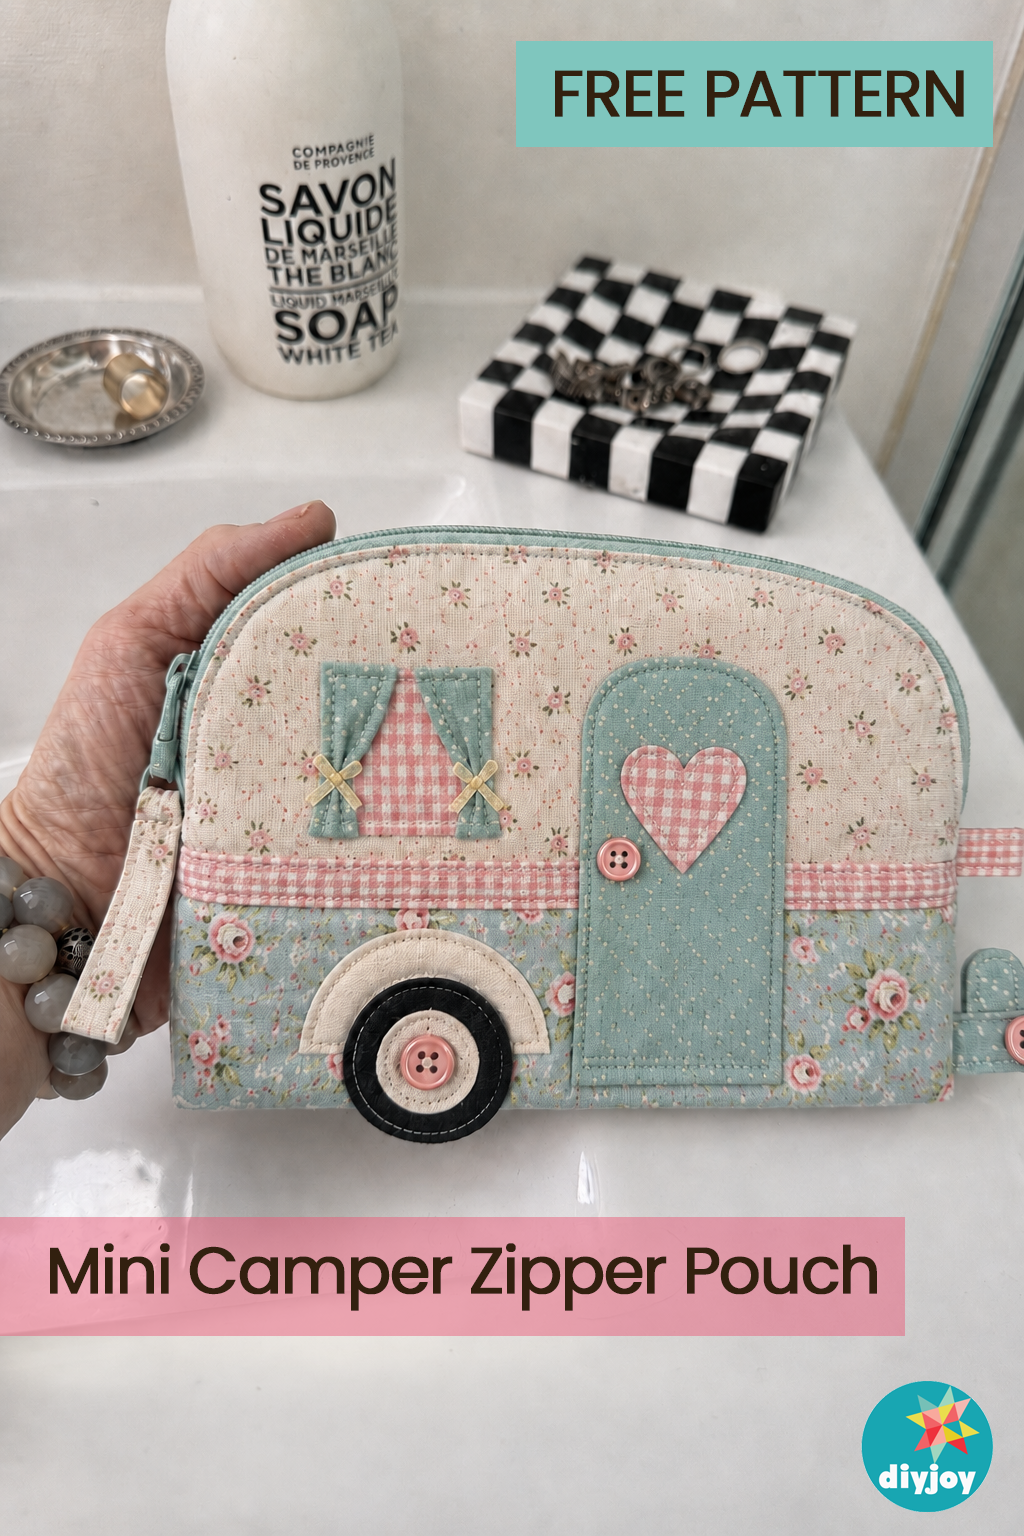
A little vintage camper she can toss in her purse, and the pattern is free. You cut the outer panels, gusset and lining from fat quarters, back them with fusible fleece and add applique pieces for the door, window, curtains and wheel. Buttons become the wheel hub and door handle, and a bit of narrow ribbon ties back the tiny curtains. A 10 inch zipper closes it up. It’s a beginner sewing project, and it holds makeup, chargers or all the small stuff that floats around her bag.
Get the full tutorial at DIY JOY.
42. Air-Dry Clay Ring Holder
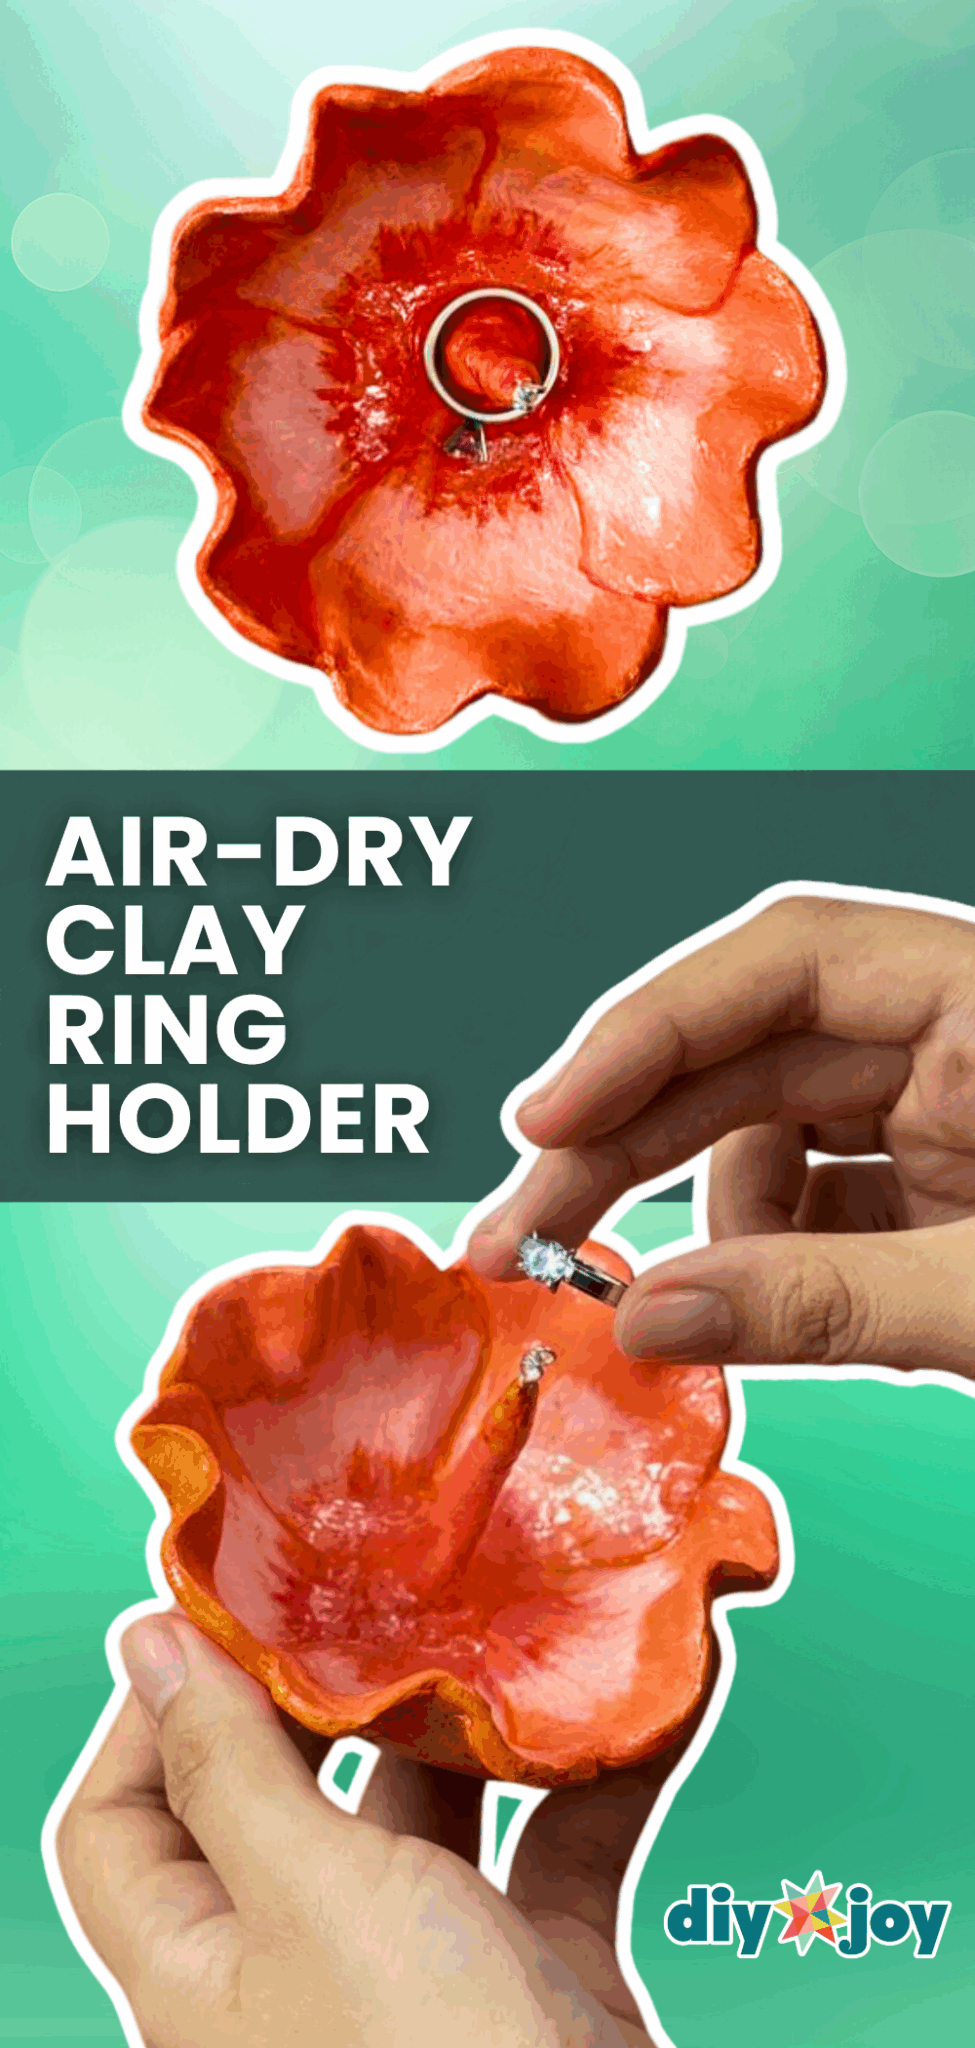
A clay flower that cups her rings right in the center. Roll air-dry clay flat, cut out a flower shape with a template, slit between the petals and drape it over a towel in a bowl so the petals overlap into a cup. A rolled clay stamen goes in the middle to hold the rings. After priming, paint from a medium shade at the edges to a darker one in the center, then add UV resin for gloss. It looks like a real poppy and makes the perfect bedside ring dish.
Get the full tutorial at DIY JOY.
43. Ferrero Rocher Jewelry Box

Give her the chocolates, then give her the box back as a jewelry organizer. Peel the label off the lid with wide tape, then Mod Podge pressed flowers onto the inside of the lid. Gold washi tape around the little compartments makes it look fancy. Every round spot holds a ring or a pair of earrings, and it all closes up clear so she can see what’s inside. Two gifts from one box of candy, and honestly, who’s going to complain about eating the chocolates first?
Get the full tutorial at DIY JOY.
44. Paper Towel Flower Bouquet
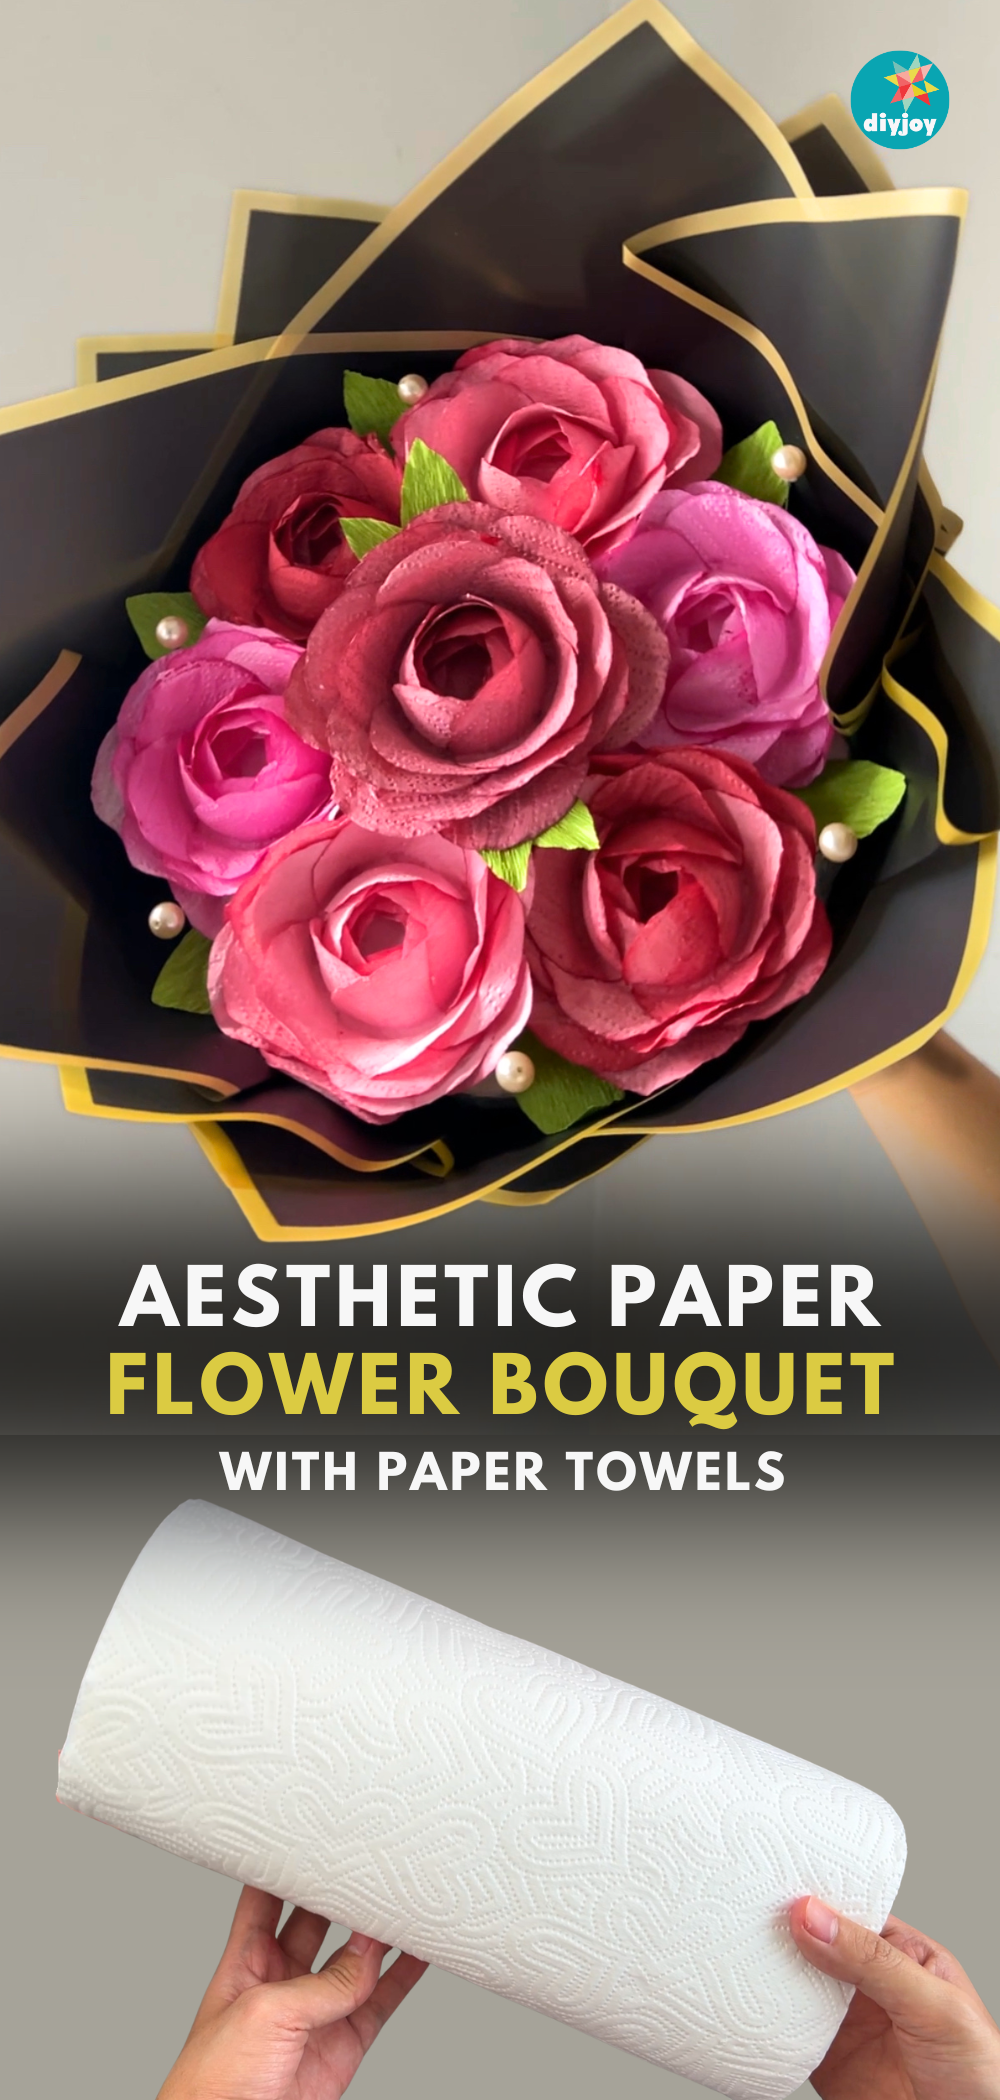
It’s hard to believe these roses started as paper towels. Trace a glass rim onto paper towels and cut 21 circles per flower, dip them in diluted acrylic paint and let them dry flat. Then fold each circle over the rim of the glass, overlapping as you go, layer after layer, the same way you build a salami rose. Glue the roses to a foam base and wrap it in floral paper. No stems needed. It’s a budget bouquet that never wilts and looks like it came from a florist.
Get the full tutorial at DIY JOY.
45. Daisy Bead Rings
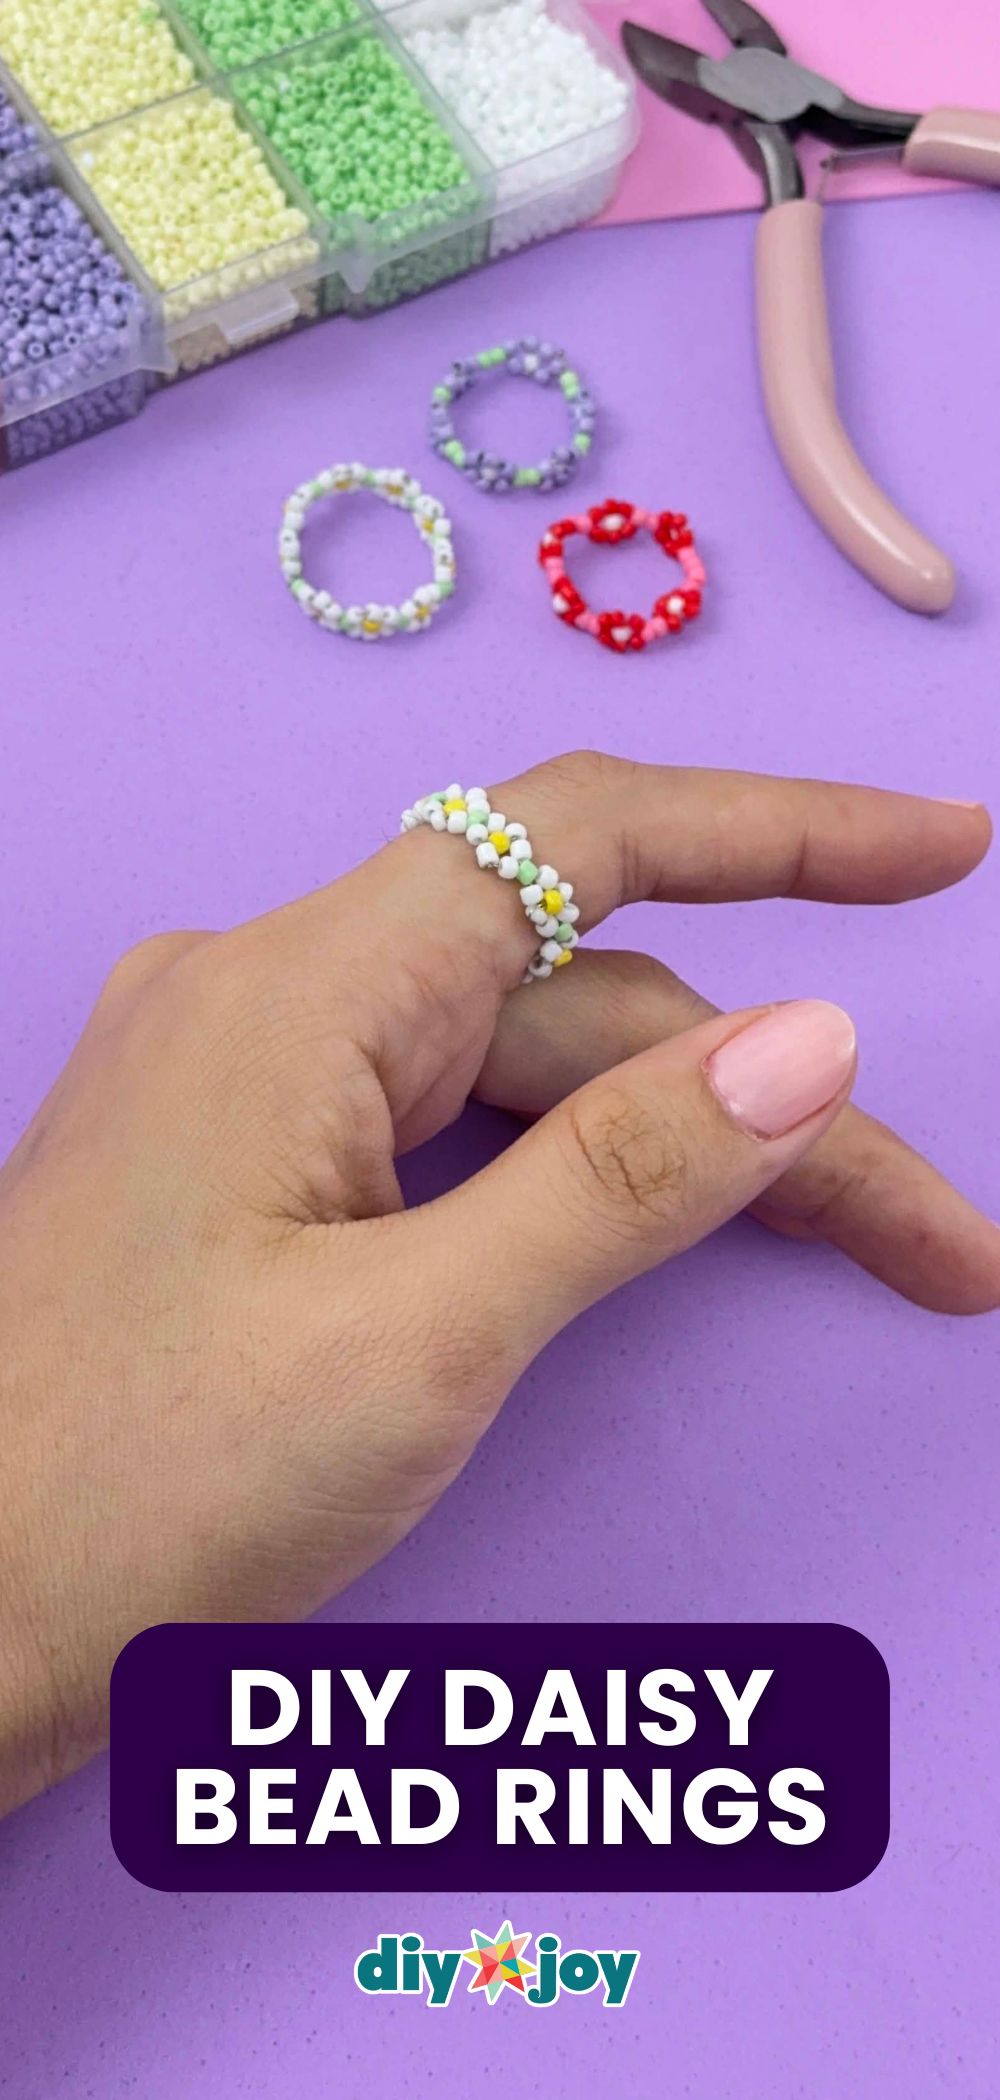
Tiny daisies all the way around her finger. Fold a length of jewelry wire, thread white seed beads on each tail with a yellow bead for the center, then cross both ends through to lock the flower in place. A green bead between each daisy makes the leaf. Repeat until it fits her finger and twist the ends closed. Once you get the rhythm, you can make one in about the time it takes to drink a cup of coffee. Make a set in different colors so she can stack them.
Get the full tutorial at DIY JOY.