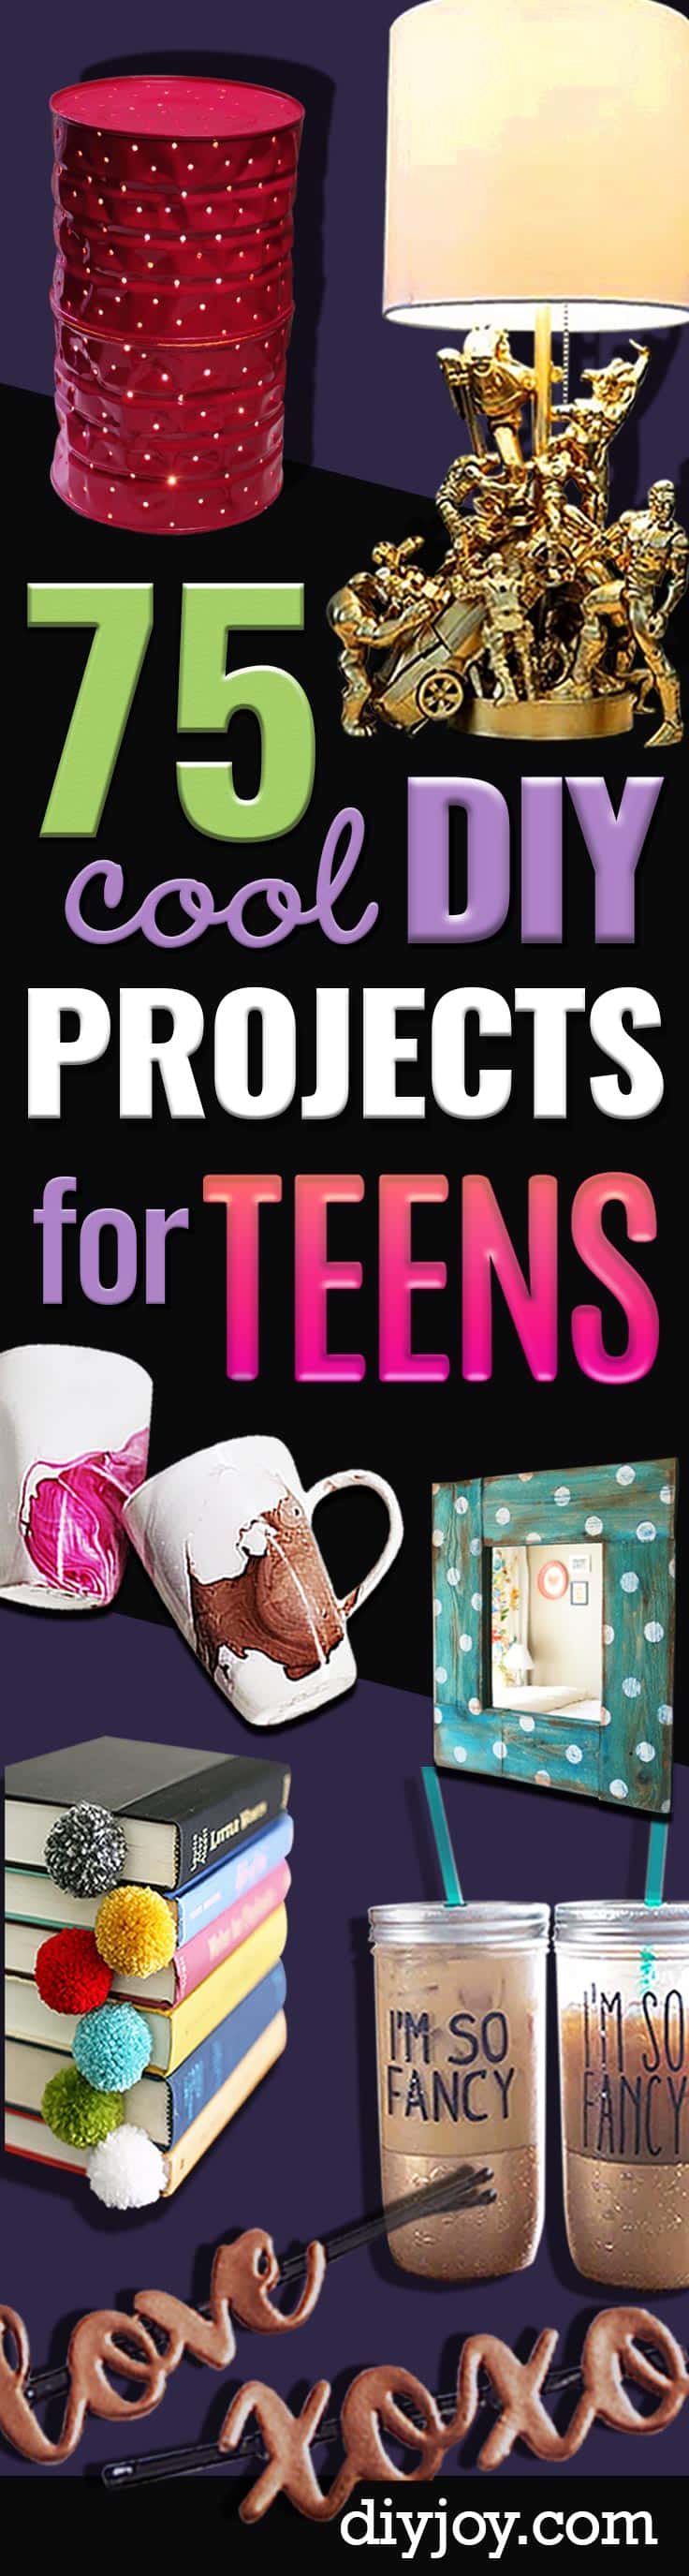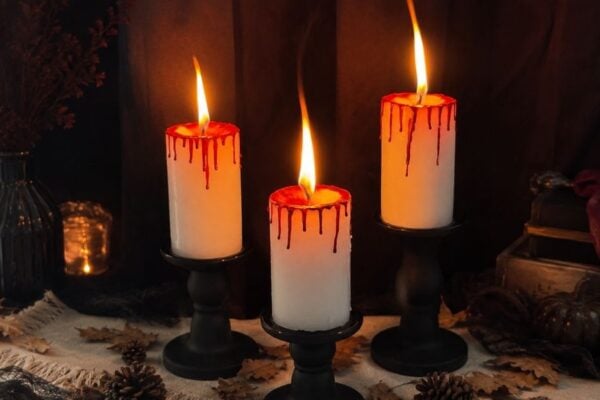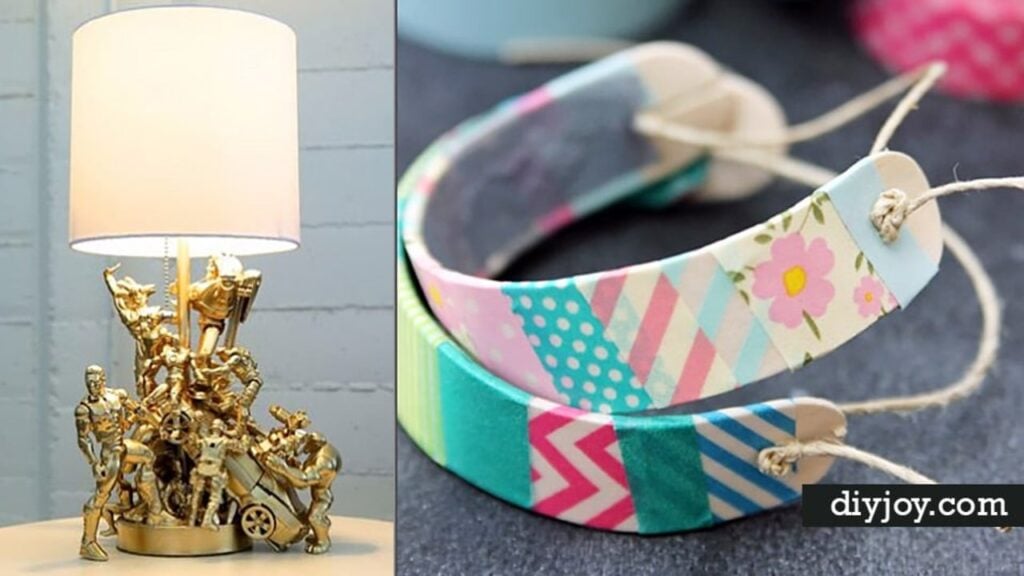
Being fifteen with an empty wall, an empty wallet and a whole Saturday is a specific kind of problem, and it is the one this list solves. These cool DIY projects for teenagers are the cheap, quick, genuinely good looking kind: cloud lights and fairy light jars for the ceiling, phone cases and galaxy shoes, tie dye you make with Sharpies, bracelets and rings and resin coasters, plus a stack of gifts worth giving to an actual friend. Most of them run on things already in the house, which is the point, and several started life as recycling. Every single one links back to the person who worked it out, and the ones marked DIY JOY are ours with full photo tutorials and video.
DIY for Teens – Cool Teen Project Ideas
Table of Contents
- DIY for Teens – Cool Teen Project Ideas
- 1. DIY Clothespin Lamp
- 2. Pretty Earrings Holder
- 3. Pom Pom Mouse Pad
- DIY Phone Case With Nail Polish
- 4. Textured Heart Canvas Art
- 5. Anthropologie Inspired DIY Turban Headband
- 6. Cute Floral Brooch
- 7. Colorfully Painted Lazy Susan
- 8. Easy Macrame Bracelet
- 9. DIY Mini Notebooks
- 10. DIY Cloud Light
- 11. Easy Handmade Sock Dolls
- 12. Mud Cloth Inspired Organizer
- 13. Handmade Jewelry Dishes With Copper Touches
- 14. Storybook Paper Roses
- 15. DIY Lush Lip Scrub
- 16. Yarn Ball Bookmark
- 17. DIY Mason Jar Fairy Lights
- 18. Creative Yarn Chandelier
- 19. Gummy Lego Candy
- 20. Upcycled Denim Jeans Bag
- 21. DIY Polka Dot Mirror
- 22. Recycled Shoe Box Suitcase
- 23. Sharpie Tie Dye T-Shirt
- 24. Easy DIY Wood And Ribbon Necklaces
- 25. DIY Washi Tape Wooden Bracelets
- 26. DIY Boho Flower Crown
- 27. Beaded Vine Desk Plant
- 28. DIY Crystal Knob Boxes
- 29. Make Up Magnet Board
- 30. Colored Paper Pen Holder
- 31. Yarn Wrapped Ombre Monogrammed Letter
- 32. DIY Pink Chalkboard Globe
- 33. DIY Kate Spade Inspired Metallic Polka Dot Phone Case
- 34. Glitter Iphone Case
- 35. Decorative Box Charging Station
- 36. Nail Polish Marbled Jewelry Purse
- 37. DIY Fancy Tumbler
- 38. Picture Frame Suncatcher
- 39. Hammock Chair DIY
- 40. Mason Jar Superhero Banks
- 41. Disco Love Sign
- 42. DREAM String Art
- 43. Cardboard Heart Garland
- 44. DIY Heart Dreamcatcher
- 45. DIY Galaxy Shoes
- 46. Washi Tape Monogram Canvas
- 47. Mirror Jewelry Wall Hangers
- 48. DIY Mirror Made With Plastic Spoons
- 49. Plastic Bunny Key Chain
- 50. Confetti Resin Coasters
- 51. Heart Eyes Emoji Zipper Pouches
- 52. DIY Hair Tie Rings
- 53. Book Page Paper Flowers
- 54. Personalized Uggs
- 55. Enameled Spoons
- 56. Twine Wrapped Bottle Vases
- 57. DIY Lush Bath Bombs
- 58. DIY Shaggy Heart Pillow
- 59. DIY Plastic Bottle Bracelet
- 60. Simple DIY Daisy Bead Rings
- 61. How to Customize a Mug Using Sharpie
- 62. Easy Flower Embroidery on Jeans
- 63. DIY Shrinky Dink Flower Bracelet
- 64. DIY Air-Dry Clay Jewelry Organizer Using Pebbles
- 65. DIY Denim Jean Organizer
- 66. DIY Tin Can Desk Organizer
1. DIY Clothespin Lamp
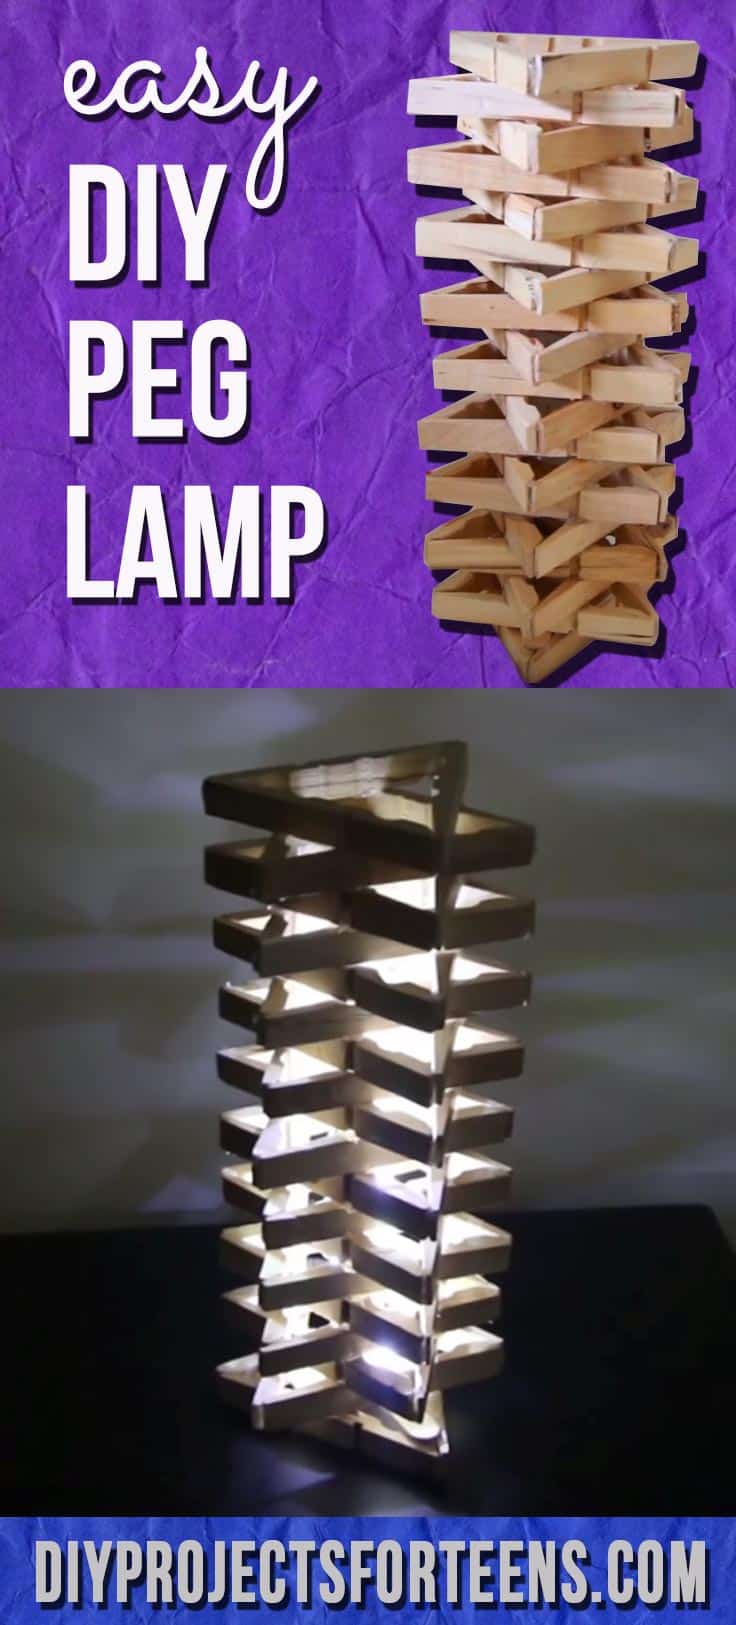
Wooden clothespins split in half, glued around a dowel in stacked rings, and a roll of LED lighting from the craft store threaded up the middle. That is the entire supply list, which is why this one keeps turning up in bedrooms. The shape does the work for you: every layer of pegs sticks out at a slightly different angle, so when the light goes on it throws a striped pattern across the ceiling and the wall behind it. Buy the LED roll rather than a bulb, since clothespins and heat are a bad pairing. Pick a color and spray them before you glue if plain wood is not your thing.
Get the full tutorial at DIY Projects for Teens.
2. Pretty Earrings Holder
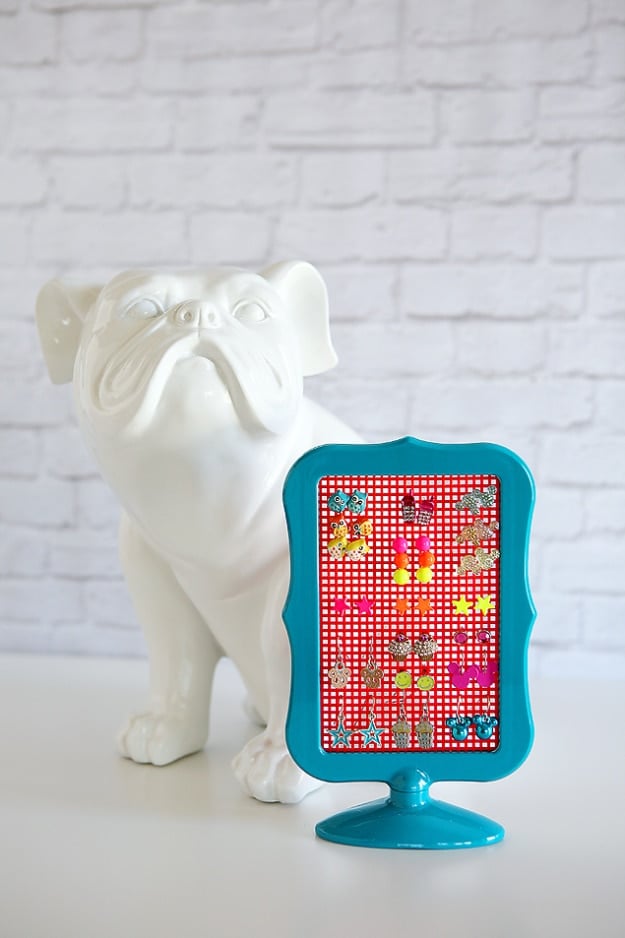
Two pieces, under three dollars, and about five minutes. You buy a cheap plastic photo frame, cut a sheet of plastic canvas to the size of the clear insert that came with it, and slide the canvas in where the insert was. Done. Every hook and post earring then pushes straight through the grid and hangs where you can see it, which is the whole reason the pile at the bottom of a drawer never gets worn. Plastic canvas comes in a pile of colors, and if the shade you want is not on the shelf, a can of spray paint on the frame fixes it. It is light enough to sit on a dresser or hang on a wall.
Get the full tutorial at eighteen25.
3. Pom Pom Mouse Pad
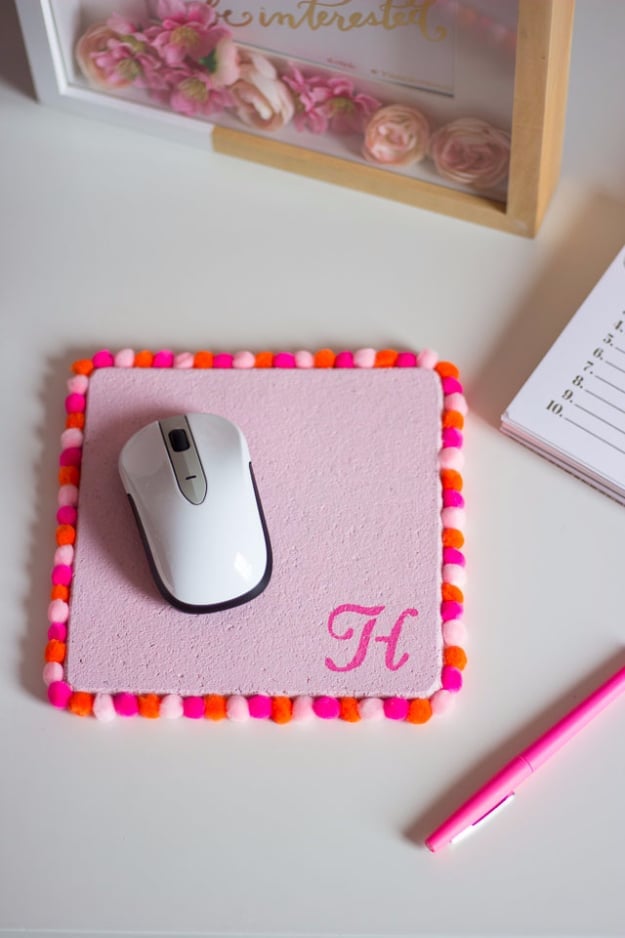
The base is a cork trivet, which is exactly the right thickness and already the right shape. Two or three coats of acrylic go on the top and the sides, drying between coats, then a monogram goes in one corner using a letter stencil and a foam brush dabbed rather than dragged, because dragging pushes paint under the stencil edge. The pom poms are the part worth getting right. Run a bead of hot glue along the side about an inch at a time and press pom poms in while it is still hot, rather than gluing the whole edge at once and racing a cooling line. Three eighths to half inch poms sit best.
Get the full tutorial at Design Improvised.
DIY Phone Case With Nail Polish
Turn your phone into a work of art instantly with this easy and quick DIY idea. You will be amazed with the way these turn out! No artistic talent required, either. For teen DIY projects that are fun and easy to make, look no further than this when it comes to cool teen crafts.4. Textured Heart Canvas Art
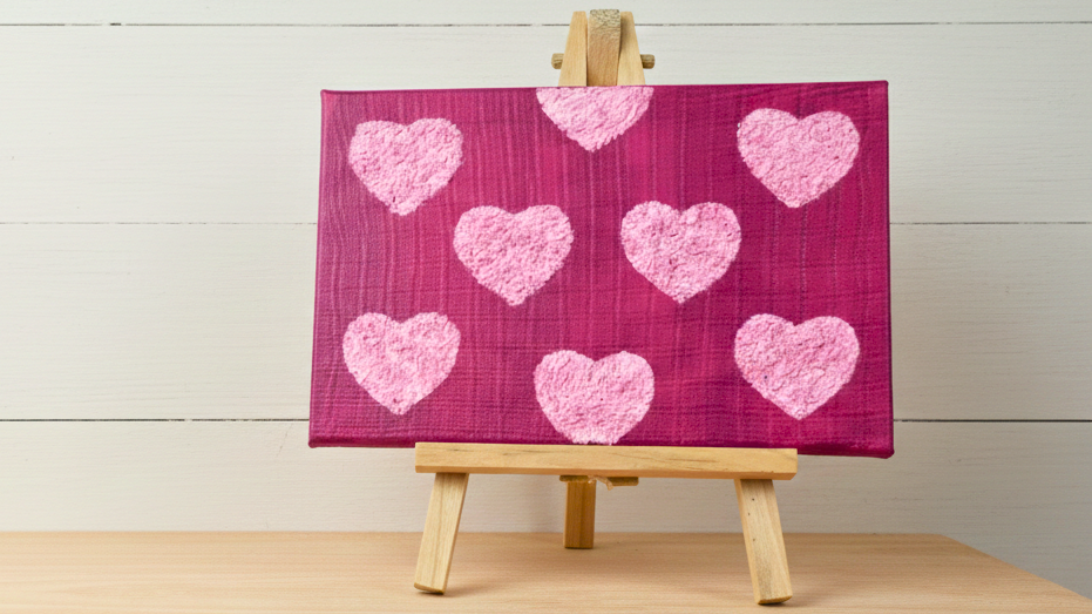
This is one of ours, and it is the project to hand someone who insists they cannot paint. There is no drawing involved. You build texture up on the canvas until the hearts physically stand off the surface, so the piece catches light and shadow instead of sitting flat, and the finish reads far more expensive than the supply list suggests. Deep pink over a soft pink ground is the version shown, but the technique takes whatever colors match the room. Prop it on a little easel on a shelf or hang it over a bed. Full photo walkthrough and the video are both on our tutorial.
Get the full tutorial at DIY Joy.
5. Anthropologie Inspired DIY Turban Headband
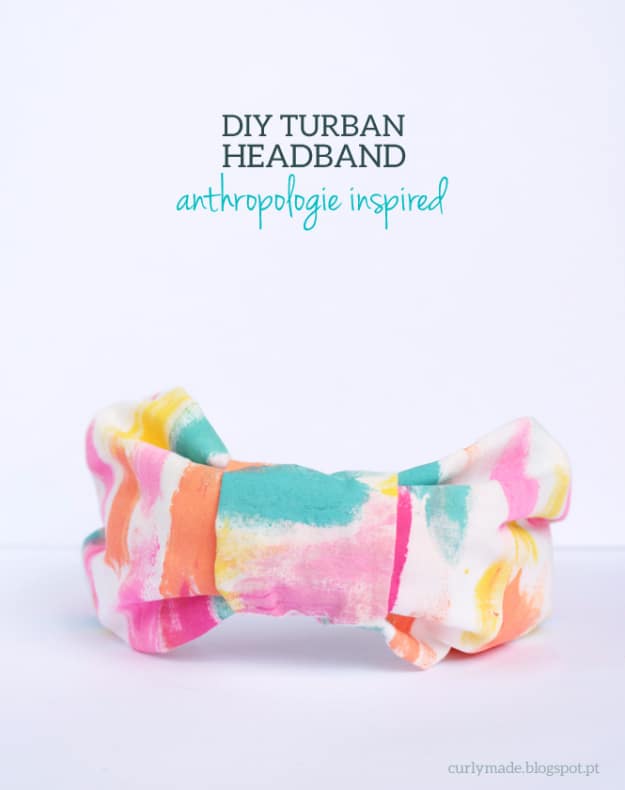
A plain plastic headband, a rectangle of white fabric roughly eighteen by eleven inches, and acrylic paint. The pattern is not printed and not bought: you brush random strokes of several colors straight onto plain white fabric and let it dry, which is why no two ever match and why the watercolor effect is impossible to buy. Fold the painted rectangle in half right sides together and run a fine line of hot glue instead of a seam, turn it out, then gather the ends onto the headband in small sections. A smaller painted piece, six by four and a half inches, wraps the center to hide the join.
Get the full tutorial at Curly Made.
6. Cute Floral Brooch
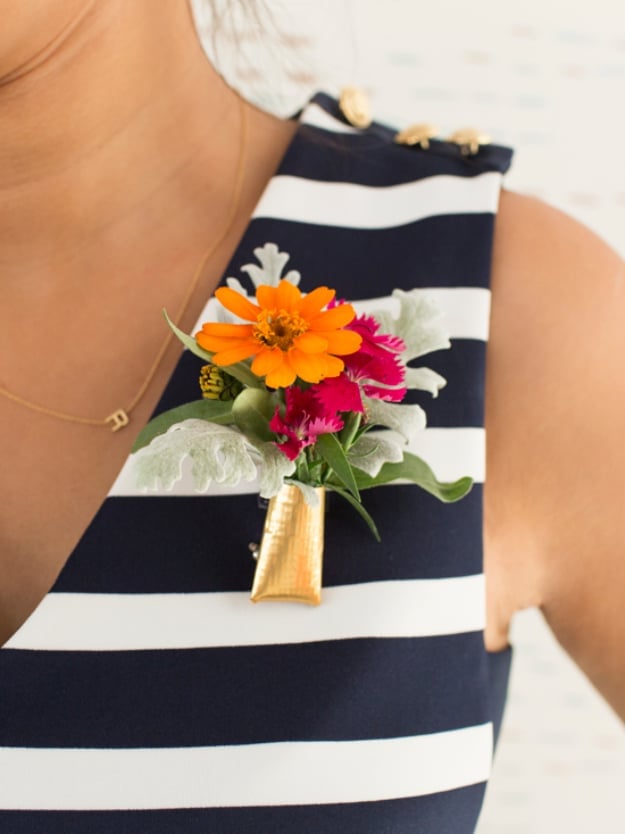
The credited source was unreachable for a while and it is back: Oh Joy moved off Typepad, and the post is live on her own domain again. The clever part is a tiny vessel of water behind the flowers, so these are fresh blooms rather than fabric ones and they last the evening rather than an hour. That vessel is nothing but an inch of half inch drinking straw wrapped in gold duct tape, with a brooch back glued on behind it. Cut the stems short, mix one bright bloom with a smaller filler, and wear it to a wedding, a formal, or a Tuesday.
Get the full tutorial at Oh Joy.
7. Colorfully Painted Lazy Susan
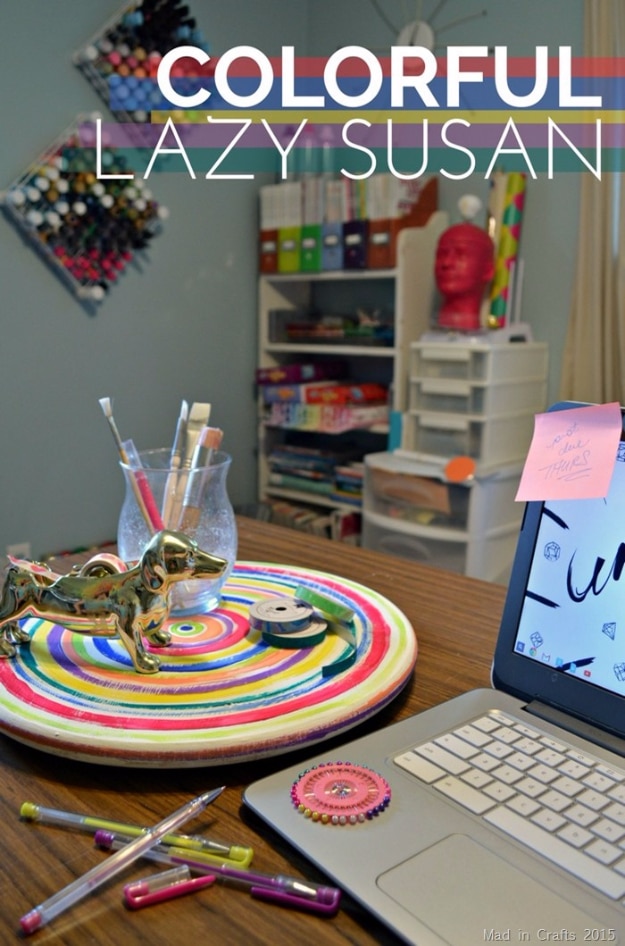
A hand me down raw wood lazy susan and a technique that is more fun than it has any right to be. You hold the paintbrush still in one spot and spin the lazy susan under it, which lays down a perfect painterly ring every time with no measuring and no masking. Work outside in, changing color and varying the width of the stripes as you go toward the center, and let coats dry between passes. Thrift stores and yard sales are full of these for a couple of dollars, and painted up it holds pens, brushes and nail polish on a desk and turns to bring the right one to you.
Get the full tutorial at Mad in Crafts.
8. Easy Macrame Bracelet
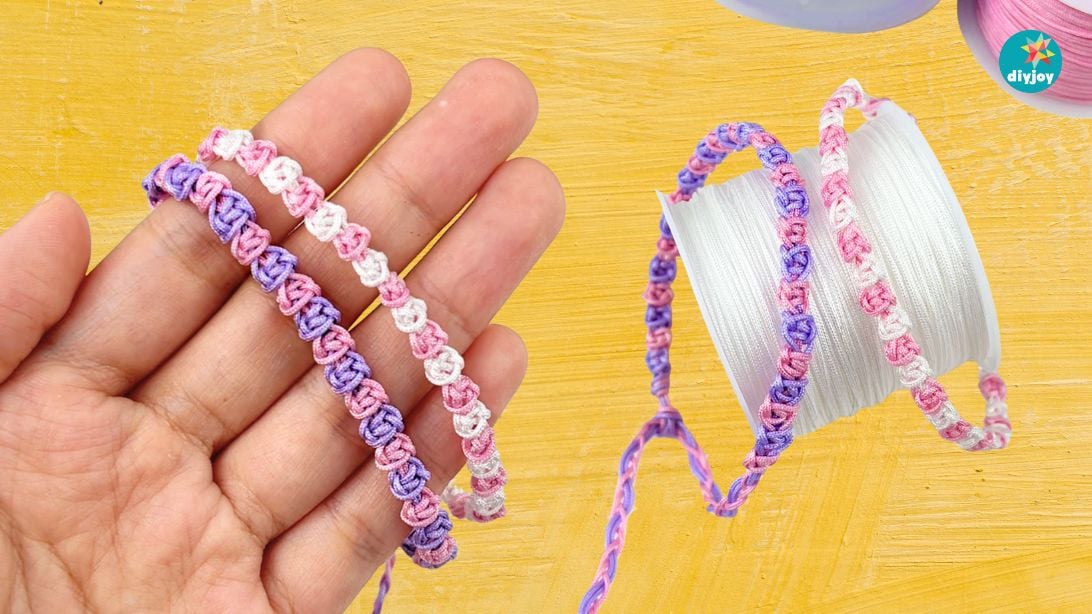
One knot. That is the honest summary of this one of ours: a square knot, repeated in alternating directions along two folded cords until the band wraps a wrist. No hooks, no special tools, no experience, and the rose pattern that emerges is a product of the alternating direction rather than any extra skill. Tape the cords to a table and you can do it in front of a film. Cheap enough to make in every color going, which is the actual point, because these are meant to stack up an arm and to be handed out to friends.
Get the full tutorial at DIY Joy.
9. DIY Mini Notebooks
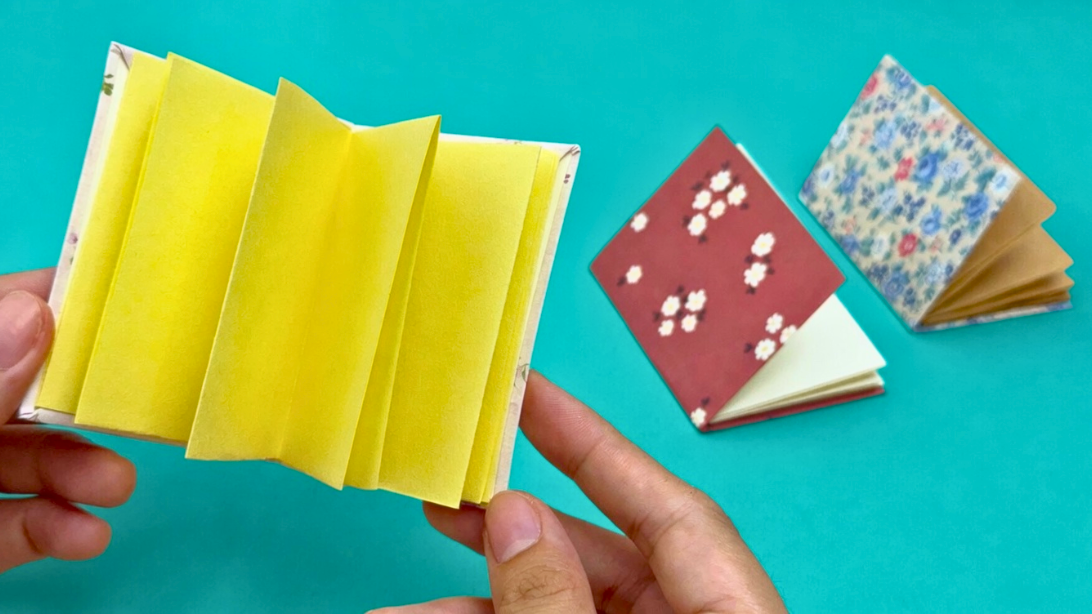
Every crafter has a stack of patterned paper, scrapbook offcuts and card scraps too pretty to bin and too small to use, and these eat the lot. The finished notebooks are genuinely tiny, small enough for a pocket, a locker or the front of a backpack, and the covers can be any scrap you like, so a batch made from one pile still comes out all different. Five minutes each once you have the fold down. Make a handful, keep one for lists and give the rest away. Full step by step and the video are on our post.
Get the full tutorial at DIY Joy.
10. DIY Cloud Light
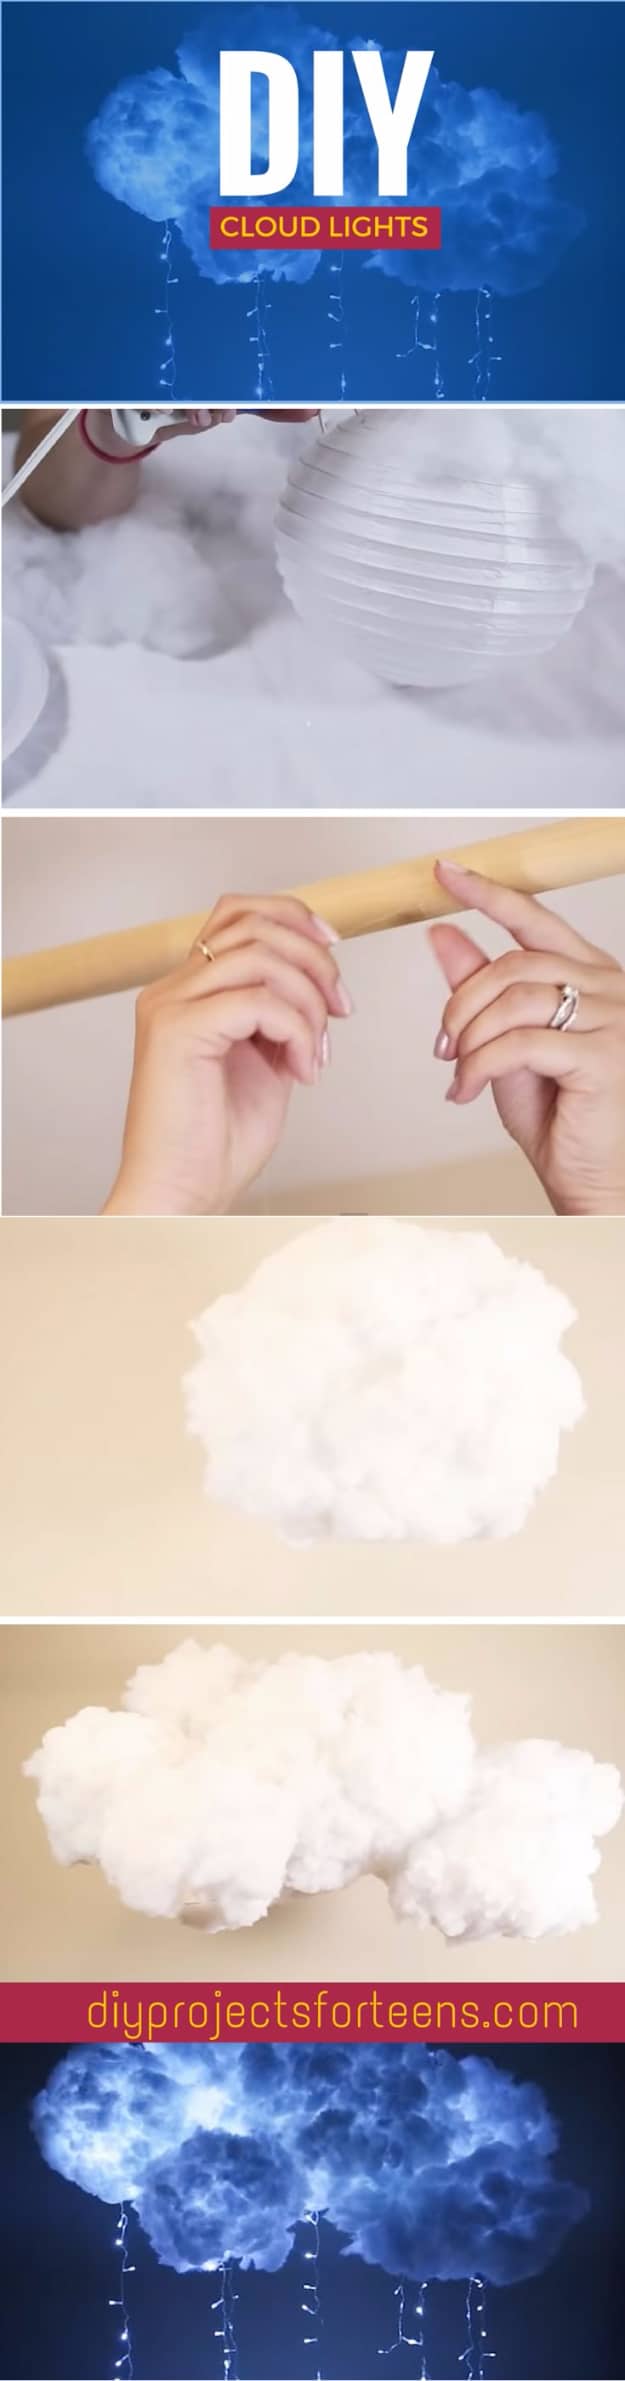
Six paper lanterns, a bag of quilt batting and a glue gun. You hot glue batting all over the lanterns until they stop reading as spheres and start reading as clouds, tie a length of fishing line to each one, then hang them at staggered heights from a wooden dowel held up by two cup hooks. String lights thread through the cluster, and several strands can be joined so the whole thing runs off one outlet. The result floats over a bed and glows from inside, and the lantern count is entirely up to you and your ceiling.
Get the full tutorial at DIY Projects for Teens.
11. Easy Handmade Sock Dolls
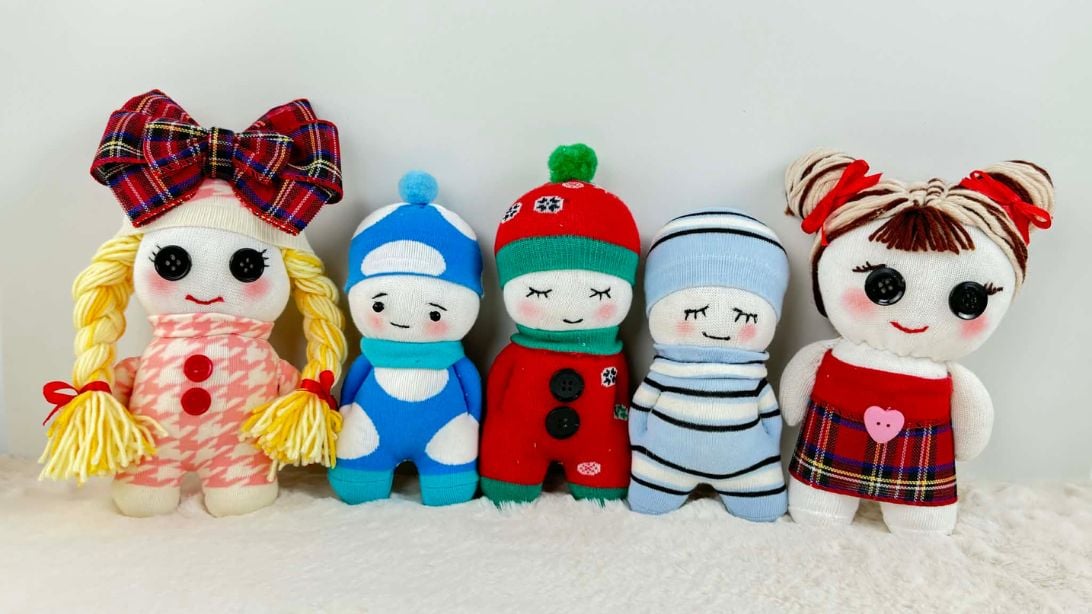
Ours, and the honest version is that the first one is fiddly and takes patience. That is worth saying out loud, because the payoff is a doll with a real face, actual hair and a proper outfit, and once the basic pattern clicks the next one goes quickly. Start with the plain shape, then get ambitious: yarn hair, little bobbles and bows, knitted hats, whatever socks are in the drawer. They make genuinely good handmade gifts, which is not something you can say about most sock crafts. Full photo tutorial and video on our post.
Get the full tutorial at DIY Joy.
12. Mud Cloth Inspired Organizer
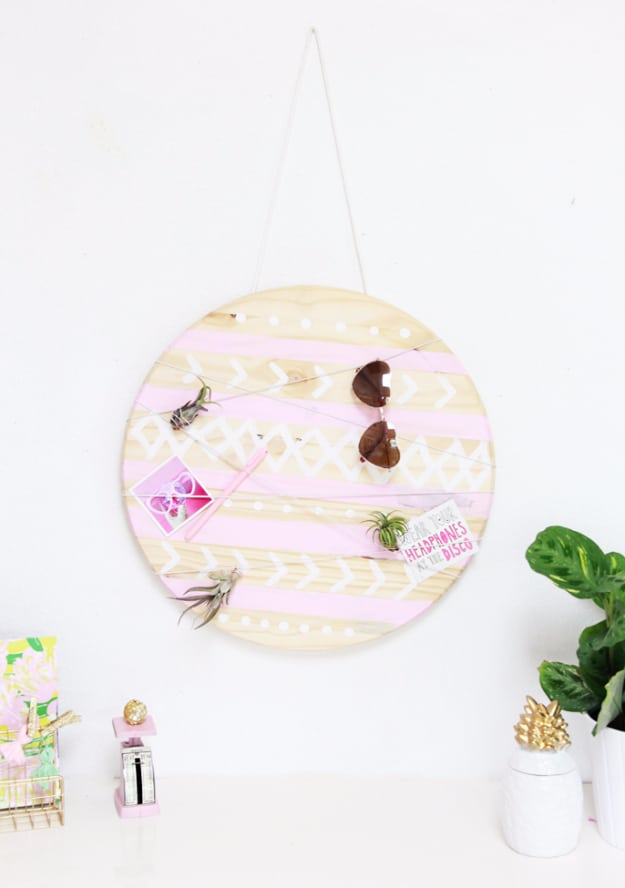
Under ten dollars, and it is a genuinely useful thing rather than just a pretty one. A plain wooden circle gets a hand painted mud cloth pattern of lines, dots and small triangles, painted freehand because the whole style is meant to be irregular and the tip of the brush makes the dots. Rope staples to the back for hanging, then elastic cord staples across the front in a crisscross so photos, tickets, sunglasses and keys tuck under it. It works as a key drop by a door or an inspiration board over a desk, and the black on raw wood keeps it looking like decor rather than a corkboard.
Get the full tutorial at A Bubbly Life.
13. Handmade Jewelry Dishes With Copper Touches
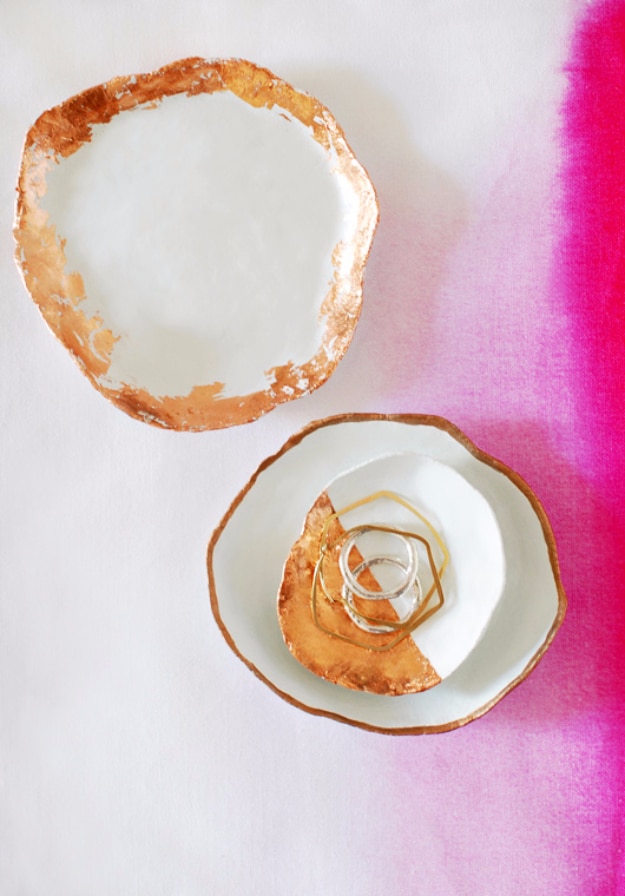
White air dry clay, rolled into a long sausage about three eighths of an inch thick and coiled into a bowl, then pinched outward and thinned by hand until the walls are irregular and the rim goes wavy. That wobble is the point; a perfect circle would look shop bought and dull. Let it cure fully before you touch it with anything. Then the copper: either run a metallic copper marker around the rim, which is the easy route, or size the edge and lay copper leaf for the torn, flashing finish, sealed with a spray. Small ones hold rings, bigger ones hold everything else.
Get the full tutorial at decor8.
14. Storybook Paper Roses
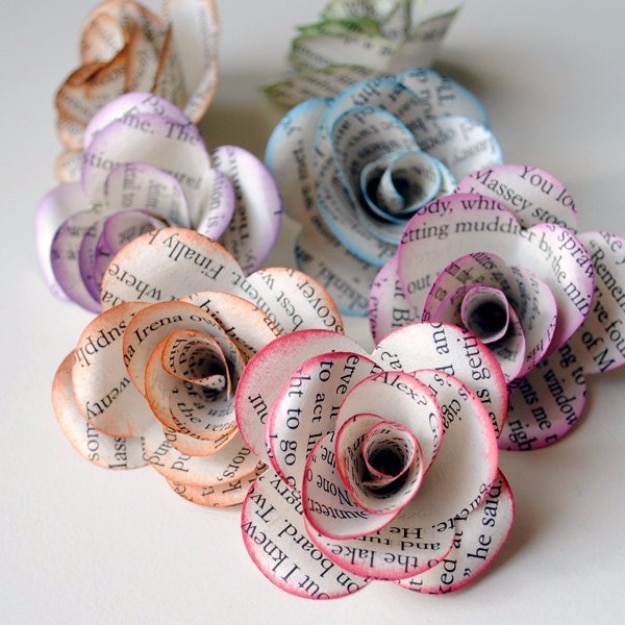
Book pages, sheet music, anything still flexible enough to curl between your fingers, cut into petals in at least five different sizes from three quarters of an inch up to three inches. Think of the shapes as little arches or church windows and vary them, because identical petals give you an identical looking flower. Shaping is the step that matters most: roll the edge of every petal and pinch the base before it goes anywhere near the glue. Then build from the smallest outward on sixteen gauge wire, one dot of low temp glue per petal, rotating the stem as you go. Half inch grosgrain wraps the base.
Get the full tutorial at 100 Layer Cake.
15. DIY Lush Lip Scrub
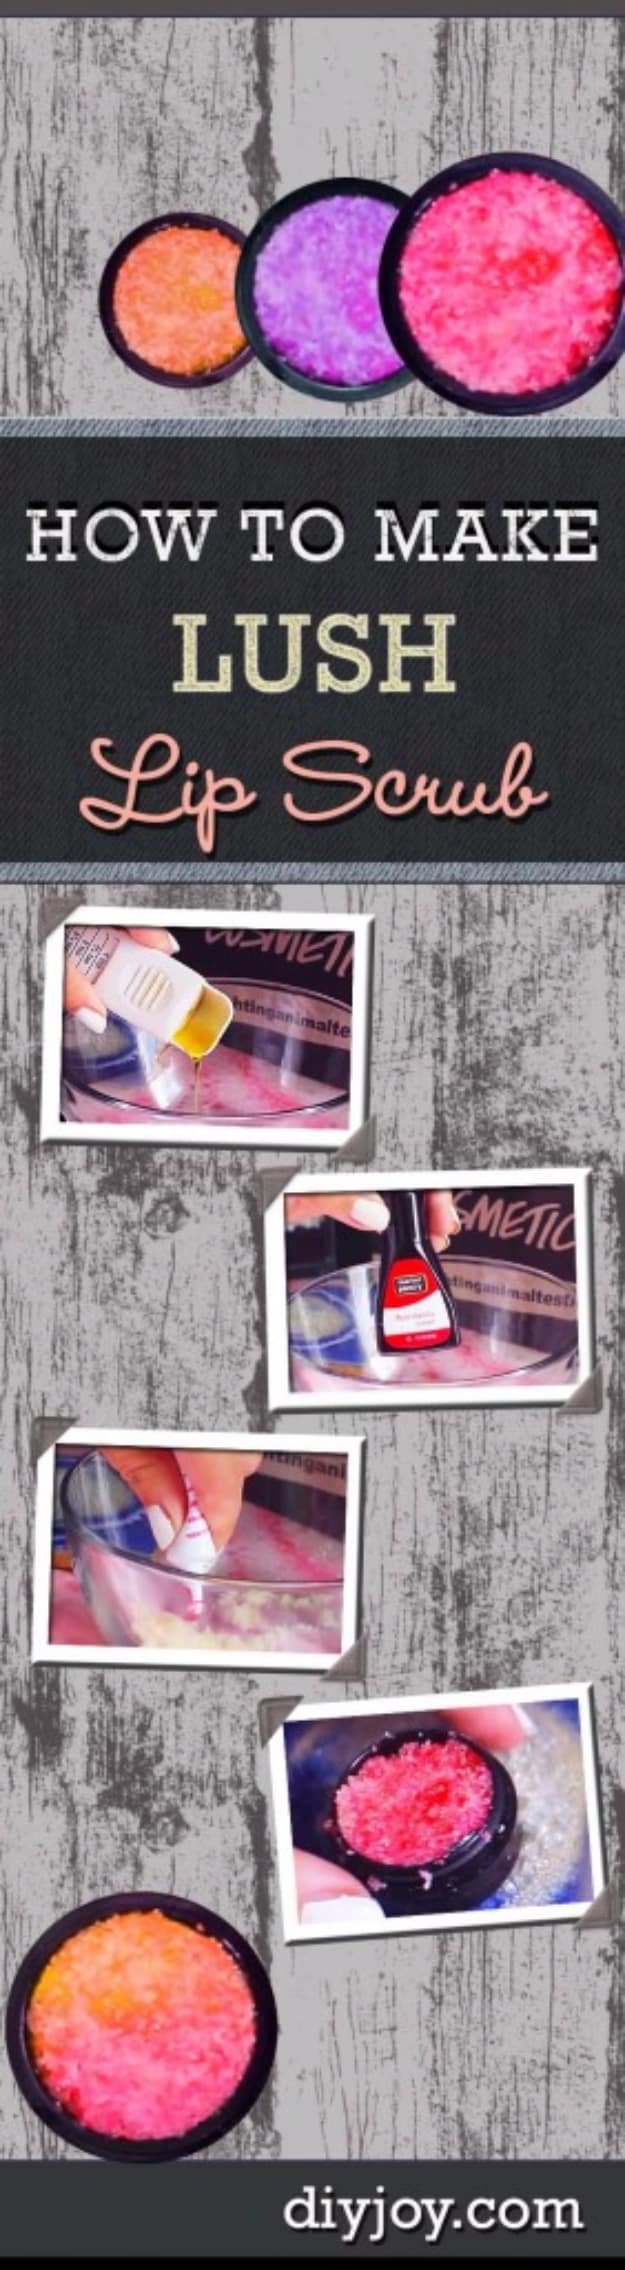
Ours, and it is the cheapest possible version of a shop counter favorite. Sugar plus a fat plus flavor, mixed in seconds, packed into a tiny pot and it does the same job as the branded one at a fraction of the price. Bubblegum pink, coral and deep berry are the colors shown, and small batches are the right call so nothing sits around for months. The whole thing is a good first make for someone who thinks they cannot craft, because there is nothing to shape, nothing to cure and nothing to sew. Full recipe and photos on our post.
Get the full tutorial at DIY Joy.
16. Yarn Ball Bookmark
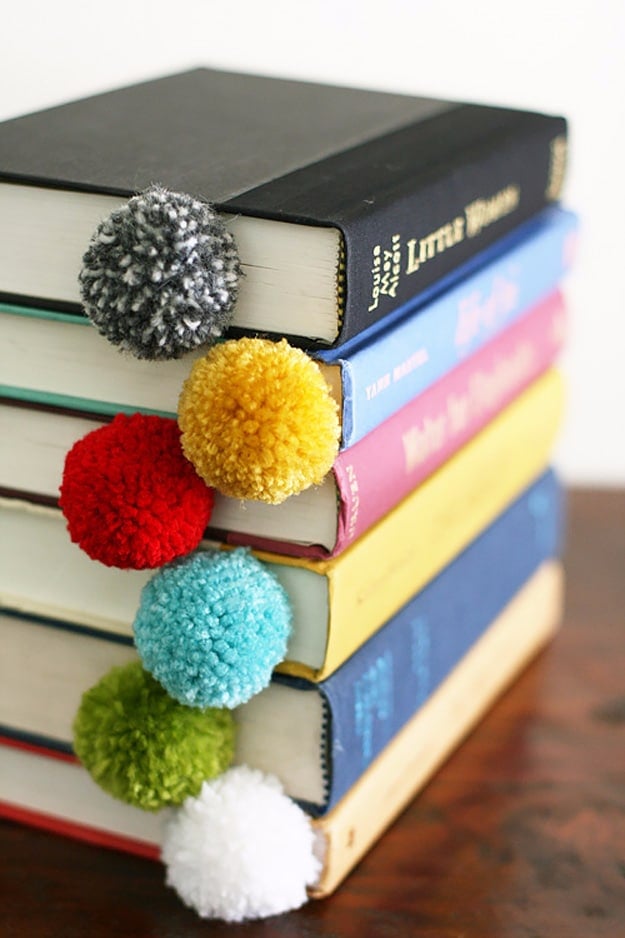
Two supplies, yarn and sharp scissors, and no tools at all. You wrap yarn around your fingers ninety times, tie the bundle tightly through the middle with an eight to ten inch strand, add a fifteen inch piece as the tail that runs down the page, then cut the loops and roll and trim the ball until it is round. Sharp scissors genuinely matter here, because blunt ones chew rather than cut and the pom never sits neatly. Make them in a stack of colors from scraps. They cost nothing and they are a good small gift tucked inside a book.
Get the full tutorial at Design Mom.
17. DIY Mason Jar Fairy Lights
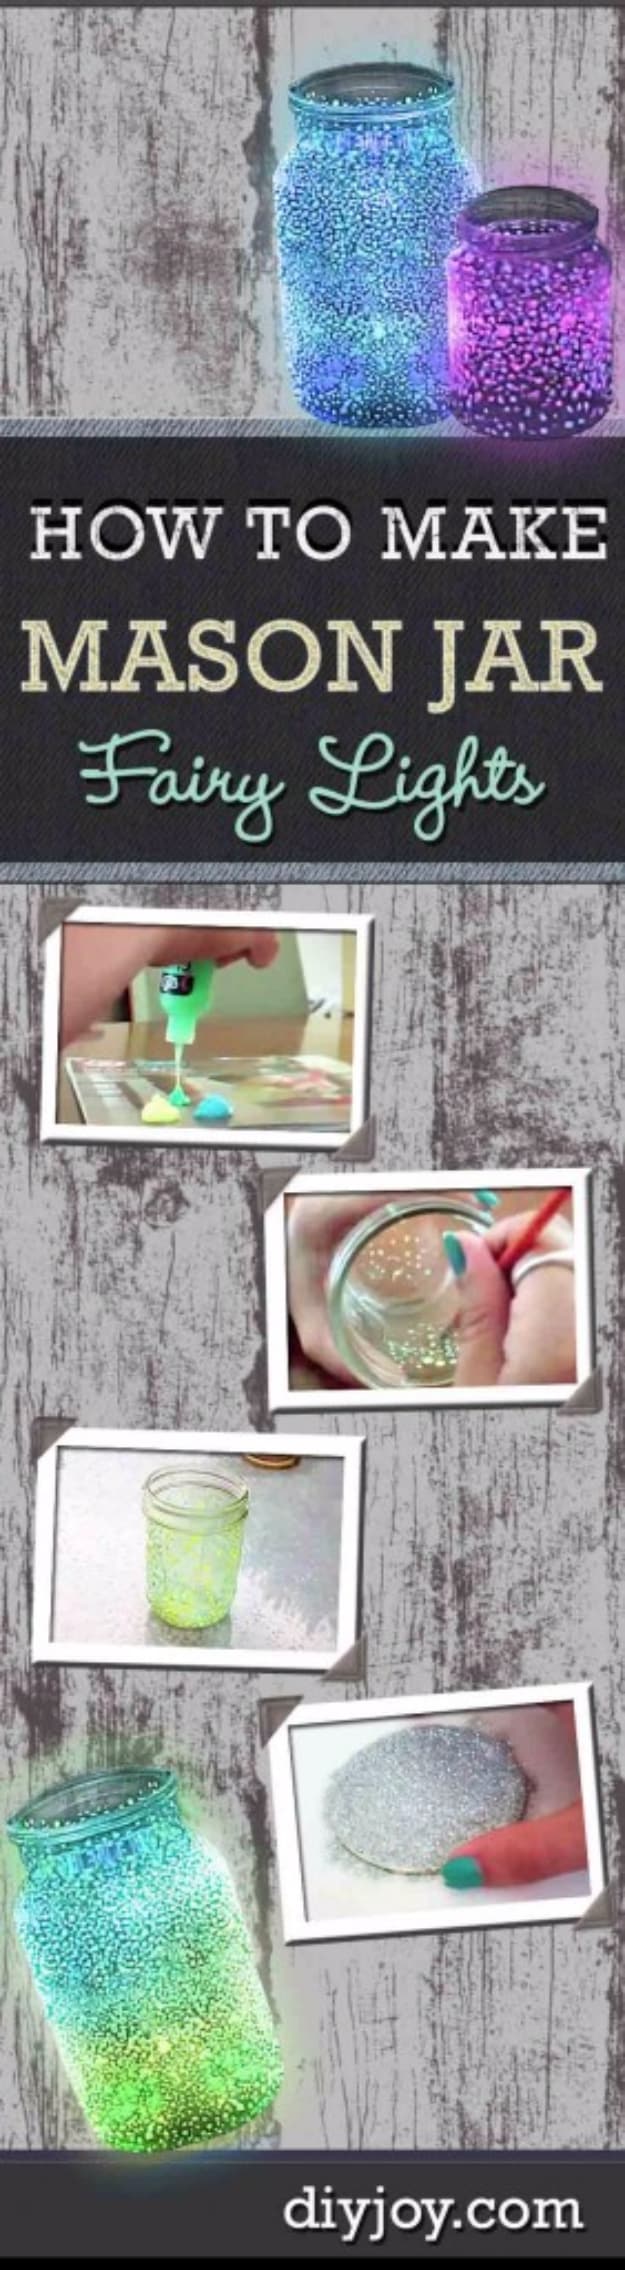
Ours, and the supply list is refreshingly short for once: glow in the dark paint, glitter and any clean jar you can find. No wiring, no batteries, nothing to break. Get a few different colors of the glow paint rather than one, because that is what turns it from a lit jar into something genuinely fairy looking, and craft stores and Walmart both keep small pots of it. The best part is that a wobbly paint job does not spoil it, so there is no wrong version, and it is cheap enough to give away when the room changes. Photos and video on our post.
Get the full tutorial at DIY Joy.
18. Creative Yarn Chandelier
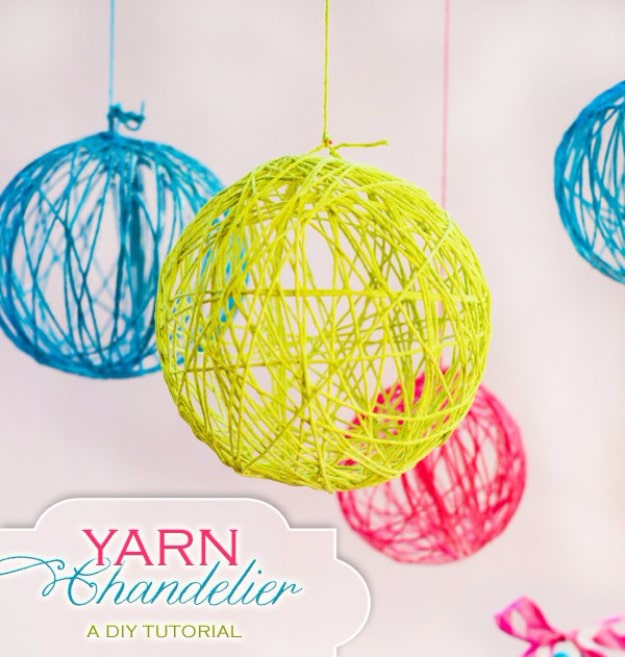
Yarn wound around an inflated balloon, stiffened, and popped once it dries, leaving a hollow globe of crisscrossed strands that hangs and glows. The stiffener is not a craft store product: it is school glue thinned with corn starch, and the balloon gets a rub of Vaseline first so the dried shell releases instead of tearing. Three at different sizes in yellow, pink and blue over a bed is the version pictured, and it is one of the cheapest big impact things you can hang from a ceiling. Wind loosely and let the strands cross at odd angles, because the gaps are what make it read as a globe.
Get the full tutorial at Hostess With The Mostess.
19. Gummy Lego Candy
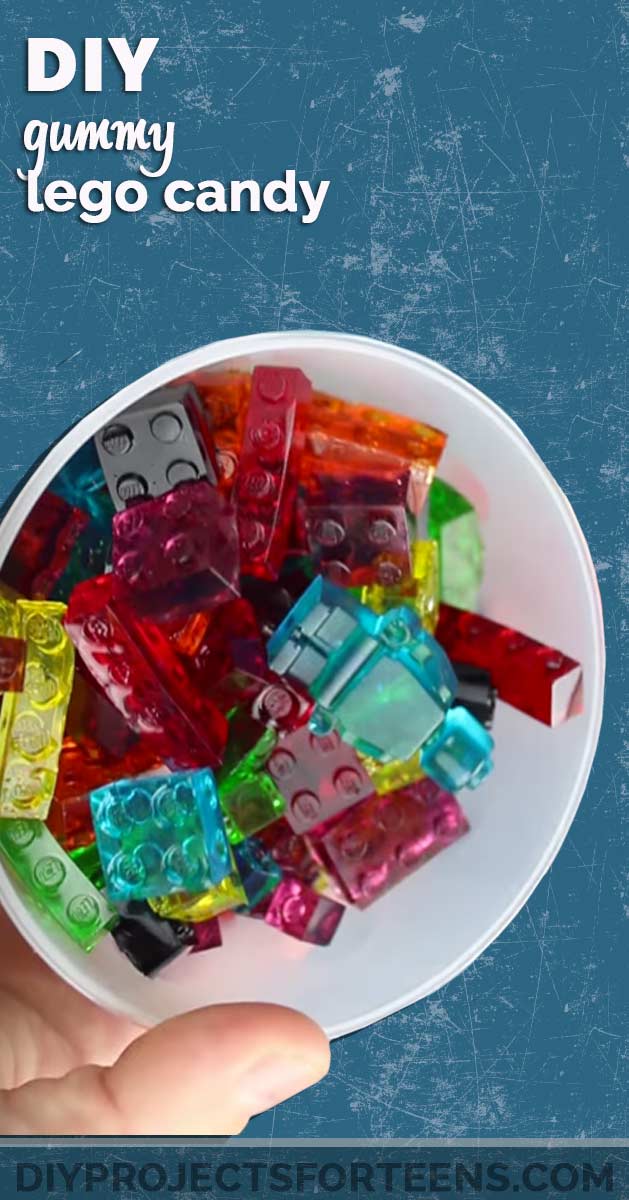
Edible building blocks, poured into silicone brick molds and turned out in translucent red, green, blue and orange so they look exactly like the real thing right down to the studs. This is the project that makes a party, since a bowl of them disappears in minutes and everyone picks them up to look before eating. The molds are the only special purchase and they get reused forever. Kitchen projects like this are also the gateway for a teenager who claims not to like crafts, because the output is candy.
Get the full tutorial at DIY Projects for Teens.
20. Upcycled Denim Jeans Bag

Ours. A pair of outgrown jeans becomes a crossbody bag, and because you are starting with denim it will take an absolute beating, which is more than can be said for most handmade bags. The pockets, seams and belt loops already on the jeans do half the design work for you before you cut anything. No two ever come out the same, and once it exists it becomes the thing you load with pins, patches and badges until it is unmistakably yours. Beginner friendly and it needs no fancy tools. Full step by step and video on our post.
Get the full tutorial at DIY Joy.
21. DIY Polka Dot Mirror
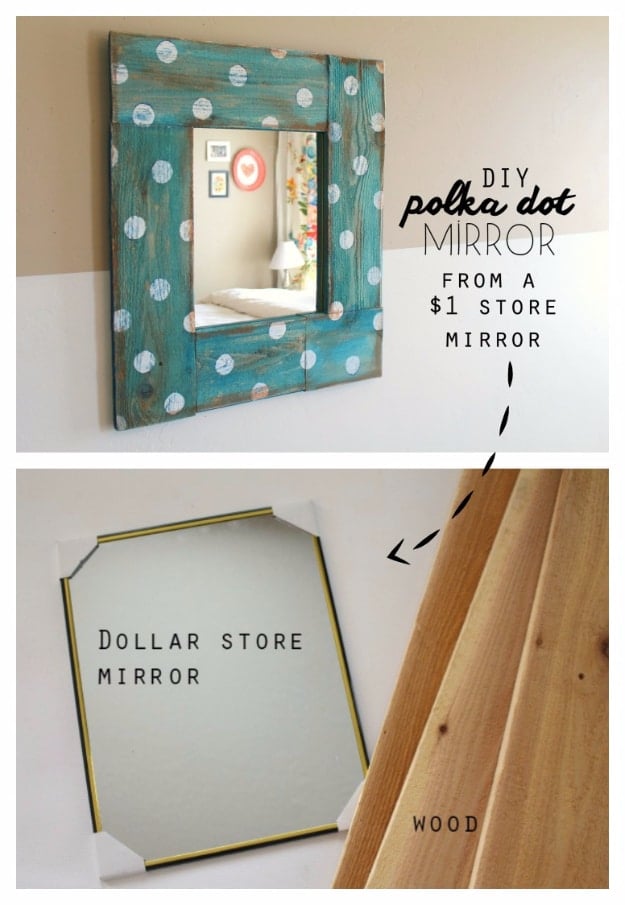
A dollar store mirror and some scrap wood. The frame gets cut about five inches longer than the mirror on each side so it overlaps properly, glued at the inside corners with wood glue and hot glued along the back seams to hold while it sets. Then water the paint down, slop it on generously and sand it back for a distressed finish, which is far more forgiving than trying to paint neatly. White dots go on with a cardboard circle as a stencil, the edges get a wash of thinned brown paint, and the mirror hot glues to the back at the very end.
Get the full tutorial at A Girl And A Glue Gun.
22. Recycled Shoe Box Suitcase
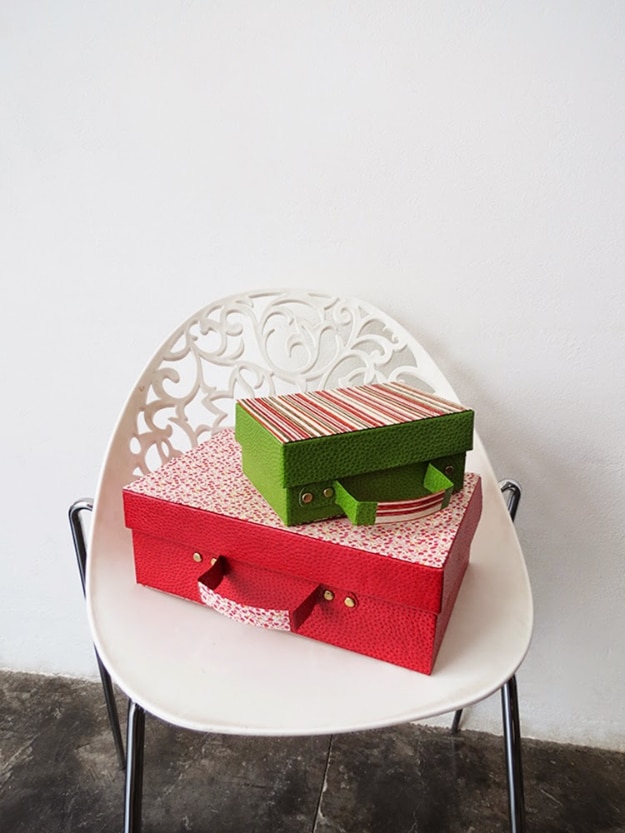
A shoe box turned into a small suitcase, papered in stripes and finished with a ribbon handle and paper corner latches, and the corner detail is what sells the whole illusion. Stacked two high on a chair they look like luggage rather than boxes, which is exactly why they work for storing anything you would rather not look at. Red and green striped paper is the version pictured, and you can match the paper to a room instead. Free, apart from the paper, and shoe boxes are the one craft supply nobody has to go and buy.
Get the full tutorial at Ohoh Deco.
23. Sharpie Tie Dye T-Shirt
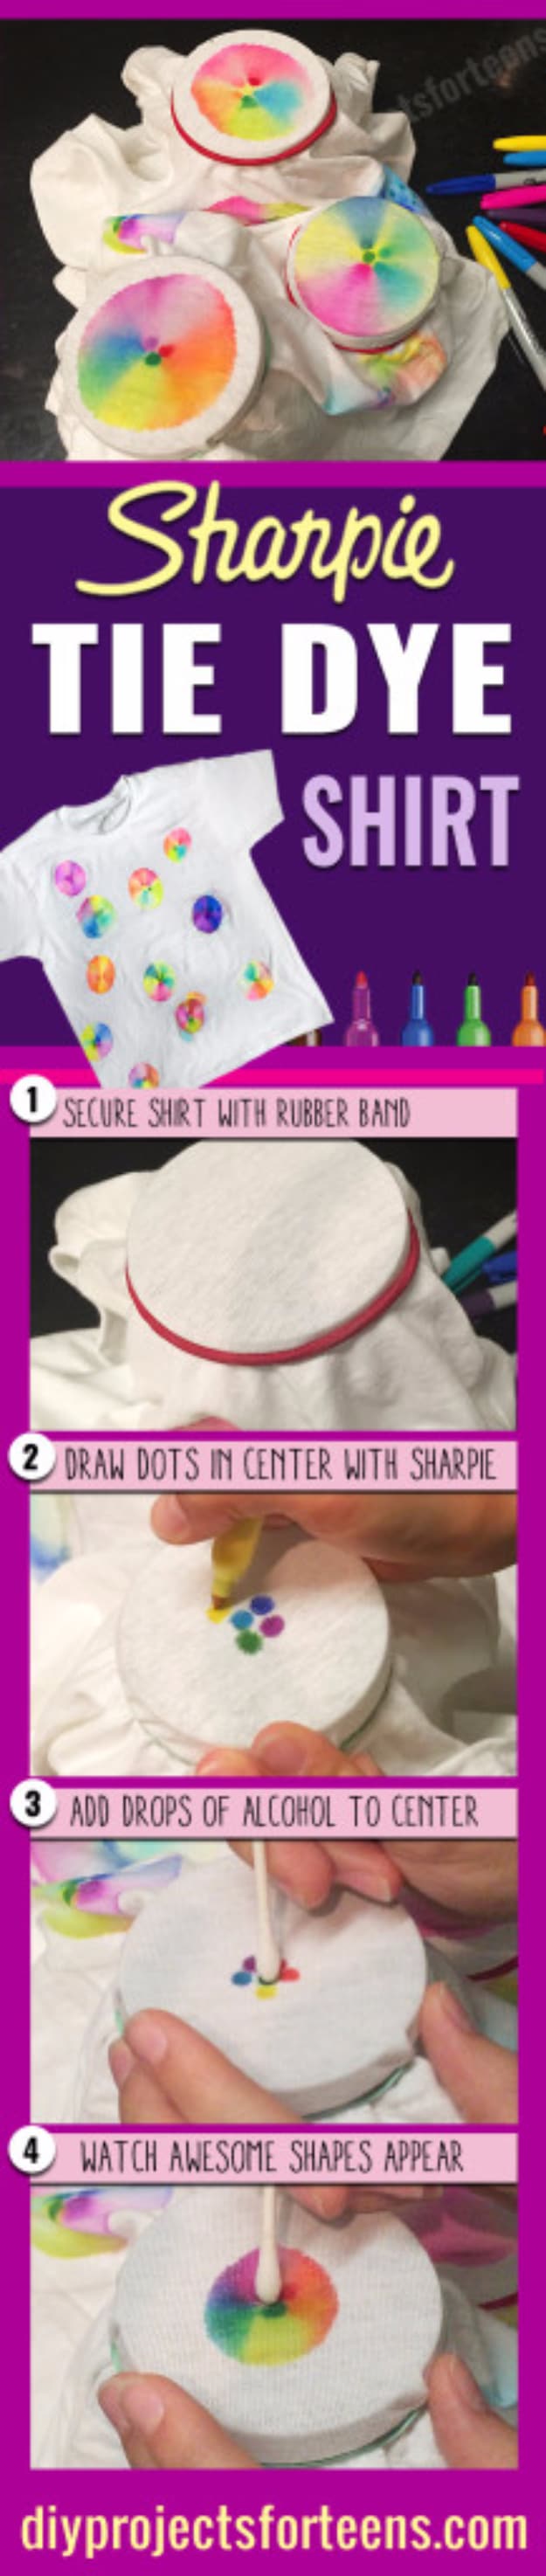
No dye, no buckets, no ruined bathroom. Stretch a section of a plain shirt over the mouth of a mason jar and hold it with a rubber band so you have a taut circle to work on. Put a pea sized dot in the middle, then ring it with more dots in other colors, keeping them separate rather than touching. Now dip a q-tip in rubbing alcohol and dab repeatedly on the dots, and the ink runs outward into rings all by itself. Repeat across the shirt, move the jar and go again. It washes and it wears, and the alcohol is the only thing doing any work.
Get the full tutorial at DIY Projects for Teens.
24. Easy DIY Wood And Ribbon Necklaces
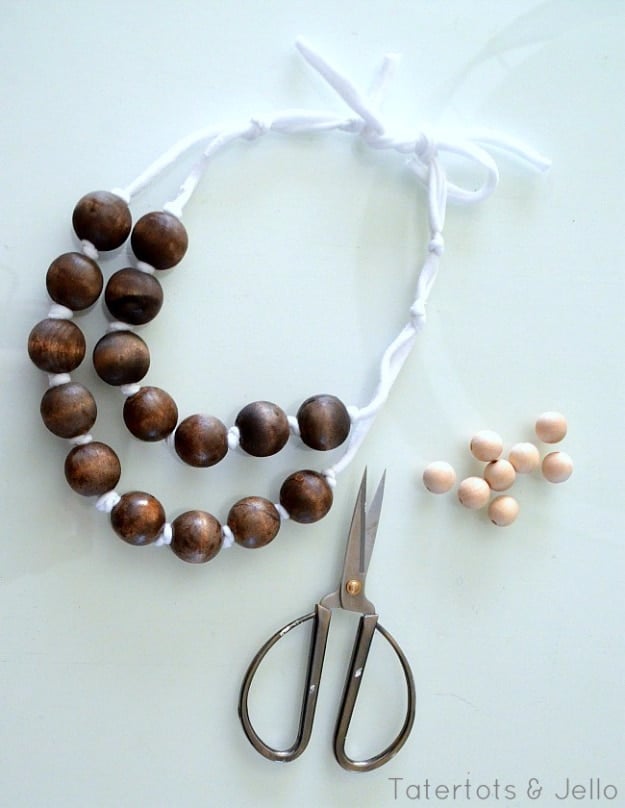
About thirty minutes, and it is a good one for a group because everyone’s comes out different. Wooden beads get threaded onto bamboo or metal skewers so you can paint them all at once with a foam brush without holding each one, which is the trick that makes it quick. Once dry and sealed with polyurethane spray, they thread onto ribbon or two inch strips cut from an old t-shirt, with a knot tied either side of each bead to hold the spacing. The t-shirt strip version sits softer against the neck than ribbon does, and costs nothing at all.
Get the full tutorial at Tatertots and Jello.
25. DIY Washi Tape Wooden Bracelets
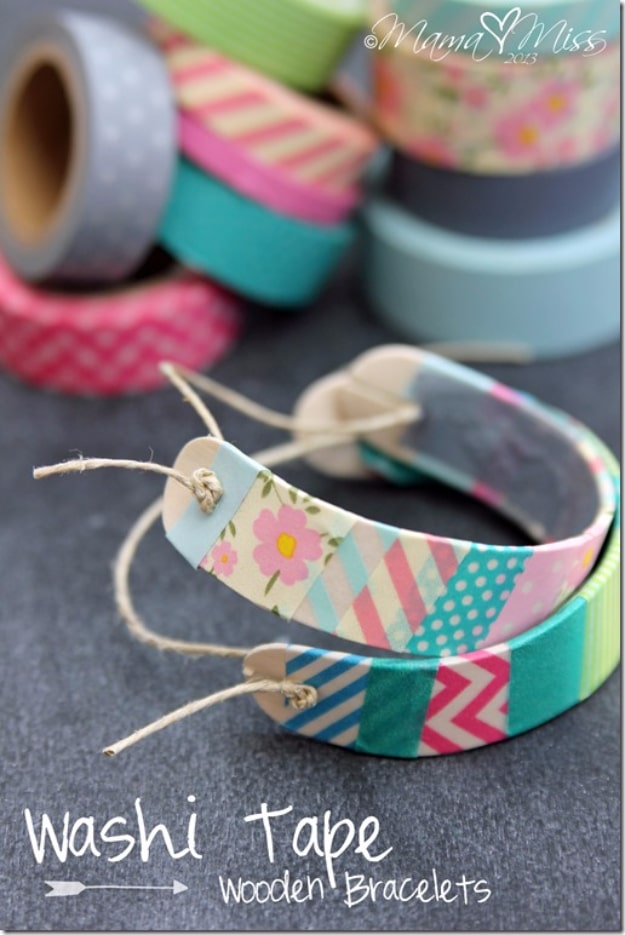
The part nobody expects is that this starts with jumbo craft sticks and a glass of water. Soak them at least two days until they go pliable, then curve each one inside a mug that is roughly the width of your wrist and leave them one to two days to dry in that shape. That is most of the project and none of it is work. After that, wrap washi tape around in roughly two inch strips, leaving room at the ends, and run a strip inside for a clean finish. Pierce both ends with an awl, and it is fine if the wood cracks a little there, then thread hemp cord through and knot.
Get the full tutorial at Mama Miss.
26. DIY Boho Flower Crown
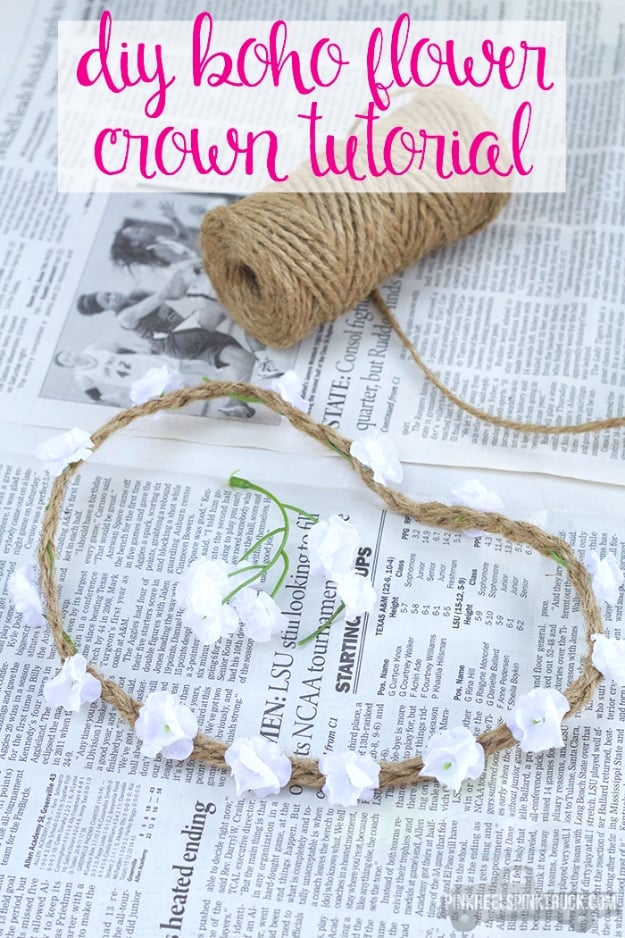
Jute twine and faux flowers, and it costs almost nothing. Cut three equal lengths of jute about one and a half times the circumference of your head, anchor one end and braid them together loosely rather than tightly, because a loose braid gives the flowers somewhere to sit. Wrap the braid around your head to check the fit before you commit, glue the overlap, trim the knotted ends, then push flowers into the braid and add a dab of hot glue behind each one. Let it dry fully. Good for a festival, a photo shoot, or a Halloween costume that needs to come together in an hour.
Get the full tutorial at Taylor Bradford, formerly Pink Heels Pink Truck.
27. Beaded Vine Desk Plant

Ours, and it is a plant that will never die on a windowsill with no light. Green seed beads get threaded onto thin craft wire and twisted into trailing vines, then the strands are bundled into a mini terracotta pot with foam and a little fake moss so they spill over the rim. The beaded plants going round on TikTok are usually much bigger; at this scale it sits on a desk or a shelf without taking any space, and it catches light the way a real trailing plant never does. Wisterias, lilies and succulents all work with the same method. Full tutorial on our post.
Get the full tutorial at DIY Joy.
28. DIY Crystal Knob Boxes
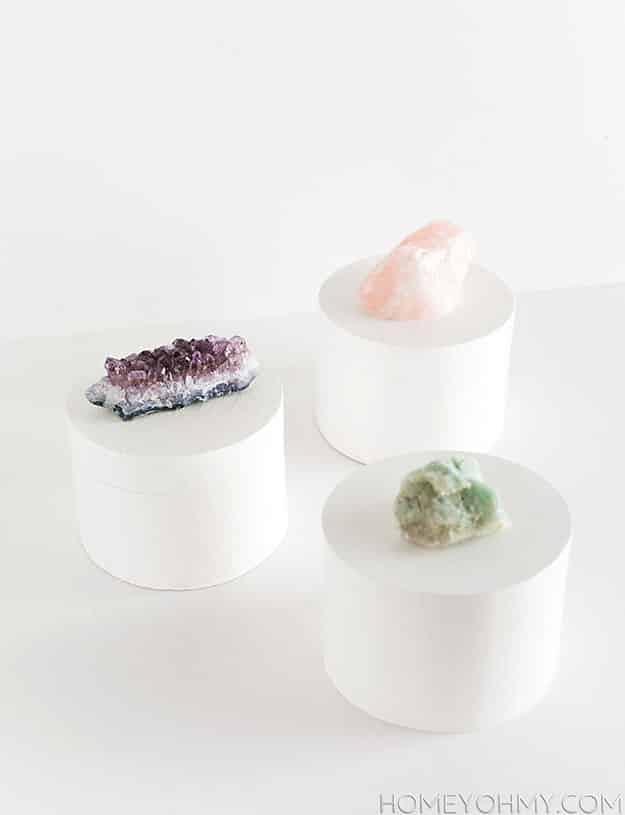
Plain wooden boxes painted glossy white with a raw crystal glued to the lid, and the contrast between the flat white and the rough mineral is the whole design. Three coats of white acrylic then two of gloss varnish is the route described, though glossy white spray paint in several light coats gives a smoother, streak free finish and is worth the swap. Leave the insides unpainted, because raw wood is a softer contrast against the gloss than a second color would be. E6000 holds the crystals; ordinary craft glue will not. They store rings and they look like a boutique bought them.
Get the full tutorial at Homey Oh My.
29. Make Up Magnet Board
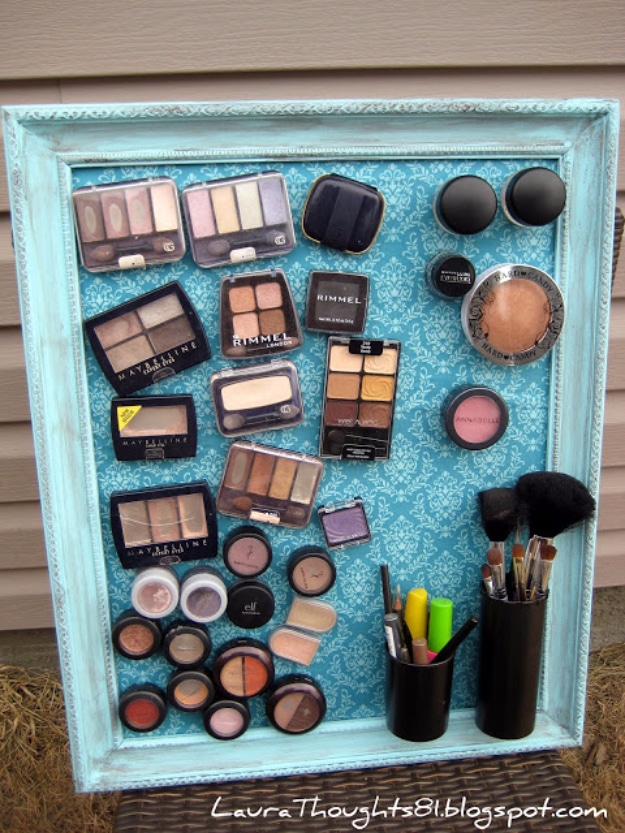
A thrifted frame, painted and glazed, with a sheet of metal cut to fit inside and covered with fabric using spray adhesive. Then the actual trick: hot glue a dollar store magnet to the back of every single eyeshadow and blush, so the whole collection goes up on the wall where it can be seen. Hot glue is the deliberate choice over anything stronger, because it peels off cleanly when a pan runs out and the magnet gets reused. A spray painted pill container with magnets on the back holds the brushes. Everything buried at the bottom of a bag suddenly gets used.
Get the full tutorial at Laura Thoughts.
30. Colored Paper Pen Holder
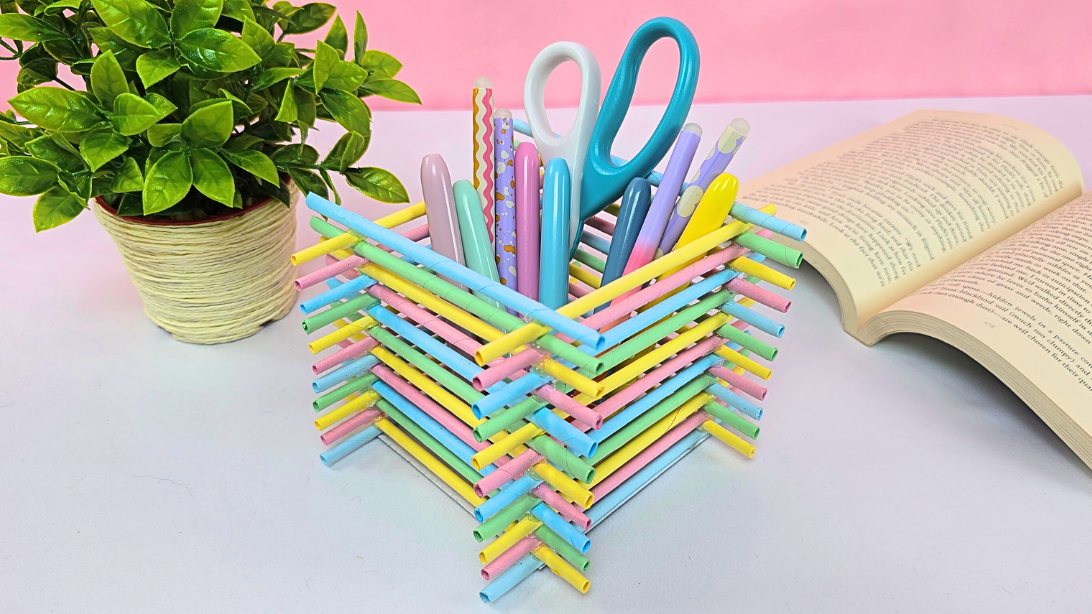
Ours, and it came out of the exact problem of owning pens in every color and losing all of them in a drawer. Strips of colored paper are folded and interlocked into a square basket, so the structure is the decoration and there is nothing to glue flat or paint. It costs close to nothing, it takes an afternoon, and it is rigid enough to actually hold scissors and brushes rather than flopping. Pastel stripes are the version shown but any palette works, including matching it to a desk. Full photo tutorial and the video are both on our post.
Get the full tutorial at DIY Joy.
31. Yarn Wrapped Ombre Monogrammed Letter
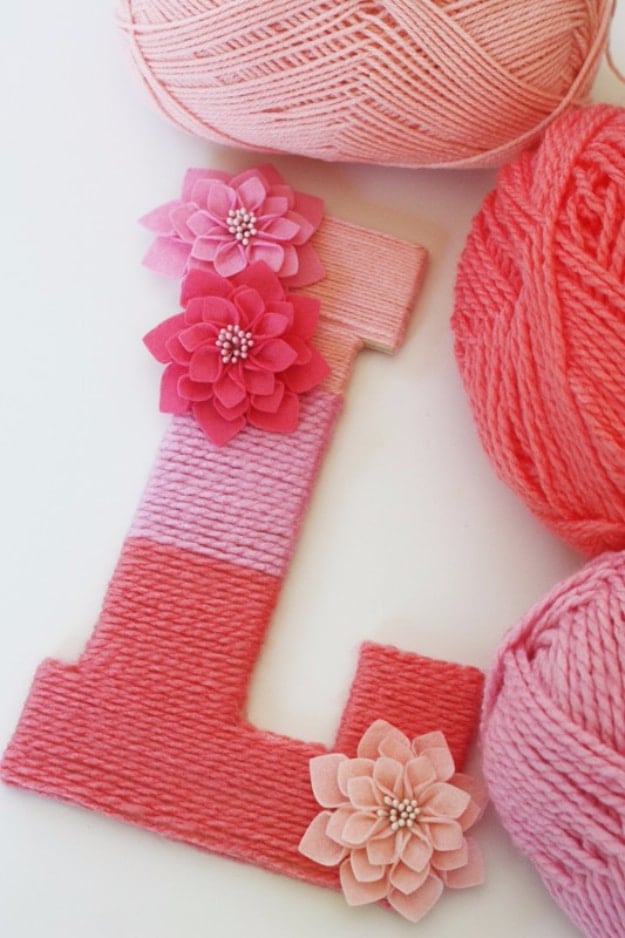
A wooden letter wrapped in yarn, with the color stepping through three shades of one pink from palest at the top to deepest at the bottom, and fabric flowers glued where the shades change to hide every join. That last part is the trick worth stealing: the flowers are not only decoration, they cover the exact points where one color stops and the next begins. Wrap tightly and keep the strands touching so no wood shows through. Over a bed or a desk it is a big, cheap piece of personalized decor, and an initial never goes out of style.
Get the full tutorial at Catch My Party.
32. DIY Pink Chalkboard Globe
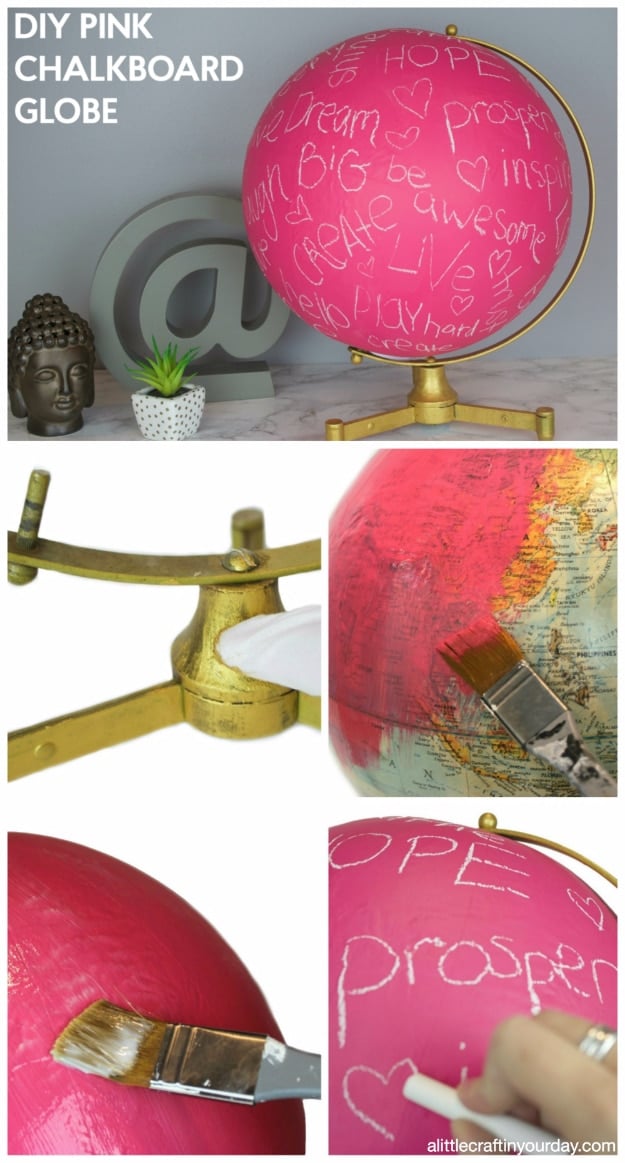
A thrift store globe painted in pink, then coated so you can write on it in chalk. It is worth being precise about the two products, because they are not one: the globe takes two or three coats of pink multi surface acrylic first, drying fully between coats, and a clear chalkboard coating goes on over the top of that. The base is not left alone either. It gets gold metallic lustre rubbed into it with a soft cloth, worked down into the grooves, and that gilded stand against the shocking pink is what makes the whole thing land. Set the globe on a cup while you paint so it stops rolling.
Get the full tutorial at A Little Craft In Your Day.
33. DIY Kate Spade Inspired Metallic Polka Dot Phone Case
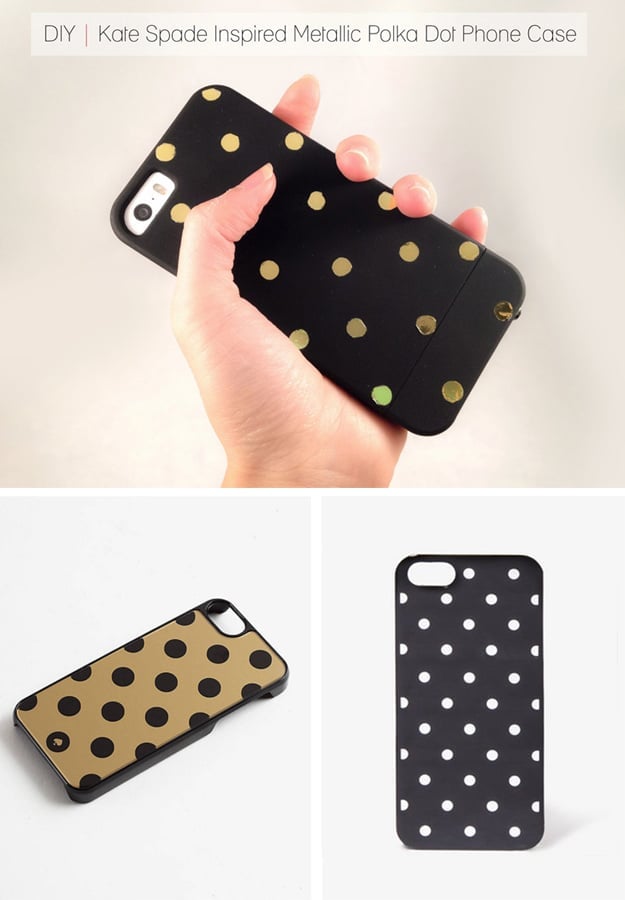
A three dollar plain black case, a hole punch and a roll of metallic tape, and no paint anywhere. Lay a strip of the tape onto wax paper first, which stops it gumming up the hole punch and makes the whole job clean, then punch through both layers and trim any rough edges with scissors. The dots peel off the wax paper and stick straight onto the case in whatever arrangement you want. The best part is that it is completely reversible: peel the dots off when you are bored and start again with a new pattern on the same case.
Get the full tutorial at Cafe Craftea.
34. Glitter Iphone Case
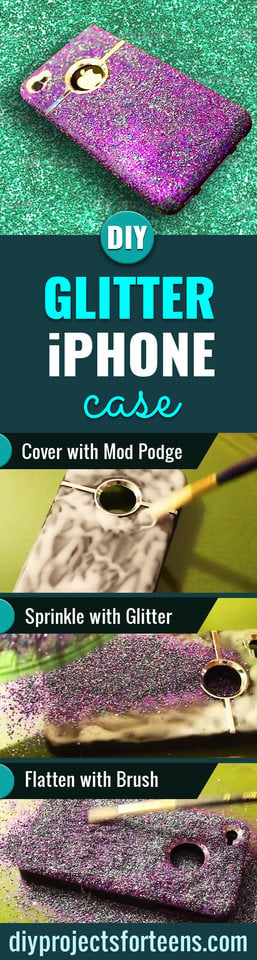
A clear or plain case, Mod Podge, glitter and a brush. Coat the case, sprinkle glitter over the wet layer, then flatten it down with the brush so the grains lie flat rather than standing proud, which is the step that stops it feeling like sandpaper in a pocket. Any color of glitter works, and a fade from one shade into another looks more expensive than a single tone. Seal the whole thing once it is dry or you will be finding glitter for weeks. It costs a couple of dollars against thirty for a bought one.
Get the full tutorial at DIY Projects for Teens.
35. Decorative Box Charging Station
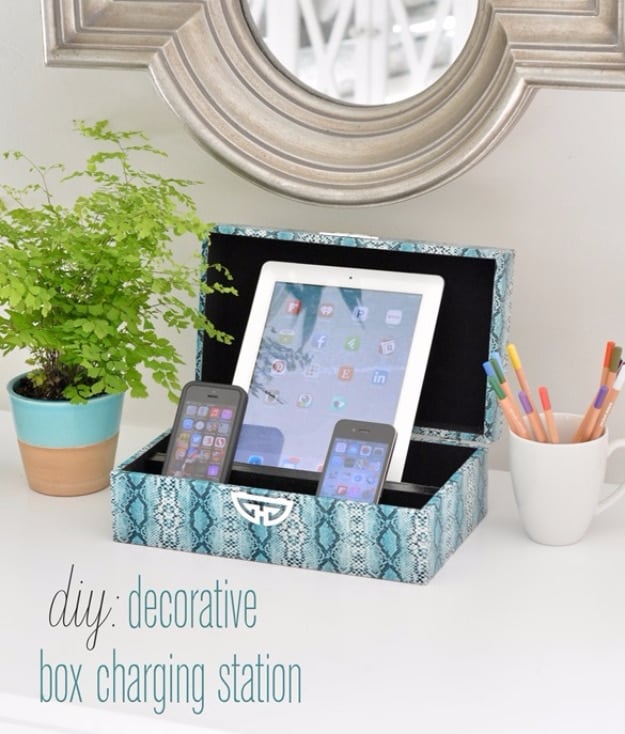
A decorative box with a lid, with a hole cut in the back for the cable to pass through, so a power strip and the tangle of cords live inside and only the devices sit on top. Phones and a tablet stand upright inside against the raised lid, charging, out of sight and off the worktop. It solves the ugliest thing in any bedroom or hall, which is four different chargers and a knot of white cable, and because the box is chosen rather than built the whole thing can match the room instead of fighting it.
Get the full tutorial at Centsational Style.
36. Nail Polish Marbled Jewelry Purse
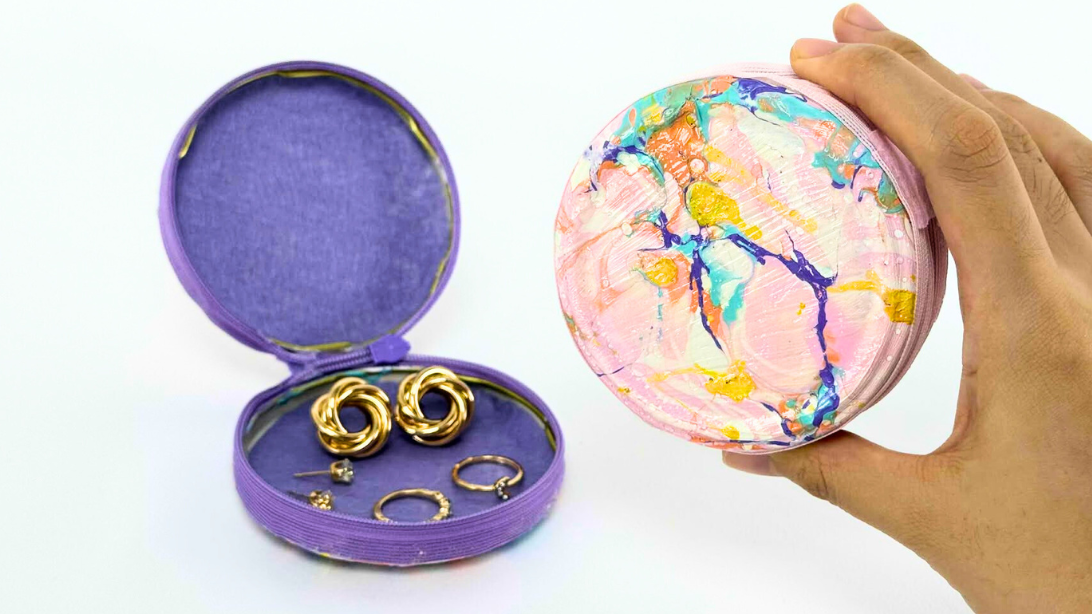
Ours, and it is the cheapest route into marbling there is. The classic version needs inks or a dedicated kit; this one needs the old nail polish already rattling around in a drawer. Two metal jar lug caps form the base, and they get dipped straight into a container of water with polish floated on the surface, with no swirling required, so the pattern happens on its own and every single one is different. Purple inside, marbled pink and gold outside is the version shown. It holds rings and studs and it looks considerably more expensive than free. Full tutorial on our post.
Get the full tutorial at DIY Joy.
37. DIY Fancy Tumbler
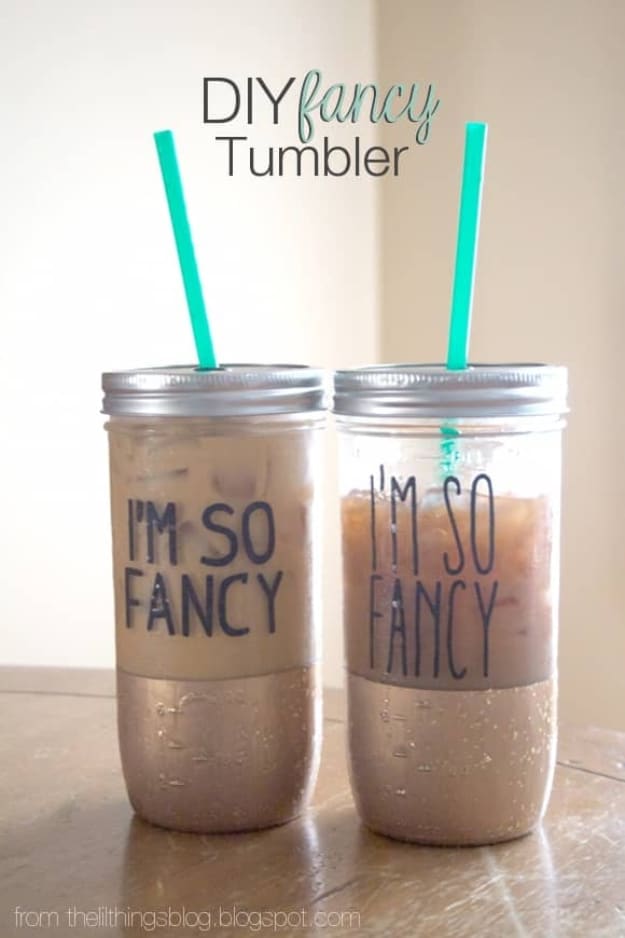
A large mason jar with a straw lid insert, spray painted gold around the base with the top taped off, vinyl letters rubbed on, then a coat of glitter mixed into Mod Podge brushed over the painted section to seal it. Press the vinyl down hard, because the jar surface is bumpy and letters lift at the edges otherwise. Give it half an hour to dry before you fit the straw lid. A pair works out around seven fifty against thirty plus for the Etsy equivalent, which is the entire argument for making them.
Get the full tutorial at Pretty Providence.
38. Picture Frame Suncatcher

Ours, and it starts with a dollar store picture frame and nothing else expensive. Beads hang in strands inside the frame so light comes through them and throws color across the room, which is far more dramatic than the supply list suggests. Every part of it is customizable, since the bead type and color decide the whole effect, so a warm amber version and an ice clear one look like two different projects. Hang it in a window that gets direct sun and it does something different every hour. Full step by step and the video are on our post.
Get the full tutorial at DIY Joy.
39. Hammock Chair DIY
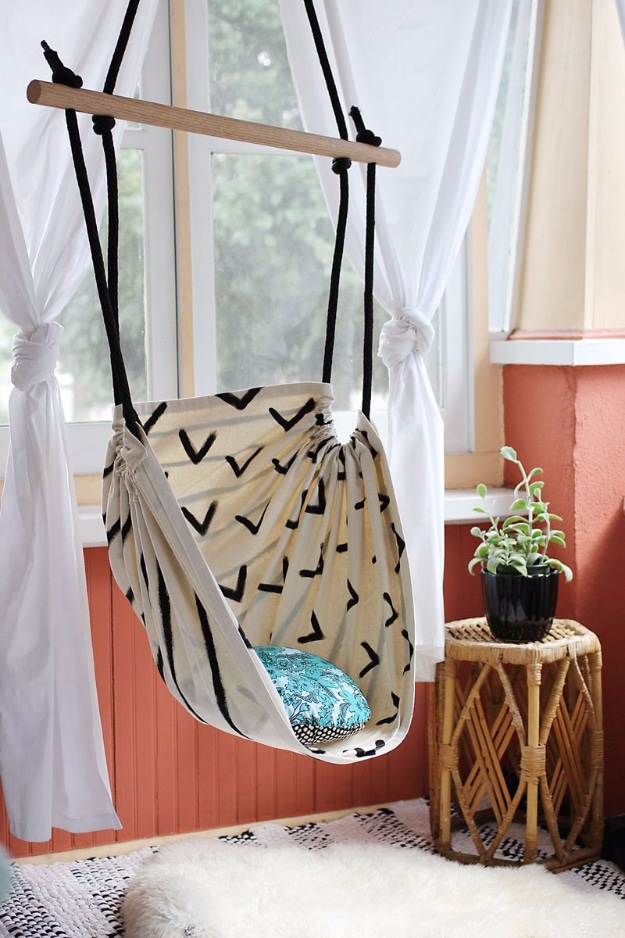
This one is real construction and it is worth knowing that up front. Two yards of plain canvas, a one and a quarter inch oak dowel cut to three feet, sixteen feet of three eighths inch braided polypropylene rope, a stainless spring snap link and a quick link. Oak rather than poplar, because it is a hardwood and safer under load; the supplies as listed hold up to two hundred pounds. The canvas is cut on a diagonal, hemmed, then folded into rope channels down each side, and black fabric paint goes on before assembly. A sewing machine and a drill are both genuinely required.
Get the full tutorial at A Beautiful Mess.
40. Mason Jar Superhero Banks
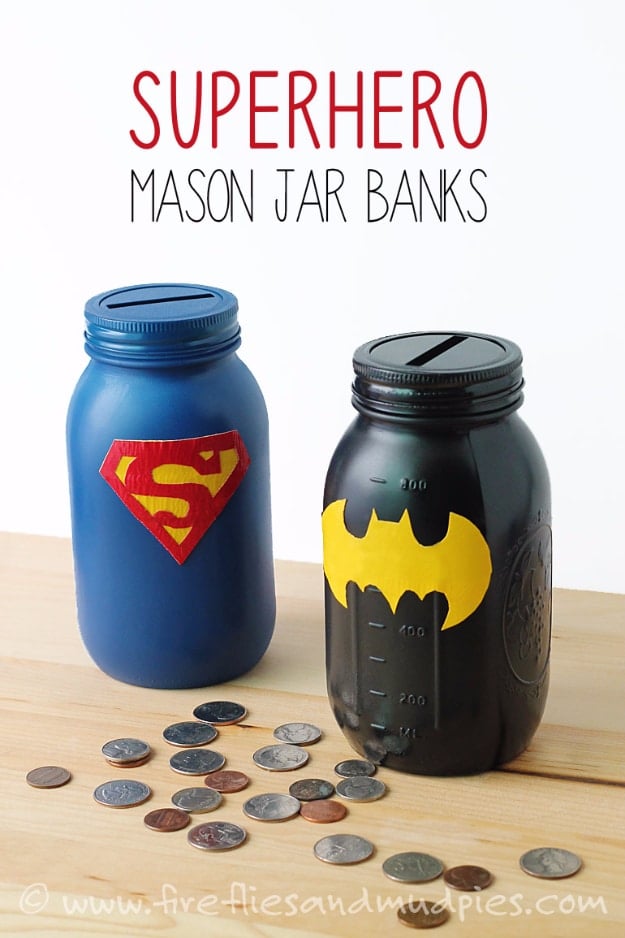
Quart mason jars spray painted solid in superhero colors, with an emblem laid over the front and a coin slot in the lid. Two things the photograph does not tell you. The slot is not cut: these are ready made mason jar coin slot lids, which is why the edge is clean and why nobody has to take a blade to metal. And the emblems are not painted either, they are cut from red and yellow duct tape with a craft knife, the Superman shield layered red over yellow. Blue and black paint, two jars, and a couple of dollars.
Get the full tutorial at Fireflies and Mud Pies.
41. Disco Love Sign
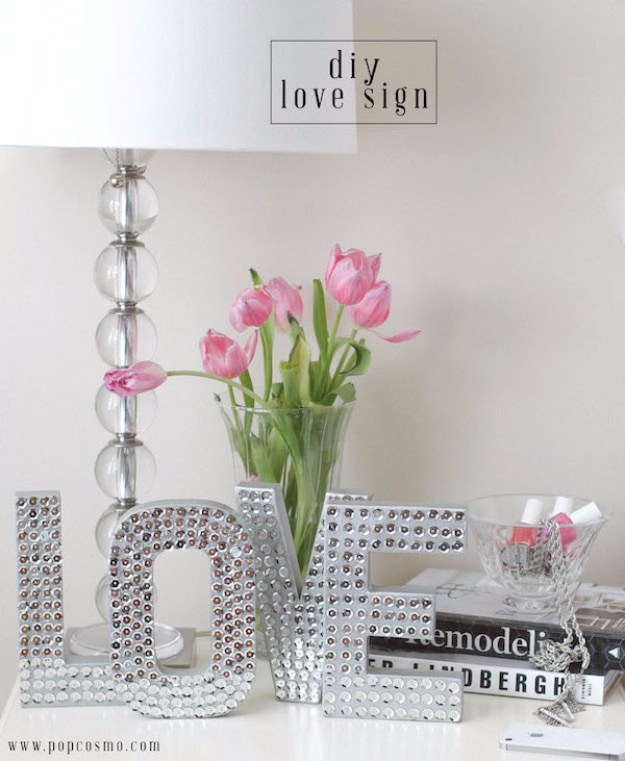
Eight inch cardboard letters, sequin pins and a huge pile of sequins, and the honest number is about forty five minutes per letter. Paint the letters first in a color that matches the sequins, so any gap you leave disappears instead of flashing cardboard. Then a thimble, genuinely, because you are pushing hundreds of pins through card and your thumb will not survive otherwise. Space the sequins as tightly or as loosely as you like for different amounts of shine. Set the pins and sequins out in cups on a tray and do it in front of the television, which is exactly how it is meant to be made.
Get the full tutorial at PopCosmo.
42. DREAM String Art
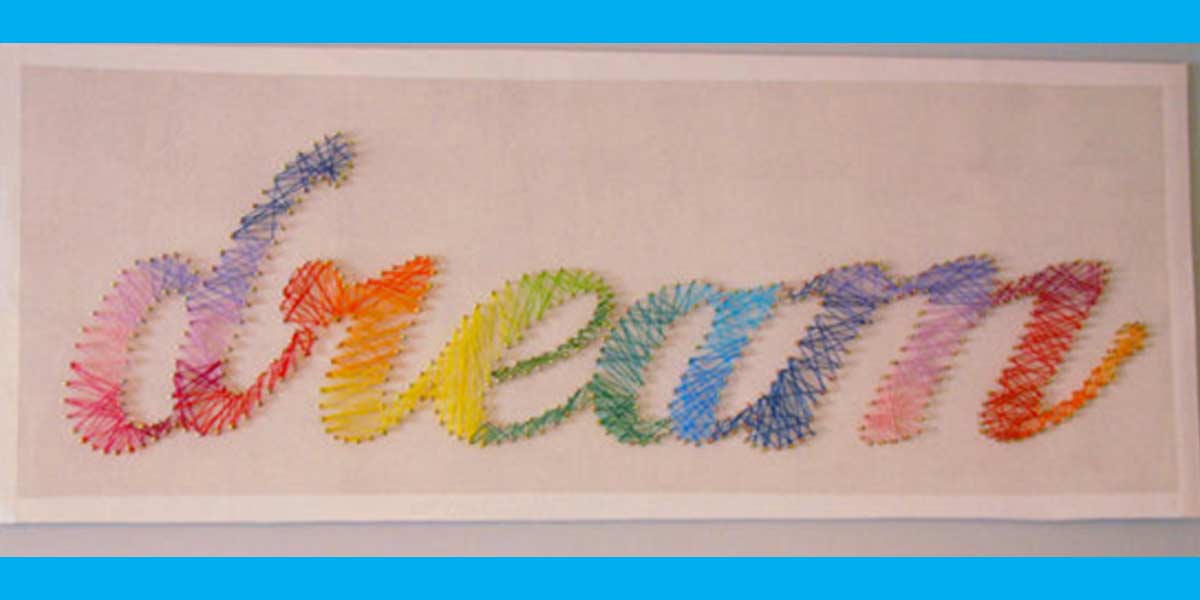
An MDF board, white spray paint, a hammer, nails and string in several colors. The word is laid out in cursive, nails are hammered around the letter outlines, and then the string wraps between them, with the color shifting gradually from one end of the word to the other so it reads as a rainbow across a single word. A few hours is realistic. Spray the board and let it dry completely before a single nail goes in, because touching up around driven nails is miserable. The lettering is the part to get right, so print the word out first and use it as a template.
Get the full tutorial at DIY Projects for Teens.
43. Cardboard Heart Garland
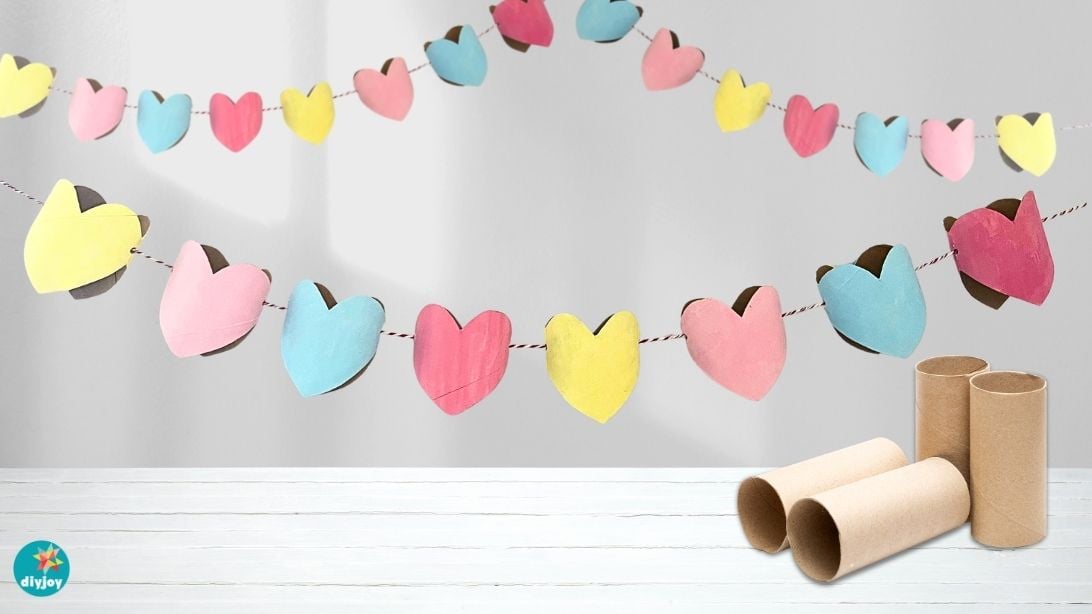
Ours, and it is the single most budget friendly thing on this list because the material is the empty toilet paper rolls you were about to throw out. Press a roll flat, cut it into rings, and each ring bends into a heart shape without any templates or measuring. Paint them in a palette, string them along a length of twine and hang it over a mirror or across a wall. Pink, yellow and blue is the version shown but a single color looks smarter. It goes up for February and it costs nothing at all. Full tutorial and video on our post.
Get the full tutorial at DIY Joy.
44. DIY Heart Dreamcatcher
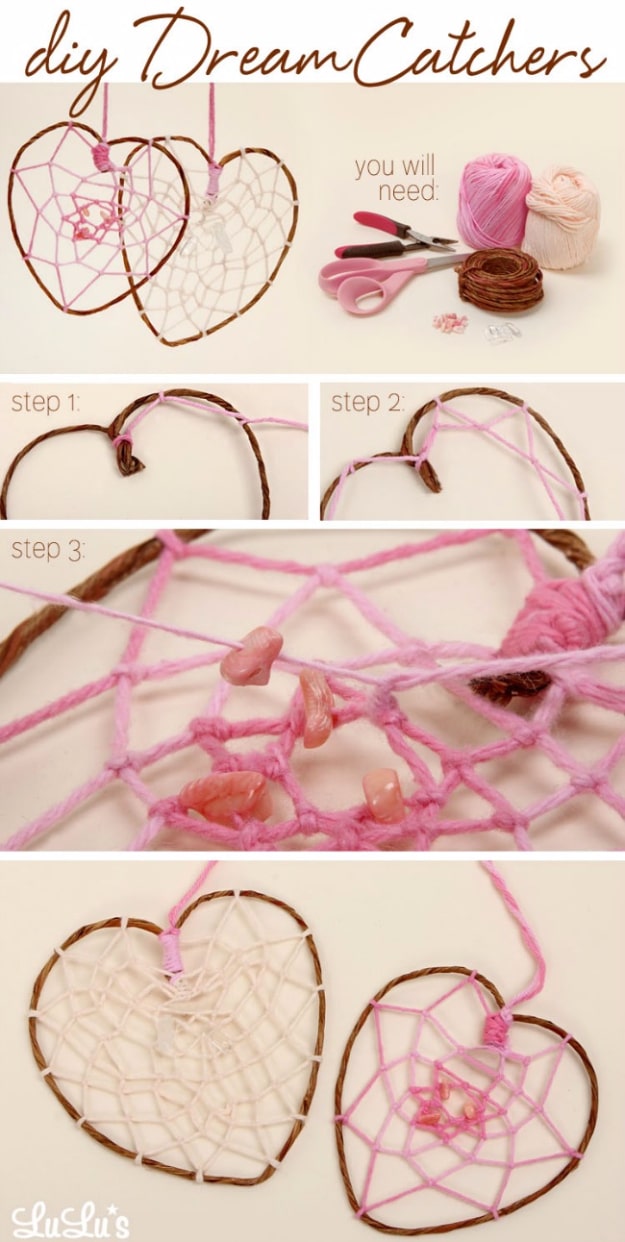
Thick floral wire bent into a heart and twisted shut at the point, then a web knotted across it in cotton yarn. The web is the whole method and it is simpler than it looks: tie the yarn at the twisted center, then loop and knot it every inch or two around the perimeter, and once you have been round once, start knotting into the middle of each length you just made. Repeat inward until it closes. Beads go on as you go. Heart shaped is the variation worth making, because the pattern reads completely differently in a point than it does in a circle.
Get the full tutorial at Lulus.
45. DIY Galaxy Shoes
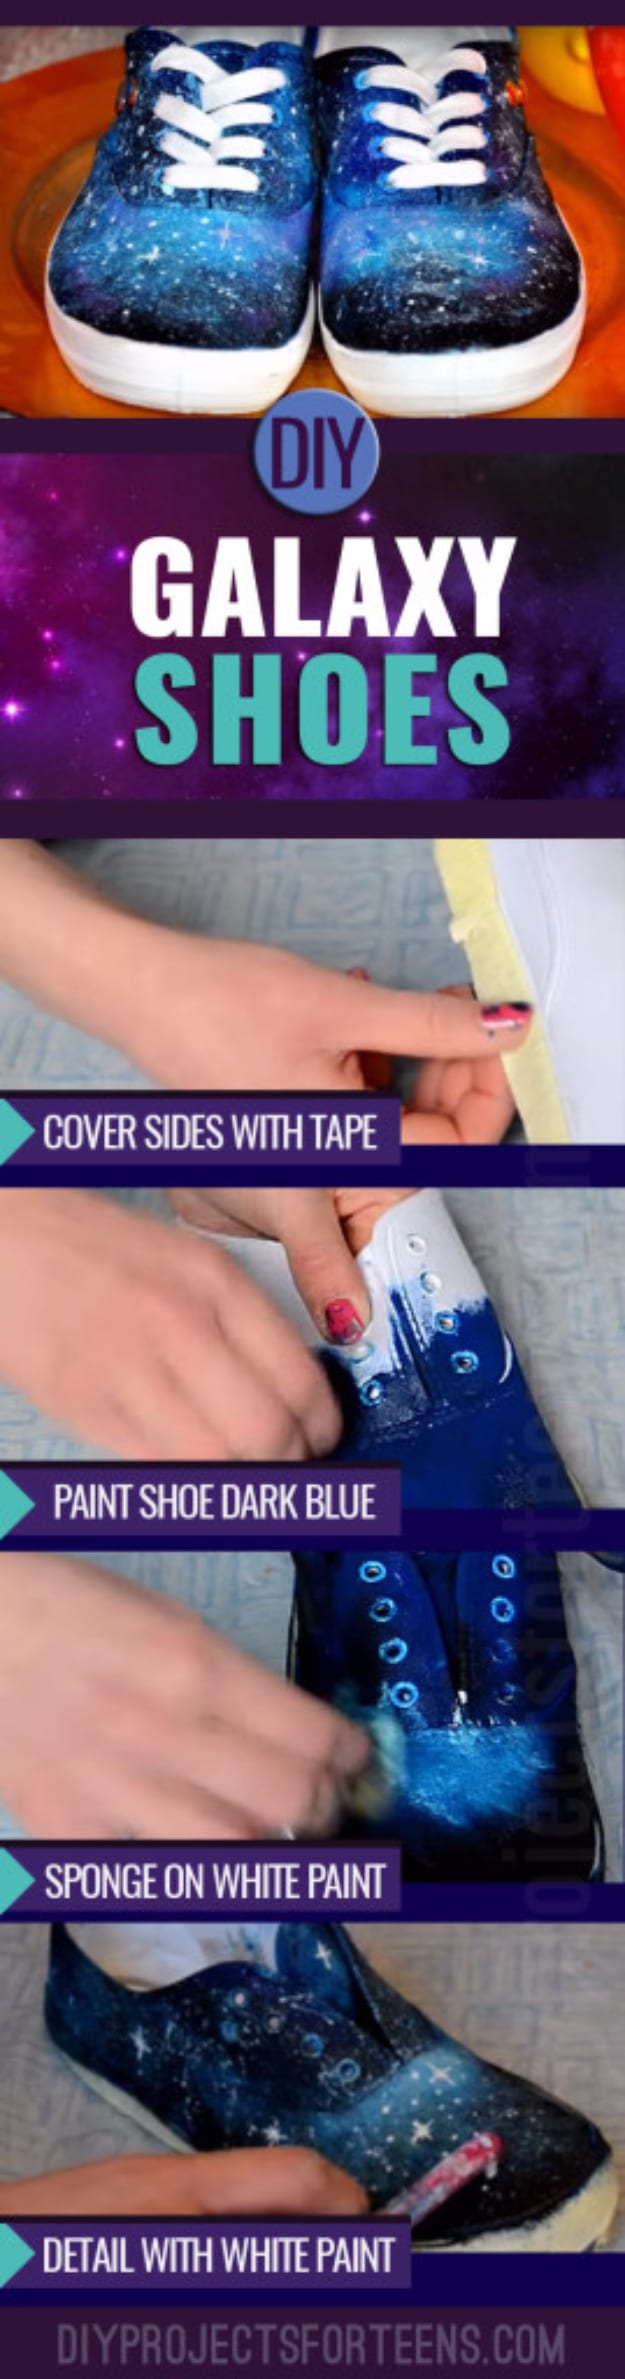
Plain canvas shoes, navy and white paint, and purple if you want more depth. The whole galaxy effect comes from sponging rather than brushing: base the shoe dark, sponge lighter color on in irregular patches, and flick tiny white dots over the top as stars. Tape the soles and the eyelets before you start, which is the difference between a clean pair and a messy one. About an hour. A pair of plain white canvas shoes costs a fraction of anything printed, and nobody else at school will have the same sky.
Get the full tutorial at DIY Projects for Teens.
46. Washi Tape Monogram Canvas
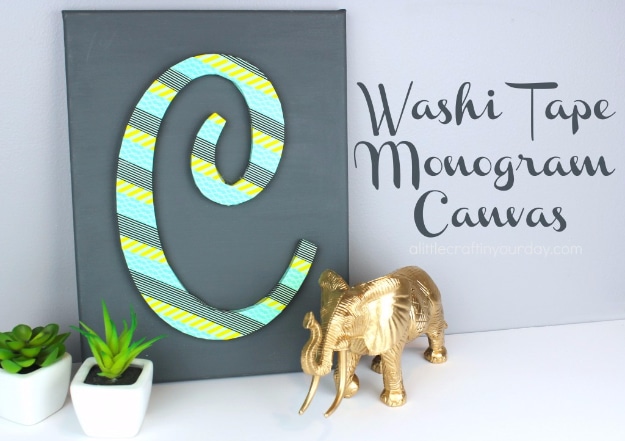
A large wooden letter striped in washi tape, mounted on a painted canvas so the letter stands off the background. One step the photograph hides: the letter is PAINTED FIRST, in a light color, and it has to be light because washi tape is thin enough to show whatever is underneath it. Mint on the letter and a neutral grey on the canvas is the version shown. Tape gets laid across the face of the letter and the excess trimmed off around the edges, then the letter is hot glued to the dry canvas. A foam brush and one glue gun is the whole tool list.
Get the full tutorial at A Little Craft In Your Day.
47. Mirror Jewelry Wall Hangers
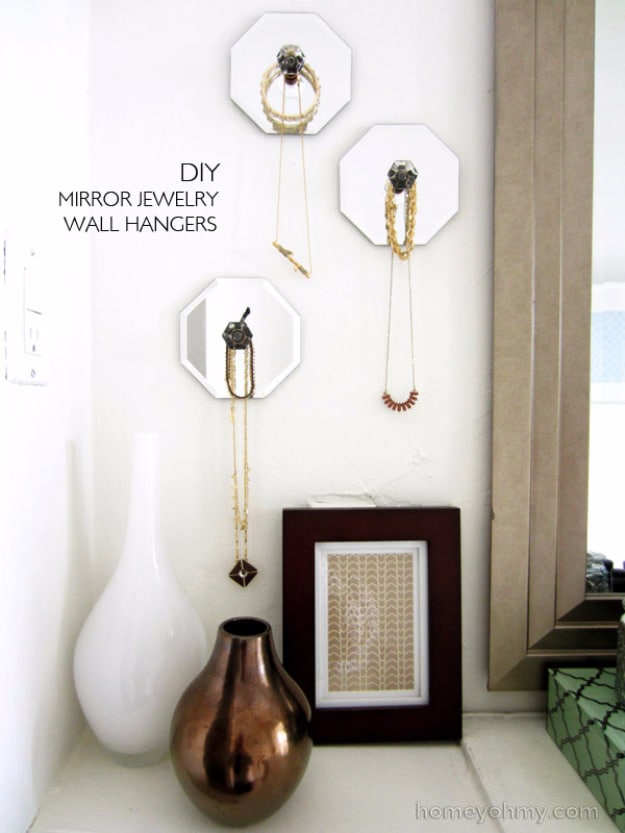
Octagonal dollar store mirrors with an acrylic knob glued to the middle of each one, hung in a scatter on a wall, and necklaces loop straight over the knobs. That is genuinely the whole build. E6000 is the adhesive, held in place until it grabs and then left overnight to cure properly before anything else happens, because a knob that falls takes a mirror with it. Adhesive backed hangers go on the back, one centered is enough although two is steadier. The geometry of the mirrors against the faceted knobs is what makes it look bought.
Get the full tutorial at Homey Oh My.
48. DIY Mirror Made With Plastic Spoons
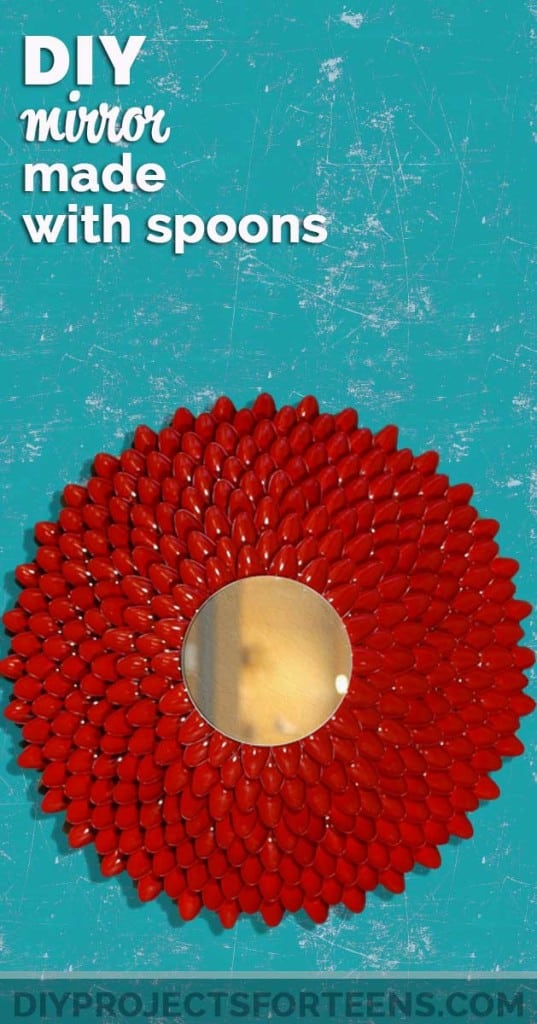
Plastic spoons with the handles cut off, each bowl painted, then glued around a small round mirror in overlapping rows so the whole thing reads as a dahlia with a mirrored center. Spray painting a whole bag of spoons at once before you cut them is the sane order of operations. Overlap every row against the one above it the way roof tiles sit, or the base will show through the gaps. A bold single color is what makes it work; the red version shown reads as a statement piece, where pastel would read as a craft.
Get the full tutorial at DIY Projects for Teens.
49. Plastic Bunny Key Chain
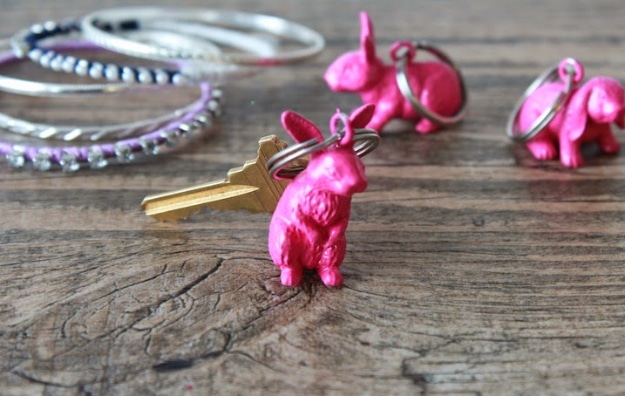
A small plastic animal figurine, spray painted a solid bright color, with an eye pin screwed into the top after piercing a starter hole with an awl, then a key ring through the loop. Four steps, no skills. The point of it is entirely practical: a neon pink bunny on your keys means you spot them across a room instead of patting down every pocket. A gold paint pen along the ears is the optional flourish. Any small hollow plastic animal works, so a bin of dinosaurs or horses gets you a set for almost nothing.
Get the full tutorial at Punk Projects.
50. Confetti Resin Coasters
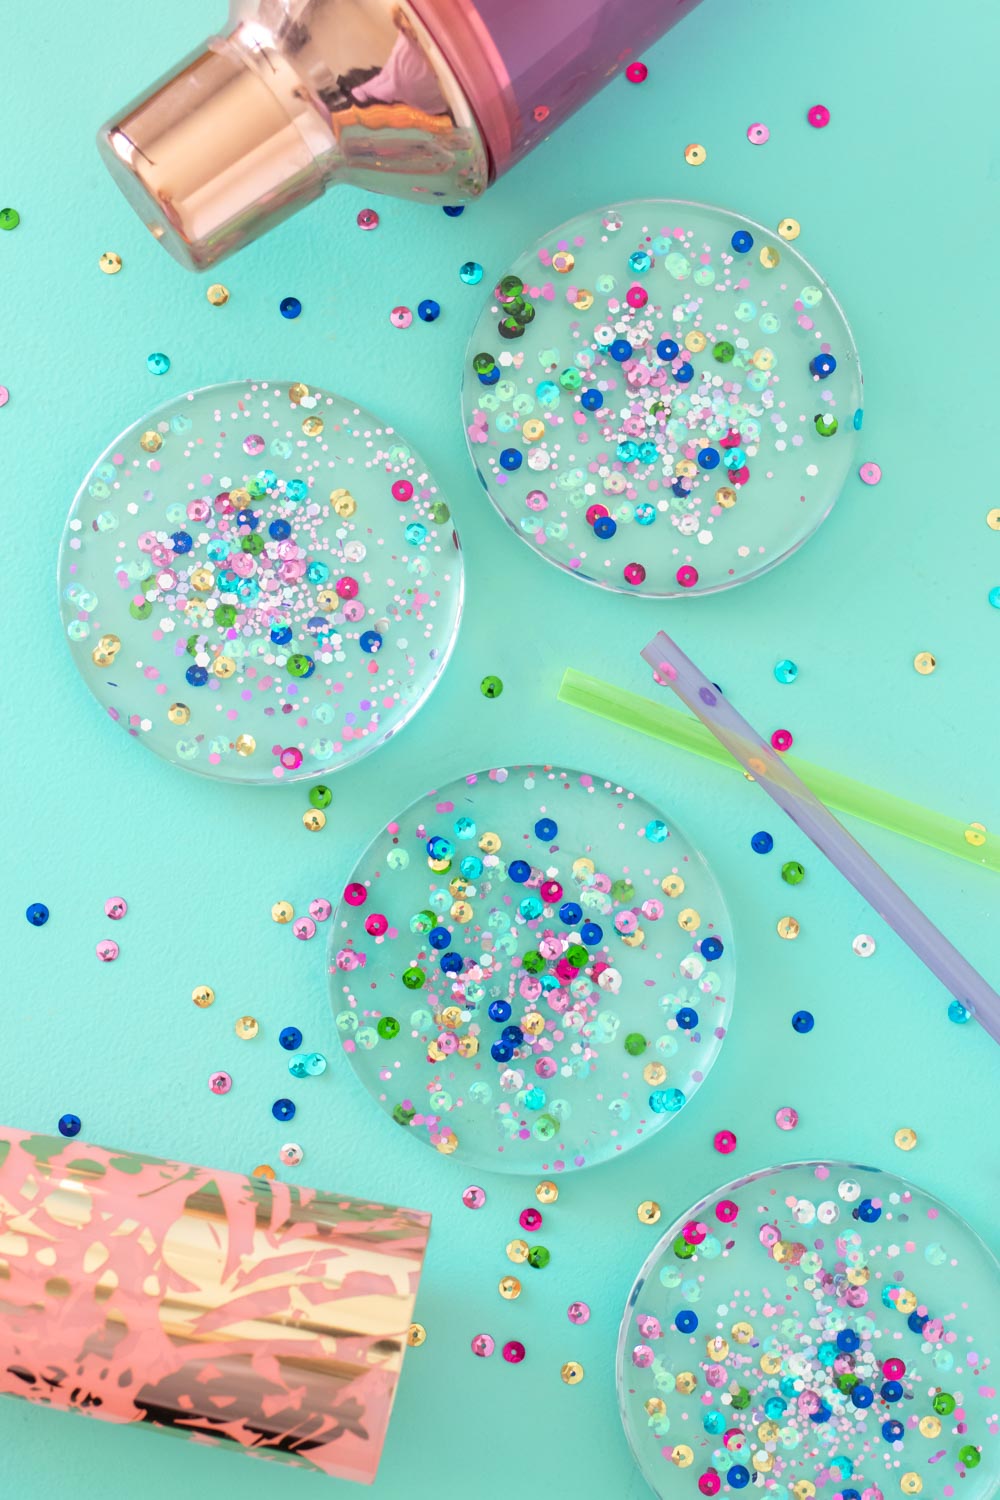
Resin is the craft that reliably comes out looking bought rather than made, and confetti is the easiest thing to suspend in it. Measure parts A and B carefully, because guessing leaves tacky patches that never cure, and mix slowly until the swirl pattern disappears completely and the liquid goes clear. Pour a shallow first layer into a silicone coaster mold, hit it with a heat gun or a hair dryer to lift the bubbles, scatter sequins and glitter evenly across it, then top with about a centimeter more resin and heat it again. Ten minutes of actual work.
Get the full tutorial at Club Crafted.
51. Heart Eyes Emoji Zipper Pouches
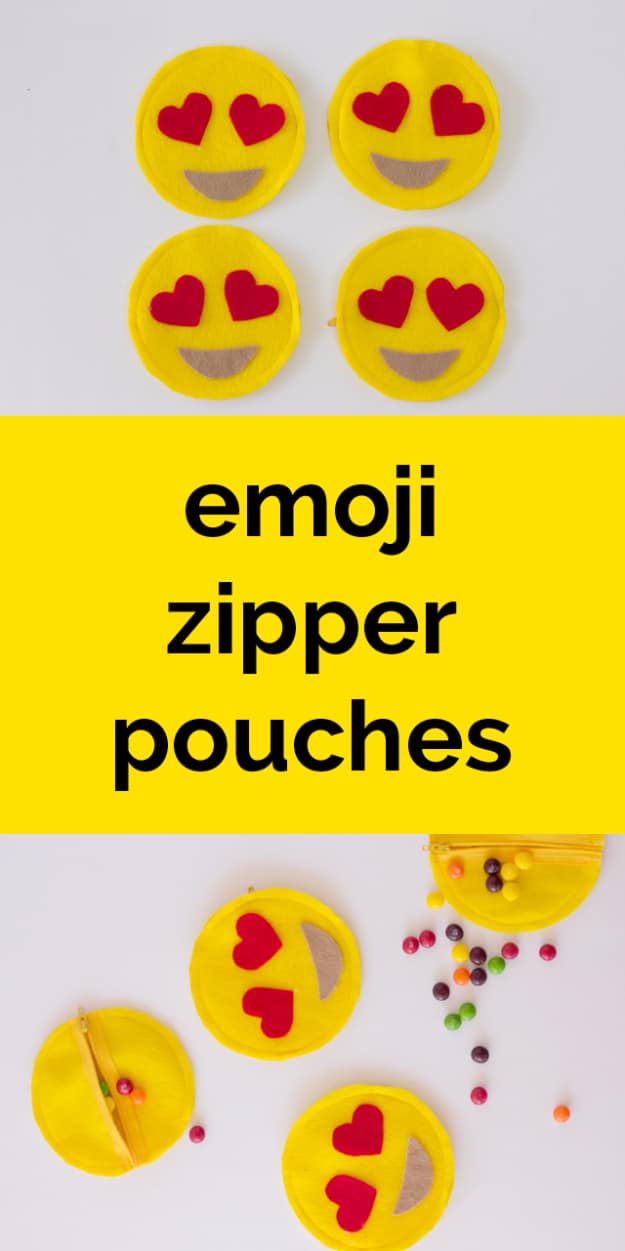
Two yellow felt circles, a seven inch yellow zipper, and red and brown scraps for the face. The zipper goes on before the circles are joined: tape it to one circle, sew it down, then sew the two circles together, trim the zipper tape and open it to cut a slit in the top layer. Hot glue attaches the heart eyes and the mouth at the very end, so the face can be adjusted until the expression is right. Minimal sewing, and small enough to fill with sweets or a lip balm and hand over as a gift.
Get the full tutorial at See Kate Sew.
52. DIY Hair Tie Rings
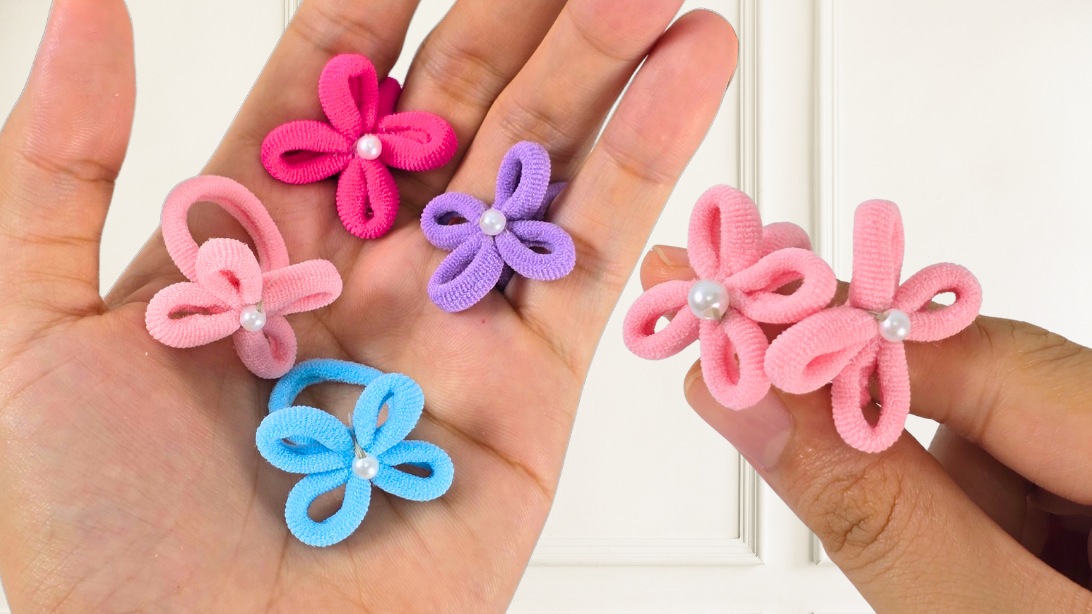
Ours, and it takes about five minutes. A hair tie is knotted into a flower shape and finished with a bead, a pearl or a small charm at the center, which turns it into a ring you wear on your hand instead of losing at the bottom of a bag. No sewing, no tools, nothing expensive, and hair ties come in packs of a hundred so a handful of colors costs almost nothing. They are a good thing to make with friends in an afternoon, because everyone can have several and they take minutes each. Full tutorial on our post.
Get the full tutorial at DIY Joy.
53. Book Page Paper Flowers
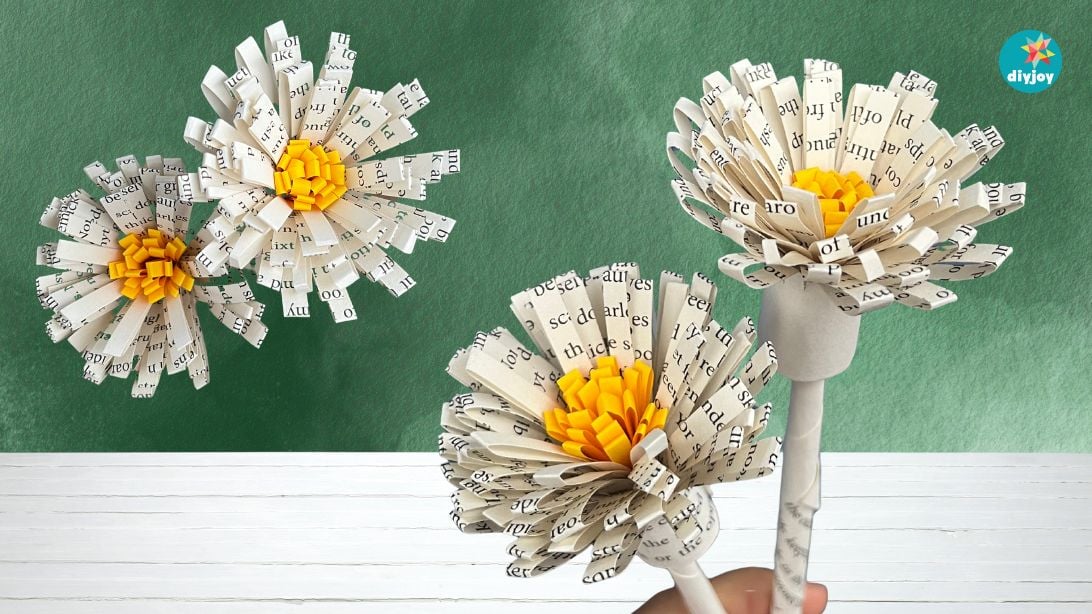
Ours, and it is what to do with books too old and too out of date for anyone to want. The pages cut and roll into layered flowers with a fringed yellow center, and the printed text showing through gives them a soft vintage color you cannot buy in craft paper. No skills needed, no special tools, and the supply list is book pages, scissors, a little colored paper and a skewer. A jar of them on a shelf, or mixed with dried flowers in a vase, looks far more considered than the cost suggests. Full step by step on our post.
Get the full tutorial at DIY Joy.
54. Personalized Uggs
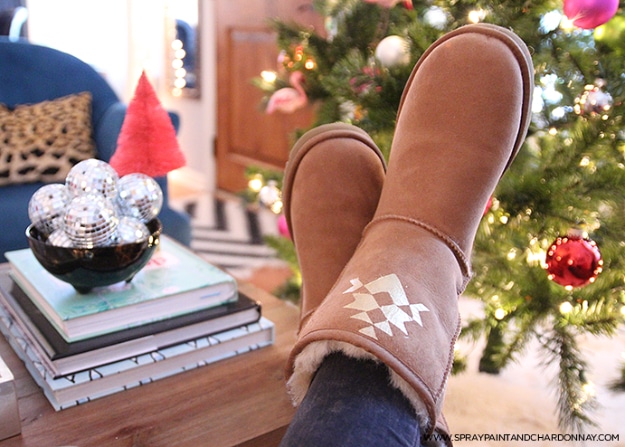
A plain pair of sheepskin boots with a small geometric pattern painted high on the outer side of each one, and the restraint is what makes it work. The technique is the part worth stealing. She does not freehand it: plain shipping labels are cut and stuck down as a mask, because they grip suede well enough to hold a crisp edge and peel off afterwards without leaving residue, and then acrylic goes on over the top and the labels come away with tweezers. A second, subtler run of the same pattern goes down the back seam.
Get the full tutorial at Spray Paint and Chardonnay.
55. Enameled Spoons
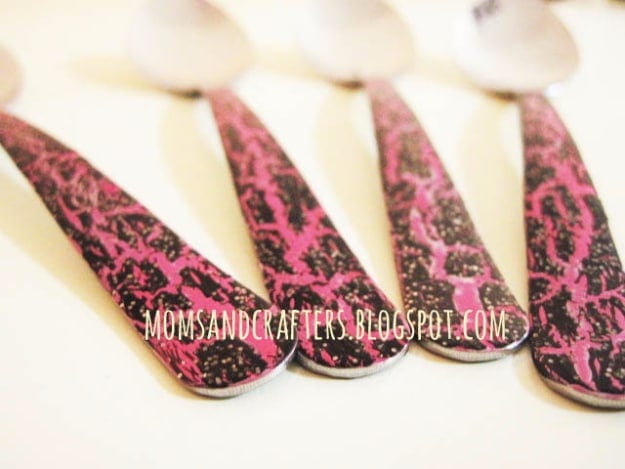
Stainless steel spoons and nail polish, and the thing you must read before starting: nail polish is not food safe. The source says so herself and recommends keeping polish away from anything that touches food, so these are for serving dips, for display or for stirring, not for eating off. Clean and dry the spoon thoroughly, lay two coats of polish with full drying between, add a third coat which is where a crackle finish can go, then seal with a topcoat and leave overnight. Hand wash gently in lukewarm water with mild soap, because a dishwasher will strip the lot.
Get the full tutorial at Moms and Crafters.
56. Twine Wrapped Bottle Vases
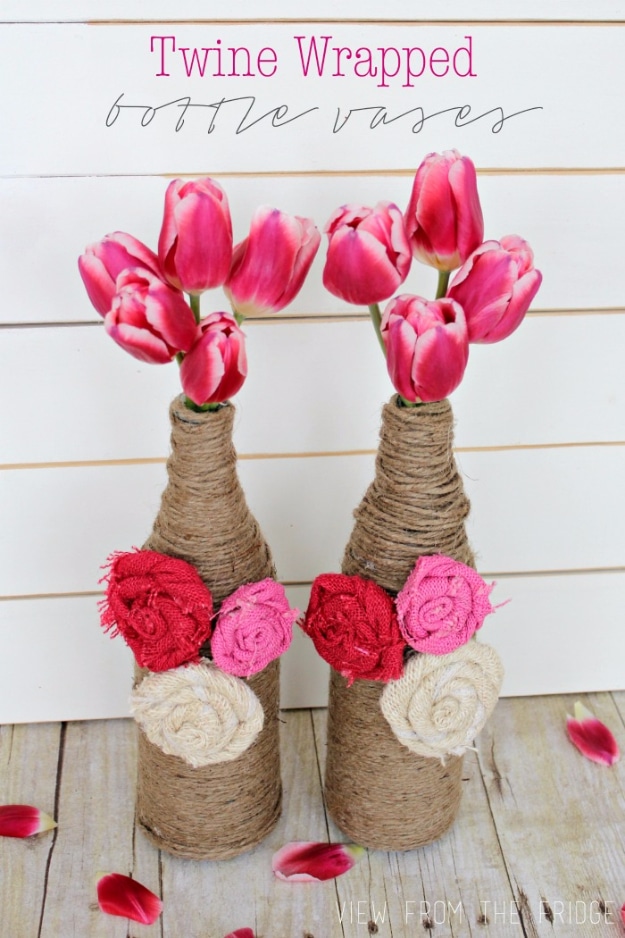
Empty glass bottles, jute twine from the floral aisle and a glue gun. Do not bother peeling the labels off, which is the practical shortcut in the original: glue the twine at the base and spiral it upward, covering the label as you go. Burlap rosettes in a couple of pinks and a cream glue on where the twine meets, and fresh tulips go in the top. Wine bottles and tall sparkling water bottles both work, and the rough twine against a soft bloom is the contrast doing all the work. Free, apart from the twine and the flowers.
Get the full tutorial at Juggling Act Mama.
57. DIY Lush Bath Bombs
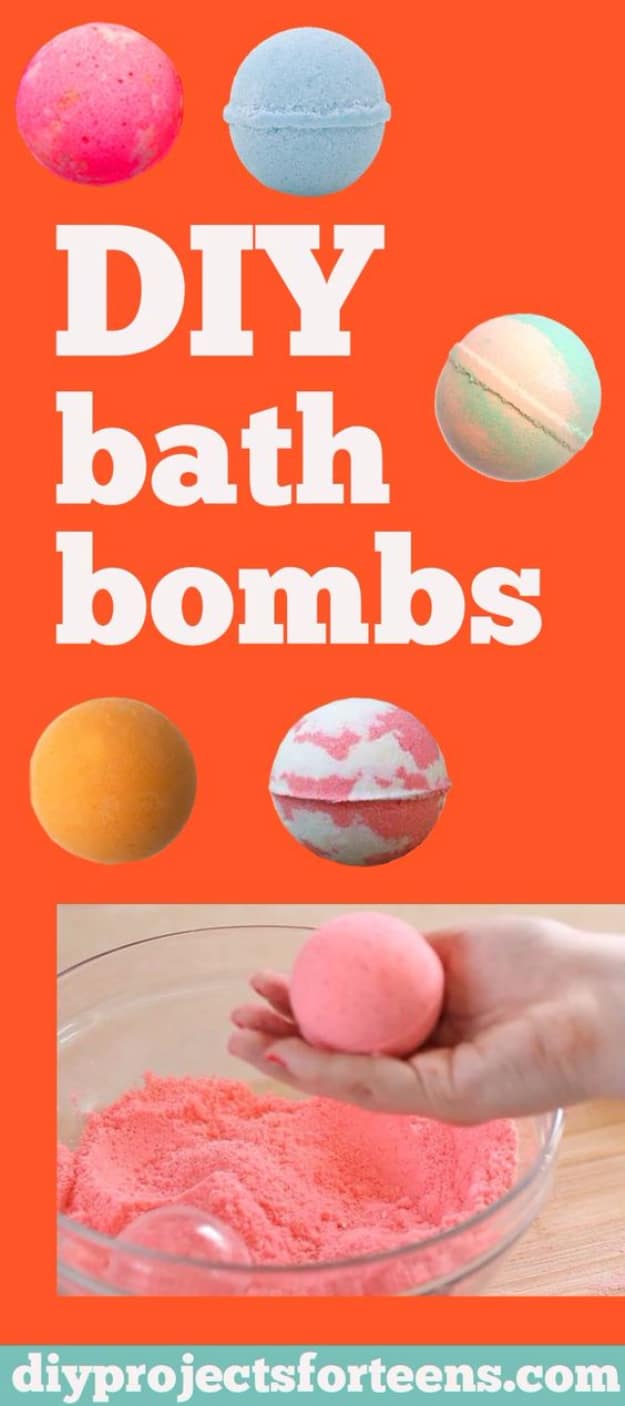
One cup baking soda, half a cup citric acid and half a cup Epsom salts for the dry side; one teaspoon water, two teaspoons essential oil and three teaspoons of a carrier oil such as olive for the wet, plus coloring. Whisk the dry ingredients evenly first, combine the liquids separately, then add the wet to the dry one small spoonful at a time, which is the step that stops the mixture fizzing off early. Pack it into molds hard and work quickly before it dries out. Lavender with a purple tint, or ylang ylang with bergamot and rose in pink.
Get the full tutorial at DIY Projects for Teens.
58. DIY Shaggy Heart Pillow
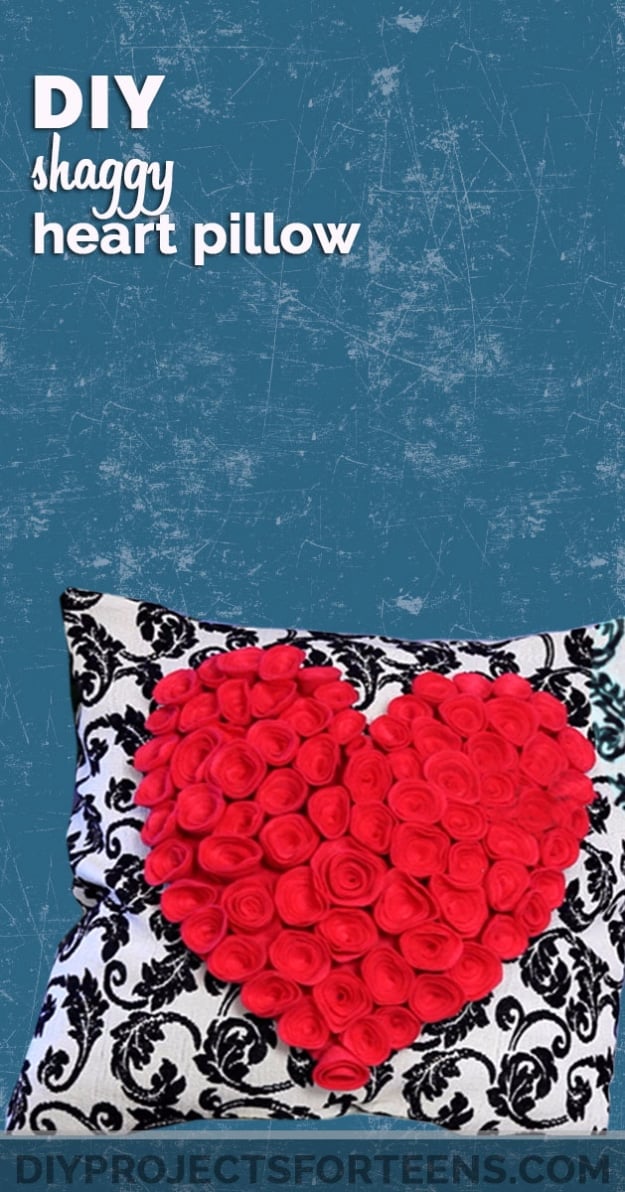
Dozens of small fabric roses, each one rolled and held with a glue gun, massed into a heart on the front of a plain patterned cushion. The roses are made from fabric scraps, so this eats a bag of offcuts and costs nothing beyond the cushion and the glue sticks. Red roses on a black and white damask is the version pictured, and the contrast is what makes it read as deliberate. The same technique works as a letter, an initial or a shape on a canvas, so it is a method rather than a single project. It is slow but mindless, which is the good kind of slow.
Get the full tutorial at DIY Projects for Teens.
59. DIY Plastic Bottle Bracelet
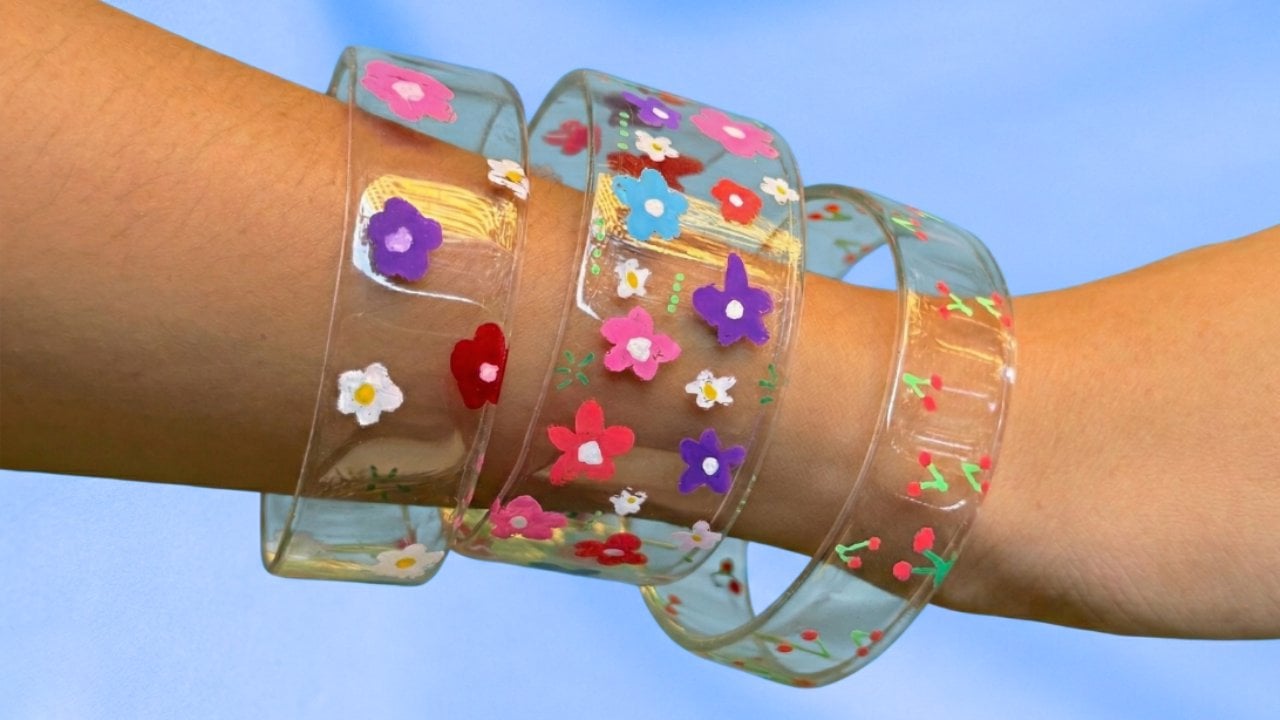
Ours, and it starts in the recycling bin. An empty plastic bottle is cut into bracelet width rings, then the cut edges are softened and curved using the base of an iron, which rounds them off so nothing digs into your wrist and gives the band its shape at the same time. After that it is decoration: POSCA pens draw patterns, doodles or whatever you like straight onto the plastic and the color sits bright against the clear. It costs nothing, it uses something everyone throws away daily, and no two ever come out alike. Full step by step and video on our post.
Get the full tutorial at DIY Joy.
60. Simple DIY Daisy Bead Rings
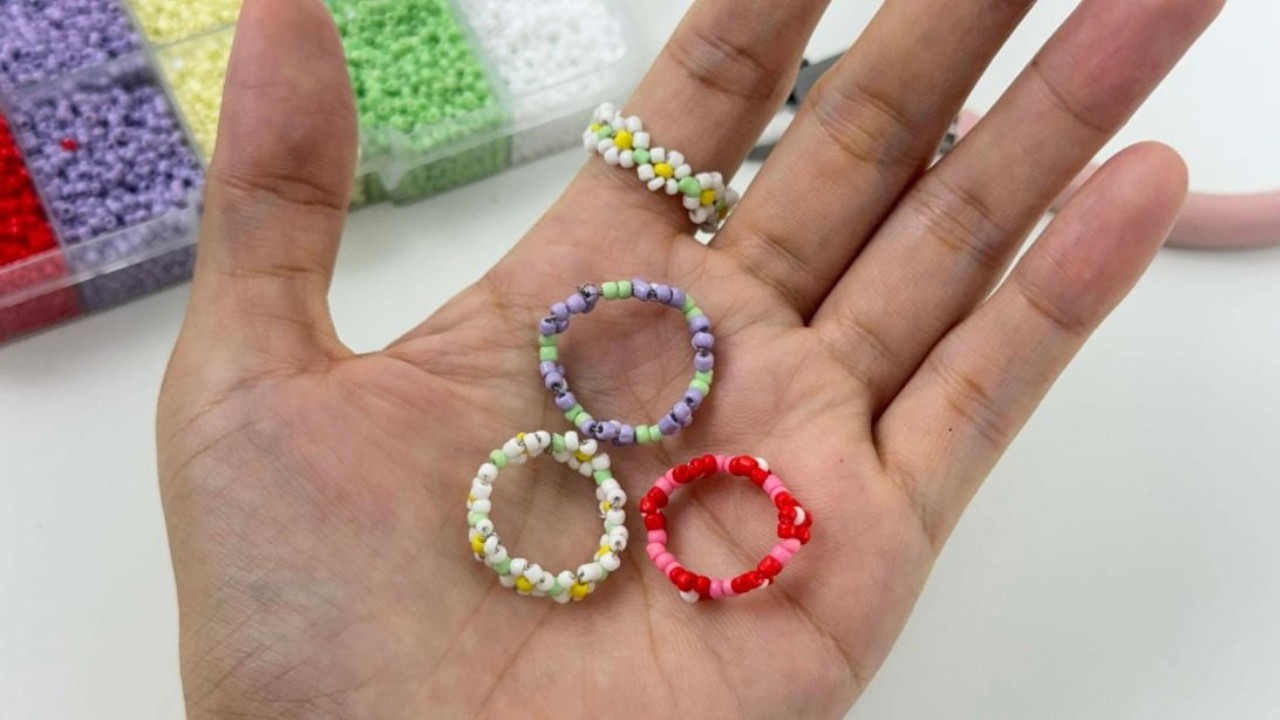
Ours, and rings are the right entry point into beading because they are small enough to finish in one sitting. A daisy motif sits on the front of a beaded band, which is a classic pattern and easier than it looks once the first flower is on. Beads come in every color, shape and size going, so the same method gives you a different ring every time, and a stack of four or five up one finger is the way to wear them. Cheap, quick, and genuinely wearable every day rather than only once. Full photo tutorial and the video are both on our post.
Get the full tutorial at DIY Joy.
61. How to Customize a Mug Using Sharpie
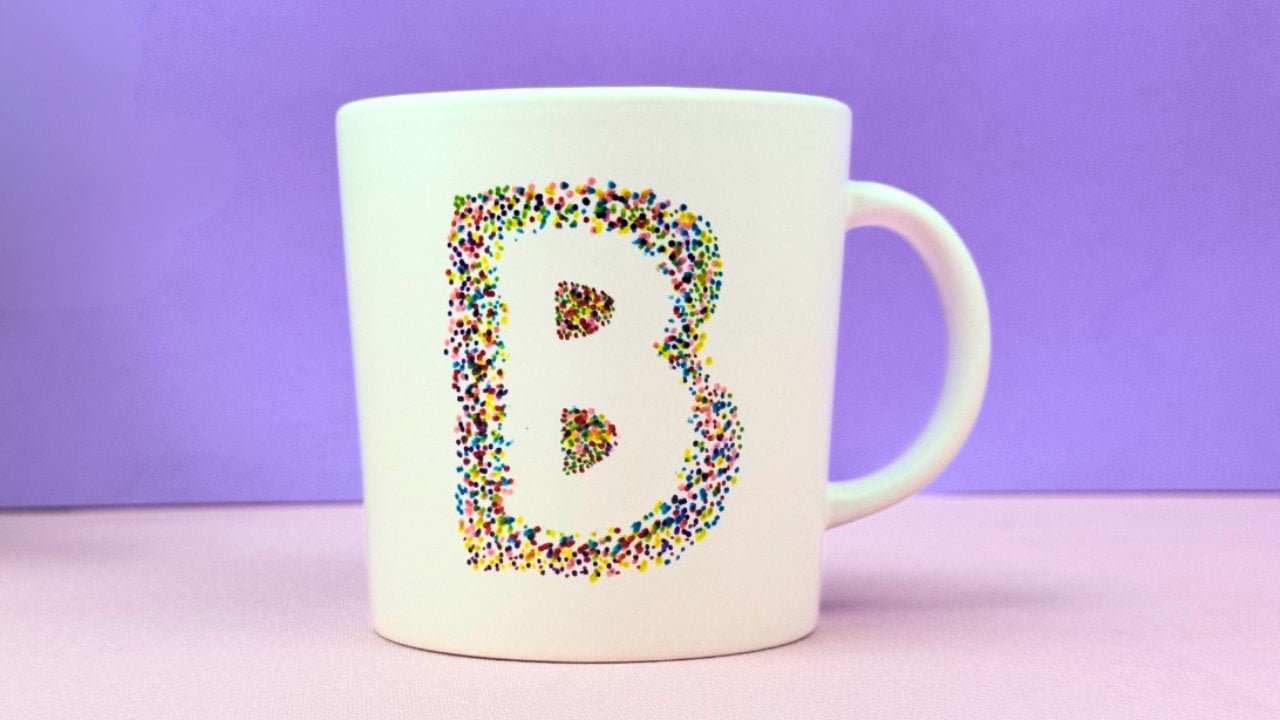
Ours, and the supply list is a plain ceramic mug and a few Sharpies. The version here is a hand drawn letter pattern, so it works as an initial, a monogram or a short word, and the lettering style, size and placement are all yours to decide. It is a beginner project by design, and it is the last minute gift that does not look last minute, which is exactly why it keeps getting made. Plain mugs cost almost nothing, so a first attempt that goes wrong is not a disaster. Full step by step and the video are on our post.
Get the full tutorial at DIY Joy.
62. Easy Flower Embroidery on Jeans
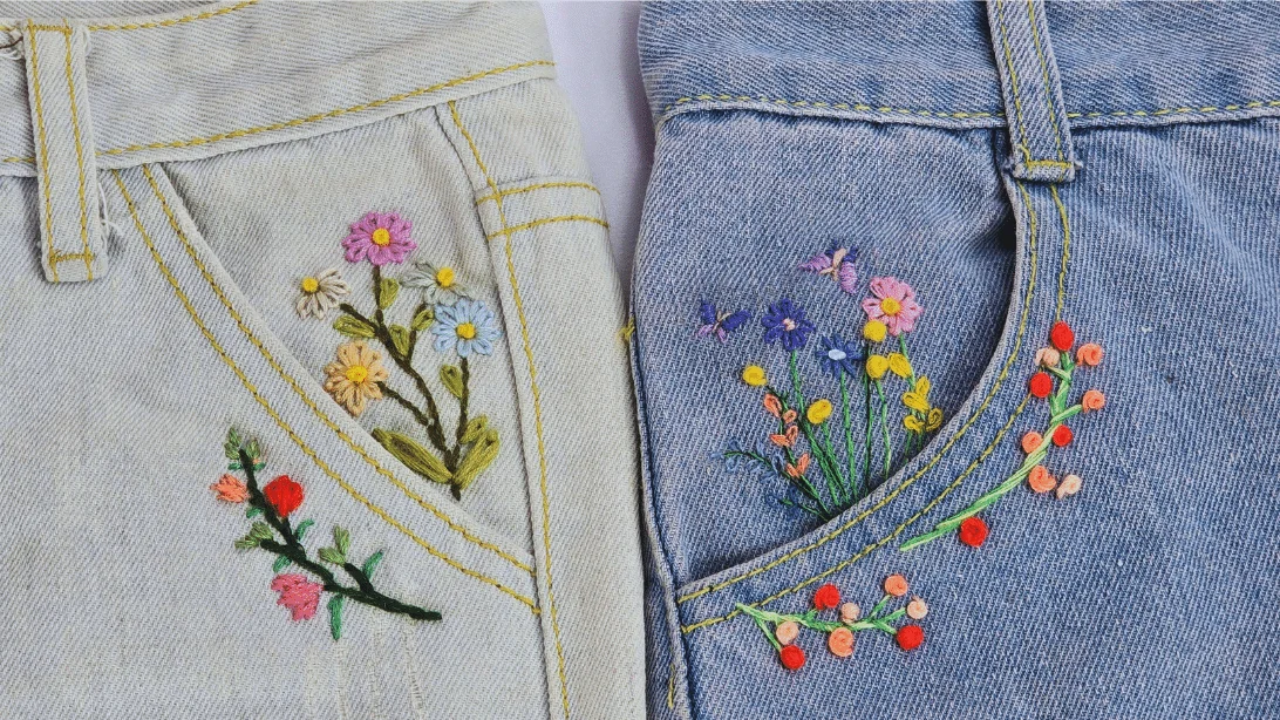
Ours, and the honest headline is that it takes about six stitches. Lazy daisies make the petals, French knots fill the centers, a satin stitch fills the leaves and a backstitch or stem stitch joins everything with a line, and that is the entire vocabulary needed. Denim is also the friendliest fabric to learn on, thick enough to hold its shape without a hoop fighting you and forgiving enough to hide a wobbly stitch. Trace the pattern onto water soluble stabilizer, stick it down, stitch through both layers and rinse the stabilizer away. One tired pair of jeans and an evening.
Get the full tutorial at DIY Joy.
63. DIY Shrinky Dink Flower Bracelet
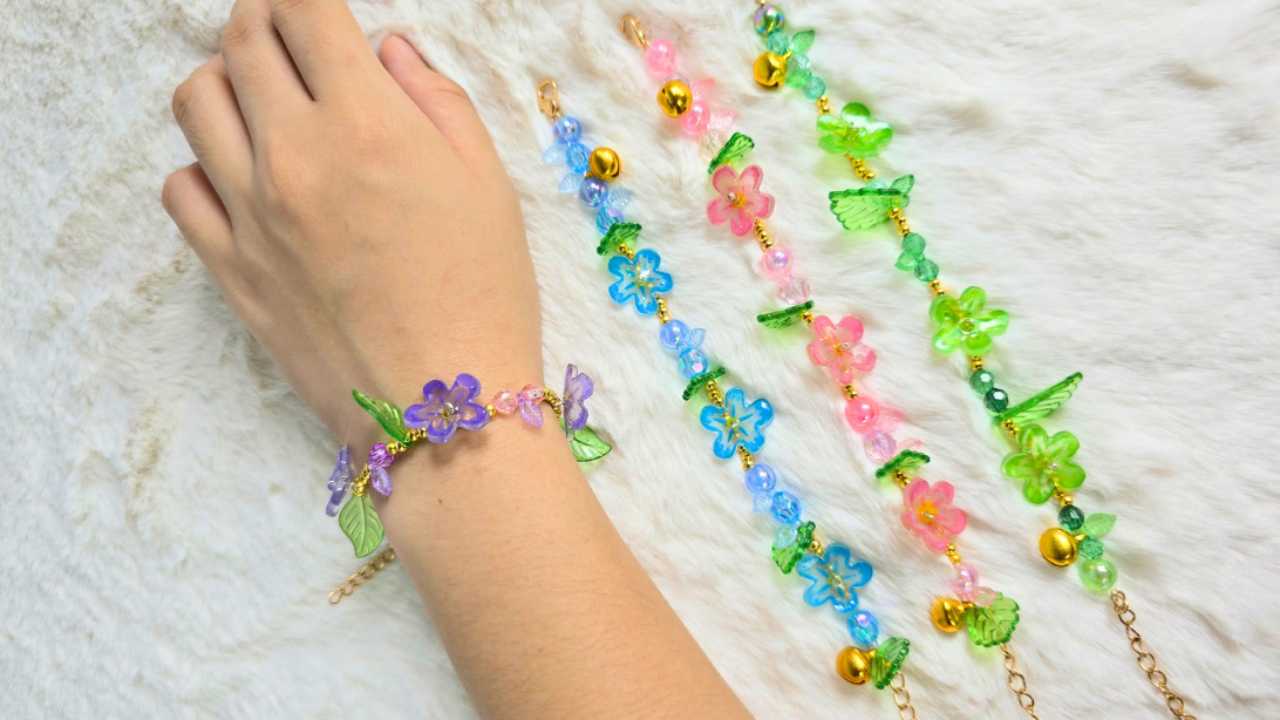
Ours, and it hinges on shrink plastic, which is the material worth knowing about. You draw and cut flowers at full size, then they shrink down in the oven into small, thick, rigid pieces that are far sturdier than anything you could have cut at that size by hand. Those flowers then get strung with beads into a bracelet, so the same bead stash gives a completely different result than a plain strung band would. Drawing large and letting the heat do the shrinking is also considerably easier than fiddling with tiny shapes. Full step by step and video on our post.
Get the full tutorial at DIY Joy.
64. DIY Air-Dry Clay Jewelry Organizer Using Pebbles
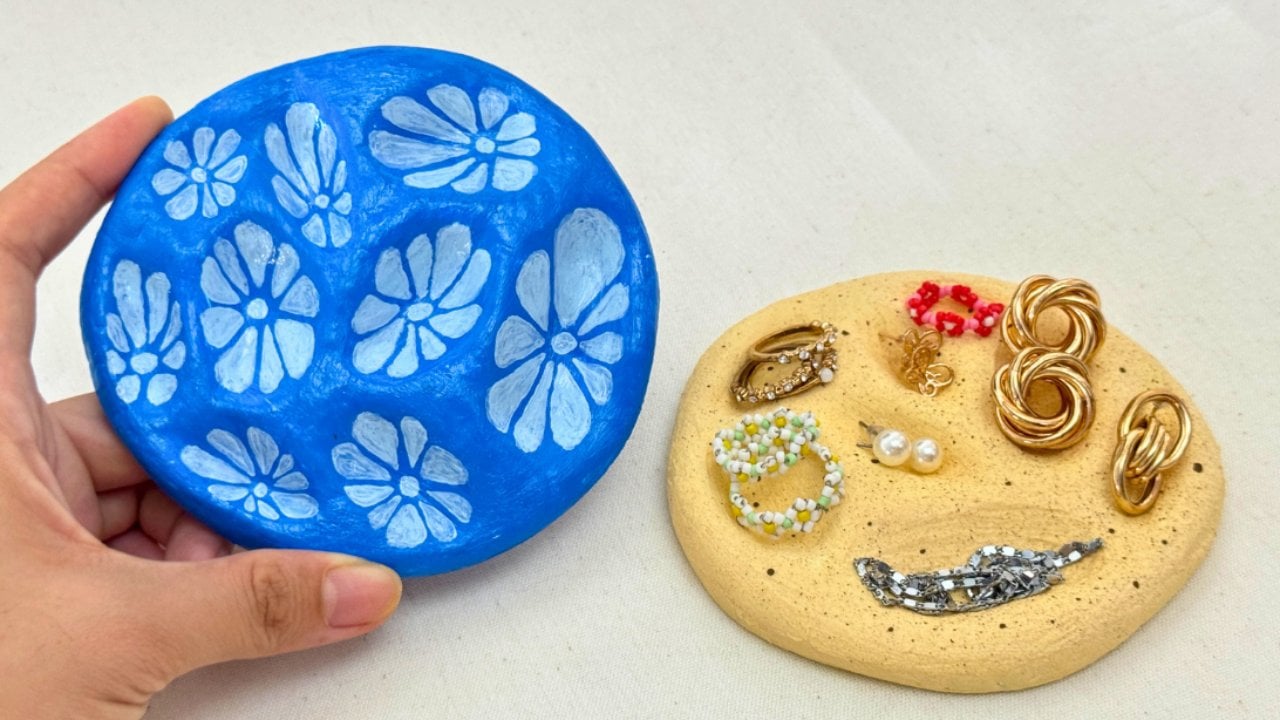
Ours. Air dry clay dishes are usually smooth, and this one is deliberately not: pebbles are pressed into the clay to texture the surface, which makes a plain dish look like something quarried rather than rolled out on a table. It holds rings, earrings and small keepsakes where you can actually see them, so nothing ends up in a tangle at the bottom of a drawer. No kiln, no wheel, nothing but a block of clay and some stones from outside. Full photo tutorial and the video are on our post.
Get the full tutorial at DIY Joy.
65. DIY Denim Jean Organizer
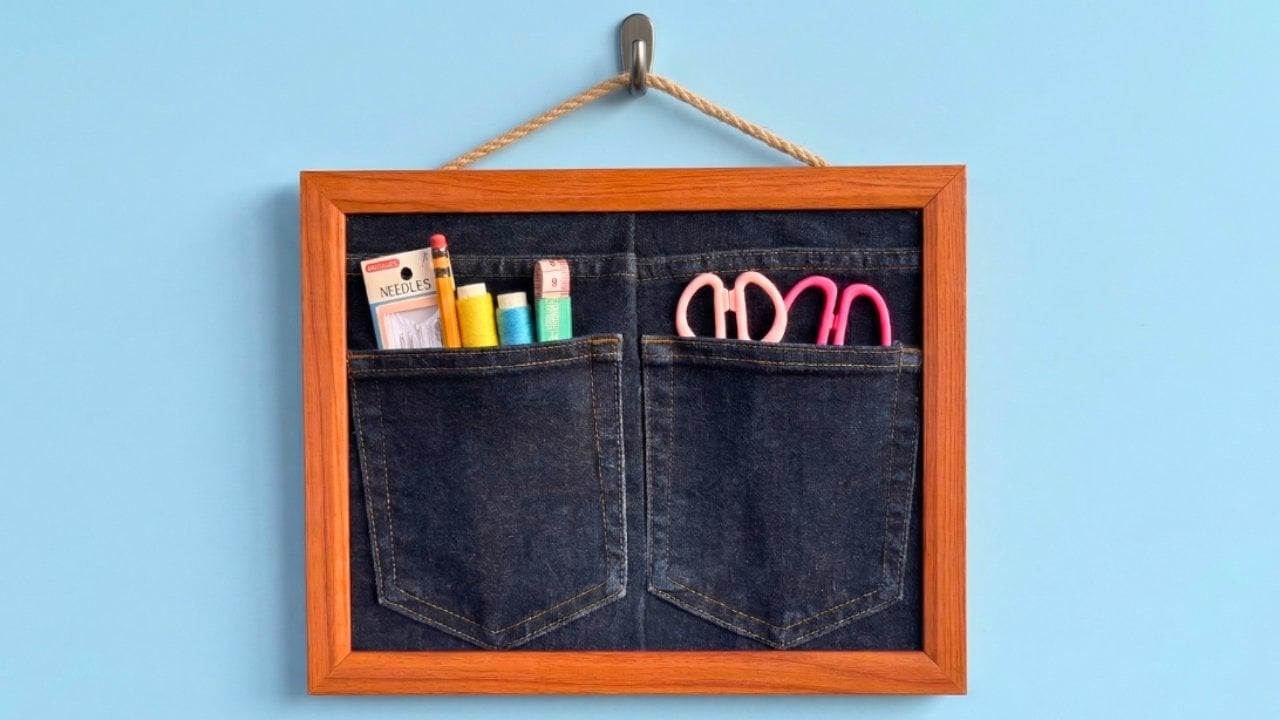
Ours, and it is the best possible use for a pair of jeans too far gone to wear. The pockets already sewn into the denim become the storage, which means half the construction is done before you start, and denim is stiff enough to hang flat on a wall without sagging. Scissors, pens, brushes and everything else stay visible and grabbable instead of buried in a drawer. It suits a desk corner, a craft space or a small room that badly needs storage without spending anything. Full step by step and video on our post.
Get the full tutorial at DIY Joy.
66. DIY Tin Can Desk Organizer
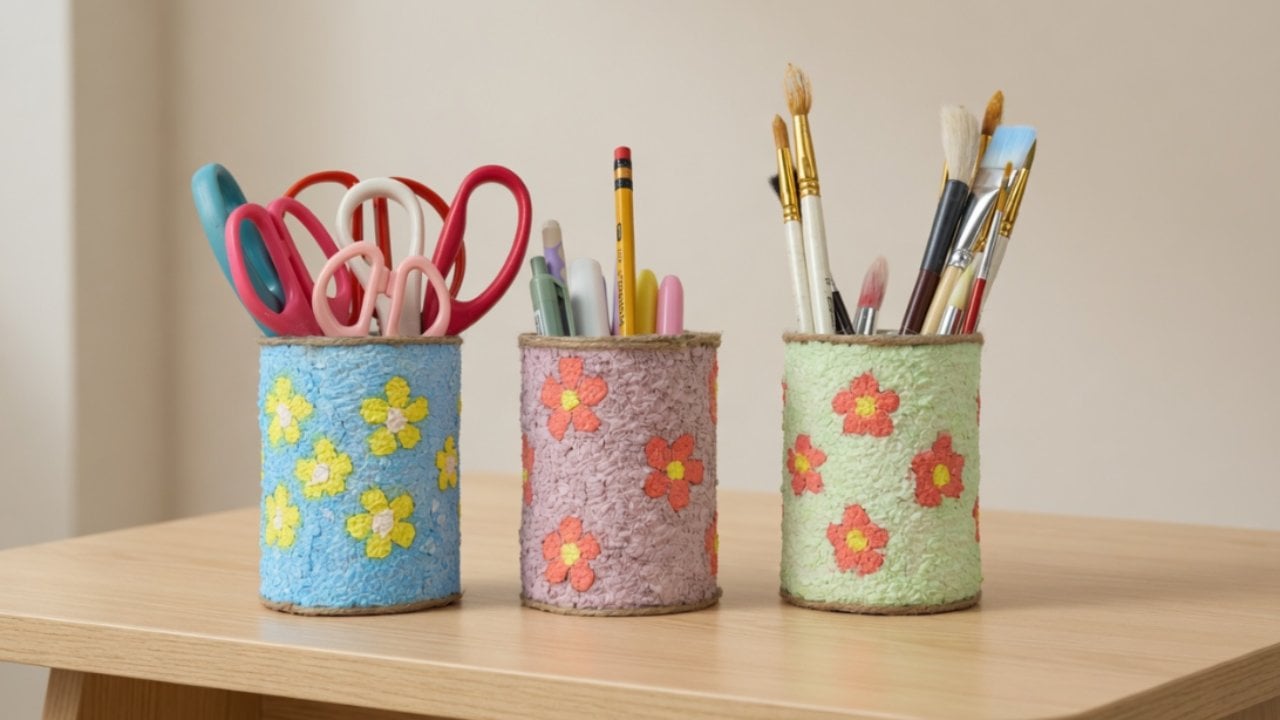
Ours, and it turns empty tin cans into something you would not guess started in the recycling. Tissue paper and paint over a paper mache technique give the cans a textured, slightly ceramic looking finish rather than a shiny printed one, which is the difference between a craft and an object. Pens, scissors and paintbrushes all stand upright in them, so a desk that has drifted into chaos comes back under control for the price of nothing. Beginner friendly throughout, with no tools required. Full photo tutorial and the video are on our post.
Get the full tutorial at DIY Joy.