Fancy containers can cost more than whatever goes inside them, which is exactly why dollar store organizing is so smart. These 24 dollar store organizing ideas put cheap baskets, locker bins, mason jars, shower caddies and cereal keepers to work in the pantry, the bathroom, the coat closet and even the car. A little spray paint, a few metal pulls and some matching labels make plastic bins look intentional rather than bargain bin. There’s even a lazy Susan made from two cake pans and a handful of marbles (it takes under five minutes, no joke). Eight DIY JOY video tutorials are mixed in too, turning tin cans, colored paper, old jeans, jute rope, air-dry clay and an empty Ferrero Rocher box into desk, tray and jewelry organizers. Before shopping, measure every drawer and shelf, and buy one or two extra of any bin you love, because the same style can vanish from the shelves next month. Find more storage projects on the organizing ideas hub.
DIY Dollar Store Organizing Ideas
1. DIY Tin Can Desk Organizer
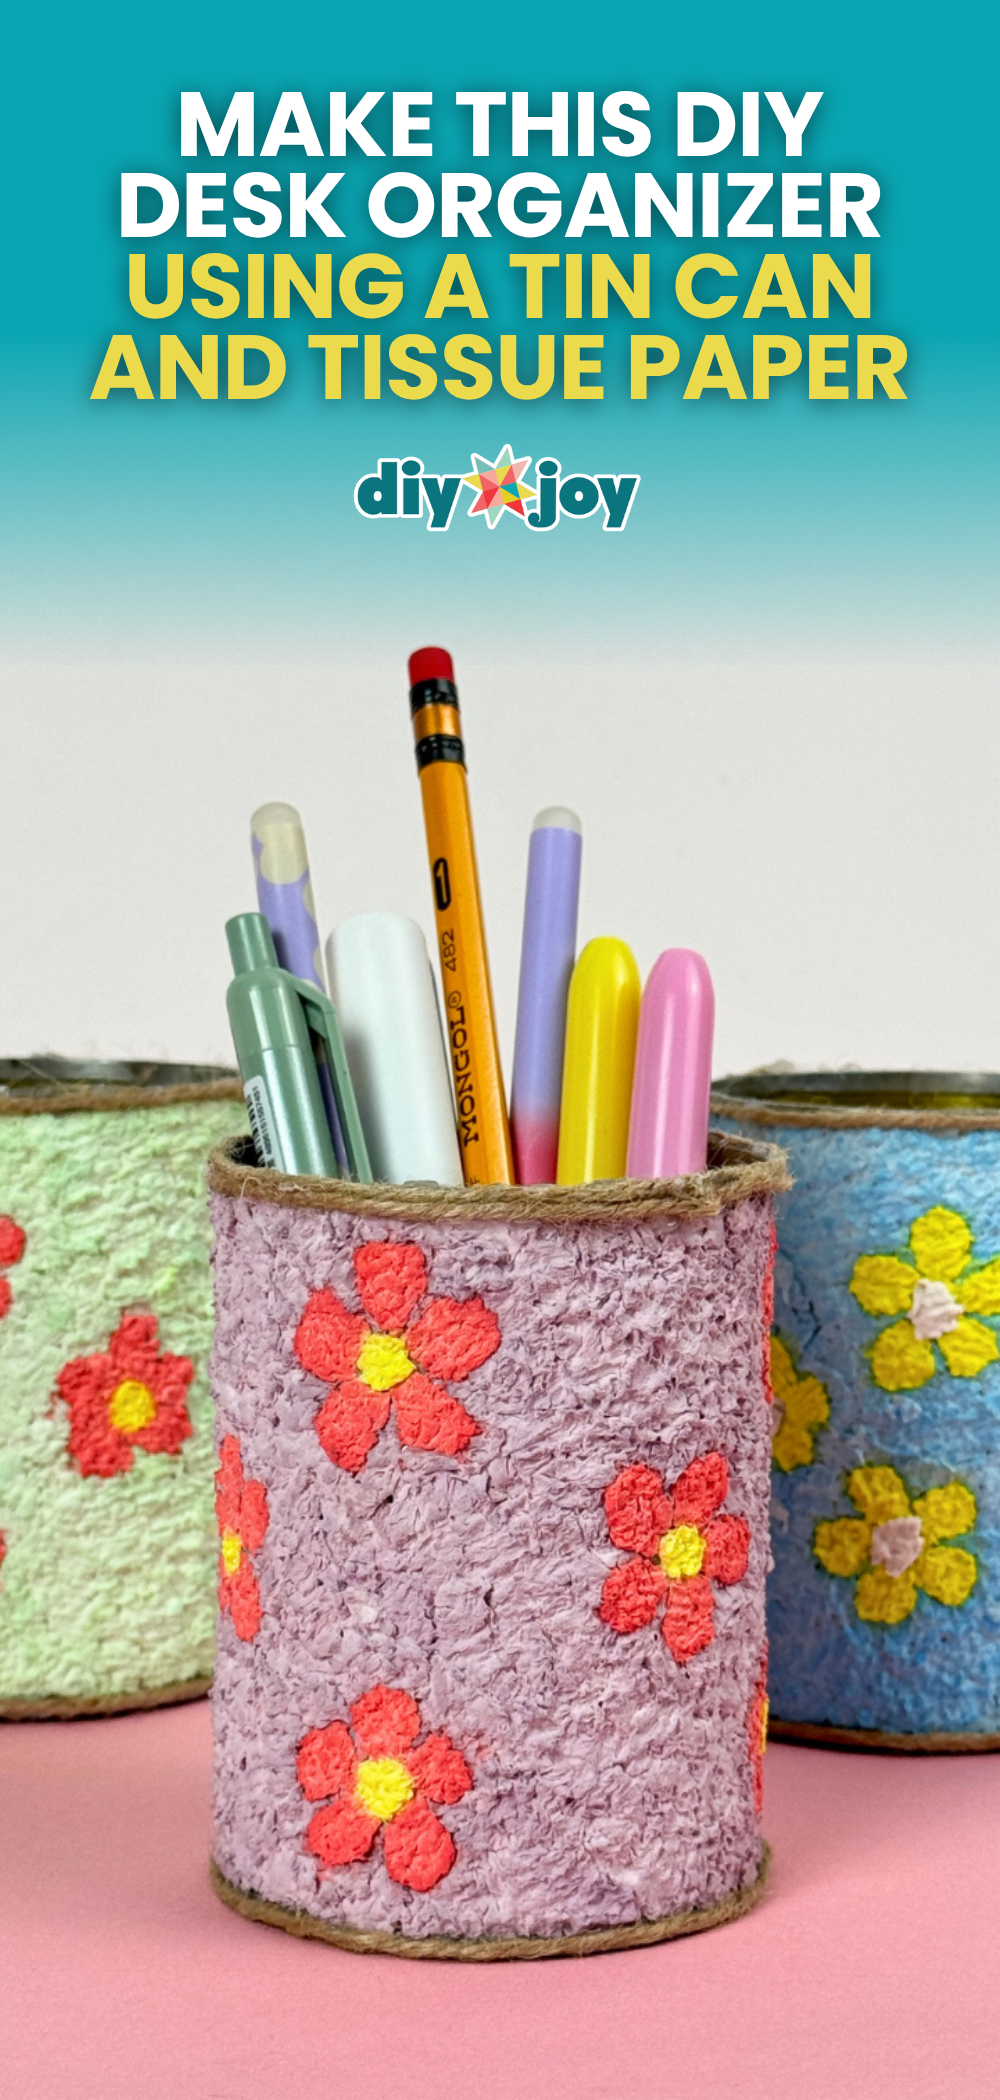
A DIY tin can desk organizer turns empty cans into pretty pen cups with tissue paper pulp. Tear tissue into small pieces, soak it until soft, squeeze out the water and mash it into a pulp. Mix in glue and paint until it’s evenly colored and smooth, adding a splash of water if it crumbles. Draw a big, simple flower on the can, fill the flower first and the background after, and let it dry for up to 24 hours. Make a few in different colors for scissors, pencils and brushes.
Get the full tutorial at DIY JOY.
2. DIY Colored Paper Pen Holder
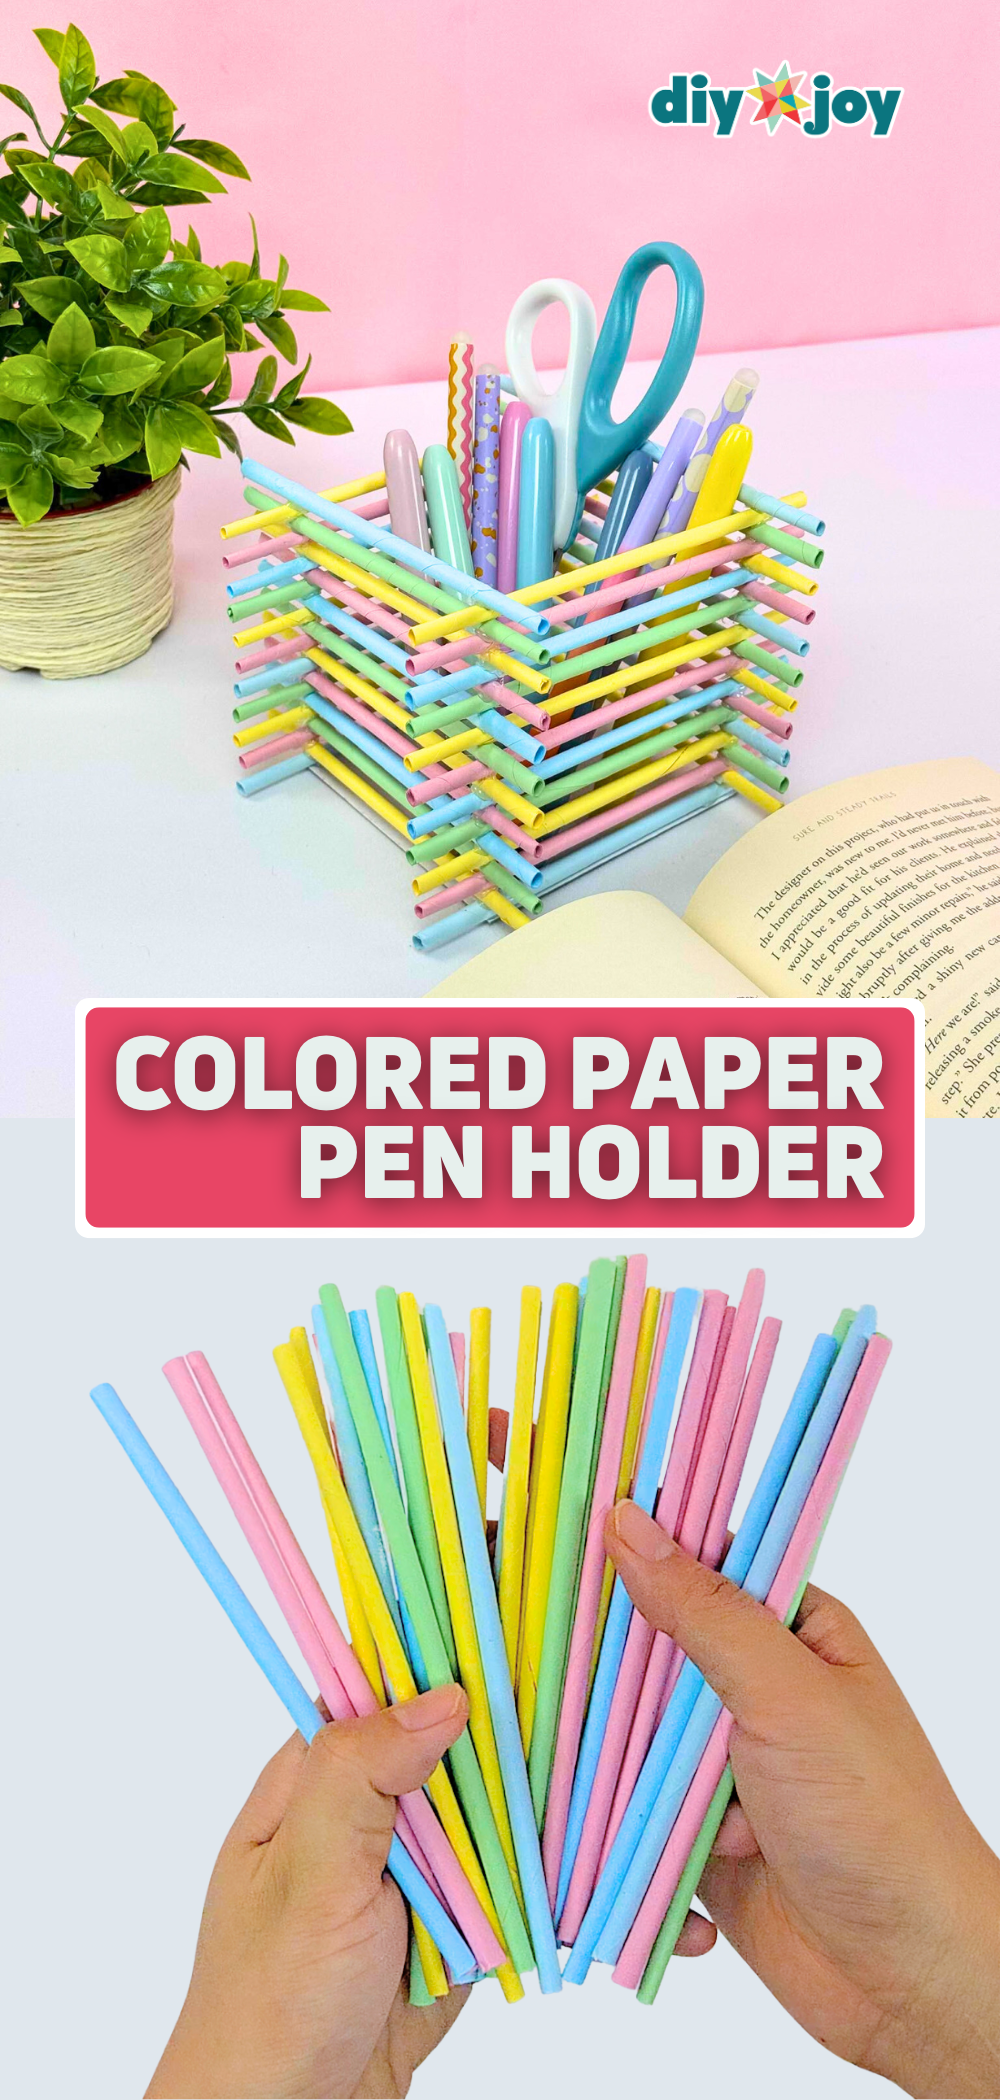
A DIY colored paper pen holder is surprisingly sturdy for something made from paper. Roll each sheet diagonally around a thin skewer, keeping it tight, glue the flap and trim the pointed tip. Make a pile of tubes in different colors. Cut a 4 inch square of cardboard for the base, then hot glue tubes along opposite edges in matching pairs, stacking each new pair across the last like a log cabin. Keep building, alternating colors, and trim the ends even. It also works for makeup brushes or crochet hooks.
Get the full tutorial at DIY JOY.
3. Dollar Store Bathroom Drawer Organization

Dollar store bathroom drawer organization costs about $4 and ten minutes. Deep vanity drawers swallow everything, but a handful of white plastic baskets from the dollar store give every item a home. Measure the drawer first, then mix sizes so the baskets fill the space wall to wall with no room to slide. Group like with like: toothpaste and mouthwash in one, makeup in another, hair ties and travel bottles in a third. Things stop getting lost at the bottom, and the drawers are actually pleasant to open.
Get the full tutorial at Bless'er House.
4. Kitchen Sink Organization

This under the kitchen sink organization project cost just $8 at the dollar store. Stack and nest bins at $1 each rise to just below the garbage disposal and hold sponges, polish and disposal tabs. Small handled caddies, three for a dollar, hold scouring pads and drain stoppers. Roomy locker bins tuck behind and around the pipes for cleaners that don’t get used every day, and one fits eight bottles. A $1 shower caddy holds hand soap, and a Command hook inside the door keeps the gloves handy.
Get the full tutorial at Neat House. Sweet Home.
5. Organize Your Baseball Hats for a Dollar

Organizing baseball hats for a dollar takes one pack of shower curtain rings from the dollar store and a plain hanger. Sort the pile first and donate the ones nobody wears. Clip a ring through the adjustable strap at the back of each cap, then slide the rings onto a sturdy plastic hanger so the hats hang in a neat row. Plastic rings are kinder to the caps than metal ones, though either works. Non-adjustable hats won’t fit, so shelve those. Hang it in the closet or on a door.
Get the full tutorial at Organizing Moms.
6. Crap Buckets

Crap buckets end the pile of shoes, toys and socks that collects on the stairs. Give each person in the house a bucket of their own and line them up on the steps or by the door. Anything left lying around goes into its owner’s bucket, and each person empties theirs on the way upstairs. Colorful metal pails with handles look cheerful, and vinyl labels cut on a craft machine tell everyone which one is theirs. Dollar store plastic buckets work too, if they fit the stair treads.
Get the full tutorial at ReMarkable Home.
7. Under The Sink Organization

Under the sink organization in a bathroom can cost about $10. Open nesting bins, some from the dollar store, slide in and stack so everything is easy to grab instead of buried in dark piles. The clever part is a dollar store shower caddy with its bottom shelf cut off: hang it on a small screw inside the cabinet door and it holds hairspray and styling bottles that won’t fit anywhere else. Clear out the cabinet completely first and toss expired products before anything goes back in.
Get the full tutorial at 320 Sycamore.
8. Dollar Store Pantry Makeover

A dollar store pantry makeover proves that the Pinterest pantry look doesn’t need $20 canisters. This one came in at $48 for everything: eight square glass jars at $1.50, large plastic bulk containers and round glass jars at $2 each, a stack of cheap plastic lunch containers and four sturdy white baskets. The real trick is the labels. Print matching vintage style labels for every jar so the whole cupboard looks coordinated. The white baskets work in the fridge too, corralling cheeses and small containers.
Get the full tutorial at The Social Home.
9. Dollar Store Storage Bins with Custom Metal Tags

Dollar store storage bins with custom metal tags look like pricey industrial baskets. Lightly sand plastic bins with fine grit paper so paint will grip, then spray on a few coats of oil rubbed bronze. Cut thin sheet metal into strips, round the corners and stamp each label with a metal alphabet stamping kit and a hammer. Brush black paint over the letters and wipe it off so they stand out. Tap the tags flat, drill small holes through tags and bins, and fasten them with silver brads.
Get the full tutorial at Little House of Four.
10. DIY Denim Jean Organizer

A DIY denim jean organizer turns the back of old jeans into wall storage, pockets and all. Empty a picture frame, keeping only the frame and its backing. Lay the frame on the back of the jeans, trace around it and cut along the line with sharp fabric scissors. Fold the denim slightly so the two back pockets meet near the middle, glue the fold and check it’s centered. Hot glue the backing behind the denim, lock it into the frame and add a jute rope hanger. Instant pocket storage.
Get the full tutorial at DIY JOY.
11. DIY Air-Dry Clay Jewelry Organizer Using Pebbles

This DIY air-dry clay jewelry organizer uses smooth pebbles to press little wells into the clay. Roll air-dry clay into an even, flat circle. Press pebbles into it one at a time, wetting them first so they don’t stick, then lift them out gently and smooth any cracks with damp fingers. Let it dry completely, overnight or longer. Prime it, paint a base color and add flowers inside the wells, then seal it. For a sandy, beachy texture, mix baking soda into the paint instead. Rings and earrings settle right in.
Get the full tutorial at DIY JOY.
12. DIY Ribbon Organizer

A DIY ribbon organizer keeps spools from unrolling into a tangled mess, and it costs about $5. Pick up a plastic storage bin with slots or holes along the sides and a 1/4 inch dowel. Slide the ribbon spools onto the dowel, then push each end of the dowel through the holes on either side of the bin. Thread the loose end of each ribbon out through a hole in the front. The spools can’t roll away, and pulling out exactly the length needed is easy. Gift wrapping gets so much faster.
Get the full tutorial at Spunky Junky.
13. Organize Your Cupcake Liners

Organizing cupcake liners takes one mason jar and about two minutes. Loose packs get crushed and lost in a kitchen drawer, so stack them inside a large jar instead, nesting each pile so the paper cups keep their shape. A wide mouth jar works best, since standard liners are often too wide for a regular mouth jar. Every color and pattern stays easy to spot, and the jar is pretty enough to sit out on the counter instead of hiding in a drawer. Muffin liners stack the same way.
Get the full tutorial at Table for Two.
14. Easy Air-Dry Clay Ring Holder
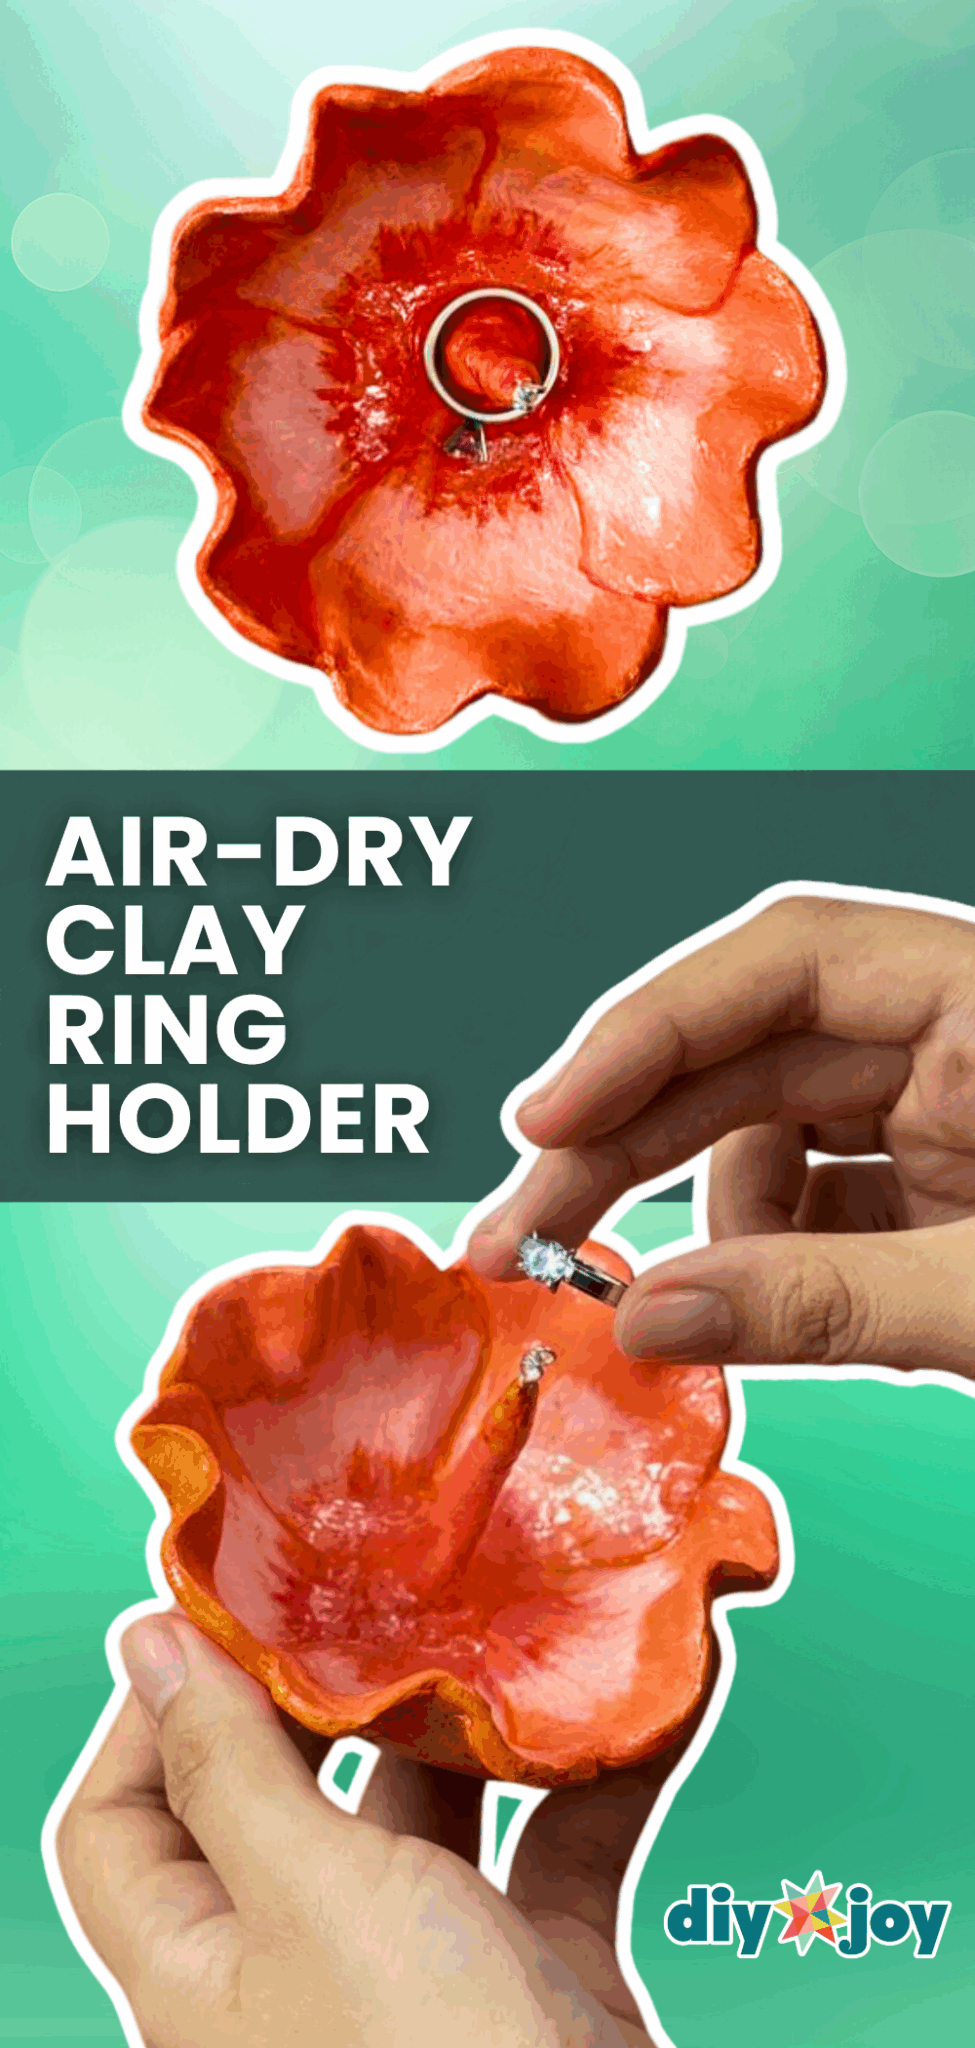
An easy air-dry clay ring holder is shaped like an open flower with a stamen in the middle to slide rings onto. Roll clay flat and cut it from a flower template, then slit between the petals, overlap them slightly and rest it in a bowl on a towel so it dries cupped. Roll a thin clay log for the stamen, set it in the center and blend clay around the base with a wet brush. Prime, paint the petals from deep to light and finish with UV resin for a porcelain shine.
Get the full tutorial at DIY JOY.
15. $1 Car Trash Can

A $1 car trash can starts as a cereal container with a flip lid from the dollar store. Tuck a few spare plastic bags in the bottom, then line the container with another bag. When it fills up, pull out the full bag and the next liner is already waiting. It stands upright on the floor between the seats, and the lid keeps the smell of old fries and juice boxes inside. Kids can reach it from their seats, so wrappers stop ending up on the floor mats.
Get the full tutorial at A Bird and a Bean.
16. Dollar Store Storage Container Makeover

This dollar store storage container makeover turns bright plastic bins into something that looks like vintage metal. Lightly sand a pack of four small Dollar Tree bins with fine grit paper so the paint grips. Spray on several thin coats in long, steady passes from one end to the other for even coverage. Screw a metal drawer pull onto the front of each one. A dab of hot glue over any screw tips that poke through inside keeps fingers safe. They fit a medicine cabinet perfectly for bandages and clippers.
Get the full tutorial at Little House of Four.
17. $1 Kitchen Drawer Makeover

A $1 kitchen drawer makeover swaps slippery rubber shelf liner for a roll of patterned wrapping paper from the dollar spot. A linear print like herringbone makes it easy to cut straight by eye. Lay the paper in the drawer, crease it into the corners and trim along the creases for a snug fit. A small piece of double stick tape in each corner holds it in place. The whole kitchen takes less than ten minutes, and when the paper wears out, just swap in a new pattern.
Get the full tutorial at so the cook said.
18. DIY Rope Basket

A DIY rope basket starts as a $1 plastic basket from the dollar store. Prime and spray paint the inside white, since the outside will be covered. Dip half the cotton filler cord in watered down paint, squeezing it under the liquid so it soaks in, then let it dry for alternating stripes. Starting just under the lip, hot glue the cord around and around every inch of the way to the bottom, then wrap the rim. About five packs of rope covered this one, for about $20 total.
Get the full tutorial at IHeart Organizing.
19. Trash Bags On A Roll

Trash bags on a roll free up the cramped space under a kitchen sink. Cut a 5/8 inch dowel to length, about 17 inches here, sand the ends so they won’t snag the bags and give it a coat of white spray paint if you like. Screw two 3/4 inch curtain rod brackets to the cabinet wall, checking that they’re level, about 13 inches apart. Push the dowel through the center of the roll and set it in the brackets. Two sets hold kitchen bags and the big outdoor ones.
Get the full tutorial at Simply Organized.
20. Winter Storage Bins

Winter storage bins for the coat closet start as bright plastic locker bins from the dollar store, $1 each. Spray them in layers of hammered metal and oil rubbed bronze paint until they look like old metal. Once dry, hang a wooden chalkboard tag from each one with twine and write what goes inside, like hats, mittens and scarves. The bins stack and nest, so they hold a whole family’s winter gear in less space than one overflowing basket. Three bins and paint cost under $10.
Get the full tutorial at Lemons, Lavender, & Laundry.
21. Ferrero Rocher Jewelry Box

That gorgeous clear Ferrero Rocher box is way too nice for the recycling bin, and it turns out the chocolate cups are the perfect size for rings and earrings. Peel the label off the lid with wide tape, then Mod Podge pressed flowers on the inside of the lid (no Mod Podge? Equal parts white glue and water works). Gold washi tape around the compartments gives it a polished finish. Fill it with jewelry, or use it for beads, buttons and paper clips.
Get the full tutorial at DIY JOY.
22. DIY Jute Rope Tray
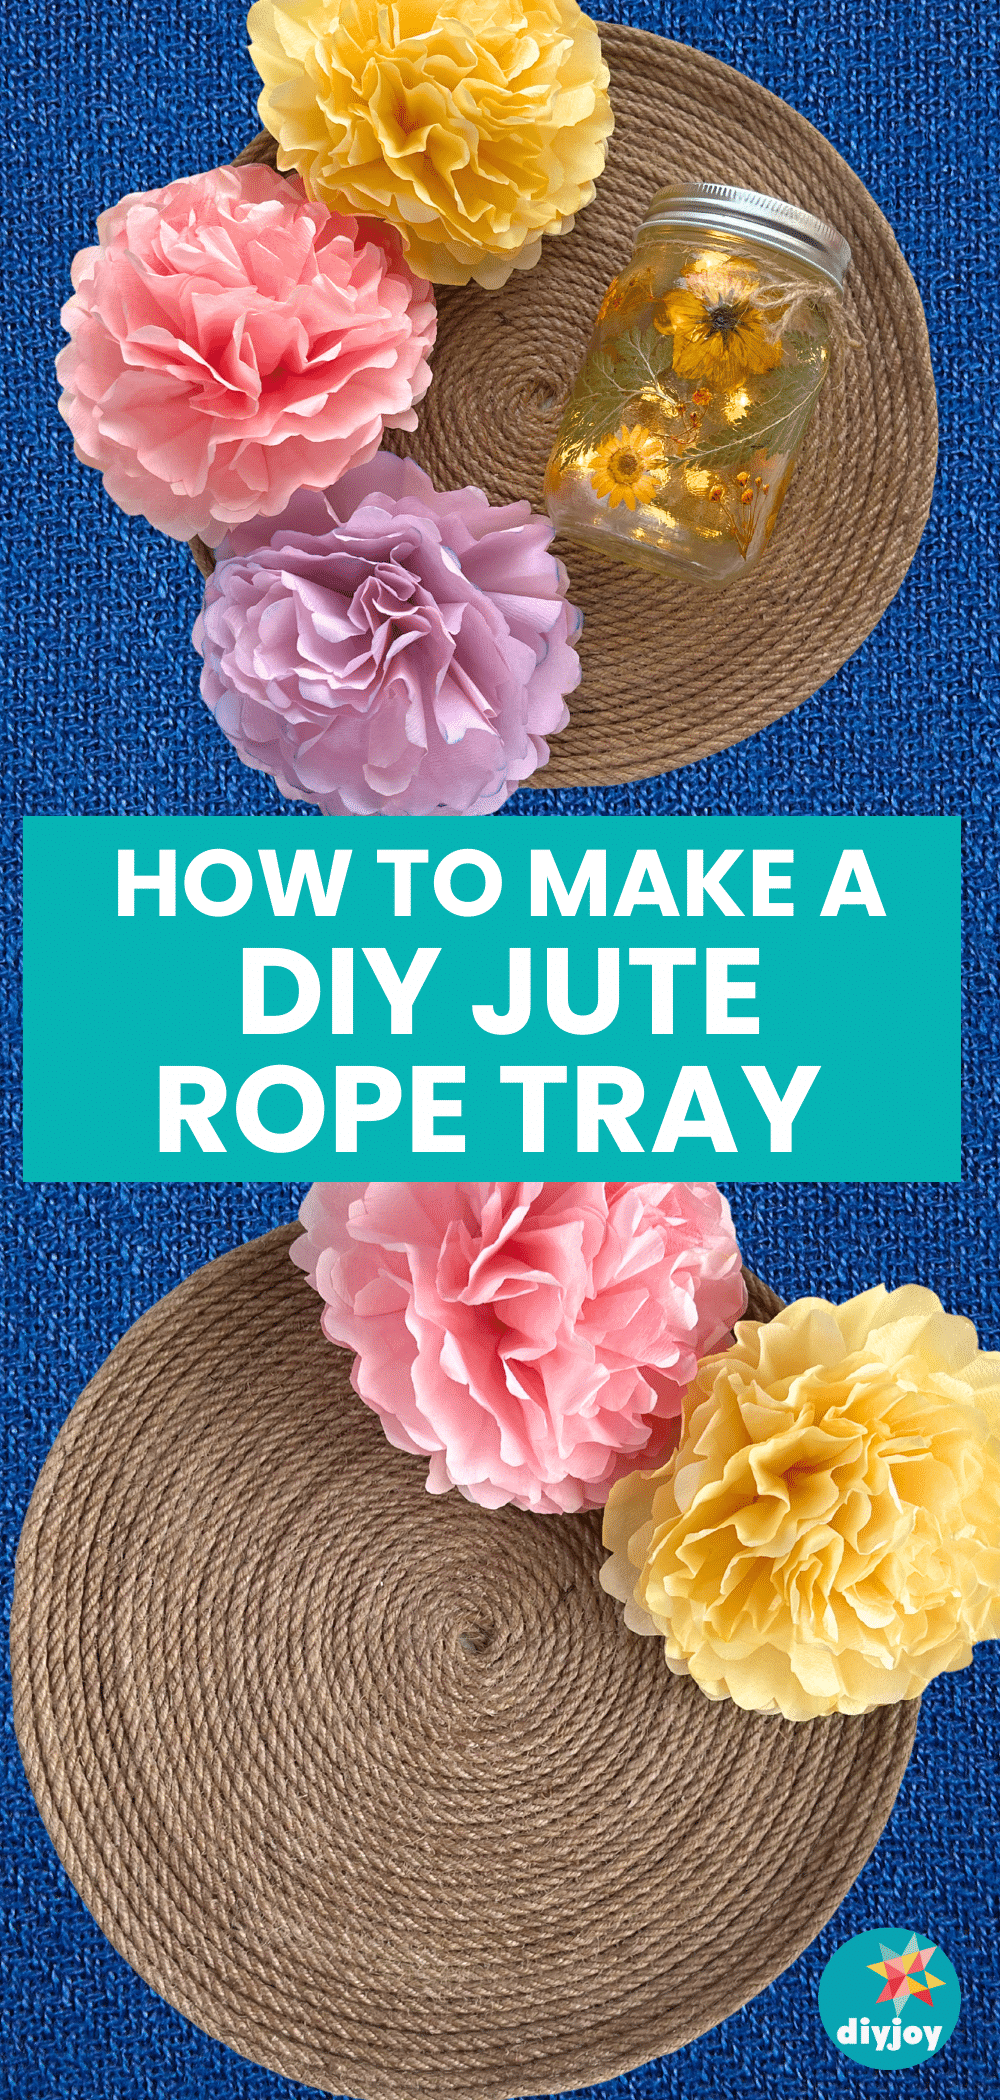
Boho jute trays can get pricey, but this one starts with jute rope that costs a couple of dollars and a bottle of Mod Podge. Wrap a tray in cling wrap, brush on glue and coil the rope in a tight spiral, adding more Mod Podge as you go. Twist it firmly with no gaps, since that’s what keeps it sturdy. Weigh it down while it dries so it stays flat, then pop it off the cling wrap. It corrals keys, candles and little odds and ends beautifully.
Get the full tutorial at DIY JOY.
23. Air-Dry Clay Jewelry Tray

An air-dry clay jewelry tray gives bracelets and rings a pretty place to land instead of the nightstand pile. Roll the clay flat, dust a tray with baby powder and press the clay inside, smoothing it with a damp sponge. Once dry, prime it and Mod Podge a patterned napkin on top (the napkin does all the fancy design work). A metallic marker edge and a thin coat of UV resin seal it. Keep the resin thin, because thick coats cure bumpy.
Get the full tutorial at DIY JOY.
24. Dollar Tree Lazy Susan
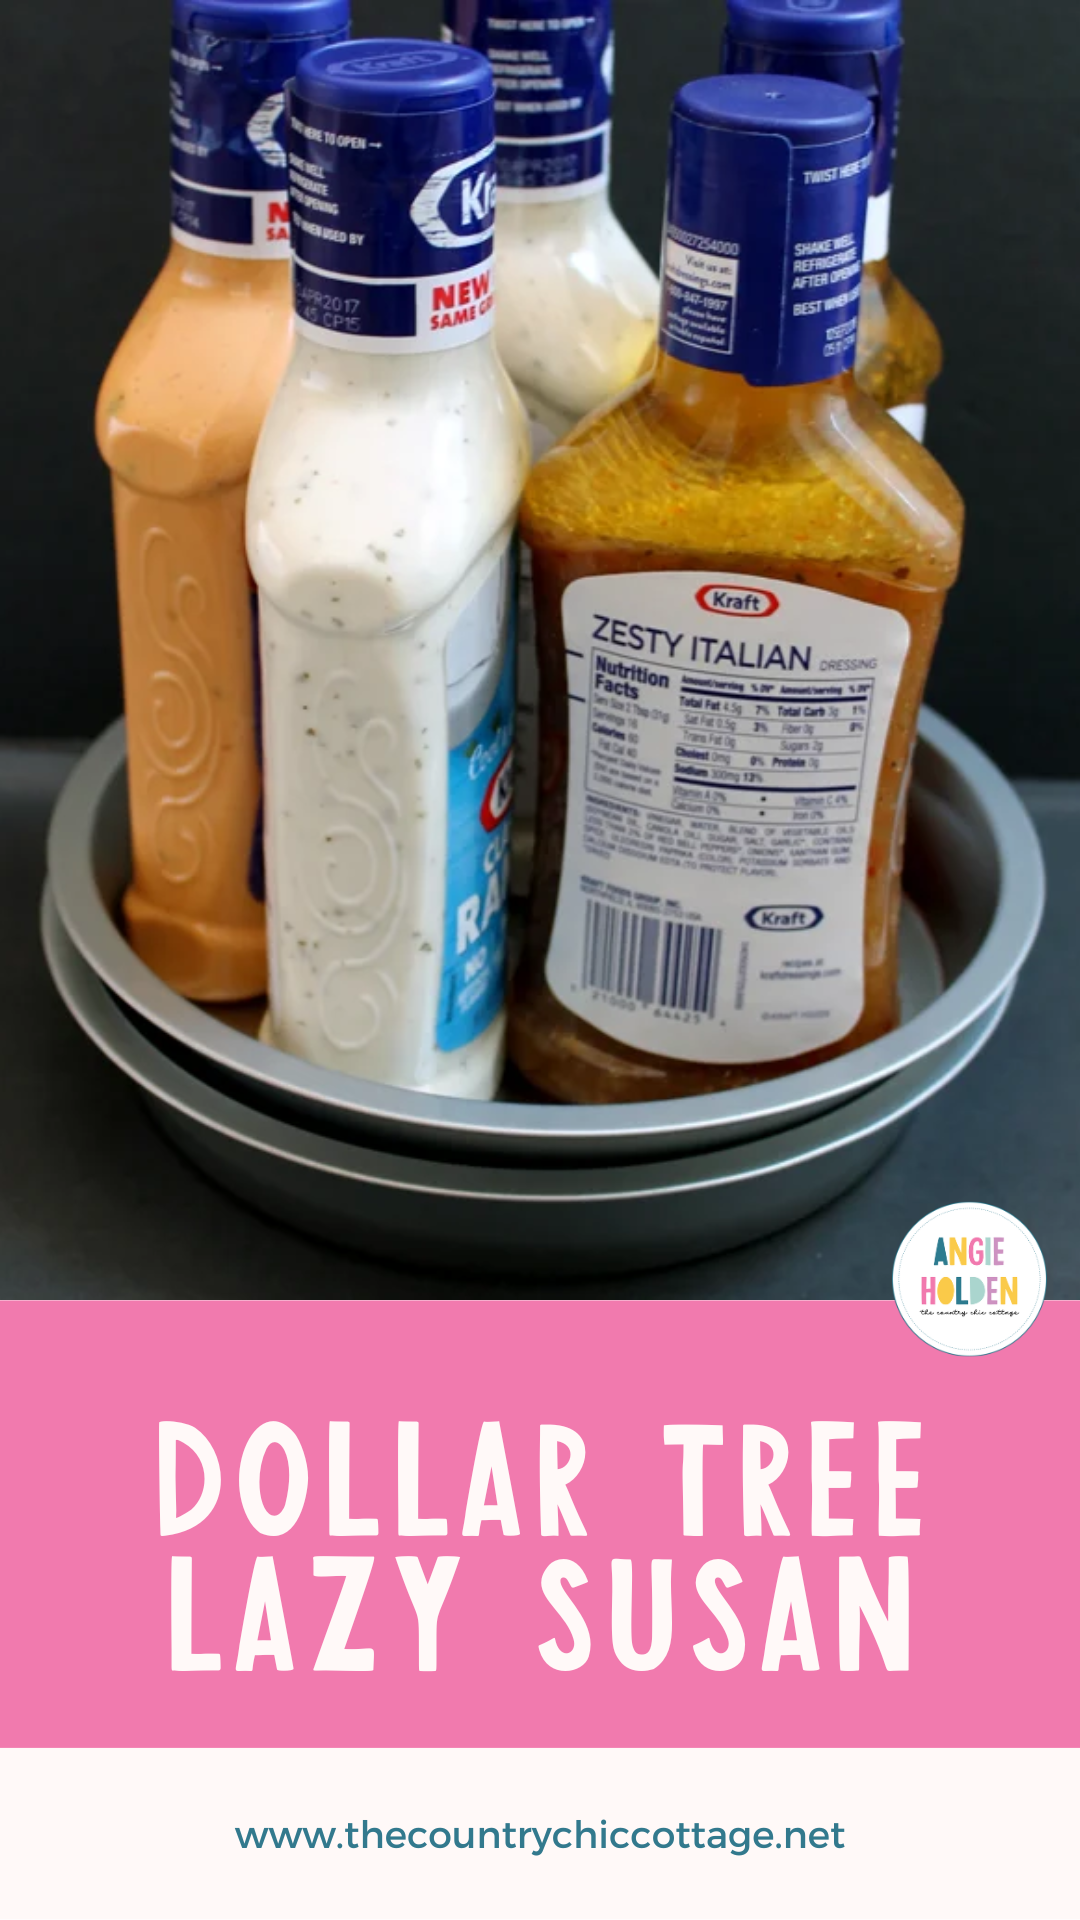
Tired of finding three jars of the same thing in the back of the cabinet? This Dollar Tree lazy Susan takes under five minutes and just two supplies: two round cake pans and marbles. Pour the marbles into one pan, set the second pan on top and fill it. It spins just like a store-bought turntable and holds heavy items too. Spray paint the pans for color (just not for food storage), and make extras for the fridge, bathroom and craft room.
Get the full tutorial at The Country Chic Cottage.