Finding the perfect gift isn’t always as easy as it seems. Sometimes, it’s simple, especially when you know exactly what someone wants and can easily find it in stores. But other times, figuring out what to give can be a real challenge! And when you’re completely out of ideas, giving money is usually the next best option.
However, I know that giving cash can sometimes feel a little too simple or effortless. If you feel the same way, or you simply want to make your money gift look more thoughtful and special, then you should definitely try folding dollar bills into fun origami shapes!
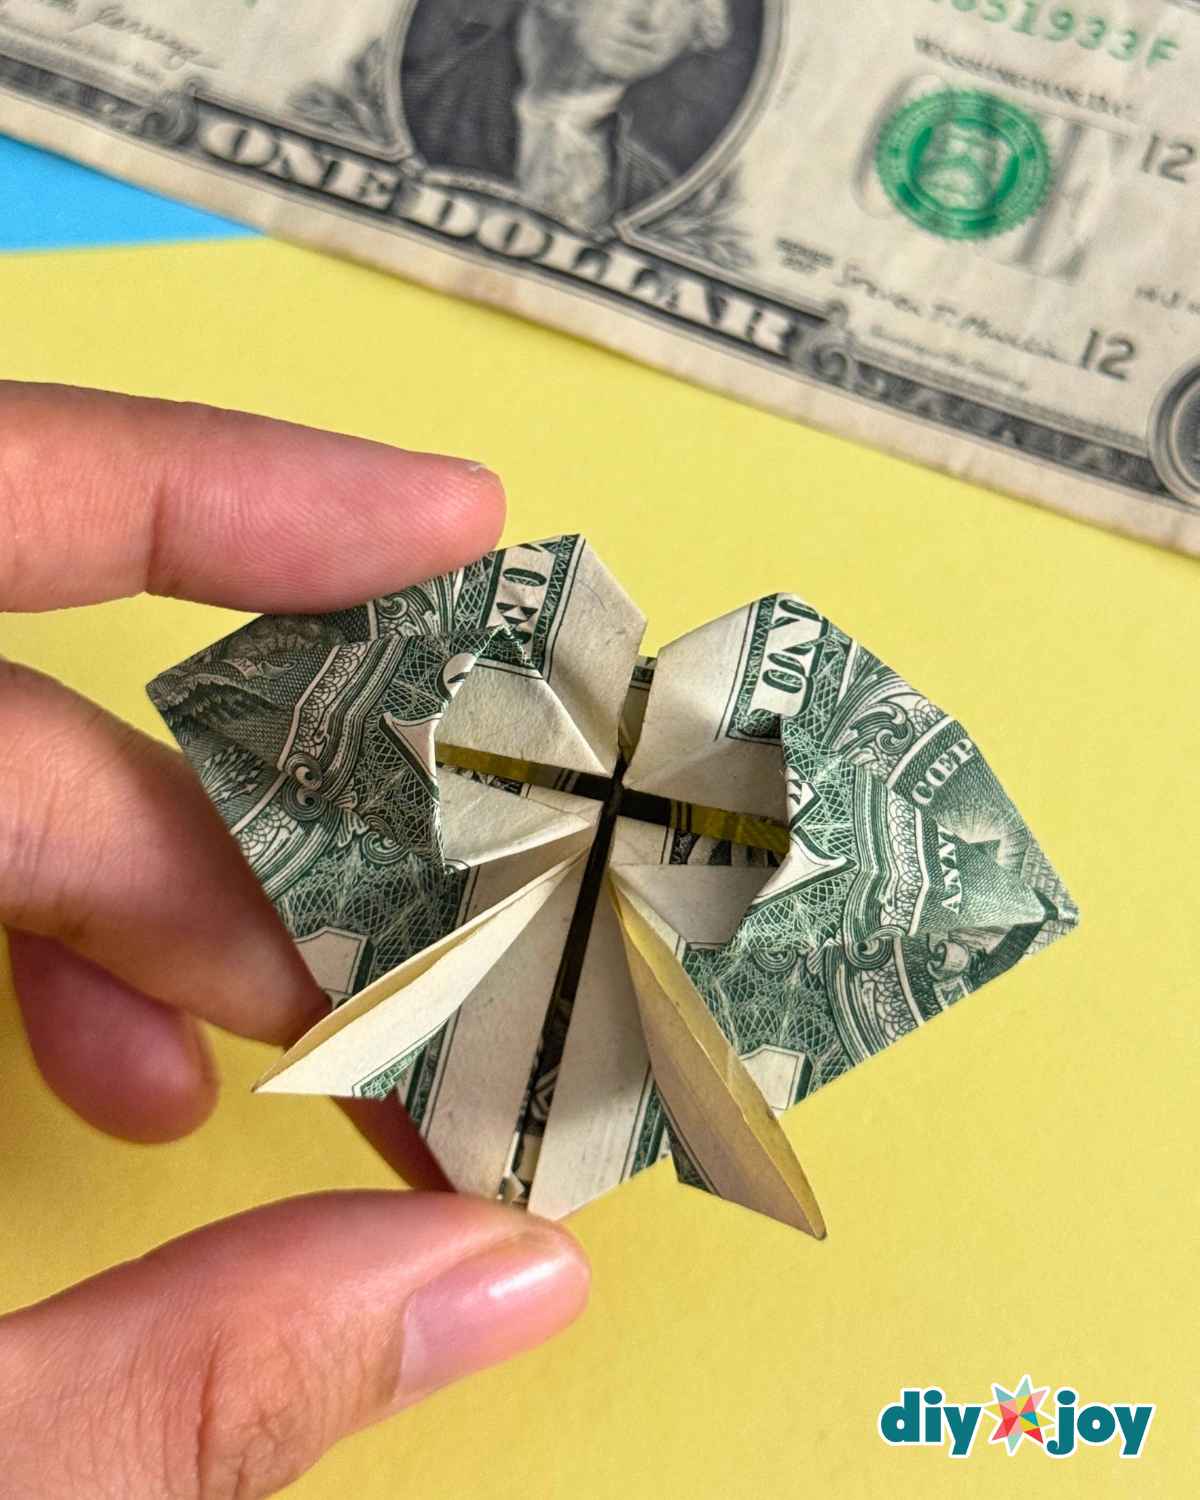
Personally, this is one of my favorite ways to give money as a gift, and it never fails to impress the receiver. There are so many creative ways to fold a dollar bill, and I’ve actually shared a few tutorials before, including two different ways to make a dollar bill heart. If you haven’t tried those yet, you can check them out here and here. Both are pretty simple and beginner-friendly, and I’m sure you can get them right even on your first try!
Now, if you’re ready to try something a little more intricate or want to challenge yourself with a slightly more advanced folding technique, then I have the perfect tutorial for you!
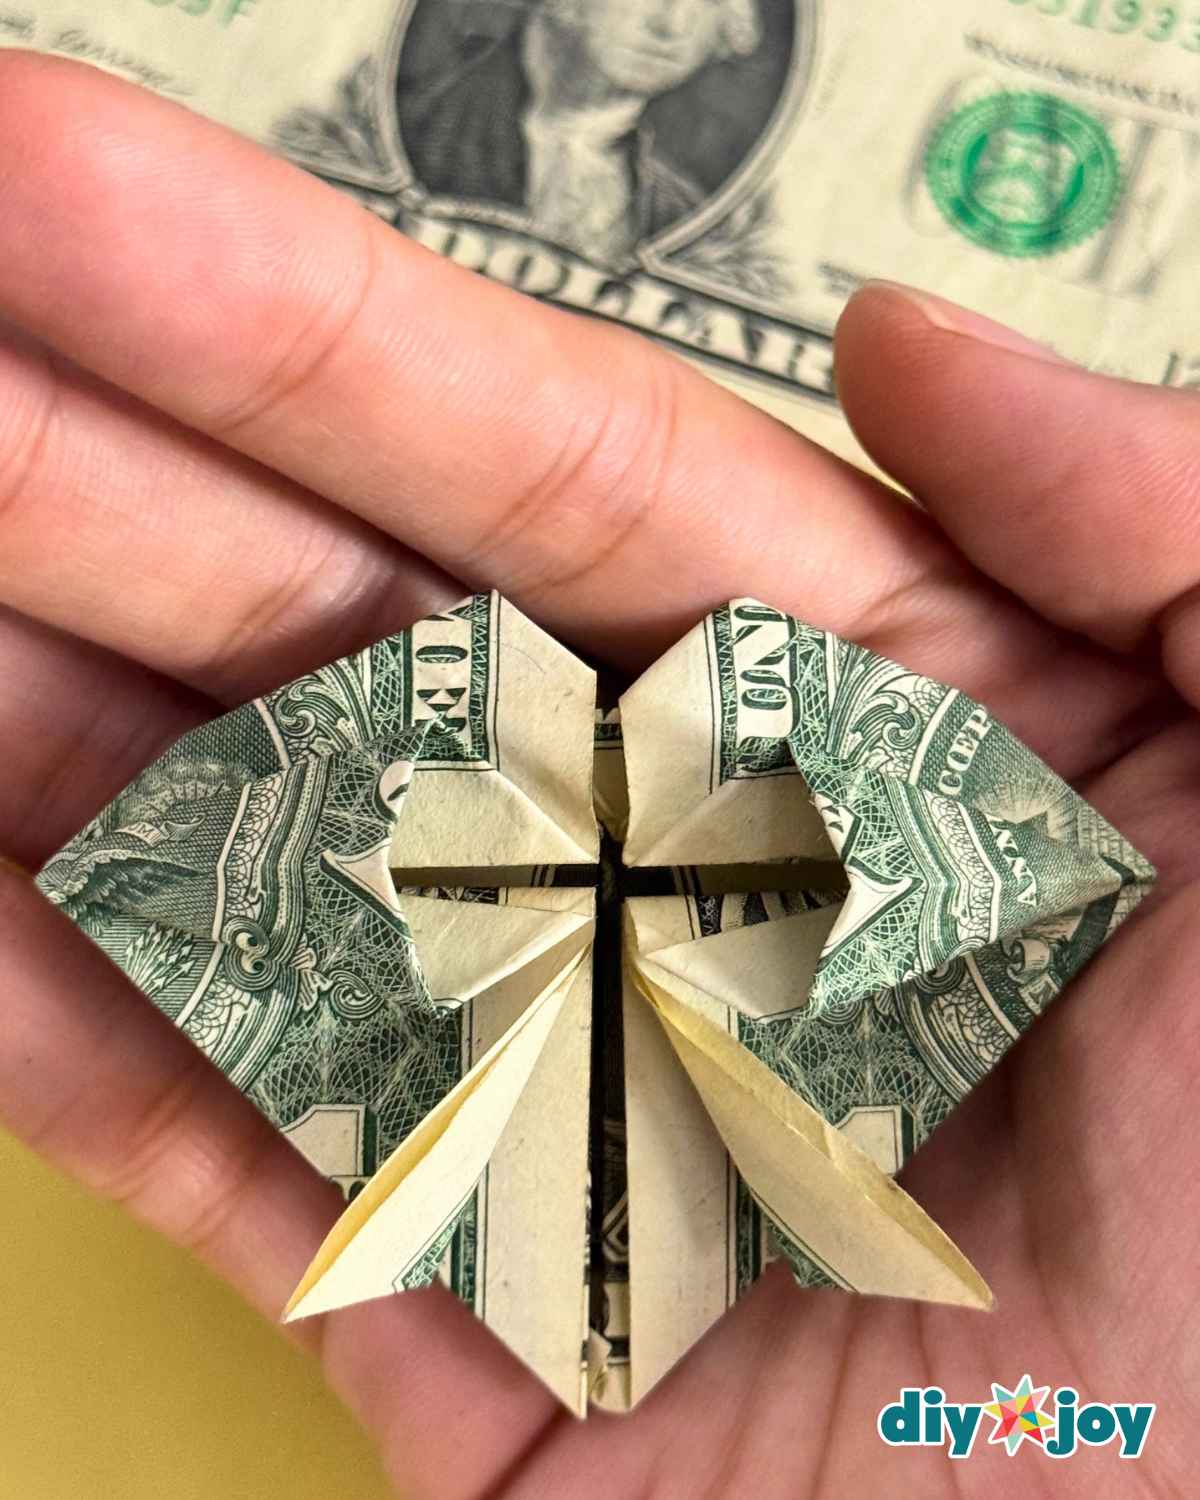
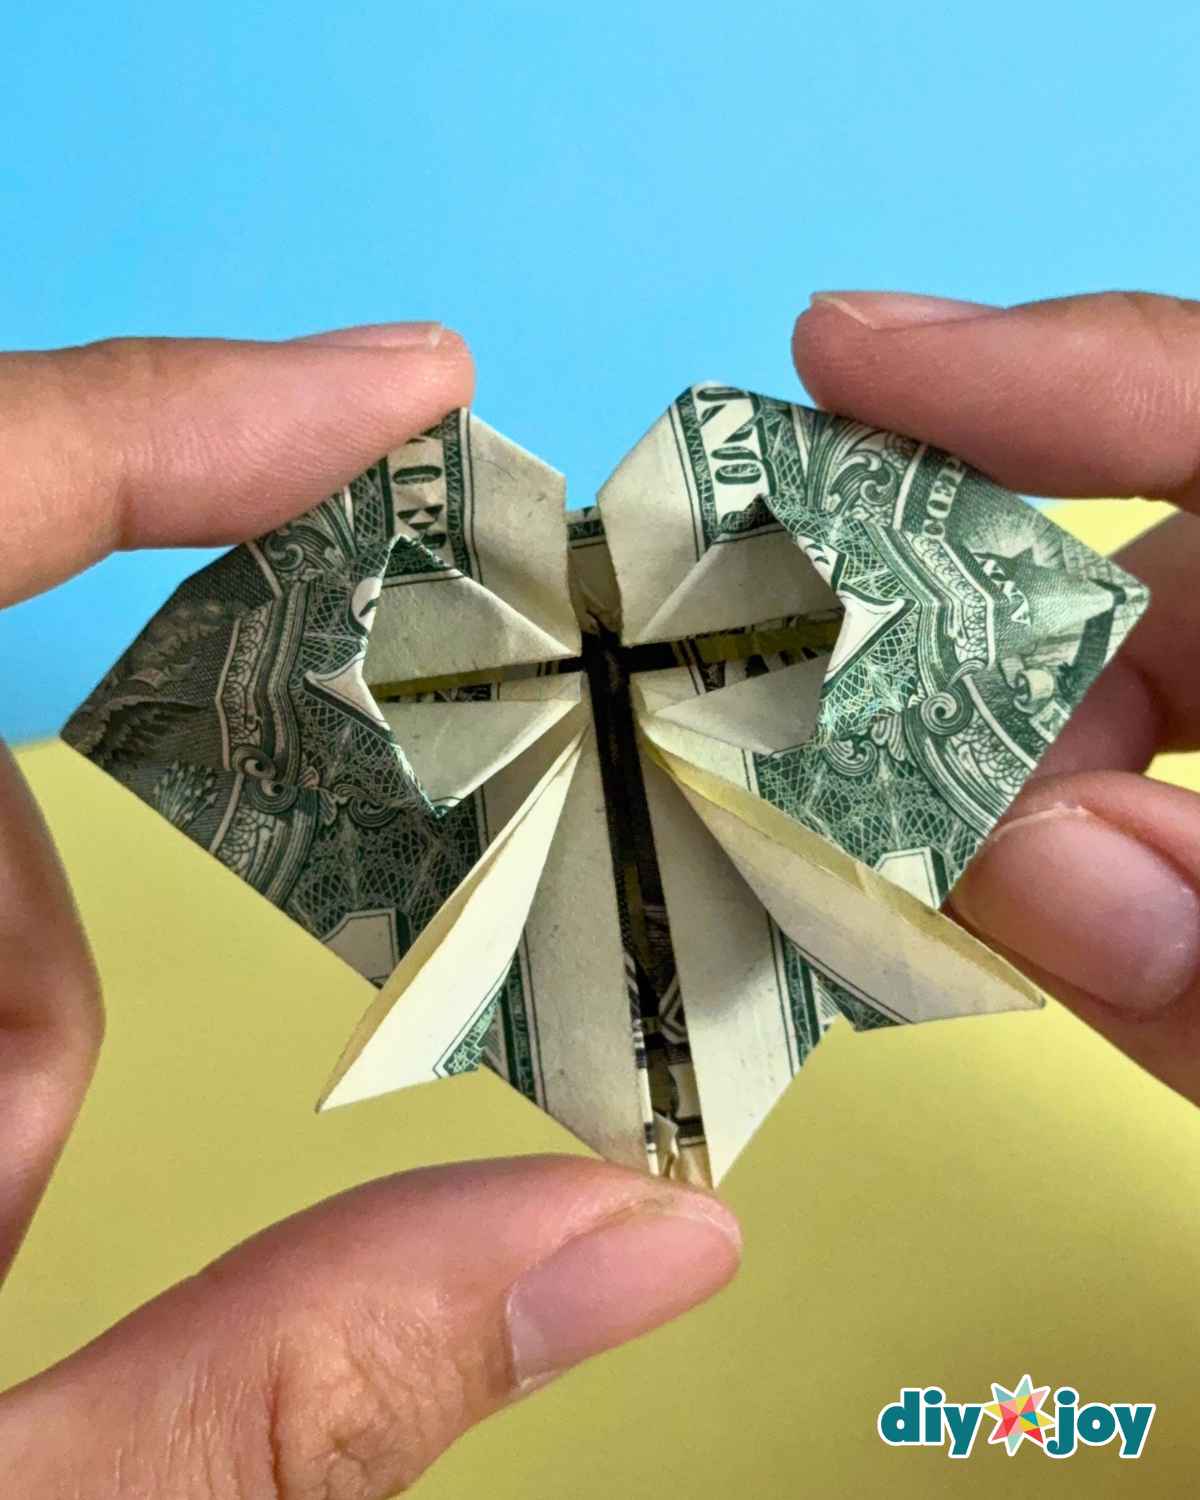
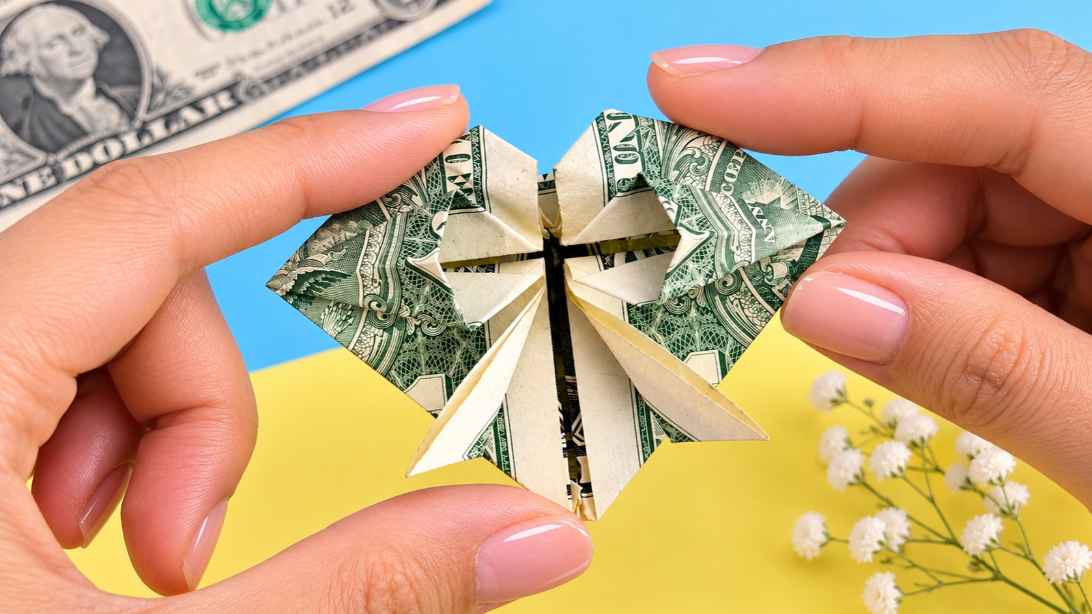
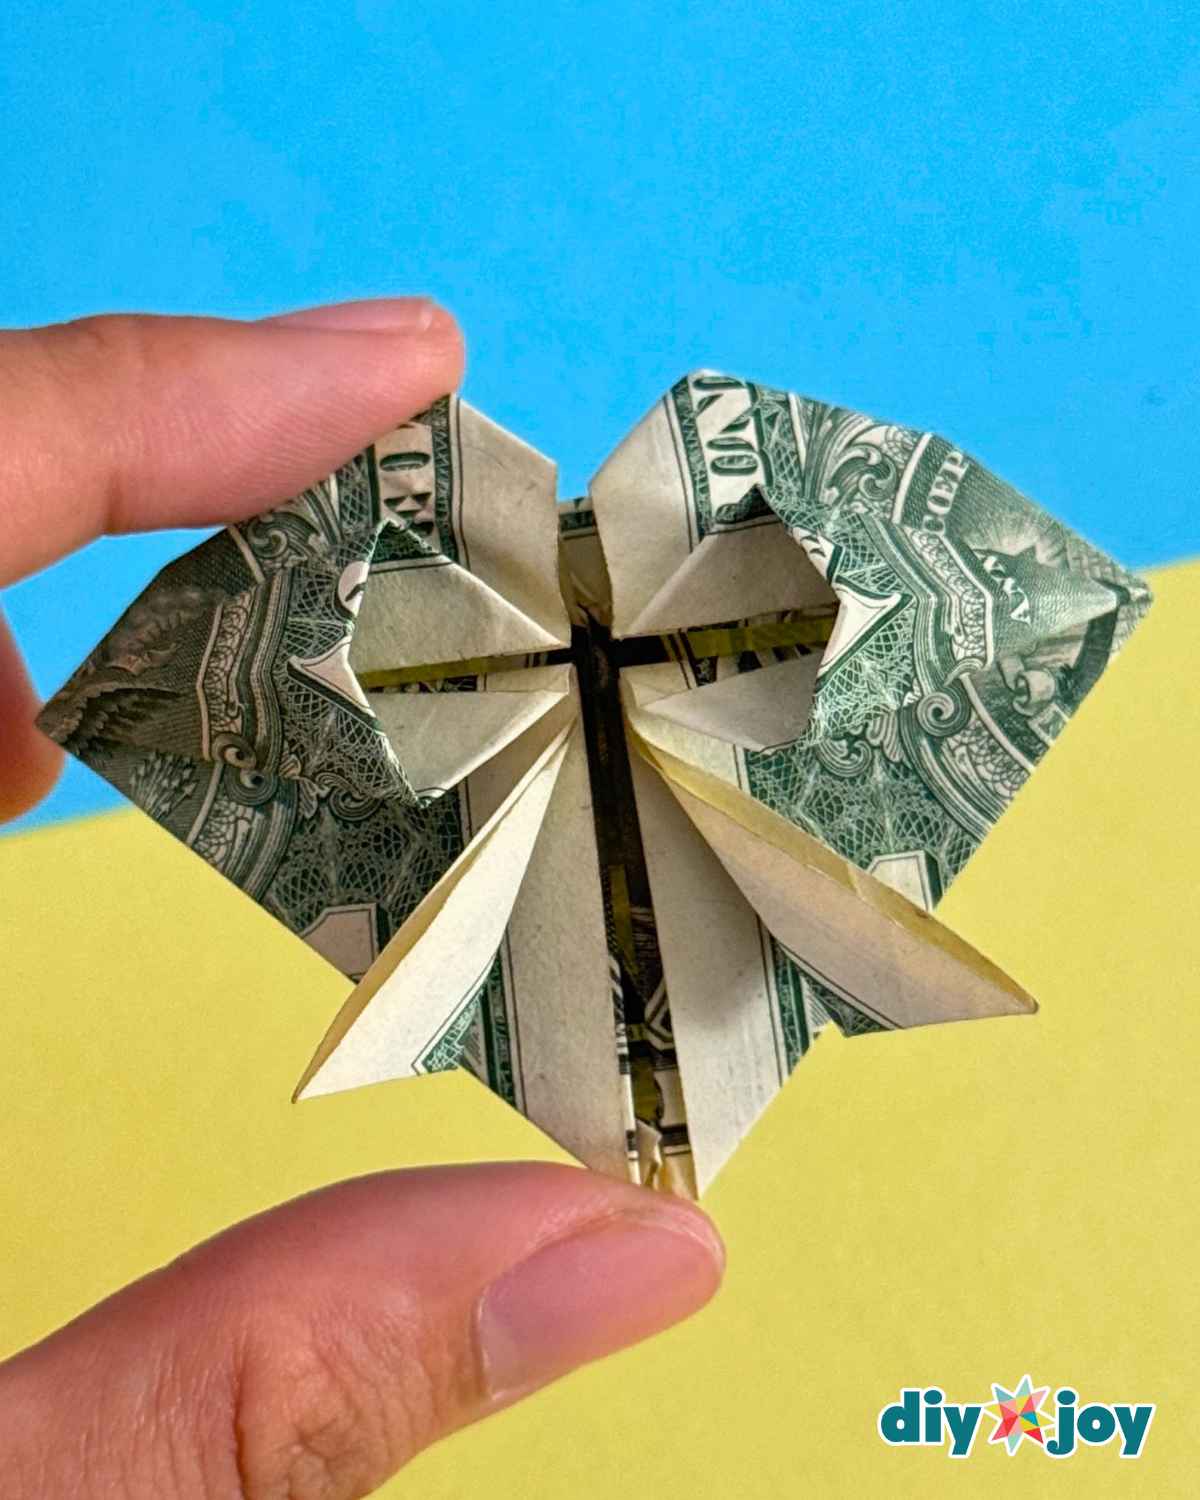
Today, I’ll show you how to fold a dollar bill into a heart, but not just any heart. This one comes with a bow! Yes, an adorable little bow right in the middle, and I think it makes the whole thing even cuter!
This dollar bill heart with a bow is also perfect for making a DIY money bouquet. Once you’ve finished folding it, you can carefully attach it to a stick and arrange several pieces into a beautiful bouquet. You can even add some chocolates, real flowers, or other small decorations as fillers to make it extra special.
It’s a fun and creative gift idea for birthdays, Valentine’s Day, Christmas, anniversaries, or really any occasion. You can even give it to someone you love just because! Keep reading below, and I’ll show you how to make this adorable dollar bill heart with a bow step by step.
RELATED: Easy $1 Bill Heart Origami Tutorial | Easy Dollar Heart Origami Tutorial
Table of Contents
How to Fold a Dollar Bill Into a Heart with a Bow
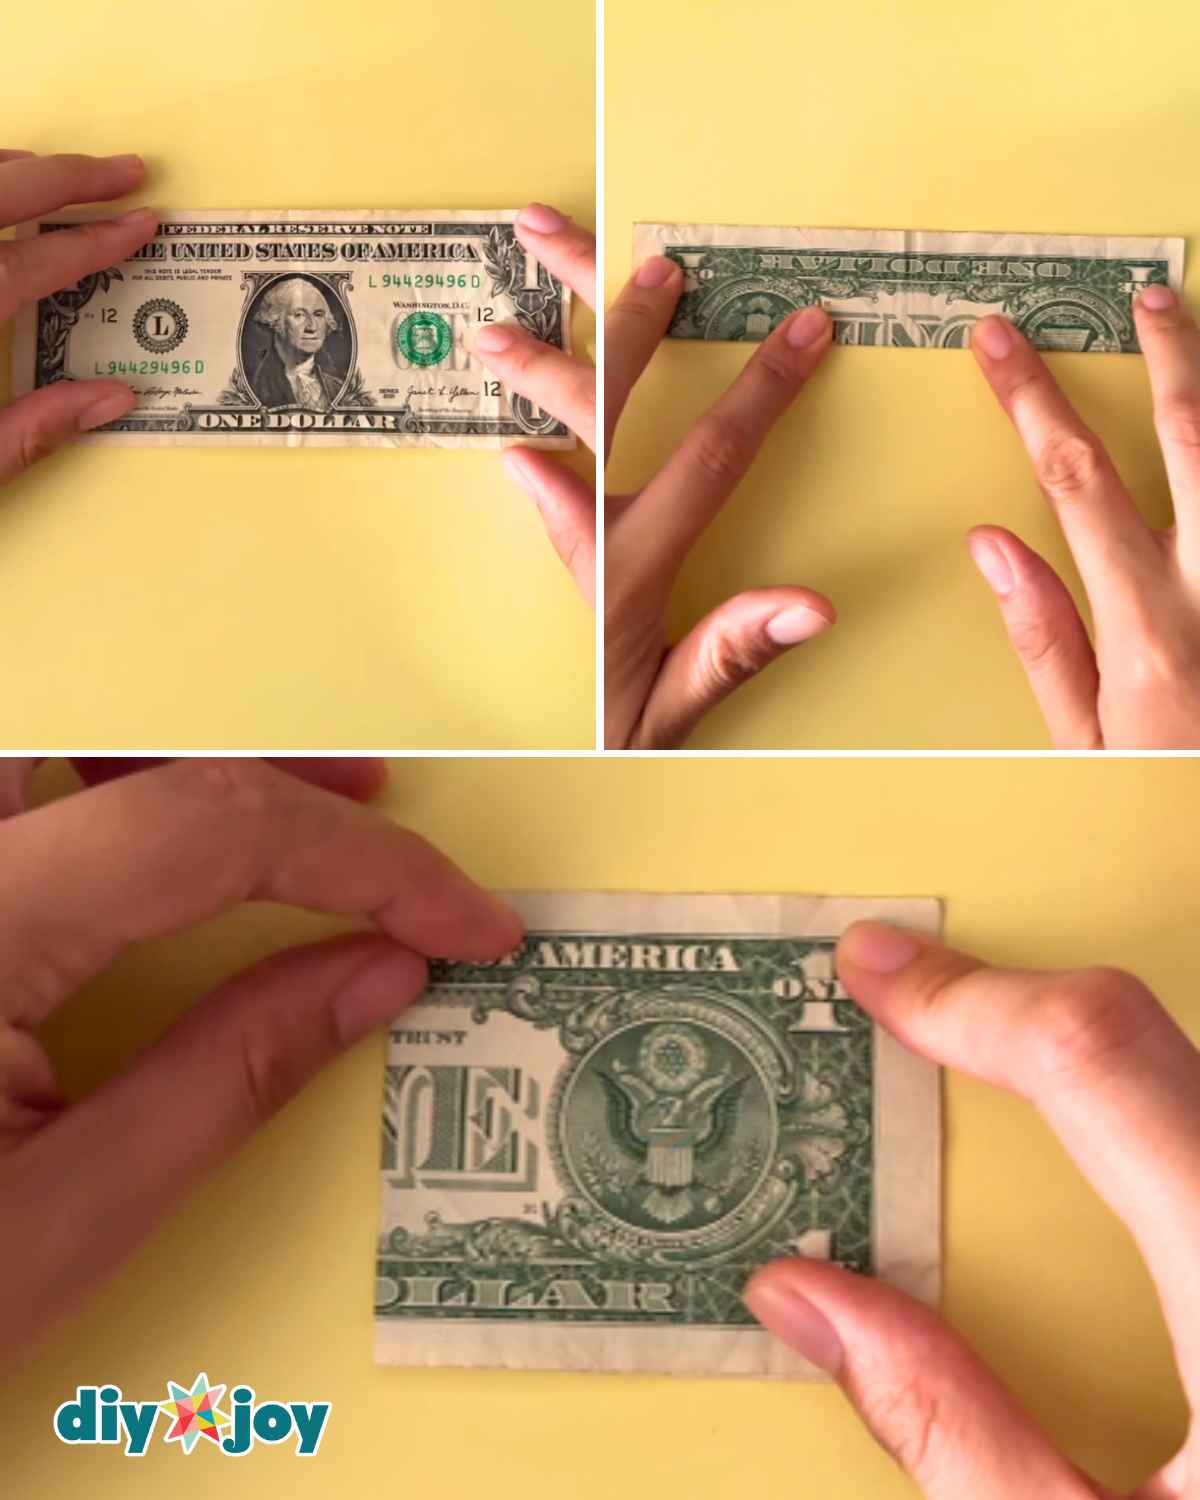
Step 1: Making the Initial Creases
Fold the dollar bill in half lengthwise, then crease it firmly and unfold. Next, fold it in half crosswise, crease it again, and unfold.
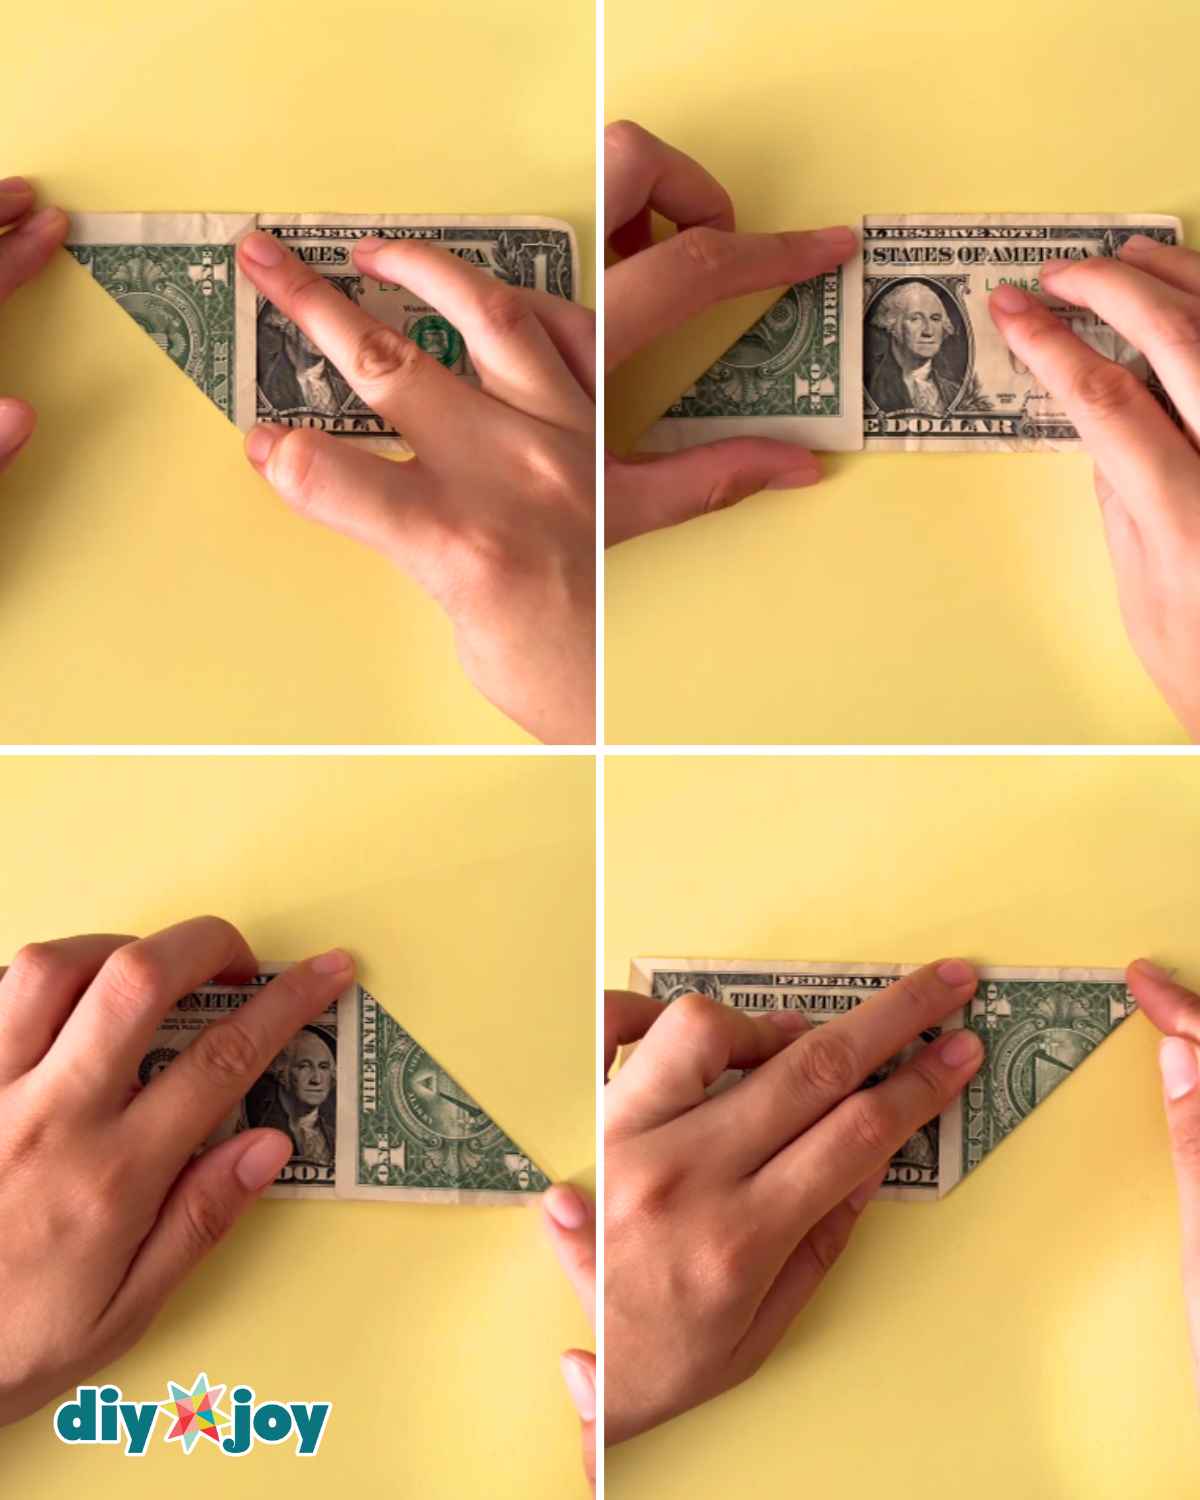
Step 2: Making the Diagonal Creases
Fold the bottom-left corner diagonally upward toward the center crease, press firmly, then unfold. Next, fold the top-left corner diagonally downward toward the same crease, press, and unfold again. Repeat these folds on the right side of the bill to create matching diagonal creases.
Step 3: Adding the Beard
Rotate the bill vertically, then gently push the sides of the top end inward, following the diagonal creases you made earlier. The folds should naturally come together to form a triangle. Press it down firmly to flatten and secure the shape, then repeat the same process on the opposite end of the bill.
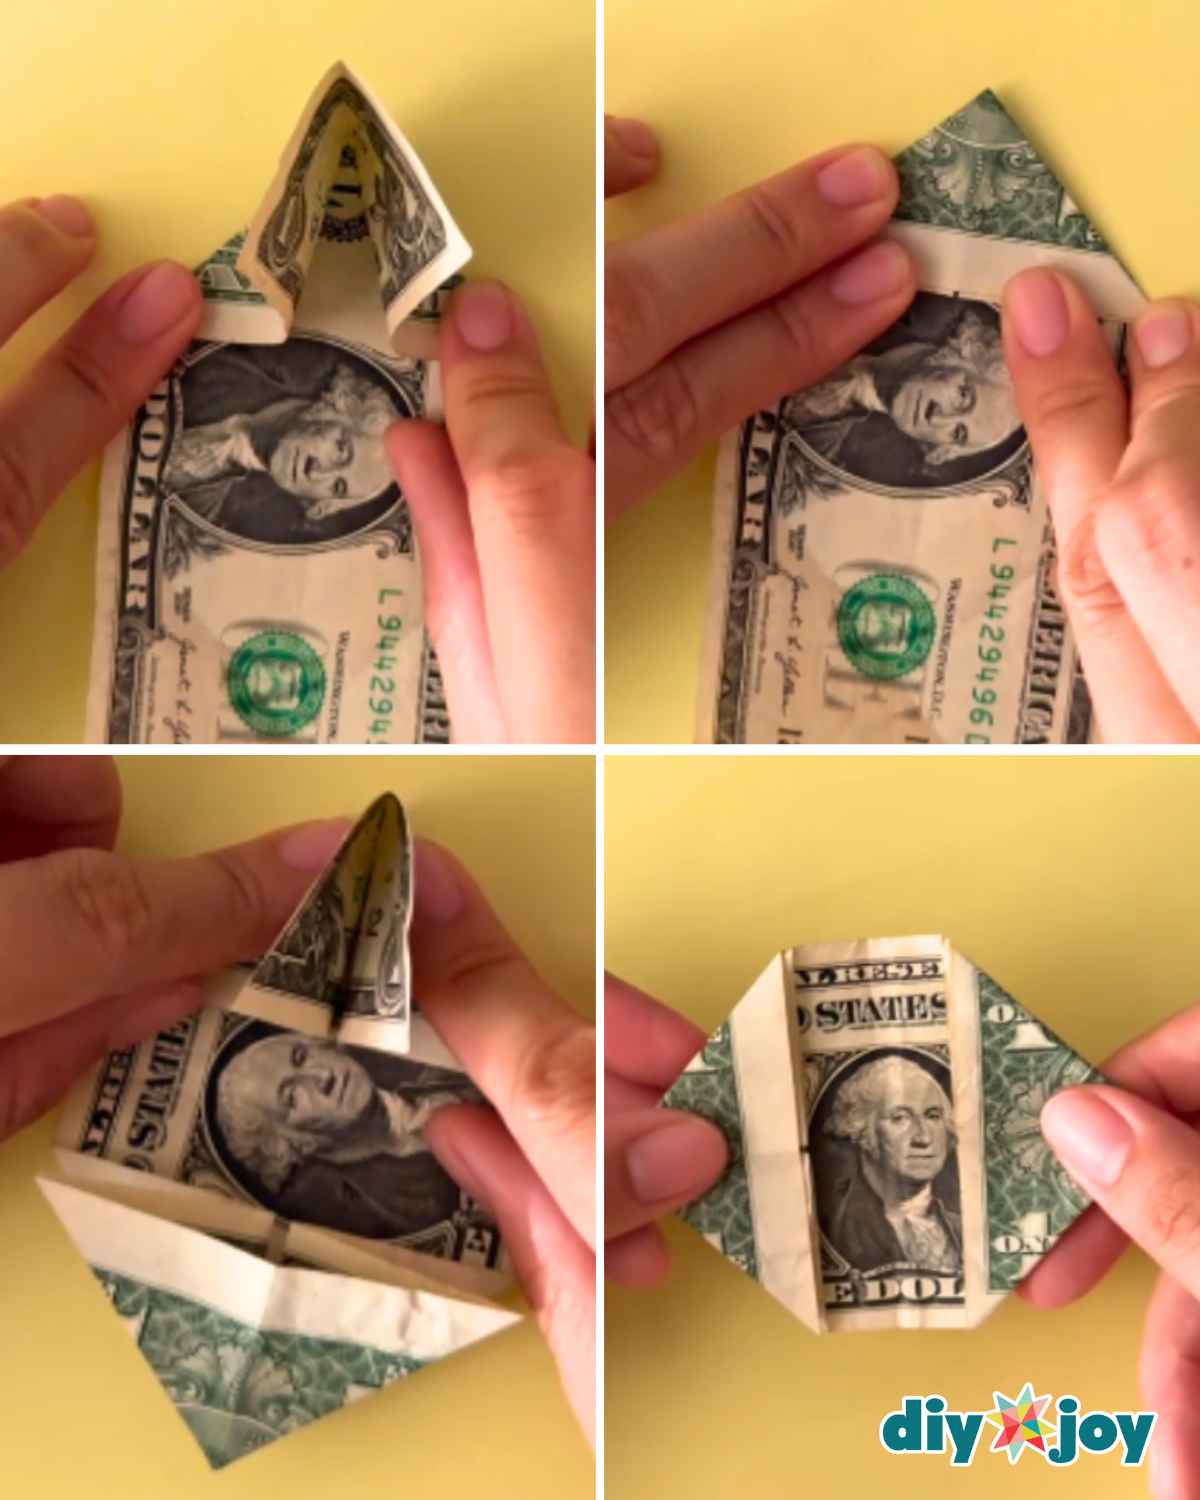
Step 4: Folding the Edges Toward the Center
Fold the bill along the base of the top triangle and press firmly to make a crease. Repeat the same process with the bottom triangle. Next, bring the creased edge of the top section toward the middle crease, then press it flat. Do the same with the bottom section, folding it upward toward the center and pressing firmly to secure the folds, as shown in the photo.
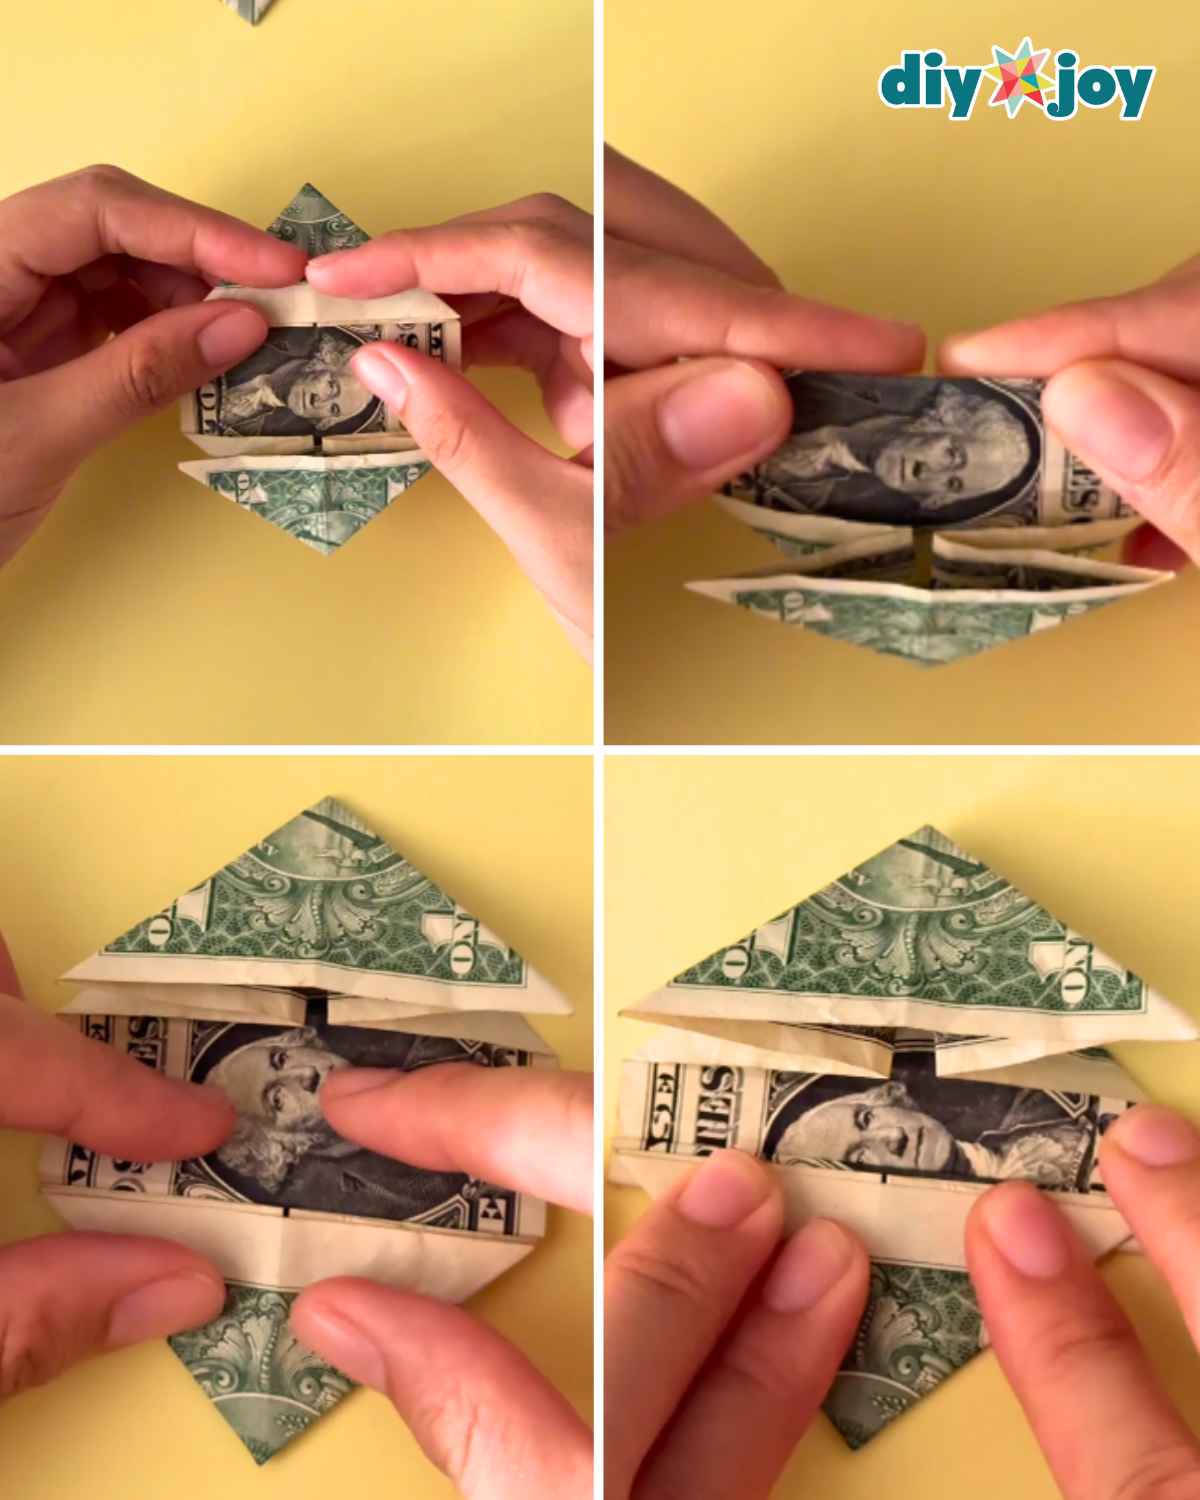
Step 5: Folding the Corners of the Center Strip
Flip the bill over so the back faces up, as shown in the photo. You’ll notice a narrow strip running down the middle, with small ends sticking out at the top and bottom. Fold both corners of the top end diagonally inward to form a small point, then press firmly to crease. Repeat the same process on the bottom end.
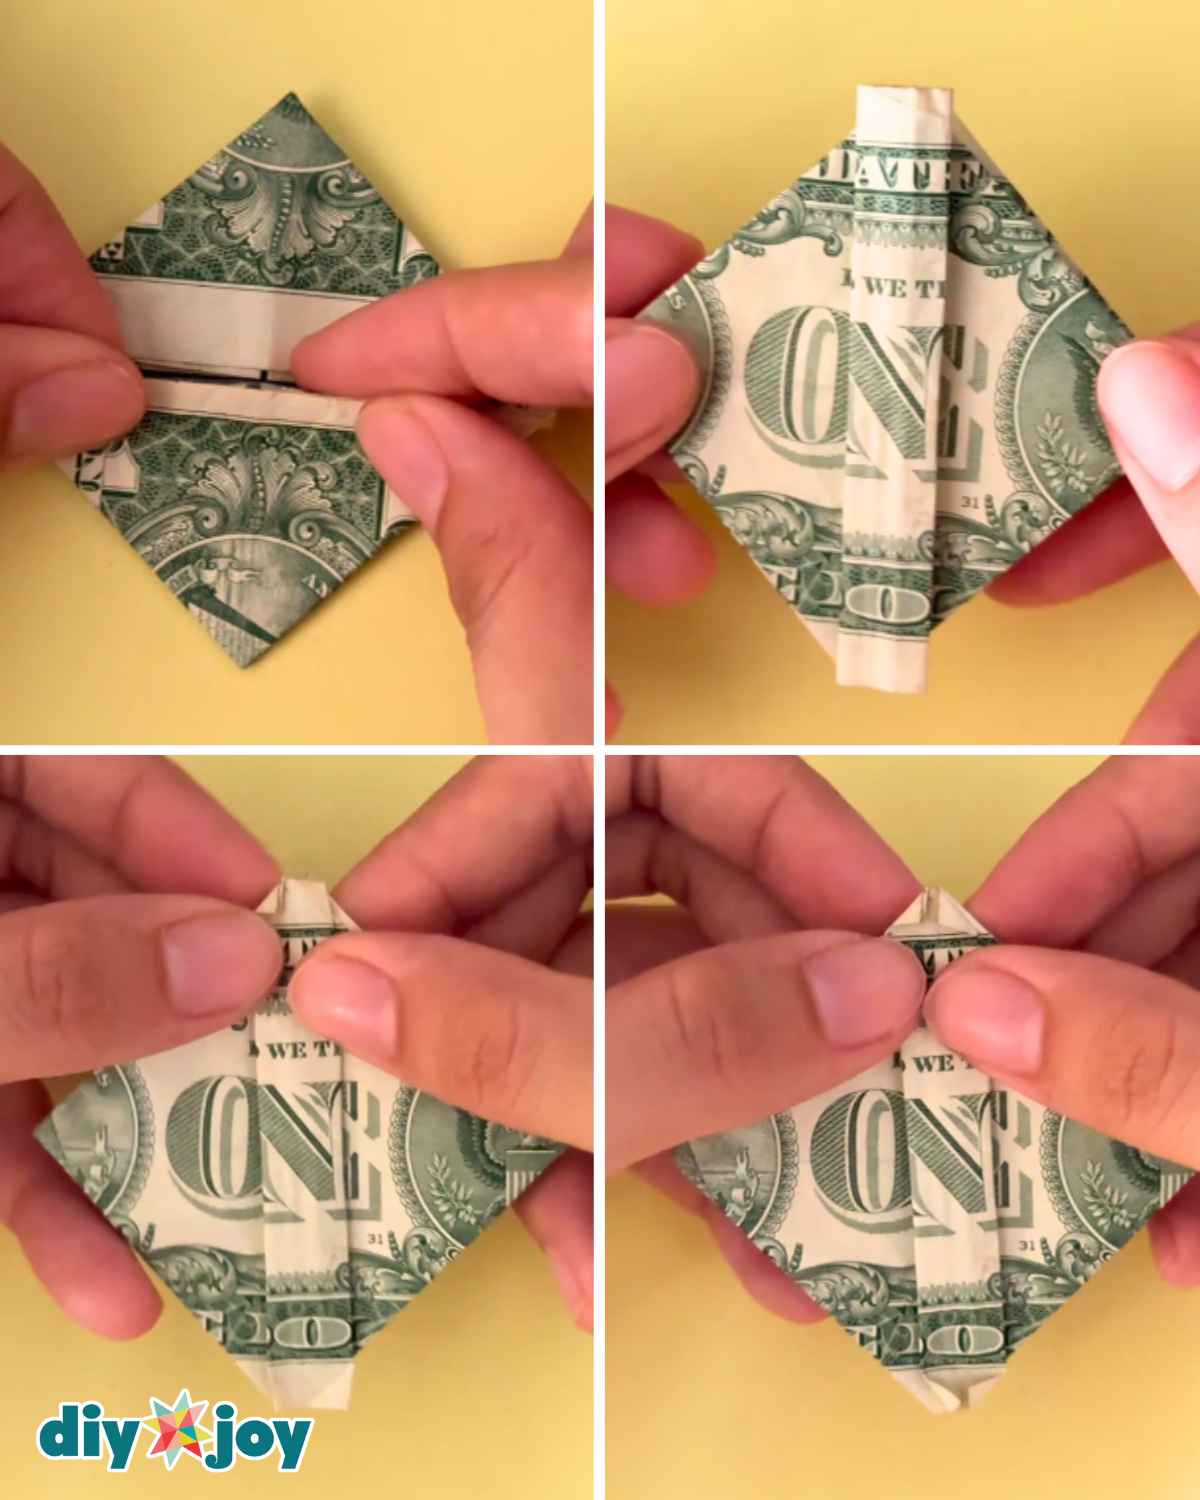
Step 6: Tucking in the Small Corners
Carefully unfold the small corners you made in the previous step. Gently open up the folded section, then push the creased tip inward and tuck it inside, following the existing folds. Press it down to secure the shape, then repeat the same process on the opposite end.
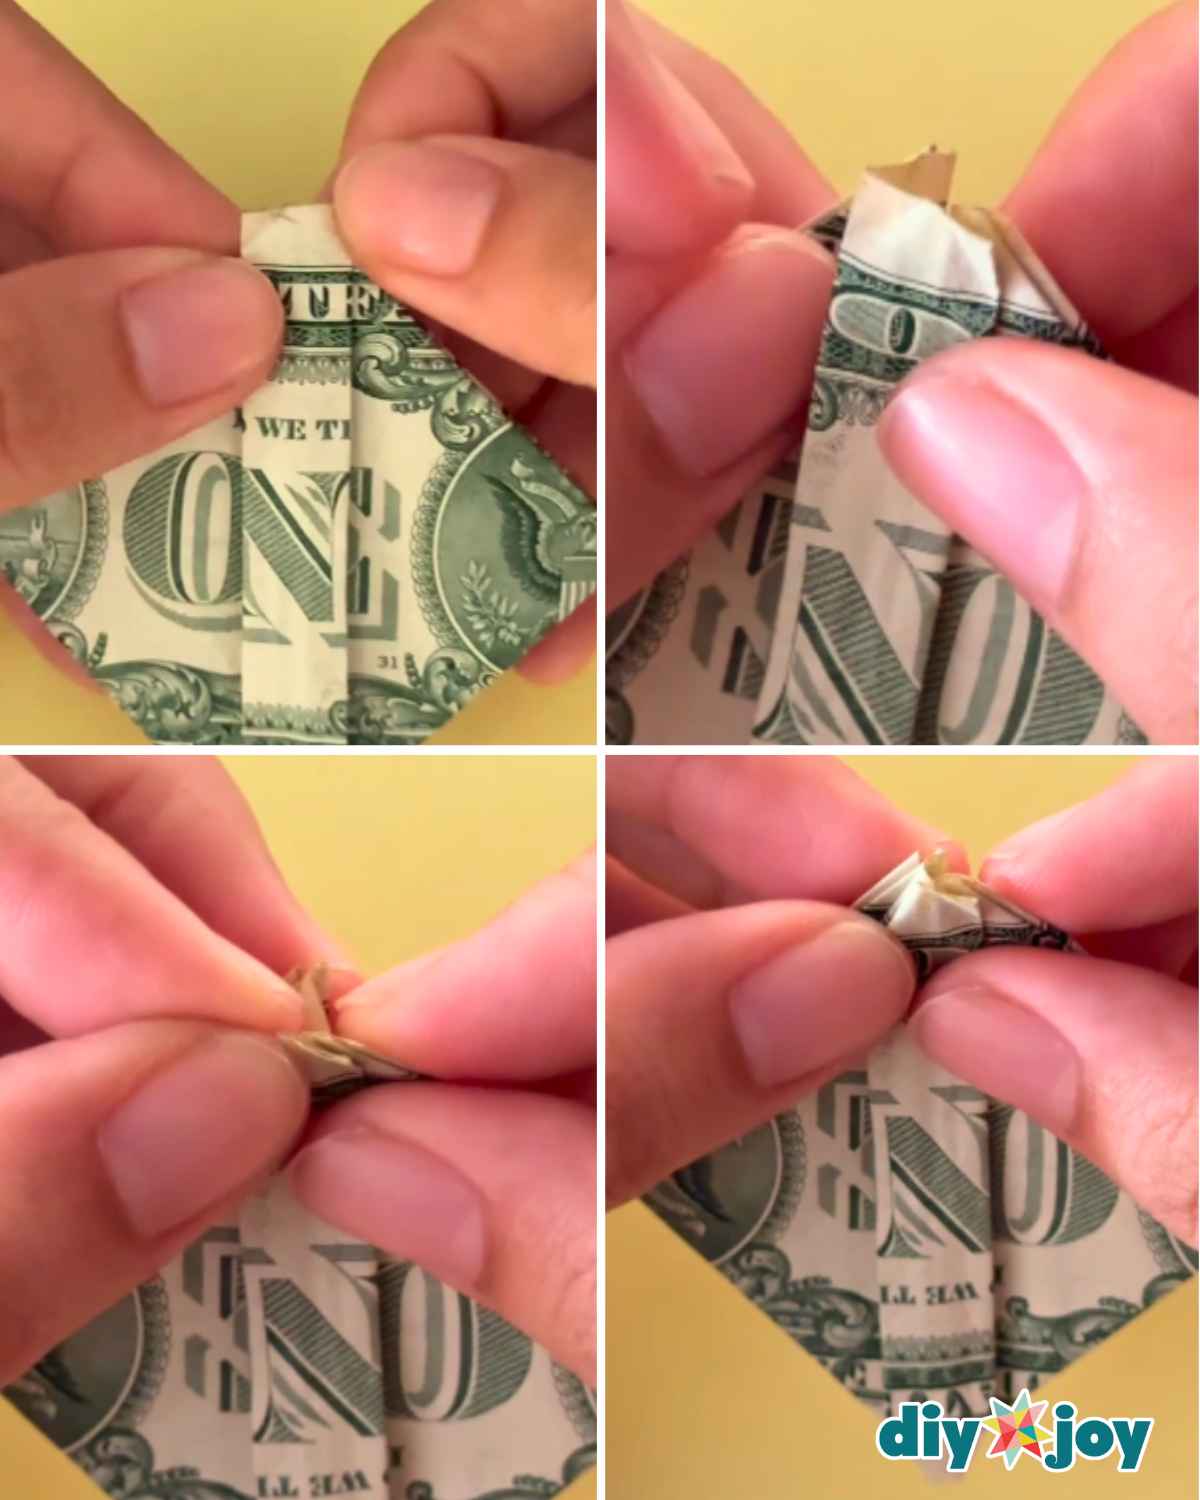
Step 7: Folding the Side Flaps
Flip the bill over so the side with the vertical opening in the middle is facing up. Take the upper corner of the left flap and fold it diagonally downward toward the center crease, as shown in the photo. Press firmly to secure the fold, then repeat the same process on the right side.
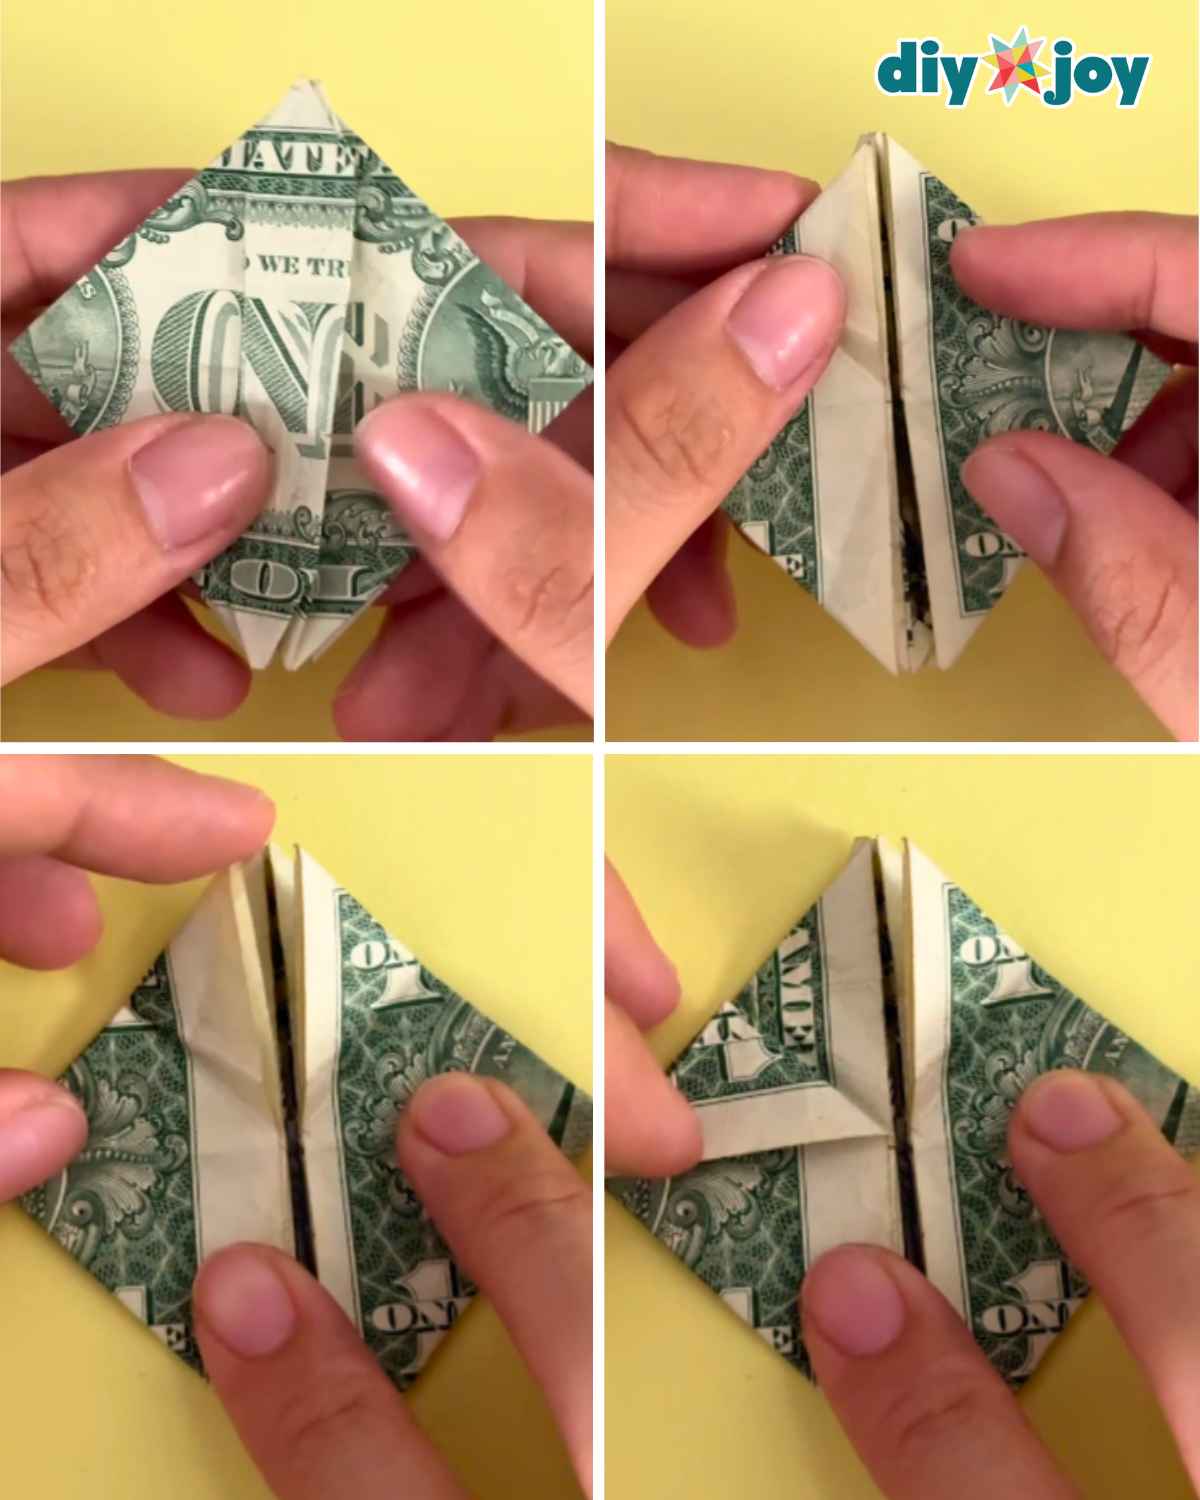
Step 8: Adding the Beard
Fold the small triangle at the top center downward and press firmly to make a crease, then unfold. Next, gently open the pocket on one side with your finger and push the folded section outward and downward, following the crease you just made. Press it flat to create a straight edge, then repeat the same process on the other side, as shown in the photo.
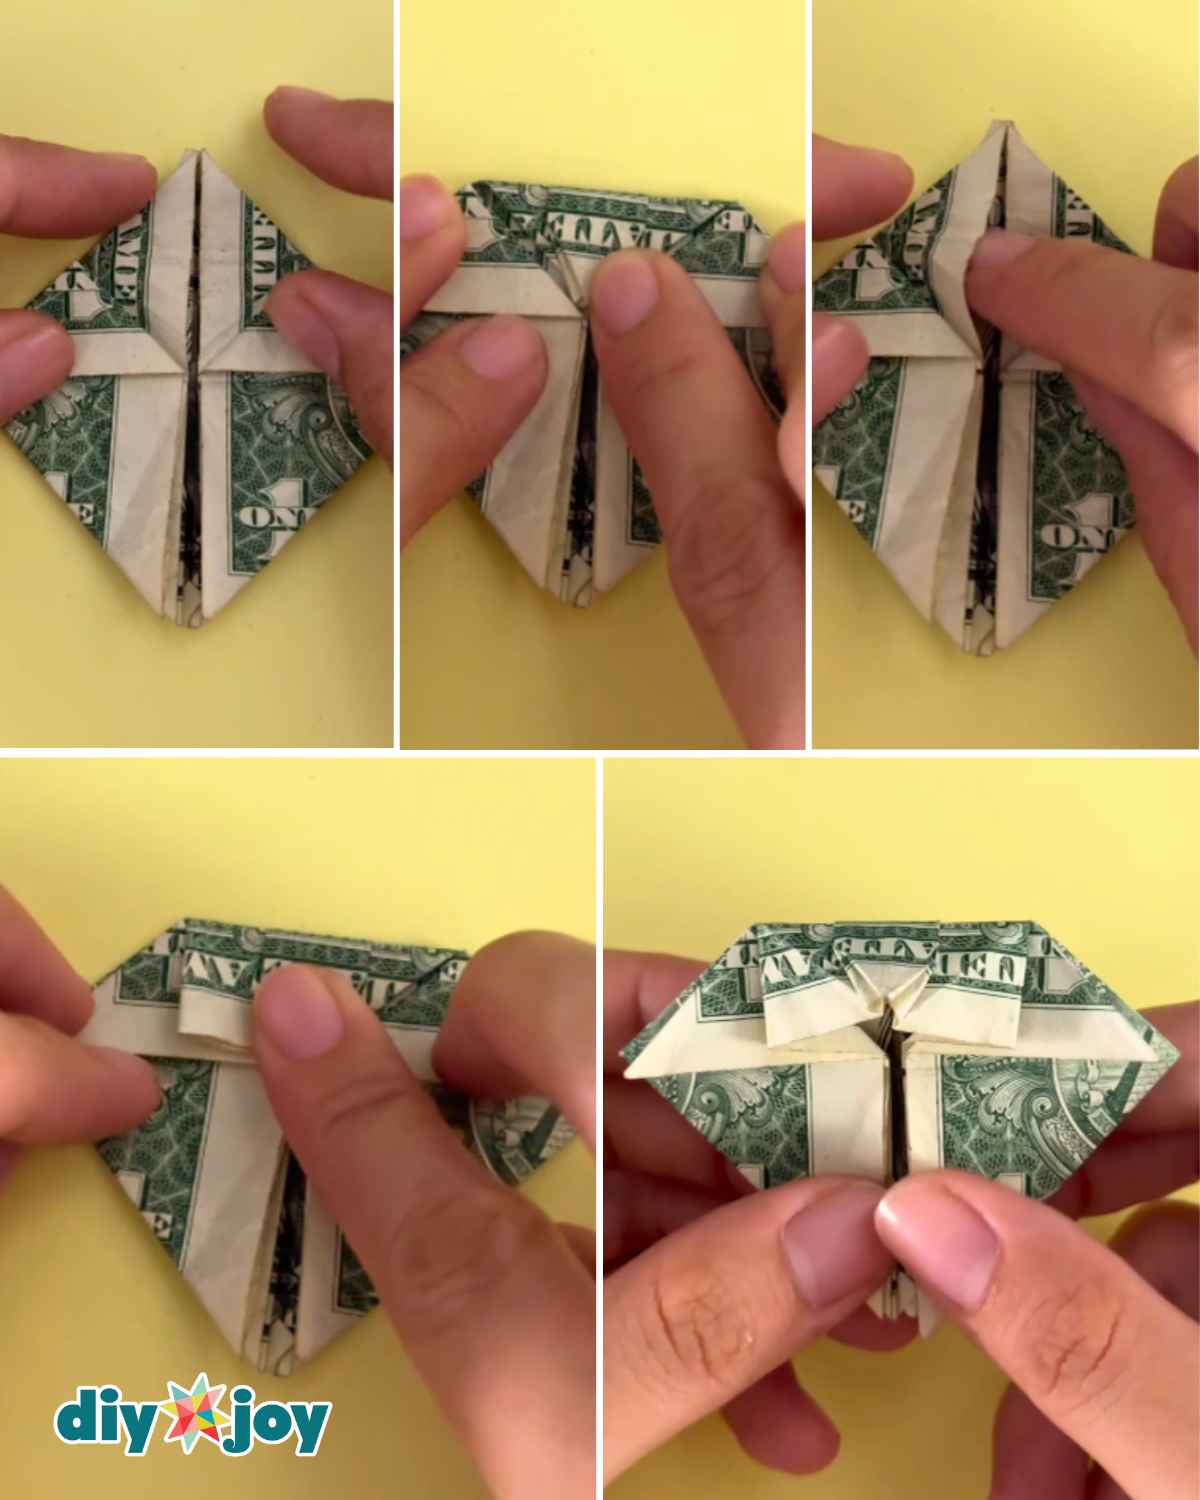
Step 9: Folding and Flattening the Top Flaps
Fold the uppermost flap upward until its edge is straight, then press firmly to crease. Repeat the same process with the flap on the other side. Next, flip the bill over and fold the top section downward, pressing firmly to secure the fold, as shown in the photo.
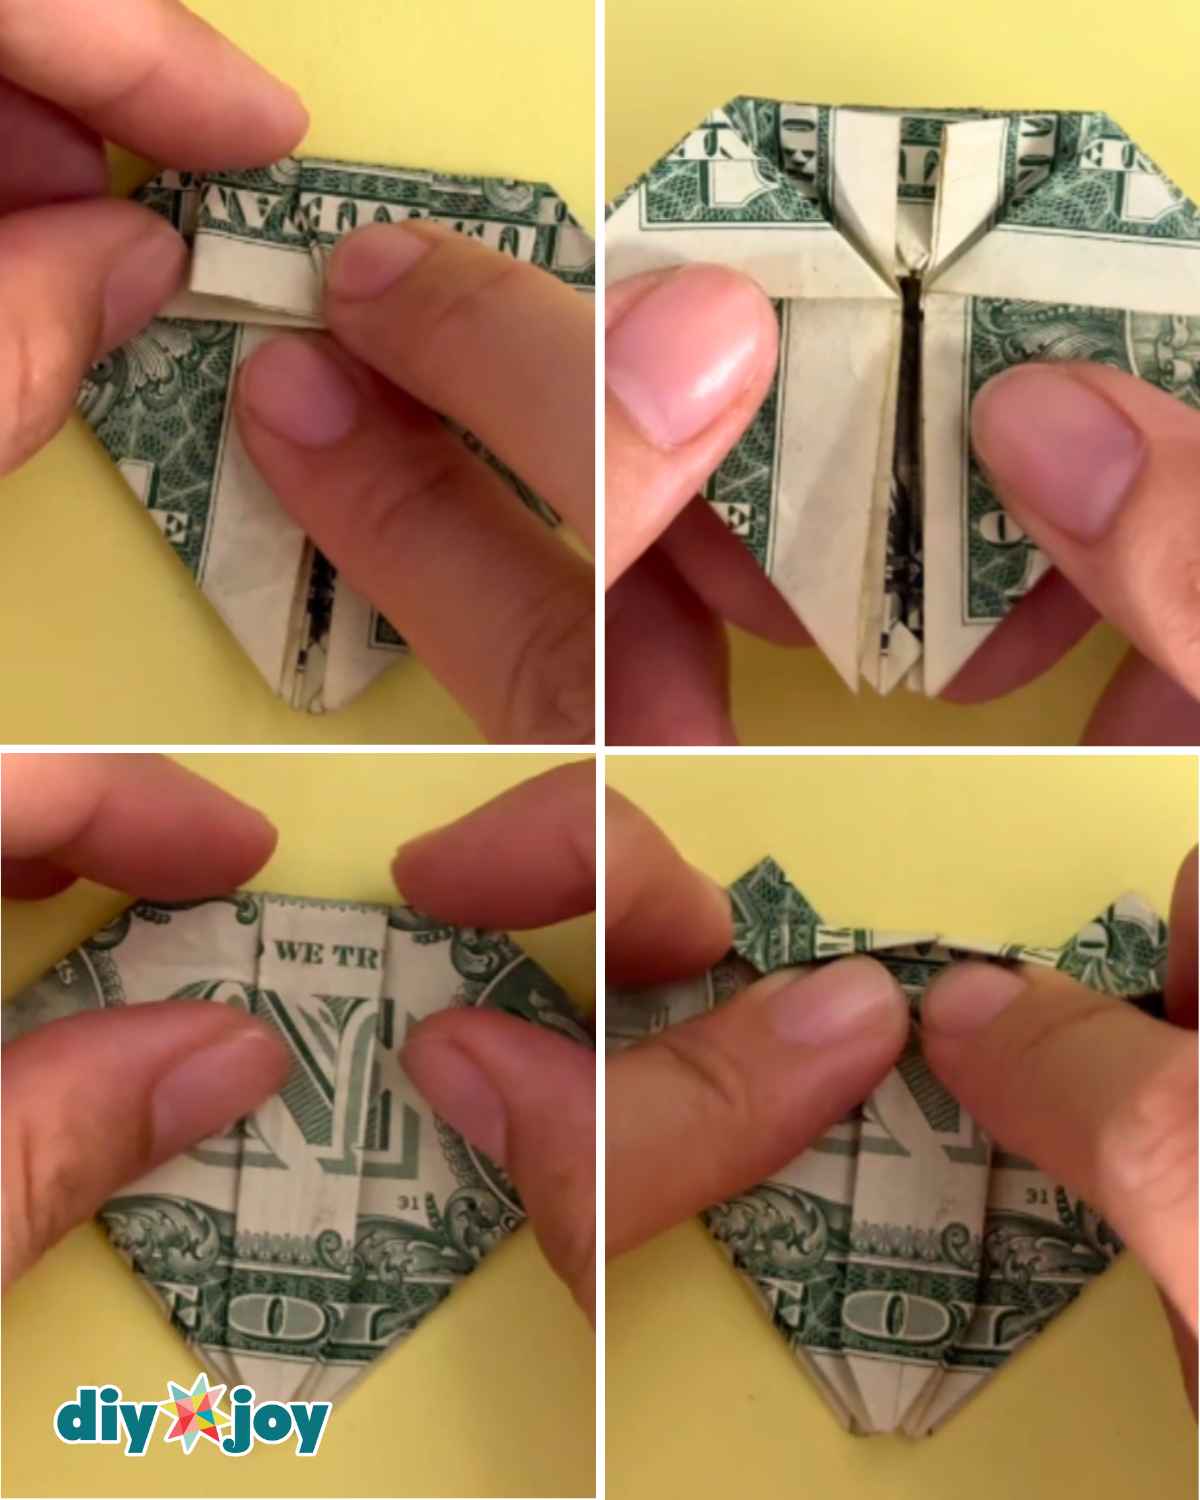
Step 10: Shaping the Top Corners
As you fold the top section downward, gently open the small pockets on both sides and flatten them along the existing creases. Next, fold the small flaps at the top diagonally inward to create neat, angled edges. Press everything firmly to secure the folds, then flip the bill over to the front, as shown in the photo.
Step 11: Tucking in the Side Flaps
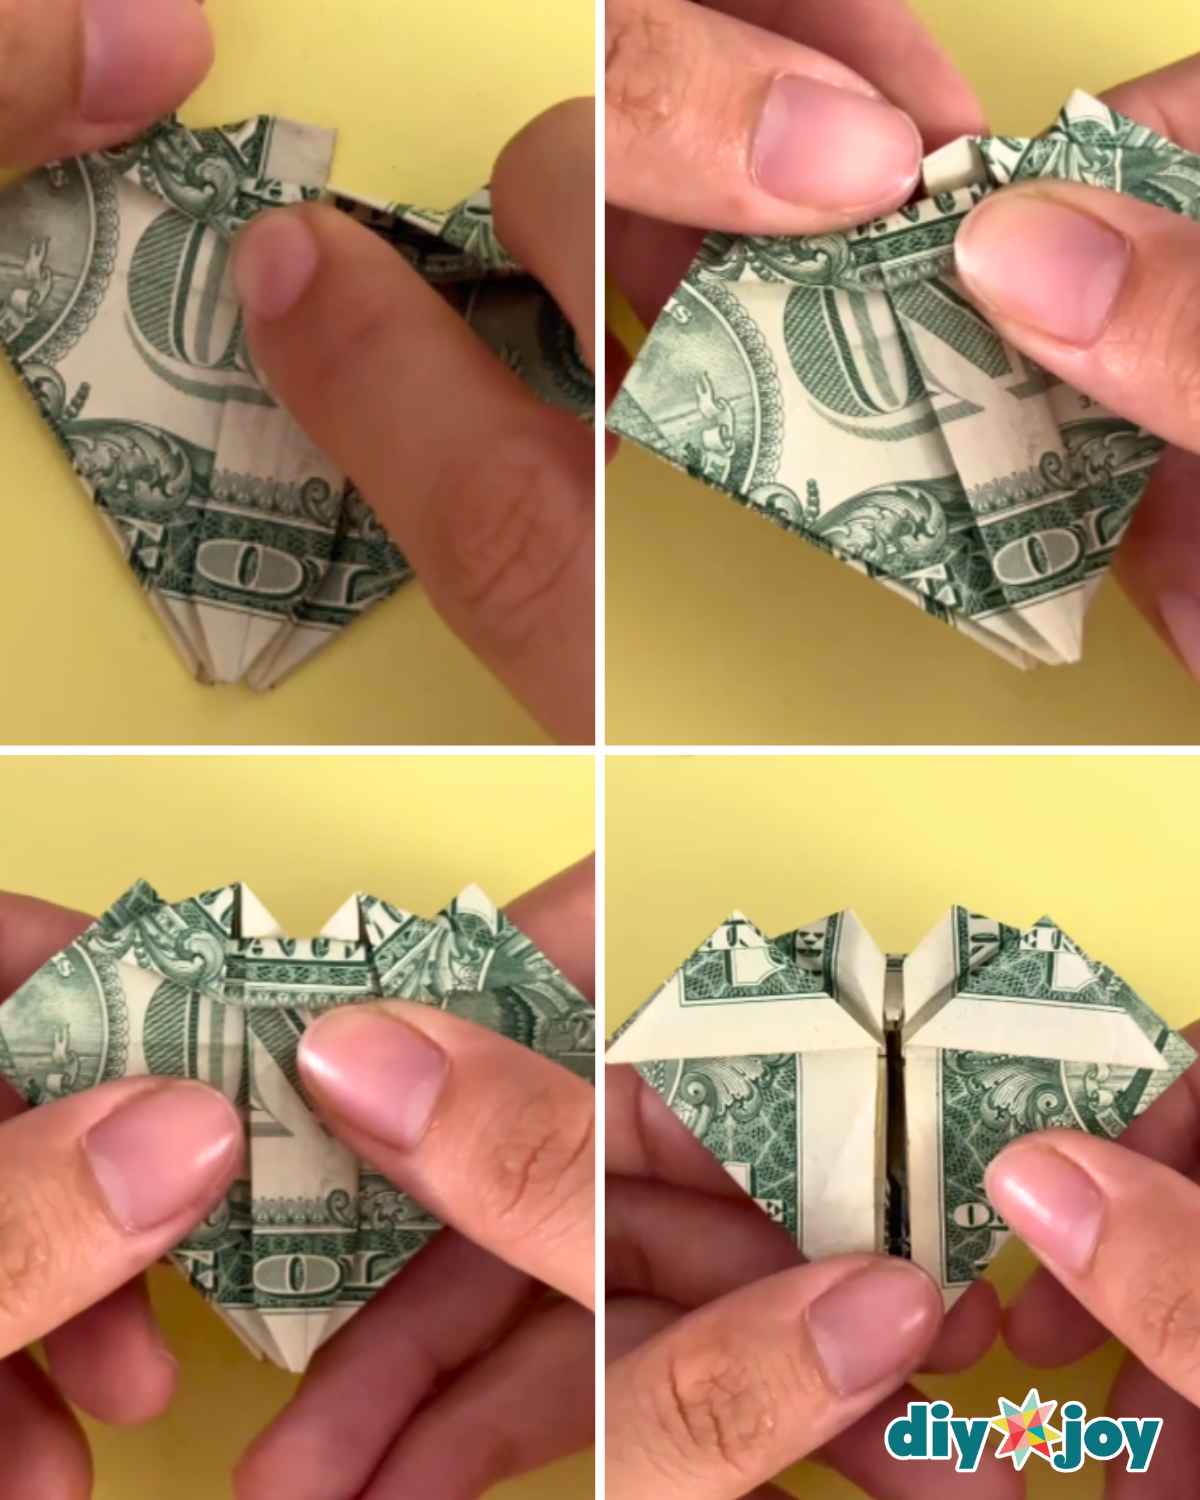
Carefully unfold the left flap and gently open the pocket underneath. Tuck the upper edge of the flap into the pocket, making sure the creases line up neatly and fit snugly together. Press firmly to secure the fold, then repeat the same process on the right flap.
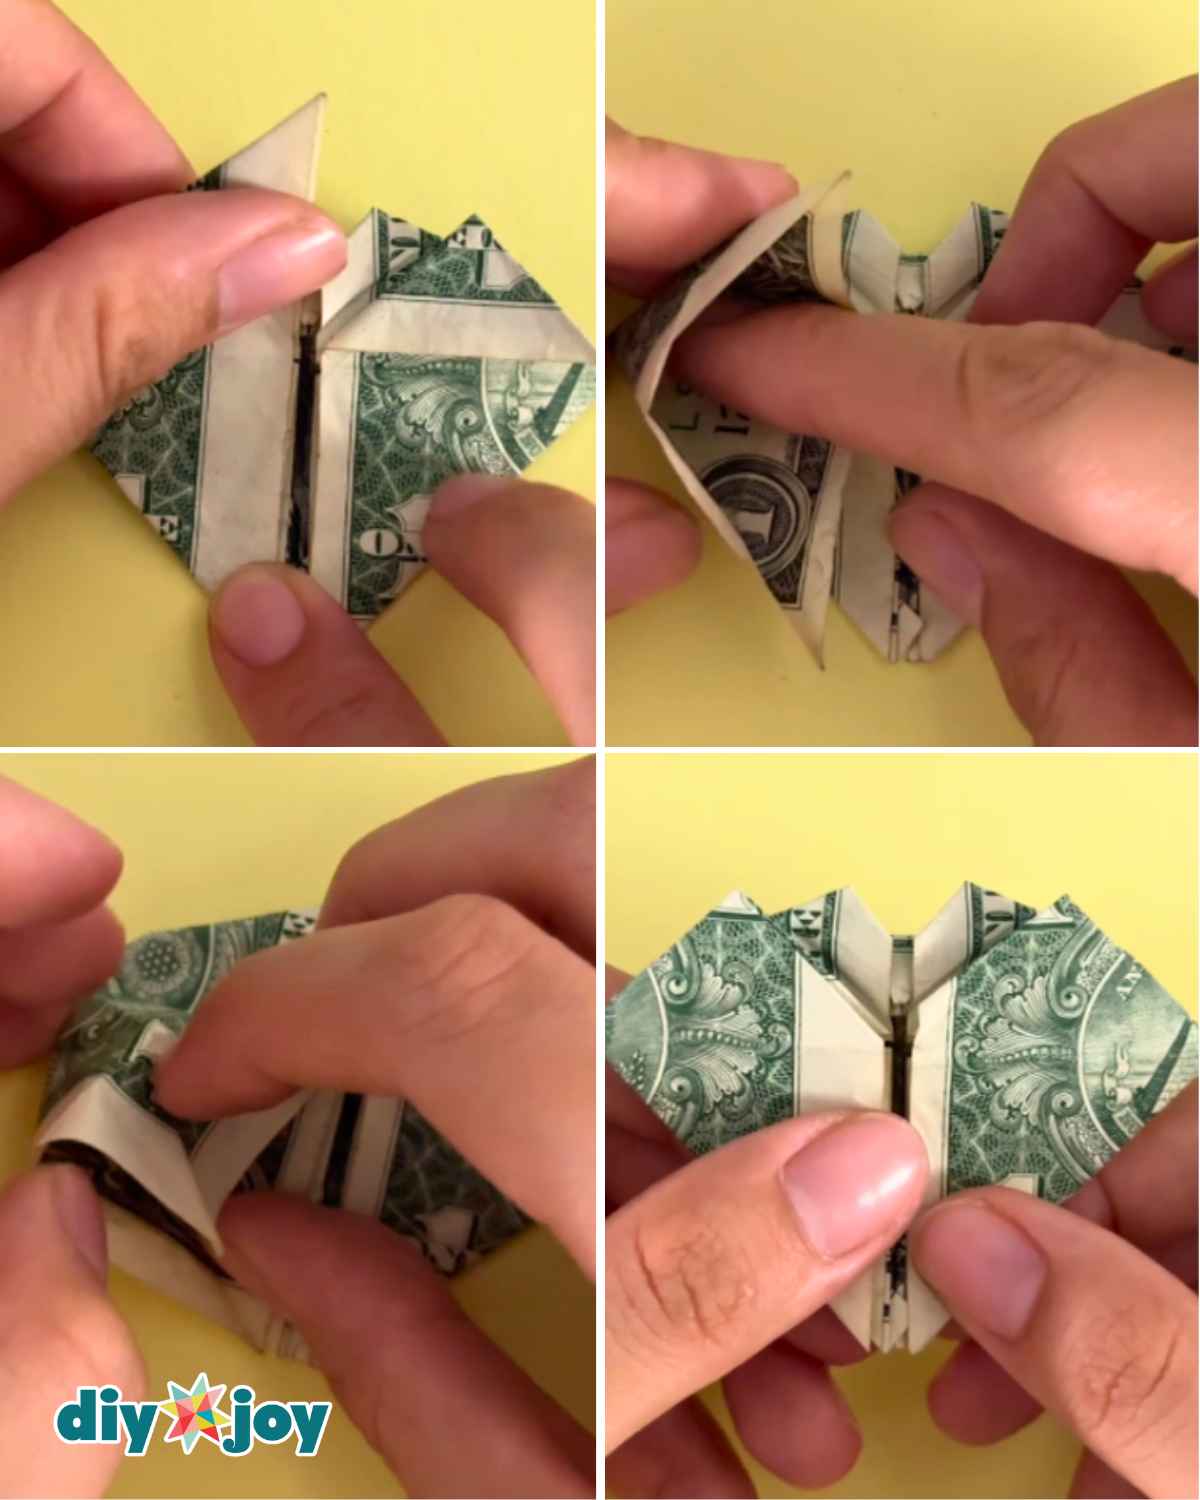
Step 12: Folding the Lower Flaps Diagonally
Fold the newly formed side flaps downward along their center creases and press them flat. Next, use the edges of these folded sections as a guide to fold the lower flaps diagonally, making sure their edges line up neatly. Press firmly to create a crease, then repeat the same process on the opposite side, as shown in the photo.
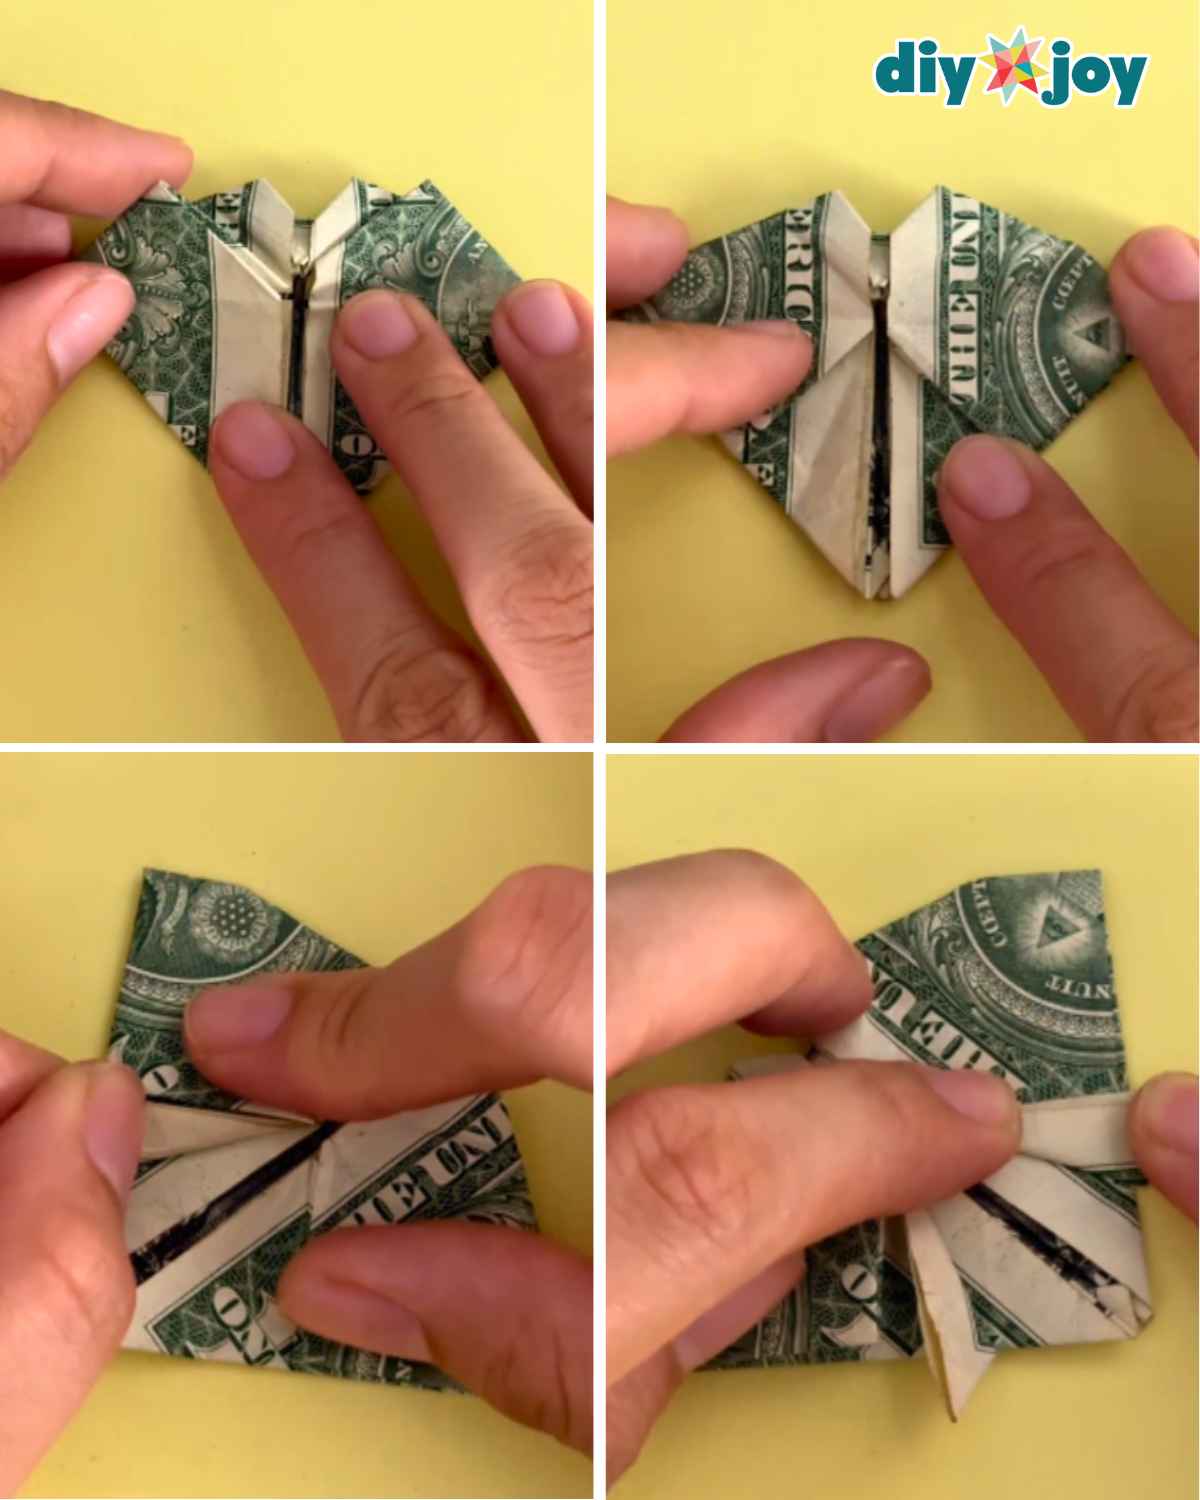
Step 13: Shaping the Bow
Finally, gently pull the upper flap toward the center, then carefully open it up to form a small pocket. Press it flat to create one side of the bow, then repeat the same process on the opposite side. Adjust the folds as needed to make the bow look neat and even, and you’re done! Your adorable dollar bill heart with a bow is ready!
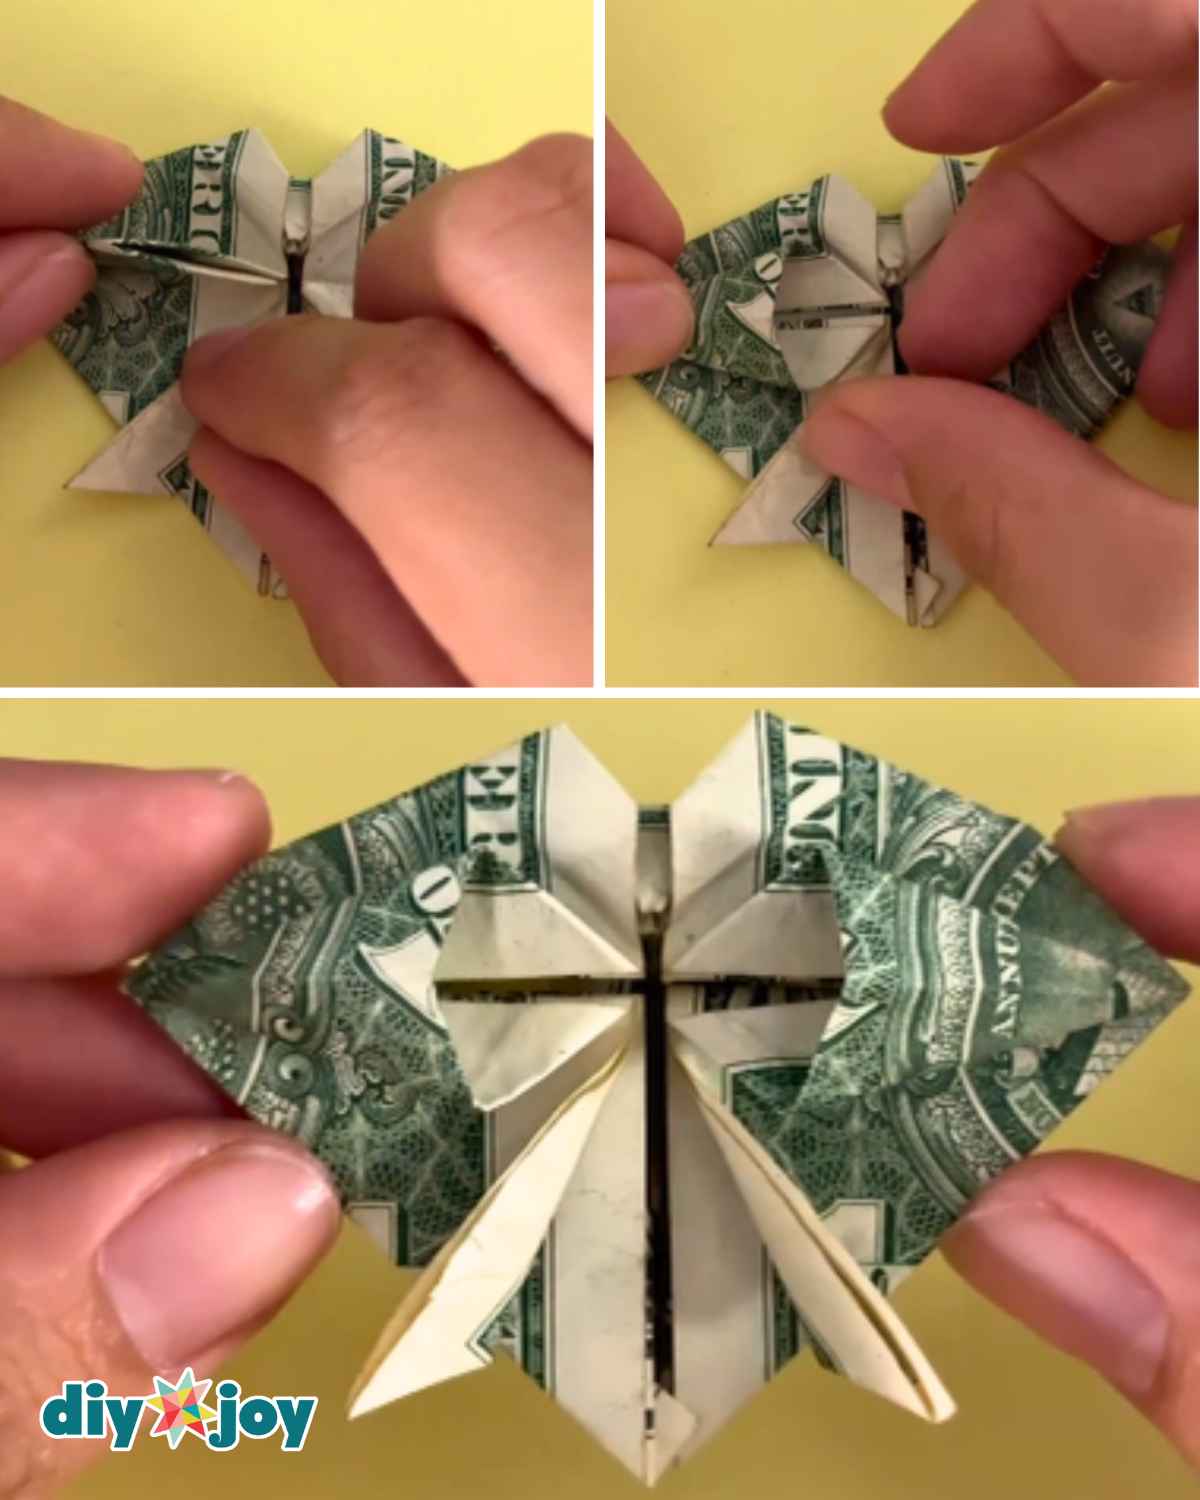

Pro Tips
Use a Crisp, Flat Dollar Bill
For the best results, use a dollar bill that’s relatively new, flat, and free of wrinkles or tears. A crisp bill makes it easier to create neat folds and helps the finished heart hold its shape better.
Practice With Paper First
If you’re trying money origami for the first time, I recommend practicing with a piece of paper cut to the same dimensions as a dollar bill, approximately 6.14 × 2.61 inches (15.6 × 6.6 cm). This lets you get familiar with the folds and practice the trickier steps without worrying about damaging real money. Once you’ve mastered the technique, you can confidently try it with an actual dollar bill!
Make Sharp and Precise Creases
One of the secrets to making beautiful money origami is creating clean, sharp creases. Press firmly along each fold using your fingertips, and make sure the edges line up as neatly as possible. This will make the next steps much easier!
Take Your Time With the Small Folds
Some parts of this project can be a little tricky, especially when opening the small pockets and tucking the flaps inside. Be gentle and avoid pulling too hard, as you don’t want to accidentally tear the bill. If a fold doesn’t look right, carefully unfold it and try again.
Practice With a One-Dollar Bill First
If you’re planning to use a higher-denomination bill for gifting, I recommend practicing with a one-dollar bill first. This way, you can familiarize yourself with the folding technique and avoid making too many creases or mistakes on the bill you actually want to give.
Be Careful When Attaching the Heart to a Stick
If you’re turning your dollar bill hearts into a money bouquet, avoid using permanent glue or strong adhesive directly on the bills. You can use a small removable clip or a clear holder attached to a stick instead. This makes it easier for the recipient to remove and unfold the money without damaging it.
Save this Craft on Pinterest
Roll over the image to get the button.