Got a basket of half used polish you’ll never wear again? Don’t toss it! These 20 nail polish crafts turn those bottles into gifts, decor and accessories you’ll actually use. Polish is cheap, dries fast, comes in every color you can dream up and leaves a glossy, enamel-like finish on metal, glass, clay, wood and shells. Float it on water and it marbles all on its own, so a plain flower pot, a stack of tiles or a sheet of paper picks up swirls in seconds. You’ll find color coded keys, enameled party spoons, glitter barrettes, seashell hair pins, glass pendants, a marbled jar lid jewelry purse and glossy hot glue flowers. Work in a well ventilated spot, keep a bottle of remover nearby for cleanup and save every last drop.
1. DIY Glitter Magnets

These DIY glitter magnets start with clear glass pebbles from the dollar store vase filler aisle. Flip each pebble flat side up and paint that side with nail polish. If you’re using a sheer glitter polish, back it with a solid color so the magnet doesn’t show through. Give it a second coat once the first is dry, then a clear top coat to stop chipping. Cut magnetic tape to size and press it onto the painted side. Swap colors for every holiday: red, white and blue in July, orange and black for Halloween.
Get the full tutorial at Finding Zest.
2. DIY Nail Polish Marbled Jewelry Purse
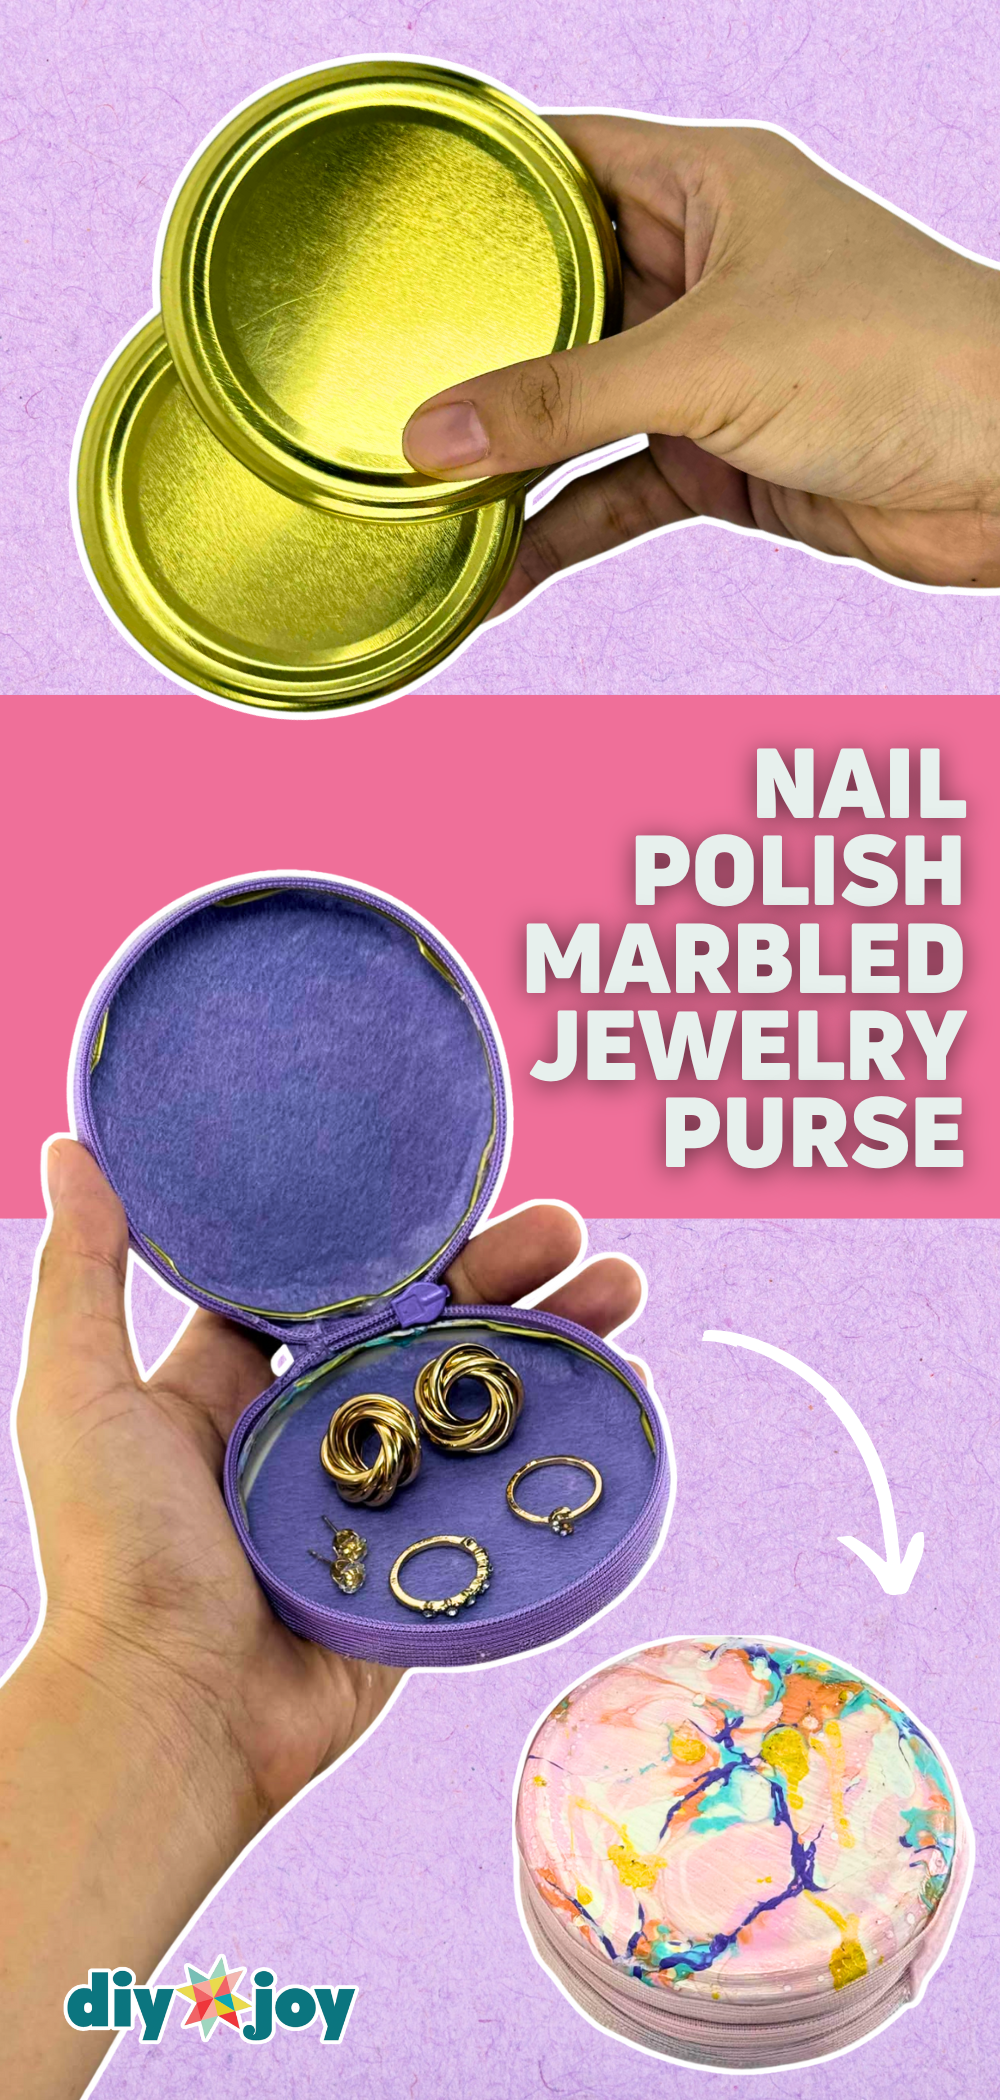
This DIY nail polish marbled jewelry purse turns two metal jar lids into a zip-around travel case. Prime the lids white and let them dry fully so the polish grips. Pour a few colors onto a container of water, dip each lid straight in, no swirling needed, and shake off the drips. Once dry, line each lid with a felt circle. Hot glue a zipper around the rim of one lid, then glue the second lid on. Cover the zipper end with felt and add a charm. A clear top coat helps it last.
Get the full tutorial at DIY JOY.
3. DIY Blinged Out Keys

DIY blinged out keys end the fumbling at the front door, because every key gets its own color. Clean each key head with rubbing alcohol and let it dry. Bend a few bobby pins into a V and tape them to the edge of a table to make little drying hooks. Tape off the part of the key you want painted, then polish both sides and hang it up. Add a second coat when it’s half dry. Finish with polka dots from a dotting tool or a toothpick, or a swipe of silver glitter.
Get the full tutorial at A Thrifty Mom.
4. Marbled Clay Butterfly Wand
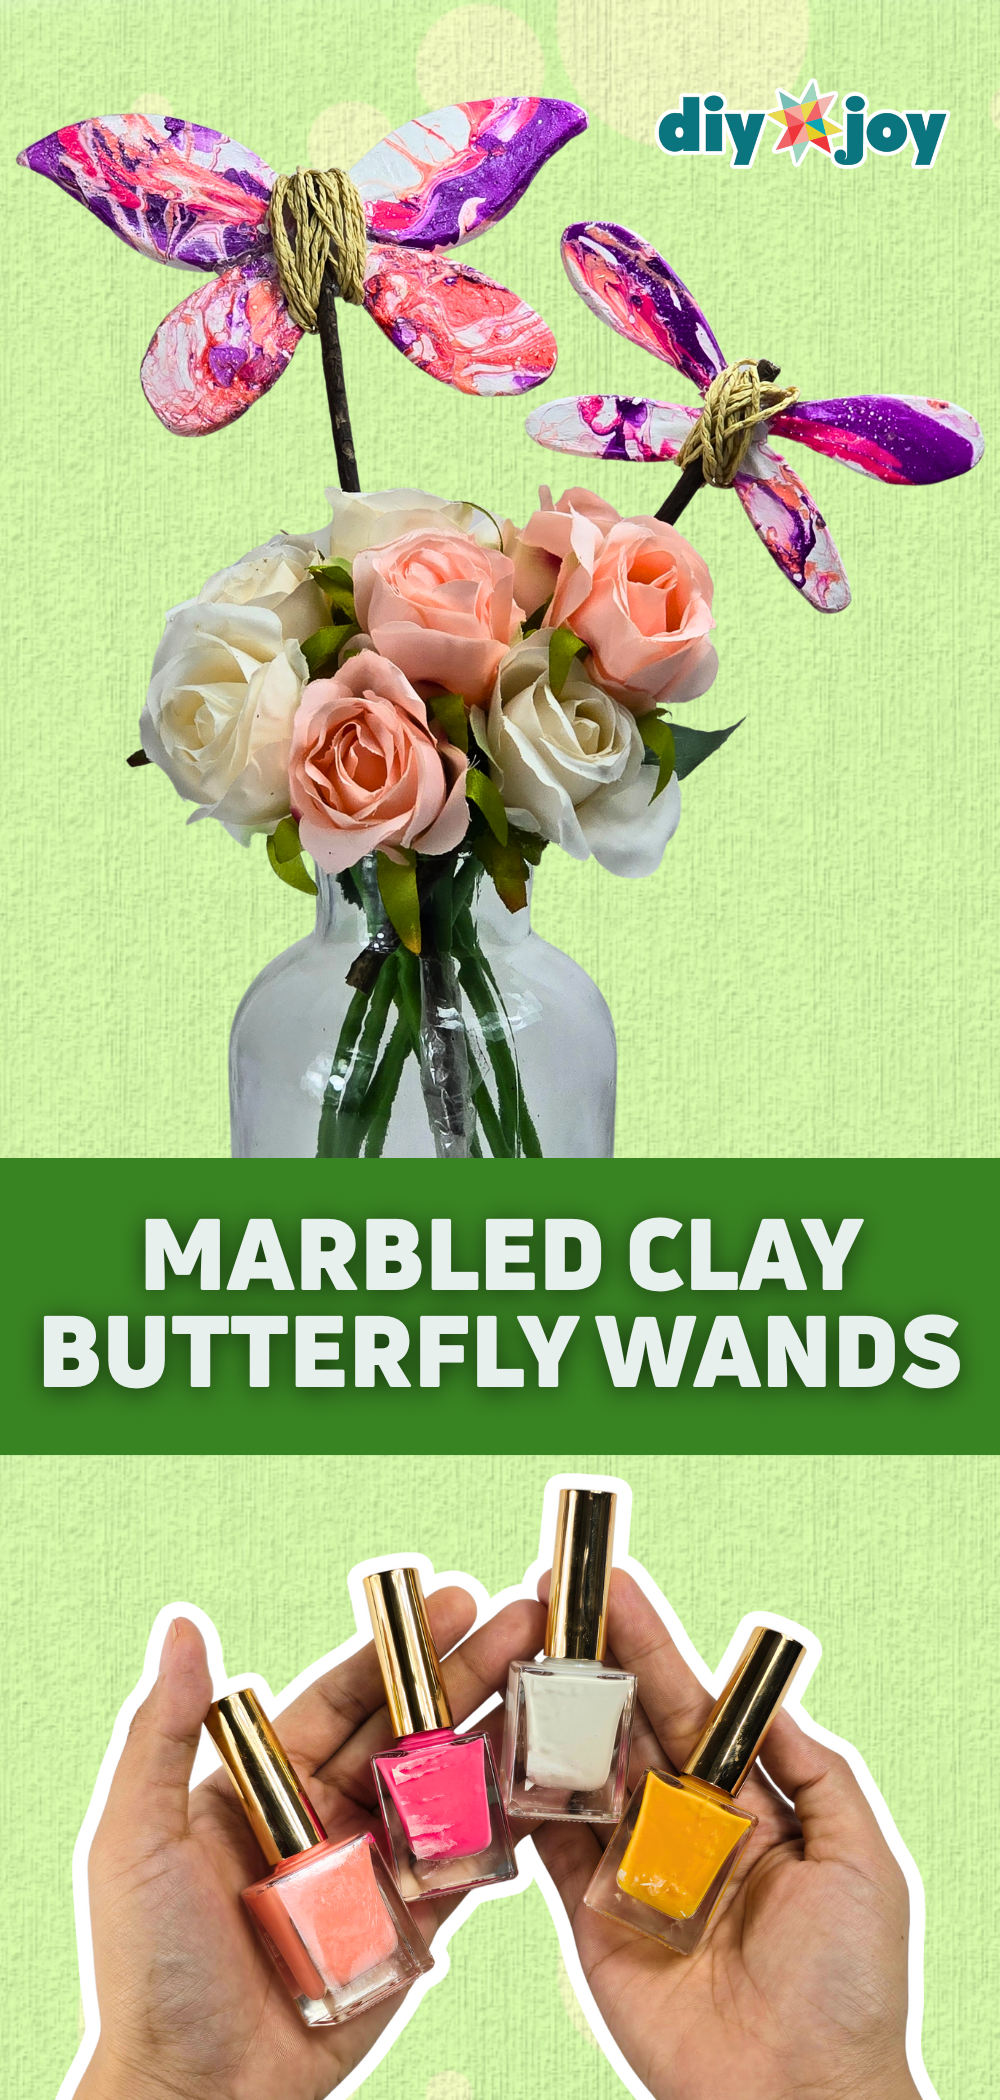
A marbled clay butterfly wand adds a pop of color to a potted plant or a vase. Roll air-dry clay flat and cut out butterfly or dragonfly wings. Push a toothpick into the pointed end of each wing to use as a handle. Prime them white so the polish sticks better. Pour a few polish colors into water, swirl and dip each wing, adding colors as you go. Once dry, pull out the toothpicks and add a clear top coat. Hot glue the wings to a stick, then wrap twine around the middle.
Get the full tutorial at DIY JOY.
5. Marbled Nail Polish Flower Pot
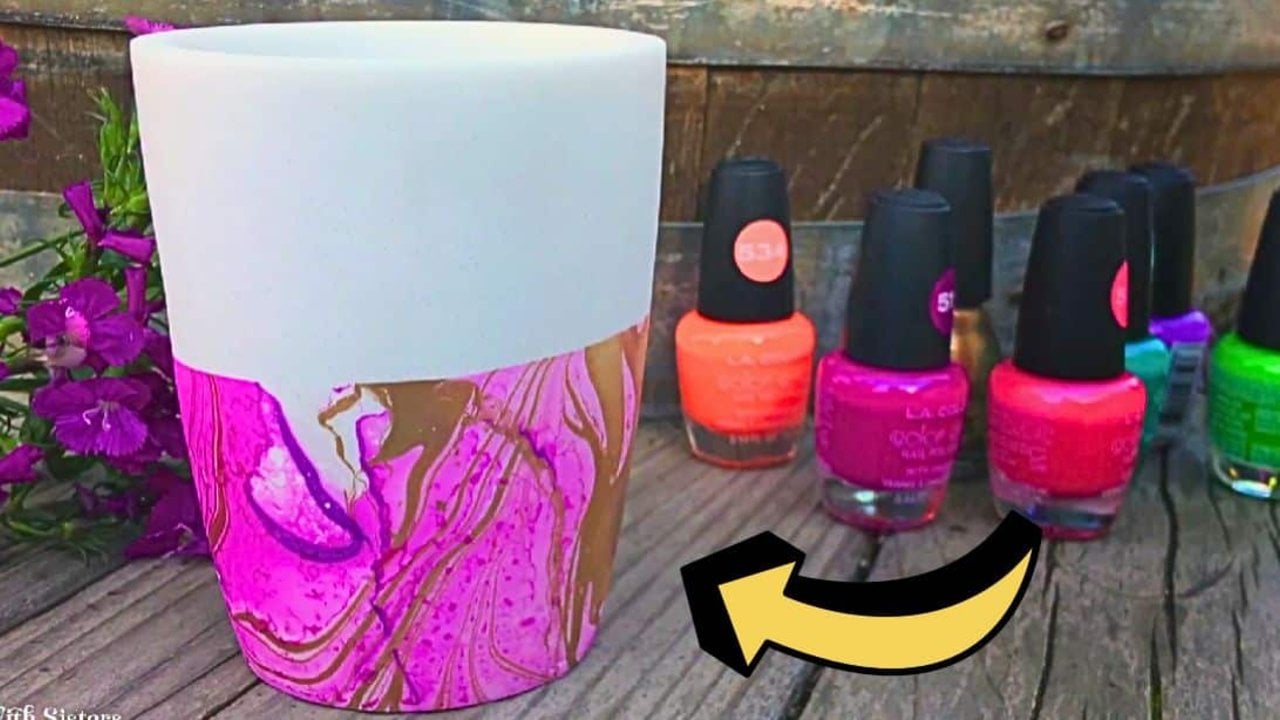
This marbled nail polish flower pot looks store bought, and all it takes is polish, water and a white pot. Paint the pot white first if it isn’t already. Fill a tub with water and open all your bottles before you start, because you’ll need to work fast. Drop the colors in one after another and swirl them with a toothpick. Test the swirl on a craft stick first. Then clear the water, add fresh polish, swirl again and dip the bottom half of the pot. Let it dry upright or hanging upside down.
Get the full tutorial at DIY JOY.
6. DIY Nail Polish Flowers

DIY nail polish flowers look like tiny enamel blooms, but they’re just thin wire and a bottle of polish. Cut about 15 cm of bendy wire, wrap it once around a thick paintbrush handle or a pen and twist to form a petal loop. Keep wrapping and twisting until you have five. Fan the petals flat or curve them for a 3D look. Pull the polish brush across each loop from the center out until a film fills it, then add a second coat and a quick dry spray. Glue them onto bobby pins, rings or earrings.
Get the full tutorial at Wonderful DIY.
7. Hot Glue Flowers
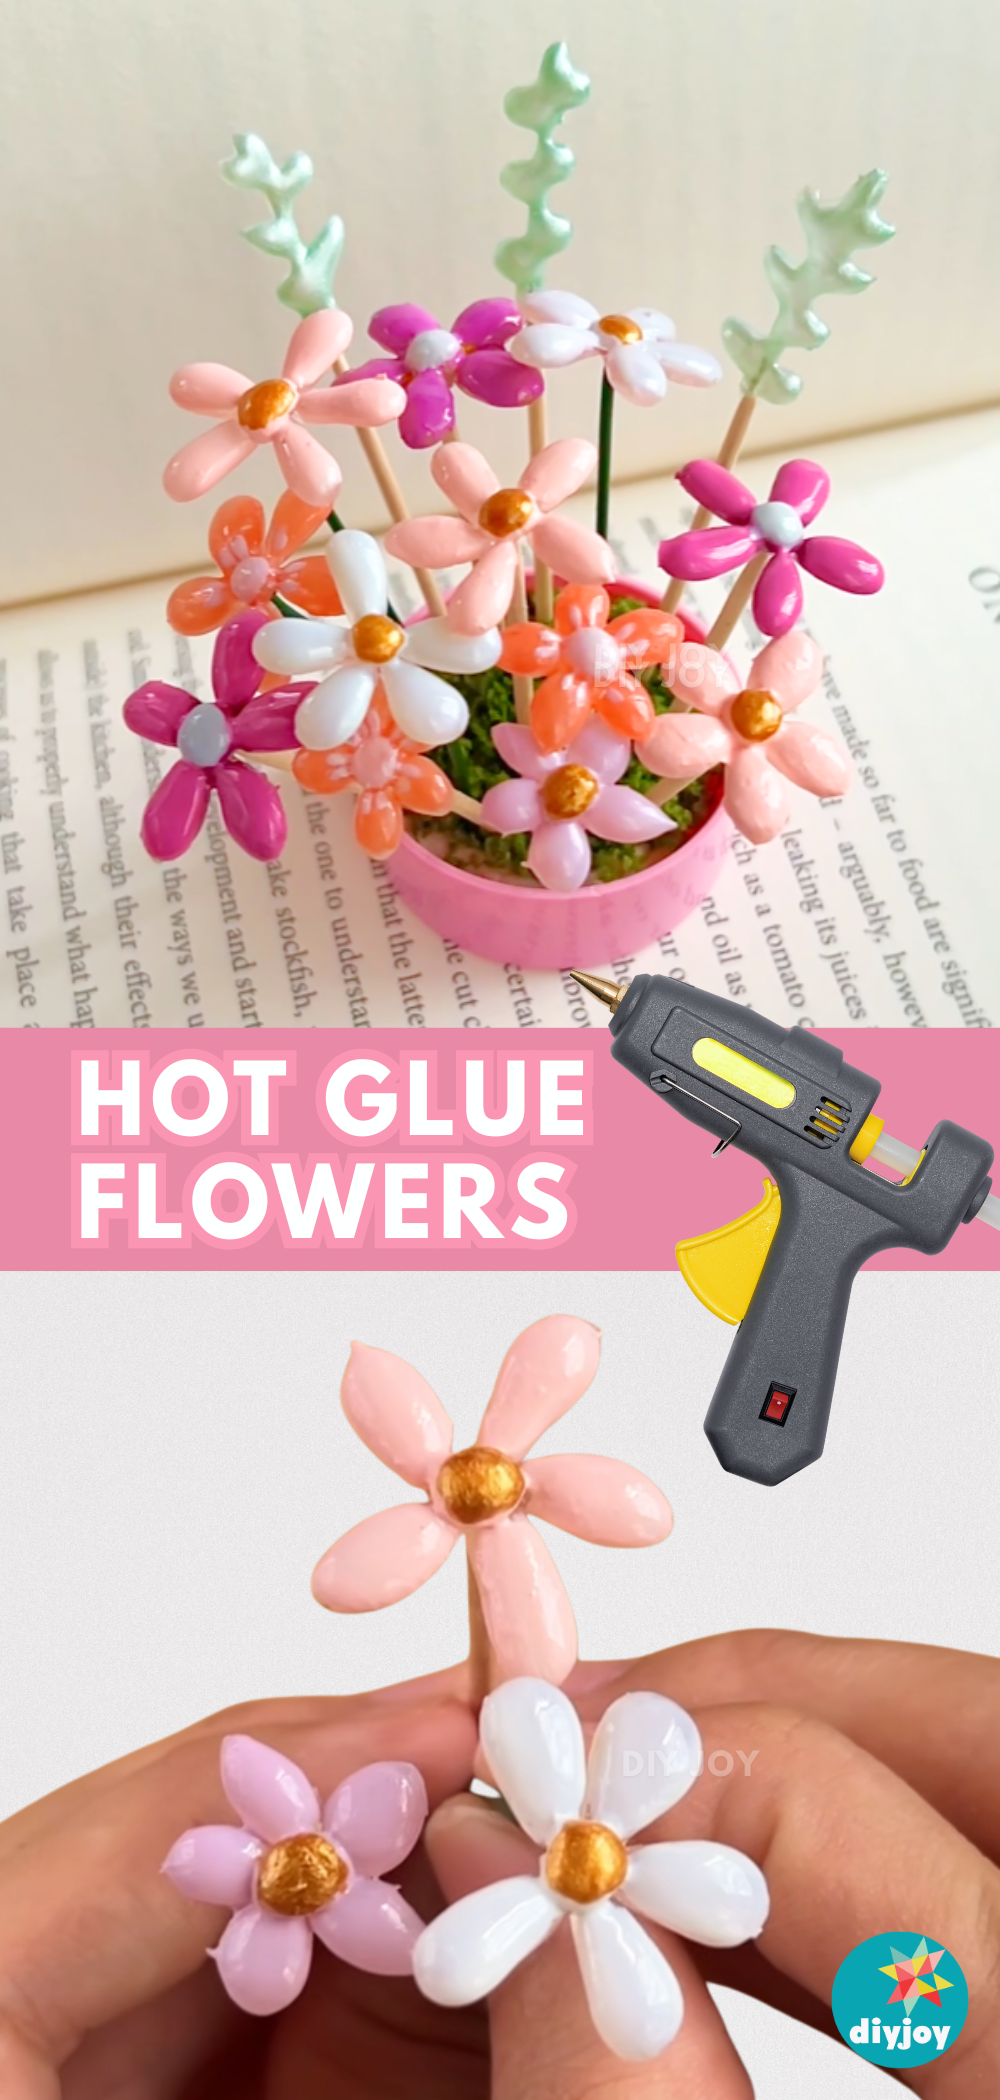
Hot glue flowers look like glossy little gel blooms. Tape parchment paper to your table and heat the glue gun. Squeeze a small dot and drag the nozzle to one side to form a teardrop petal, five times over. Peel them off once set, arrange them in a circle and fill the center with glue. Push a toothpick into the back for a stem and add hot glue leaves. Paint the petals with nail polish and the leaves green. A plastic bottle cap packed with clay and moss makes the pot.
Get the full tutorial at DIY JOY.
8. DIY Marbled Paper Artwork

DIY marbled paper artwork gives you framed wall art for about $10. Fill a pan with roughly an inch of water and have watercolor paper ready, since the polish starts to set quickly. Drizzle thin ribbons of polish across the surface. Some will float, some spread and some sink, and each gives a different look. Tilt the pan to swirl or leave it be, lay the paper on top, then peel it off from one corner. Clip it up to dry. Cheap matted frames from the big box store make the set look gallery worthy.
Get the full tutorial at Mad in Crafts.
9. DIY Painted Chopsticks

DIY painted chopsticks make a sushi night or a little dinner party feel planned. Raw wood takeout chopsticks work perfectly. Split them carefully and grab a few spare sets in case one breaks uneven. Sand them smooth, wash and dry them, then dip the top ends straight into the polish bottle. Turn them upright and give a little swirl so the color spreads evenly. For bottles that are too short, just brush the color on. Rest them slanted in a bowl and let them air out for a few days before the party.
Get the full tutorial at …love, Maegan.
10. DIY Faux Rock Crystals

DIY faux rock crystals give you the gemstone look without gemstone prices. Hunt for small and medium rocks with lots of jagged edges, then wash and dry them. Pick the most jagged side as the top. Choose three shades of metallic or pearly polish in one color family, dark to light. Dab big drippy dots of the darkest shade, then layer the medium and lightest while they’re still wet. Let it drip and dry overnight. Spray the bottom gold and let a little overspray drift up the sides. Use them as paperweights or shelf accents.
Get the full tutorial at …love, Maegan.
11. Office Stationery Makeover

This office stationery makeover turns a dull stapler, hole punch and binder clips into desk pieces you’ll actually want to use. Mask off the moving parts with tape so everything still works. Spray two coats of gold paint outside, waiting about an hour between coats so it doesn’t peel. Spray an old jam jar inside and out while you wait, and you’ve got a matching pen pot. Once the gold is dry, dot on hot pink polish with a cotton swab. Polka dots hide little imperfections and look so cheerful.
Get the full tutorial at Craftaholique.
12. Neon Shoes And Painting Leather

Neon shoes and painting leather go together better than you’d think. Start with leather sandals that are close to raw, without a heavy finish. Tape off everything you don’t want painted, then wipe the painted areas with rubbing alcohol on a cotton swab. Prime with a coat or two of white polish and let it dry overnight. Layer bright neon colors on the soles and heels over a few days, using the bottle brushes for fewer streaks. Nail polish remover on a fine brush cleans up the edges.
Get the full tutorial at …love, Maegan.
13. DIY Super Easy Enameled Spoons

DIY super easy enameled spoons take no skill at all, and nobody will guess they’re homemade. Grab simple stainless steel teaspoons and paint the handles with nail polish in color blocks, or brush a crackle polish over a bright base for that cracked enamel look. Seal them with a top coat. Nail polish isn’t food safe, so keep the color on the handles and use them for serving dips or as party spoons. If they ever chip, polish remover wipes them clean and you can start again.
Get the full tutorial at Moms and Crafters.
14. Nail Polish Washer Necklace

A nail polish washer necklace costs about a dollar and comes together in 25 minutes, drying time included. Pick up flat metal washers from the hardware store aisle. Paint the front of each one with polish, then add dots, blobs or stripes. For a swirl, lay down stripes of a few colors while they’re wet and drag a toothpick through them in a circle. Let it dry completely, paint the back if you like, then thread a long piece of cord through the hole. It’s a great camp or sleepover craft for teens.
Get the full tutorial at Gluesticks Blog.
15. DIY Colored Headphones
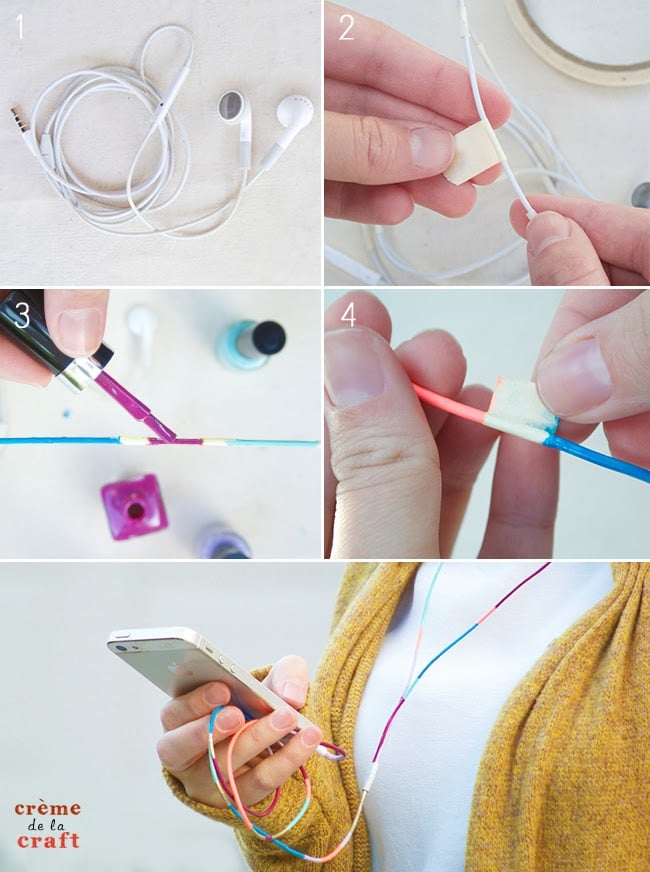
DIY colored headphones make a plain white pair easy to spot in a backpack. Tape off sections of the cord at different spacings, from half an inch to a few inches, and press the tape down firmly. Hang the cord between two clothespins so you can paint all the way around. Paint the exposed bits in different colors and let them dry completely. Peel the tape only when the polish is fully dry, or it’ll bleed. Paint the gaps freehand or tape again, then seal with clear polish.
Get the full tutorial at Creme de la Craft.
16. Glittery Barrettes

Glittery barrettes are a gift kids can make for siblings almost on their own. Pick up a few packs of snap clips at the pharmacy along with glitter polish. Lay the barrettes on index cards so the edges are easy to see. Brush on one coat at a time and let each dry, since glitter often needs a few. Black clips need fewer coats than tortoiseshell ones. Run a fingernail around the edge of the wet polish so the clips pop off the card cleanly once dry. They look great in matching sets.
Get the full tutorial at It's Two AM.
17. Nail Polish Ceramic Tile Crafts

Nail polish ceramic tile crafts give you watercolor effect coasters, and no two turn out the same. Cover your table with an old towel. Fill a plastic container a bit bigger than your tile with water at least two inches deep. Drip a few drops of polish in slowly, so it spreads instead of sinking. Glitter polish doesn’t work here. Dip the tile shiny side down, then lift it right back out and flip it over. Clear leftover polish with a paintbrush handle and dip again to layer another color.
Get the full tutorial at Clumsy Crafter.
18. DIY Painted Seashell Accessories
DIY painted seashell accessories are a perfect rainy beach day craft. Craft store shells work, or clean and dry the ones you collect. Nail polish is ideal here because it lets the natural ridges show through, dries fast and comes in every color. Paint the shells and let them dry. Then hot glue them onto bobby pins, ring blanks or a plain headband. For a headband, glue shells along the edges first, then fill in the middle. Glue a few onto a photo frame for your vacation snaps.
Get the full tutorial at The Polka Dot Chair.
19. Nail Polish Pendants

Nail polish pendants use up the glitter bottles you’ve stopped wearing. Order round and square glass tiles with matching bezel settings and chains. Paint the back of each glass piece in layers: clear polish first, then a glitter polish or glitter top coat, then a solid background color, then a top coat. Let each layer sit for hours or overnight. Glue the glass into its setting, face up. Multichrome polish shifts color as you tilt it. Glue magnets onto any rejects for the fridge.
Get the full tutorial at Fluid Motion.
20. Nail Polish Valentine Gift Tag

This nail polish Valentine gift tag is a simple way to tell your girlfriends you’re thinking of them. Print the free tags, cut them out and tie each one onto a bottle of polish in Valentine hues with baker’s twine. Want to go bigger? Fill a clear bag with polish, a nail file and orange sticks for a little manicure kit. It’s a quick class party favor for tweens and teens, too. The printable is free for personal use, so share it with friends, but don’t sell it.
Get the full tutorial at The Benson Street.