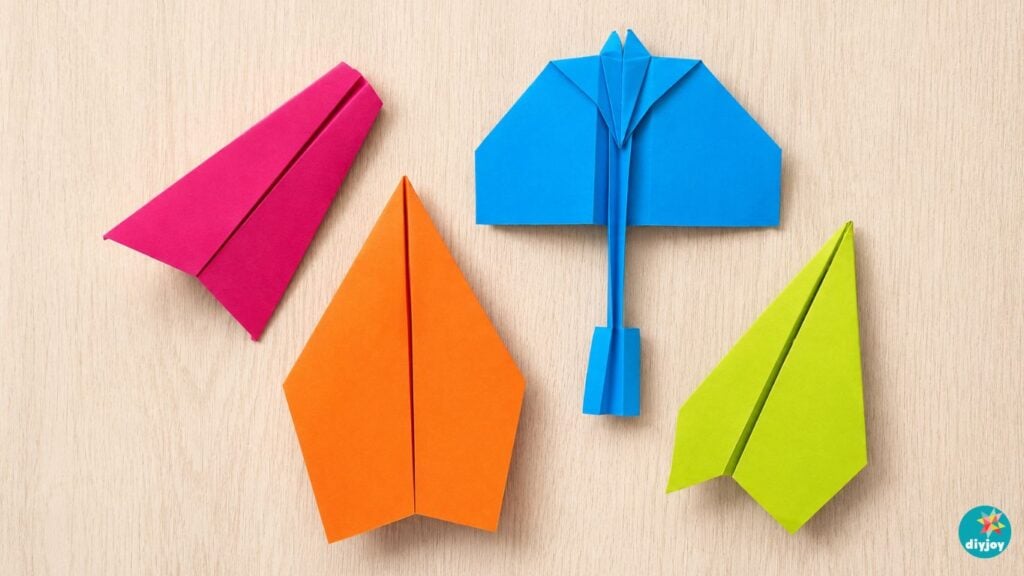
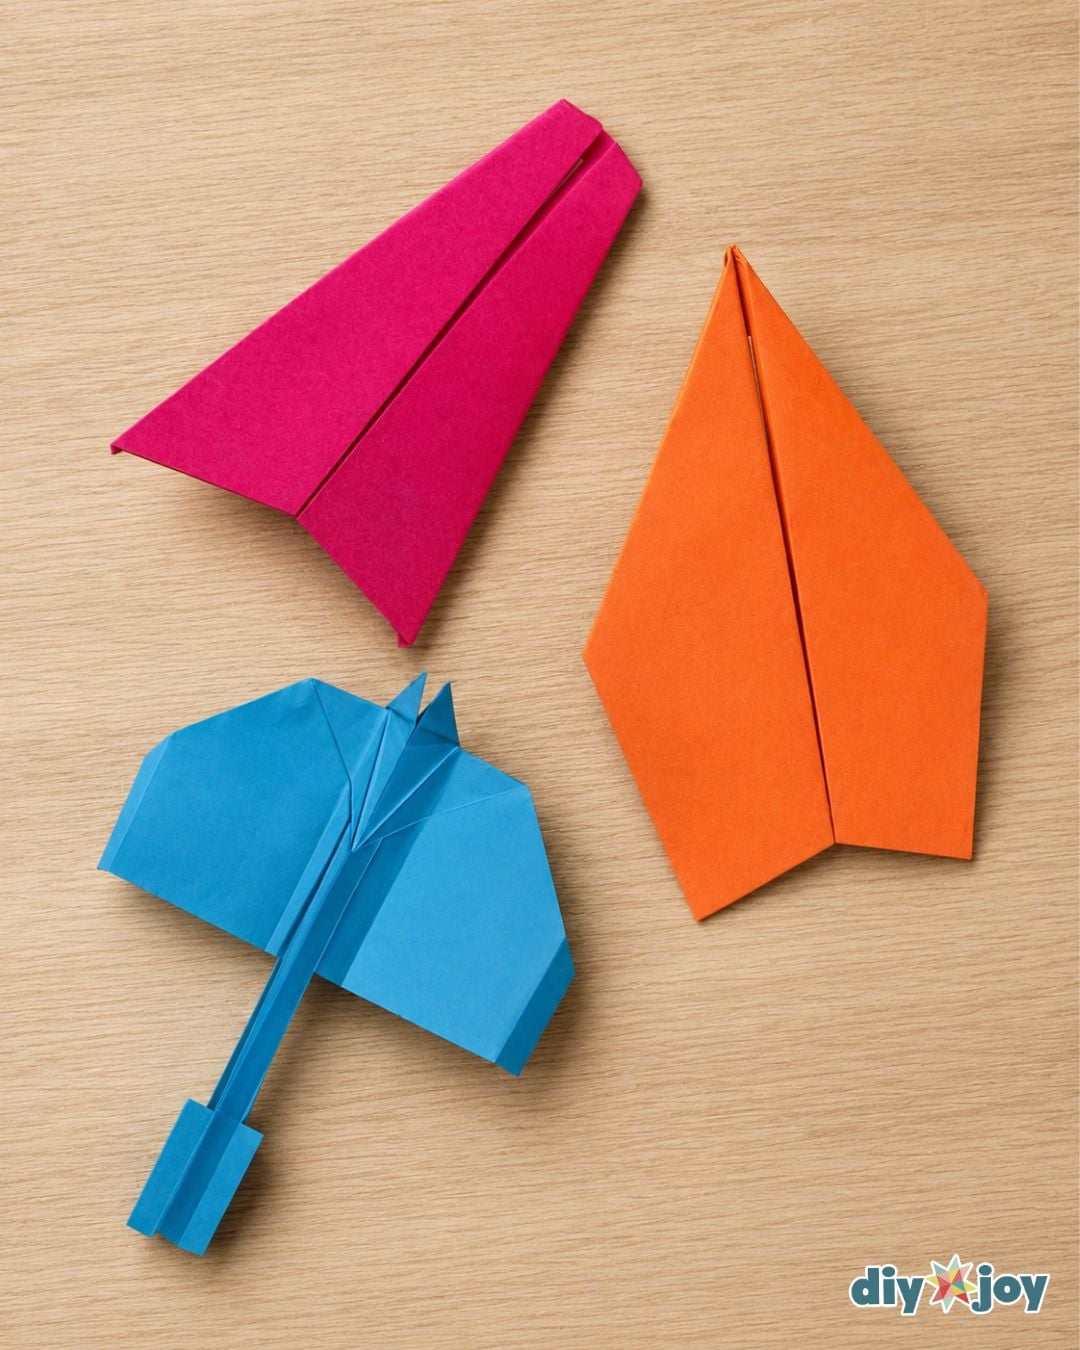
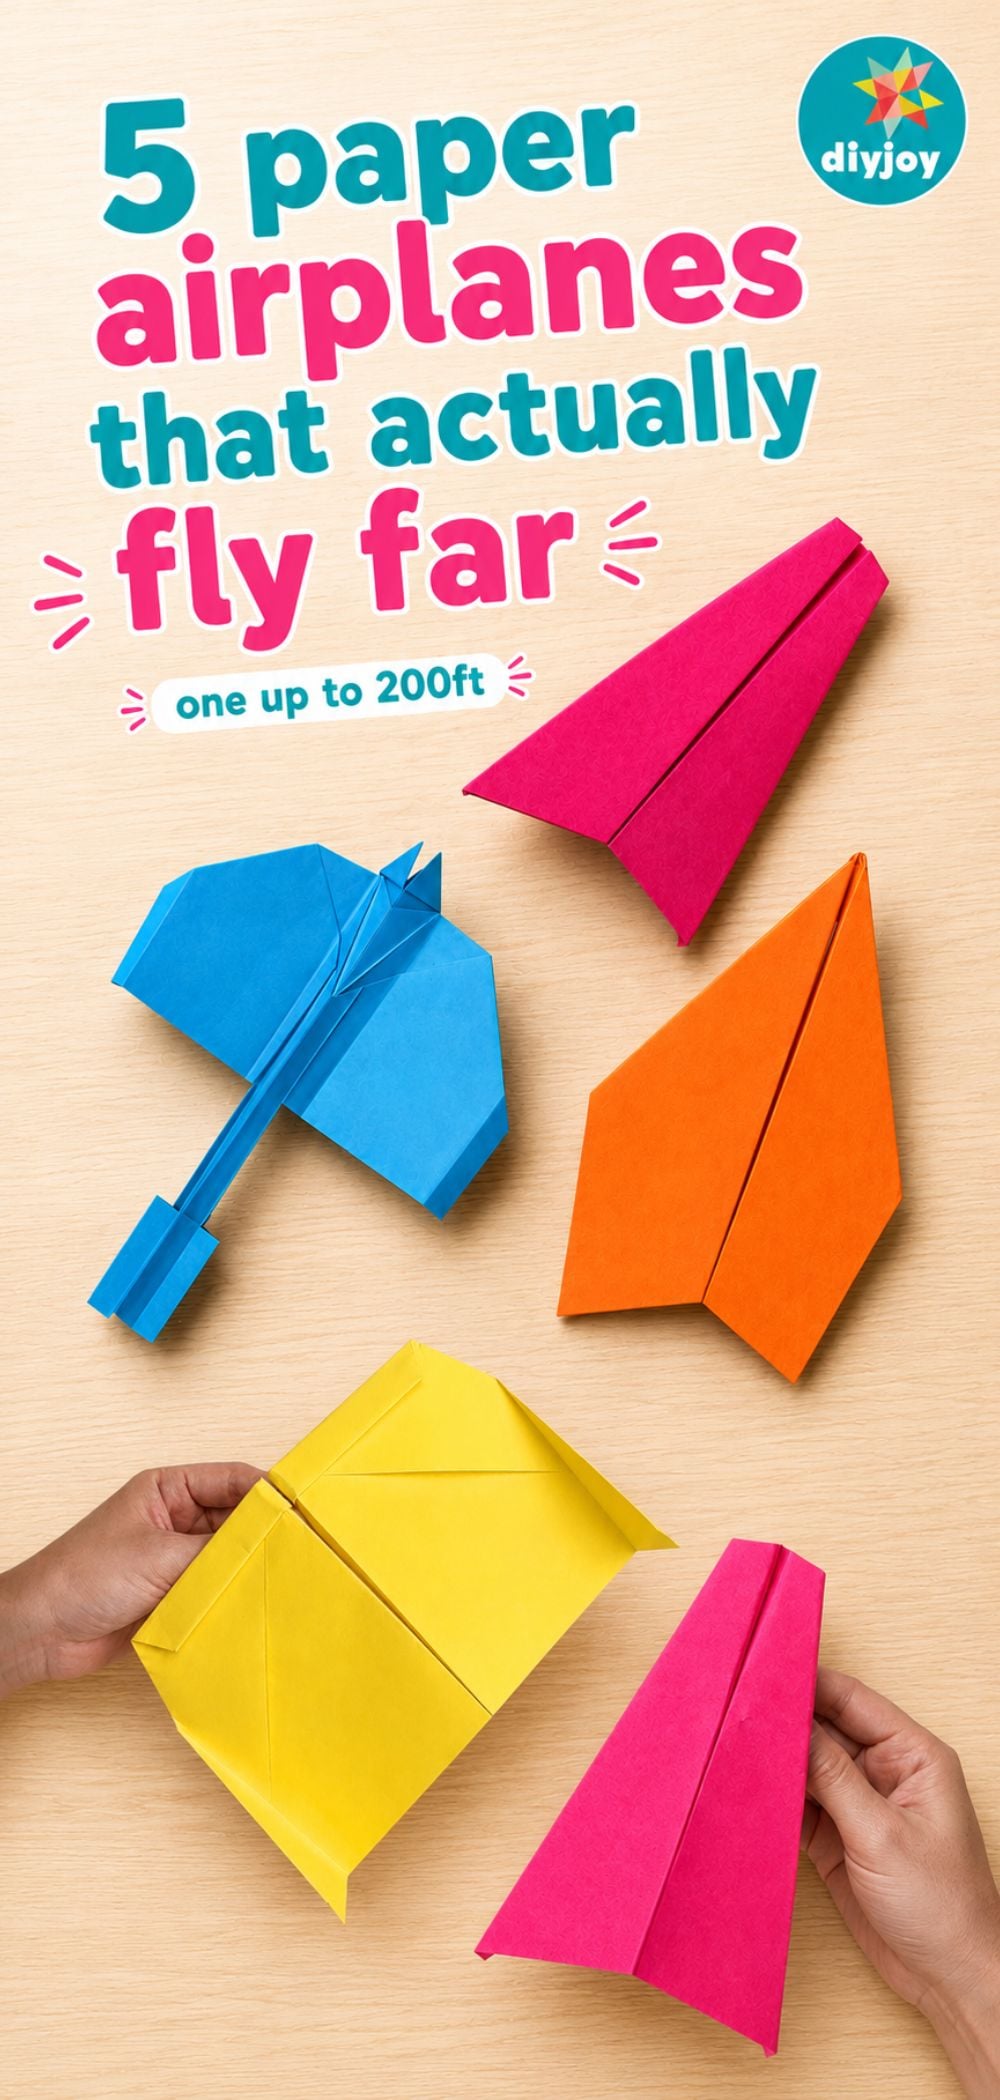
If you’re looking for fun things to do at home on a boring day, try making paper airplanes! These 5 paper airplanes are not your typical ones. They fly far, and one of them even once held a Guinness World Record.
I remember making a ton of paper airplanes as a kid, but most of them didn’t fly far enough to be that impressive. That’s why learning how to make a paper airplane the right way makes such a big difference. With the right paper airplane instructions and a few simple folding tips, you can make an easy paper airplane that flies straight, glides smoothly, and actually goes the distance. The perfect kids’ craft to do on a weekend afternoon.
I love making all kinds of paper crafts, such as origami and paper flowers, so I had plenty of paper at home to practice and perfect these paper airplanes. In this step-by-step paper plane tutorial, I will show you how to make the martin, harrier, hammer, blackburn, and suzanne.
What is the Best Paper For Paper Airplanes
If you’re wondering what paper to use, lightweight printer paper, around 75–80 gsm, works best. Avoid cardstock or very thick paper because it can make the airplane too heavy, and you definitely don’t want that if you want your paper airplane to fly far.
These products are all listed on our DIY JOY Amazon store, so you can order and know exactly what you will get, and when. We do earn a small commission on these links and very much appreciate your support ❤️
Martin Paper Airplane Tutorial
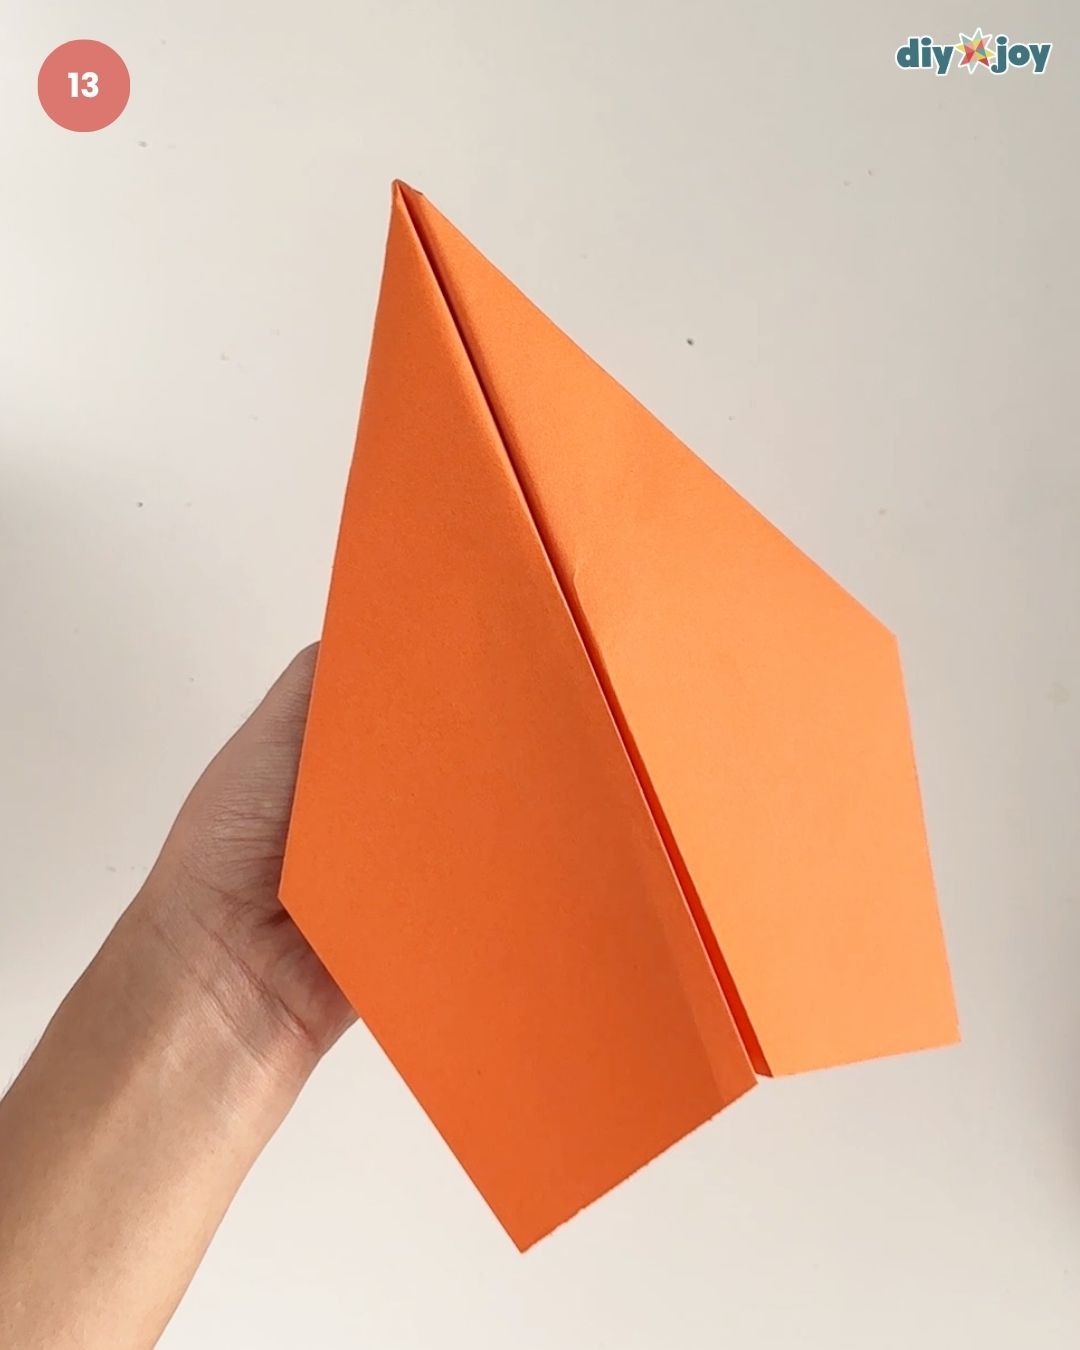
The Martin paper airplane has a unique shape that makes it look more like a cool folded paper glider than a regular paper plane, which I’m sure kids will go crazy for. I know it may look a little different from typical paper airplanes, but with the right folds, it can glide smoothly and fly surprisingly well.
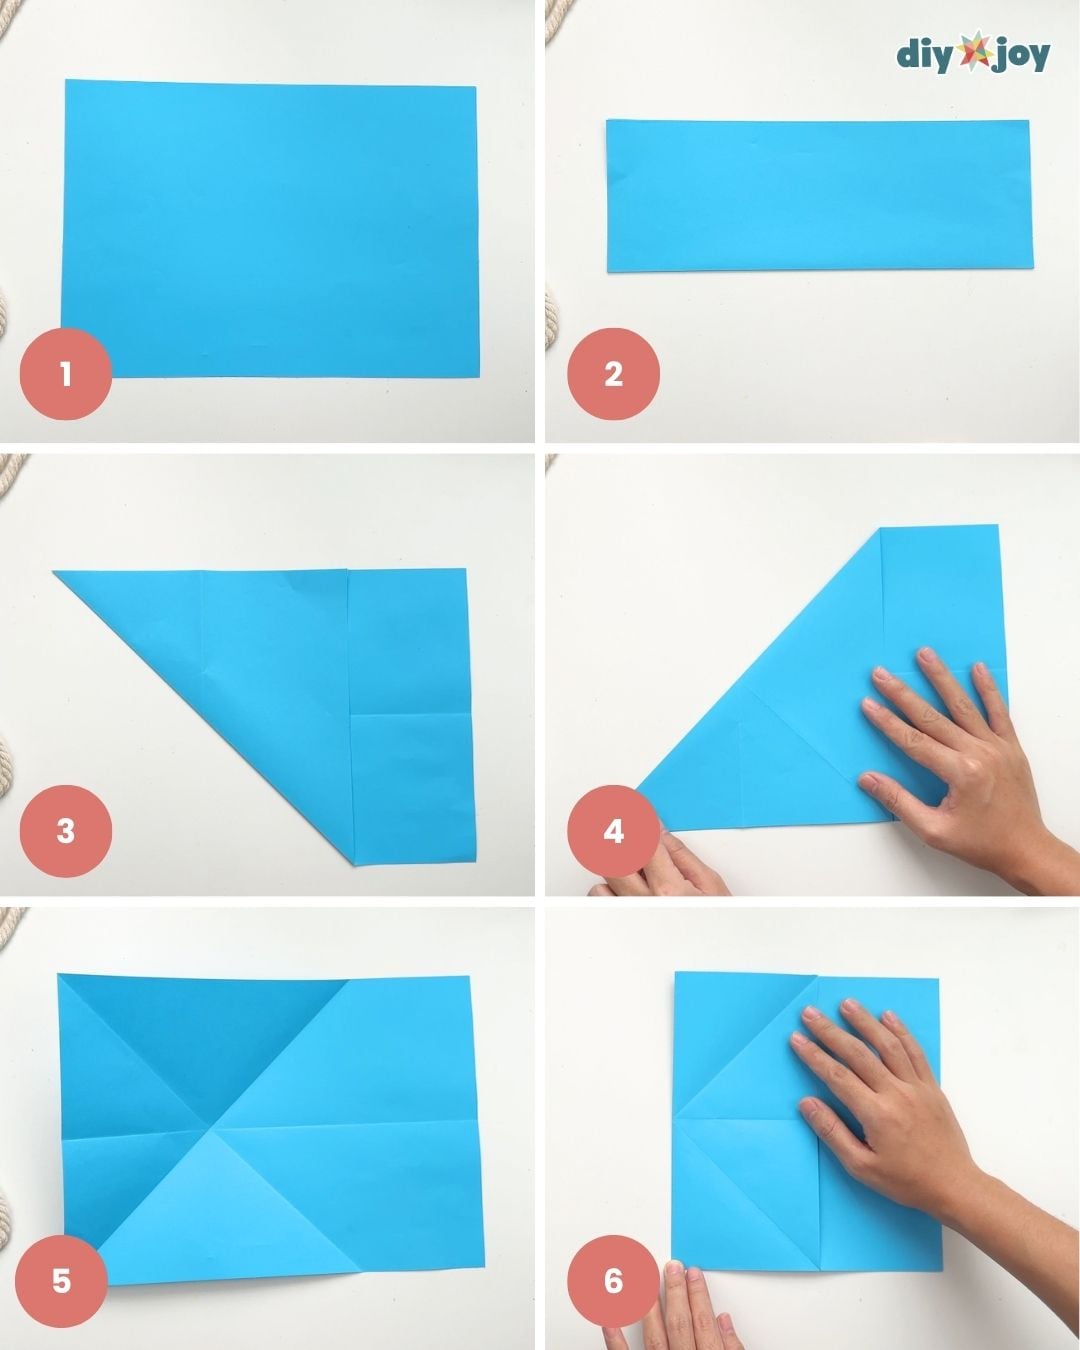
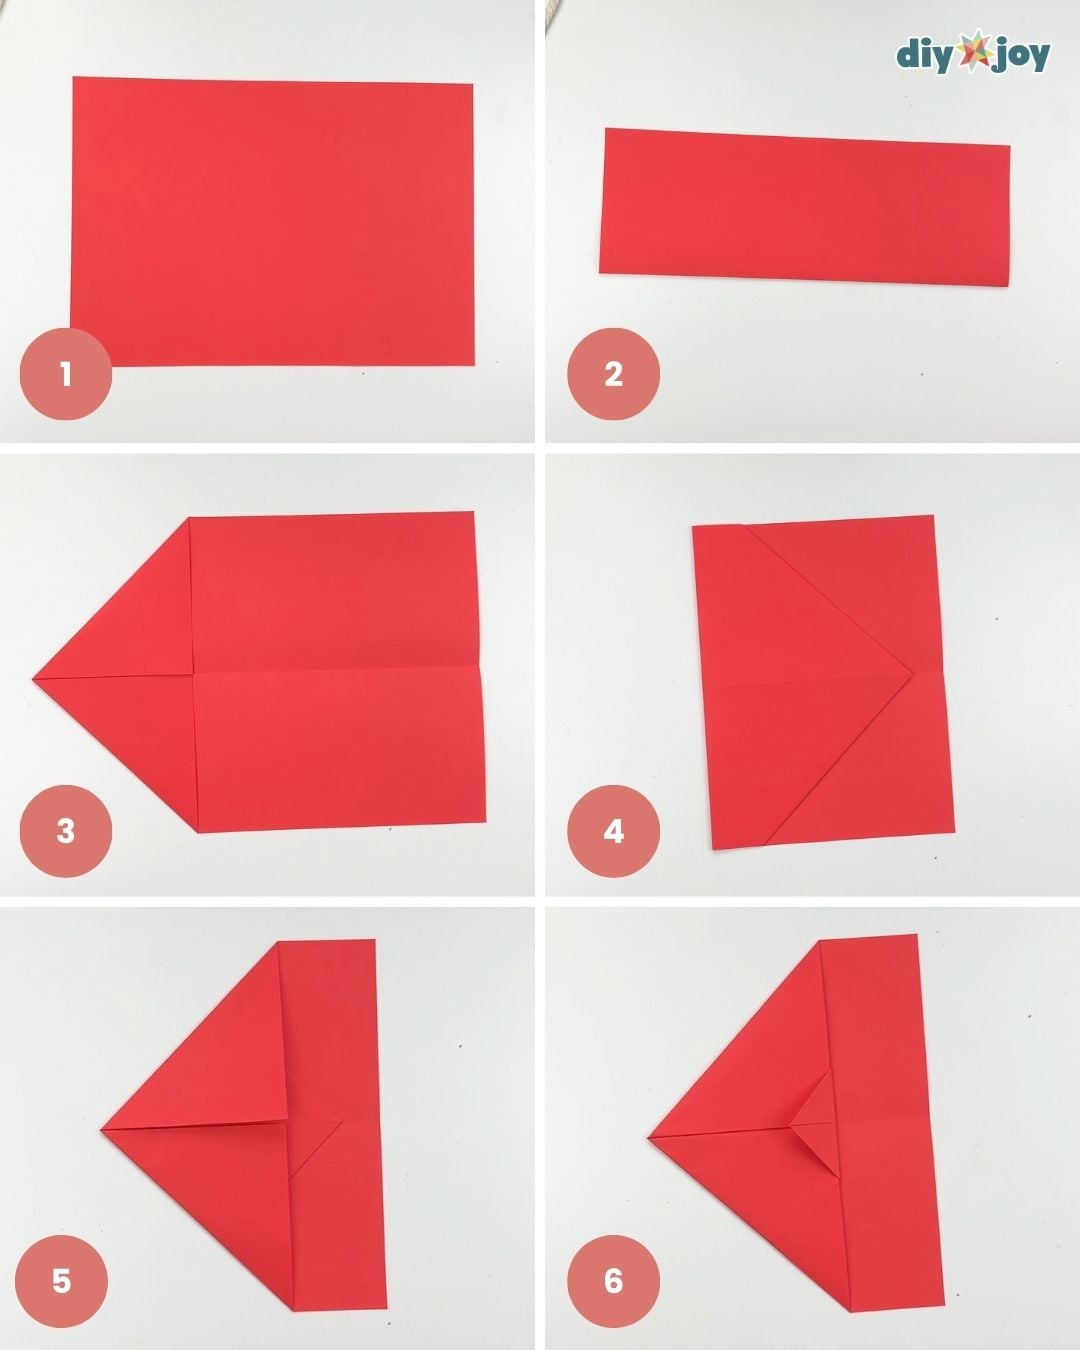
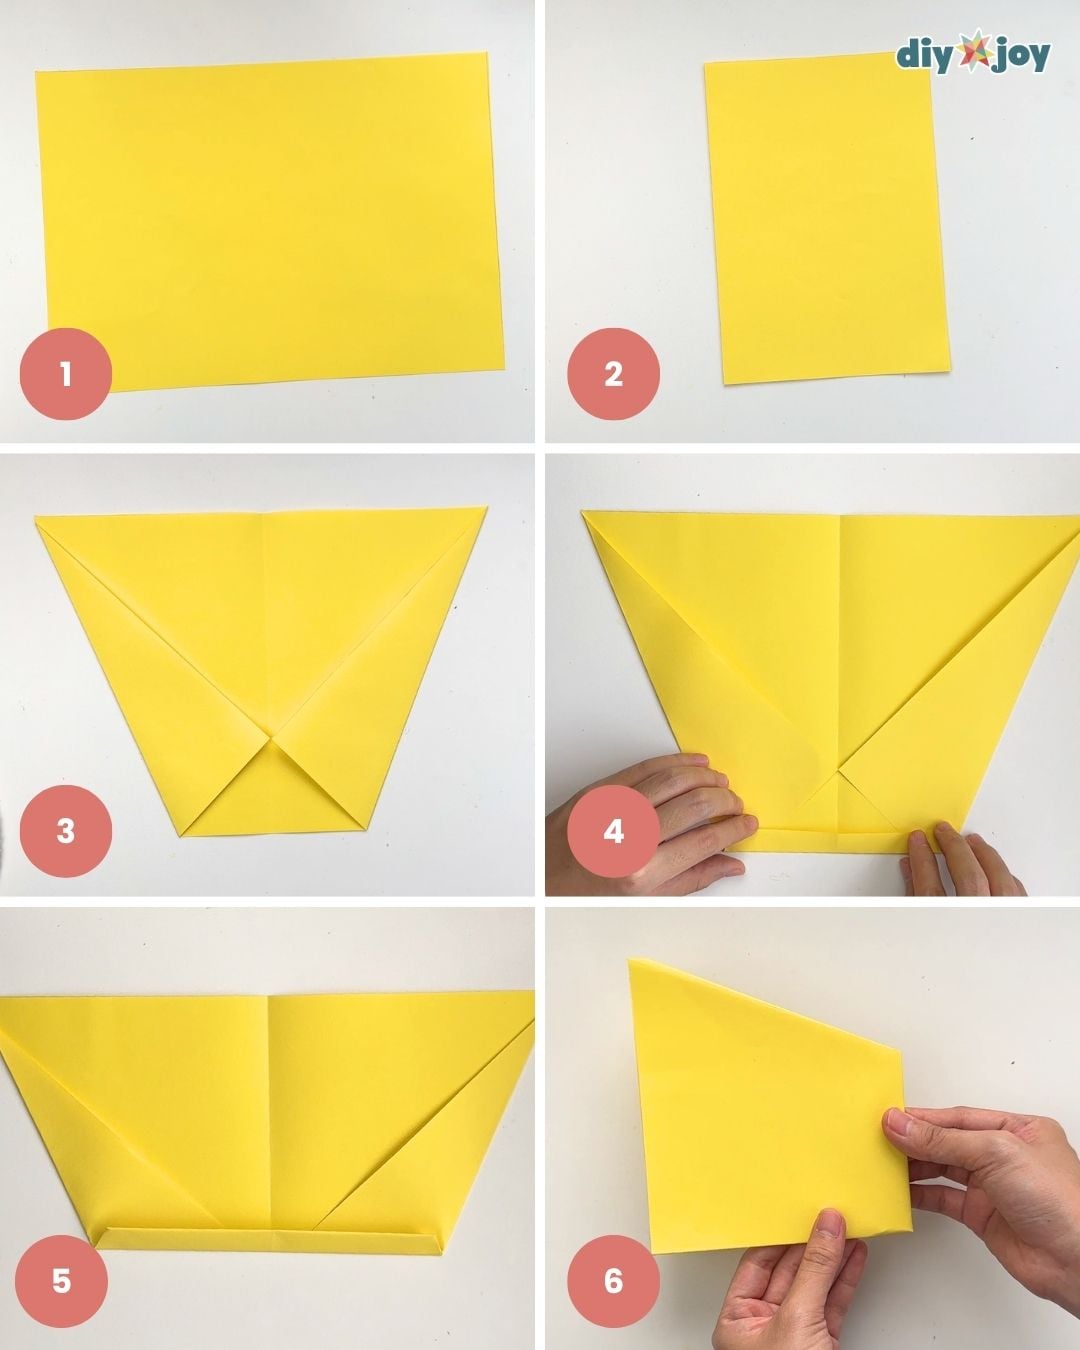
Steps 1 to 6
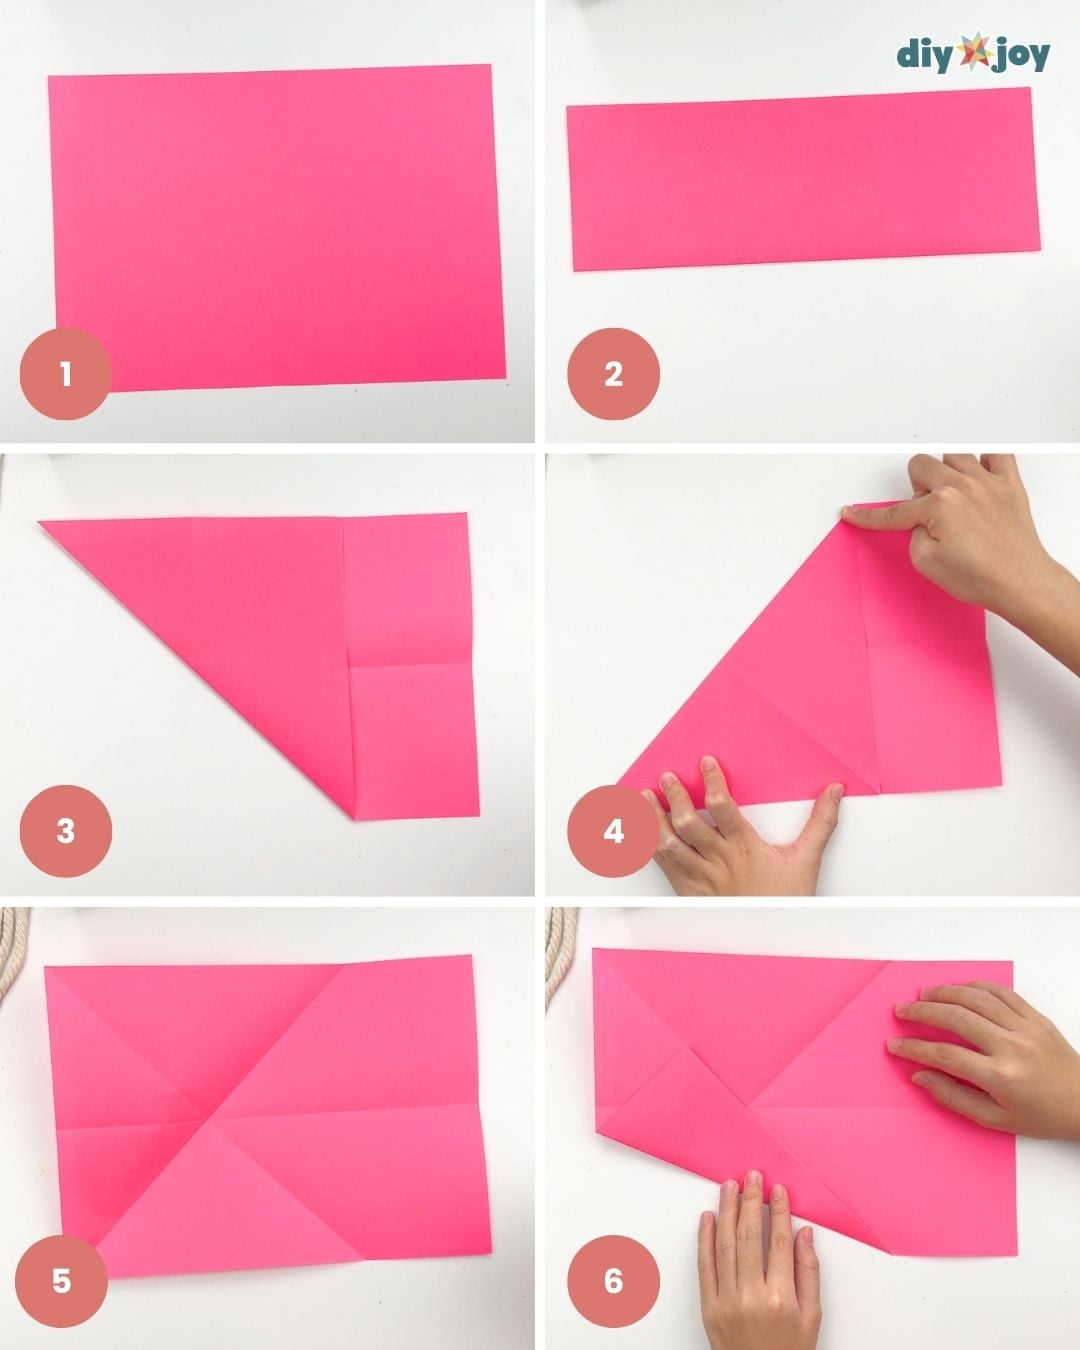
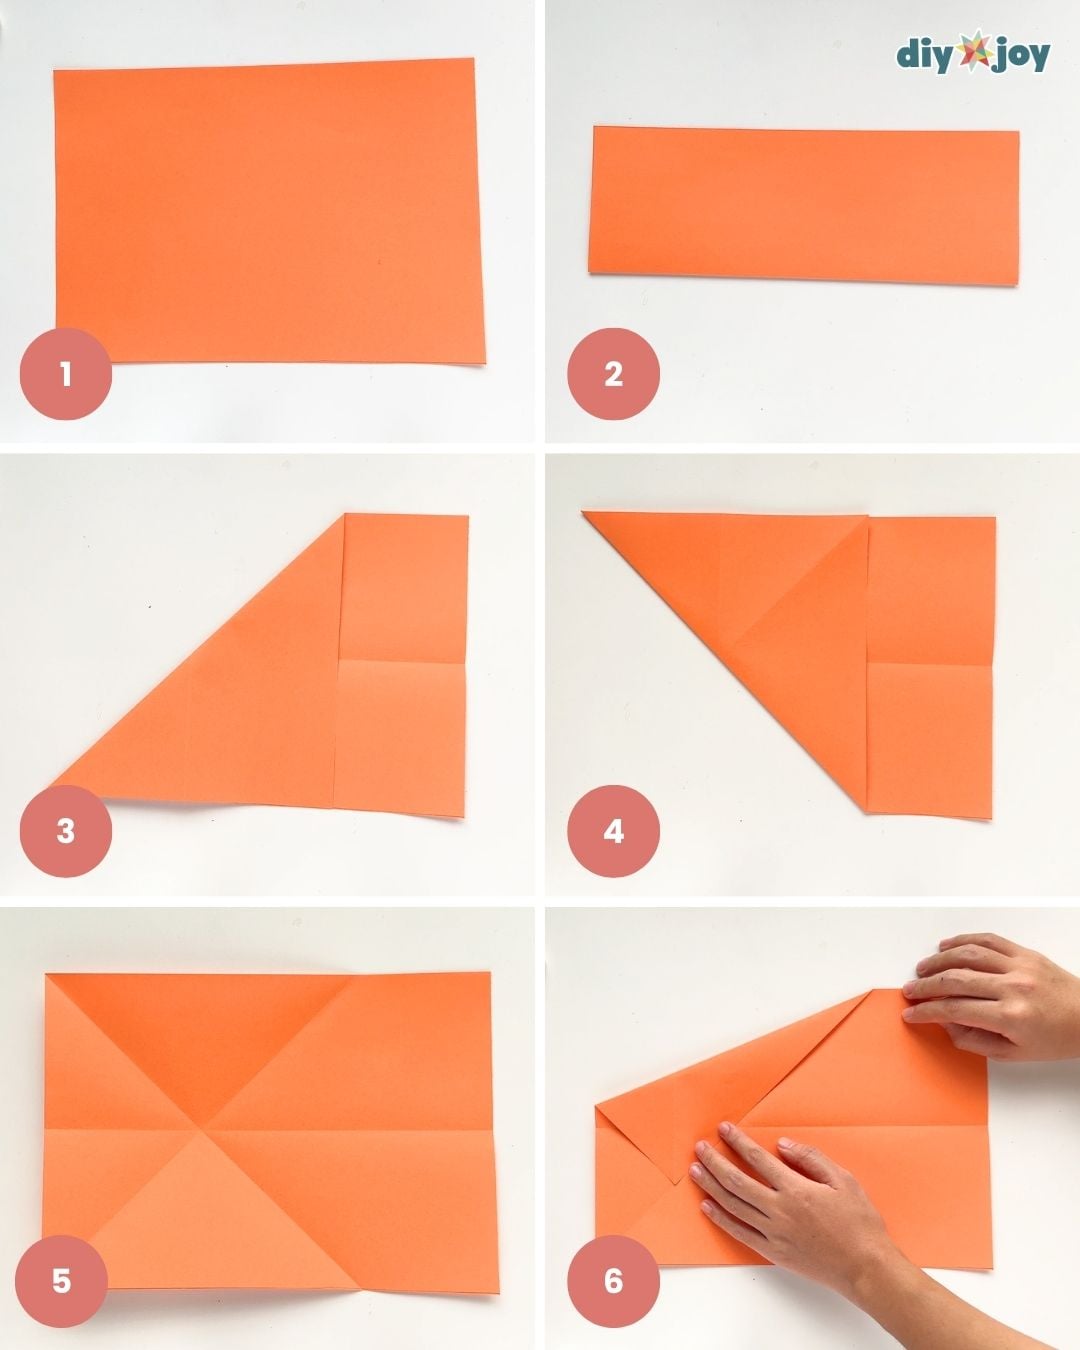
Step 1: Place your paper on a flat surface.
Step 2: Fold the paper in half crosswise to make a crease, then unfold.
Step 3: Fold the bottom left corner to the opposite edge to form a triangle, then unfold.
Step 4: Repeat on the top left corner.
Step 5: Unfold. The crease lines should look like this.
Step 6: Fold where the crease lines intersect. Unfold.
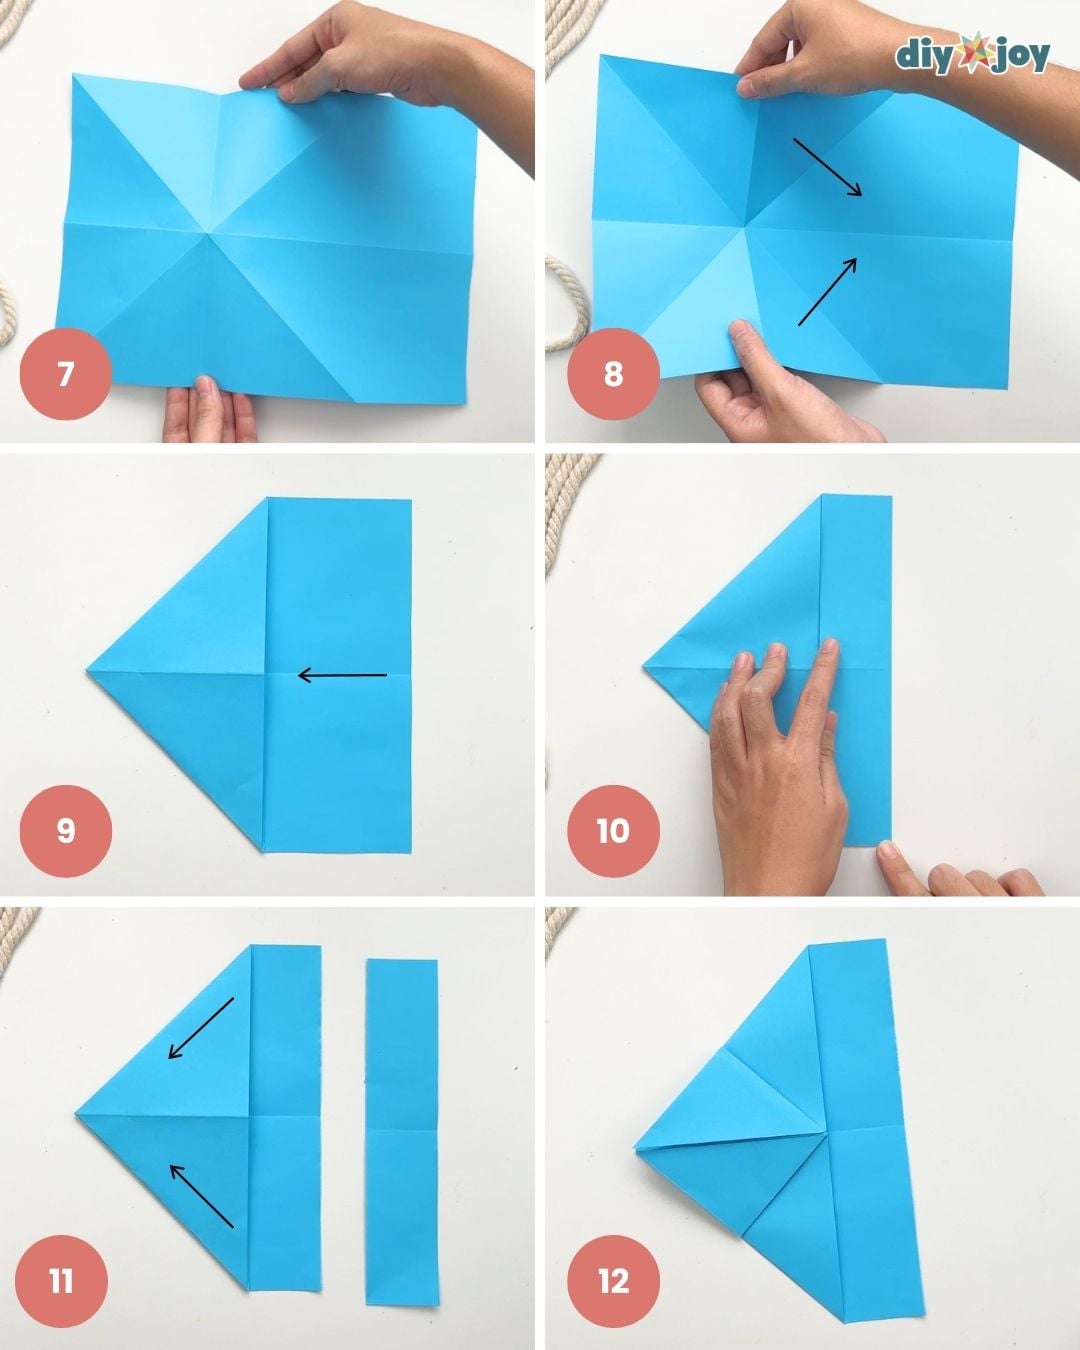
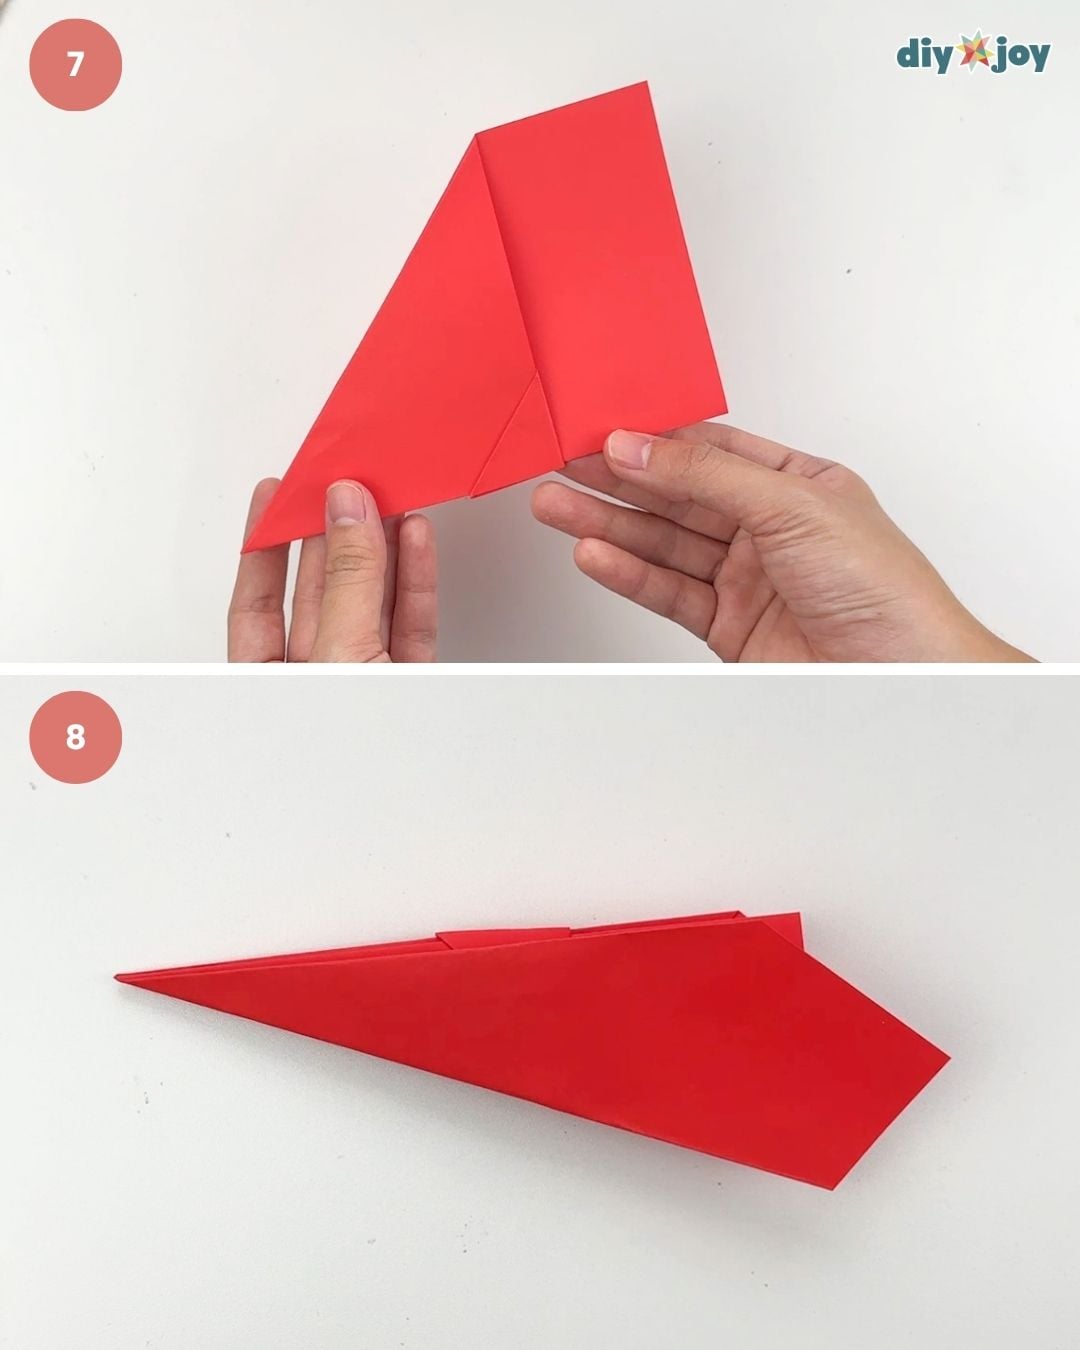
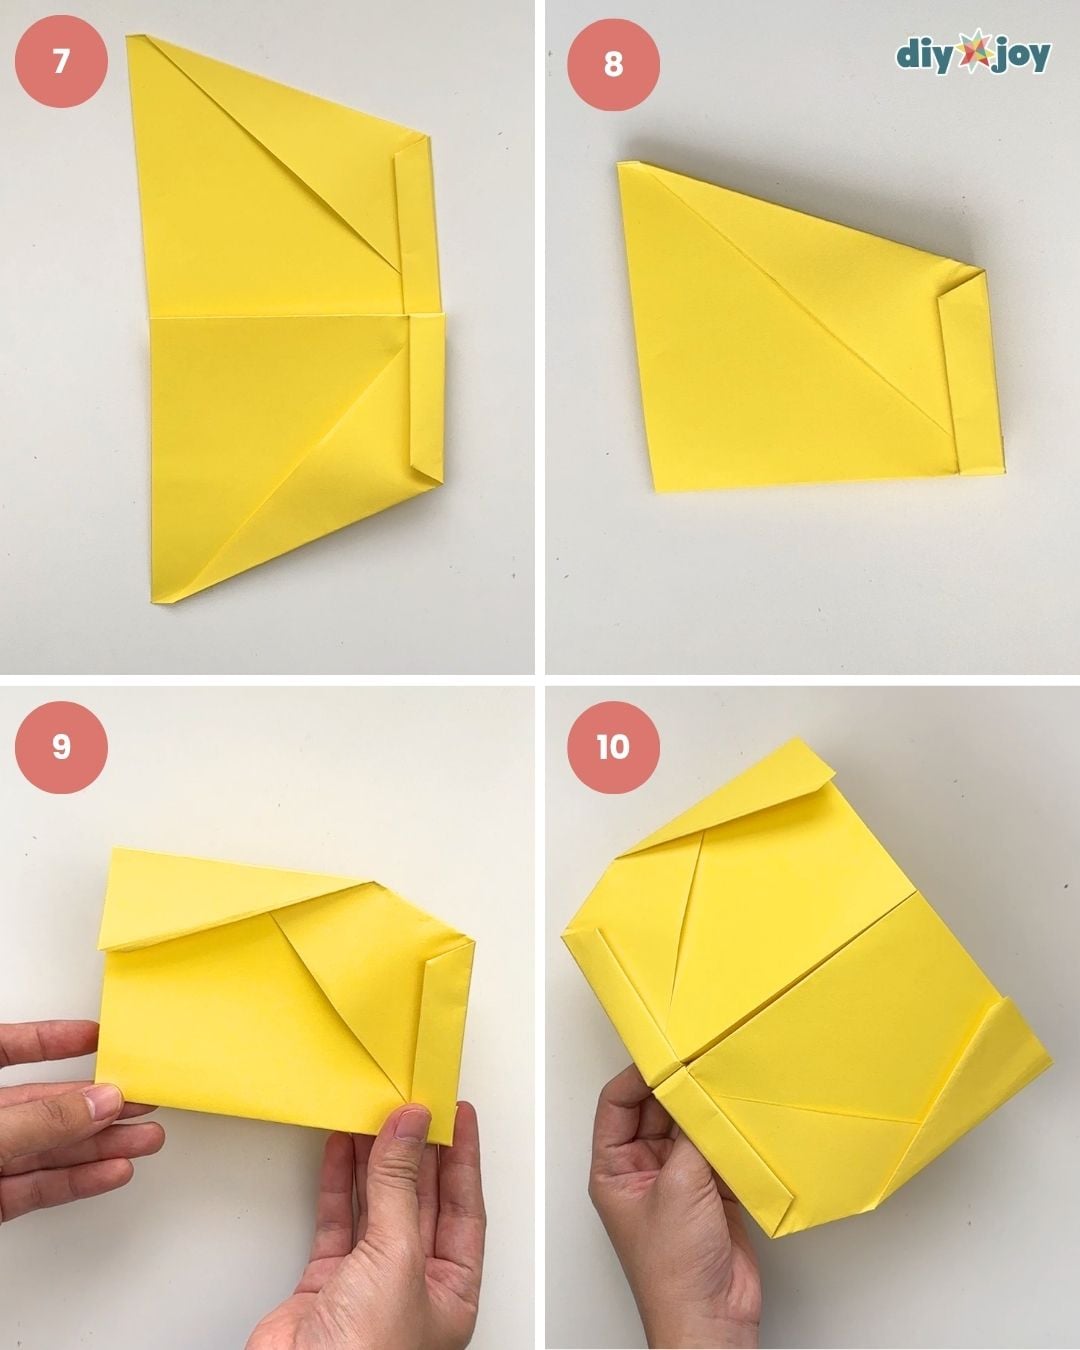
Steps 7 to 12
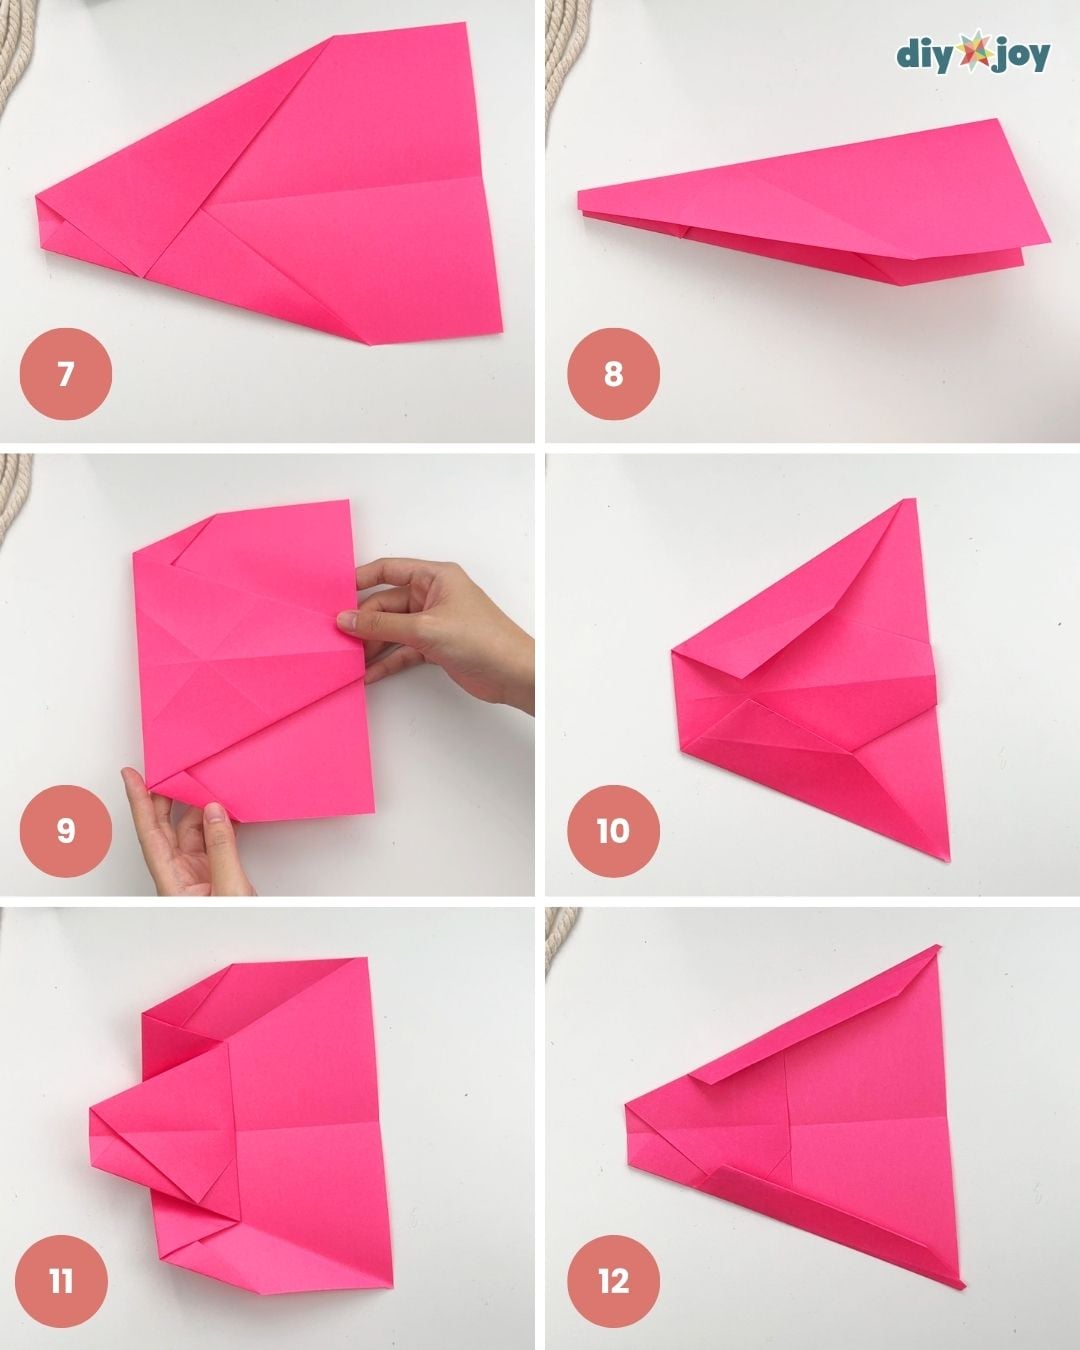
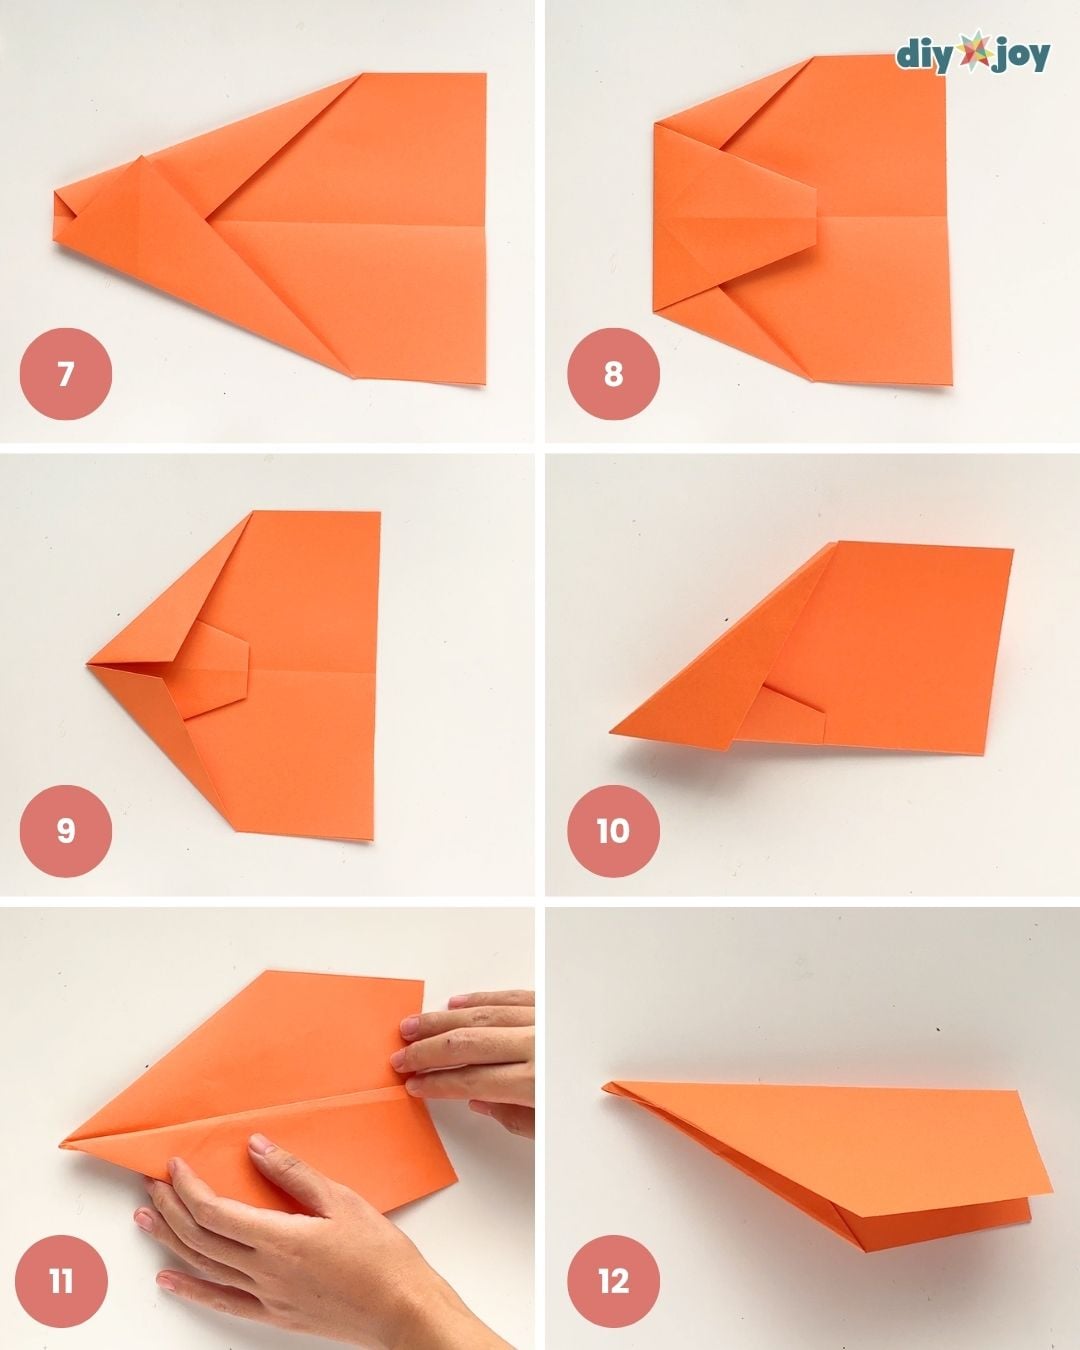
Step 7: Flip the paper over. Hold both sides, then press down on the point where the crease lines intersect to form a pointed center.
Step 8: Hold both sides again, then pull them down toward the center.
Step 9: Press the triangle down to form a house shape.
Step 10: Fold the bottom rectangle in half to make a crease line, then unfold.
Step 11: Cut on the crease line. Reserve the rectangle piece for later.
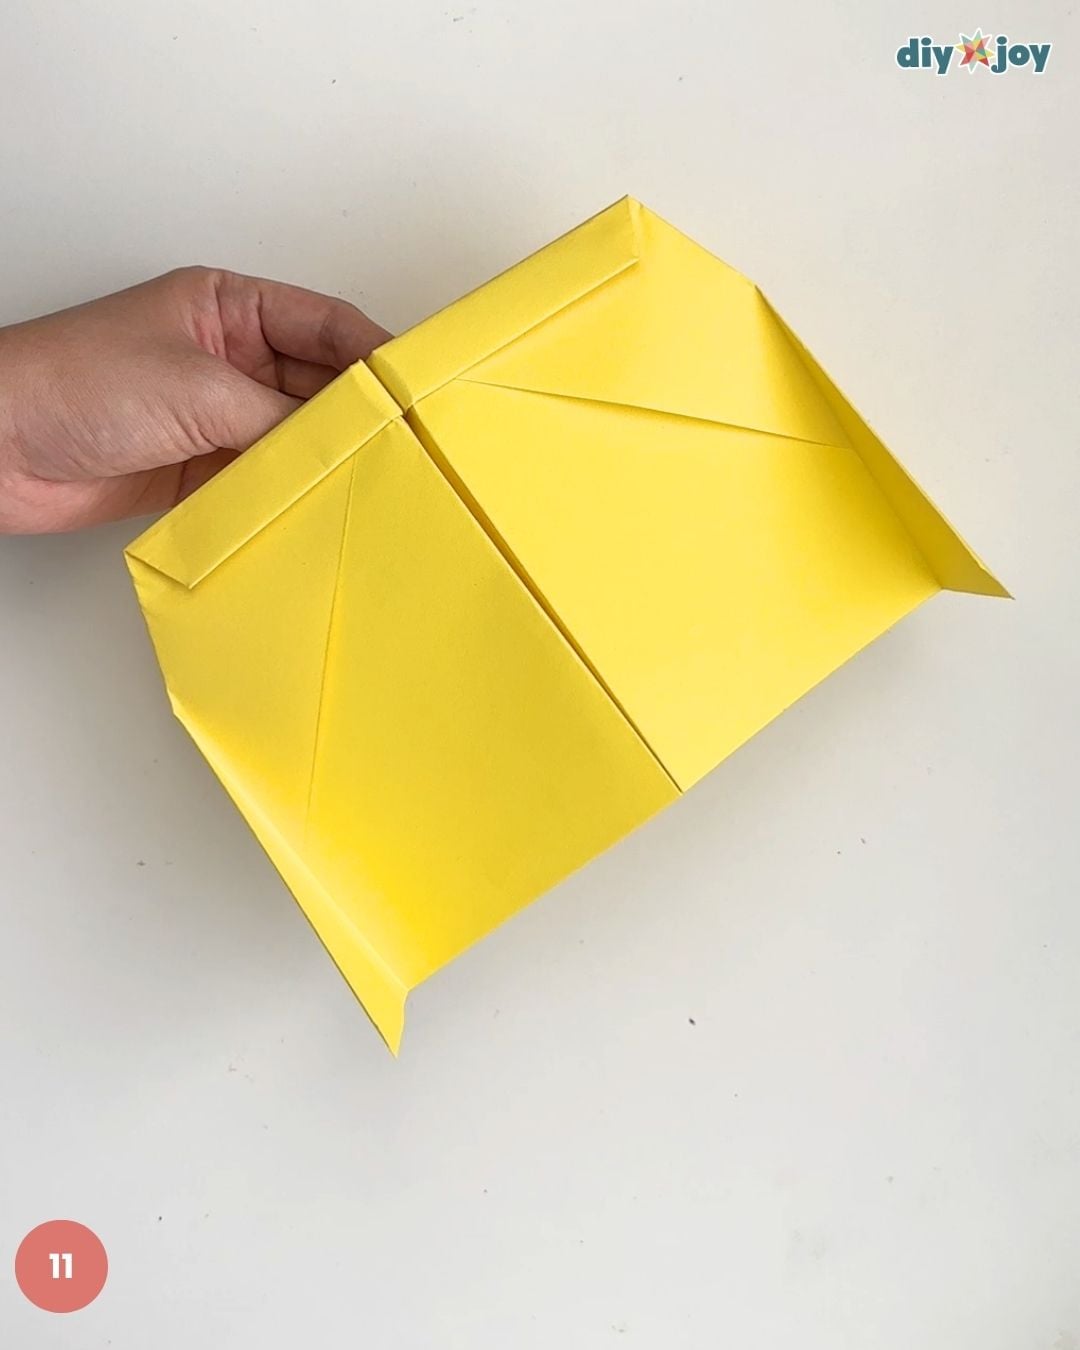
Step 12: Fold the corners of the triangles toward the tip.
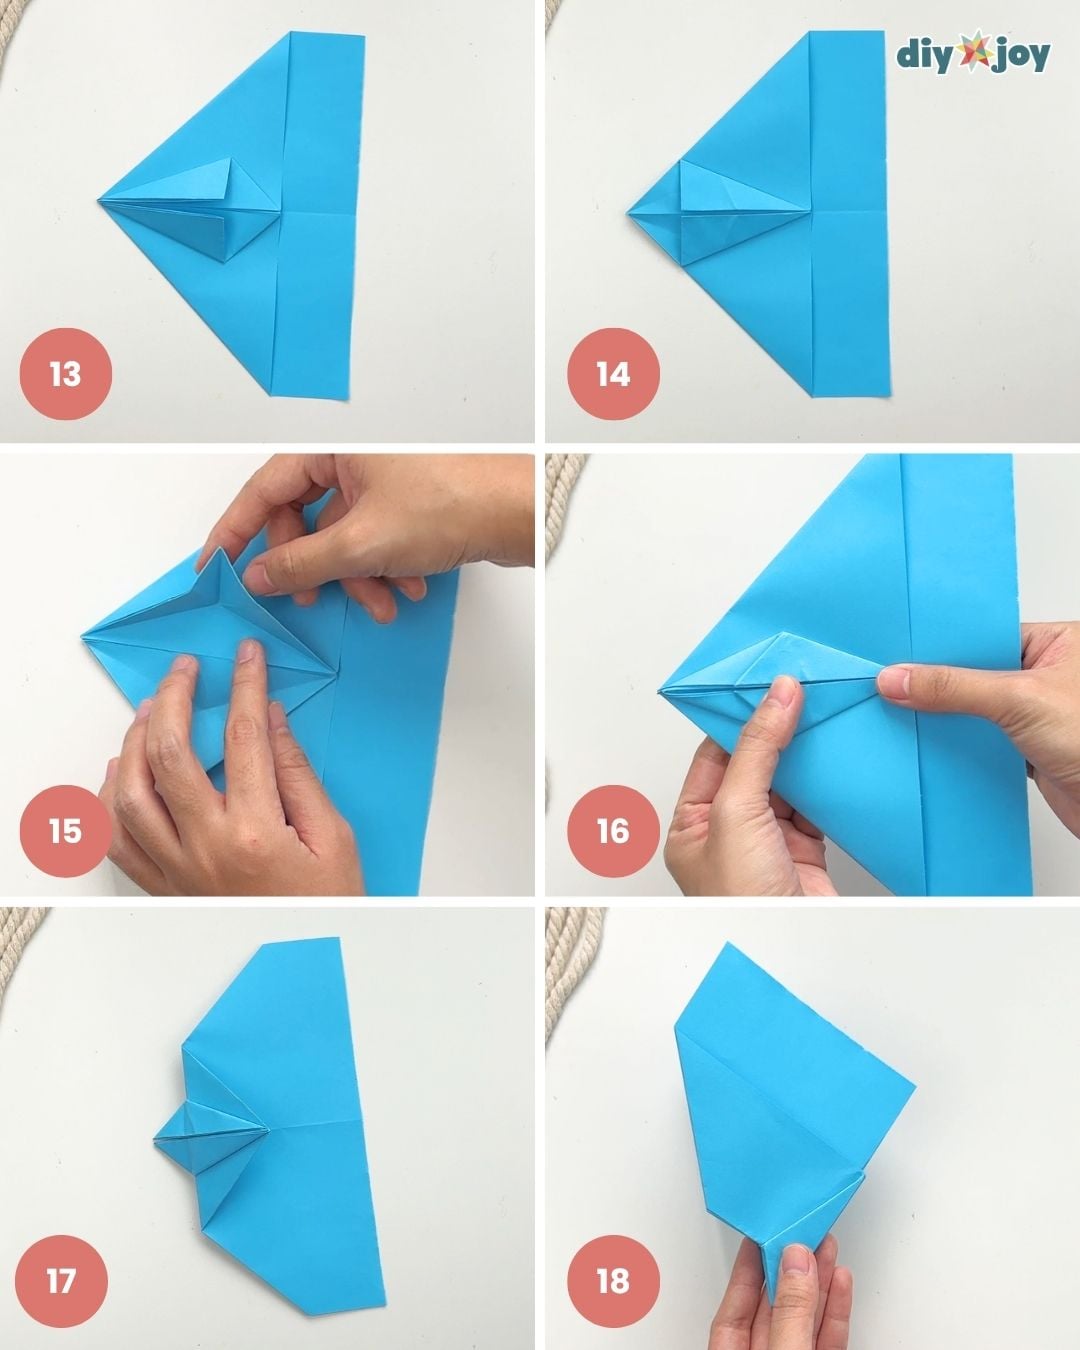
Steps 13 to 18
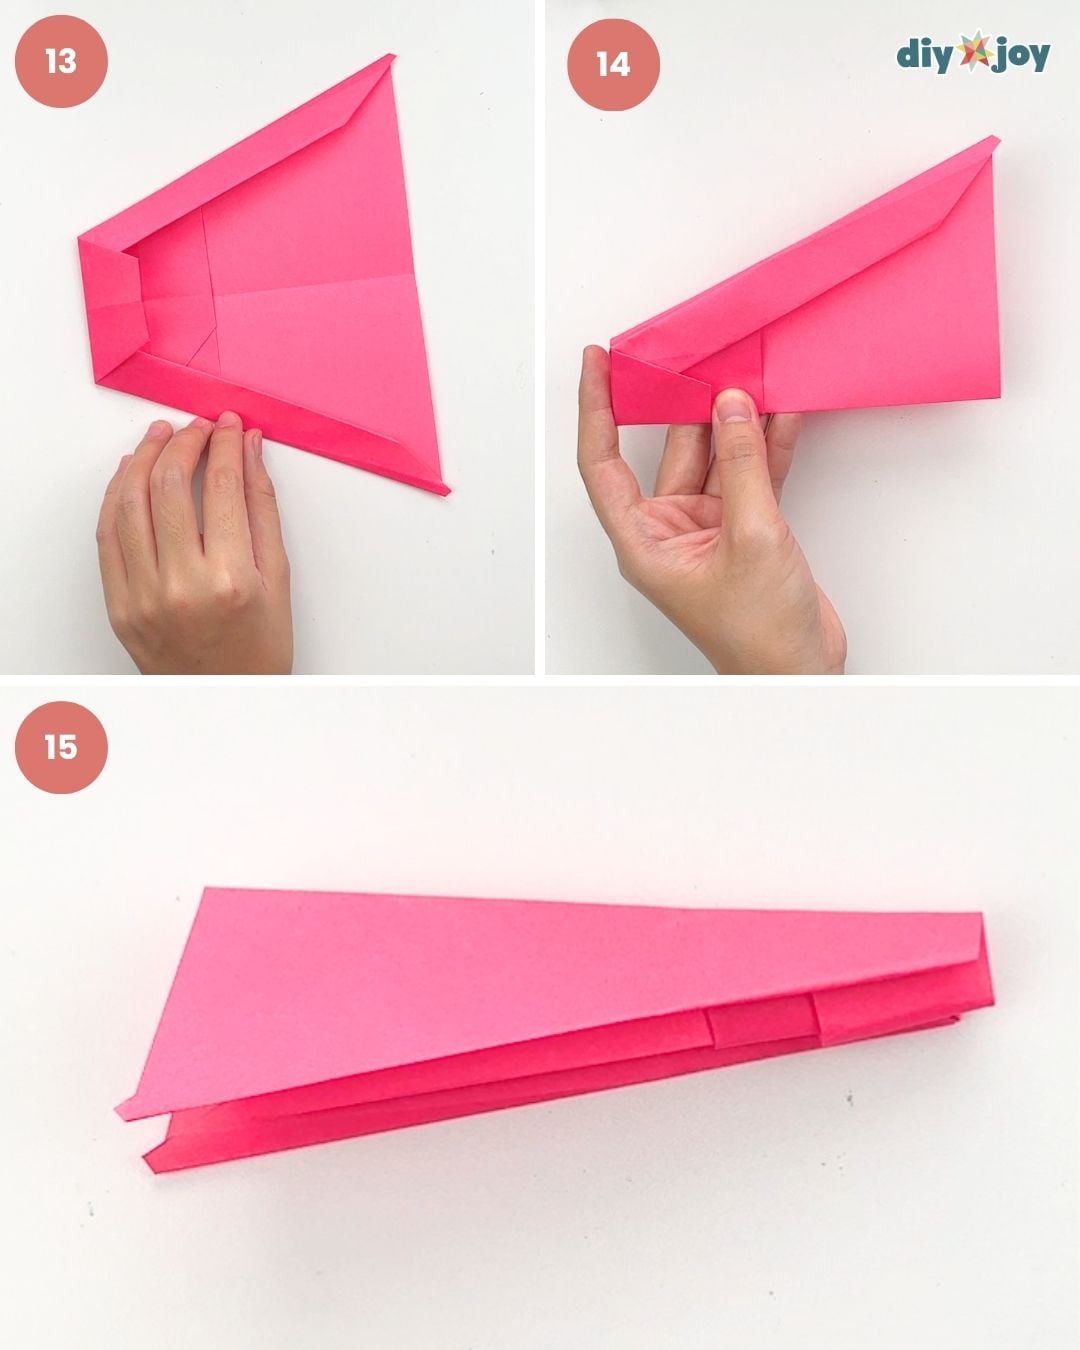
Step 13: Fold the left side of the top triangle toward the center line. Repeat on the bottom triangle, then unfold.
Step 14: Repeat step 13 on the right side. Unfold.
Step 15: Pinch the center of the top triangle to form a point, then fold the point toward the left.
Step 16: Repeat step 15 on the bottom triangle.
Step 17: Flip it over, then fold the tip of the triangle.
Step 18: Fold it in half.
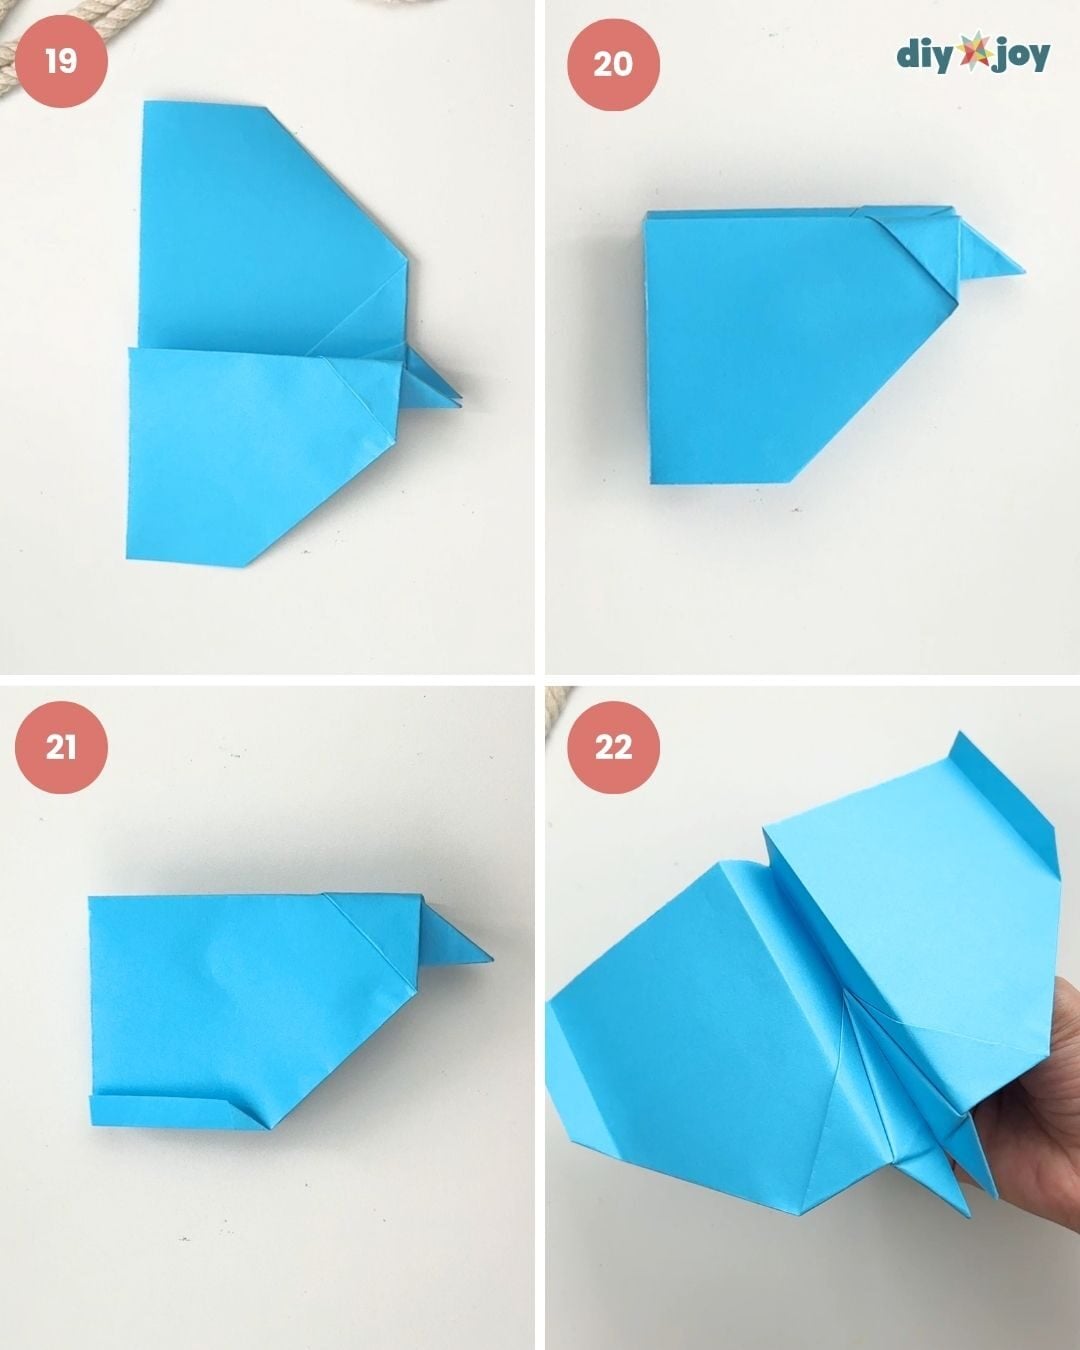
Steps 19 to 22
Step 19: Fold the flap down.
Step 20: Repeat on the other side.
Step 21: Fold the lower part of the wings upward.
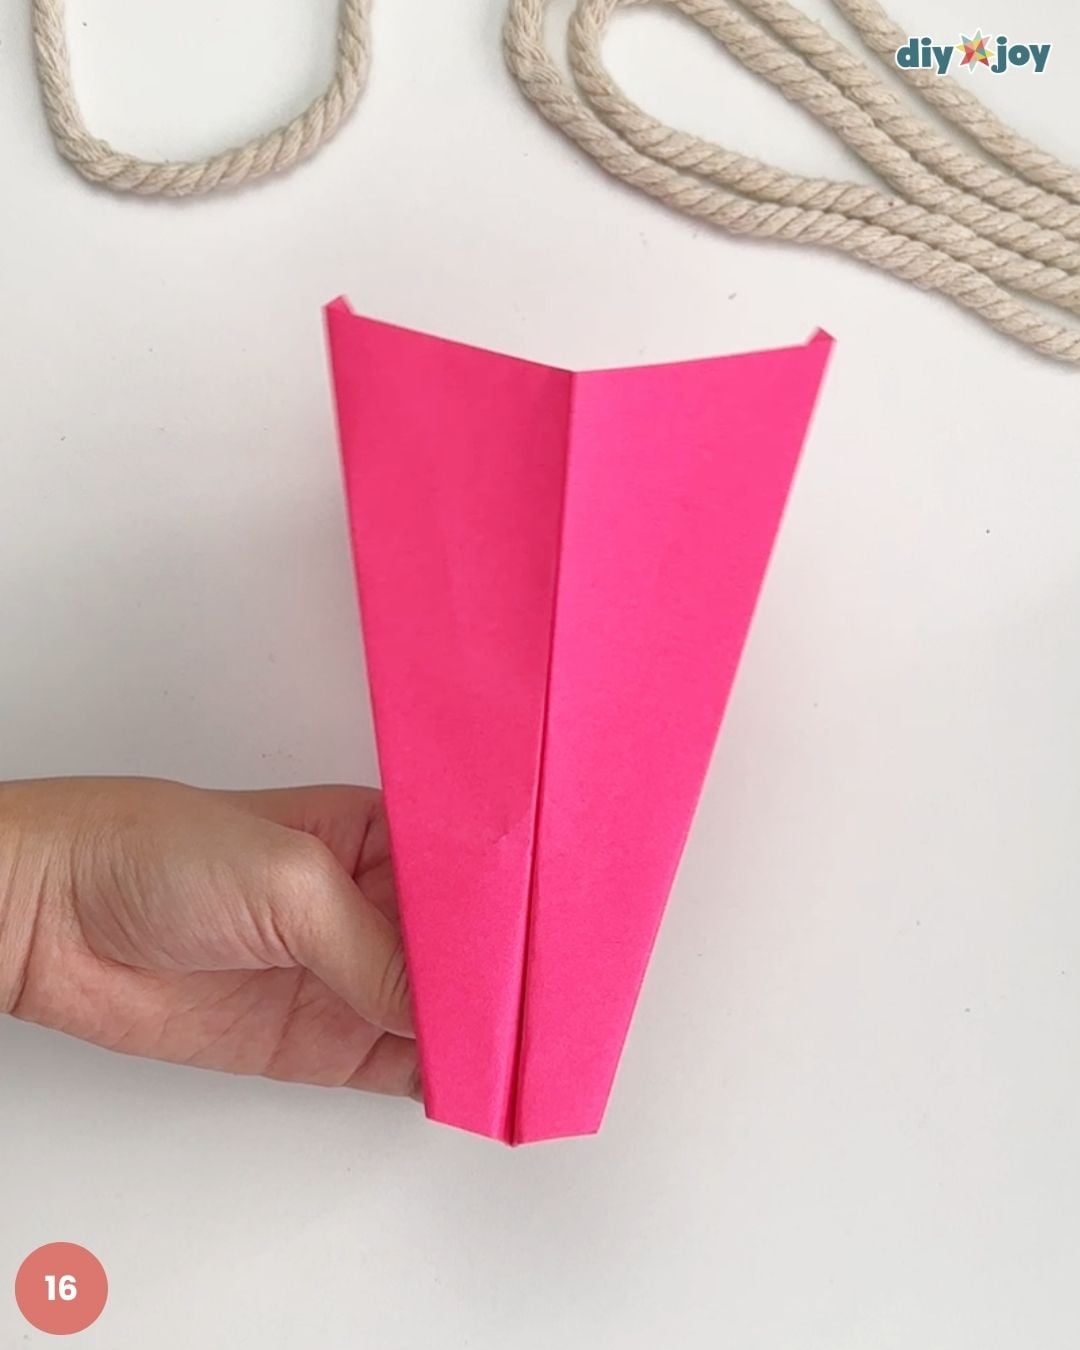
Step 22: Open the flaps to a 90-degree angle.
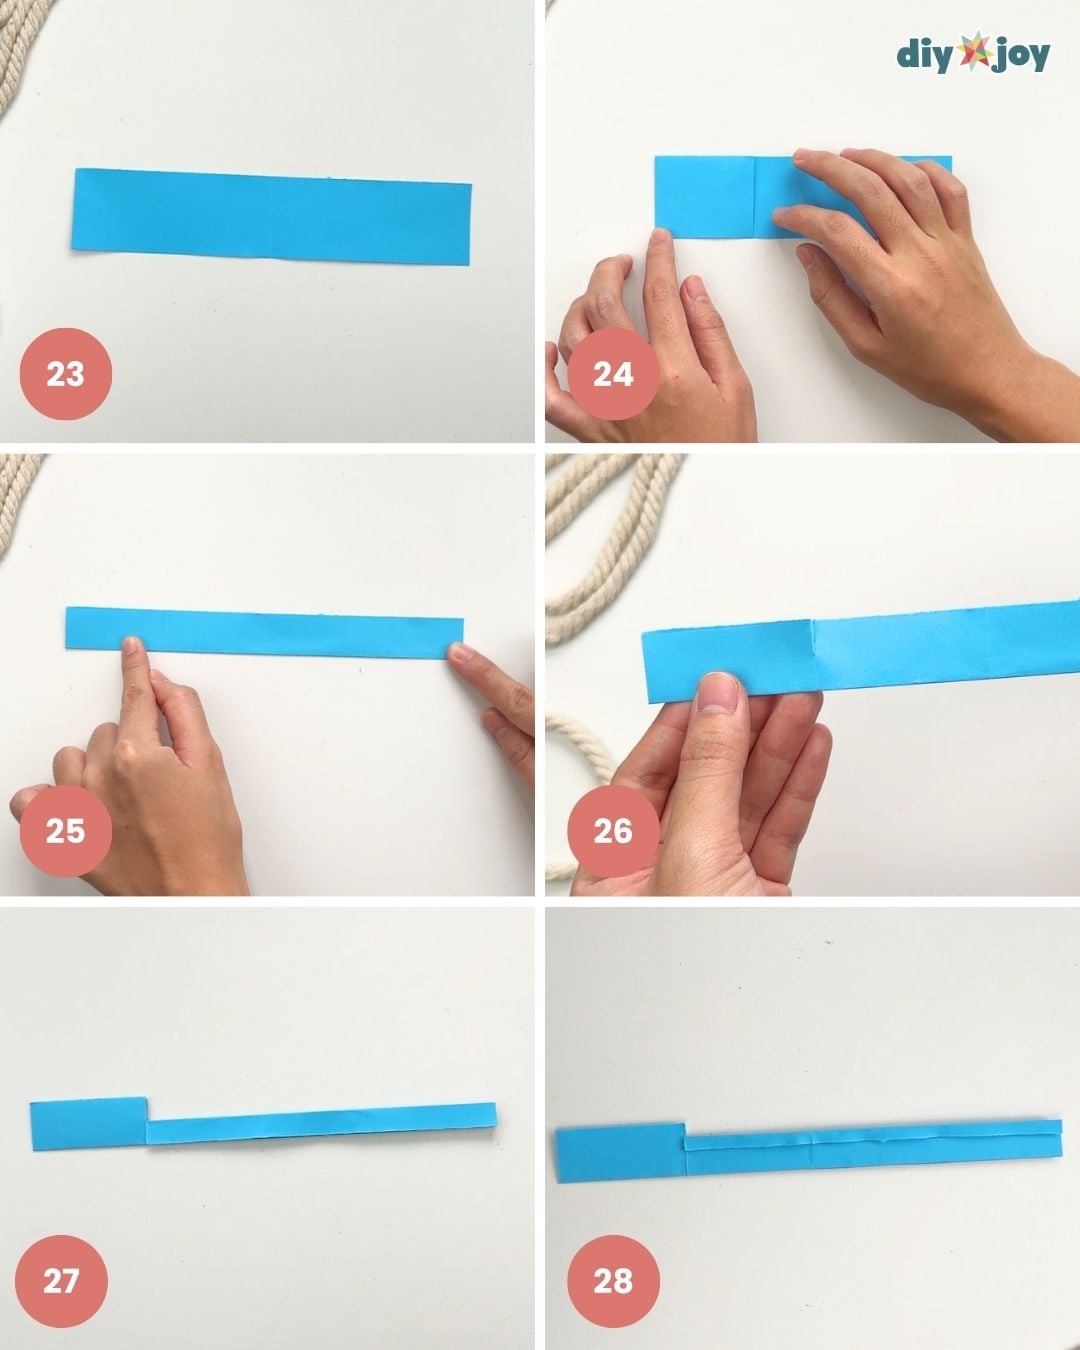
Steps 23 to 28
Step 23: Take the reserved piece from earlier.
Step 24: Fold the left side toward the center line, then unfold.
Step 25: Fold the paper crosswise.
Step 26: Cut halfway through the crease line at the 1/4 mark.
Step 27: Fold the right side in half crosswise to make a crease line. Repeat on the other side. Unfold.
Step 28: Fold the right side toward the center crease line. Repeat on the other side.
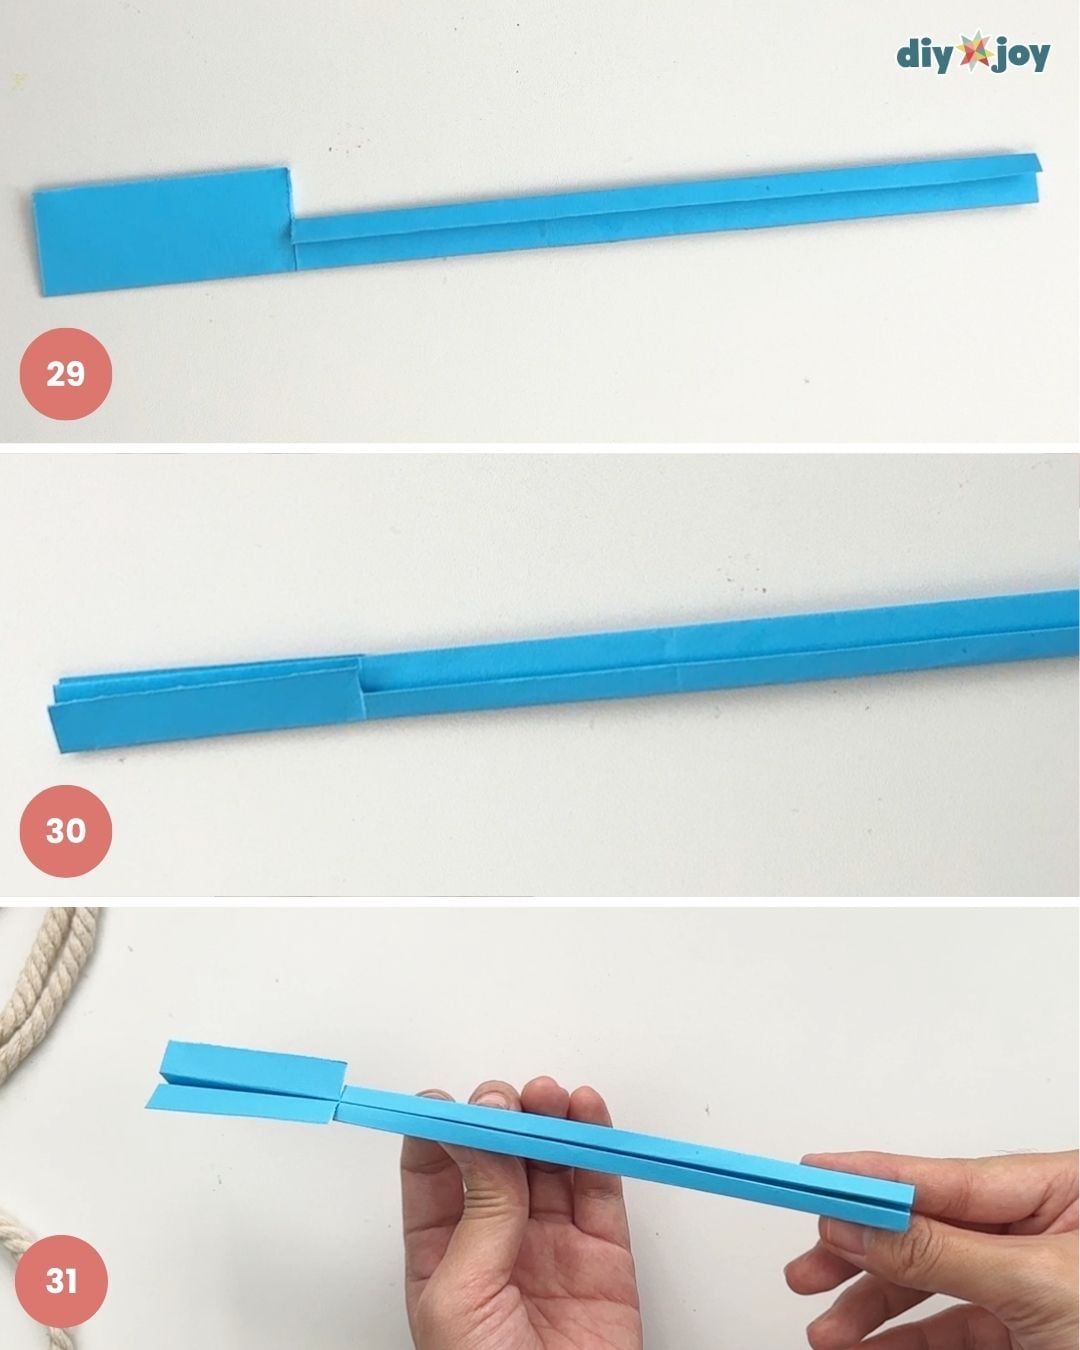
Steps 29 to 31
Step 29: Fold the right sides again.
Step 30: Fold the left sides in half crosswise.
Step 31: Open the folds at a 90 degree angle.
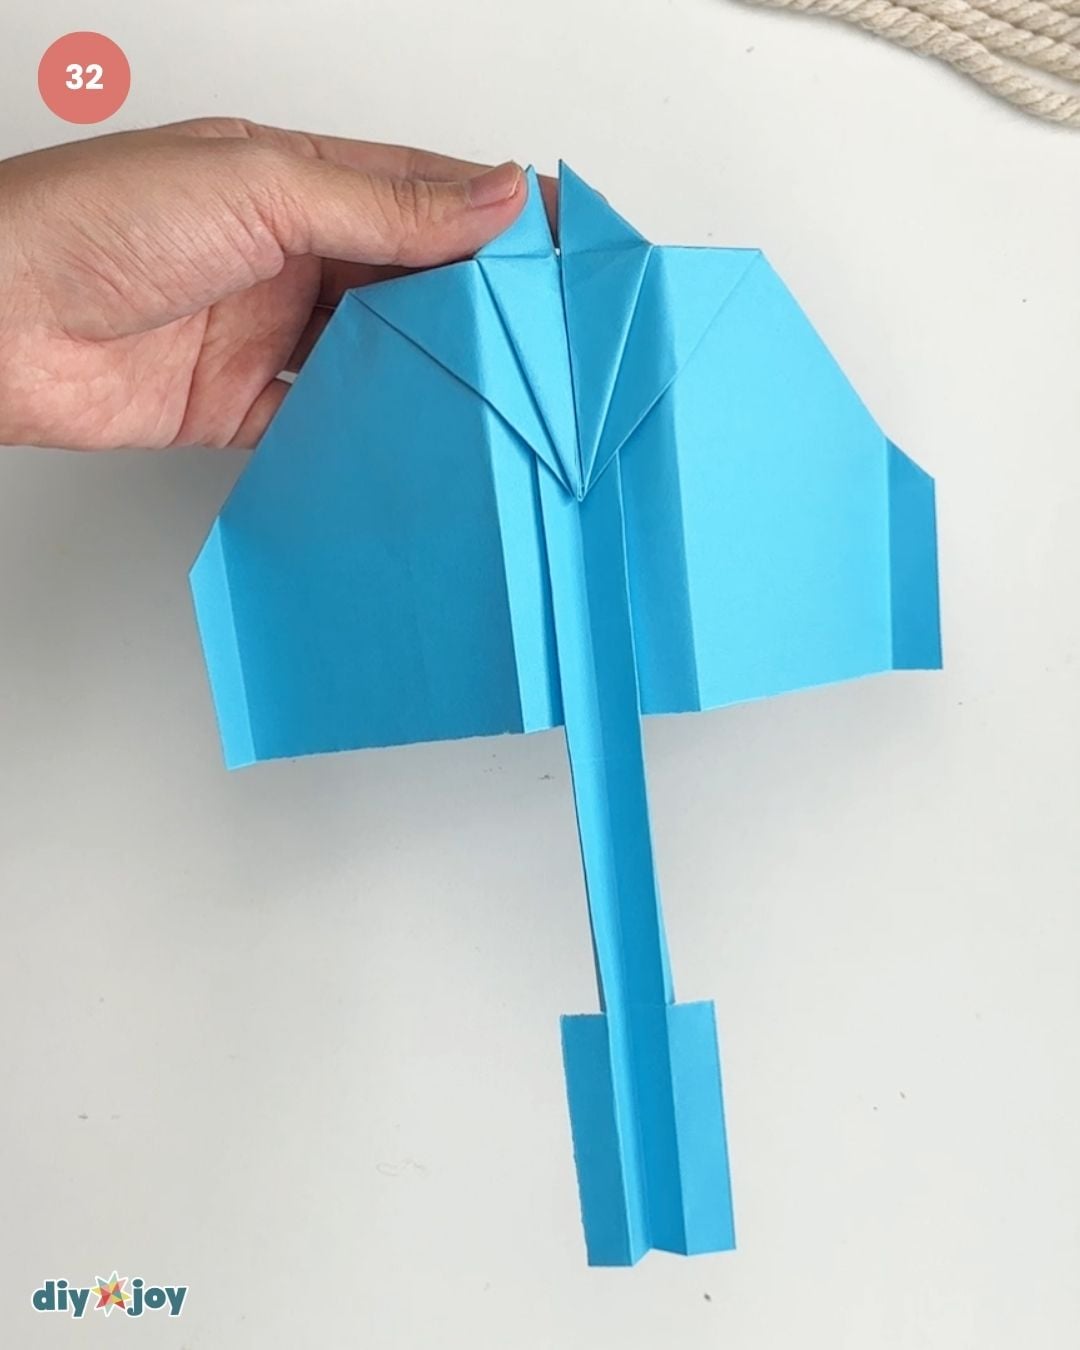
Step 32
Step 32: Insert the tail to the body of the airplane.
Harrier Paper Airplane Tutorial
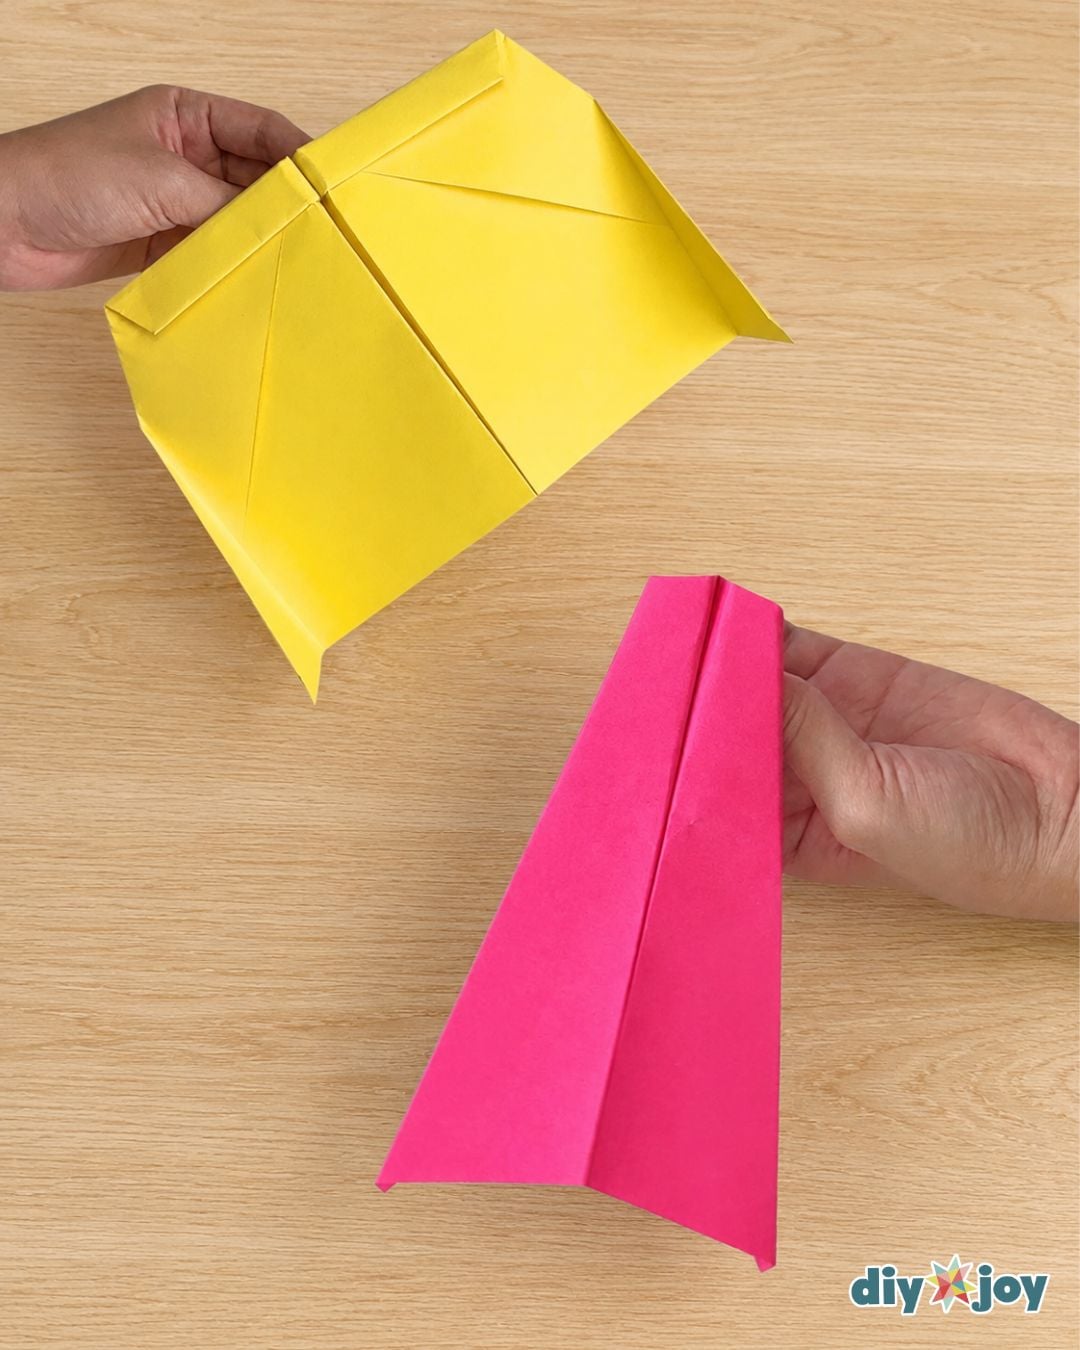
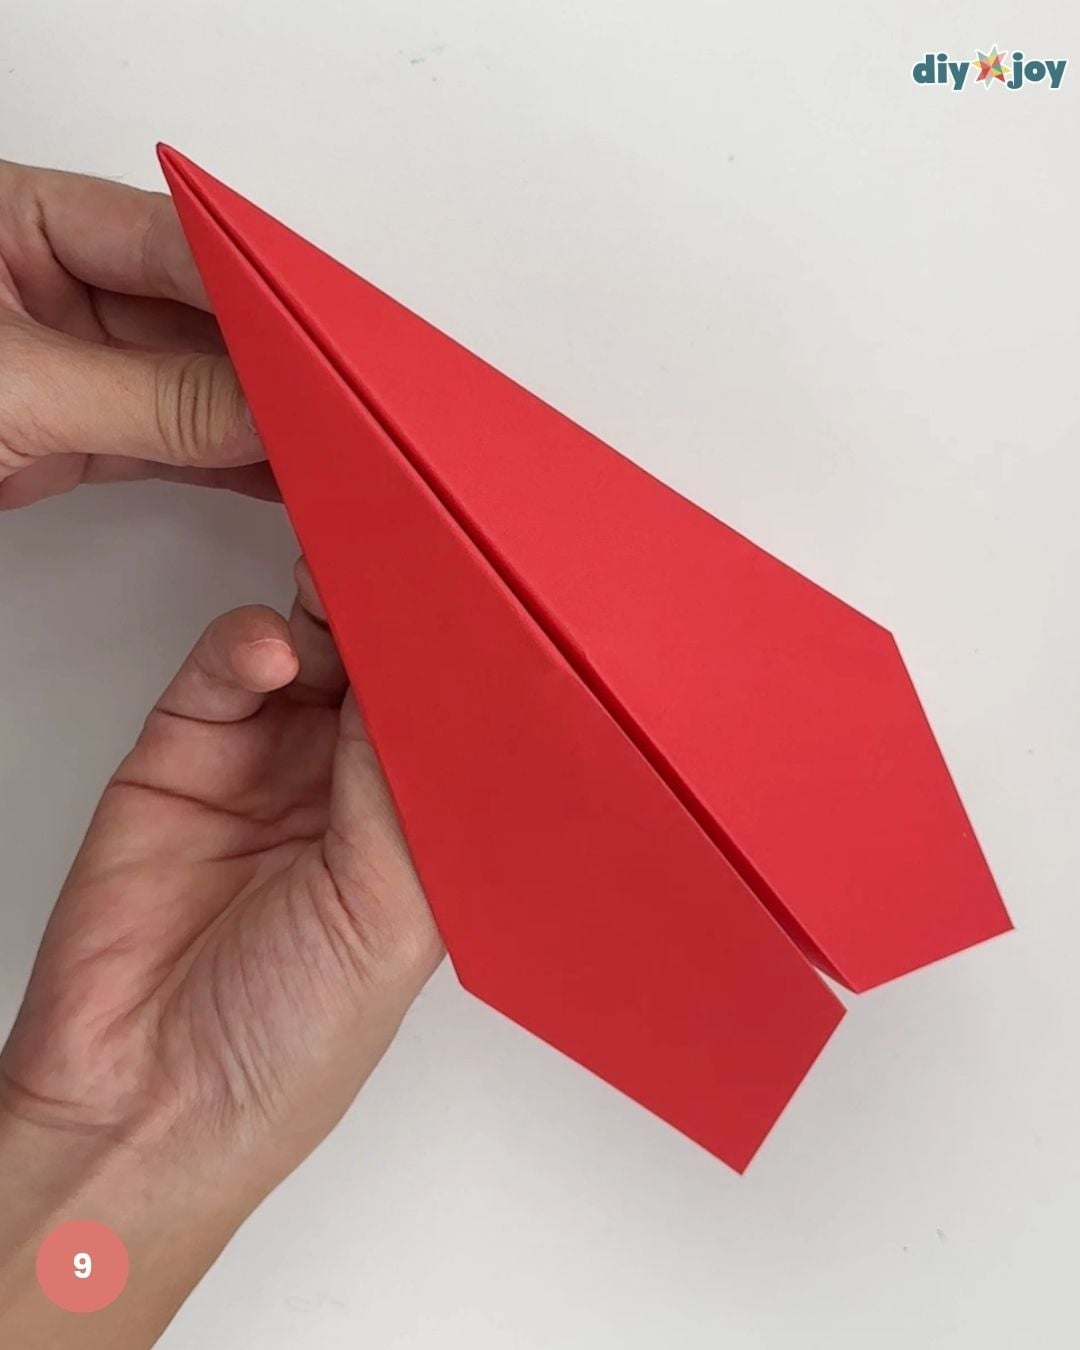
The Harrier paper airplane is similar to the one I used to make when I was a kid. It has a sharp, sleek shape that makes it look like a fast paper plane. It may look simple compared to the other cool paper airplanes on this list, but this one is great if you want a paper airplane that flies far and straight with the right folds.
Steps 1 to 6
Step 1: Lay your paper on a flat surface.
Step 2: Fold the paper in half lengthwise, then unfold it.
Step 3: Fold the left top and bottom corners toward the center line.
Step 4: Fold the tip to the right to make an envelope shape.
Step 5: Fold the new left corners toward the center line.
Step 6: Fold the small triangle to the left.
Steps 7 to 8
Step 7: Fold the paper airplane in half.
Step 8: Fold the slanted parts on both sides down to the bottom edge to make the wings.
Step 9
Step 9: Open the wings.
Hammer Paper Airplane Tutorial
The Hammer paper airplane has a clean, narrow shape that makes it look like a simple but strong paper plane.
Steps 1 to 6
Step 1: Place the paper on a flat surface.
Step 2: Fold the paper in half lengthwise, then unfold it.
Step 3: Fold the bottom left corner to the opposite edge to form a triangle, then unfold.
Step 4: Repeat on the top left corner.
Step 5: The crease lines should look like this.
Step 6: Fold the bottom left corner toward the diagonal crease line.
Steps 7 to 12
Step 7: Fold the top left corner toward the diagonal crease line.
Step 8: Fold the paper in half lengthwise, then unfold.
Step 9: Fold the paper in half crosswise.
Step 10: Fold the top and bottom left corners toward the center crease line, then unfold.
Step 11: Use the points as your guide. Fold the top section along the points
Step 12: Fold the sides to the crease line.
Step 19: Fold the top of the cone shape
Step 20: Fold it in half
Step 21: Fold the flaps down to the bottom edge.
Step 22
Step 22: Open the wings.
Blackburn Paper Airplane Tutorial
The Blackburn paper airplane designed by Ken Blackburn stands out with its wide wings and bold folded shape that makes it look different from a regular paper plane.
Steps 1 to 6
Step 1: Place your paper on a flat surface.
Step 2: Fold the paper in half crosswise.
Step 3: Use the center line as the guide. Fold the bottom corners toward the center line.
Step 4: Fold 1/2 inch from the bottom.
Step 5: Repeat step 4 four more times.
Step 6: Fold the paper in half.
Steps 7 to 10
Step 7: Fold the flap down about half an inch from the bottom.
Step 8: Repeat on the other side.
Step 9: Fold the tip of the wings down.
Step 10: Open the paper airplane.
Step 11
Step 11: Open the flaps to a 90-degree angle..
Suzanne Paper Airplane Tutorial
The Suzanne paper airplane Designed by John Collins is the one that feels the most classic at first, but that is also what makes it so impressive. It has a clean, simple shape, but once you fold it the right way, you can see why it became known as a paper airplane that flies far. This design once held a Guinness World Record back in 2012!
Steps 1 to 6
Step 1: Place the paper on a flat surface.
Step 2: Fold it in half crosswise.
Step 3: Fold the bottom left corner to the opposite edge to form a triangle, then unfold.
Step 4: Repeat on the top left corner.
Step 5: The crease lines should look like this.
Step 6: Fold the bottom left corner toward the diagonal crease line.
Steps 7 to 12
Step 7: Fold the top left corner toward the diagonal crease line.
Step 8: Fold the left part over the right, exactly where the two folds meet.
Step 9: Fold the bottom-left and top-left corners toward the center line.
Step 10: Fold the paper in half.
Step 11: Fold the top part down to make a pointed tip, making sure the back covers the bottom corner. Repeat on the other side.
Step 13
Step 13: Open the wings.
Pro Tip
Make sure your folds are super sharp. This helps reduce drag so your plane can really soar! Just take an extra second to press down firmly on every fold with a ruler or your thumbnail.
Since I lover experiments, I’ve alwaysnloved to create, paint, as well as cook and style food. I feel in love with DIY as soon as I discovered it and could not have been more excited when I learned I could share projects with people around the world. Taking photos is a passion of mine, as is design and painting with oils. I love holidays and celebrations, crafting cute little gifts and serving up at least one new recipe I am excited about.