Seven dollars and a single 2×4. That is the entire bill for one of these builds, and it sets the tone for the rest. These 28 easy woodworking projects are for anyone who loves the idea of making furniture and decor but is not quite ready for dovetail joints. Most need a saw, a drill, wood glue and a sanding block, and plenty of them come from one board or a pile of scraps. There is a two tier planter box for $40, a bench held together with nothing but adhesive, a desk organizer cut from a 1×3 and a console table built from six studs. Start small, finish it, and the next one gets easier every single time.
1. Bath Tray with Book Rest

Hot bath, cold drink, good book, and nowhere to put any of them. This bath tray fixes that with two long boards, two cross braces and one thinner board that props up at an angle as a book rest. Old fence pickets or leftover lumber are perfect. Glue and screw the braces near the middle so they support the rest, then stick adhesive felt to the underside so the tray never scratches the tub. A white dry brush and a wax finish give it that weathered spa look.
Get the full tutorial at Kim Pepper Blog.
2. DIY Geometric Shelves
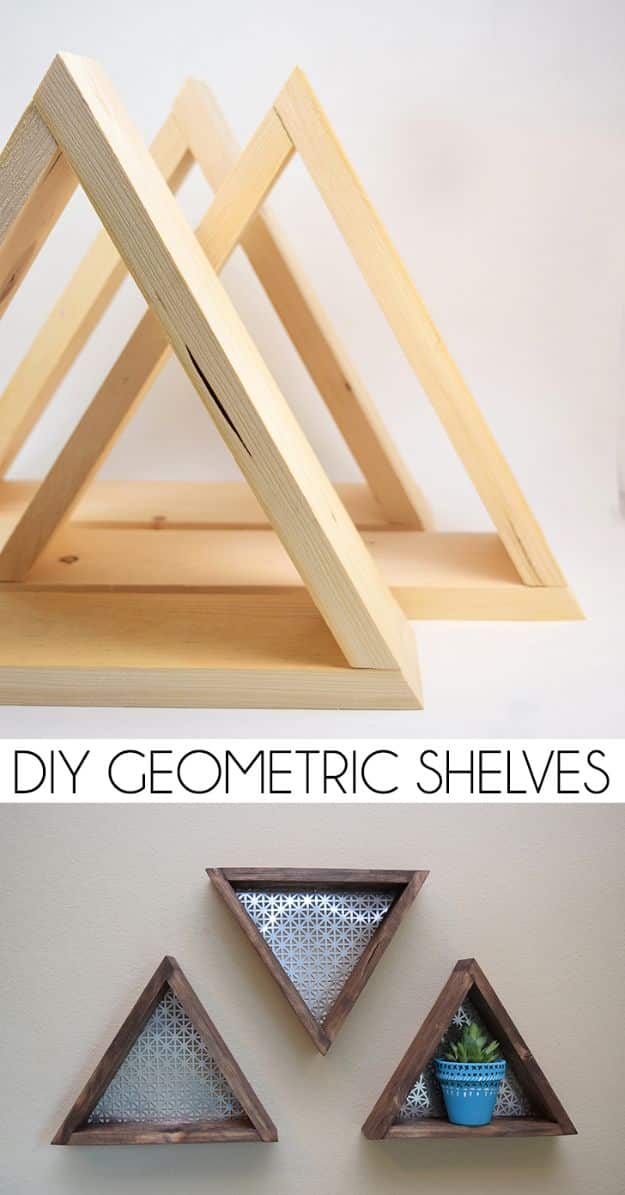
Triangle shelves look like something from a pricey boutique and cost less than $15 in materials for three good sized frames. No fancy tools either: a miter box with a hand saw and a staple gun get it done, which makes this a true first project. Cut three equal strips at matching angles, join them into a triangle, then add a short shelf across the base. Hang them at slightly different heights in a cluster so they read as one piece of art.
Get the full tutorial at Dream a Little Bigger.
3. DIY Wooden Toy Bins

Toys multiply overnight, and smaller bins make them far easier to find and put away than one giant toy box. These mercantile style bins are cut from 1×12 pine with an angled side profile, so each opening tips forward. Trace a cardboard template for the sides so every bin matches, then glue and nail it together. A top piece of 14 x 11 inches and side pieces of 13 x 11 are the starting measurements. Mending plates join the stack so it never topples.
Get the full tutorial at The Merrythought.
4. DIY Upholstered X-Bench

An end of the bed bench built from just two 2×4 boards, with under $10 in lumber. The X legs look tricky because of all the angles, but printable plans and a video walk through every cut. Pocket holes with a Kreg Jig join the mitered parts, and the top gets foam, batting and a cozy fabric stapled underneath. Faux fur makes it impossibly soft. Skip the upholstery and the very same frame becomes an indoor or outdoor bench.
Get the full tutorial at Anika's DIY Life.
5. DIY Modern Z Table

A side table shaped like the letter Z, made from one 1×8 board, a little glue and some screws. Three pieces do it all: a 15 inch top, a 15 inch base and a 20 inch middle cut at 45 degrees on one end. The tip that saves a lot of frustration: angled joints are a beast to clamp, so tack them with a brad nailer first and then drive 2 inch screws in at an angle. Fill the holes, sand and paint it a bold color.
Get the full tutorial at ToolBox Divas.
6. DIY Wooden Couch Sleeves

Somewhere to set a drink when the side table is across the room. A wooden couch sleeve slips right over the arm of the sofa and is basically three boards glued into a U. Measure the arm, add about a quarter inch so it slides on easily, plus the thickness of the sides for the top piece. Glue and clamp, then stain and seal it well since drinks will land there. Ten minutes to set up, the rest is waiting for glue.
Get the full tutorial at Ugly Duckling House.
7. DIY Floating Ladder Shelf

Half ladder shelf, half floating shelf, plus a towel bar tucked underneath. This one is built for the wall above the toilet, where a little extra storage counts most. Cut the lumber to the plans and sand every board before assembly, which is much easier than sanding into corners later. Clamp two 1×3 sides together and drill straight through both with a 3/4 inch spade bit, so the towel rod holes line up perfectly. Finish with a dark gel stain.
Get the full tutorial at Anika's DIY Life.
8. Simple DIY Wood Crate

A little wood crate for the remote controls, made entirely from scraps lying around the garage. Two 1×4 sides, a quarter inch plywood bottom and two plywood ends, plus a drawer pull on each end for handles. Here’s the lesson worth stealing: use wood glue. Thin plywood will not hold a nail on its own, and nails tend to work loose over time. Drill pilot holes so nothing splits, bang the boards up a bit with a hammer and stain it.
Get the full tutorial at Create and Find.
9. Desk Organizer

One 1×3 board becomes a whole desk organizer, which is exactly the kind of low risk first project that lets a beginner get to know the tools. Cut three 14 inch lengths, glue two together and drill pencil holes straight through with a 3/8 inch Forstner bit. Slice that glued block into slim segments, drop one, space the rest along the third board and glue them down. The gaps hold a phone and notes. Wrap sandpaper around a pencil to sand inside the holes.
Get the full tutorial at The Kim Six Fix.
10. Rustic X Console

A two shelf console with X sides that looks straight out of a farmhouse catalog, built from standard boards: 2x4s, 1x12s, 2x2s and 2x6s. Each shelf is a 1×12 framed with 2x2s using glue and brad nails, then the 32 inch 2×4 legs are screwed on with 2 1/2 inch wood screws. Here’s a smart move: measure the 2x2s against the actual 1×12 before cutting, since lumber sizes vary. Stain it dark and that console becomes the first thing guests notice.
Get the full tutorial at Handmade Haven.
11. Easy DIY Planter Box
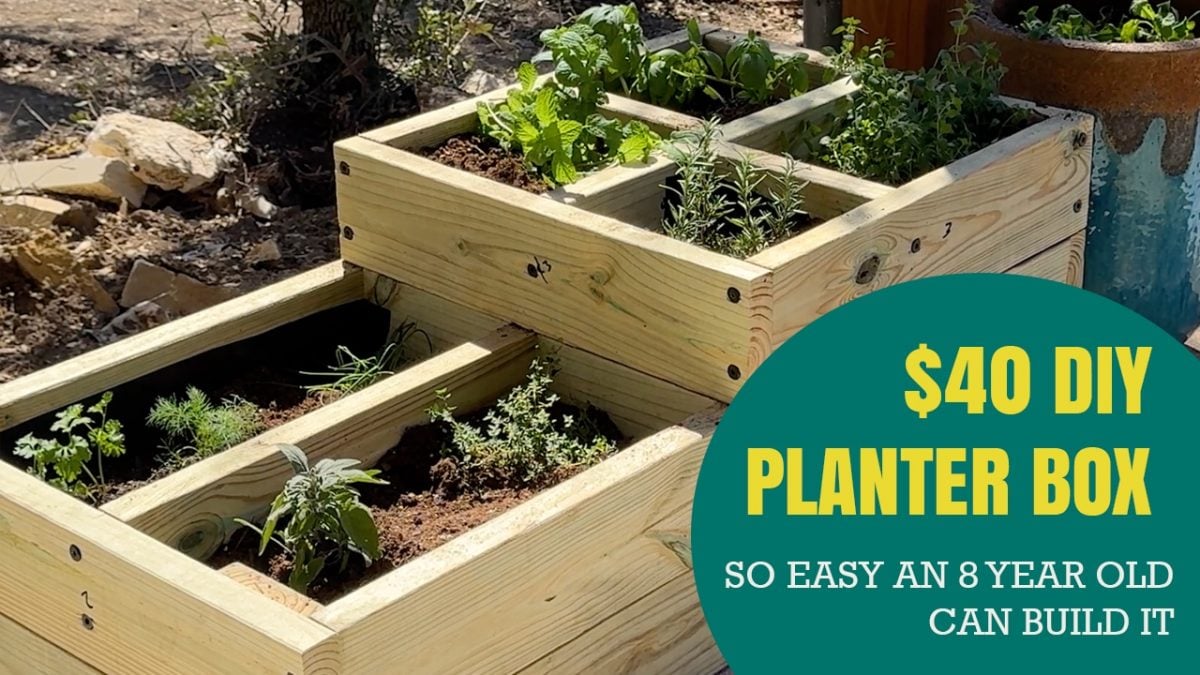
A two tier planter box with built in dividers that looks high end and comes in at $40 or less in materials. The whole thing is five 2×6 boards, a drill, a saw and some screws, and it took about an hour to build. The design is simple enough that an 8 year old helped build it, so a beginner will do just fine. Split herbs from vegetables or sun lovers from shade plants, and everything sits at an easy reach height.
Get the full tutorial at DIY JOY.
12. Easy Scrap Wood Photo Display

Two scrap wood gifts come from one page here, each under $5 and about half an hour of work. The clip frame in the photo is just 1x2s: cut the boards, then glue and staple or brad nail the frame together with the side pieces overlapping the back slats, and glue clothespins along the slats with craft glue. The second is a 12 inch scrap 2×4 block stained golden oak, with twisted wire poked into drilled holes to hold a photo. Grandparents will love either one way more than another sweater.
Get the full tutorial at Ana White.
13. DIY Outdoor Bench

A designer style outdoor bench that comes in at $35, built from plain 2x4s and construction adhesive, with no screws or nails anywhere. The boards are glued face to face into solid slabs, then the ends are milled and sanded down to a finished 16 x 40 x 13.5 inch bench. A belt sander with 80 and 120 grit does the smoothing. Water seal stain keeps rain beading right off. Pressure treated lumber costs more but stands up better if it lives outside year round.
Get the full tutorial at DIY Candy.
14. How to Make a $7 Stool
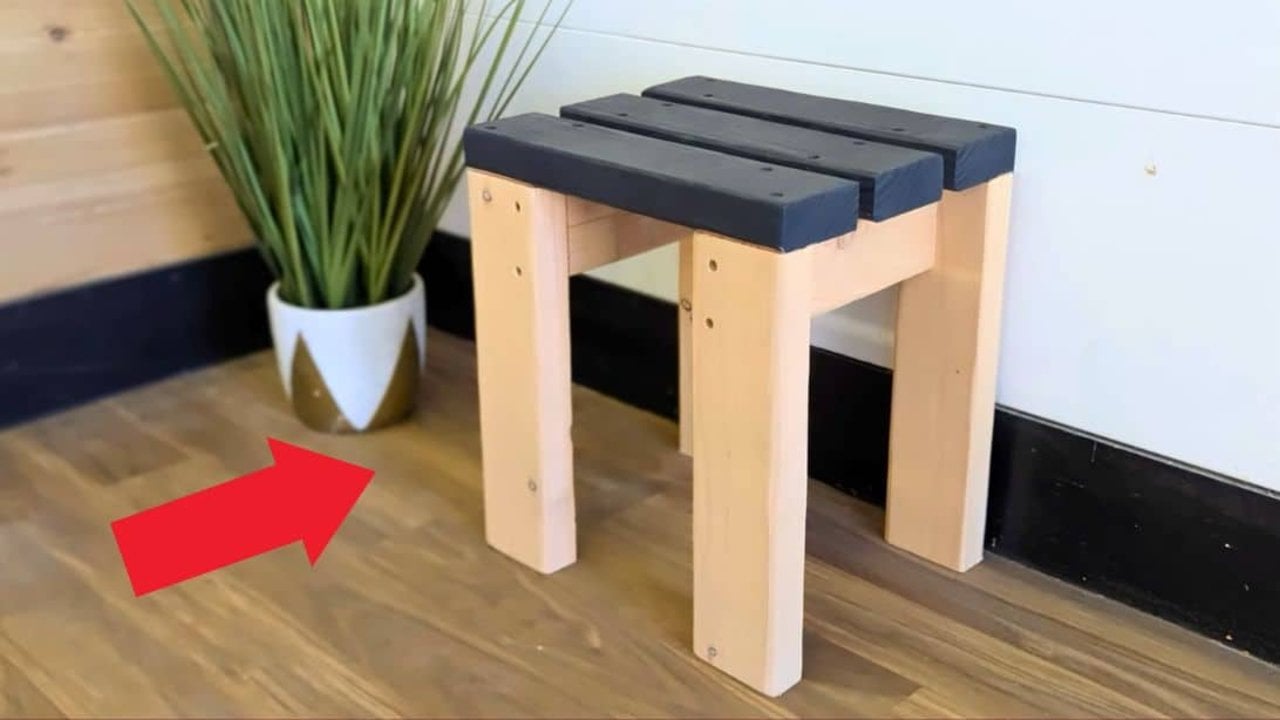
A sturdy little stool from one 2×4, and the whole thing costs about $7. One 10 foot board is cut into nine pieces: four at 14 1/2 inches, three at 14 inches and two at 9 inches. Two side frames go together first, then three boards across the top, with the outer two flush to the legs. Predrill every screw hole so the wood never splits. Sand the edges and paint the top a contrast color. Basic cutting and screwing skills, nothing more.
Get the full tutorial at DIY JOY.
15. DIY Market Style Wooden Fruit Holder
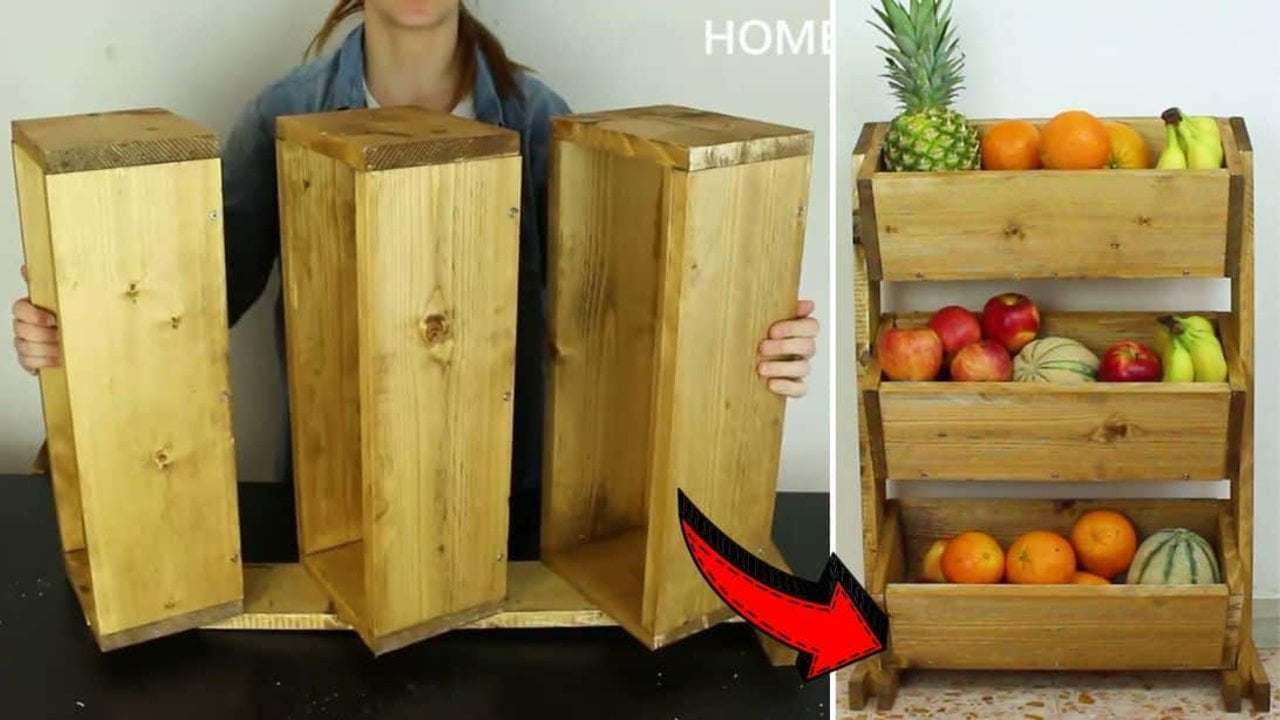
Fruit sprawled across the counter, meet a three tier market style stand that holds a surprising amount without hogging space. Each shelf is three boards screwed into a trough with side pieces, then two long stand boards are laid on the diagonal and trimmed to match. Stain every piece before assembly, add small feet at the base and mount the shelves about 10.6 inches apart. It looks like a farm stand display and works for potatoes and onions too.
Get the full tutorial at DIY JOY.
16. DIY Produce Stand for under $30

A three box produce stand that stands about 32 inches tall and costs under $30 in lumber. Two 10 foot 1x6s, one 8 foot 1×4 and a bit of 2×4 are the whole shopping list. Each box is three 18 inch pieces plus two 7 inch ends, nailed together. Here’s the tip: 1x6s split easily, so drill little pilot holes before every nail and screw. The side supports are cut to tilt the boxes 30 degrees, so everything inside stays visible.
Get the full tutorial at Over The Big Moon.
17. Build Simple Crates

Crates are like baskets: there’s no such thing as too many. These go together in about 20 minutes of active time, plus an hour for the stain to dry. Thin quarter inch strips at 12 and 15 inches make the sides and slats, and half inch square dowels cut to 5 inches form the corners. Glue and nail the sides to the dowels, then space the bottom slats evenly. For heavy duty storage, switch to 1x4s and 1 inch dowels.
Get the full tutorial at Queen Bee of Honey Dos.
18. Farmhouse Style Shiplap Wall Key Holder

Keys, a purse, an umbrella or a scarf finally get a landing spot by the door. The back is a barnwood shiplap trim board cut into four 2 foot pieces and glued edge to edge. Three 1×4 scraps glued together make the front basket that holds the mail, and a row of decorative hooks takes the keys. The basket sides are 1×10 scraps mitered at 15 degrees for that slanted look. Two of these as wedding gifts came in around $25 total. Stain the basket and leave the back raw.
Get the full tutorial at Sawdust Sisters.
19. Kid's Step Stool

A two step stool built from one single 1×8 board, with about $9 in wood. It’s sized at 18 inches so a little one can actually reach the bathroom faucet, unlike the short plastic stools. Pocket holes and 1 1/4 inch screws hold the stair supports together, and the diagonal legs get a 25 degree miter on both ends. Choose the full tread version on top to cover the screws and pocket holes. Stain the steps and paint the frame white for contrast.
Get the full tutorial at Her Tool Belt.
20. Rustic V Wall Decor

A big piece of farmhouse wall art built in under an hour. Ten boards cut to 28 inches are glued and brad nailed across two longer 39 3/8 inch stretchers, then two V braces cut at 35 degrees go on top. Textured, weathered wall boards give it a chippy look with no sanding at all, though plain wood works too. Two coats of white chalk paint let a little of the brown show through. Hang a wreath in the center and change it every season.
Get the full tutorial at Handmade Haven.
21. $10 Cedar Cubby Shelf

A wall of little cubbies for $10, made from five cedar fence pickets. Buy a sixth, since one may split or have knots in the wrong place. The trick is notched dividers that slide into each other like a puzzle, so there’s barely any hardware. Mark which end is the bottom on every board before cutting the notches, because pickets are rarely exactly half an inch thick. A mallet persuades tight joints, then 1 1/4 inch nails and glue lock it.
Get the full tutorial at Ana White.
22. DIY Wooden Arrow

Wood arrows bring a little rustic charm to a nursery, a gallery wall or anywhere a blank wall needs some personality. Two 24 inch craft boards make each arrow. Cut every board in half, then set the miter saw to 45 degrees and cut the points, marking first so nothing goes to waste. The halves join into the chevron shape. Make three in stepped sizes and stain them dark. It’s about 20 minutes of real work, plus an hour for the stain.
Get the full tutorial at The Crafty Blog Stalker.
23. Office Supply Tray

A divided tray that turns a drawer full of loose supplies into neat rows, built in about an hour for around $12. The sides are 1x3s, the base is a quarter inch plywood project panel, and the dividers are hobby boards resting on square dowel cleats. The cuts are simple; the trick is accuracy with the nail gun, since thin dividers are easy to miss. Paint it white and it slides into a desk drawer or sits on top as a catchall.
Get the full tutorial at Build Basic.
24. Farmhouse Industrial End Table

An end table deep enough to hold the TV equipment and a stack of blankets, built from eight 2x4s for about $20 in wood. Count the casters and the metal corner brackets and the total reaches about $35. The finished size is 28 inches deep, 24 tall and 24 wide. Pocket holes do all the joinery here, so plan where each one goes so screws never collide. Pre stain conditioner first, then Special Walnut stain, and the casters let it roll for cleaning.
Get the full tutorial at Infarrantly Creative.
25. DIY Bar Stool

Technically a counter stool at 26 1/2 inches tall, this one is built from 2x4s and nothing else, and four boards make two stools. Three 12 inch pieces joined with pocket holes and 2 1/2 inch pocket screws form the seat; drill those holes a few inches in from the ends to leave room for the legs. The four 25 inch legs are beveled at 10 degrees with parallel ends, and the large crossbars are mitered at 10 degrees. Glue every joint and cut precisely, because wobbly legs are no fun. One also makes a sweet outdoor plant stand.
Get the full tutorial at Sawdust Sisters.
26. 2×4 Console Table

Six 2×4 studs and a few corner braces make a console table with a bold V shaped base. The wood and braces total about $25. The two long legs get 45 degree bevel cuts so they meet at the bottom, and pocket hole screws hold everything together. The finish is the clever part: golden oak and kona stain layered on the top, oil rubbed bronze spray paint on the braces. A belt sander smooths the chunky top so it looks like reclaimed wood.
Get the full tutorial at Her Tool Belt.
27. Rustic Lantern

Pallet frames leave behind a stack of 2x4s, and this rustic lantern is a great way to use them up. The whole thing takes about 181.5 inches of 2×4, cut into bases, tall posts, sides and little feet, then joined with 2.5 inch screws and glue. Pop a candle or a string of lights inside. It’s a great beginner build that also sells well at craft fairs. Going outdoors? Finish it with an exterior rated stain or paint.
Get the full tutorial at Diva of DIY.
28. Floral Centerpiece

Leftover 2×4 scraps become a year round centerpiece that holds fresh flowers in glass test tubes. Four pieces cut to 9.5 inches with mitered corners are glued and brad nailed into a square. Mark three dots on top of each side, then drill 12 matching holes with a 5/8 inch paddle bit, all at the same depth so the tubes sit level. Sand it, use pre stain conditioner and finish in English Chestnut. Tulips in spring, anything in fall.
Get the full tutorial at Infarrantly Creative.