Store-bought planters cost a small fortune, and half the time they still don’t fit the spot you had in mind. These 22 DIY planters fix that! You’ll find big builds for the front porch, like cedar boxes, pallet troughs and window boxes stained a rich walnut, plus little desk-size projects you can finish before lunch. Some start as trash: a soda bottle, a soup can, a burnt-out light bulb, an old kettle or an enamel colander. Others are quick paint jobs that dress up plain pots with stripes, gold or faux copper. Whether you’re a beginner or already own a nail gun, there’s a planter here for you. One tip before you start: give every planter a way to drain, either holes in the bottom or a layer of gravel.
1. Modern Tree Stump Planter

A modern tree stump planter gives a fallen tree a second life, and those skinny hairpin legs make it look like it came from a design shop. Level the top of a dried stump, then drill a starter hole and cut a circle around the edge with a jigsaw for a clean opening. Bore down with a big drill bit and pry out the chunks with a chisel until it’s about 6 inches deep. Drill a drainage hole, seal the inside and bottom, then screw on three legs.
Get the full tutorial at Not Just a Housewife.
2. Simple Berry Basket Succulent Planter

Got a plastic berry basket with no holes in the bottom? This simple berry basket succulent planter turns a $1 basket into a tiny tabletop garden. Run a gold leaf pen or gold acrylic paint around the top rim for a fancy band, and paint the handle too if you like. Once it’s dry, fill the basket with potting soil and tuck in baby succulents. Here’s a money saver: pull small offshoots from one bigger plant, because they’ll root on their own, so a couple of plants can fill the whole basket.
Get the full tutorial at Simple as That.
3. West Elm Inspired Wooden Plant Stands

West Elm inspired wooden plant stands give plain pots a designer lift for under $10 each, and you don’t need big power tools to build them. Cut four legs from 3/4 inch square hardwood, about as tall as the pot. Then cut 1×2 pine into an X shaped platform, join it with wood glue and dowel pins, and drill pocket holes to attach the legs. Size everything to the widest part of your pot. A coat of dark walnut stain makes cheap pine look like a $125 catalog stand.
Get the full tutorial at Hey There, Home.
4. DIY Window Flower Boxes

These DIY window flower boxes skip the usual plain white box for a grooved, stained look, and each one takes about three 1×4 boards, roughly $15 in lumber. Rip the boards into strips and round over every front and side edge with an orbital sander, which is what gives the boxes their shape. Size the bottom, back and trim to your own window. Two coats of American Walnut stain and three of spar varnish, inside and out, protect the wood. Line them with landscape fabric and hang them on galvanized L brackets.
Get the full tutorial at Kruse's Workshop.
5. DIY Pig Planter From a Plastic Bottle
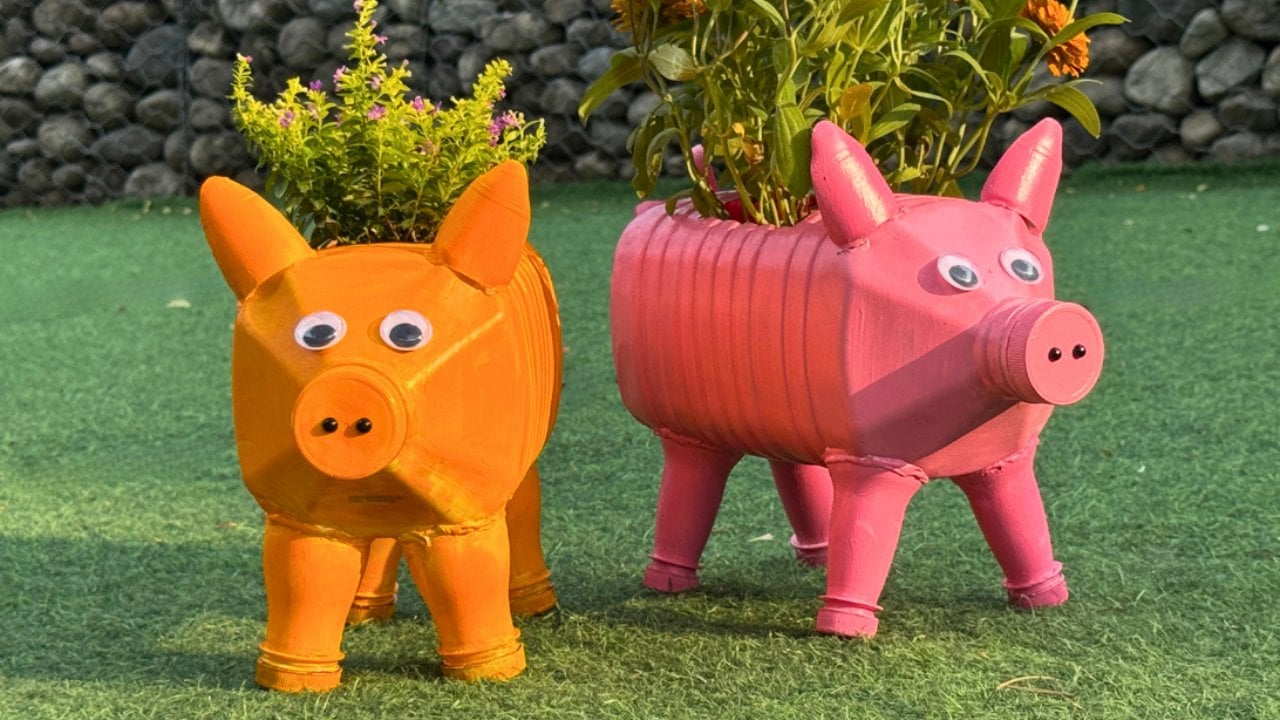
Don’t toss that empty plastic gallon jug! This DIY pig planter turns it into the cutest garden buddy, and the bottles are free. The gallon becomes the body and four small bottles make the feet. Cut the jug carefully and smooth any sharp edges, then give everything a coat of primer, caps and gaps included, so your paint goes on smooth and lasts. Paint it pink, orange or any color you love, add the face details and fill it with flowers or herbs. Make a whole herd for the yard.
Get the full tutorial at DIY JOY.
6. DIY Pallet Wood Planter Box

A DIY pallet wood planter box is easier when you build it around a plastic planter you already own. Make two L-shaped end pieces that hold the plastic liner from underneath, then nail four pallet boards of equal length across them with a brad nailer. Cut vinyl stencil letters on a Silhouette, stick them on, and dry-brush paint over the whole box. Peel the letters off and the bare wood shows through as rustic lettering. A few coats of polycrylic help it stand up to watering.
Get the full tutorial at House by Hoff.
7. Vintage Colander Planter

A vintage colander planter is a sweet use for an old enamel strainer, and the drainage holes are already built in! Clip a carabiner onto each handle, then twist heavy gauge jewelry wire around the clip and handle so it can’t slide around. Line the bowl with a couple of layers of cheesecloth to hold the soil without eating up planting space. Cut a length of chain with an odd number of links so the center link hangs from your porch hook. Enamel is heavy enough that it won’t swing in the wind.
Get the full tutorial at Sadie Seasongoods.
8. DIY Copper PVC Wall Planter

This DIY copper PVC wall planter looks like modern art, but it’s really just plumbing parts from the hardware store. Ask the store to cut 1/2 inch PVC pipe into short lengths, then press them together with elbows, two crosses and a red valve, no glue needed. Spray it with metallic copper paint in a well ventilated spot, about three coats, and it’ll pass for real copper at a fraction of the price. Hang it with large nails and tuck in small plants with short, narrow roots.
Get the full tutorial at CraftBits.
9. DIY Light Bulb Mini Planter
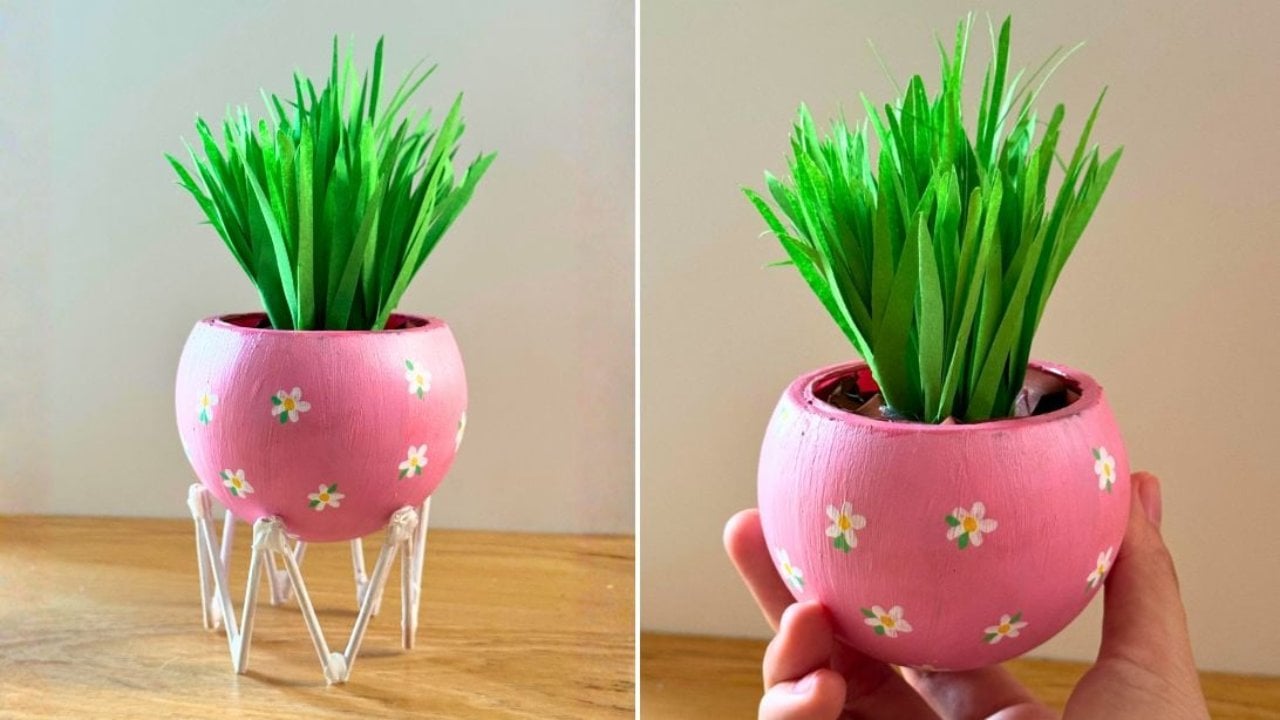
Replaced a light bulb lately? Don’t throw it out! This DIY light bulb mini planter uses the round glass part as a tiny pot. Carefully separate the glass from the metal base, then paint it, adding a second coat if you need one. POSCA pens make easy work of the little flowers. For the stand, cut 8 to 10 sticks to about 2 inches, hot glue them into A shapes, then join the pairs into a slanted ring. Fill it with a small succulent, faux greens or paper grass.
Get the full tutorial at DIY JOY.
10. DIY Two-Tier Planter Box
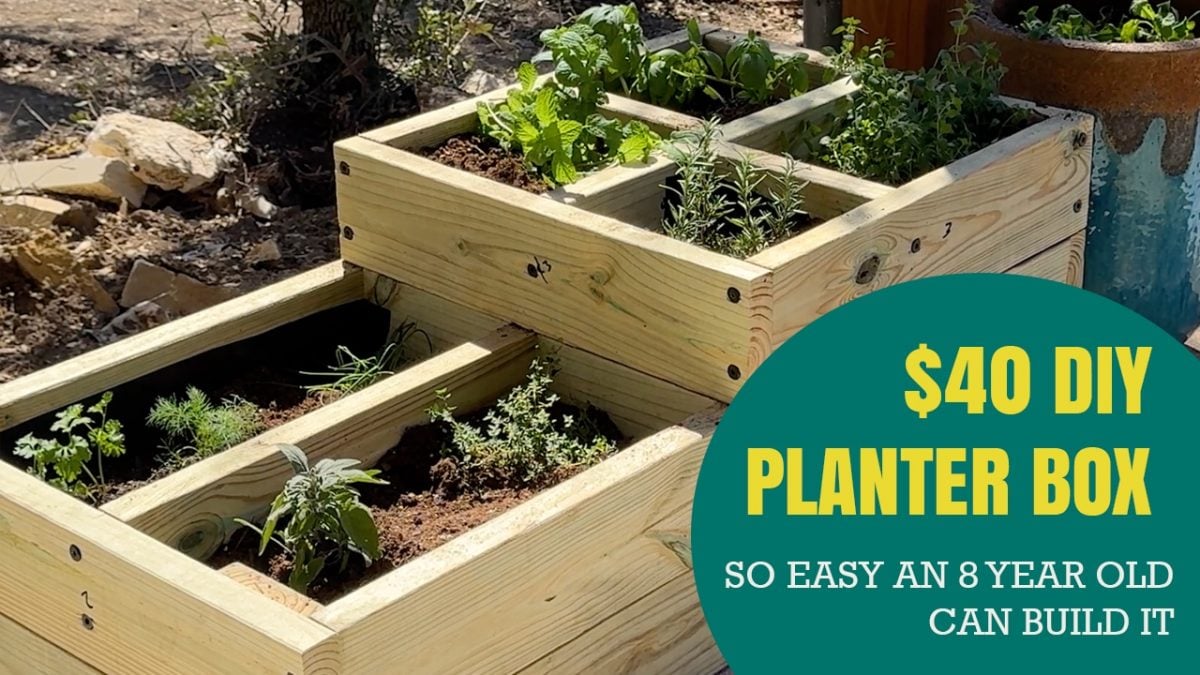
This DIY two-tier planter box looks high end, but it costs $40 or less and takes about an hour. All you need are five 2×6 boards, a saw, a drill and some screws. The design is so simple that even beginning woodworkers can get it right, and a kid can help with the build. Two tiers and built-in dividers let you keep herbs, veggies and flowers in their own sections, or separate sun lovers from shade plants. The raised design puts everything within easy reach.
Get the full tutorial at DIY JOY.
11. DIY Black And White Striped Pots

DIY black and white striped pots give plain square planters a crisp, modern look, and any pot with flat sides works. Tape off the stripes, using a scrap piece of wood as a spacer so the lines stay even, and press every edge down firmly. Painter’s tape is best, though duct tape works in a pinch on a sturdy pot. Spray a coat of primer, two or three coats of glossy white, then a clear glossy sealer. Peel the tape right after the last coat so the paint doesn’t lift.
Get the full tutorial at Dimples and Tangles.
12. Pallet Planter Box For Cascading Flowers

Dreaming of flowers spilling over the edge like a main street hanging basket? This pallet planter box for cascading flowers stands on legs so wave petunias have room to tumble down the sides. The frame uses four 2×4 legs about 40 inches long, 2×2 bottom supports and 1×4 boards for the floor, wrapped in long and short pallet slats. No pallets handy? Pine 1x4s or cedar fence pickets work too. Set it under a plain window in a spot sheltered from harsh afternoon sun and wind.
Get the full tutorial at Her Tool Belt.
13. DIY Painted Cinder Block Planters

DIY painted cinder block planters are a budget win, since each block costs about 99 cents in the hardscape aisle. Mark off a color block design with painter’s tape and brush on acrylic paint, giving it a couple of coats because the cement is porous. Gold and black both look great. Stuff the bottom of each opening with crumpled newspaper or paper towels, set your succulents in plastic bags so the soil stays put, then press them in. Top with white rocks for a clean finish.
Get the full tutorial at Little Miss Momma.
14. Cedar And Pine Planter Box

This cedar and pine planter box is a substantial piece for the front of the house, and it came together for only $11 using leftover 2x2s. It follows a free cedar planter plan, with one change: the top posts sit flush, finished with mitered 1×3 trim. Scrap boards nailed in make the floor. Sand it, brush on pre-stain wood conditioner so the color doesn’t streak, then stain it English Chestnut and seal with spar varnish. Staple black ground cover inside so soil doesn’t sneak through the gaps.
Get the full tutorial at Infarrantly Creative.
15. DIY Front Porch Planter With Gold Dipped Legs

A DIY front porch planter with gold dipped legs is a classic box with a little glam at the feet. Cut four 2×2 legs at 30 inches, then nail 1x4s between them at the same height to make two square frames, checking for square at every corner. Join the frames with more 1x4s, then add cedar fence pickets cut to 20 inches for the side panels. Paint or stain it outdoor ready, and spray the bottom of each leg gold. Build two at once for both sides of the door.
Get the full tutorial at Home Heart and Hands.
16. Rustic Modern Copper Planters

Rustic modern copper planters can run $225 in stores, but you can fake the look for far less. Wrap thin copper sheets around a plain planter or an empty paint bucket and fasten the seam with rivets for that warm, industrial feel. Want something smaller? Try short lengths of copper pipe as mini pots. Copper looks great with snake plants and other upright greens, and it works in a big house or a small apartment. Group three sizes up the porch steps for the most impact.
Get the full tutorial at ManMadeDIY.
17. Old Kettle Planters

Old kettle planters are about the easiest project on this list, and they’re perfect for a small indoor herb garden. Dig through your junk stash or thrift store for kettle style containers, add potting soil, and plant herbs like spearmint and thyme. A little Spanish moss over the soil gives it texture and hides the dirt. Set a few kettles on rusty gears or other salvaged bits to vary the heights. Keep them by the kitchen so you can pinch off herbs while you cook.
Get the full tutorial at Funky Junk Interiors.
18. DIY Soda Bottle Kitty Cat Planters

DIY soda bottle kitty cat planters are pure fun for cat lovers! Peel the labels off one large and one medium bottle, then draw a cat outline on the bottom third: two ears in front and a little tail in back. Start the cut with a craft knife, then finish with scissors. Spray paint the back first, then the front, and use pink and black paint pens for ears, a heart nose, whiskers and sleepy eyes. Drill drainage holes or add gravel before planting.
Get the full tutorial at Salty Canary.
19. DIY Pallet Trough Planter

Short on patio space? This DIY pallet trough planter is about 4 feet long and only 6 inches wide, so it slides right up against a wall. Cut the two ends off a pallet, use one slat for the bottom and screw it all together in an afternoon. Give it a quick sanding and a light stain, but leave some of the shipping ink showing for character. Line it with landscape fabric, fill it with container soil, and plant tall rushes in the middle with geraniums around them.
Get the full tutorial at Sow & Dipity.
20. DIY Vertical Planter

This DIY vertical planter stacks five terra cotta pots, from 14 inches down to 6, on a matching base, so you get a whole herb garden in one small spot. Build it where you want it to stay. Fill the biggest pot three quarters full, push a rod through the center holes, and plant around the outer edge. Then set the next pot inside, sitting a couple of inches down, and repeat. A wooden stake works for the rod, or try a tension rod if it’s too thick.
Get the full tutorial at Grace and Good Eats.
21. Brass Succulent Planter DIY

This brass succulent planter DIY uses black PVC drain caps from the hardware store, wrapped in brass colored aluminum sheeting, and three planters cost under $20. Paint the caps black if they’re white, then drill drainage holes in the larger ones. Measure the circumference and height, cut the metal to size with a craft knife, and wear gloves so you don’t leave prints. Spray the back with permanent adhesive and wrap. Stack a planter on a smaller cap as a pedestal that catches extra water.
Get the full tutorial at A Beautiful Mess.
22. Decoupage Tin Can Planters

Decoupage tin can planters cost almost nothing, since the cans come straight from your pantry. Peel the labels off two soup cans, wash and dry them, and pick cans without sharp top edges. Measure each can’s height and the distance around it, then cut scrapbook paper to match. Brush Mod Podge on with a foam brush, wrap the paper around, and seal the outside too. Plant tiny succulents in cactus soil, since they’re hardy and stay small. They’re perfect for dorm rooms and apartments.
Get the full tutorial at Freebie Finding Mom.