

The best diy gifts for mom don’t wait for a holiday, and this list proves it with a pig planter made from an empty plastic gallon jug. These easy diy gifts for mom work for her birthday, a random Tuesday or a thank you for the last favor she did you. There are things she’ll wear (a seed bead cherry bracelet takes minutes), things she’ll use every day, like a painted Kilim basket and a tin can desk organizer, and a few that glow, including a flower light built from faux rose petals and plastic spoons. Every one of these homemade gifts for mom is beginner friendly, and most cost a few dollars. Perfect for moms, grandmas, mothers-in-law and the friend who mothers everyone in the group chat.
1. DIY Beaded Wind Chime

A wind chime that sparkles before it even makes a sound. All it takes is a stick, twine and a pile of colorful glass beads with a few charms mixed in. String each strand, knot it to the branch and let the lengths vary so the strands swing past each other. Tiny bells on the ends are the secret (the soft tinkling is half the gift). Hold the string taut while you bead, because one slip sends everything rolling under the couch. Hang it by her sunniest window and it throws little rainbows all afternoon.
Get the full tutorial at DIY JOY.
2. Kilim Inspired Painted Basket

A plain cotton rope basket from the dollar section turns into something that looks imported, all with acrylic craft paint. The pattern borrows from Turkish Kilim rugs: stacked diamonds in pink, yellow, teal, purple and gray. The weave of the basket works as your ruler, so you count rows instead of measuring (a pencil and ruler help if you want the center perfect). The tutorial puts the cost around $2 and the whole thing at a couple of hours with drying. Fill it with her favorite snacks or yarn and the basket is half the present.
Get the full tutorial at diycandy.
3. DIY Spring Candle Decor

Plain white taper candles plus a set of Posca paint markers equals the prettiest display candles on her mantel. Draw the outlines first, work on one small area at a time so nothing smudges, and let each color dry before you fill in the next. Flowers, butterflies, bunnies and carrots all look adorable in soft pastels. One important note: these are for display only and should never be lit. Tie a ribbon around a bundle of four and she gets a centerpiece that looks like it came from a boutique.
Get the full tutorial at DIY JOY.
4. Easy DIY Hair Tie Rings

Two hair ties, a needle and thread and one little pearl, and somehow it becomes a ring. Stack two hair ties, push the needle through the center and pull the thread tight until the loops pinch into a flower shape. Wrap the center a few times, knot it, sew a pearl in the middle, then stitch one more hair tie underneath to make the band. Each ring takes a few minutes (fair warning: you’ll make a whole handful). Pick her favorite color, or tuck a matching set into her birthday card.
Get the full tutorial at DIY JOY.
5. Fabric Terracotta Pots

Patterned planters can cost a small fortune, and these come from plain terracotta and a fabric remnant. Cut a piece of fabric that wraps once around the pot, with extra at the top and bottom to fold over the edges. Brush Mod Podge on the pot, smooth the fabric in place, fold the edges inside and under, then add a top coat of Mod Podge to seal it. A bold floral like this one makes the plainest herb look fancy. Keep these indoors, since the tutorial doesn’t recommend them for outdoor use.
Get the full tutorial at shelterness.
6. Easy DIY Flower Pot Candy Jar
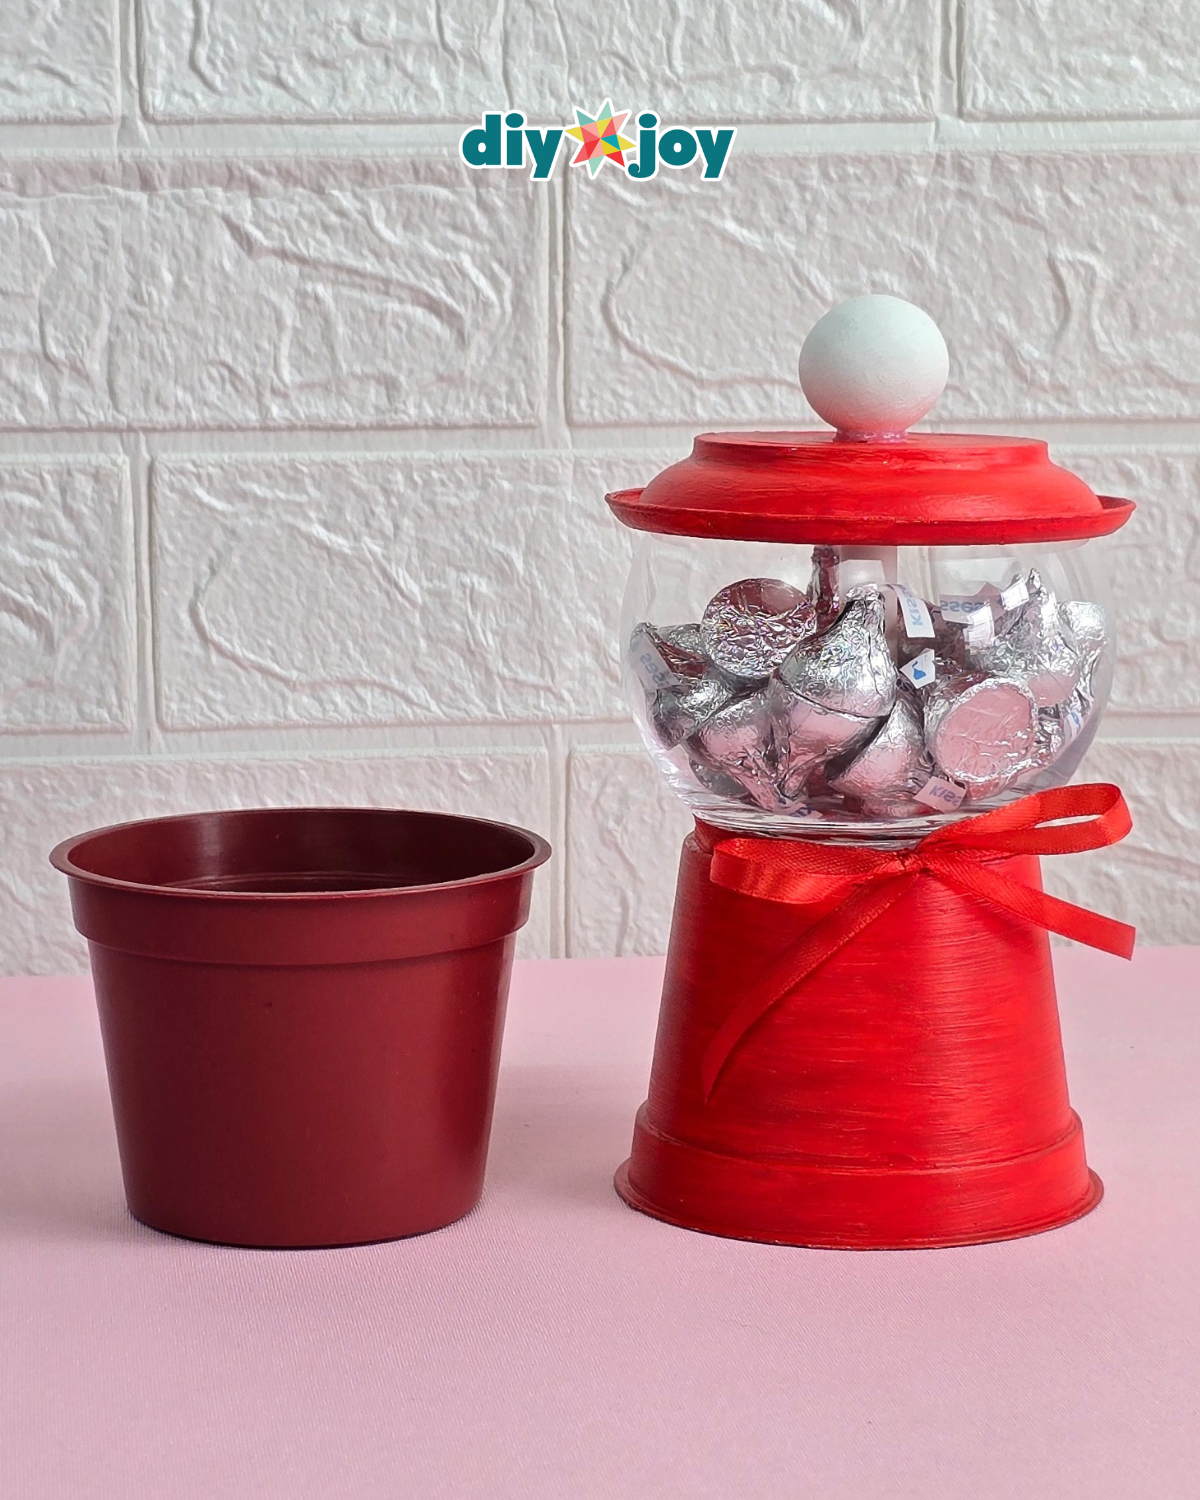
Remember begging for quarters at the gumball machine? This treat jar brings that look home with a plastic flower pot, a saucer and a wooden ball. Prime all three, paint them a bright candy red and let them dry fully before a second coat. The clear candy bowl sits between the pot and the saucer lid, with the ball as the knob on top. Fill it with her favorite chocolates and tie a ribbon around the base. When the candy’s gone (and it will go fast), it stores little keepsakes beautifully.
Get the full tutorial at DIY JOY.
7. DIY Chalkboard Spice Jars

Store bought chalkboard jars run $10 to $12 apiece, and these are glass jars rescued from the recycling bin. Clean them well, then spray paint the jars and lids with three thin coats, letting each dry completely. Add chalkboard labels (or cut your own from chalkboard vinyl) and write salt, sugar or baking soda in your best handwriting. Baby food jars are the right size for spices. Use food safe paint if anything will go straight inside, or fill them with craft supplies instead. She’ll love seeing them lined up on her counter.
Get the full tutorial at sarahhearts.
8. Beaded Bracelet

A beaded bracelet with a toggle clasp is one of the fastest handmade gifts there is, and you can make several in one sitting. Cut beading wire about 9 to 10 inches long, then secure one half of the toggle with a crimp bead and squeeze it twice, once into a C shape, then an O. Start and end with a few small beads so the toggle slides through easily. For sizing, add about 1/2 inch to her wrist measurement with small beads, or about 1 inch with chunky ones. Pick her colors and you’re done.
Get the full tutorial at crazylittleprojects.
9. Cute Apron

If she lives in the kitchen, she needs an apron this cute (pink polka dots, enough said). You’ll want a yard each of two coordinating fabrics, one for the front and one for the lining, plus wide ribbon for the side bow. The tutorial gives every measurement: 11 inches across the chest and 24 inches from chest to hem. A little ruffle runs around the bottom. Basic sewing skills cover it, nothing tricky. Pick a print that matches her kitchen and wrap it with her favorite cookie recipe tucked into the pocket of the gift bag.
Get the full tutorial at crazylittleprojects.
10. Printable Coupons For Mom

Sometimes the best gift isn’t a thing at all, it’s a week of you doing the dishes. This free printable coupon book handles the cute part for you. Print the pages on a color printer (cardstock for the cover makes it sturdier), cut out the holder and the coupons, then fold the holder like a matchbook and staple the coupons inside. Two blank coupons let you write in your own promise, like a car wash or a breakfast in bed. It takes minutes, and she’ll actually cash these in all year.
Get the full tutorial at skiptomylou.
11. Clay Plant Markers
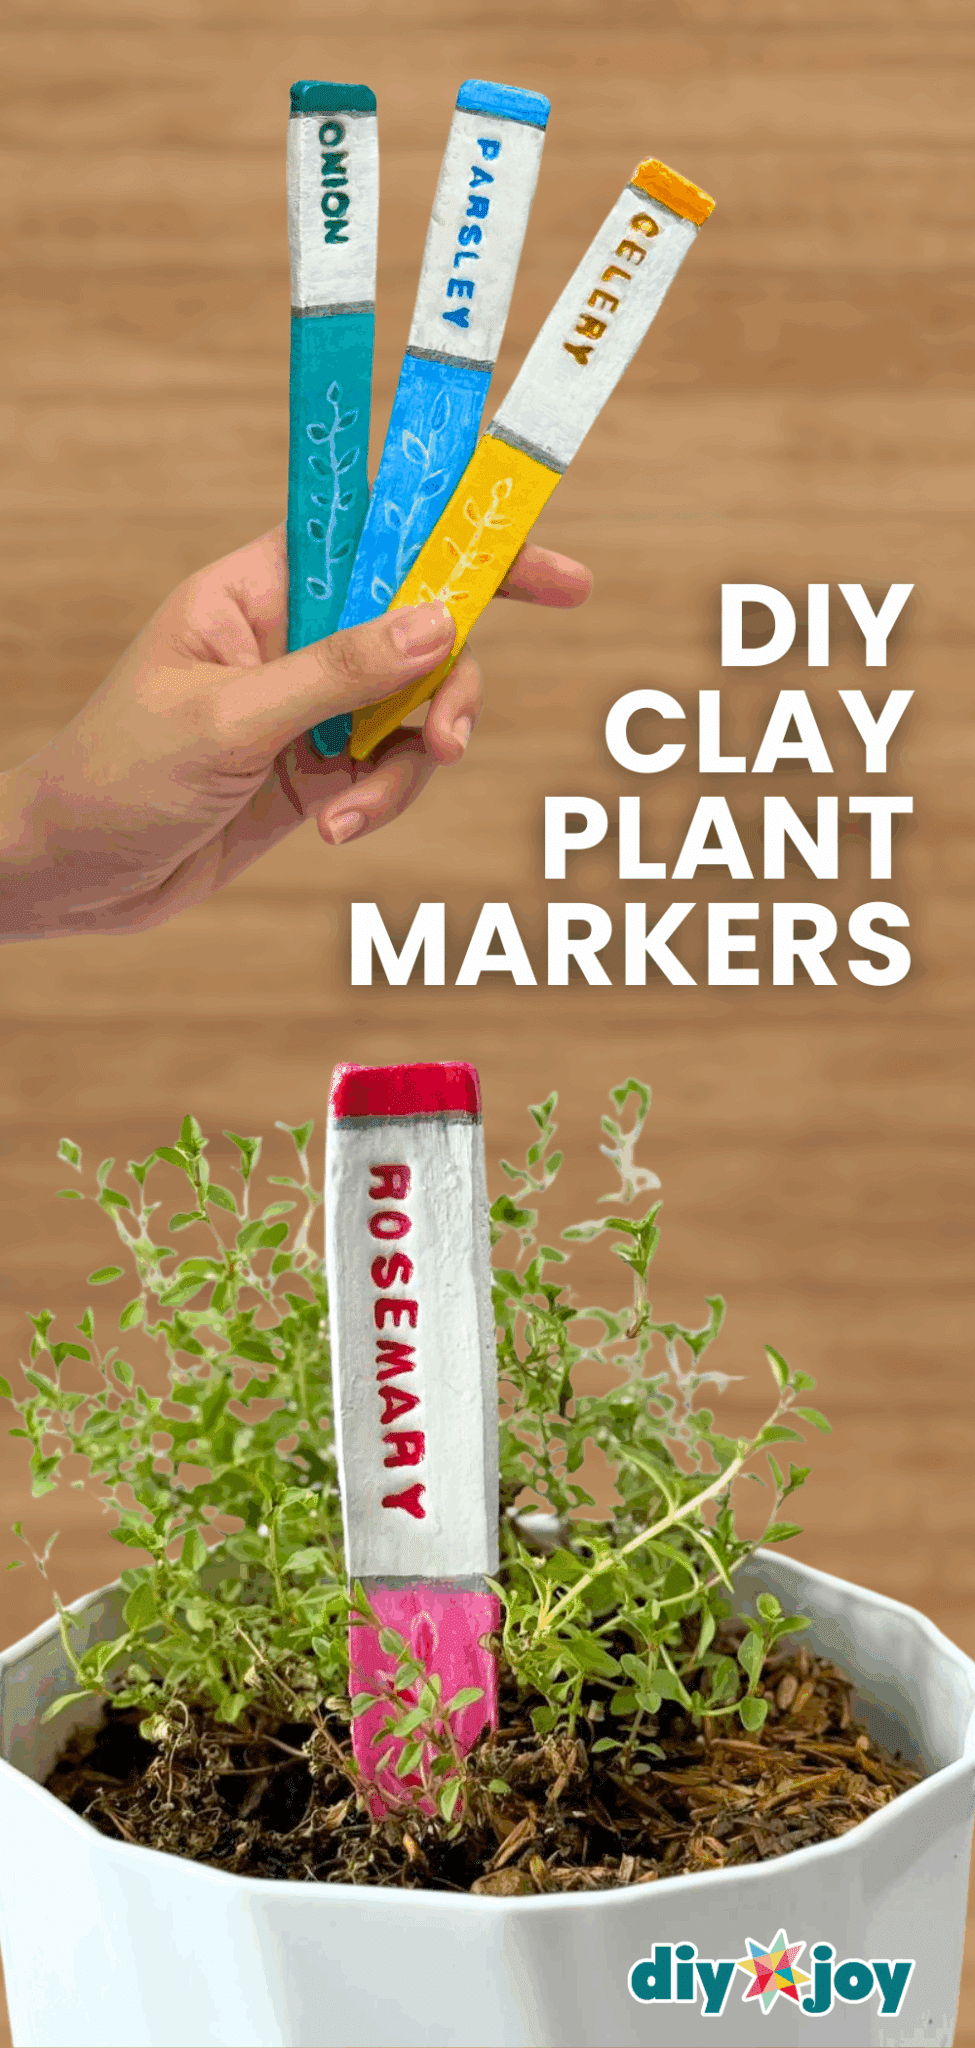
For the mom whose windowsill herbs have multiplied into a full garden, these markers finally settle which pot is parsley. Roll air dry clay smooth, flatten it and cut each marker from a paper template. Stamp the plant names into the clay, let it dry, then prime and paint them in bright colors. A coat of UV resin keeps them glossy through every watering. Little wobbles are part of the handmade charm, so don’t fuss over perfect edges. Bundle a set with a small potted herb and she’s ready to plant.
Get the full tutorial at DIY JOY.
12. Vintage Teacup Candles
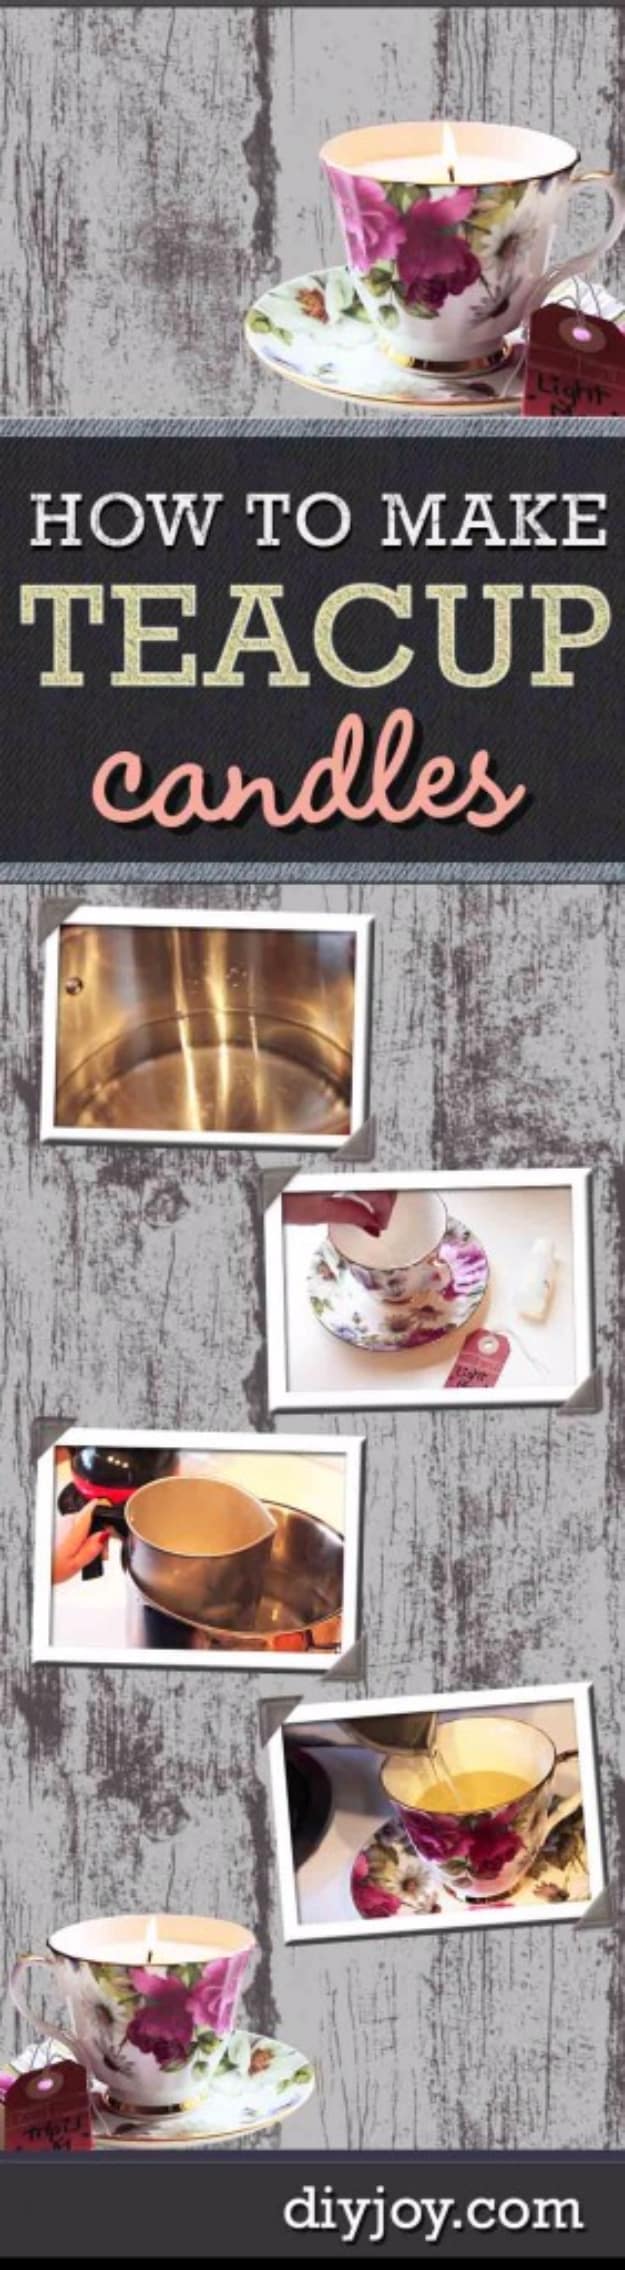
That orphan teacup at the thrift store (the one with the roses) is a candle waiting to happen. Hot glue a wick to the bottom center of the cup. Melt candle wax in a double boiler set in a pot of boiling water, adding scent if you like. Pour the wax into the cup and let it harden naturally, no rushing it in the fridge. The whole thing takes under an hour. Keep the saucer underneath so it’s steady and pretty on her nightstand, then tuck a tea bag tag on top for a cute finishing touch.
Get the full tutorial at DIY JOY.
13. Reclaimed Wood Photo Holder for Mom

A scrap of old wood, a few letters and a clip, and her favorite photo gets a real place of honor. The tutorial uses a reclaimed board about 7 by 18 inches, 2 inch wood letters spelling MOM and a script love shape. Paint the letters white, glue everything to the board with wood glue, then screw a metal clip in place to hold the picture. Honestly, the hardest part is finding a board the right size (you might need a saw). Swap in a new photo every season and it never gets old.
Get the full tutorial at craftcuts.
14. DIY Swirl Ring

Six inches of wire and a little hammering, and she has a ring that looks straight off an artisan’s table. Fold 18 gauge half hard wire in the middle into a flat U, wrap it around a ring mandrel and hammer the band into shape. Leave the two ends alone until you’ve shaped them into swirls with your pliers, then hammer everything again to harden the design. That six inch length makes about a US size 6 to 7. Want a little sparkle? Wire wrap a small moonstone onto one end.
Get the full tutorial at oheverythinghandmade.
15. Citrus Print Tea Towels
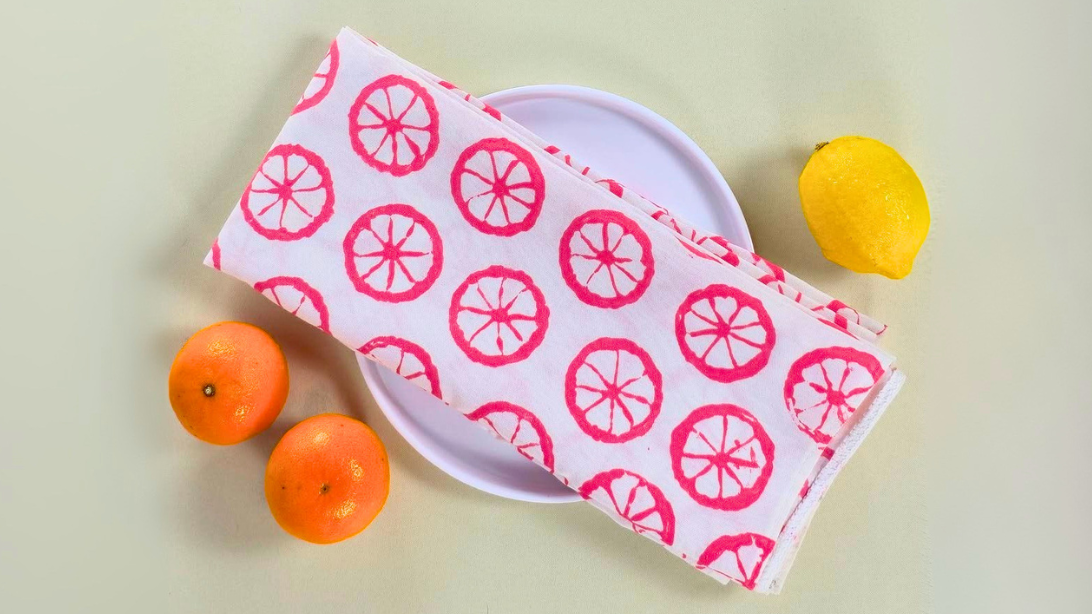
Real lemons and oranges do the stamping here, which is exactly as fun as it sounds. Slice the fruit, blot it dry, dip it in paint and press it onto plain white tea towels in rows or a scattered pattern. One bright color looks modern, while mixed halves and wedges feel playful. Let the paint dry completely before anyone uses them. It’s an easy way to rescue a stack of plain towels from the back of the closet. Tie three together with a ribbon and she gets something cheerful she’ll reach for every single day.
Get the full tutorial at DIY JOY.
16. Mini Album Scrapbook

This one is part craft, part interview, and it might be the most meaningful item on the list. Send her a handful of questions about her life, then build a little album around her answers and old photos. Cut the pages from white cardstock, layer on patterned paper, paper flowers and brads, punch the corners round and add eyelets so a binder ring holds it together. Free 5 by 7 digital templates are included if you work in Photoshop Elements. Plan on a couple of hours once her answers come back.
Get the full tutorial at simpleasthatblog.
17. Denim Flower Bracelet

That jar of buttons you’ve been saving for no reason finally has a job. Cut a strip from old jeans, fold both long edges toward the center and hold them down with double sided tape. Arrange flower buttons, beads and leaves across the strip any way you like (there’s no wrong layout), then sew each piece on. Crimps, a short chain and a lobster clasp finish the ends. Light denim and dark denim both look great, so make one of each. It costs almost nothing and she’ll get asked where she bought it.
Get the full tutorial at DIY JOY.
18. Easy Beaded Bracelet

Strung in her favorite colors, a beaded bracelet stops being generic and starts being hers. This design uses more beads and a fuller nylon cord than a basic stretch bracelet, which is exactly what makes it sturdier and less likely to snap. Yes, it takes a little more patience. It’s still beginner friendly, and the woven look is worth every bead. Swap the palette to suit her style: bright reds and greens, soft pastels, or black and gray for a sleek, understated version. Beads are cheap in bulk, so make a matching one for yourself.
Get the full tutorial at DIY JOY.
19. Upcycled Denim Jeans Bag

One leg of old jeans becomes a crossbody bag, and you don’t need a sewing machine to make it. Cut the leg to size, turn it inside out and hot glue the bottom closed, then fold down the top about 2 inches. Strips from the other leg glue into a strap. A small piece of Velcro keeps it shut and the back pocket glues onto the outside (perfect for her phone). Decorate the front however she’d like: pom poms, patches or embroidery. It’s sustainable, practical and honestly adorable.
Get the full tutorial at DIY JOY.
20. Flower Jewelry Dish

A cookie cutter does the hard part, so even little kids can help make this one. Roll air dry clay about half an inch thick, cut a tulip or heart shape and smooth the edges with a damp finger into a shallow dish. A toothpick carves a name like Nana or Ma right into the clay. Lift it with a wet spatula (it gets sticky), then let it dry over a couple of nights. Paint it in her favorite colors and seal it with Mod Podge. It’s the perfect spot for her rings by the sink.
Get the full tutorial at mommysbundle.
21. DIY Altoid Tin Prayer Boxes

A mint tin that holds her worries, her prayers or her grocery list (no judgment). Buy a few tins of Altoids, then trace the lid once and the bottom twice onto the back of scrapbook paper. Cut the pieces, trimming the inside lid piece just inside the line so it fits. Lightly sand every spot you’ll glue paper to, then glue the paper to the top, bottom and inside the lid. Slip in a stack of tiny notes and a mini pen. She can keep it in her purse, and it costs just a few dollars to make.
Get the full tutorial at travelersdream2012.
22. Mason Jar Picture Frame Vase

A vase and a photo frame in one, which means she sees the grandkids every time she looks at her flowers. Stick a vinyl shape (or painter’s tape cut with decorative scissors) where you want the window, then paint the outside of a clean mason jar. Peel the sticker off right away so the edges stay crisp. A clear spray coat protects the paint. Tape a favorite photo inside facing out, add water and flowers, and you’re done. Kids can do most of the steps with a little help, which makes it extra sweet.
Get the full tutorial at homestoriesatoz.
23. Photo Frame Magnets
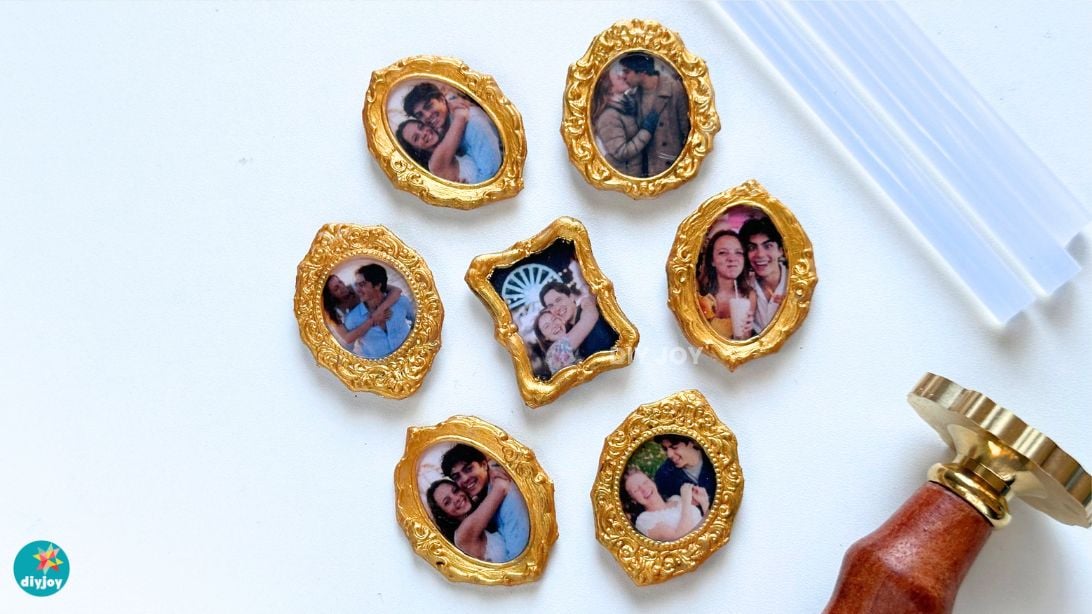
Frame the grandkids (or the dog, let’s be real) in mini magnets that go straight onto her fridge. The surprise is how they’re made: hot glue pressed with wax seal stamps creates those ornate little frames, and nobody ever guesses it. Paint them gold, trim tiny prints to fit and glue a magnet on the back. The hardest part is choosing which photos make the cut. Make a set of six or seven for a fridge gallery wall. They’re quick, budget friendly and look like vintage finds from an antique shop.
Get the full tutorial at DIY JOY.
24. DIY Flower Light

A glowing rose that looks straight out of a fairy tale, built around plastic spoons. Take apart a large faux flower and cut it into petals: 12 yellow (8 large and 4 small) plus 4 pink. Cut the handles off four spoons, glue a big petal to the back of each, then hot glue the spoons around a battery tea light. Layer the rest of the petals and the leaves around the base and trim. Flip the switch and the whole bloom glows. Set it on her nightstand with a good book for the coziest corner.
Get the full tutorial at DIY JOY.
25. Q-Tip Flower Bouquet
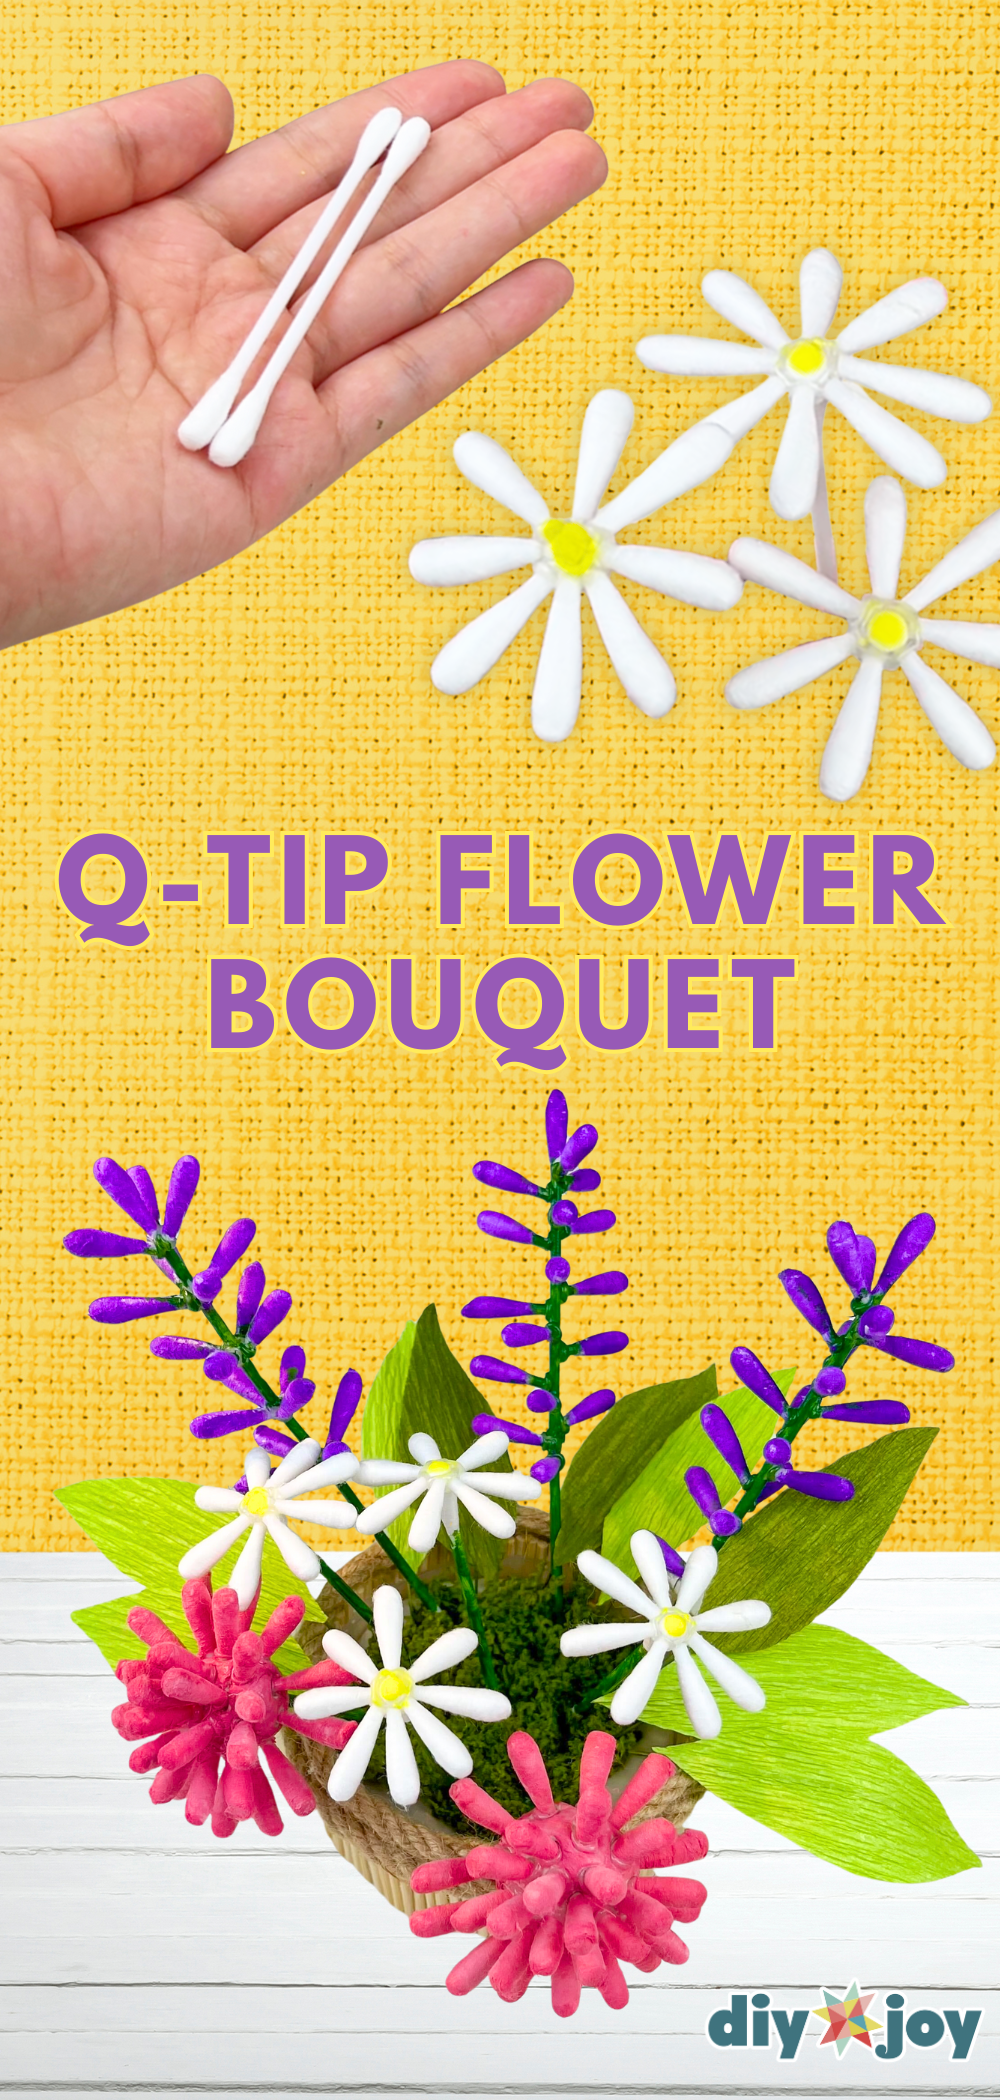
Cotton swabs, of all things, become a bouquet that never wilts. Pom pom flowers start with a small ball of air dry clay covered in snipped cotton tips. Daisies get a ring of swab petals around a yellow center, and lavender is cotton tips glued up a floral wire stem. The vase is an old plastic container wrapped in skewers and jute rope. Everyone who sees it asks what it’s made of, which is the fun part. Make a mixed bunch for her desk and she’ll never have to water it.
Get the full tutorial at DIY JOY.
26. Spa Basket For Mom

Skip the flowers and give her an evening off instead. Start with a wire basket and pack it with things that say relax: a fluffy robe, a nice bath towel, a bath sponge, a jar of homemade lavender bath salts and plenty of dark chocolate. A little chalkboard tag that says Mom makes it look boutique. The idea is a full spa night at home: a long bath, the robe, then chocolate. It’s also an easy one to tailor, so swap in her favorite lotion, a candle or a book she’s been wanting.
Get the full tutorial at mom4real.
27. Painted Tin Can

Ten minutes of painting and a tin can from the recycling becomes a planter she’ll want on her porch. Paint the can with chalky paint in a soft mint, then add a band of washi tape around the middle. A tiny printable label punched out with a scalloped paper punch gives it a monogram. Fill it with mini potted roses from the grocery store and it looks like it came from a florist. Little hands can hold it up proudly (and probably sniff the roses before she does).
Get the full tutorial at housebyhoff.
28. Vegan Butterfly Art

All the look of a vintage specimen box, and no butterflies were harmed. Print a set of nine antique butterfly illustrations on cardstock (a free printable is included), then cut them out with small scissors and a craft knife for the tiny bits. Bend the wings up along a ruler so they lift off the page. Glue them in three neat rows on a 9 by 9 inch piece of white cardstock and set it in a shadow box frame. Fresh craft knife blades make the cutting much easier. It’s an elegant gift for her wall.
Get the full tutorial at ahomefordesign.
29. Cherry Bracelet
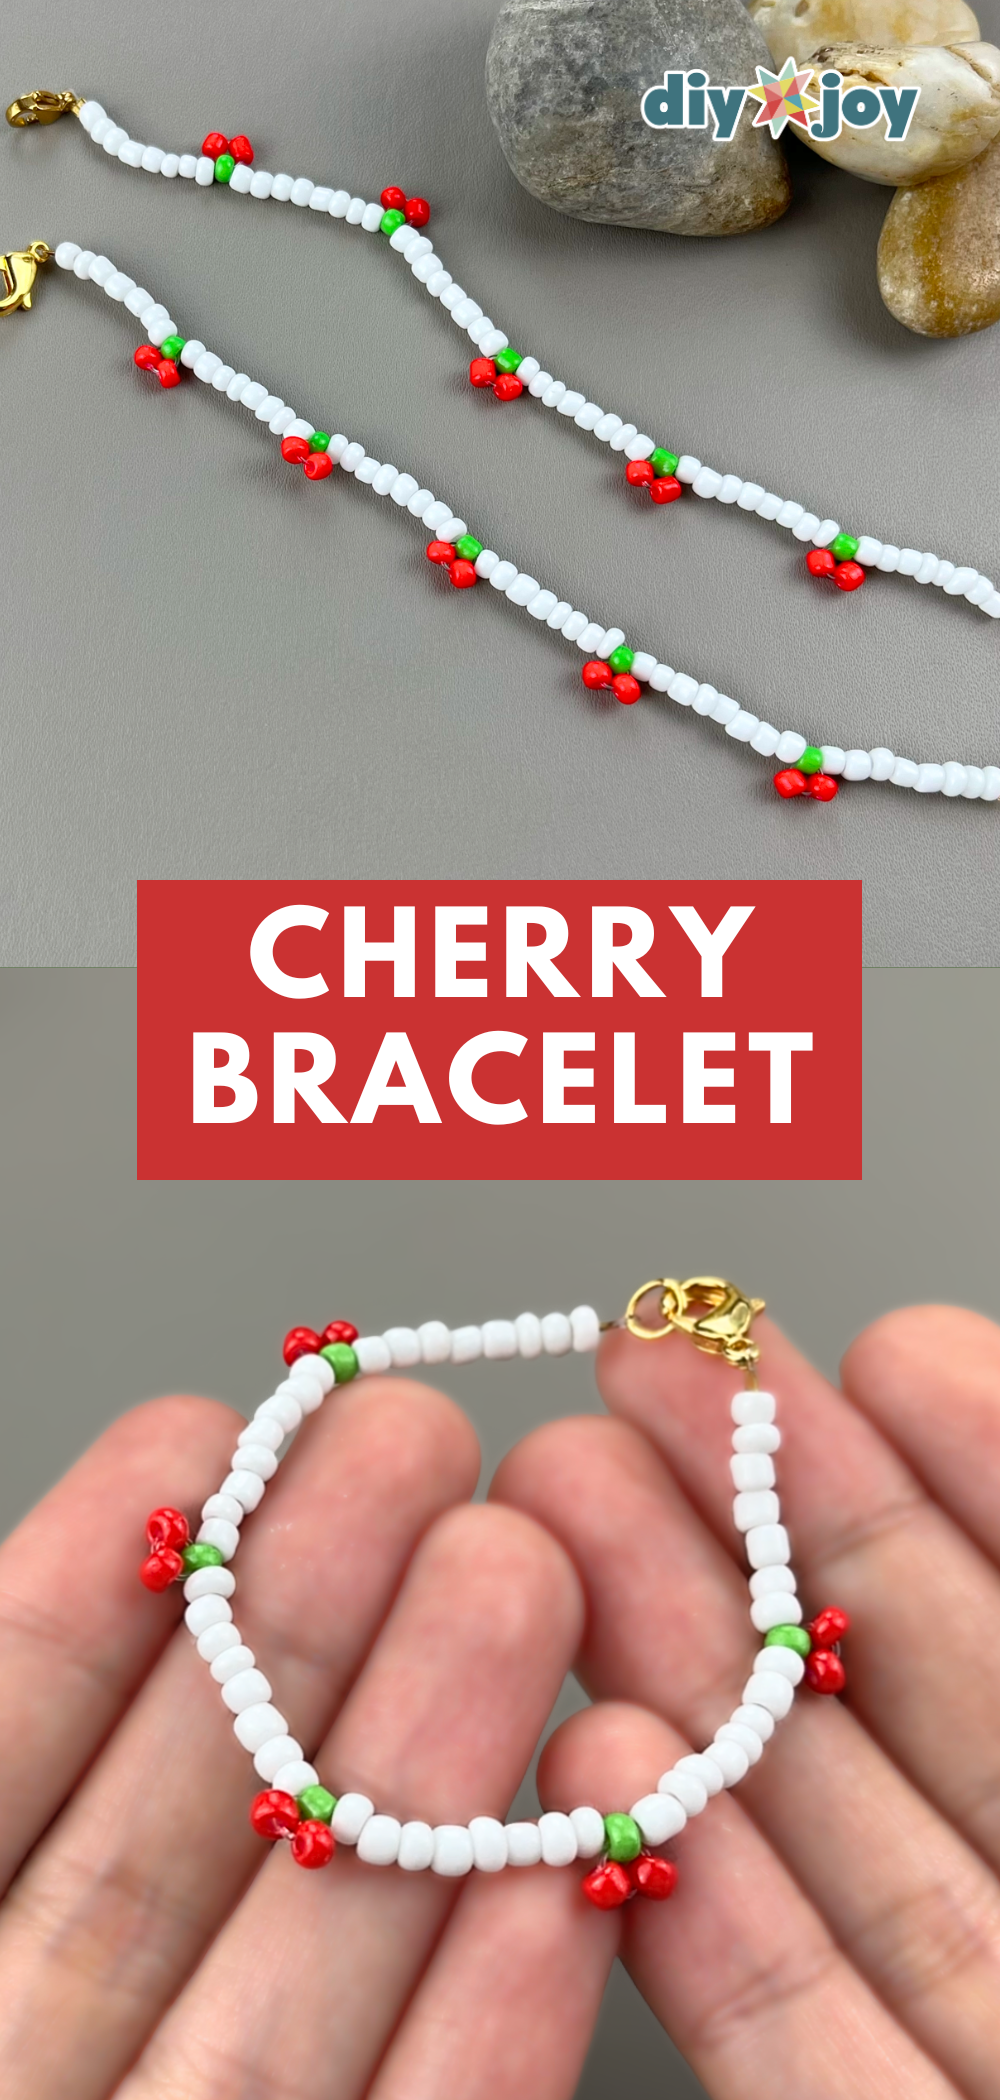
Seed bead bracelets are everywhere right now, and the cherry design is one of the cutest. String white seed beads on stretchy bead thread, then every so often add a tiny green stem and two red beads to make a little cherry pair. Knot it off and you’re done in a few minutes. No bracelet experience needed. Make a matching necklace with the same pattern for a set, or a few in different colors for her and her friends. It’s a nice screen free craft, and she’ll be wearing it all summer.
Get the full tutorial at DIY JOY.
30. Tin Can Desk Organizer
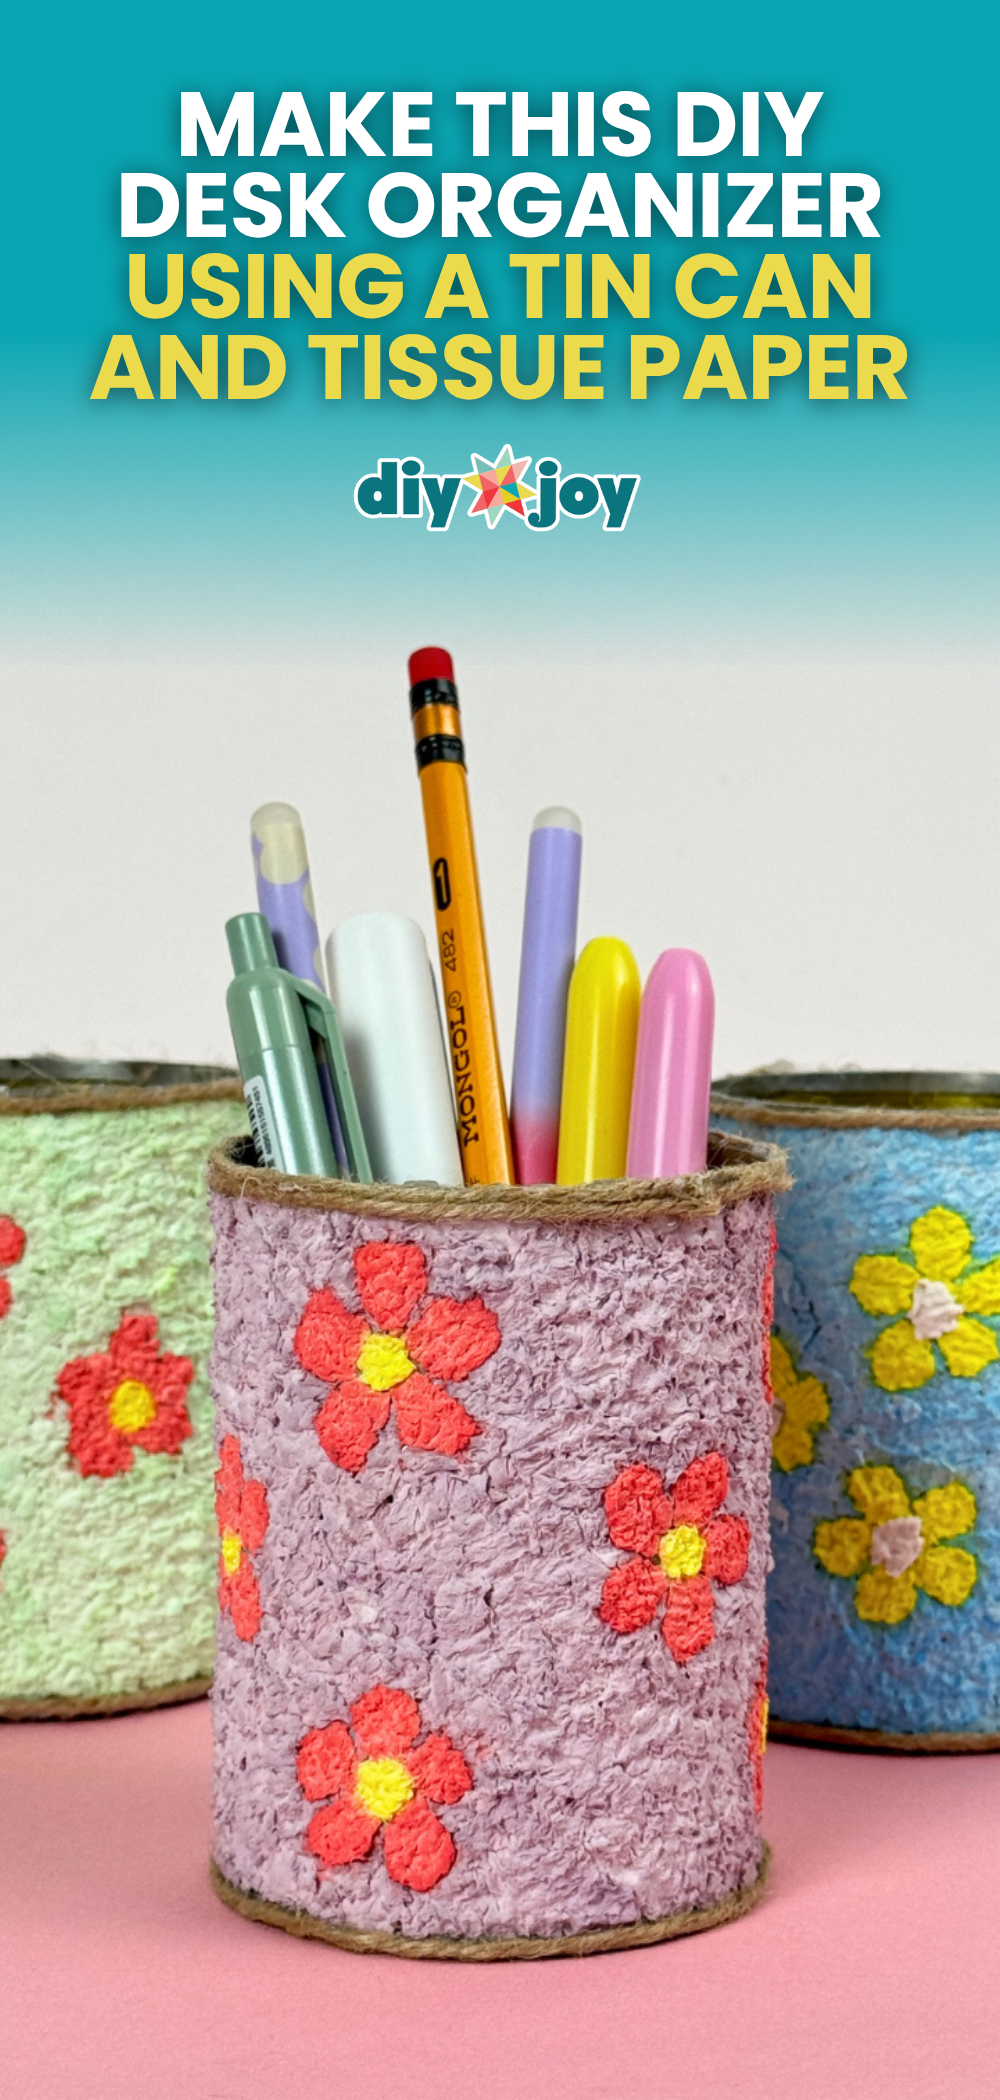
Her desk is a jumble of pens, scissors and stray paintbrushes, and an empty tin can fixes it. Tear tissue into small pieces, soak it in water, squeeze it out and mash it into pulp. Mix in glue and paint until the color is even, then press the paper mache onto the can for a soft, textured finish. Add little flowers in contrasting colors on top. It costs nothing but tissue and a can, and you’ll finish in one sitting. Make two or three in different shades and line them up together.
Get the full tutorial at DIY JOY.
31. Painted Flower Rocks
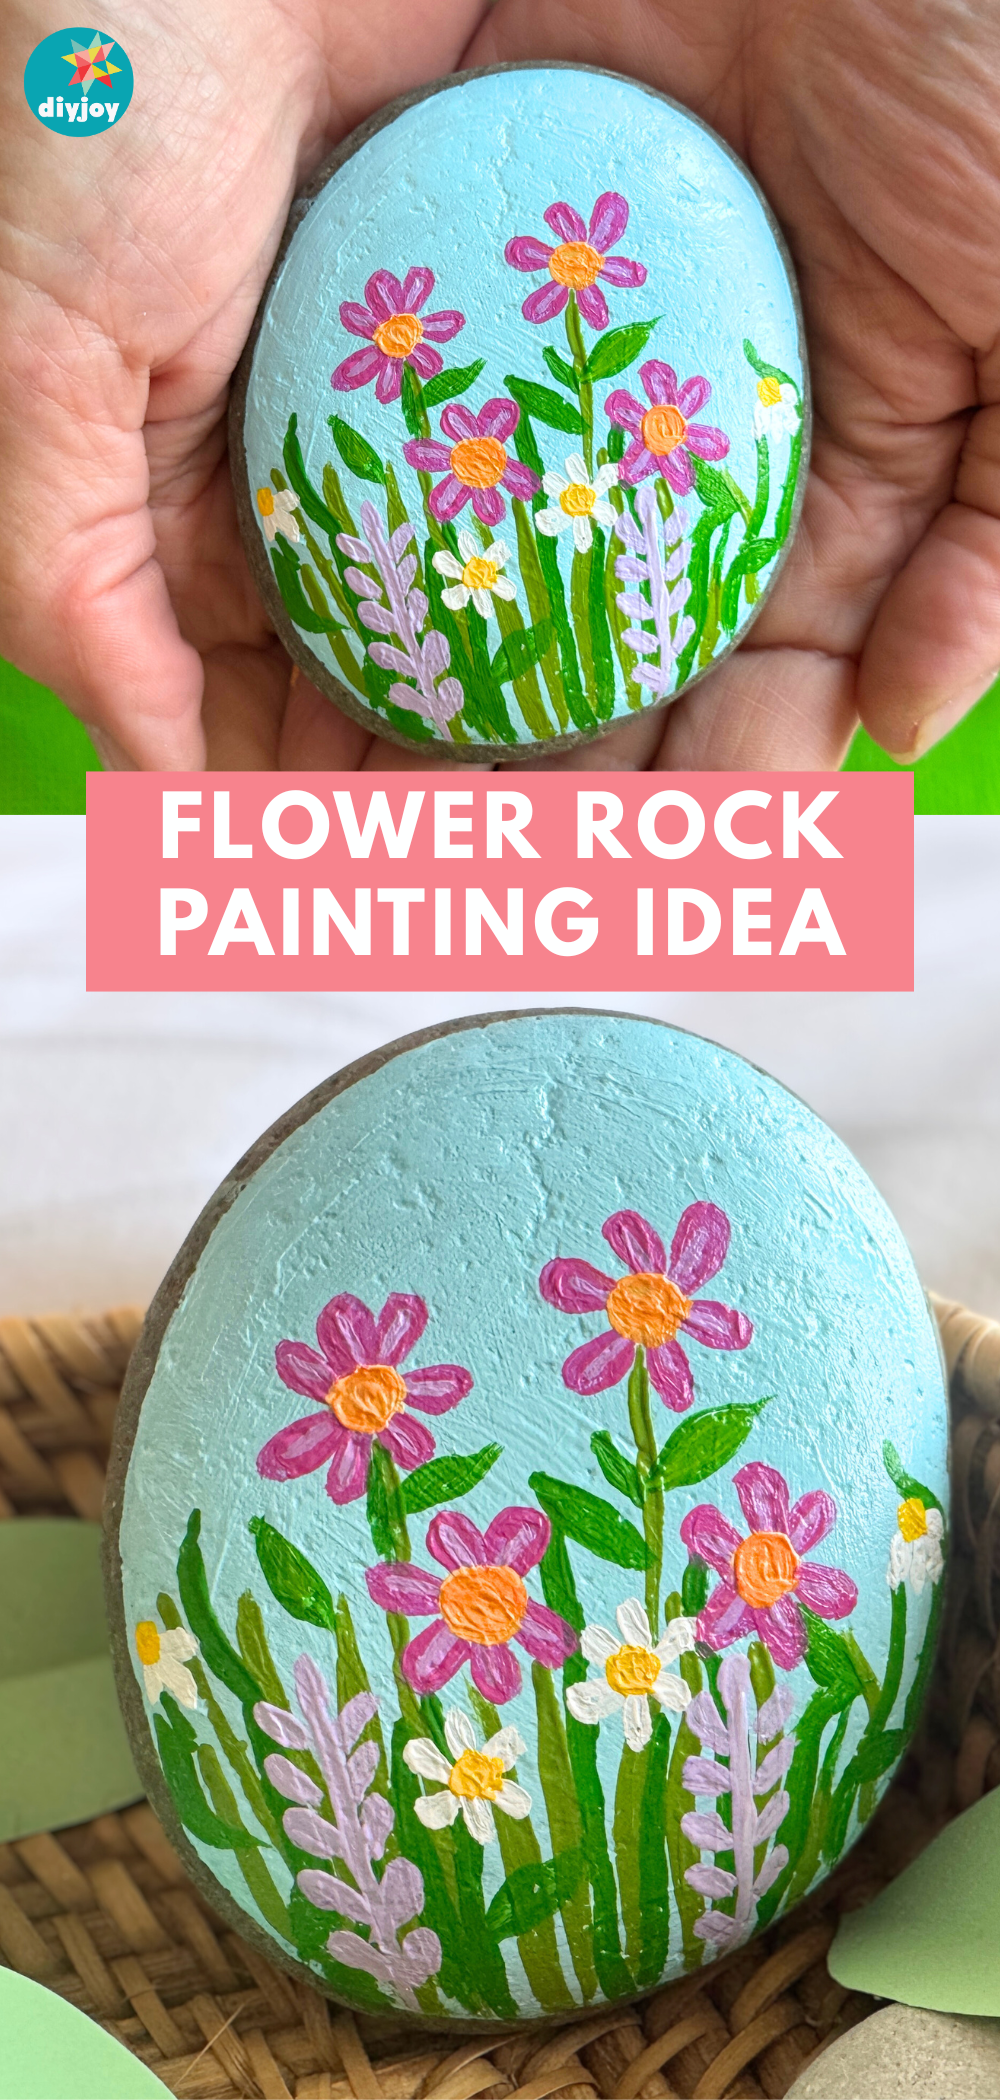
Flowers on a rock are easier than they look, promise. Start with smooth, flat river rocks, scrub them in soapy water and let them dry completely. Paint a solid base coat, then add stems, petals and centers with good acrylic paint, letting each layer dry (a hair dryer speeds it up). Shaky hands? Rest your pinky on the table. Made a mistake? Scrape it off with a toothpick. Finish with a spray sealer so rain won’t wash it away. Tuck one into her garden or onto her desk as a paperweight.
Get the full tutorial at DIY JOY.
32. Picture Frame Suncatcher
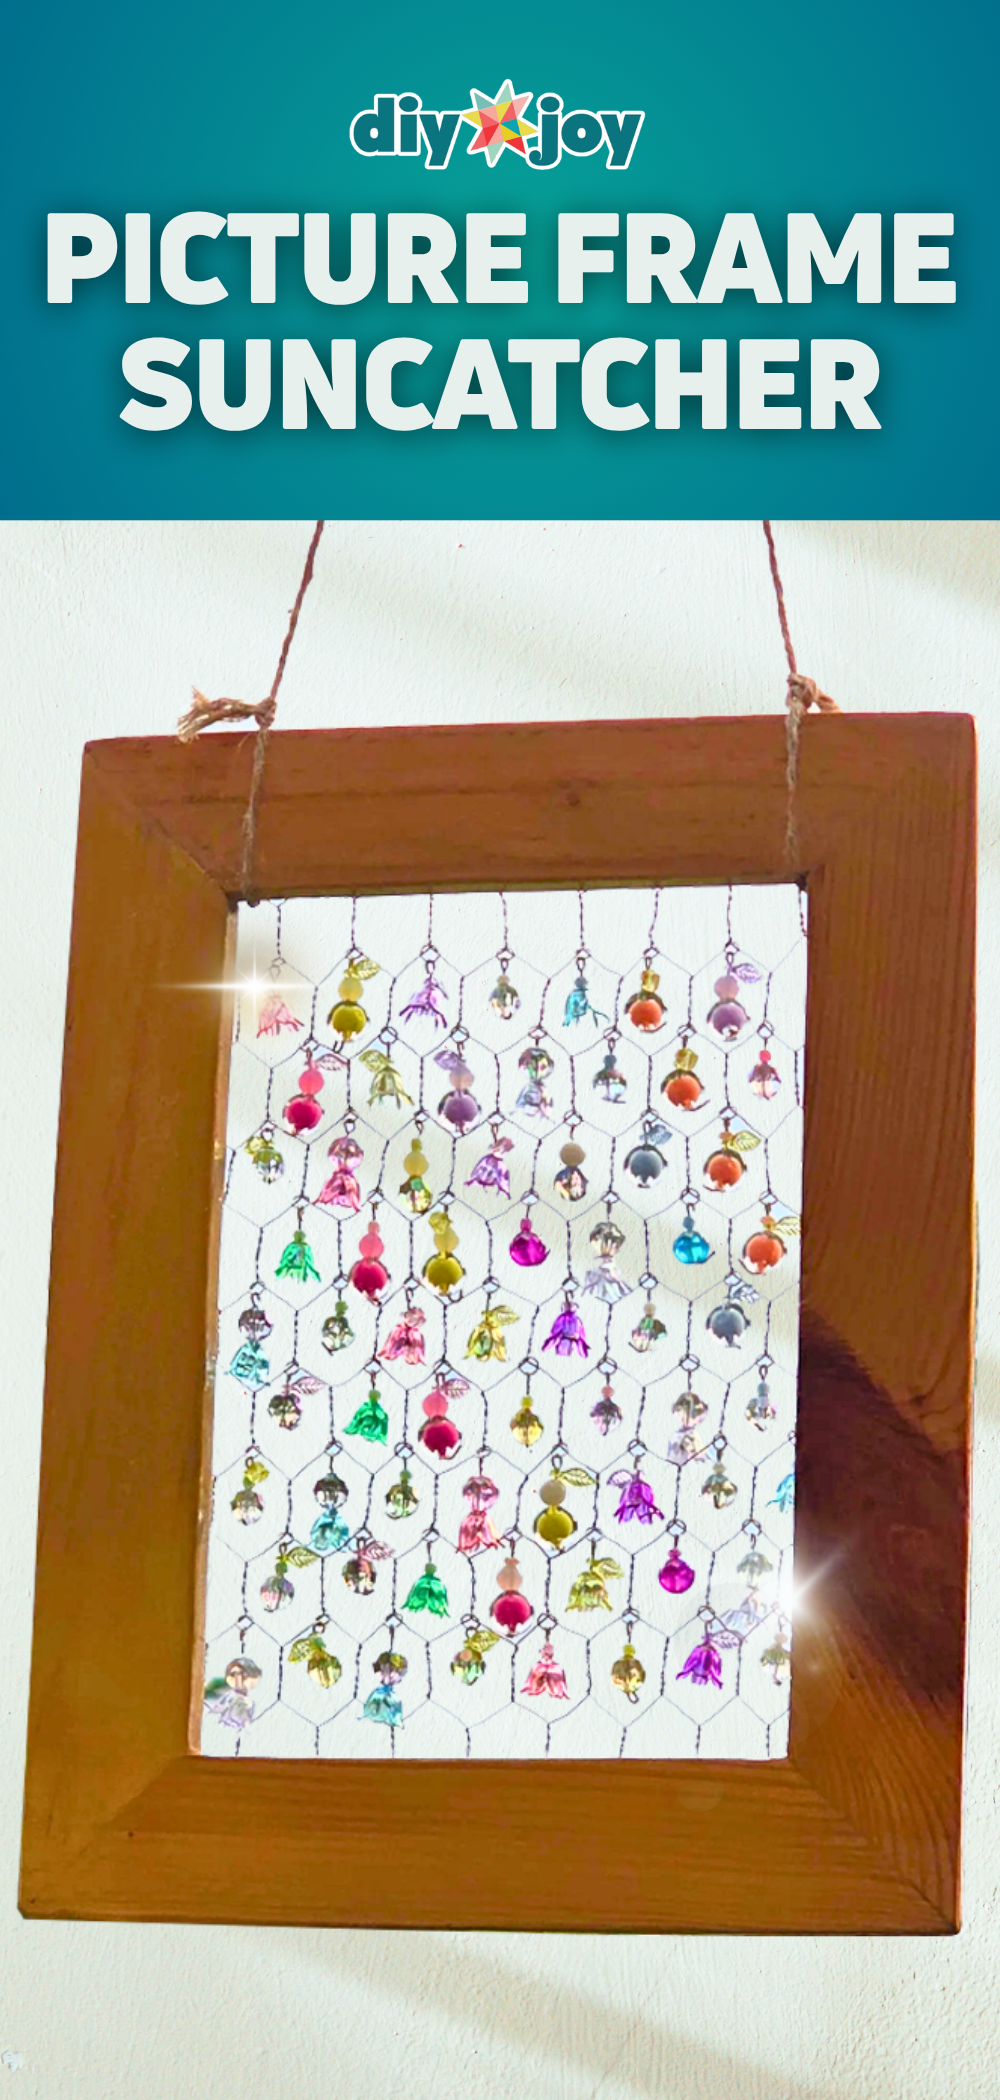
An old picture frame finds a second life as a window full of sparkle. Pop out the glass and attach chicken wire across the back (wear gloves, it’s pokey). Thread beads and charms onto eye pins, bend the ends to lock them, then add a jump ring or two to each. Hang the beaded drops on every section of the wire. The first few feel slow, then you hit a rhythm. Tie jute rope across the top as a hanger and hang it in her sunniest window, where the light hits it all day.
Get the full tutorial at DIY JOY.
33. Denim Jean Organizer

Those jeans back pockets were made for holding things, so let them. Remove the glass and backing from a picture frame, then fit old denim with its pockets intact into the frame. Hang it on the wall and the pockets hold scissors, pens, markers and craft tools where she can see and grab them. It’s ideal for a sewing corner, a craft room or a home office. Dark denim looks crisp in a white frame, and a little bow or a few buttons dress it up. It costs nothing if the jeans and frame are already around.
Get the full tutorial at DIY JOY.
34. Delicious Dark Chocolate Bouquet

Flowers she can eat, which is a promotion over regular flowers. Paint bamboo skewers green (or buy them pre painted at the craft store). Trace flower shapes onto sturdy cardstock with a cookie cutter, since flimsy paper won’t hold the weight. Attach foil wrapped dark chocolates as petals with double sided tape and hot glue, then glue each flower to a skewer. Stick the stems into floral foam inside an opaque vase so nobody sees the foam. Kids can do most of this one themselves. Expect a few petals to go missing.
Get the full tutorial at tikkido.
35. Plastic Bottle Pig Planter
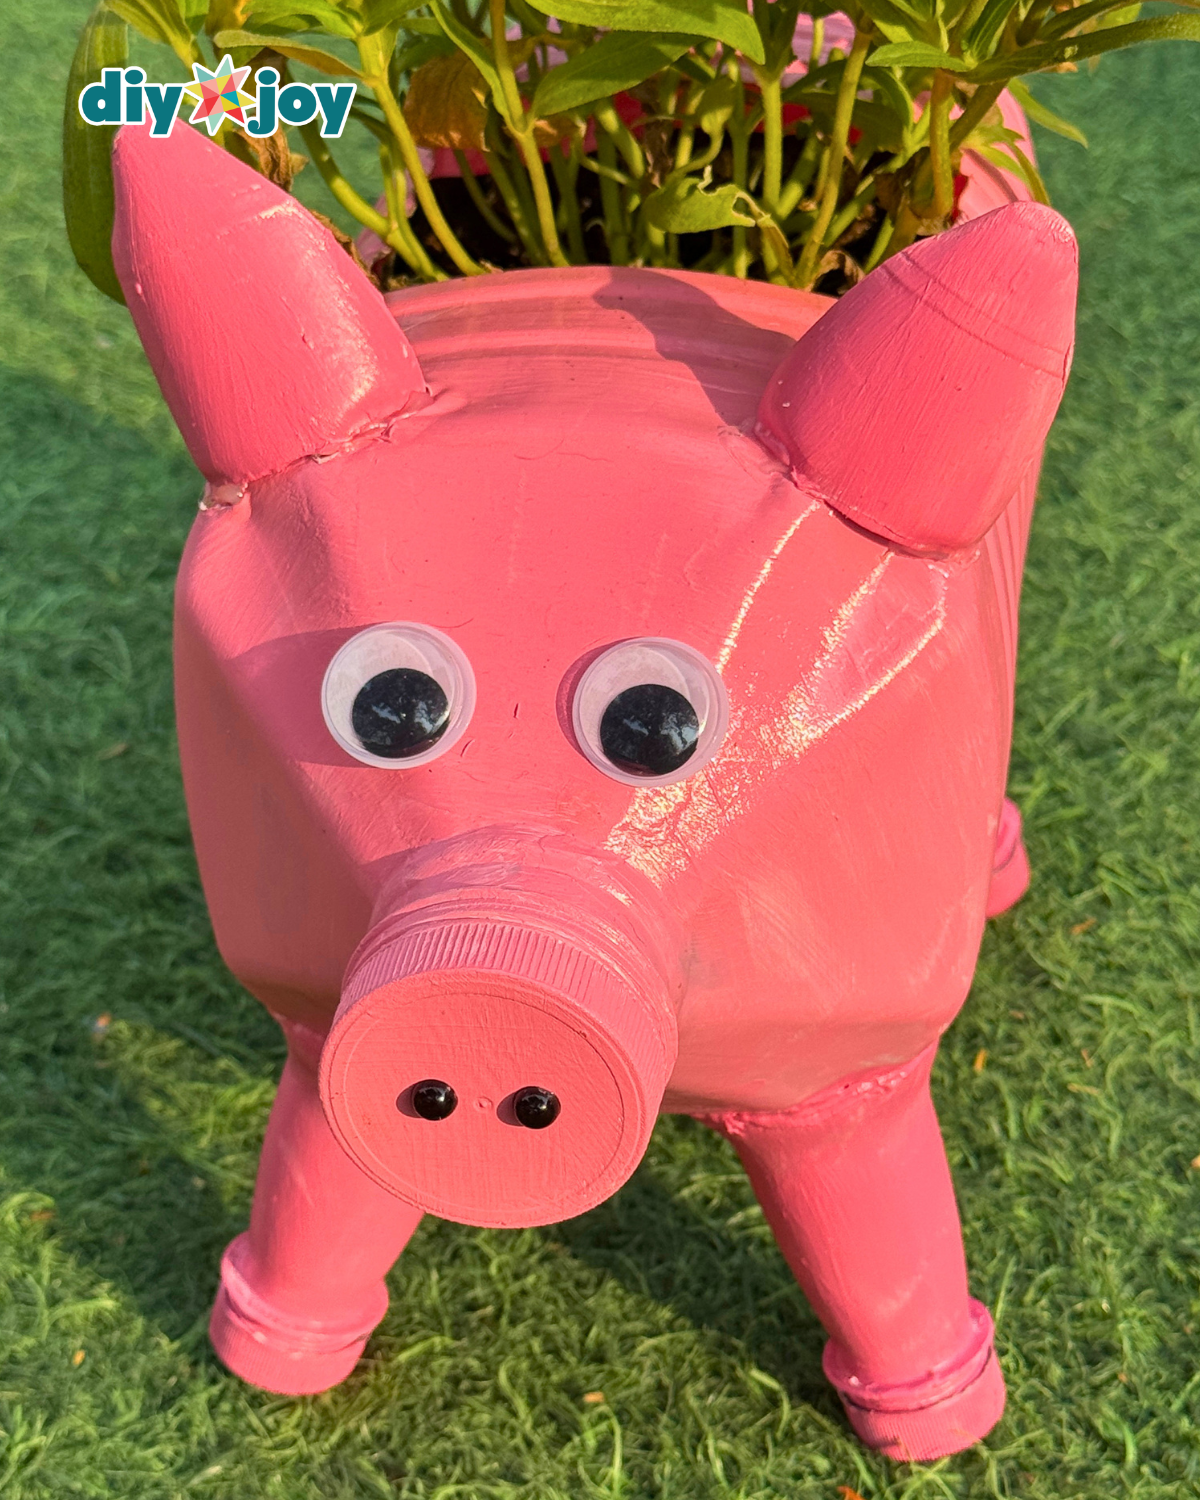
An empty plastic gallon jug becomes the cutest thing in her garden, and it’s practically free. The jug lies on its side as the pig’s body, smaller bottle pieces make the snout, ears and little legs, and pink paint pulls it all together. Googly eyes are not optional (they’re the best part). The process looks like a lot at first, but each step brings the pig to life. The big gallon size gives flowers or herbs plenty of room to grow. It’s the kind of gift that makes her laugh every time she waters it.
Get the full tutorial at DIY JOY.
36. Woven Hair Tie Headband

A drawer full of old hair ties becomes a boho headband she can wear right away. Weave or braid the hair ties together, linking loop through loop until it’s long enough to stretch over her head. No sewing, no fancy tools and the stretchy texture makes it comfortable all day. Pastels look soft and sweet, bright mixes look playful and neutrals feel classic, so pick what matches her style. It’s free if you raid the hair tie stash, and fast enough to make two (one for you, obviously).
Get the full tutorial at DIY JOY.
37. Succulent Planter For Mom

A soup can, a pretty label and her favorite plant, and you’ve got a gift that keeps growing. Download one of four free printable labels with a watercolor texture, print it and wrap it around a clean can or other container. Then plant her favorite succulent inside (an echeveria looks gorgeous against the pink). It’s simple, green and fast enough to make on the way to her house. Pick a plant that matches how much attention she wants to give it, because succulents forgive a forgotten watering.
Get the full tutorial at sarahhearts.
38. Fabric Embellished Dish Towels

Plain clearance dish towels plus a handful of fabric scraps add up to a set that looks handmade in the best way. The tutorial shows three styles on 18 by 24 inch towels: a patchwork band of nine 2.5 by 3.5 inch pieces, a stripe of three 1.5 by 18.5 inch strips and a row of paper pieced hexagons. Sew the strip, press under a quarter inch on each side and stitch it across the short edge. You’ll need basic sewing machine skills. Make all three and she has a coordinating kitchen set.
Get the full tutorial at quiltstory.
39. Jeans Pocket Placemats
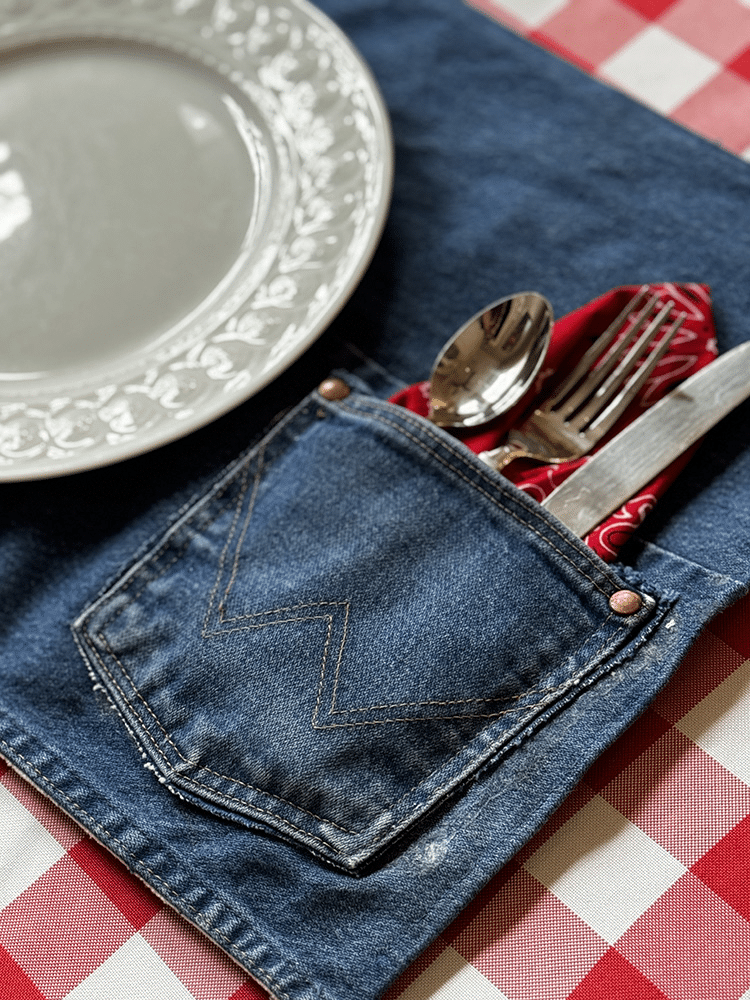
Every placemat gets its own back pocket for the silverware, and you don’t sew a single stitch. Grab old jeans (non stretch denim works best), cut rectangles from the legs with a back pocket on each, then fold and glue the edges with fabric glue, holding them with clips while it dries. A ruler keeps everything square. Mixing washes and brands makes the set more fun. Thrift stores are great for extra pairs. Tuck a bandana napkin and a fork into each pocket and her table looks instantly farmhouse.
Get the full tutorial at DIY JOY.






