The dollar store aisle that pays off is never the craft aisle. It is the kitchen aisle, the garden aisle and the party aisle: terracotta pots, plastic bowls, clothespins, candlesticks, paper plates, tin cans. Below are 46 dollar store crafts built almost entirely from those, and the good ones share a trick. You take something cheap and you change its texture, with rope, with burlap, with twine, with clay, with a single coat of spray paint. Nobody can price a thing once they cannot tell what it used to be. There are stacked bowls that turn into a planter for eight dollars, a rubber door mat that passes for old ironwork, and a set of thirty plain white plates that become a wall. Start with whatever you already have too many of.
1. Patterned Tablet Case
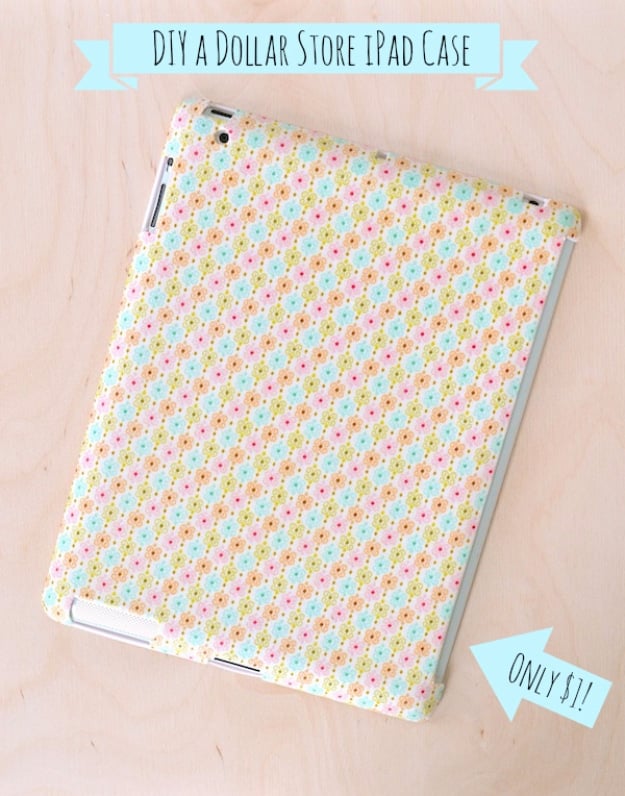
A dollar case and a scrap of thin cotton, and the total really is one dollar. Give the plastic case a light sanding first so the glue has something to hold. Coat the fabric with Mod Podge on waxed paper and let it dry before you touch the case, which stops it fraying when you cut. Then brush glue onto the case, smooth the fabric down, fold the edges over the sides and trim the camera and port holes with detail scissors. Pick a white or pale case, because Mod Podge makes thin fabric slightly see-through.
Get the full tutorial at Mod Podge Rocks.
2. DIY Floral Mouse Pad
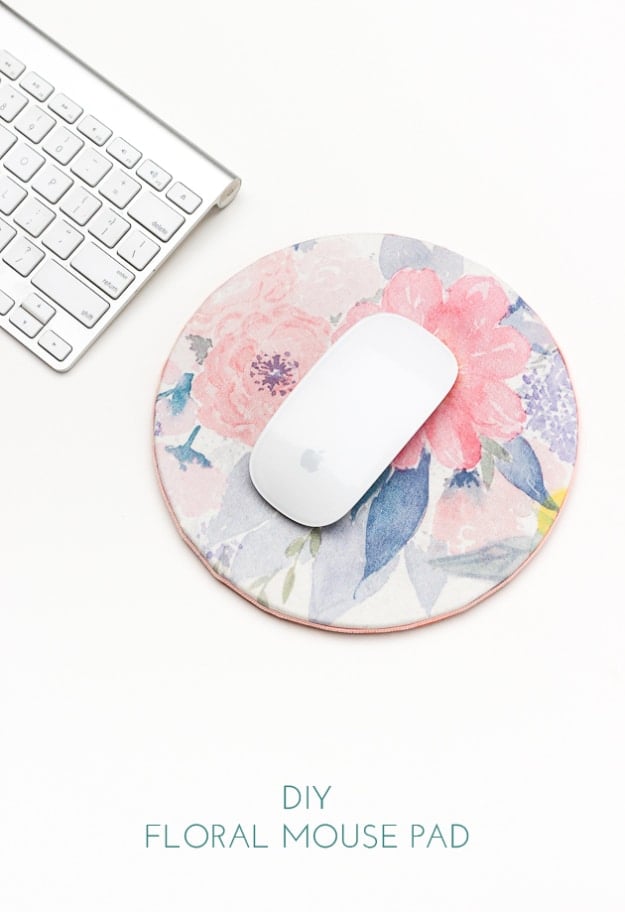
A cork round and a piece of fabric, and thirty minutes of it is waiting for glue. Cut the fabric with about two inches of overhang all around, brush fabric Mod Podge onto the cork, smooth the fabric down and fold the excess underneath. Ribbon over the underside hides the raw edges, or glue a second cork round on to sandwich them. Go heavy on the fabric weight here, because thin cotton lets the glue bleed straight through to the front. The maker had used spray adhesive on an earlier one and it did not hold.
Get the full tutorial at The Crafted Life.
3. Cardboard Heart Garland
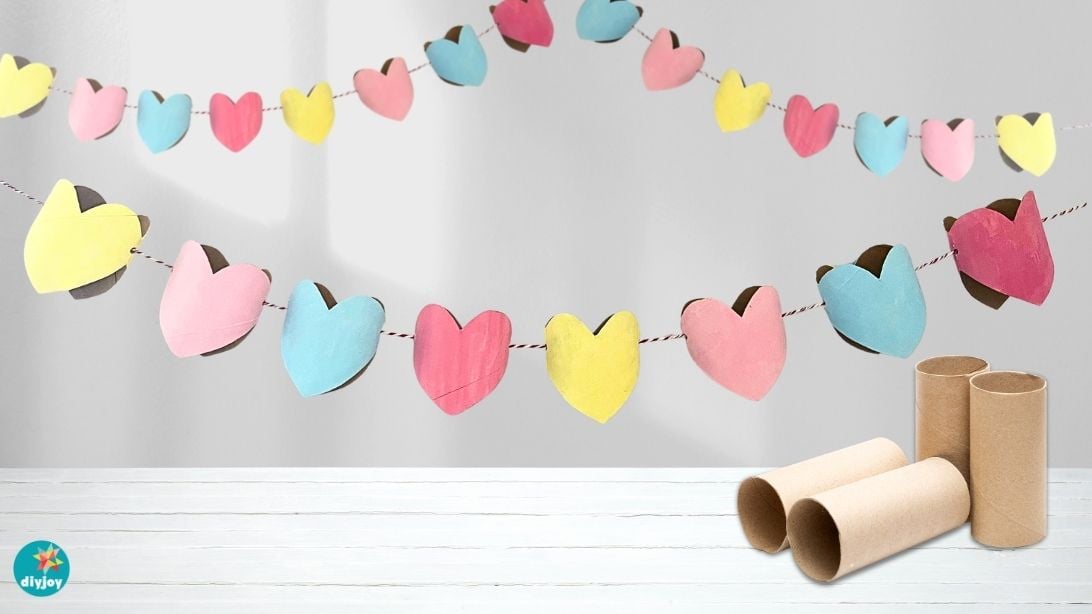
Empty toilet paper rolls, flattened, and nobody guesses once it is on the wall. Flatten the tube, trace a heart template on it, cut, and the natural curve of the cardboard does the rest. Both sides get a coat of white first so the color on top stays true rather than going muddy over brown board. Once that is dry, paint your real color, make a hole in each side with something pointed, and thread twine through. Pastels are shown here but stripes, polka dots or single words on each heart all work, and a string of fairy lights behind it lifts the whole thing.
Get the full tutorial at DIY Joy.
4. Inexpensive Beaded Chandelier
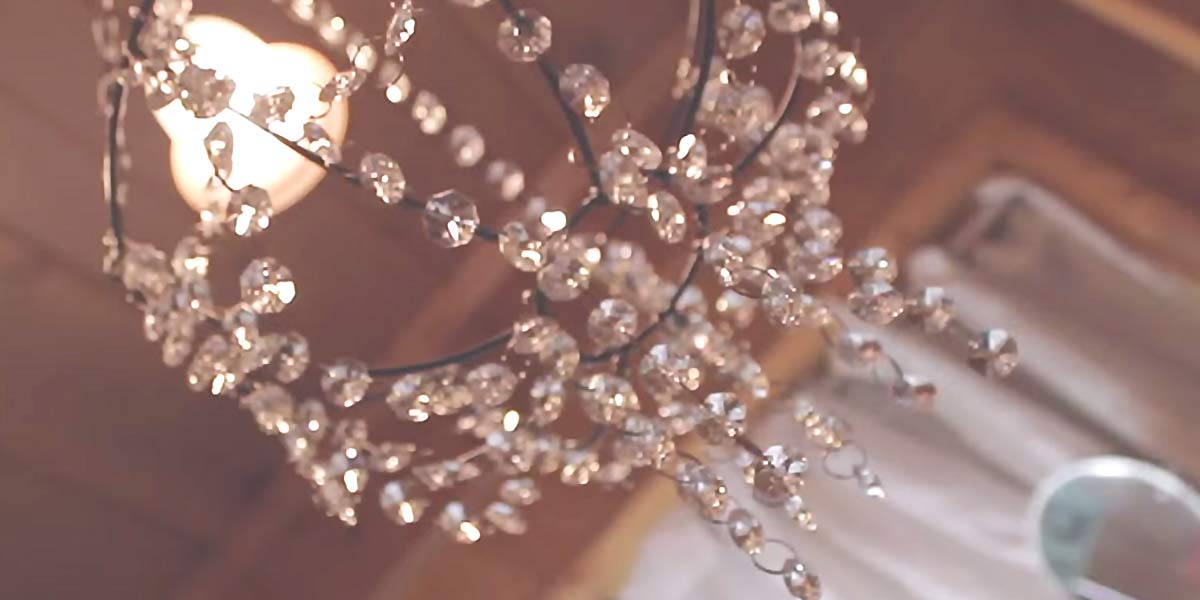
A hanging wire plant basket from the dollar store, spray painted silver, then loaded with plastic crystal beads until it stops looking like a plant basket. The long strands go on first, clipped to the top link of each chain near the hook and carried down to the basket rim. Then a ten-bead strand follows the metal ribs underneath and meets at the center circle, and short four and five bead strands fill the middle. The tutorial it is based on uses three packs of beads; more were used here. Old jewelry hooked in among them is what makes it look expensive.
Get the full tutorial at DIY Joy.
5. DIY Pocket Tic Tac Toe

An Altoids tin, a free printable and ten half-inch magnets. Print the board and pieces on matte photo paper, cut them out, then decoupage the title panel to the lid and the grid to the inside of the tin with a foam brush. The X and O circles get glued onto the magnets, which is the part that makes it work, because the tin is steel and the pieces stay put in a moving car. Let everything dry hard. If the finish still feels tacky afterward, one coat of clear sealer fixes it.
Get the full tutorial at Craftaholics Anonymous.
6. DIY Mason Jar Soap Pump
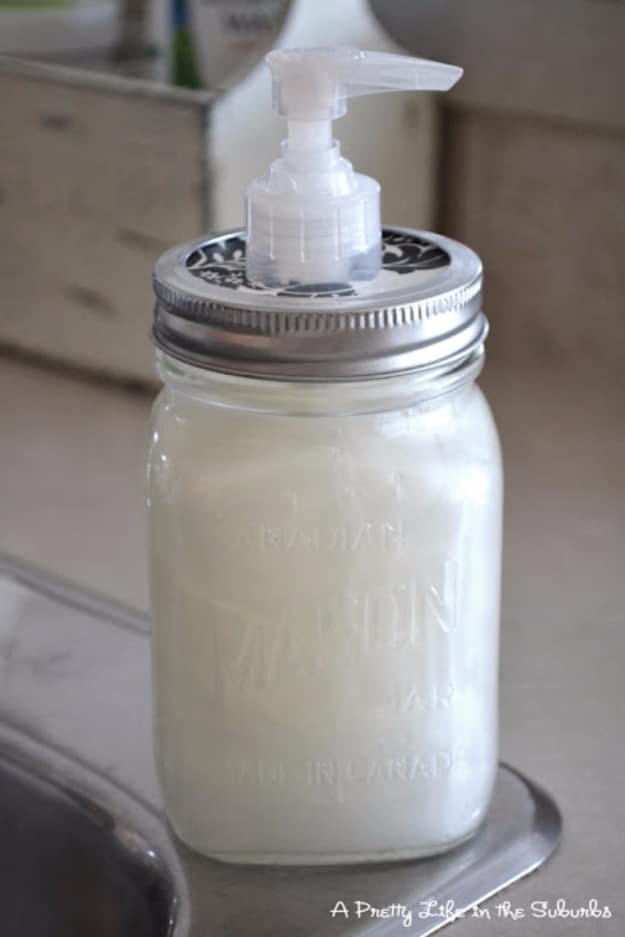
A mason jar, a decorative lid and a pump saved off an old lotion bottle. Drill a hole through the center of the lid big enough for the pump’s threaded collar to pass through, push the pump in from the top, and then run hot glue around the underside where the two meet. That glue is not decoration. It seals the gap so soap and steam cannot sit against bare metal and rust the lid from inside, which is how most of these fail. Cut decorative paper to sit under the tin insert if you want the pattern.
Get the full tutorial at A Pretty Life in the Suburbs.
7. Stenciled Burlap Candle Holders
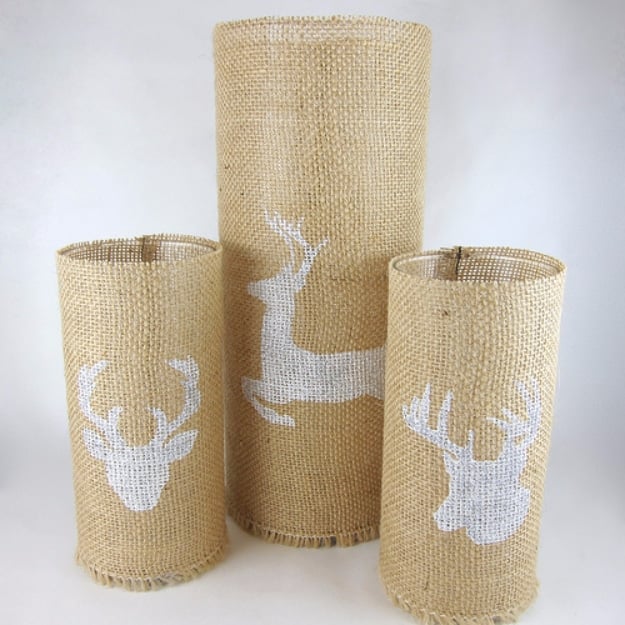
Cut burlap about an inch taller than your glass hurricane and two inches longer than the way around it. Tape a cardstock stencil to the middle of it, then dab paint through with a sponge pouncer rather than brushing, because brushing pushes paint under the edges and you lose the shape. Go light. Glitter onto the wet paint if you want it, and accept that most of it falls off later. Then wrap the burlap around the holder painted side facing in, pin it, sew the seam with backstitching at both ends, turn it right side out and slide it on.
Get the full tutorial at Just Crafty Enough.
8. DIY Flower Caddy
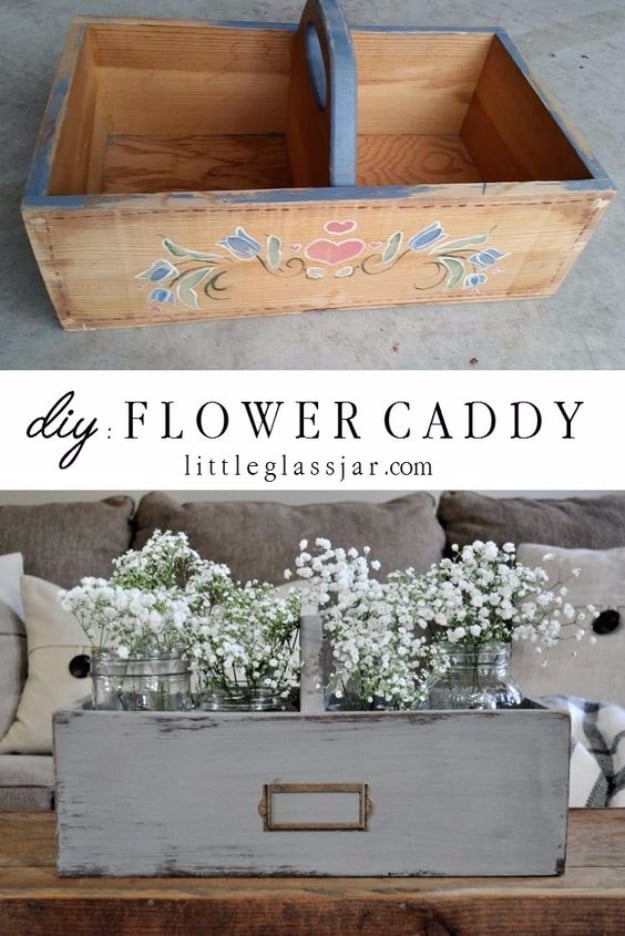
A two dollar wooden box caddy from Goodwill, and the label plate on the front cost a quarter at a Habitat ReStore. Sand it back, lay down a coat of wood stain first and let it dry, then a coat of grey milk paint over the top, which is what gives you that chalky, slightly worn finish rather than a flat painted box. Screw the label plate to the front. Then clear mason jars go in the compartments and baby’s breath goes in the jars. The stain underneath matters, because milk paint is meant to chip a little and you want something warm showing through.
Get the full tutorial at Little Glass Jar.
9. DIY Painted Terracotta Pot
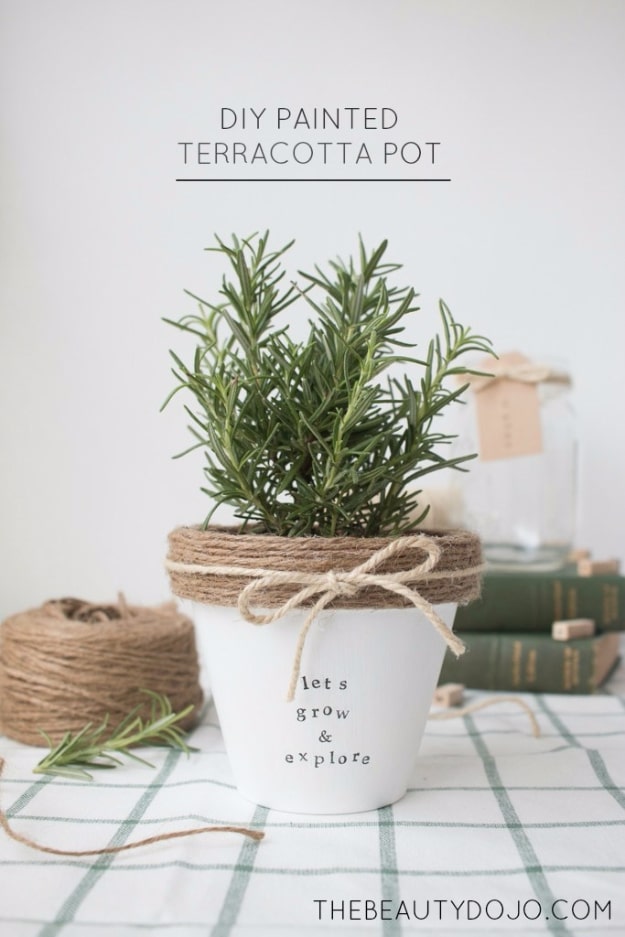
Terracotta is the cheapest thing in any garden aisle and it takes paint beautifully, which is why it keeps turning up on this list. The version shown here is the plainest of the lot: white over the whole pot, twine wound around the rim and tied in a bow, and a short line of stamped lettering on the front. If you want something bolder the same source runs a drip-painted one at around two dollars fifty, where you upend the pot and pour paint over it, and it takes twenty minutes. Whichever you choose, seal the outside if it is going to live outdoors.
Get the full tutorial at The Beauty Dojo.
10. DIY Monogram Clay Keychains
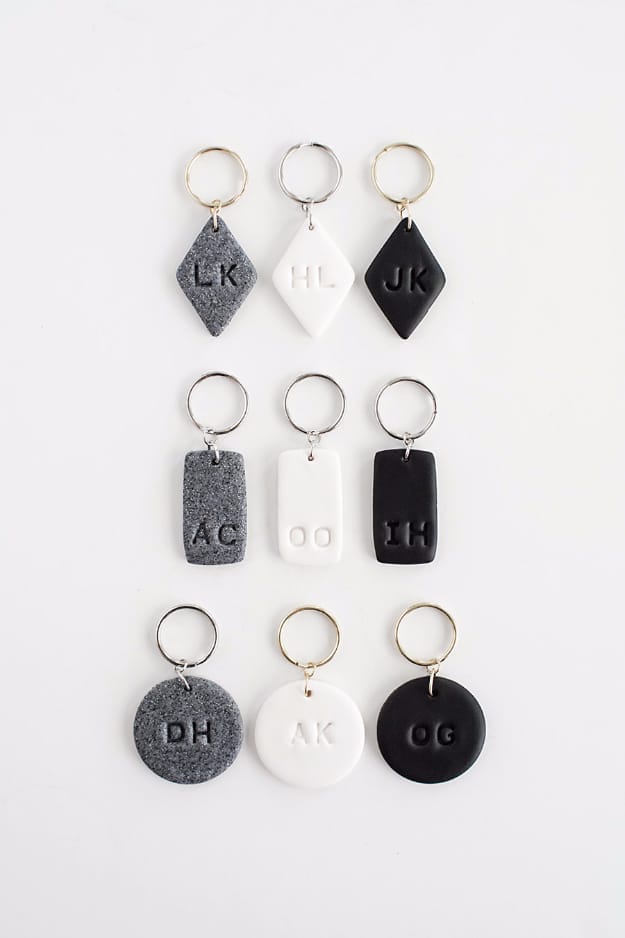
Polymer clay in black, white and granite, rolled flat on parchment and cut with circle and rectangle cutters about an inch and a half across. Stamp the letters in with an embossing kit, then make the hanging hole with a toothpick worked in a small circular motion rather than a straight jab, which keeps the edge from tearing. Bake at 230 degrees for forty minutes; ten pieces went in at once. A two ounce block makes roughly five. Once cool, a small jump ring goes through the hole and a second one joins it to the keyring.
Get the full tutorial at Homey Oh My.
11. Stylish Planter Using Dollar Store Bowls
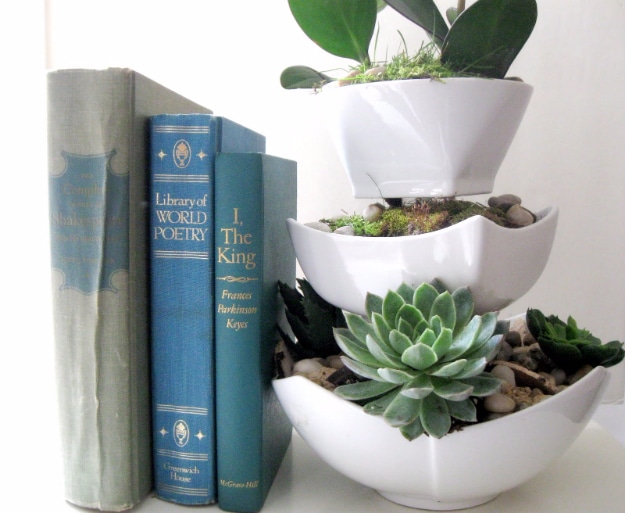
Three ceramic bowls and two clear glasses, stacked alternately and joined with Gorilla epoxy, and the entire project came in under eight dollars. The clear glasses between the bowls are the clever part, because they read as a stem rather than a container and the whole tower looks deliberate. Each bowl gets gravel or pumice at the bottom, then a layer of sand, then potting soil. Plant your succulents, cover the roots, and tuck river rocks, moss or a bit of driftwood into the gaps. Brush the soil off the leaves at the end or they look dusty in every photograph.
Get the full tutorial at Craftberry Bush.
12. Vintage Wire Shopping Cart Basket
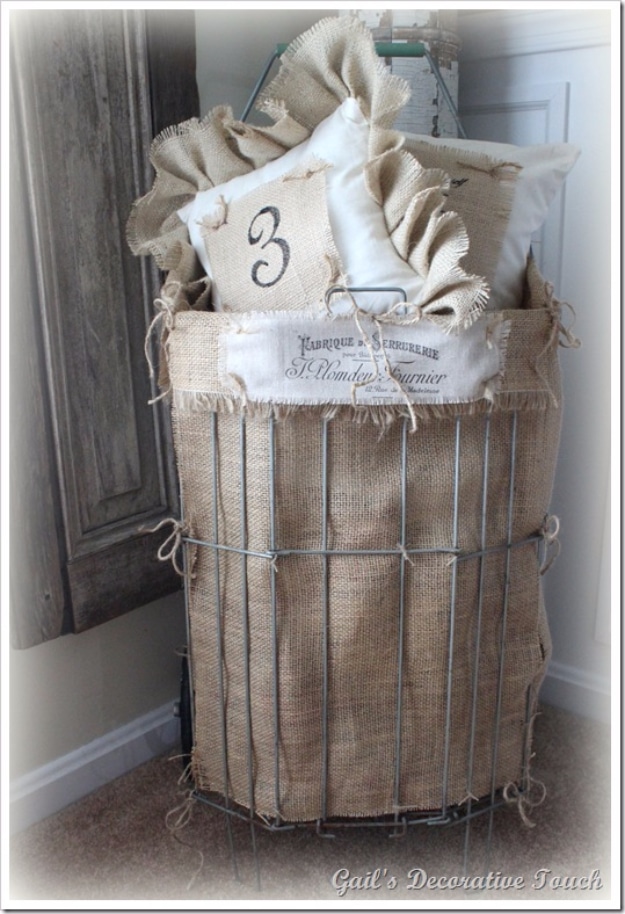
The cart itself is a flea market find, but the part you can actually copy costs almost nothing: a burlap liner and a printed fabric label on the front. The printing trick is freezer paper. Cut your fabric to letter size, iron it flat, lay freezer paper shiny side down onto the back and press with a dry iron on medium until it bonds all over. That stiffened sheet feeds through a home printer like ordinary paper. Print a vintage French label, peel the freezer paper off, and tie the panel to the wire front with twine.
Get the full tutorial at Gail's Decorative Touch.
13. Dollar Tree Make Up Storage
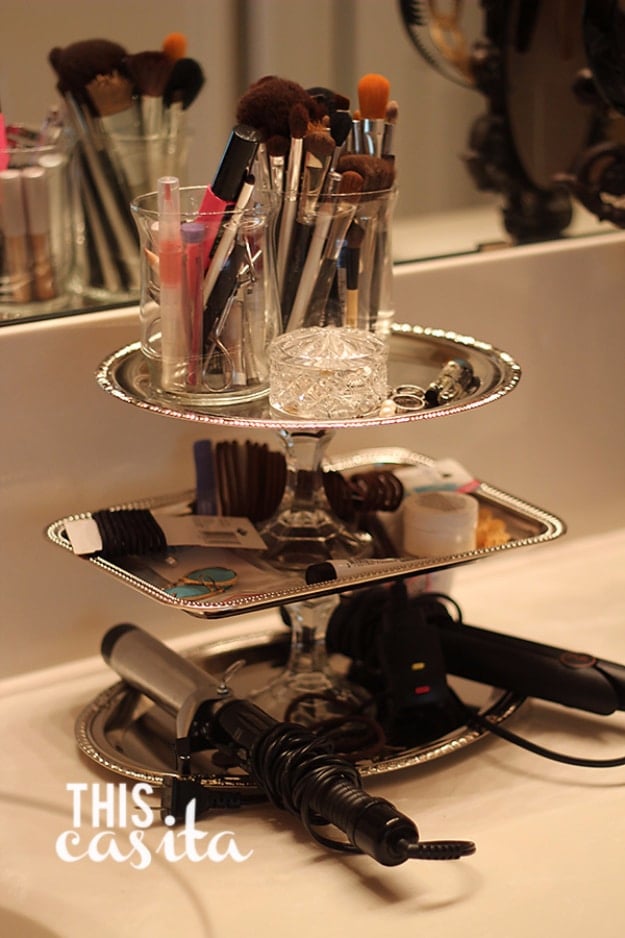
Five dollars plus tax, and the only thing not from the dollar store was the glue. Two candlesticks, a set of faux silver trays in mixed sizes, and two clear glass candle holders. The trays are in the dishware section and the candlesticks sit over with the vases and floral supplies, which is why people walk past them. Stack tray, candlestick, tray, candlestick, tray, then stand the clear holders on the top tier for brushes and pencils. Use E6000, and only E6000. Hot glue was tried first here and it did not hold the weight at all.
Get the full tutorial at This Casita.
14. DIY Rope Basket
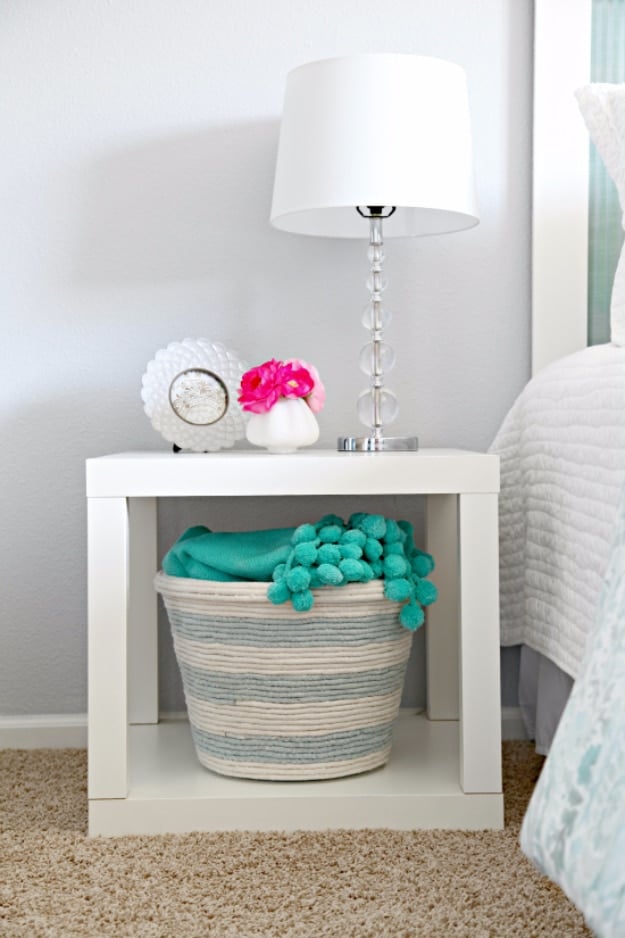
Worth saying plainly: this ended up costing about twenty dollars and taking four days, and it is still far cheaper than the seventy to a hundred dollar baskets it copies. A dollar store basket gets primer and two coats of matte white inside, left two days to cure. Cotton filler cord goes around the outside, hot glued along every inch because the basket underneath is flimsy and the rope is what makes it rigid. Half the rope here was tinted by squeezing it under paint-tinted water and drying it for days, to get the stripes.
Get the full tutorial at I Heart Organizing.
15. Rubber Door Mat Wall Art
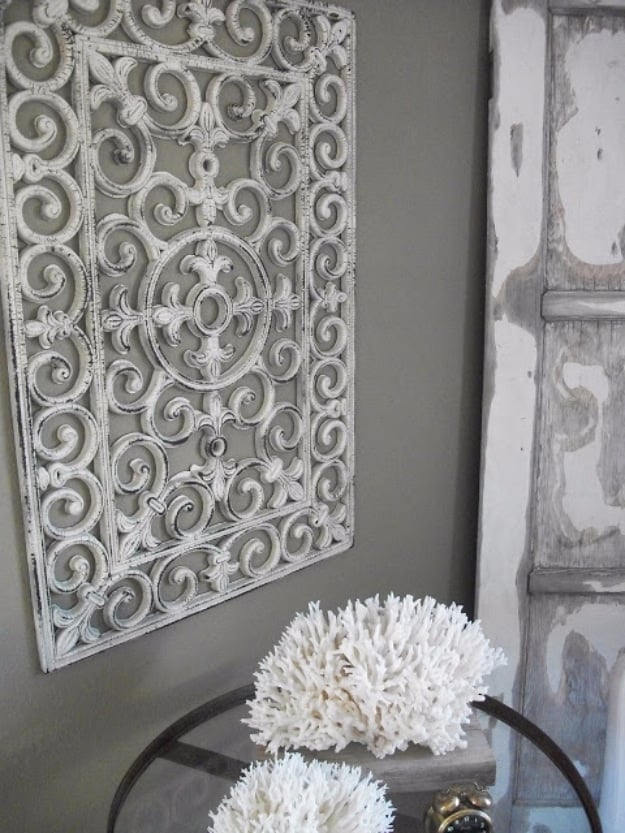
This is the cheapest idea on the whole list and it still looks like salvaged ironwork. Buy a black rubber outdoor door mat with an ornate scrolled pattern, the kind every dollar store carries, and spray it with an off-white such as Heirloom White. Once dry, take a hand sander across the raised surfaces so the black shows through the high points and it reads as aged cast iron rather than painted rubber. Sand harder in some places than others. They can also be cut into smaller shapes and grouped, which is how you fill a big wall for a few dollars.
Get the full tutorial at Salvage Dior.
16. Accent Stone Candle Holders
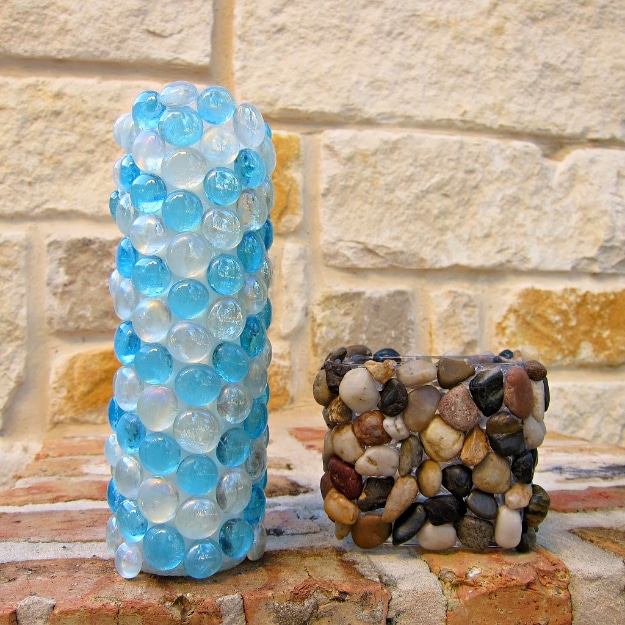
Flat backed glass gems or smooth river stones, glued all over a plain glass votive holder until the glass disappears. The original version used one color per holder; the maker here alternated colors to build horizontal stripes, and also did a second one in river stones for a heavier, earthier look. That is really the whole choice: glass gems throw light around when the tea light is lit, river stones absorb it and glow only at the gaps. Super glue holds them. Work on one face at a time and let it set, or gravity quietly slides the bottom row off.
Get the full tutorial at Morena's Corner.
17. DIY Air Dry Clay Jewelry Bowls
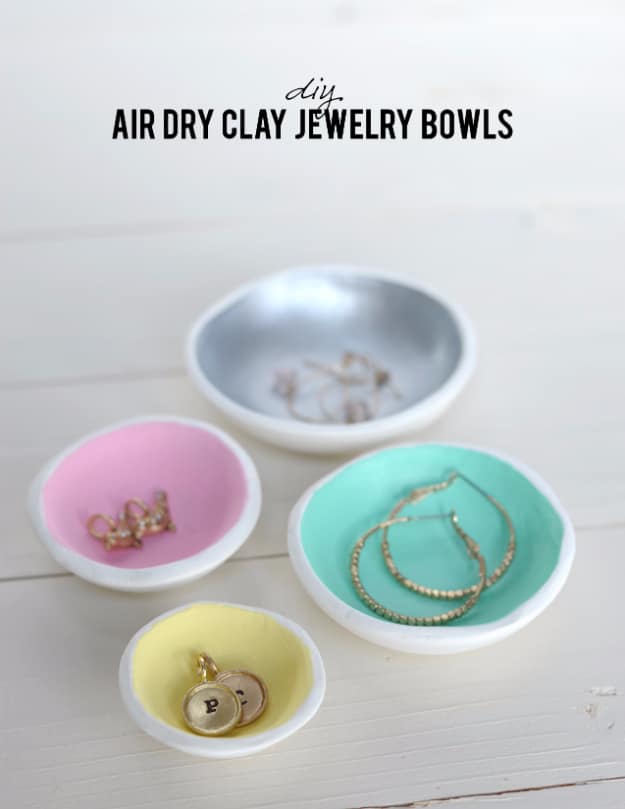
One package of air dry clay makes roughly eight small bowls, which is enough for every surface in the house that collects earrings. Roll the clay a quarter inch thick, set a glass nesting bowl upside down on it, cut around the rim, then lift the disc and press it down inside the bowl instead. Smooth the edge with a finger and keep your hands slightly damp the whole time, which is what stops the surface cracking as you work. Leave overnight to harden, pop out, sand the rim smooth and paint the inside only.
Get the full tutorial at Alice and Lois.
18. Decoupage Vase
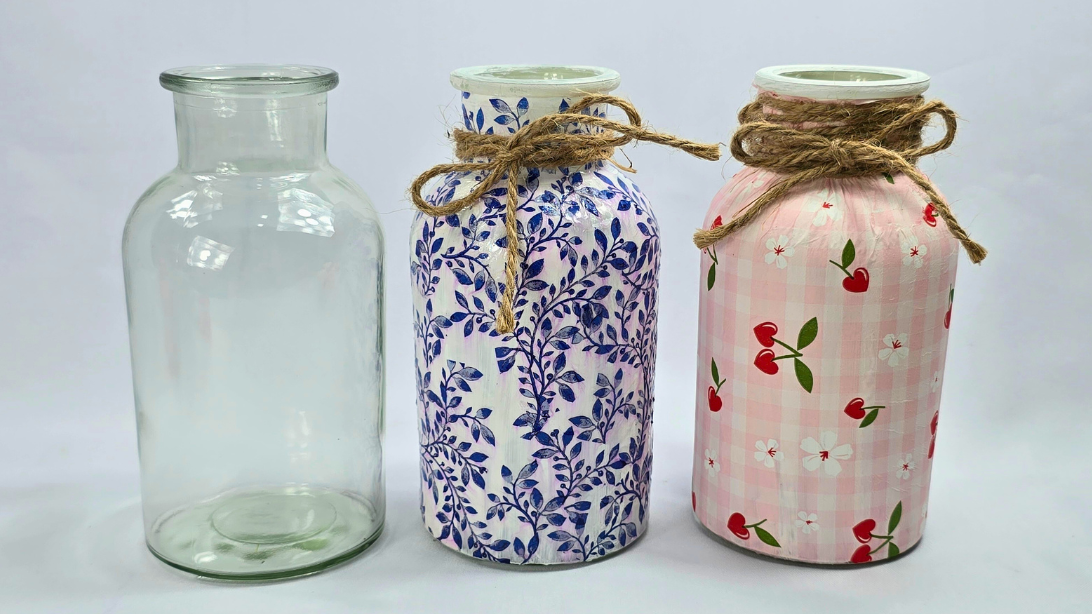
A plain glass jar and a packet of pretty napkins, and it ends up looking like something off a boutique shelf. Clean the outside, then paint the whole jar white and add a second coat if any glass shows through, because that white layer is what makes the napkin pattern read instead of vanishing into the glass. Cut close around the motif you want and peel the backing plies away so only the printed tissue is left. Lay it on, then brush Mod Podge over the top until it sits flat. Twine at the neck finishes it.
Get the full tutorial at DIY Joy.
19. Clay Plant Markers
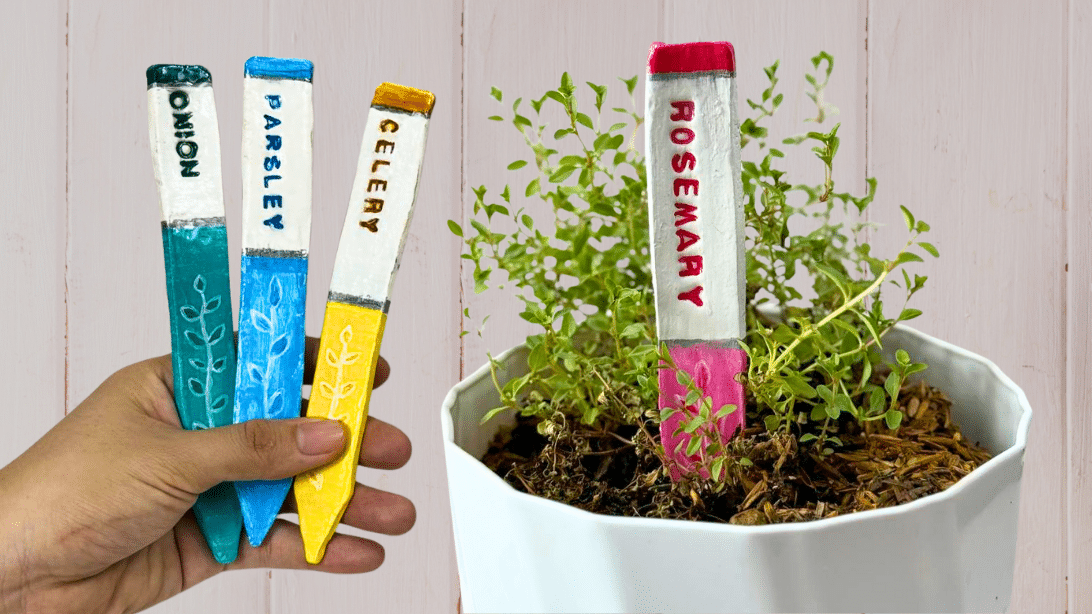
One plant becomes two plants becomes a shelf of herbs you can no longer tell apart, which is exactly how these came about. Roll air dry clay smooth and flatten it with a rolling pin to the thickness you want, lay a paper template over it and cut the marker shape out, point at the bottom. Stamp the herb name in while the clay is still soft. Let it dry, then prime, paint in blocks of color, and seal. They cost almost nothing and they look considerably smarter than a popsicle stick with marker on it.
Get the full tutorial at DIY Joy.
20. Picture Frame And Message Board
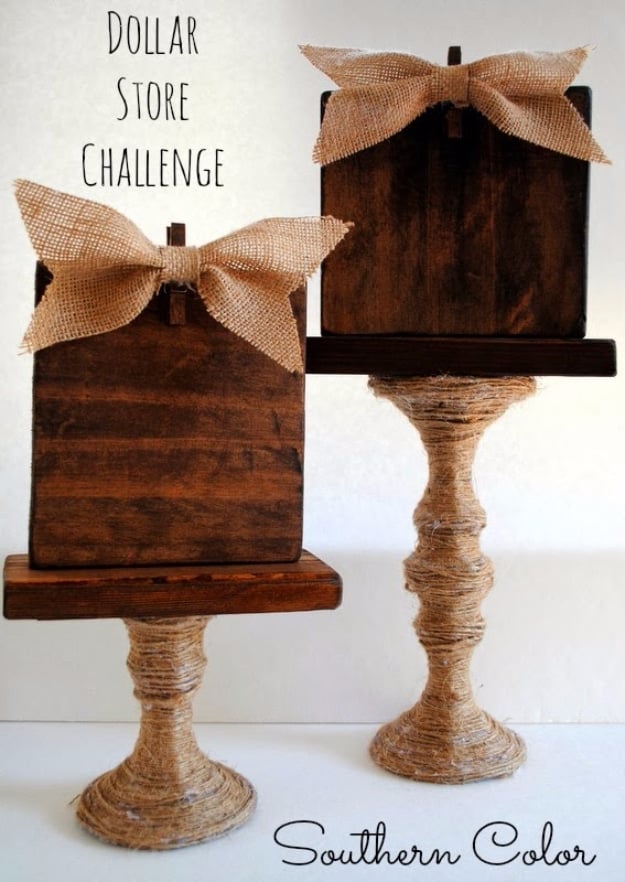
Three glass candlesticks, a pack of twine, two small clothespins and a bit of burlap, all from the dollar store, plus wood scraps you probably already have. Epoxy two candlesticks together, one inverted on top of the other, to get the height. Wrap the pair in twine, hot gluing as you go so it cannot unwind. The top is two pieces of scrap, six by three and a half and five by five, sanded, stained and screwed together with inch and a quarter screws, then epoxied to the candlestick base. A clothespin and a burlap bow on the front hold the photograph.
Get the full tutorial at Southern Color.
21. Dollar Tree Contact Paper and Used Boxes Wall Art

Four cereal boxes, two mac and cheese boxes and a roll of patterned contact paper. Tape any open flaps shut first, then spray the front of each box white, which stops the printing ghosting through a pale contact paper. Cut pieces big enough to wrap around the front and the sides, smooth them on, and patch any exposed corners with offcuts. Cut a small slit in the center of each box back to hang it on a nail. Keep the gaps between boxes equal when you hang them, which is the one thing that decides whether a grouping looks deliberate.
Get the full tutorial at Ahhh Mom.
22. Dollar Store Trash Can Makeover
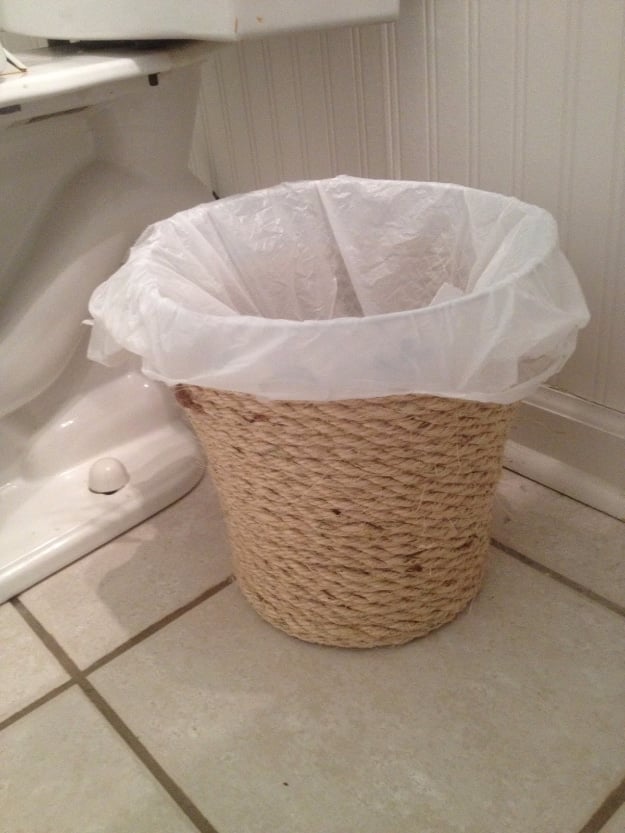
Fifteen minutes, one dollar, and a leftover spool of rope. Start at the base of a plain plastic waste basket, run the glue gun along a few inches at a time and press the rope down as you go, working up in a tight spiral until you reach the rim. That is genuinely all of it. Two things help: keep each round pushed hard against the one below so no plastic shows in the gaps, and stop the glue short of the rim so the last round can be adjusted before it sets. A liner still drops in normally.
Get the full tutorial at Two It Yourself.
23. Jewelry Holder from a Cutlery Tray
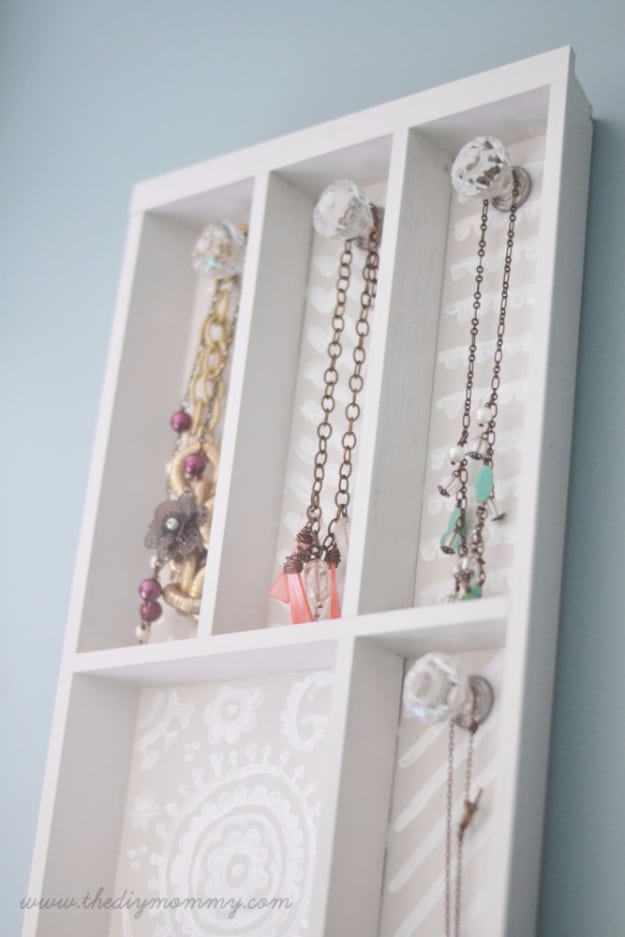
A wooden cutlery tray, hung on its side, becomes a jewelry wall with compartments already built in. Sand it properly first, especially the laminate back, or the paint sits on top and peels. Two coats of grey, then white detailing brushed inside the compartment boxes if you want the contrast, then two coats of clear Varathane for a finish that will not mark when a chain drags across it. Glass knobs superglue to the compartment tops for hanging necklaces, which is easier than drilling them. Five cup hooks along the bottom edge take the rest, and pilot holes make those go in straight.
Get the full tutorial at Cozy DIY Home.
24. Iron-On Floral Patterned DIY Shoes
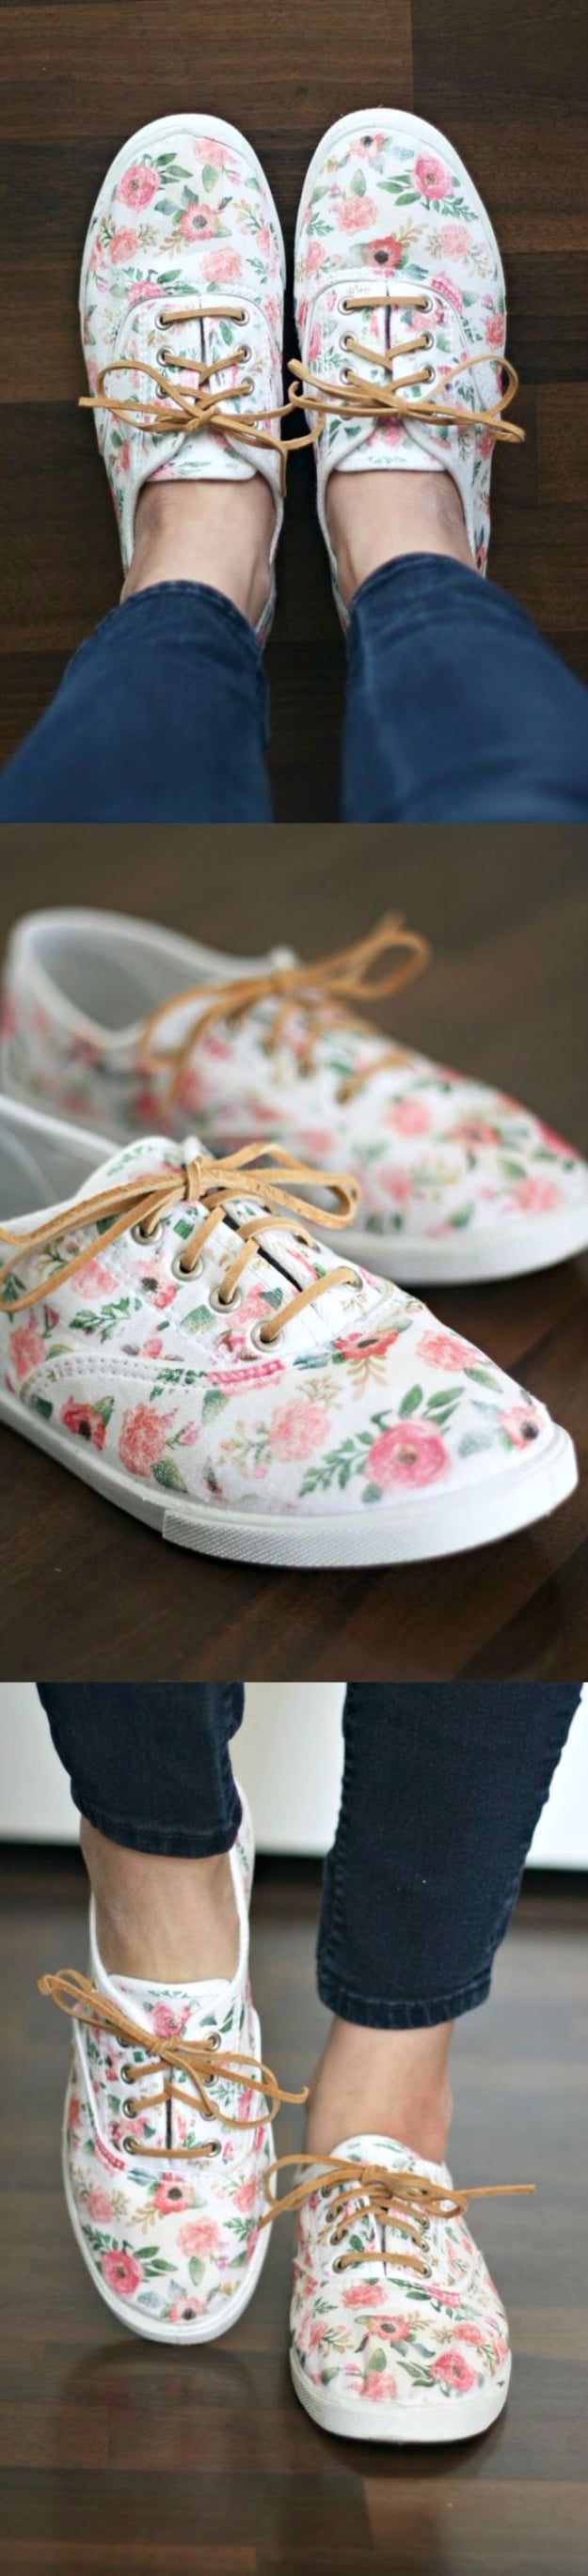
Fifteen dollars and about an hour and a quarter, prep included. Print a floral pattern onto iron-on transfer paper, then cut the sheets into small pieces around individual flowers rather than pressing whole panels, because a curved canvas shoe will wrinkle anything large. Iron each piece on following the transfer paper’s own instructions, peel the backing and press the edges down firmly. Then swap the factory laces for leather or suede ones, which is a two minute change that does more for the finished look than any of the flowers do.
Get the full tutorial at DIY Candy.
25. Dino iPhone Tripod
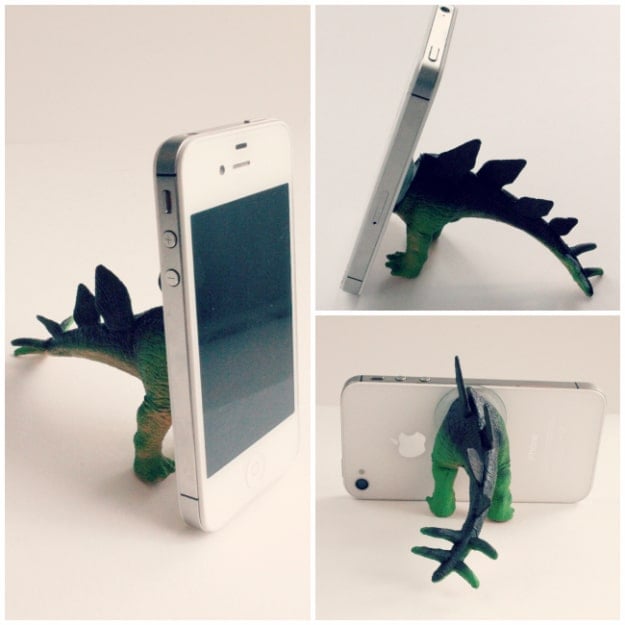
Cut a hollow plastic dinosaur in half with a utility knife, and check it is hollow first, because a solid one ends the project on the spot. Pack the back half tight with caulking, using a finger to work it right in. Press a suction cup into the wet caulk, then set your phone against it to check the angle before it starts to skin over. Dab caulk on the feet and tail too, or the whole thing slides backward the moment a phone leans on it. Then leave it four or five days to cure properly.
Get the full tutorial at Eat Sleep Make.
26. Tin Can Organizer
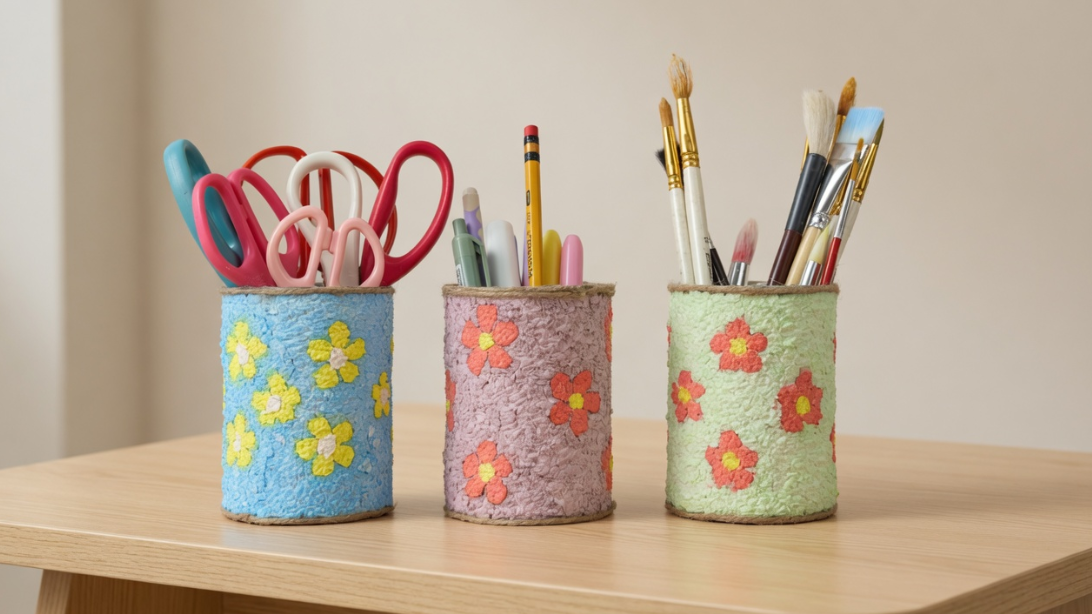
Empty tin cans, tissue paper and paint, and a desk that disappears under pens and scissors comes back under control. Tear the tissue small, soak it in water until it softens, squeeze the water out and mash it into a pulp. Glue goes in next, then your paint color, mixed until the whole batch is one even shade. Press that pulp around the outside of the can and it dries into a thick textured shell that hides every bit of the label underneath. Small flowers pressed on in a second color finish it. Beginner friendly from start to end.
Get the full tutorial at DIY Joy.
27. Ferrero Rocher Jewelry Box
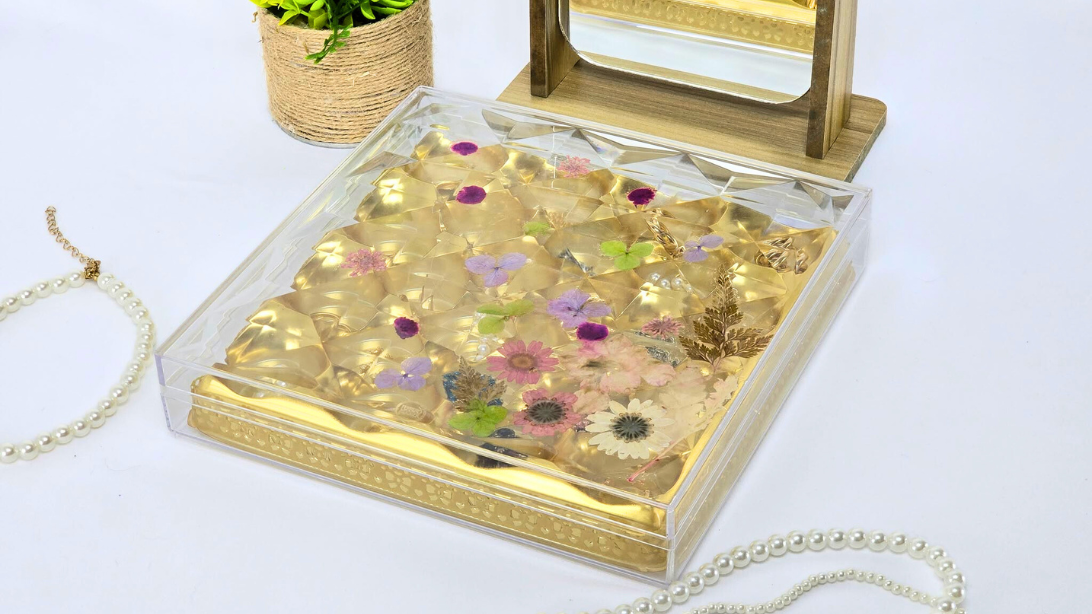
The clear acrylic box those chocolates come in is too nice to bin, with its solid build and gold lining, and the compartments happen to be exactly the right size for rings and studs. Lift the printed label off by pressing wide tape over it and peeling, repeating until the lid is clear, then wipe it down. Lay your pressed flowers out on the inside of the lid and photograph the arrangement before you commit, because you will not remember it once glue is involved. Brush a layer down, set the flowers, seal over the top. Fabric or felt in the base is optional.
Get the full tutorial at DIY Joy.
28. Dollar Store Frame Makeovers
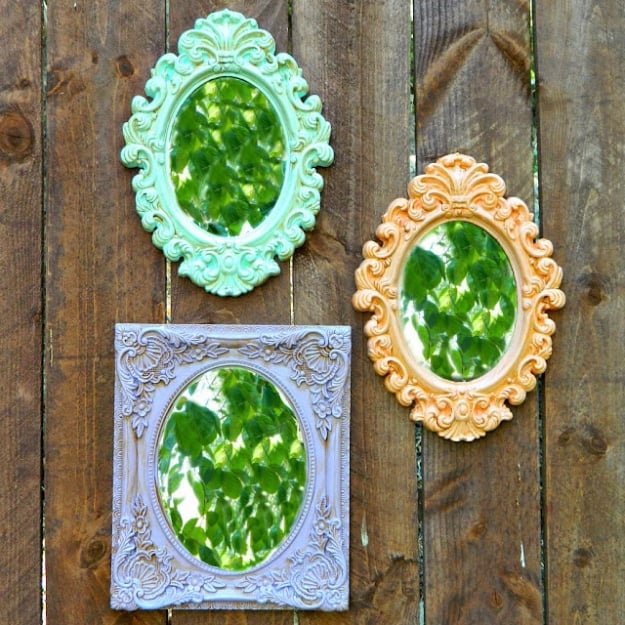
Those swirly ornate plastic frames and mirrors are in every dollar store and they all look like plastic until chalky finish paint goes on them. One coat covers, because chalk paint grips plastic without priming, which is the entire reason this works. Then a light satin varnish to protect it and creme wax worked into the raised scrollwork and wiped back, which is what makes them read as old carved wood rather than painted plastic. Paint a cluster all the same color and hang them together and you have a gallery wall for under fifteen dollars.
Get the full tutorial at Mark Montano.
29. Anthropologie Plate Art
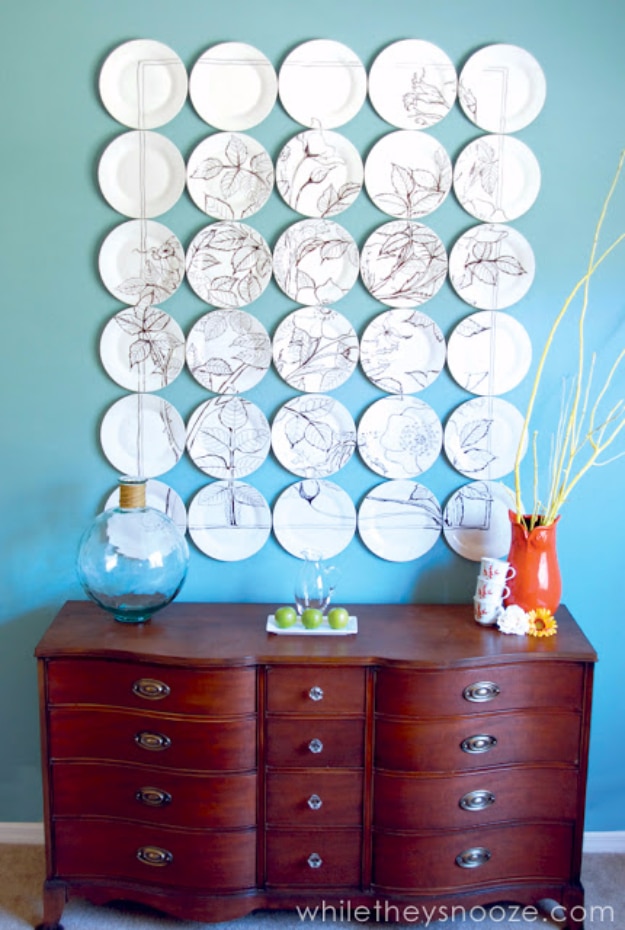
Thirty white plates at a dollar each, and a wall that people assume cost a fortune. Stick a medium Command strip to the back rim of every plate and label each one before it goes anywhere, A1, A2, B1 and so on, because once thirty identical plates are off the wall you will never sort them again. Tape a scrap board to the wall as a level ledge, hang the center plate of each row first and work outward. Then, and this is the step everyone skips, take them all down to let the strips cure before rehanging. The botanical drawings are traced from a projector in Sharpie.
Get the full tutorial at While They Snooze.
30. Hexagon Ring Dishes
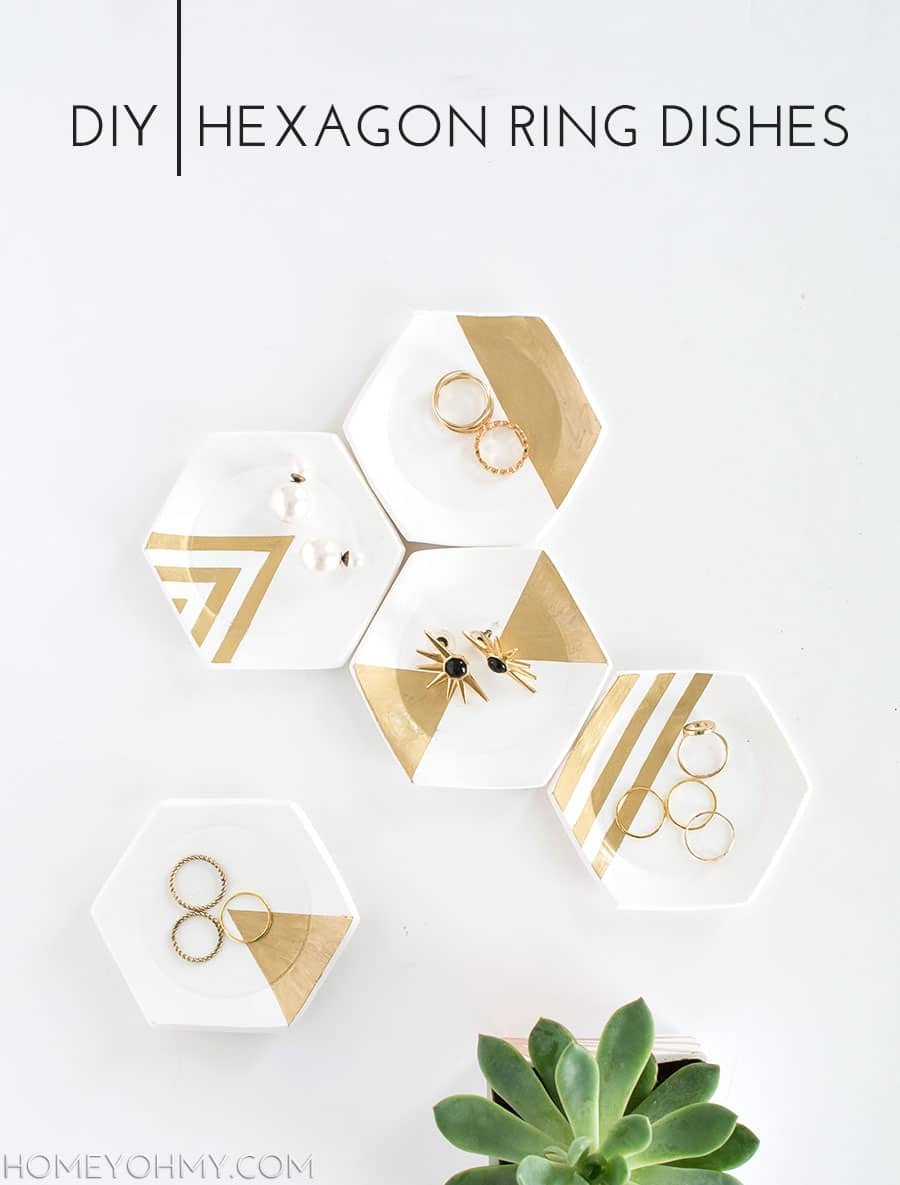
White clay, rolled to about four millimetres on parchment, with a hexagon box lid from the craft aisle used as the template. Cut around it with a craft knife rather than a plastic clay cutter, because a blade leaves a clean edge and a cutter drags. Drape each hexagon over the base of an upturned oven-safe bowl, which gives you a flat bottom so the dish sits steady. Bake at 230 for thirty minutes. Spray the whole thing white afterward, which covers clay dust and fuzz, then quarter inch tape masks the pattern and a gold leaf pen fills it in.
Get the full tutorial at Homey Oh My.
31. Flip Flop Makeover
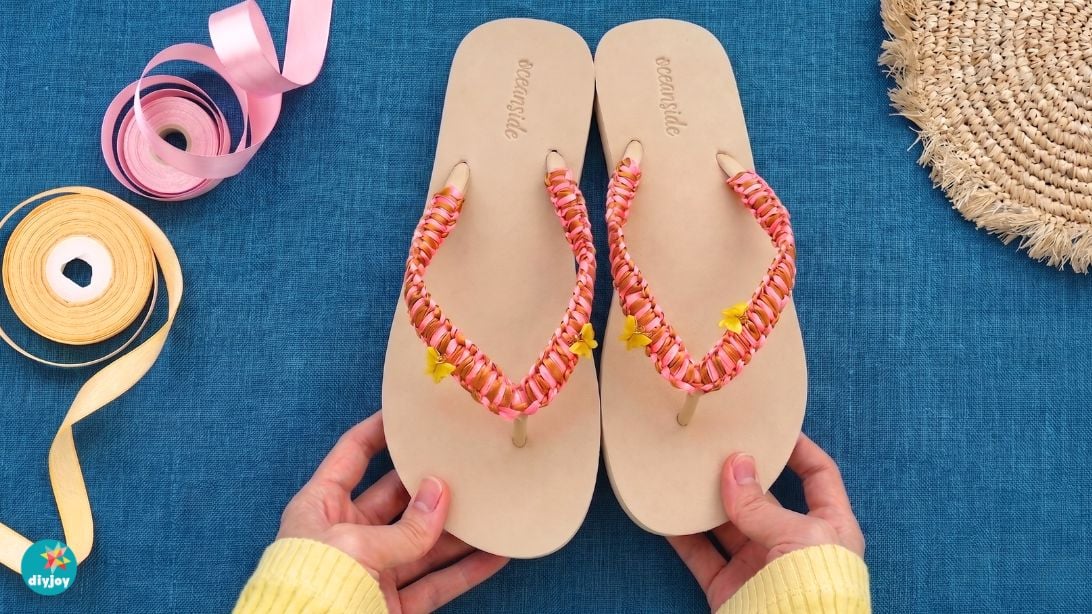
A plain pair of flip flops and a few metres of ribbon, and pool season arrives with sandals nobody else has. The ribbon is braided around the straps, so the plastic underneath vanishes completely and what you see is color and texture. Two shades work better than one, since the braid pattern only shows when the colors contrast; neon pink against sunset yellow is what is shown here. Small charms threaded on at the end, butterflies in this case, take it from homemade to finished. Ribbon is cheap, the shoes are cheap, and the whole thing is an afternoon.
Get the full tutorial at DIY Joy.
32. DIY Ruffled Burlap Shade
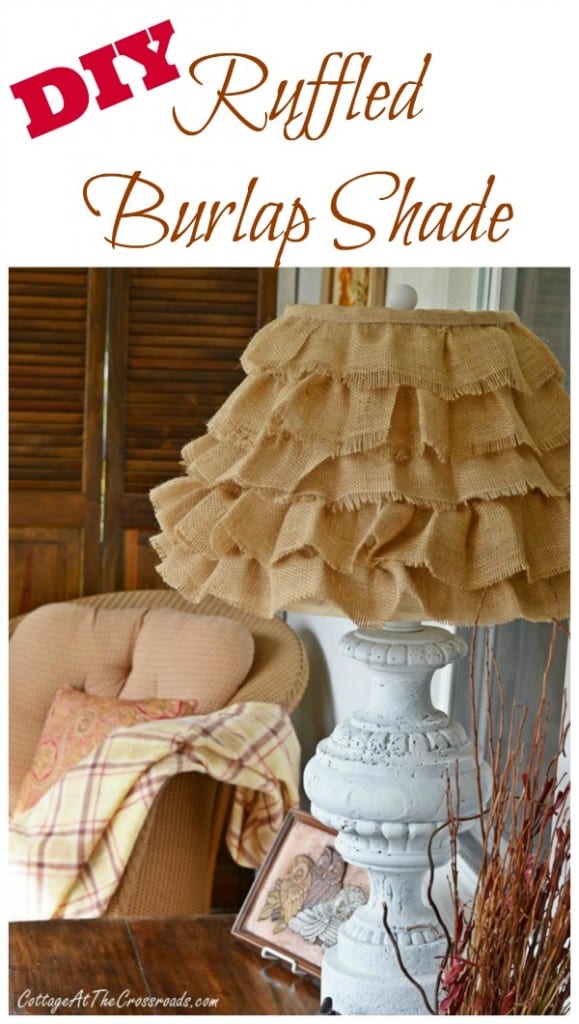
An old lampshade, free at an auction in this case, and strips of burlap four inches wide and around six feet long. Pull one thread out of the cut end and keep pushing the fabric along it, and the strip gathers itself into a ruffle you can tighten or loosen by sliding it. Hot glue the first ruffle around the bottom edge, folding the end under for a clean join, then work upward with each row overlapping enough to cover the top of the one below. Burlap ribbon across the top hides the last raw edge. The frayed bottom edge stays frayed on purpose.
Get the full tutorial at Cottage at the Crossroads.
33. Beaded Wind Chime
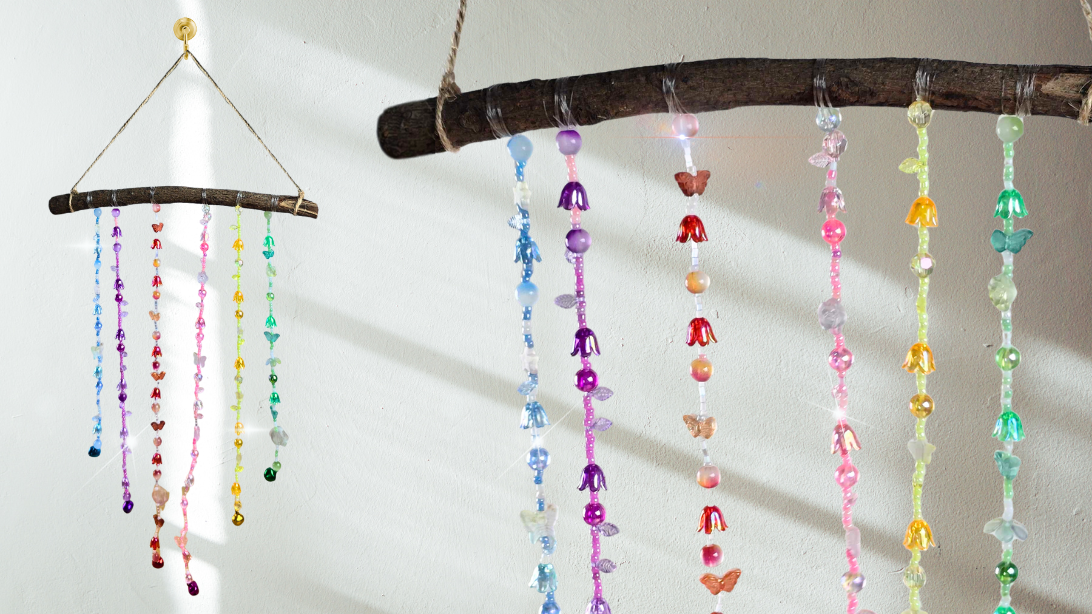
A stick, some twine and a handful of dollar store glass beads, and a porch gets its own soundtrack. The strands hang from a found branch, each one a different color run so the whole thing reads as a rainbow when the sun catches it. Little bells threaded in among the beads are what turn it from a suncatcher into a chime, and the sound is soft rather than clattering. Fair warning from experience: if the thread slips out of your fingers mid-strand the beads go everywhere and you start that one again. Work over a tray.
Get the full tutorial at DIY Joy.
34. Colorful Clothespin Trivets
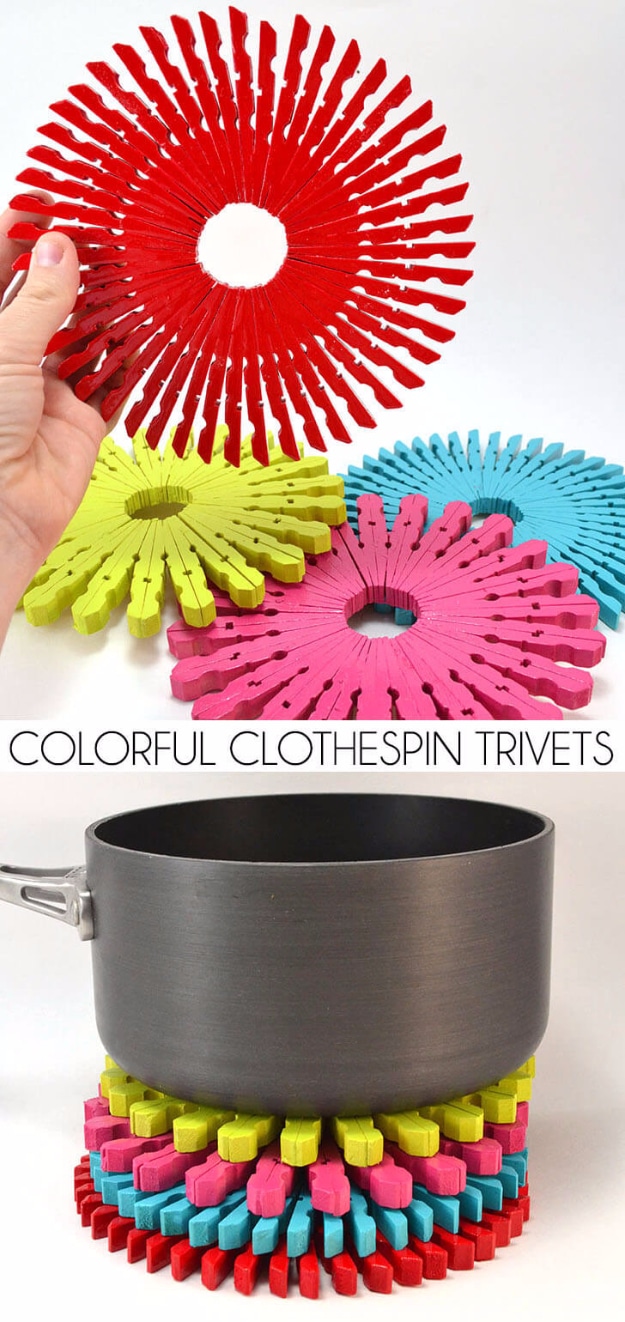
Roughly twenty four clothespins make one trivet, and a bag of a hundred runs under a dollar at a big box store. Buy them there, not in the craft aisle, where the same pins cost several times as much. Take each pin apart, stain or paint the halves, and arrange them into a ring before you commit to any glue so you can see the spacing. Glue the ring, let it set hard, then join your rings together. One caution the maker is clear about: these will not take a pan straight off the burner, so let cookware cool or seal them with high heat paint.
Get the full tutorial at Dream a Little Bigger.
35. Cutting Board Storage
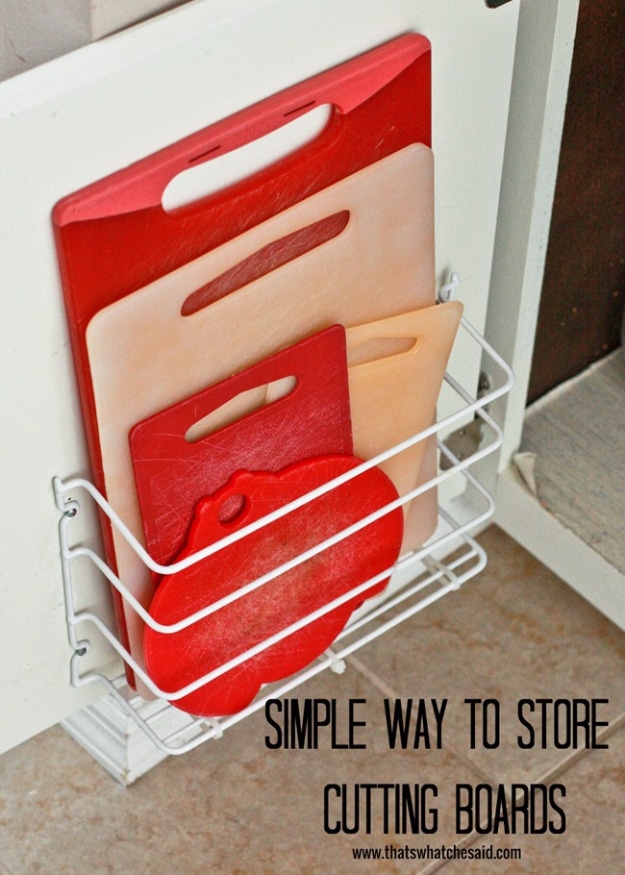
Two dollars, and it takes longer to find the drill than to do it. A wire foil and plastic wrap organizer screws to the inside of a cabinet door and holds every cutting board in the kitchen on edge. Two things to get right. Mount it low enough that your tallest board still clears the cabinet contents when the door swings shut, which you check by closing the door with a board in place before you drive the screws home. And zip tie across the open slats at the bottom, then trim the tails, so boards cannot slide out when the door moves.
Get the full tutorial at That's What Che Said.
36. DIY Rhinestone Tissue Box
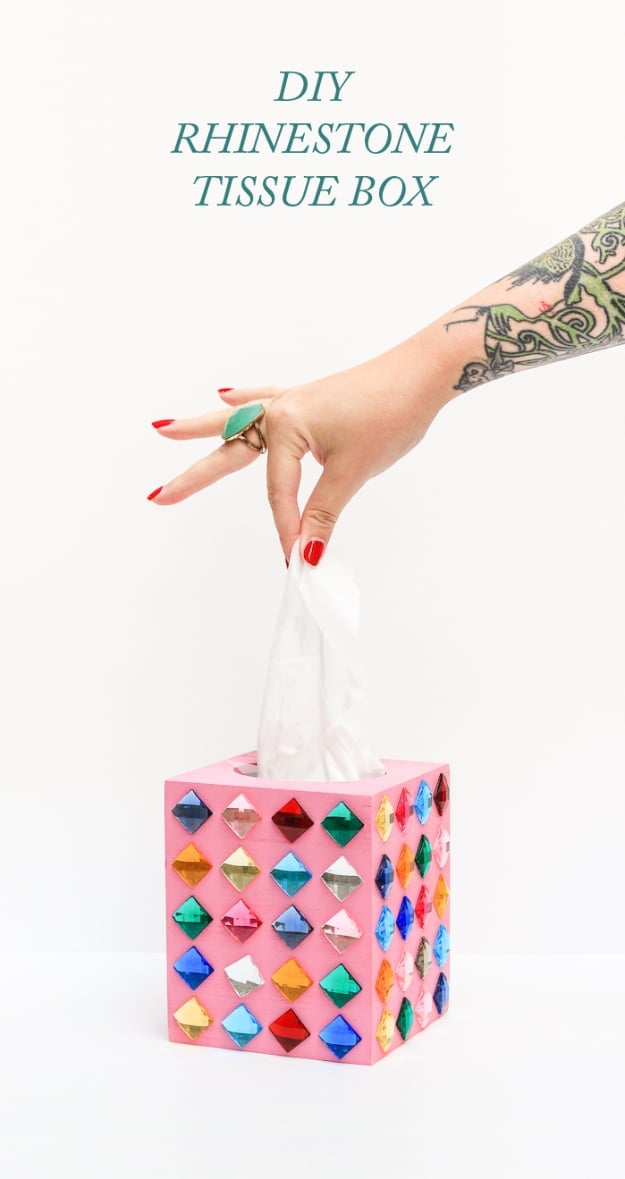
Half an hour of work plus drying, and the cost lands somewhere between seventeen and twenty dollars, mostly in rhinestones. Start with a wooden tissue box cover rather than a cardboard one, because paint chips straight off cardboard at every corner. Spray it, let it dry completely, then glue sixteen millimetre square rhinestones on in a grid using E6000, or tacky glue if you would rather not deal with the fumes. Do one face at a time and leave it flat until set, or the stones slide down the side and you find them pooled at the bottom edge.
Get the full tutorial at The Crafted Life.
37. DIY Pig Planter
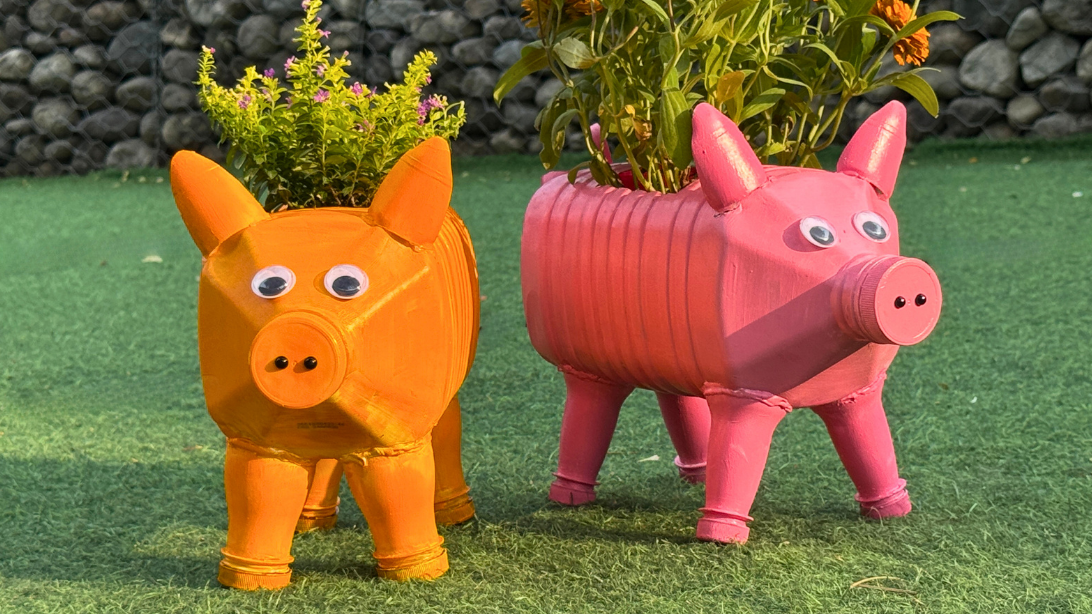
A plastic gallon bottle, some paint and a pair of googly eyes, and the material cost is nothing at all because the bottle was going in the recycling anyway. The ridges moulded into the bottle become the pig’s body, the cut sections become the legs and ears, and the cap end becomes the snout, which is the part that makes people laugh when they work out what they are looking at. A gallon bottle gives real root space, so it takes herbs and flowers rather than only a single succulent. It looks harder than it is; the shape emerges as you go.
Get the full tutorial at DIY Joy.
38. DIY Chunky Tassel Bookmarks
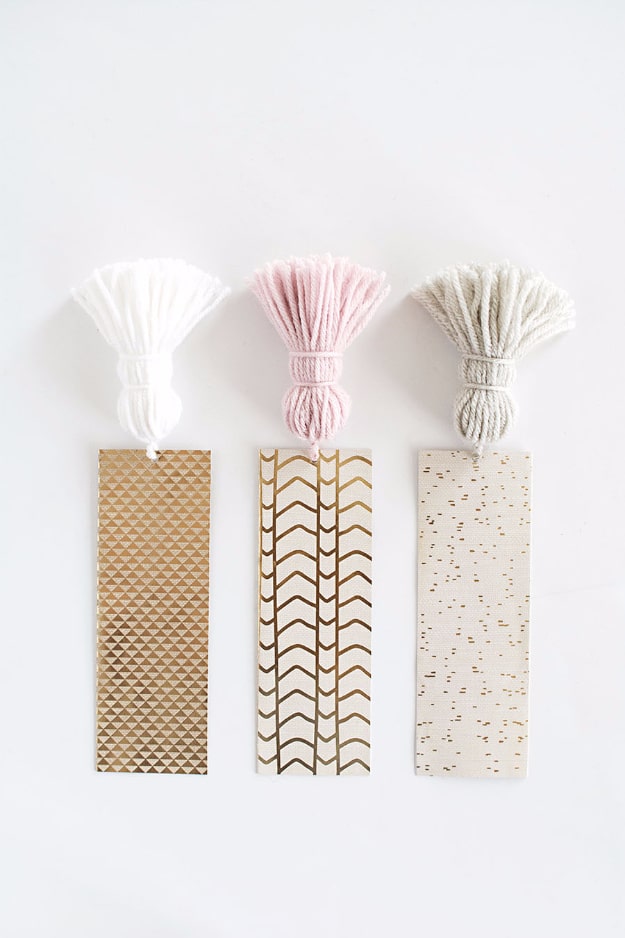
Wrap yarn about fifty times around a piece of cardboard roughly three and a half inches wide, then cut the excess off. Slide a length of yarn under the loops at the top, double knot it tight, cut the loops open at the opposite end and then double knot again just below the head to form the tassel. The bookmark itself is cardstock cut to four and a half by six and a half, folded lengthwise with a thin coat of Mod Podge inside to bond the two halves, which gives it enough stiffness to survive a handbag. Punch a hole, knot the tassel through.
Get the full tutorial at Homey Oh My.
39. Mini Notebooks
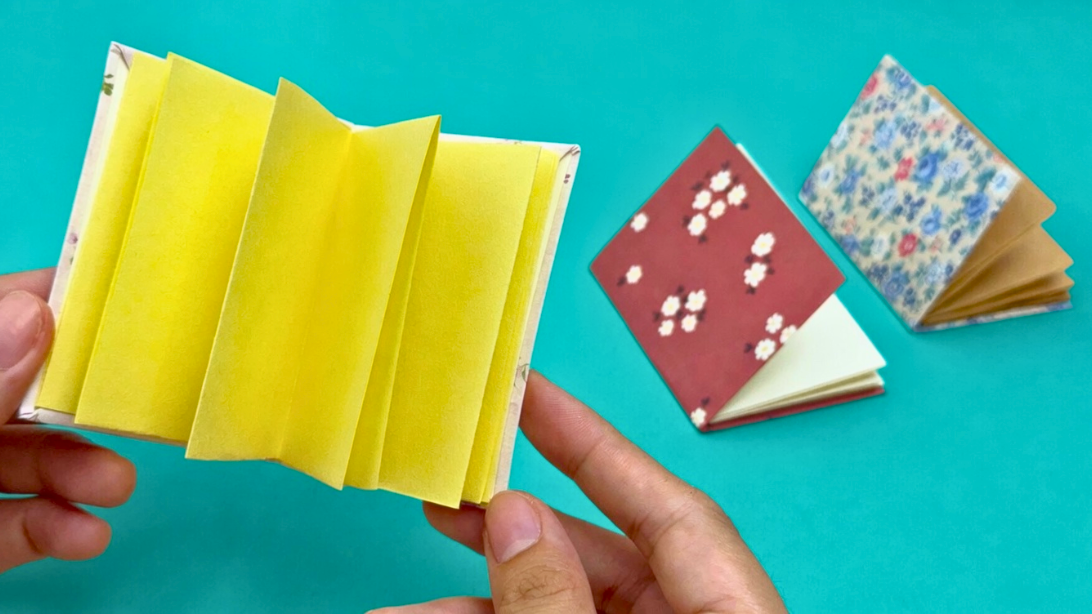
Leftover scrapbook paper, patterned sheets and cardstock scraps pile up fast once you craft, and this is where the pile goes. The notebooks come out small enough to sit in a pocket or a pencil case, and they still work as notebooks: quick lists, reminders, a tiny journal. The whole thing takes about five minutes each, which is exactly why you end up with a stack of them. Mix patterns across a batch and no two look alike. They make good party favors, small handmade gifts, or something to tuck into a little free library.
Get the full tutorial at DIY Joy.
40. Mini Watermelon Bags
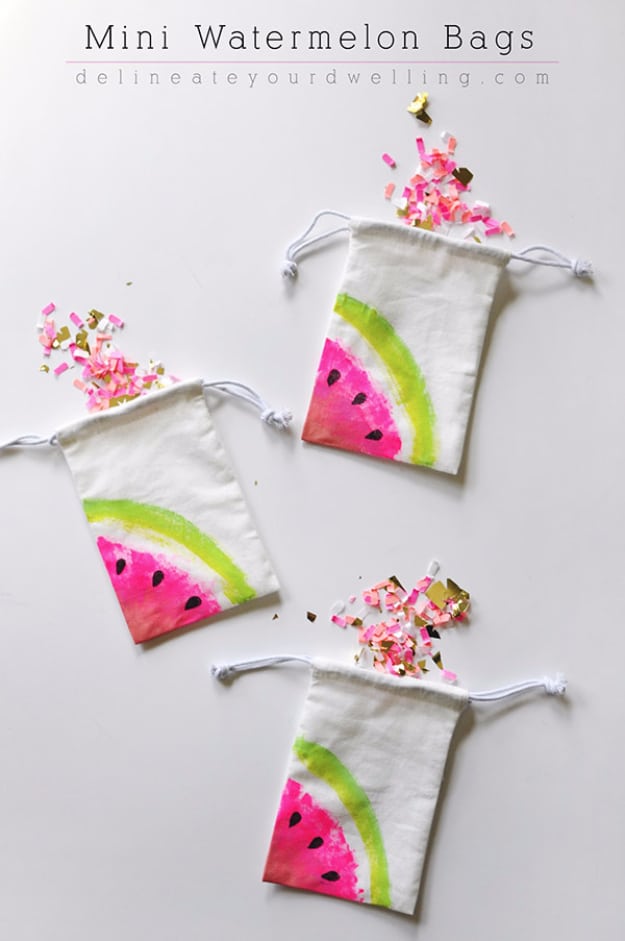
Three small canvas bags, thirty minutes, and acrylic paint in five shades: two greens and three pinks. Cut a paper plate down to fit inside each bag first, which stops the paint bleeding through to the back. Paint the rind as an arc in the darker green, then a lighter green over it. The fruit goes brightest neon pink first, then rosy pink, then coral toward the center, which is what gives you that graded watermelon flesh rather than a flat pink wedge. Three black seeds drawn on with a permanent marker once it is all dry.
Get the full tutorial at Delineate Your Dwelling.
41. Flat Iron Holder
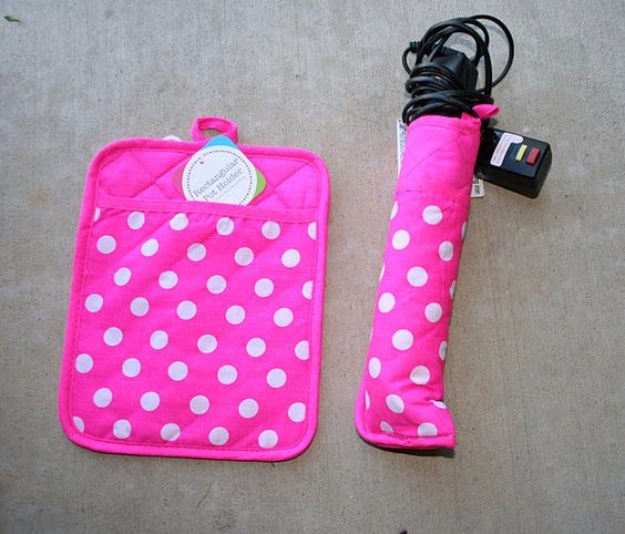
One dollar, one potholder, and about five minutes with a needle. Fold a quilted potholder in half lengthwise, sew up the long side, sew across the bottom, and leave the top open. That is the entire project, and it works because a potholder is already heat resistant and already bound around the edges, so there is nothing to finish. A hot flat iron goes straight in. Fold it the other way, sewing the horizontal edge and the bottom instead, and you get a padded sunglasses case from the same dollar. One warning from the comments: do not wind the cord tightly around the iron.
Get the full tutorial at Your Creative Juices.
42. DIY Colored Glass Mason Jars
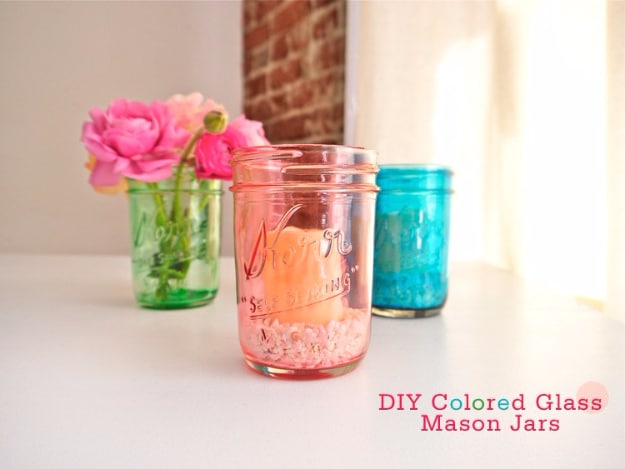
The mix per jar is one tablespoon of Mod Podge gloss, half a tablespoon of water and seven to nine drops of liquid food coloring, stirred smooth. Pour it in, swirl until the whole inside is coated, and tip the excess out. Wipe the rim, stand the jar open side down on a lined tray for an hour to drain, then wipe the rim again and turn it the right way up on a second tray. Bake at 225, or the warm setting, for forty five minutes until fully dry. Once colored they are decorative only, not for food or drink.
Get the full tutorial at Freutcake.
43. DIY Fairy Jar Lanterns
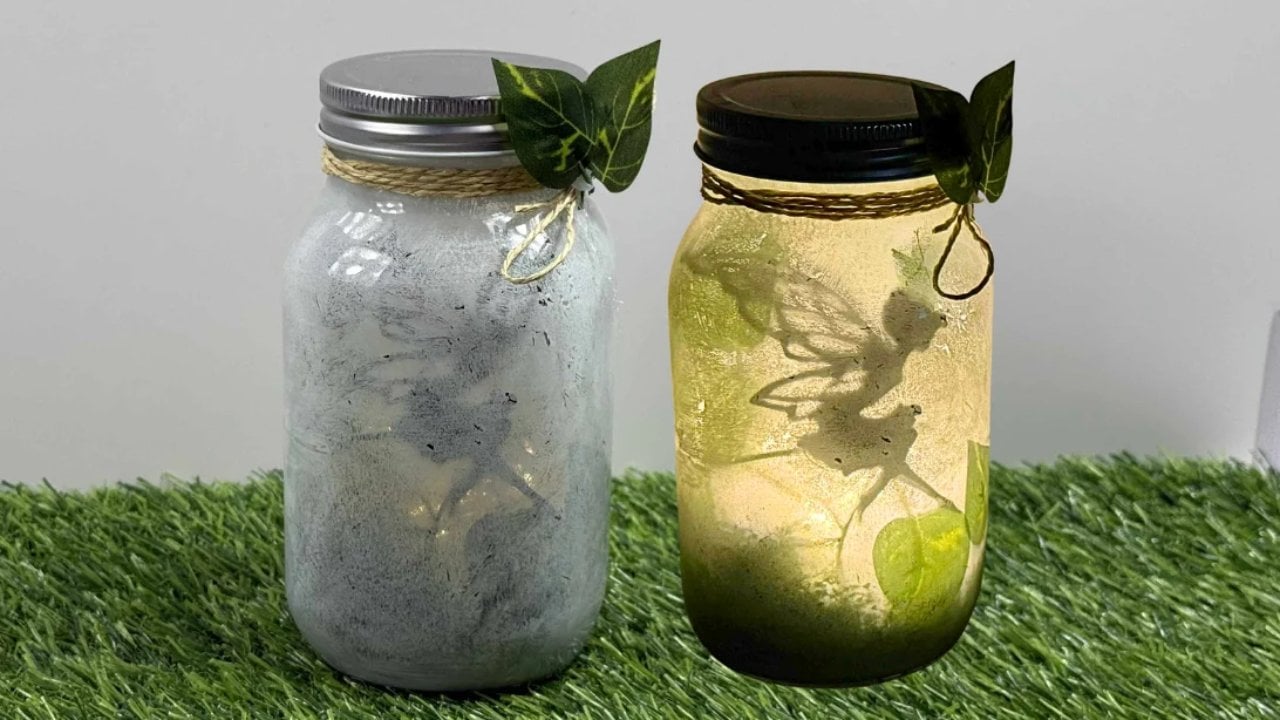
An empty jar, and a pickle jar is genuinely the best shape for it. A fairy silhouette is cut from paper and fixed inside, then the glass is worked over until it glows rather than shines, so the light diffuses and the cut-out reads as a shadow inside a lantern rather than a sticker on the outside. Warm fairy lights go in and the whole thing becomes a soft night light, the kind you can leave on in a reading corner. Glitter, dried flowers and different silhouettes, trees or mushrooms, mean no two ever come out the same.
Get the full tutorial at DIY Joy.
44. Flower Pot Candy Jar
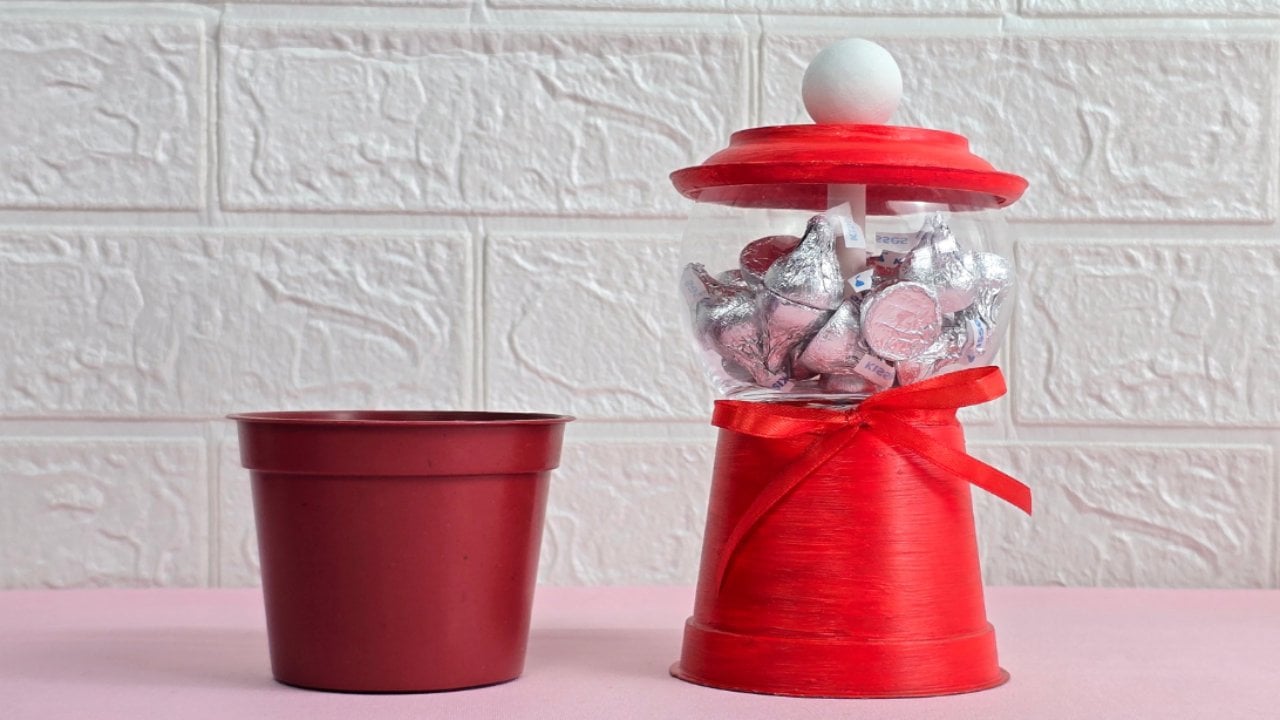
A small terracotta or plastic flower pot, a saucer, a round glass bowl and a wooden ball, and you have the gumball machine you begged your mother for coins in front of. Prime every piece first, then paint the pot, the saucer and the ball in one bold color, adding a second coat once the first has dried. The pot goes upside down as the base, the glass bowl sits on top to hold the sweets, the saucer caps it and the wooden ball finishes it. It is much quicker to assemble than it appears, and it works for keepsakes as well as candy.
Get the full tutorial at DIY Joy.
45. Air Dry Clay Decoupage Jewelry Dish
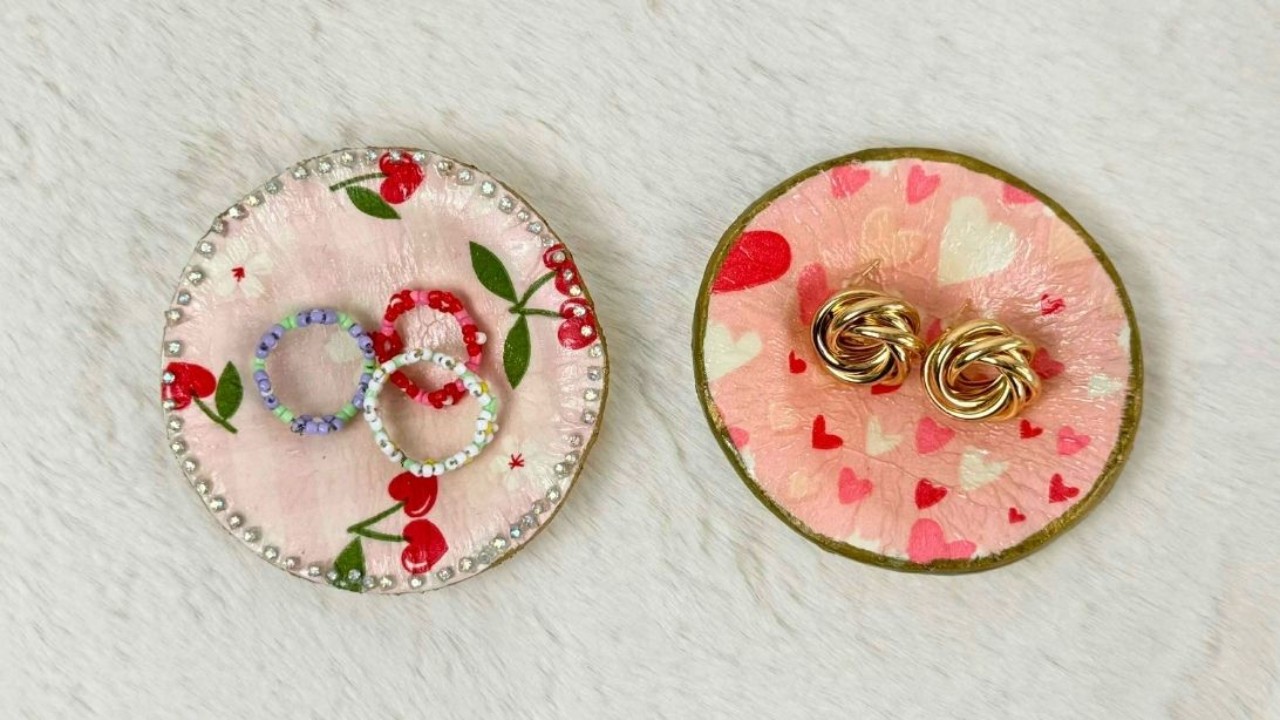
Air dry clay and a paper napkin, and the combination is better than either on its own. Shape the dish, then decoupage a printed napkin over the surface so the pattern sits in the clay’s own texture rather than on a flat painted plane. From there it is all optional detail: rhinestones set into the rim, a gold or silver edge painted round the outside, or the rim gently crimped before the clay dries. Sturdy but light, and if you get good at them they sell well at a craft fair. Otherwise they are a very easy gift to have ready.
Get the full tutorial at DIY Joy.
46. Mason Jar Fairy Lights With Pressed Flowers
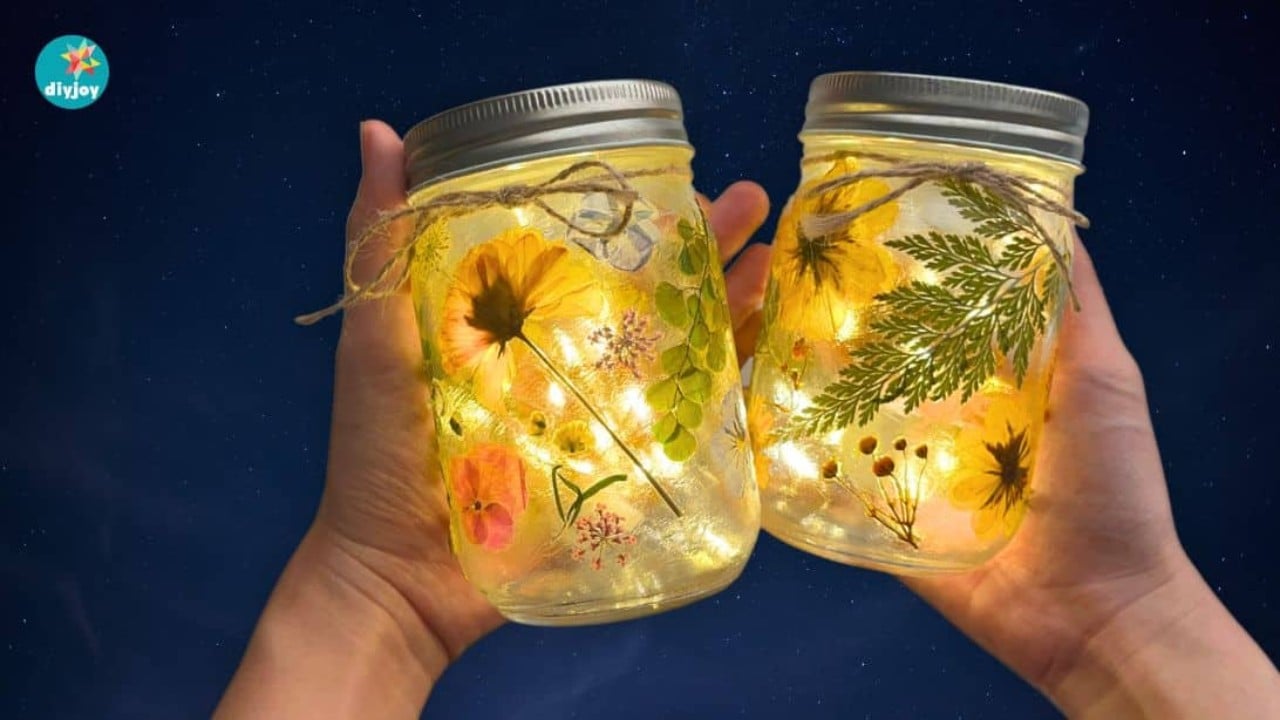
Clean the jar properly, with soap and water if it needs it, and let it dry completely, because Mod Podge over a damp surface goes cloudy. Lay your pressed flowers out first and settle on an arrangement before any glue appears. Then brush a thin layer onto the glass, place one flower at a time, press it gently and brush a thin coat over the top of it. Thin coats, repeatedly, rather than one heavy one. Fairy lights go in afterward and light the petals from behind, which is when the whole thing stops being a jar.
Get the full tutorial at DIY Joy.