Kicked over water bowls and a kibble bag slumped in the corner are not the look you’re going for. These 22 DIY pet bowls and feeding stations fix both. You’ll find raised dog feeders on pipe legs and hairpin legs, a dresser turned into a full feeding station, a pair of old chairs and a picnic basket put back to work, and bowls you can personalize in five minutes. Several hide the food inside, so dinner and storage live in one tidy spot. Raised stands are easier on big and senior dogs, and lower ones suit cats and small breeds. Measure your pet from floor to chest before you build, and keep any paint on the outside of the bowl, never where food and water sit.
1. Easy To Build DIY Dog Bowl Stand
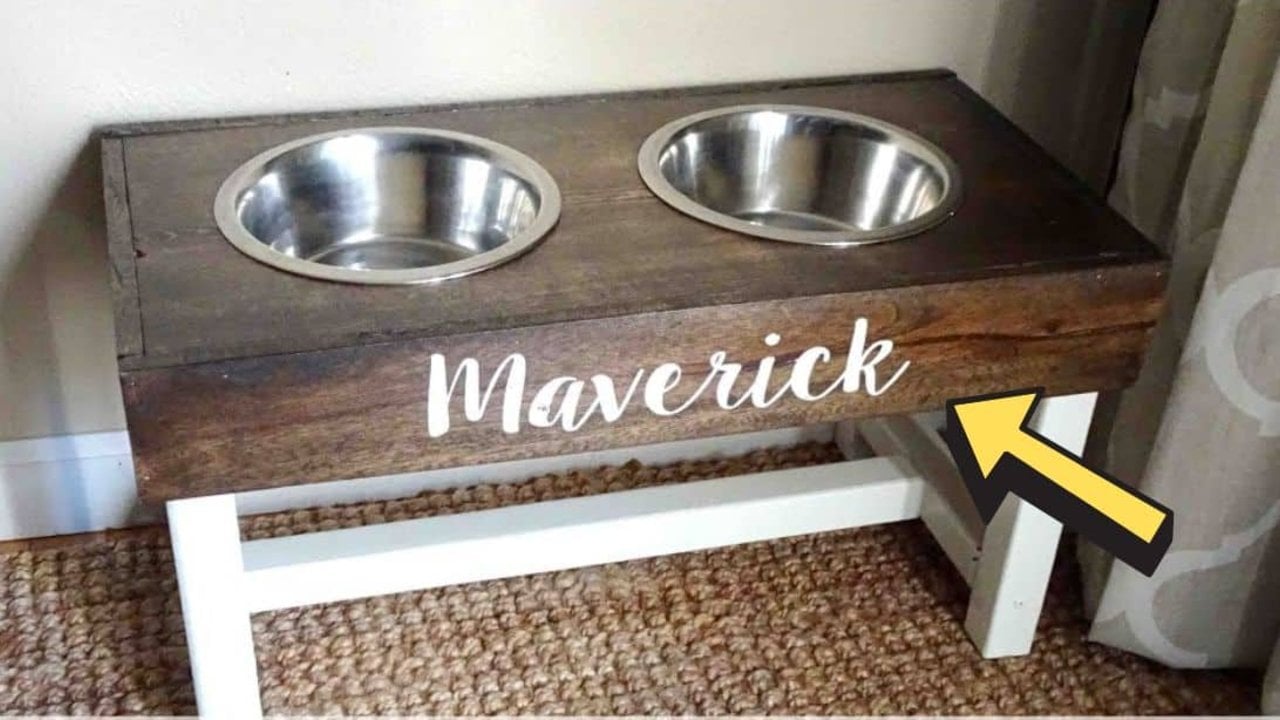
An easy to build DIY dog bowl stand uses a 1×12 board, a few pallet boards and two dollar store bowls. Set the bowls upside down on the board, trace the rims and cut the openings with a jigsaw, leaving about half an inch so the bowls catch on the lip. Frame the top with sanded pallet wood. Cut four scrap wood legs about 12 inches tall and brace them. Stain the top, tape it off, then give the legs two coats of white chalk paint and seal it all.
Get the full tutorial at DIY JOY.
2. How to Make a DIY Untippable Dog Bowl
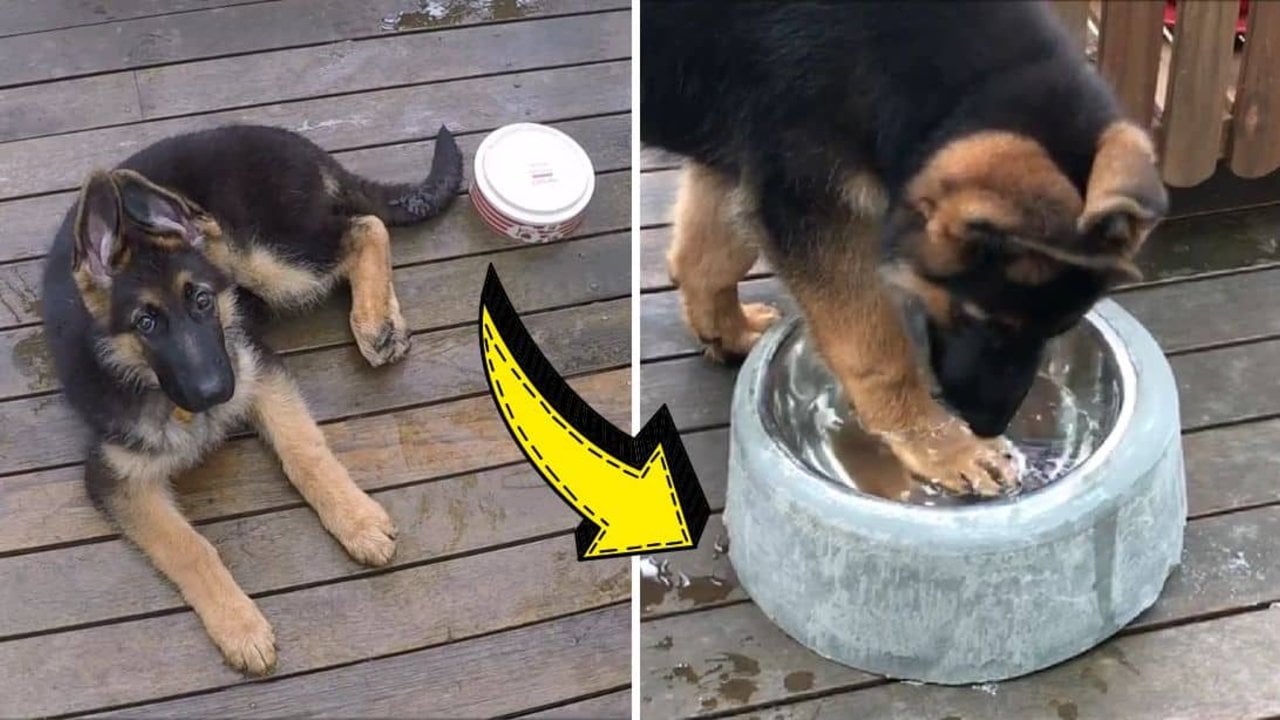
A DIY untippable dog bowl is the answer for pups who flip their water every afternoon. You’ll need a metal bowl, a bag of quick-set concrete, a flexible rubber bucket as a mold and a second bucket for mixing. Center the bowl upside down in the mold. Mix about 2 liters of water with 22 to 33 pounds of concrete and pour it over the bowl quickly, spreading it evenly. Let it set for a few hours, then flex the mold and pop it out. It costs about $5 to $10.
Get the full tutorial at DIY JOY.
3. DIY Dog Bowl Chairs

DIY dog bowl chairs give a pair of wobbly old chairs a sweet new job as a raised feeding station. Sand the seats to knock down the old finish, then trace a bowl on each seat and draw a second circle just inside it, so the bowl’s lip has something to rest on. Drill a starter hole, cut along the inner line with a jigsaw and test the fit before you put the saw away. Add word art like EAT and DRINK to the backs, stain the chairs and seal them with a spar urethane.
Get the full tutorial at The DIY Village.
4. DIY Pet Bowl Stand

A DIY pet bowl stand keeps food and water off the floor where everyone kicks them over. This one costs under $15 and is cut from two 3/4 by 8 inch boards. Fold paper the width of the board in half, sketch a gentle curve for the feet and cut it out as a template. Trace it onto both ends, cut with a jigsaw and attach the feet with a Kreg jig or L brackets. Cut bowl holes in the top, then stain or paint it. Five inches suits a grown cat.
Get the full tutorial at Centsational Style.
5. Ombre DIY Dog Feeder

An ombre DIY dog feeder dresses up an old slatted duckboard so bowls stop sliding and scratching the floor. Sand the slats smooth and clean off any grime, or skip that step if the board is new. Mix three shades: your full color for the first slat, that color lightened with white for the second, and plain white for the third. Leave the rest of the slats bare for a rustic finish. Paint a few coats on each, let it dry and finish with a craft paint sealer.
Get the full tutorial at Pretty Fluffy.
6. Vintage Coca Cola Crate Turned Dog Bowl Holder

A vintage soda crate becomes a dog bowl holder that stops a little pup from carrying off his dish. Cut 3/4 inch plywood to fit snugly inside the crate opening, here 14 by 10 inches. Measure your bowls, find the radius and mark two evenly spaced circles with a compass, keeping them close to the front for a small dog. Drill a starter hole and cut just inside the lines with a jigsaw so the lips rest on the wood. Spray paint the insert red, sand it to distress and nail it in place.
Get the full tutorial at Sew Woodsy.
7. DIY Wood Pallet Dog Feeder

A DIY wood pallet dog feeder holds three bowls side by side, which helps when more than one dog eats at once. Start with a board a little wider than your bowls. Lay the bowls upside down, evenly spaced, and trace around them with a pencil. Drill a hole inside each circle for the jigsaw blade, then cut along the lines. Build the sides and ends from broken down pallet boards, glue and nail them square and sand. White chalk paint, clear wax and dark aging cream finish it.
Get the full tutorial at Saved By Love Creations.
8. Industrial Dog Feeder Tutorial

An industrial dog feeder pairs a solid wood board with black pipe legs for an edgy, modern look. Measure your bowls, decide how many you want, and trace each outline evenly spaced on the board. Cut the board to length, then drill and jigsaw the openings just smaller than the bowl rims so they sit firm. Sand the edges and holes, then stain or paint and seal the wood. Screw metal flanges underneath and thread on pipe legs at whatever height suits your dog.
Get the full tutorial at The Charming Farmer.
9. How To Make An Elevated Dog Feeder

This elevated dog feeder holds three dishes on galvanized pipe legs. Pick metal dishes with a lip and a 1 inch thick plank, here 18 by 28 inches. Lay out the bowls and the flange spots first, then trace each bowl. Drill a starter hole in each circle and jigsaw about 1/4 to 1/2 inch inside the line so the lip rests on the wood. Sand, then finish with gel stain and water-based polyurethane. Screw on four flanges and add pipe, couplings and more flanges for feet.
Get the full tutorial at Cuteness.
10. DIY Corner Pet Food Station

A DIY corner pet food station tucks into the narrow wedge of wall beside a door, so it takes up almost no floor. Glue two 1 inch plywood project panels together overnight for a thick, modern edge. Draw an L shape about 17 inches per side and 8 inches deep, trace three bowls evenly spaced, then cut the shape with a circular saw and the bowl holes with a jigsaw. Sand, spackle the edges, sand again and paint it with tough exterior paint. Corner braces anchored to the wall hold it up.
Get the full tutorial at Yellow Brick Home.
11. DIY Pet Feeding Station Dresser Makeover
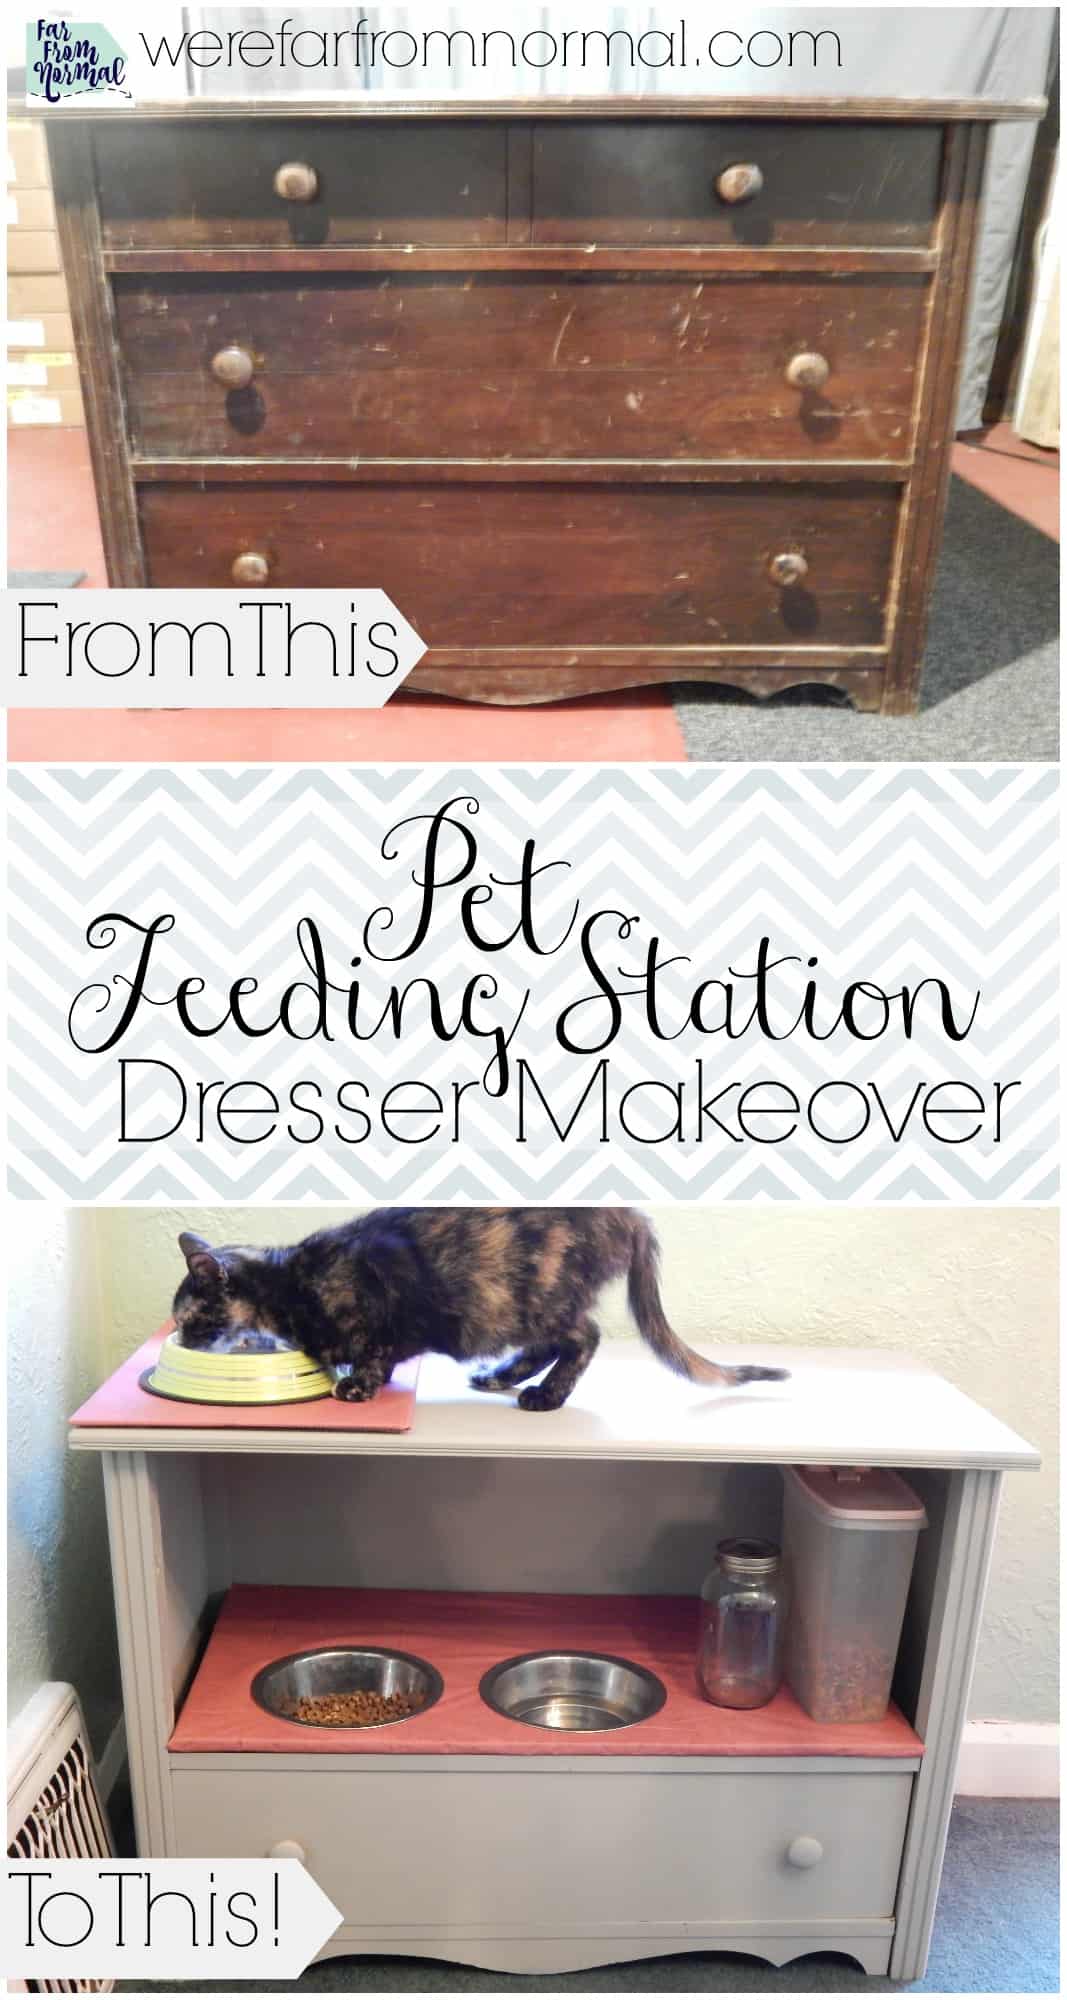
A DIY pet feeding station dresser makeover gives a tired old dresser a useful second life. Glue any loose pieces and wipe it down, then decide which drawers stay. Pull the top two drawers and their supports so your pet has headroom, and saw off any front pieces you don’t need. Cut a fresh board for the bowl shelf, trace the bowls and jigsaw the holes near the front so the drawer below still opens. Finish with chalk paint, and the bottom drawer stores the food.
Get the full tutorial at We're Far From Normal.
12. Distressed DIY Dog Feeding Station

This distressed DIY dog feeding station is built as a sturdy plywood box, and you can adjust the height for any size dog. Cut the front and back at 12 by 23 inches, two 12 inch square sides and a 12 by 21 1/2 inch top. Trace the bowls on the top and jigsaw openings that let each bowl slip in but catch its lip. Assemble with wood glue and pocket screws, with the top set just inside. Trim the top edge, stain the top, paint the base and distress it.
Get the full tutorial at Saved By Love Creations.
13. Picket Fence Dog Bowl Station

A picket fence dog bowl station puts old fence pickets to work for a tall dog who eats better with her bowls up high. Use your current bowl stand as a guide for height and width. Cut pickets for the legs, keeping the pointed tops at the bottom, and build a box frame from the salvaged pieces. Attach the legs and a center brace with wood screws. Cut a thin board for the top with a small overhang, trace the bowls, drill a starter hole and jigsaw out the circles.
Get the full tutorial at Kim Pepper Blog.
14. DIY Raised Pet Feeding Station

A DIY raised pet feeding station can be cut from a single 1×4 board in an afternoon. Measure one piece a little wider than your two bowls side by side, about 10 inches, and two shorter pieces for the legs, about 4 inches tall. Miter the ends for a waterfall look, or use straight cuts if you don’t have a miter saw. Jigsaw two holes just smaller than the bowls so they rest in place. Screw it together and finish with a dark walnut stain.
Get the full tutorial at Charleston Crafted.
15. DIY Colour Dipped Dog Bowls

DIY colour dipped dog bowls start with plain glass Pyrex dishes, a big one for water and a smaller one for food. Stretch a wide headband or thick elastic band around each dish in a straight line, and tape off the top half so no paint splashes up. Brush non-toxic glass paint over the bottom half with a foam brush, adding coats as needed. Once it’s fully dry, peel off the band and tape. Keep the paint on the outside only, and hand wash to keep the color fresh.
Get the full tutorial at Pretty Fluffy.
16. Easy DIY Personalized Dog Bowls

Easy DIY personalized dog bowls take about five minutes and a quick trip to the dollar store. Grab two stainless steel dog dishes, a pack of vinyl letters from the hardware aisle and a roll of decorative tape. Press the letters of your dog’s name across the center of each bowl, then run a line of tape above and below the name. The vinyl letters hold up to water, so the bowls last. Set them on a washable bowl mat to catch the dribbles.
Get the full tutorial at Must Have Mom.
17. Large Dog Food Station

A large dog food station is built for big breeds, with bowls at the right height and a deep drawer underneath. The drawer fits a 10 gallon storage tote, and its lid keeps the food fresh. Cover the top in water-resistant marble contact paper so spills wipe right off. Screw small plastic feet to the bottom to lift it off the floor in case of a spill and to help the drawer slide. Free downloadable plans come in a large size and a smaller version for little pets.
Get the full tutorial at The House of Wood.
18. A Personalized Dog Food Tray

A personalized dog food tray keeps a messy eater’s crumbs and water drips in one easy to clean spot. Start with a wooden, wipeable serving tray. Cut vinyl words with a cutting machine to mark each side, like “hungry” under the food bowl and “thirsty” under the water bowl, and press them onto the tray. The labels also help everyone in the house fill the right bowl. Set the bowls in place, and the tray lifts off the floor for a quick wipe after dinner.
Get the full tutorial at Dukes and Duchesses.
19. Picnic Basket Food Bowl Holder

A picnic basket food bowl holder lifts dinner off the floor for an older dog and stores the kibble inside. Start with a lidded picnic basket from a thrift or consignment shop. Pick two containers that hold food and water, trace them on a cardboard template shaped like the lid, then transfer the outlines. Drill a hole at the corner of each shape for the jigsaw blade and cut them out. Line the basket with a canvas bag of dog food, and seal the lid with polyurethane.
Get the full tutorial at Sew Many Ways.
20. The New & Improved Pet Station

The new and improved pet station turns an antique cabinet into a bed and dining room for a cat. The bowls sit in a cubby at the bottom, and a cushion on the shelf above makes a cozy nap spot. To refresh one, pull the drawer and bowls and remove the hardware. Spot sand with 220 grit, prime and paint. Sand the edges so the old color peeks through, then rub on an antiquing glaze and wipe it back. Keep the interior a crisp white for contrast.
Get the full tutorial at Addicted 2 Decorating.
21. Elevated Pet Food Station

This elevated pet food station is made from a single leftover wall stud, so it’s a great way to use up scraps. Cut the stud into three 22 inch pieces and join them side by side with a pocket hole jig and long screws to make one solid tray. Trace your bowls, cut just inside the lines with a jigsaw so the lips rest on top, then sand away any splinters. Tape off the top, paint the edges a bright yellow and seal it with two coats of a water based clear finish. Screw on hairpin legs.
Get the full tutorial at Yellow Brick Home.
22. DIY Mid Century Dog Bowl Stand

A DIY mid century dog bowl stand holds one big water bowl on three tapered legs and takes about an hour plus drying time. Jigsaw a hole in the center of a 12 inch round board, sized to the bowl minus its rim, about an inch smaller overall. The bowl hides the cut edge, so the circle doesn’t need to be perfect. Sand, then space three angled leg plates evenly underneath and drill pilot holes. Stain, seal with polyurethane and screw in the 8 inch tapered legs.
Get the full tutorial at Sarah Hearts.