A kitchen that looks great but hides the measuring cups is still a messy kitchen, and these 34 DIY kitchen organizing ideas fix the parts nobody photographs. Kitchen organizing simply means giving every pot, lid, spice and leftover container a home you can reach in one move. Most of the projects here cost less than takeout: dollar store baskets in the fridge, cooling racks bent into spice shelves, or an old ladder hung as a pot rack. Others are a weekend job, like plywood dividers in a deep drawer. Start with the spot that makes you sigh every time you open it, because fixing one drawer is how the whole kitchen gets done. For more ideas, browse the organizing ideas hub or these dollar store kitchen organizing ideas.
1. Flea Market Basket To Store Utensils

A thrifted basket makes a better utensil crock than most store bought ones. This idea comes from a bright kitchen home tour, where a woven flea market find holds the everyday wooden spoons, whisks and spatulas within reach of the stove. Flea markets and thrift stores are a great hunting ground for little accents and useful storage pieces like this, and a basket brings warm texture to a white kitchen. Look for a sturdy base and tall sides so long handles stay upright.
Get the full tutorial at A Beautiful Mess.
2. Storage For Little Upper Cabinets

Those short cabinets over the sink usually end up empty or stuffed with forgotten clutter. Medium woven plastic baskets from Target slide into the cubbies and turn them into the most useful nook in the kitchen. One basket corrals sippy cups and snack cups with their lids. Two more split food storage containers from their lids, so stacks stop toppling every time one gets pulled out, and the last basket keeps spices together. Measure the cubby before you shop, since basket colors change every season but the size is what matters.
Get the full tutorial at The Homes I Have Made.
3. Vintage Coca-Cola Crate Spice Rack

A vintage Coca-Cola crate already has 24 perfect little cubbies, so it becomes a spice rack with almost no work. Vacuum out the dust, then hang it by the metal strip on the back using two extra large picture hangers, each rated for around 75 pounds. Use a level before you nail the hooks in, without the crate on them. Matching spice jars with round printed labels make it look tidy, and a few pretty jars set on top hide the hangers. These crates turn up at flea markets, antique malls and online.
Get the full tutorial at BROhaha.
4. Organize Cookie Cutters In A Jar

A big glass jar is the easiest home for cookie cutters, which never stack and always tangle in a drawer. This tip comes from a ten step pantry organizing guide that uses a 2 gallon glass jar for the whole collection. A chalkboard label is not strictly necessary, since you can see right through the glass, but it makes the jar look finished and can be rewritten later. The same guide pairs jars with woven baskets for snacks, airtight pour lid containers for flour and sugar and risers for canned goods.
Get the full tutorial at Design Improvised.
5. Incredible Organizing Tips For The Kitchen

Plastic food storage containers are the cabinet everyone slams shut, and this DIY JOY feature is about exactly that kind of mess. It rounds up a home organizer’s ideas for the kitchen spots that go wrong behind cabinet doors, from the food storage avalanche to the pantry. The pictured setup shows the goal: a cutlery drawer with wood dividers, cabinets with room to breathe and spices lined up in a shallow pullout drawer, so every jar label is visible at a glance.
Get the full tutorial at DIY JOY.
6. Stainless Kitchen Cart

A stainless steel serving cart can take all the bottles, appliances and cookbooks off your countertop. This one is the IKEA Flytta cart, parked in the kitchen with a stand mixer and oil bottles on top, Dutch ovens on the middle shelf and a row of cookbooks below. Clear work surfaces are the whole point. Casters let it roll out as an extra prep station or tuck against a wall. A small basket on top keeps salt, pepper and little tools from wandering, and the steel wipes clean in seconds.
Get the full tutorial at Mary made this.
7. Painted Mason Jar Utensil Holder

Painted mason jar utensil holders take less than an hour. Pour white acrylic paint into a clean, dry jar (or spray the inside), roll it around until every bit of glass is coated, then flip it upside down on cardboard to drain. Tip it up before the rim sticks and let it dry for a few hours. A coat of clear shellac inside keeps the paint from chipping. Cut labels from black vinyl with a cutting machine or a craft knife, then add doodles with a white paint pen.
Get the full tutorial at DIY Projects.
8. Simple Way To Store Cutting Boards

Cutting board storage on a cabinet door costs about $2. Pick up a wire foil and plastic wrap organizer and a pack of zip ties at the dollar store. Screw the organizer to the inside of a lower cabinet door, low enough that the tallest board fits and with clearance for whatever sits on the shelves when the door closes. The bottom slats are open, so weave a few zip ties across them and trim the ends to keep boards from sliding through. Boards slip in and out without toppling the pots.
Get the full tutorial at That's What {Che} Said…
9. Dollar Store Refrigerator Makeover

A dollar store refrigerator makeover can cost about $6. Six Dollar Tree baskets in two sizes and two colors turned a standard, no frills fridge into a zoned system. On the bottom shelf, one basket holds everything for packed sandwiches (deli meat, sliced cheese and condiments), one holds vegetables and one holds salsa and hot sauce. The middle shelf gets a cheese basket, a salad dressing and condiment basket and a meal helper basket. Chalkboard labels are the next step. Measure your shelves before buying so the bins slide straight in.
Get the full tutorial at The Domestic Geek Blog.
10. Divide A Deep Drawer

Plywood dividers turn a deep drawer into a file for pots, pans and lids. Remove the drawer, sand it with 120 or 180 grit and prime and paint it. Cut four strips of dentil molding for the top and bottom of the drawer sides and glue them with Titebond, lining every strip up so the slots run parallel. Clamp the top strips and wedge the bottom ones while they dry. Cut 1/4 inch plywood panels to fit, paint them and add a few coats of polyurethane against chipping, then slide them in.
Get the full tutorial at Seeded At The Table.
11. Lazy Susan for Organizing Kitchen Stuff

A lazy Susan on the top shelf of the fridge ends the hunt for the open jar of jam. One quick spin shows every condiment, so no more buying duplicates because the old one was hiding at the back. The same trick works in a cabinet for tall unopened bottles and jars, where step risers are too short, and a large one under the sink keeps cleaning supplies in reach. Measure the shelf depth before buying, since the turntable needs to spin without hitting the door bins.
Get the full tutorial at 'A Casarella.
12. Canned Food Organization

Dollar store wire baskets make a simple canned food organizer. Take a large can and a small can to the store to test the fit, since that is the whole trick. Sort cans into baskets by type, so soups, vegetables and beans each get their own row, then add printed labels so you can see what is on hand at a glance. Baskets slide out like drawers, which makes it easy to rotate older cans to the front. Stocking up during sales gets a lot less chaotic.
Get the full tutorial at My Uncommon Slice of Suburbia.
13. Easy $1 DIY Spice Racks

These easy $1 DIY spice racks start as Dollar Tree cookie cooling racks. Bend the little legs flat, then use needle nose pliers to bend one side up at the fourth wire, skip a wire and bend the other side up to form a narrow shelf. Skip two wires for bigger jars. Hot glue woven ribbon on as side rails. Hang each rack on a pantry door from large head screws, hooking the bent legs over them, then tighten the screws so nothing rattles. A couple of welds may pop, but they still hold fine.
Get the full tutorial at The Stonybrook House.
14. Kitchen Organization Inside The Cabinet Doors

The inside of a cabinet door is free storage. In this food cabinet, the left door gets geometric contact paper on its inset panel, trimmed with a straight edge, then two fit to size wood spice racks made for under $8 and a half round strip of trim with screw-in hooks for utensils. Both attach with a strong two part epoxy, held in place for three to five minutes. The right door gets a decorative magnetic metal sheet glued on with spray adhesive, perfect for grocery lists and notes.
Get the full tutorial at Jenna Burger Design.
15. Hanging Ladder Pot Rack

A hanging ladder pot rack gives new cookware a home instead of a nested stack. Hunt for an old round rung ladder at antique and thrift shops (this one was $38). Sand the rough spots, spray it white, then mist on a thin coat of lime green so a little white peeks through, and sand the edges for a distressed look. Screw two 1×4 boards to the ceiling joists for support, add four hook eye bolts and hang the ladder on rope. S hooks on the rungs hold the pans.
Get the full tutorial at Fab from Drab.
16. Dollar Store Spice Cupboard

A dollar store spice cupboard makeover costs about $9. Small glass spice jars came 3 for $1, so 18 extra jars were $6. Spray paint the lids silver with three light coats, painting only the outside, then decant bulk spices and herbs into the jars. Kraft labels with shaped edges finish the look for about $3. A plastic tiered riser lets you read every label on the back rows, so the mismatched jumble of bottles becomes a neat little display every time the cupboard opens.
Get the full tutorial at The Social Home.
17. Use Nifty Rails To Hang Pots And Pans

Two wall rails can hold a small kitchen’s whole collection of pots and pans. This setup reuses IKEA Grundtal rails in a tight apartment corner by the stove. Hold the rails up first to check that the corner does not feel cramped. Mount the top rail as high as you can still reach comfortably, with deeper pots on top and pans below so nothing is in the way when you cook. A rail like this spreads the weight, but ask a hardware store for the right drywall anchors for your load.
Get the full tutorial at The Order Obsessed.
18. Refrigerator Organization

Refrigerator organization works best right before grocery day, when the shelves are nearly empty. Clear the counters, take everything out and wash the shelves and drawers, adjusting shelf heights as you go. Clearance bins and Dollar Spot baskets kept the total around $13.50. Sort food into zones like Mexicano, Snacky, Cheesy, Dairy, Meaty, Fruity, Veggie, Buttery and Bakery, and save the top shelf for leftovers so they get eaten. Let the fridge get cold again, then add vinyl or printed labels so everyone knows the system.
Get the full tutorial at Polished Habitat.
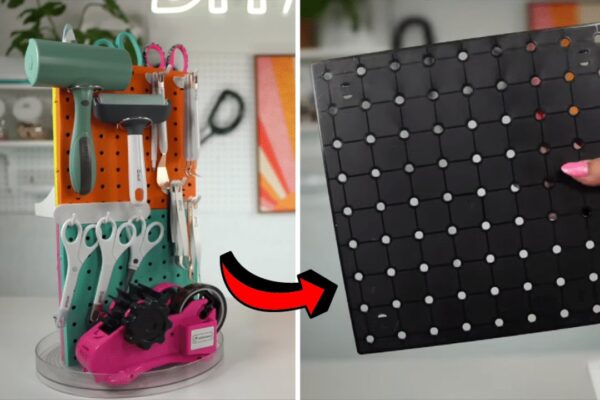
19. Pegboard Pantry Organizer
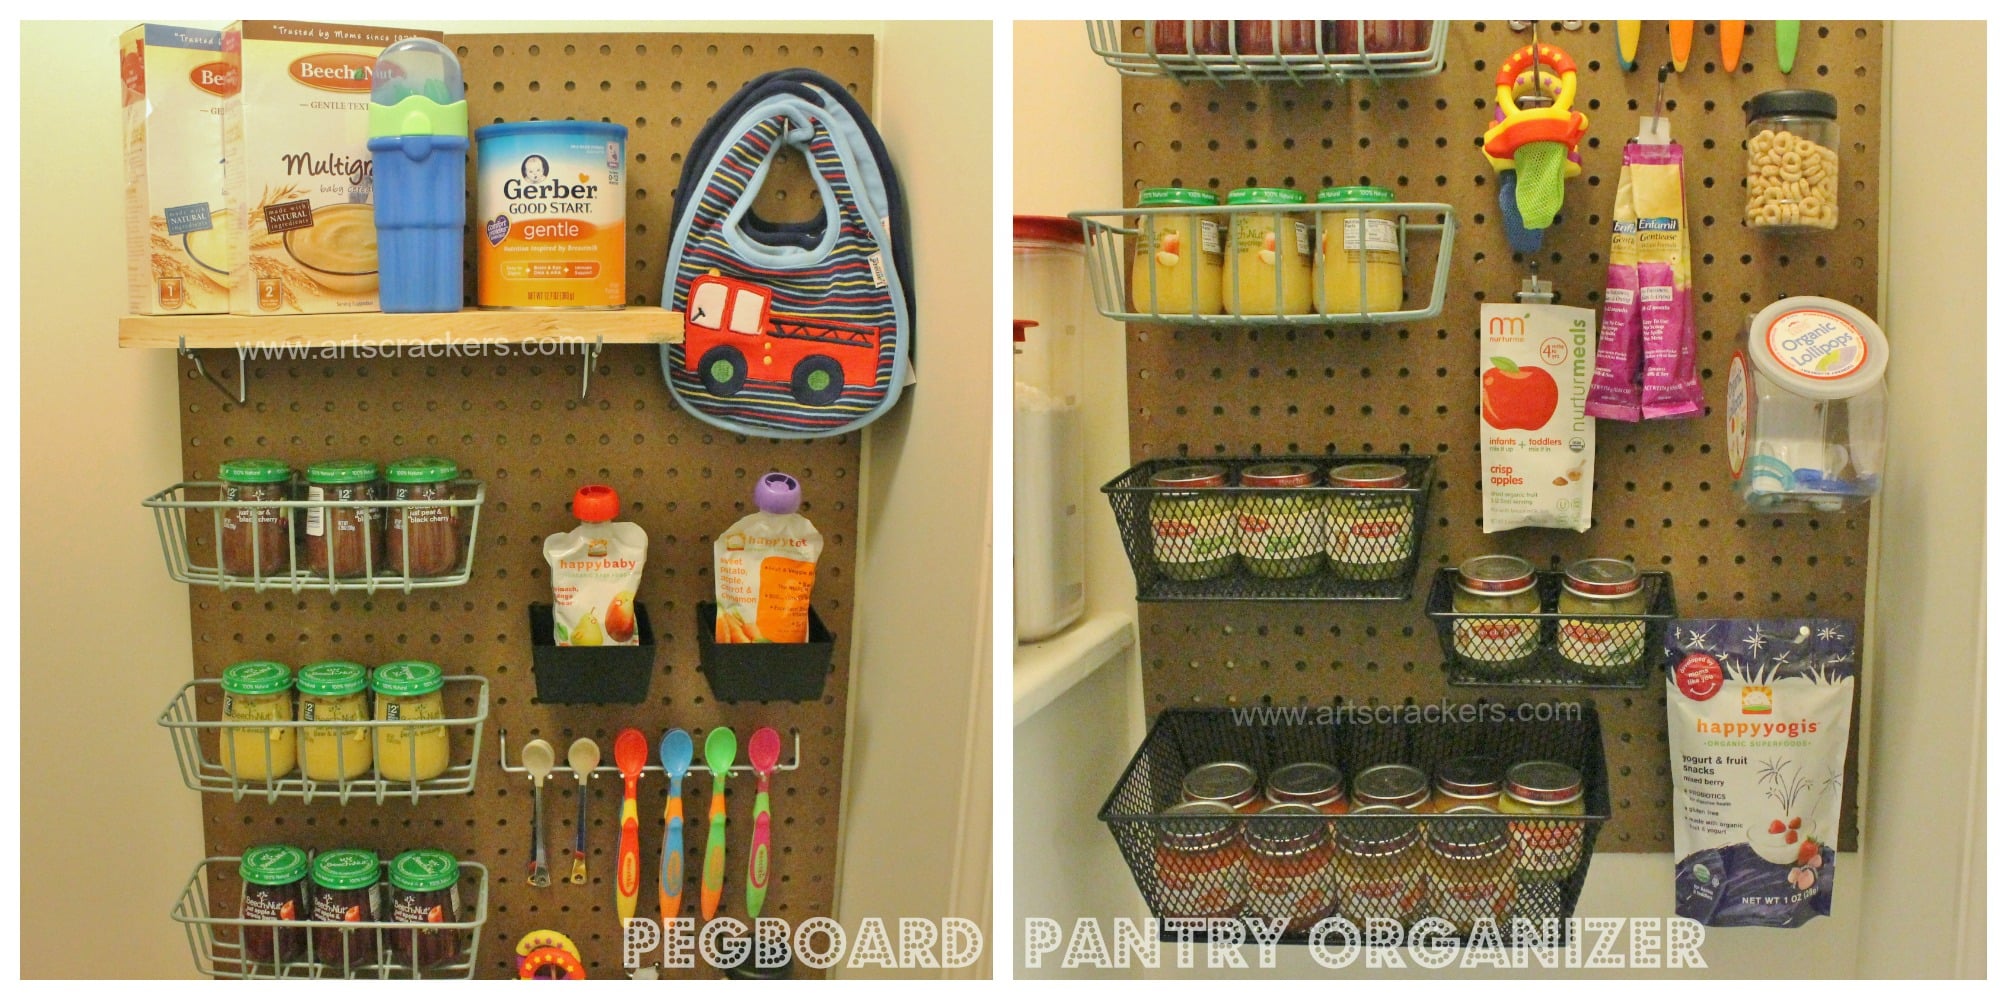
Is your pantry floor turning into a storage zone? A piece of 1/4 inch pegboard hung on the pantry wall turns empty space into shelves, baskets and hooks. Mark and level it, drill holes and tap in wall anchors, then add nylon spacers behind the board so the pegboard hooks have room to hang. Wire baskets hold small jars, hooks hold spoons and bibs, and little shelves hold boxes. It works just as well for spices, baking mixes, oils and hot pads. Cut the board to fit if needed!
Get the full tutorial at Arts and Crackers.
20. Rolling Wood Crate for Pantry Floor
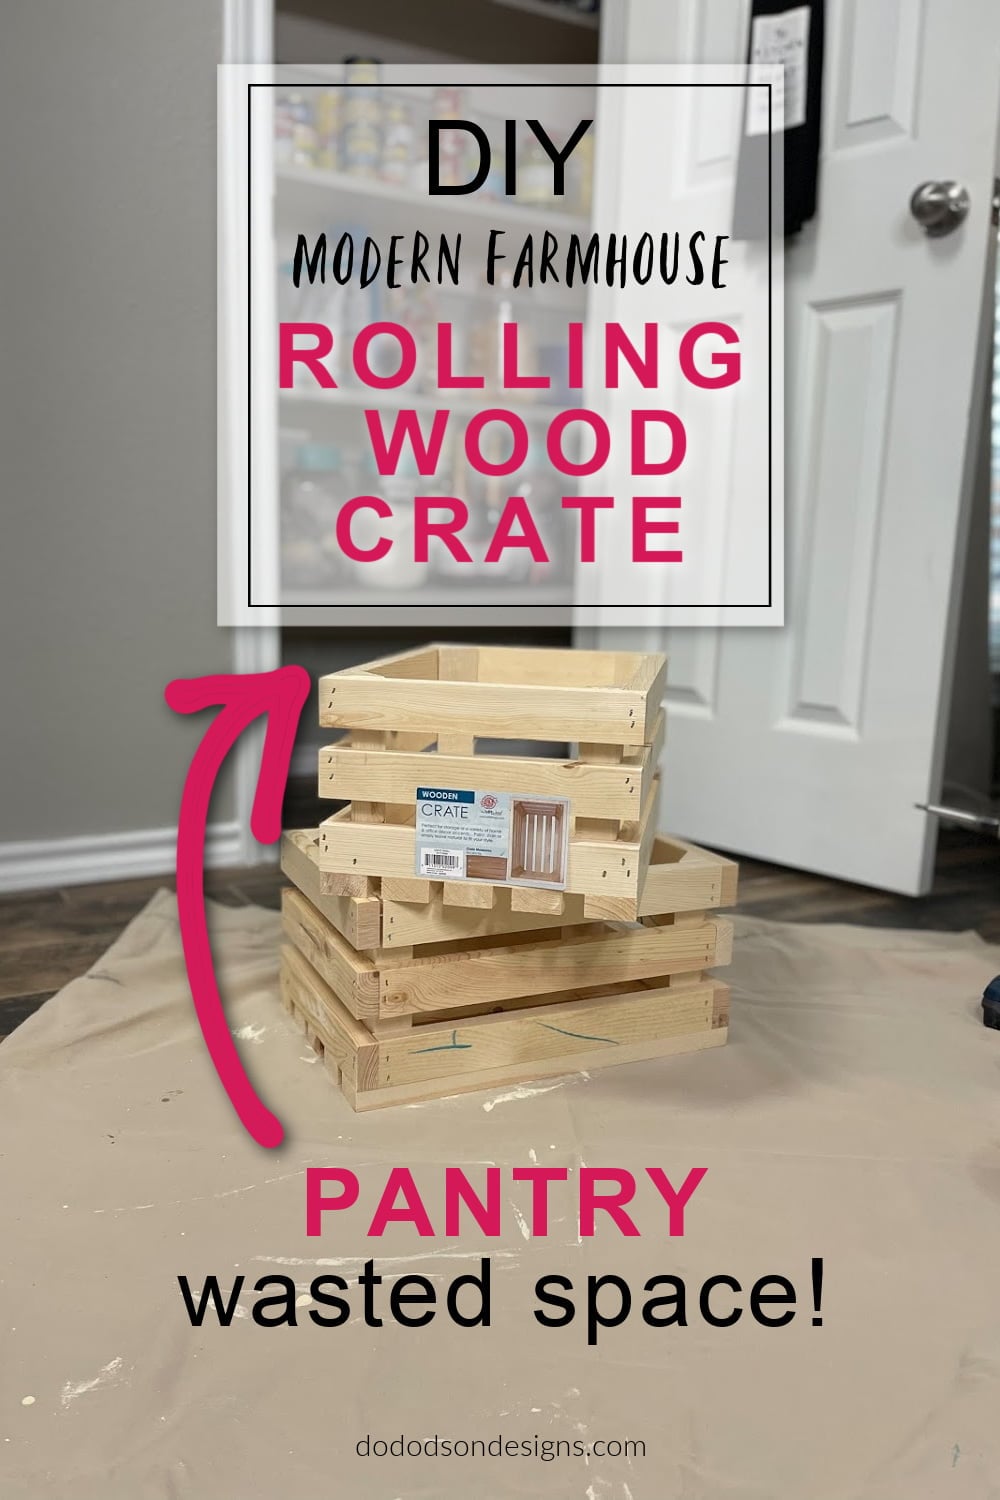
Got wasted space on the pantry floor under the bottom shelf? Unfinished wood crates from the craft aisle, about $8.63 each, become rolling bins for veggies, snacks and extra cans. Sand them with a 220 grit pad, brush on Picklin’ White gel stain and wipe it back, no topcoat needed. Tiny swivel casters on the bottom add very little height, so they still slide under the shelf. A cabinet pull on the front makes them easy to grab. Measure before you shop!
Get the full tutorial at Do Dodson Designs.
21. Painted Crate Cabinet Organizer
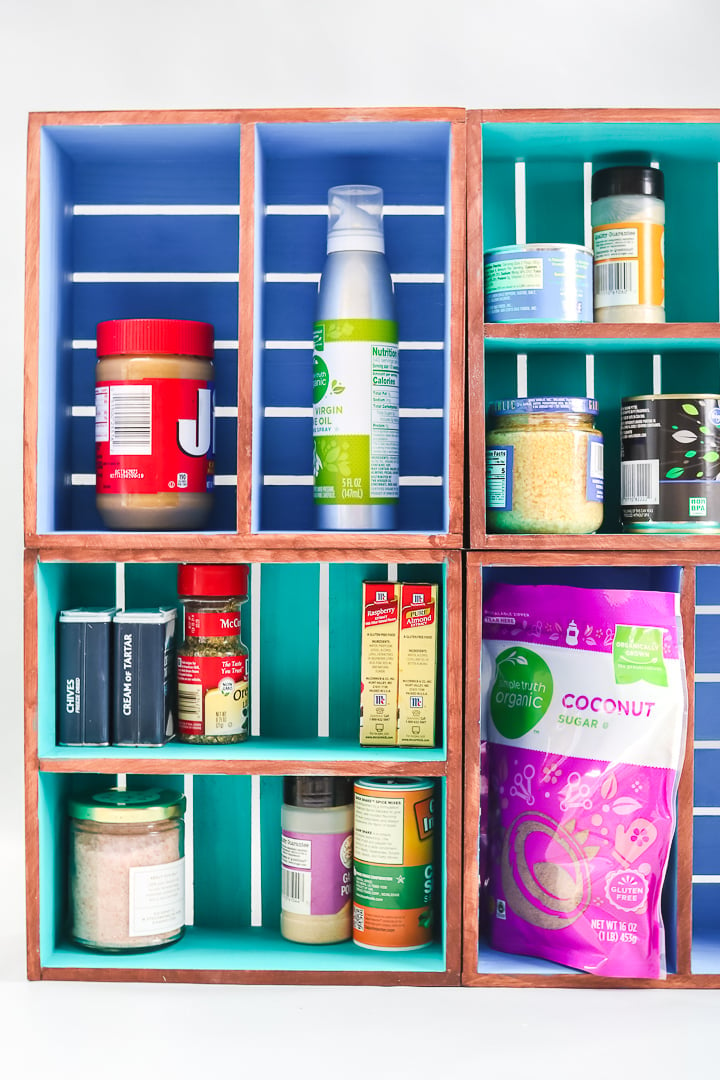
Want your cabinets to look organized every time you open the door? Divided wood crates become a stackable cabinet organizer in about 30 minutes. Stain the outsides, let them dry, then paint the insides in a bright craft paint color. Stack them, or glue them together for one bigger unit. They hold cans, peanut butter, sprays and baking supplies in neat little cubbies, and any crate that fits your cabinet works. Crates without dividers? Add some with thin wood boards!
Get the full tutorial at Angie Holden The Country Chic Cottage.
22. Side of Fridge Mug Rack
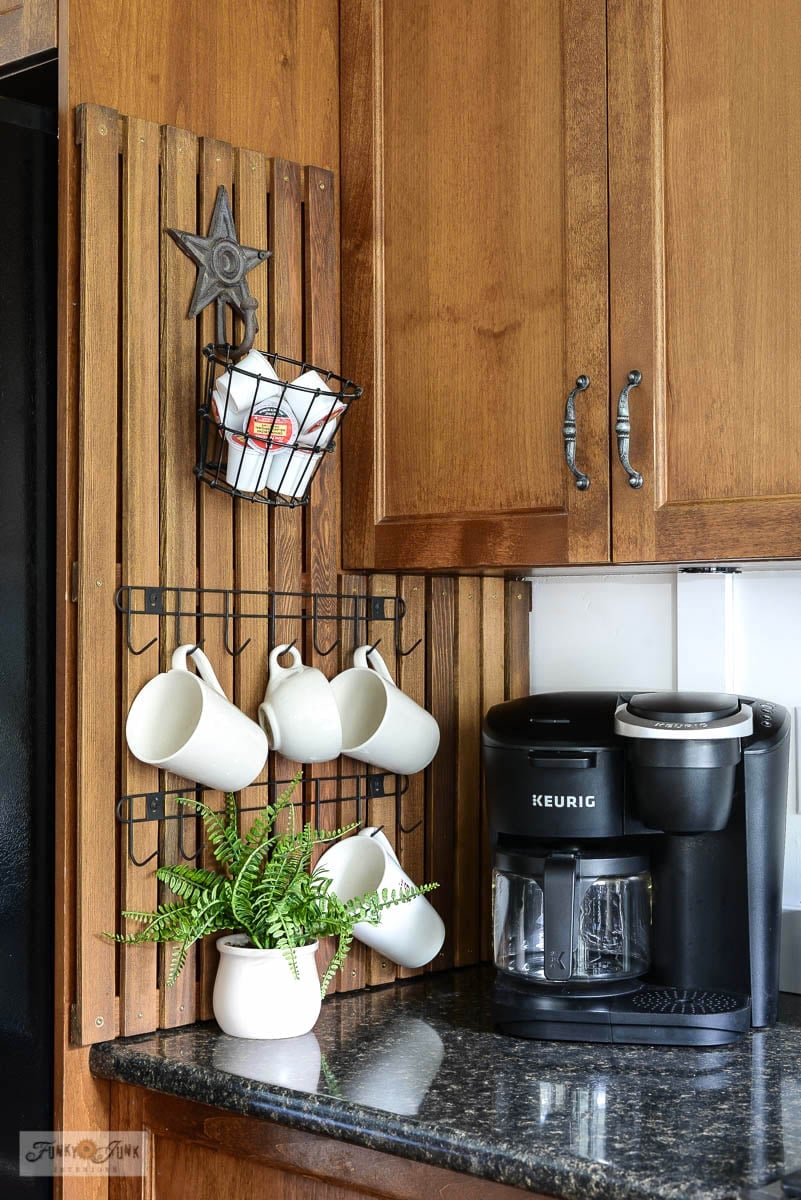
Is there a bare side panel next to your fridge? This rack turns it into mug storage! An L shaped frame of 1.5 inch cedar strips, stained in Golden Pine, attaches with heavy duty sticky Velcro, and the shallow boards still let the cabinet door beside it open. A row of dollar store hooks spray painted black holds the coffee mugs, while a small mesh basket and a rustic star hook add more spots for pods, towels or keys. It costs very little and looks original to the kitchen.
Get the full tutorial at Funky Junk Interiors.
23. Cardboard Silverware Drawer Organizer
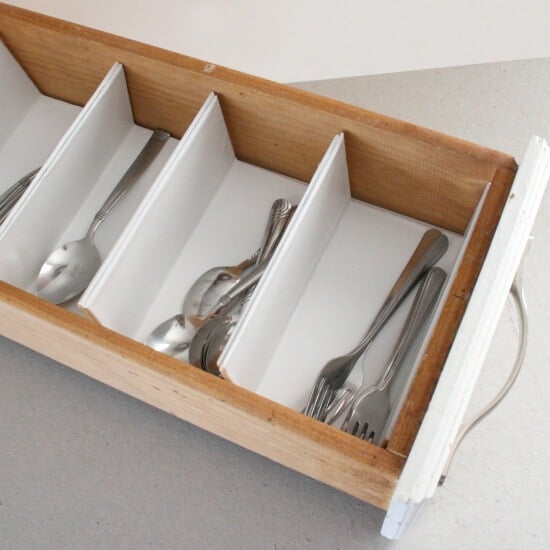
Can’t find a store bought organizer that fits your drawer? Make one from cardboard! Cut a base to fit the drawer, then build each divider as a scored U shaped section about 2.5 inches tall so it doesn’t block the back. Cover every piece in contact paper so wet silverware won’t ruin it, wrap the edges and hot glue the sections together. Foam mounting tape holds it in place. Measure carefully and leave about an inch of wiggle room. It costs almost nothing!
Get the full tutorial at Dream a Little Bigger.
24. Under Sink Trash Pull Out
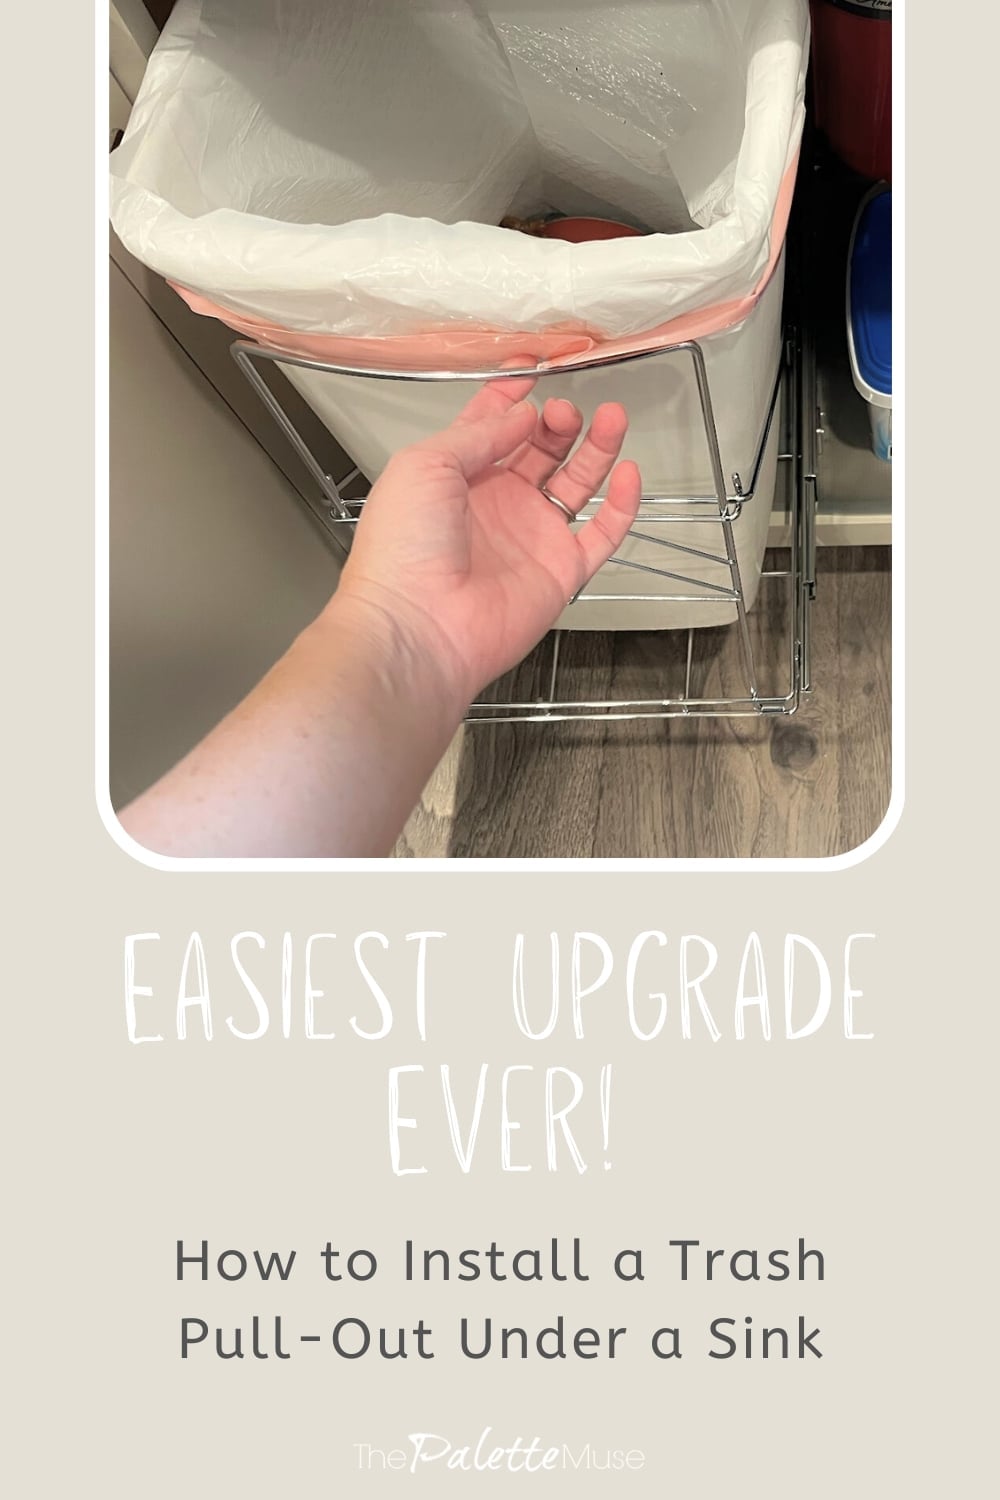
Tired of dragging the trash can out from under the sink? A pull out trash insert is easier to install than you’d think. The key is measuring around the plumbing: width from the cabinet frame to the disposal, the full opening height and depth to the pipes at the back. Order from somewhere with easy returns in case it doesn’t fit. Then mark, pre drill and secure the unit with four screws on the bottom. It slides out smoothly and saves the cabinet frame from wear!
Get the full tutorial at The Palette Muse.
25. Wood Drawer Dividers
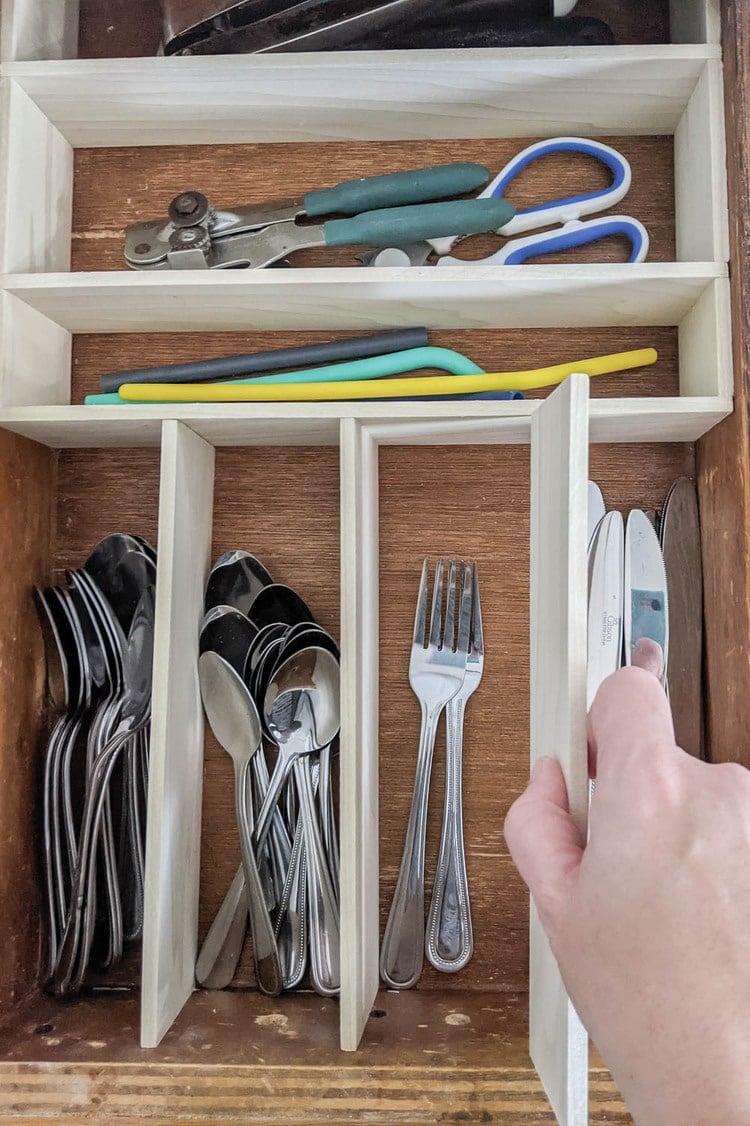
Do your store bought drawer bins just rearrange the mess? These wood drawer dividers are made from 1/4 inch by 3 inch boards and custom fit any drawer. Empty and clean the drawer, set everything back where you want it, then plan the layout with a quick sketch or washi tape. Cut the boards with any saw and glue them together. They lift right out for cleaning, and each drawer used about one and a half 4 foot boards. Great for the junk drawer too!
Get the full tutorial at Lovely Etc.
26. IKEA Canned Goods Cabinets
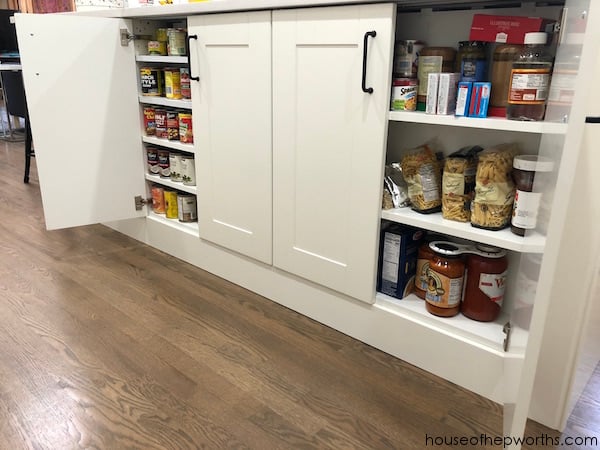
Ever wish your island hid a secret pantry? These shallow cabinets are just 7 inches deep, perfect for canned goods, spaghetti sauce jars and pasta boxes. They start as 15 inch deep IKEA base cabinets, cut down on a table saw before assembly, with the back panel nailed on and the shelves screwed in at fixed heights sized to real cans. Closed, they look like regular doors. Open them and everything is one row deep, so nothing gets lost in the back!
Get the full tutorial at House of Hepworths.
27. Pantry Door Spice Rack
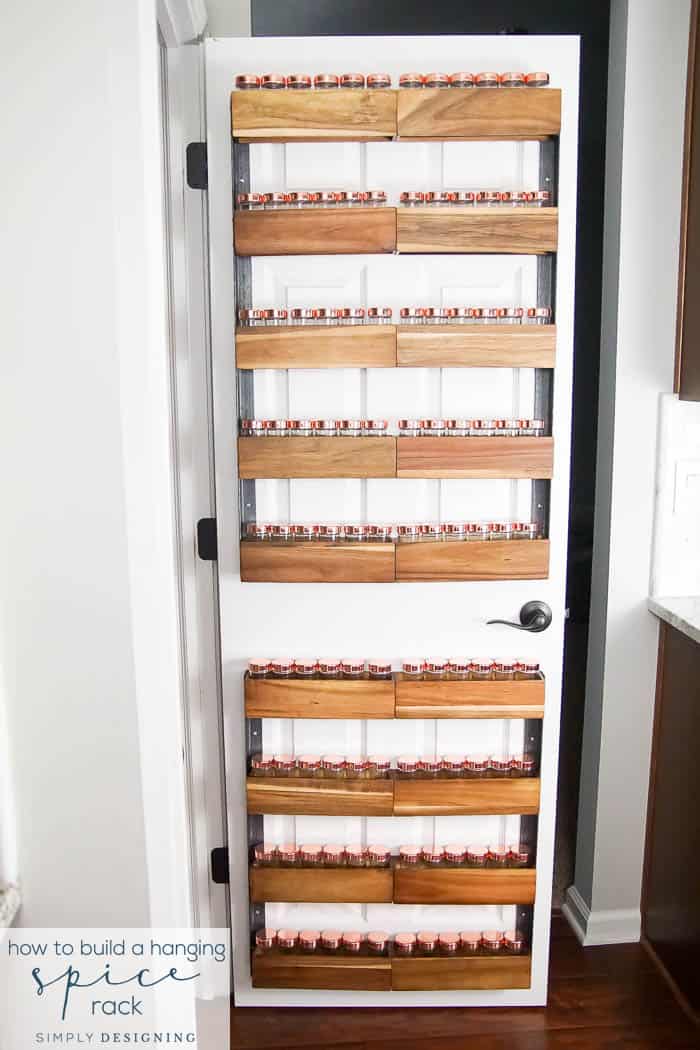
Need room for more spices? This rack holds 108 jars on the back of a pantry door! Rows of small wooden spice racks mount on 36 inch angle iron, with threaded inserts and machine screws, then hollow door anchors fasten everything to the door. The angle iron cuts on a miter saw with a metal cut off blade. Nothing wobbles or falls when the door opens and closes, and the spices take up zero shelf or cabinet space. A great fix for a wobbly over the door wire rack!
Get the full tutorial at Simply Designing with Ashley.
28. Removable Utensil Drawer Organizer
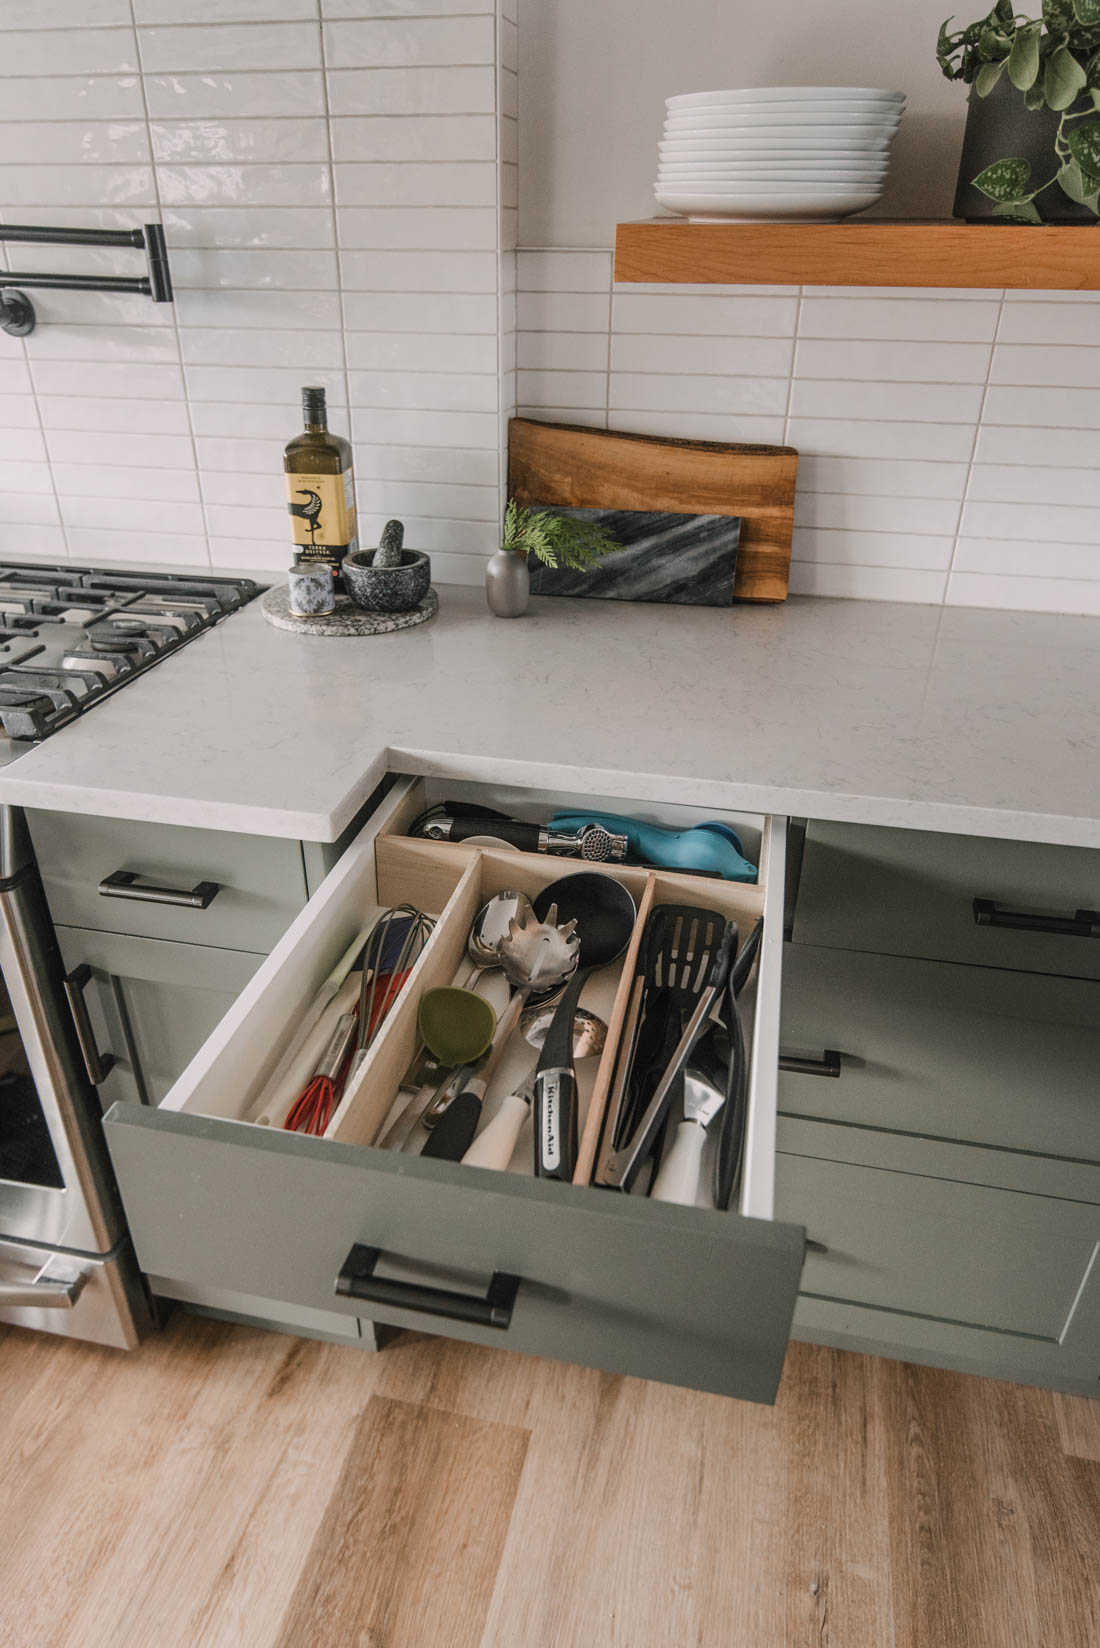
Renting, or just hate permanent fixes? This drawer organizer goes in with no glue, screws or nails. Buy a 3 or 4 foot hobby board the same width as your drawer height, then cut a front piece, the dividers and short supports with a hand saw or miter saw. The tension fit holds it in place. The clever part is those little rubber cabinet door bumpers: stick them on the ends of any loose pieces and they grip the drawer tight. No perfect cuts needed!
Get the full tutorial at Lemon Thistle.
29. Repurposed Chair Back Kitchen Rack
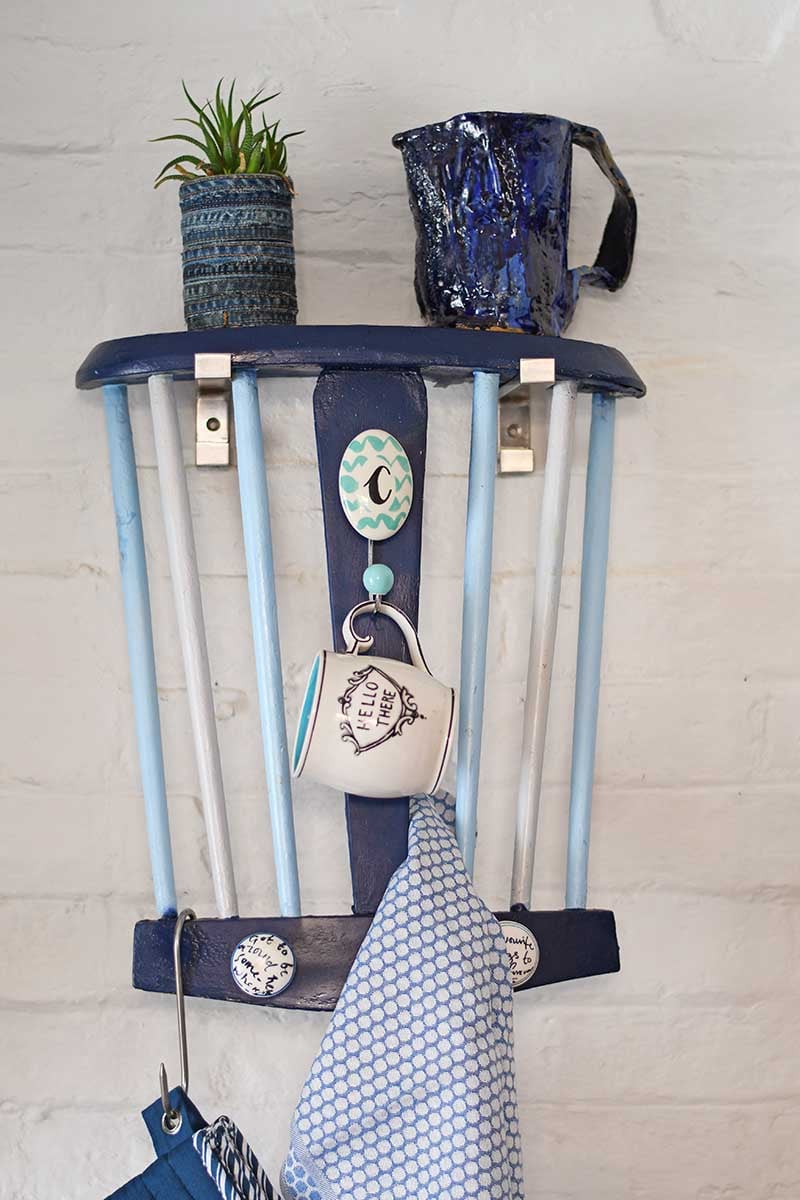
Got a wooden chair with a broken leg? Don’t toss it! Cut off the legs, mark a line across the seat about 6 inches from the back and saw along it, and the chair back becomes a little wall shelf. Spray paint the spindles in different shades of blue, add ceramic hooks and knobs, then hang it on the wall with two shelf brackets. The seat holds a plant or a pitcher, and the hooks hold tea towels and mugs. Ask friends for a broken chair, it’s usually free!
Get the full tutorial at Pillar Box Blue.
30. DIY Kitchen Wall Cubbies
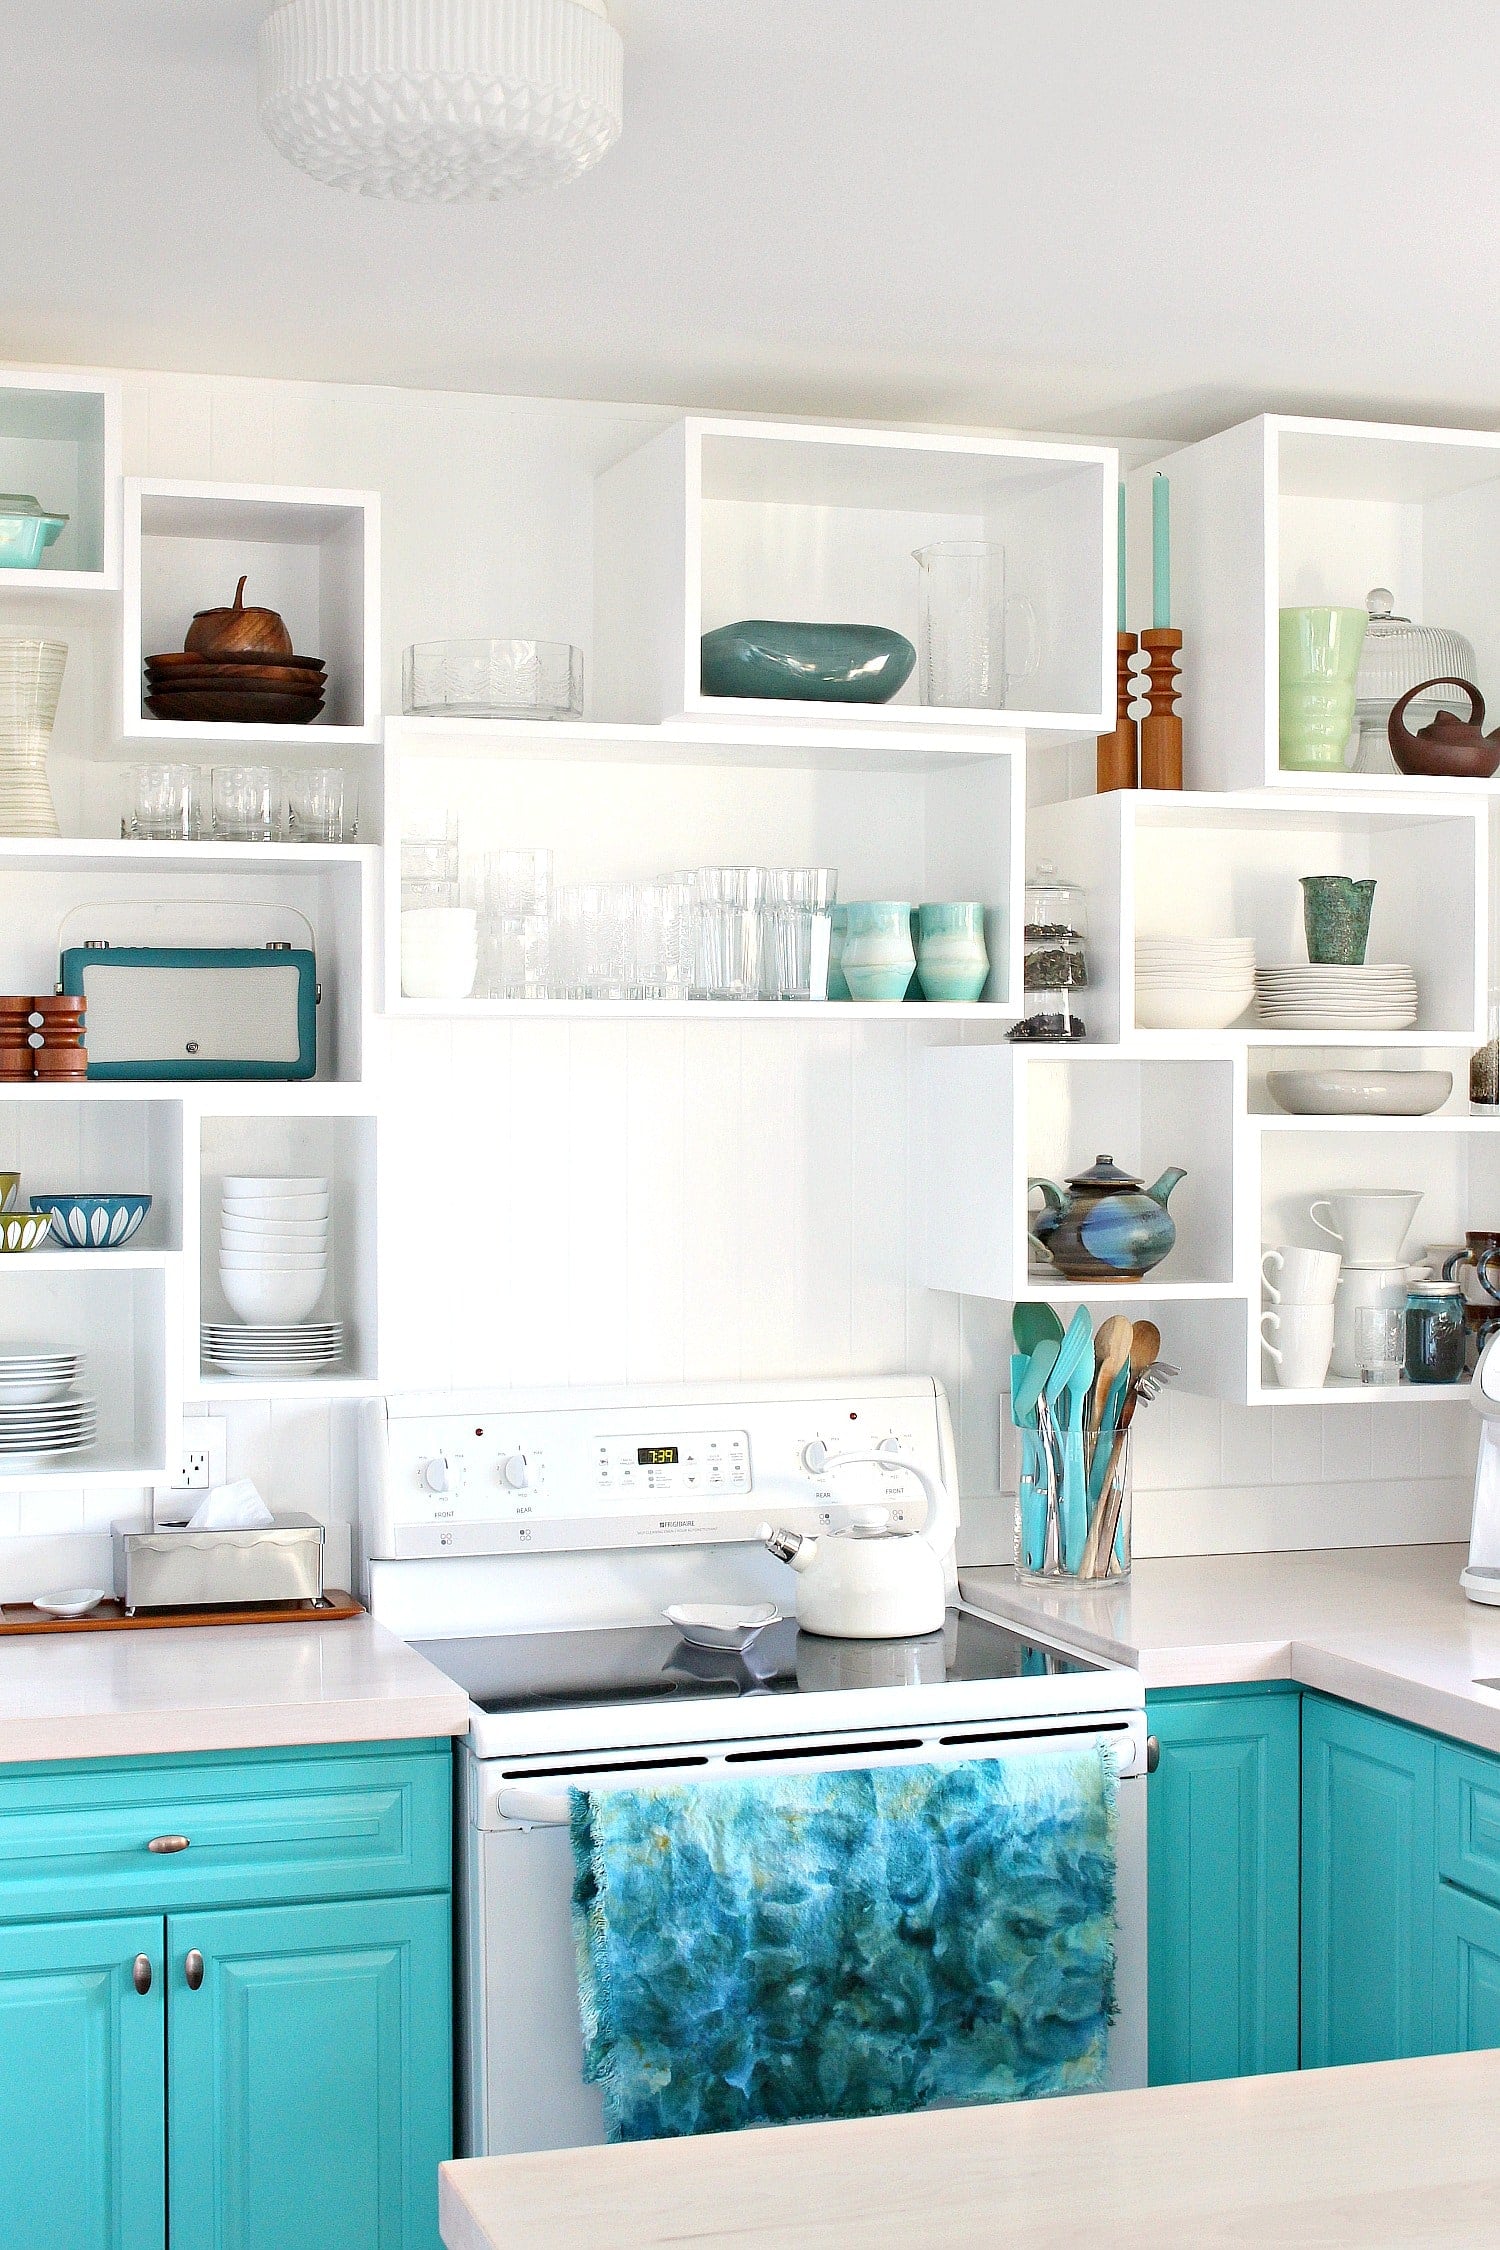
Want open shelving with a little more personality? These wall cubbies are simple wood boxes in different sizes, built from laminated pine shelving with plywood backs, butt jointed, glued and nailed. Paint the wall first, then plan the layout with painter’s tape so you can see it to scale. Size the boxes for your plates, bowls, mugs and teapot. Each cubby screws into a stud and two drywall anchors, and it’s a two person job until the first row is up. Check code clearance above the stove!
Get the full tutorial at Dans le Lakehouse.
31. Skewer Knife Block
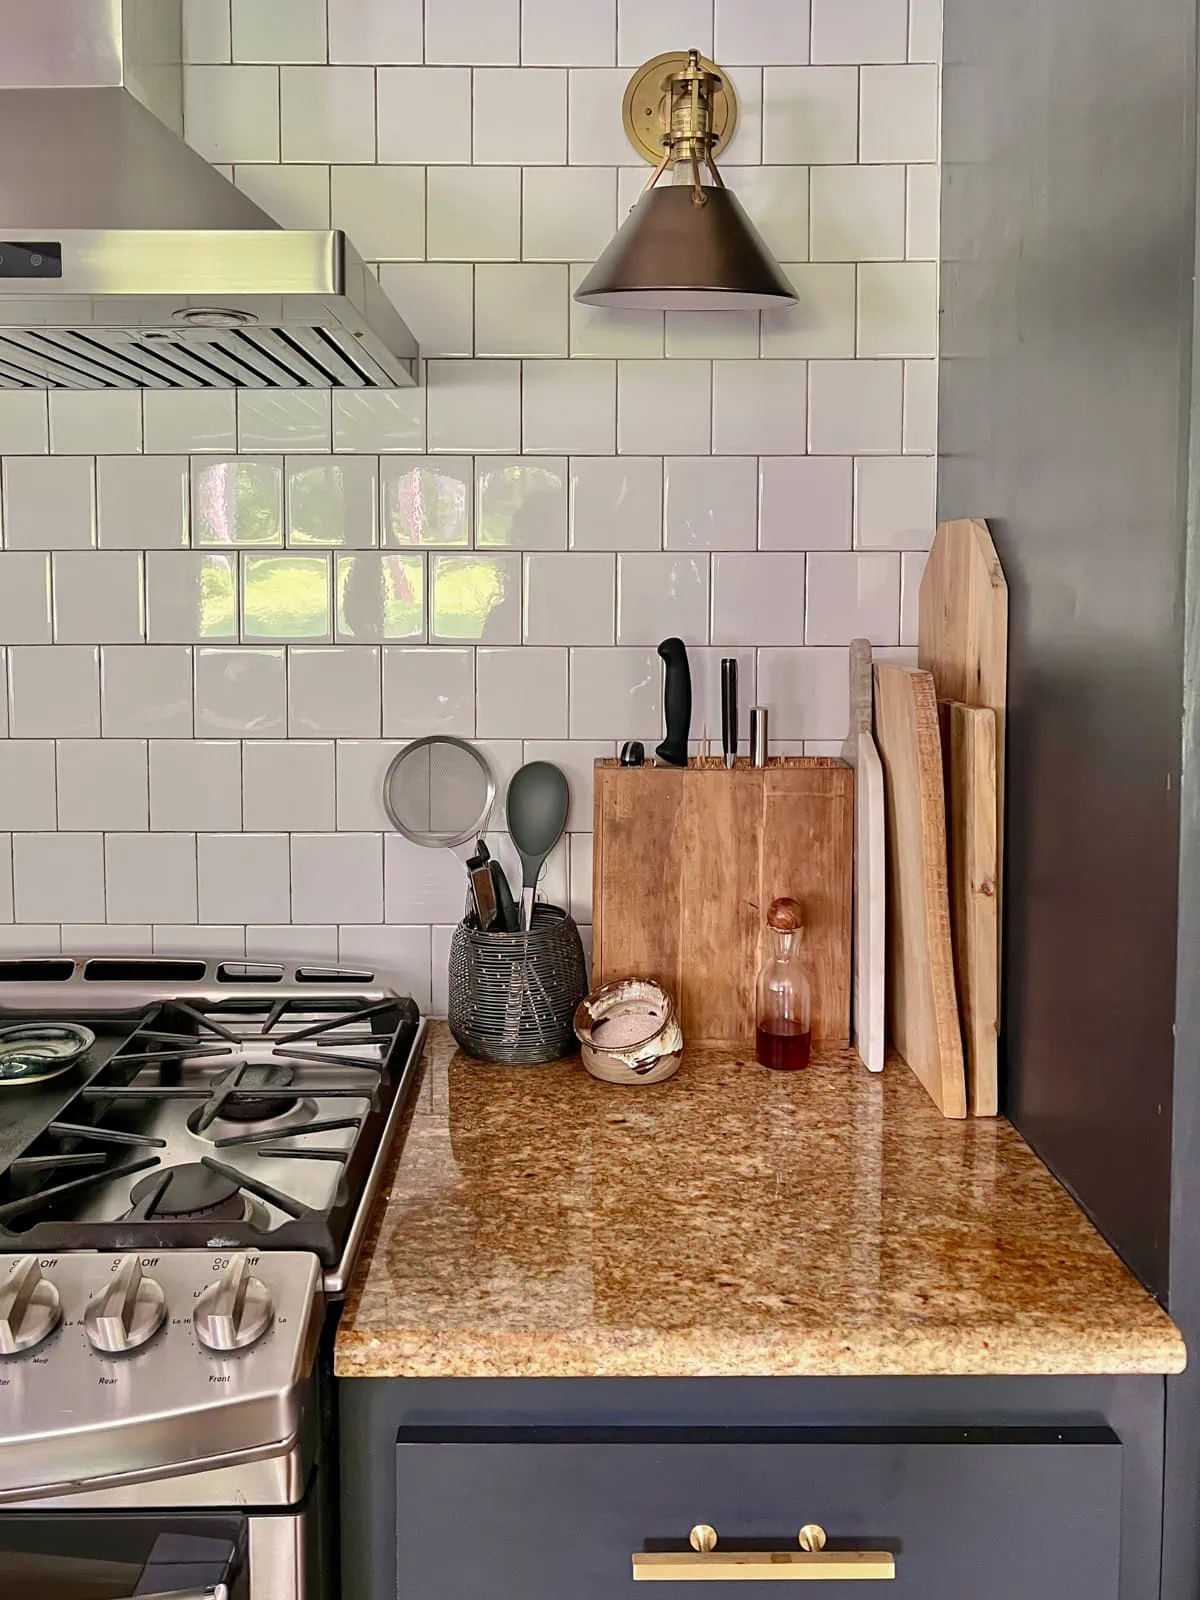
Still keeping knives loose in a drawer? This knife block is inspired by a pricey store version and made from eight 3/8 inch by 4 inch craft boards. Glue three boards side by side to make two wide panels, build a 12 x 12 x 4 inch box with brads and glue, then fill, sand, stain and seal it. Pack it full of bamboo skewers, and knives of any shape slide right in and stay put. It protects the blades and looks great on the counter!
Get the full tutorial at Bigger Than the Three of Us.
32. Cricut Vinyl Pantry Labels
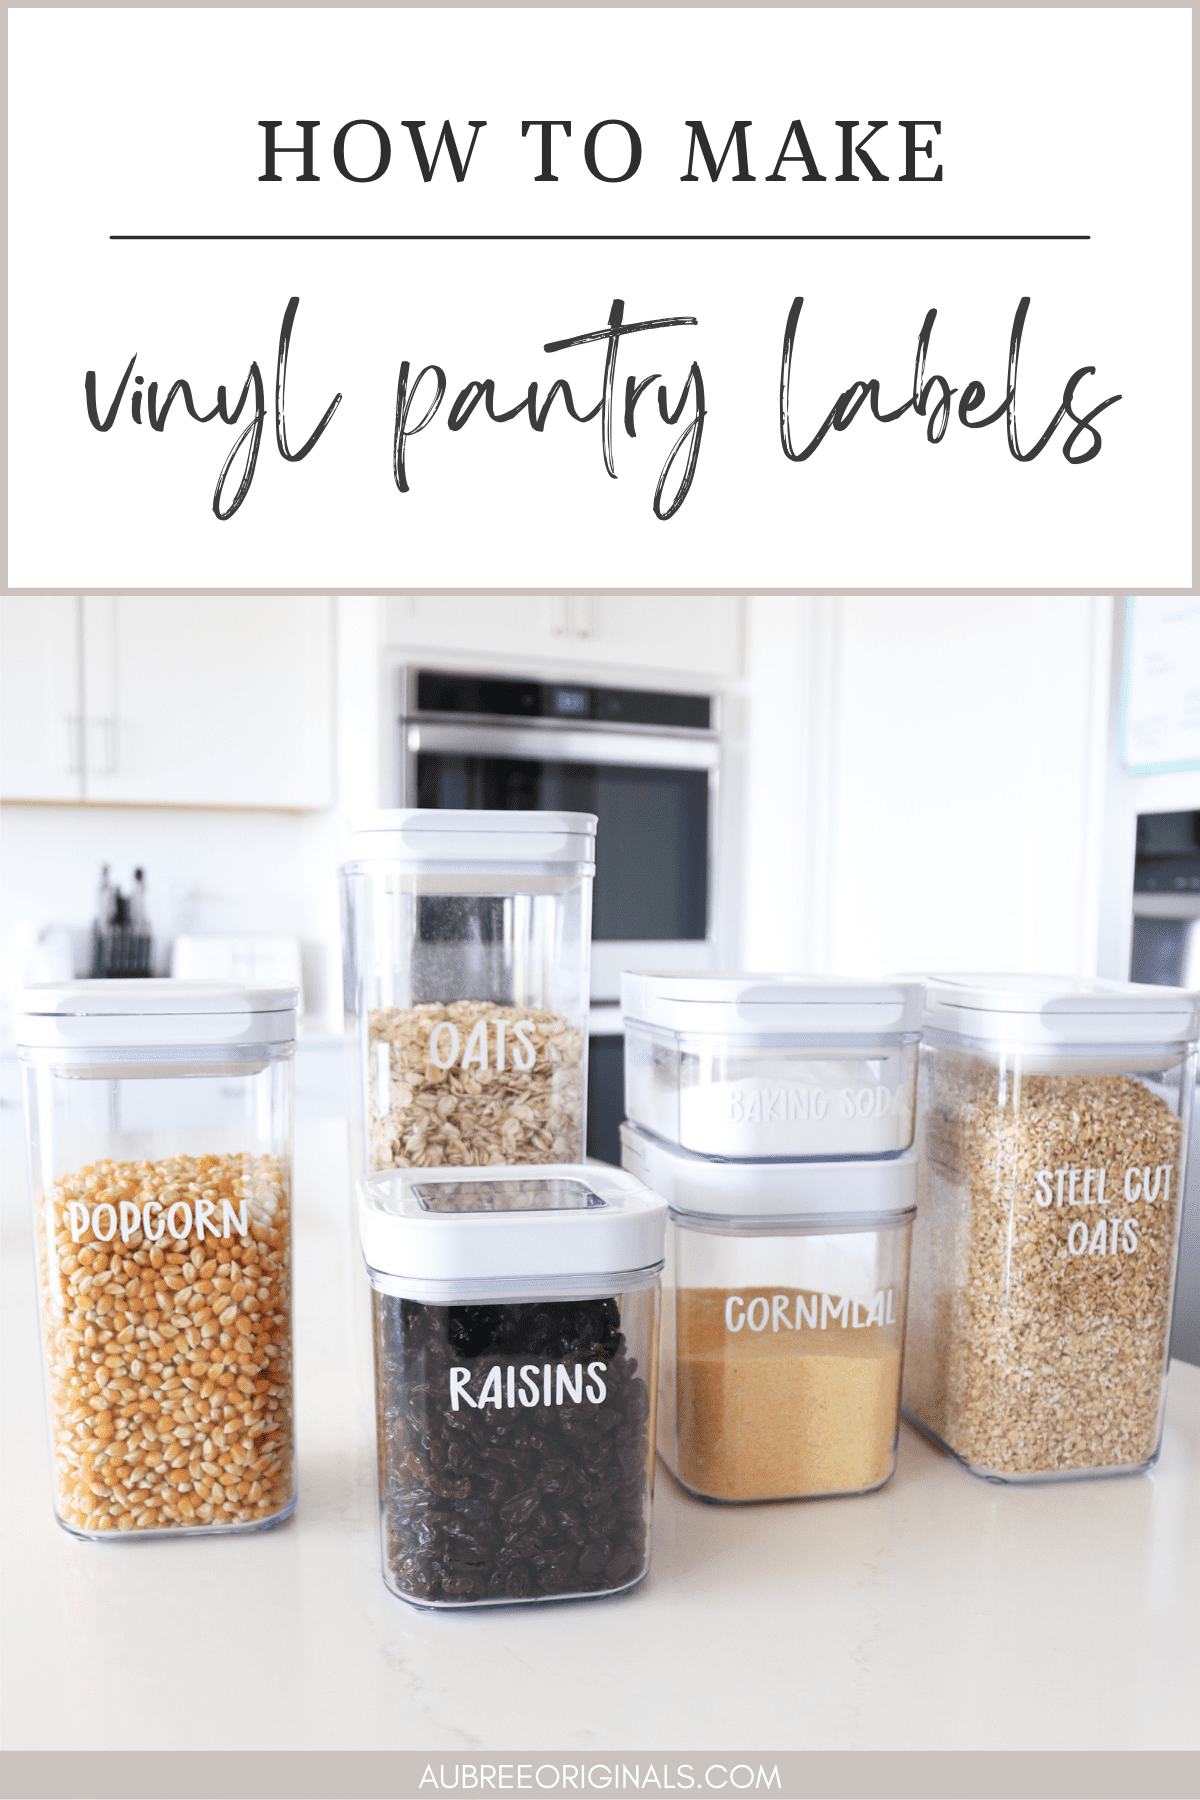
Want a pantry that looks like a magazine photo? Clear containers plus vinyl labels do it. Type simple labels in Cricut Design Space, stretch the font a little for a custom look, then cut them from permanent vinyl so they survive washing, or removable if the contents change often. Weed, apply transfer tape and smooth them onto the containers with a scraper. Vinyl sticks best on smooth surfaces like plastic and glass. Design Space has free fonts as well as paid ones!
Get the full tutorial at Aubree Originals.
33. Baking Sheet and Foil Caddy
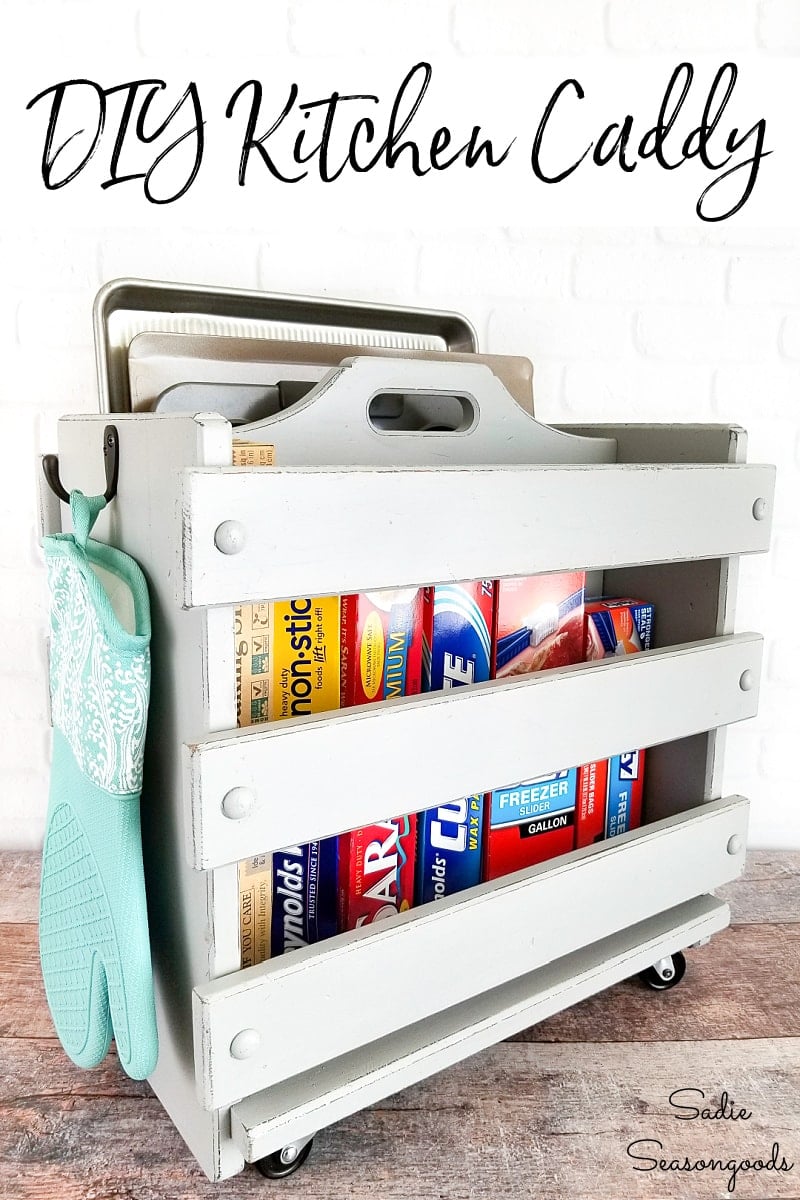
Got a narrow empty gap in the kitchen? A tall thrifted magazine holder with straight sides becomes a rolling caddy for baking sheets, muffin tins, foil and parchment. It gets cleaned, spray painted pale gray and lightly distressed only on the edges and corners where it would naturally get bumped. Four small casters go underneath, set in far enough to spin freely, and a robe hook on each side holds oven mitts. Perfect for small or galley kitchens!
Get the full tutorial at Sadie Seasongoods.
34. Under Sink Pull Out Baskets
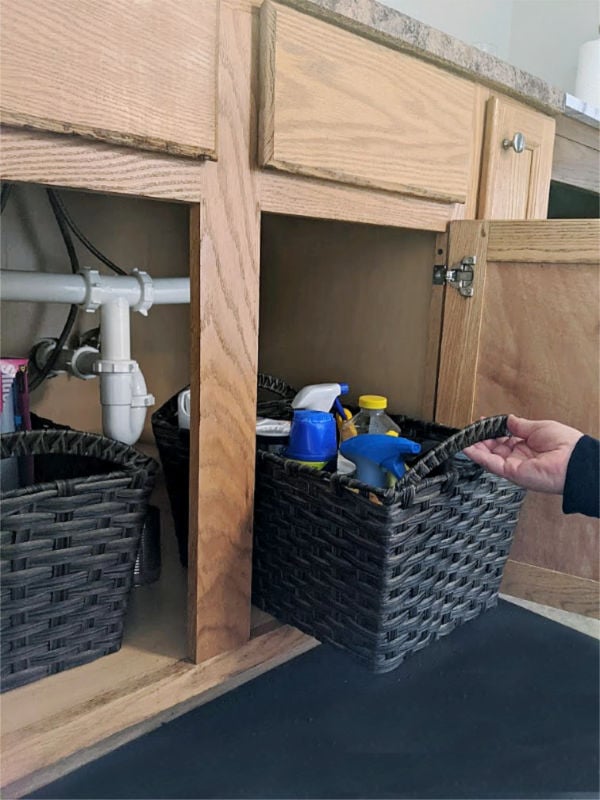
Is the cabinet under the sink where cleaning supplies go to hide? This fix needs just a tape measure and two baskets with handles. Measure the cabinet depth, the height up to the pipes and the width of the door opening, then find bins that fit. Faux rattan plastic baskets are the smart pick since they’re waterproof and slide in and out easily. Wraps, foils and bags go in one and sprays go in the other. Declutter first!
Get the full tutorial at Stow&TellU.