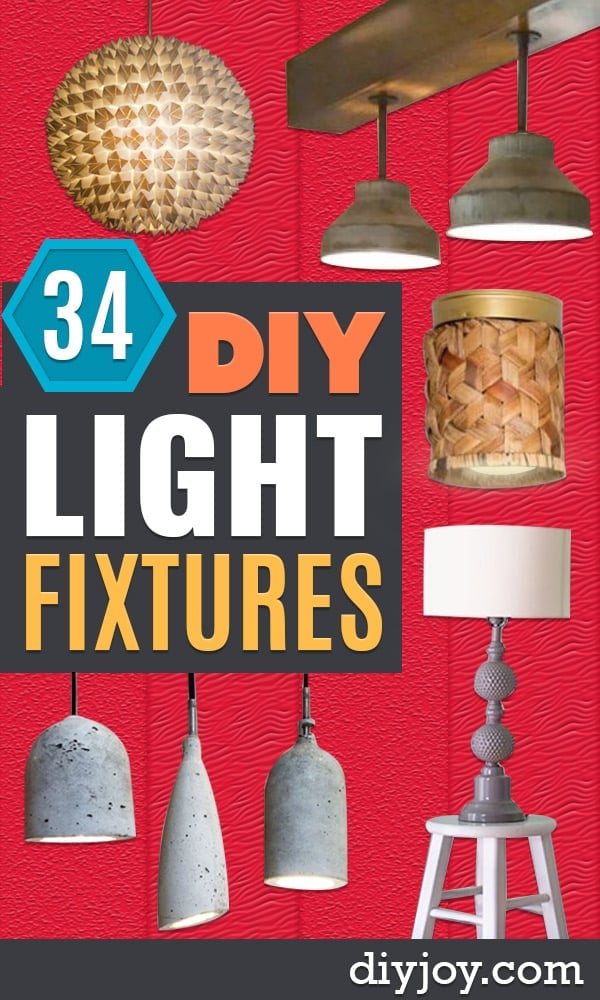
Builder grade ceiling lights have a way of making a whole room look tired, and these 35 DIY light fixtures are the fix. A DIY light fixture is a pendant, ceiling light cover, chandelier, sconce or lamp you make or remake yourself, often from thrift store finds like colanders, baskets, chicken feeders, old lampshades and even a vintage camera or a music stand. Plenty need no rewiring at all (a basket and a few zip ties can hide a dated dome light in minutes), while the pendants and lamps use an inexpensive cord kit from the hardware store. Spray paint does a lot of heavy lifting, too, and so do embroidery hoops, sisal rope and birch wood slices. Two DIY JOY originals with step by step videos are mixed in, a pressed flower mason jar light and a glowing fairy jar lantern. One safety tip before you start: switch off the breaker before touching any hardwired fixture, and keep bulbs low heat inside paper, yarn or fiber shades.
DIY Lighting Projects
1. Bathroom Light Fixture Makeover

This bathroom light fixture makeover swaps dated white bell shaped glass covers for open wire cages, starting with small thrift store lampshades at 75 cents each. Strip the fabric off the shades to find the wire frame inside, twist out the center piece and clean off the old adhesive with Goo Gone. Two coats of black spray paint give them an industrial farmhouse look. The fixture can be painted right on the wall with newspaper stuffed in the sockets, though spraying it outside is easier, and turn off the breaker first. Rest the cages on and finish with vintage style bulbs.
Get the full tutorial at Sawdust Sisters.
2. DIY Eames Inspired Bohemian Pendant Light

This Eames inspired bohemian pendant covers a basic ceiling light with no rewiring at all. Start with a hanging wire planter basket and a full skein of yarn. Fold lengths of yarn in half and loop them around the basket rim, about eight strands per beaded section and six or seven on the plain ones, then string wooden craft beads on every other section. Remove the glass from the old fixture, hang the basket from three screw hooks and sweep the strands under and through the center. Feathers tied to the ends finish it.
Get the full tutorial at Love, Maegan.
3. DIY Chicken Feeder Light Pendant
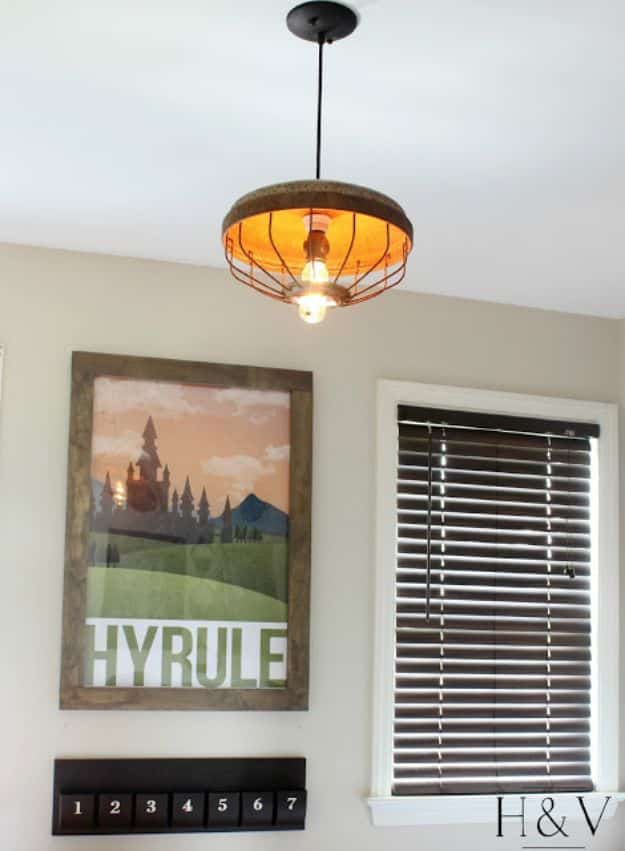
A rusty metal chicken feeder from an antique shop becomes a quirky industrial pendant light with a $14.99 pendant kit from Home Depot. Drill a hole in the bottom of the feeder, then follow the kit instructions for the wiring. A narrow Edison bulb suits the vintage style, and a pull cord adapter is a handy extra. Leave the rust, since it adds authentic character and warm orange tones, and the slatted sides give off a lovely glow at night. It’s a great pick for a teen’s room with an industrial theme.
Get the full tutorial at Hymns and Verses.
4. DIY Metal Cylinder Light

A DIY metal cylinder light wraps a decorative cloverleaf aluminum sheet into a big drum pendant. Cut the sheet to 12 by 24 inches and spray it oil rubbed bronze. Stain 12 by 1 inch wood strips in dark walnut and staple the sheet to one strip, then attach the other strip at the far end on the opposite side so the seam closes when wrapped; secure with screws. Glue and screw a wood piece across the top, drill a center hole and run the lamp wire, brass nipple and finial ring through to the socket.
Get the full tutorial at Designed Decor.
5. Modernize A Thrifted Light

This upcycled kitchen pendant began as a $5 thrift store glass light with a shape much like a $600 designer fixture. Take the whole thing apart, then remove the old top cap and the candelabra piece in the middle. Measure the top opening and order a matching vase cap (a 17 inch one ran about $16 online). A sleeker holder and the chain from an old chandelier finish the update, along with one new socket and a spool of electrical wire. The faceted glass shade makes a great focal point over a kitchen table.
Get the full tutorial at Bigger Than the Three of Us.
6. DIY Brass Himmeli Inspired Geometric Light Fixture

This brass himmeli light fixture copies a store bought geo pendant with round brass tubes and steel wire, a safer pick than straws near a bulb. Cut the tubes with a hacksaw (a Dremel may be easier). Thread wire through three 6 inch pieces and loop back to form a triangle, then keep adding pairs until six triangles form a hexagon. Add pieces off each side for six more triangles and join their points with more 6 inch tubes. A small top hexagon of 5 inch and 1 inch tubes holds the light kit.
Get the full tutorial at Tatertots and Jello.
7. DIY Orb Light

A DIY orb light can replace a dated brass lantern in under an hour for less than $20. The orb is a decorative metal sphere from the home decor aisle at Marshalls or TJ Maxx (similar ones are online). Keep the working light portion of the old fixture and unscrew the outer lantern frame. Protect the ceiling with paper and tape, remove the bulbs, tape the sockets and spray three coats of oil rubbed bronze. Once dry, slip the orb over the light and hang it from the original braces.
Get the full tutorial at Lovely Etc.
8. Mason Jar Fairy Lights With Pressed Flowers

Mason jar fairy lights with pressed flowers are a calming, easy craft that glows like a little fairy tale. Clean and dry the jar, plan your flower design, then brush a thin layer of Mod Podge onto the glass. Press each flower in place and brush more Mod Podge over the top, working in sections so the glue doesn’t dry. Thin flowers and leaves lie flatter and let more light through. Add a second coat to seal, tuck fairy lights inside, close the lid and tie on a jute twine bow.
Get the full tutorial at DIY JOY.
9. DIY Glass Pendant Light Fixture

This DIY glass pendant light fixture knocks off a sold out designer light and saved about $100. The shade is a $10 IKEA glass bowl topped with a stained wooden bun foot from the hardware store, hung from a pendant cord kit. Take the kit apart first to see how wide the holes need to be, then drill a 1/2 inch hole through the bowl with a diamond glass bit, working slowly outside on a towel to avoid chips. Drill the bun foot with a spade bit and stack the pieces onto the cord.
Get the full tutorial at Ugly Duckling House.
10. Basket Ceiling Light

Basket ceiling light covers hide a dated dome light in minutes, no rewiring needed. Pick a drum shaped basket a few inches wider than the fixture, up to twice its width, and keep at least 7 feet of clearance where people walk. Remove the glass shade by loosening the small screws around its lip, then trace the shade onto painter’s tape on the basket bottom and cut a hole. That bottom becomes the top. Hang the basket with one nylon zip tie per screw hole, level it and snip the tails.
Get the full tutorial at The Heathered Nest.
11. Ruffled Lampshade

A ruffled lampshade dresses up a plain drum shade with fabric scraps, a glue gun and a sewing machine, or a needle and thread. Measure the shade height and divide by three for three tiers, then add 1 inch to get each strip’s width, so a 9 inch shade takes 4 inch strips. Cut long strips and stitch down the center of each with the machine set to gather, or hand stitch and pull the thread to ruffle it. Expect to need extra strips. Hem them for a crisp finish or leave the edges frayed.
Get the full tutorial at Dear Lillie Studio.
12. Faceted Pendant Lights

Faceted pendant lights recreate an Anthropologie look by covering a standard paper lantern in hundreds of folded paper fortune tellers, the same ones kids fold at school. Fold them from simple white printer paper. Gluing all four corners down is slow and tricky on a sphere, so put one dab of hot glue on the center point underneath and let the corners settle against their neighbors. A few small gaps won’t show once it’s lit. Newspaper or another printed paper could make an interesting layered version.
Get the full tutorial at The 3 R's Blog.
13. Easy DIY Vintage Cage Light Fixture

This easy vintage cage light fixture update is completely non-permanent, which makes it perfect for renters. Remove the glass shades from a basic fixture and store them somewhere safe. Slip on plastic light cages from the hardware store, about $2 each, and spray paint them metallic aluminum so they pass for metal. Swap regular bulbs for Edison style chandelier bulbs to finish the vintage industrial look. When you’re ready for a change, the original glass shades go right back on. Simple, cheap and fully reversible.
Get the full tutorial at All Things with Purpose.
14. Easy DIY Fairy Jar Lanterns
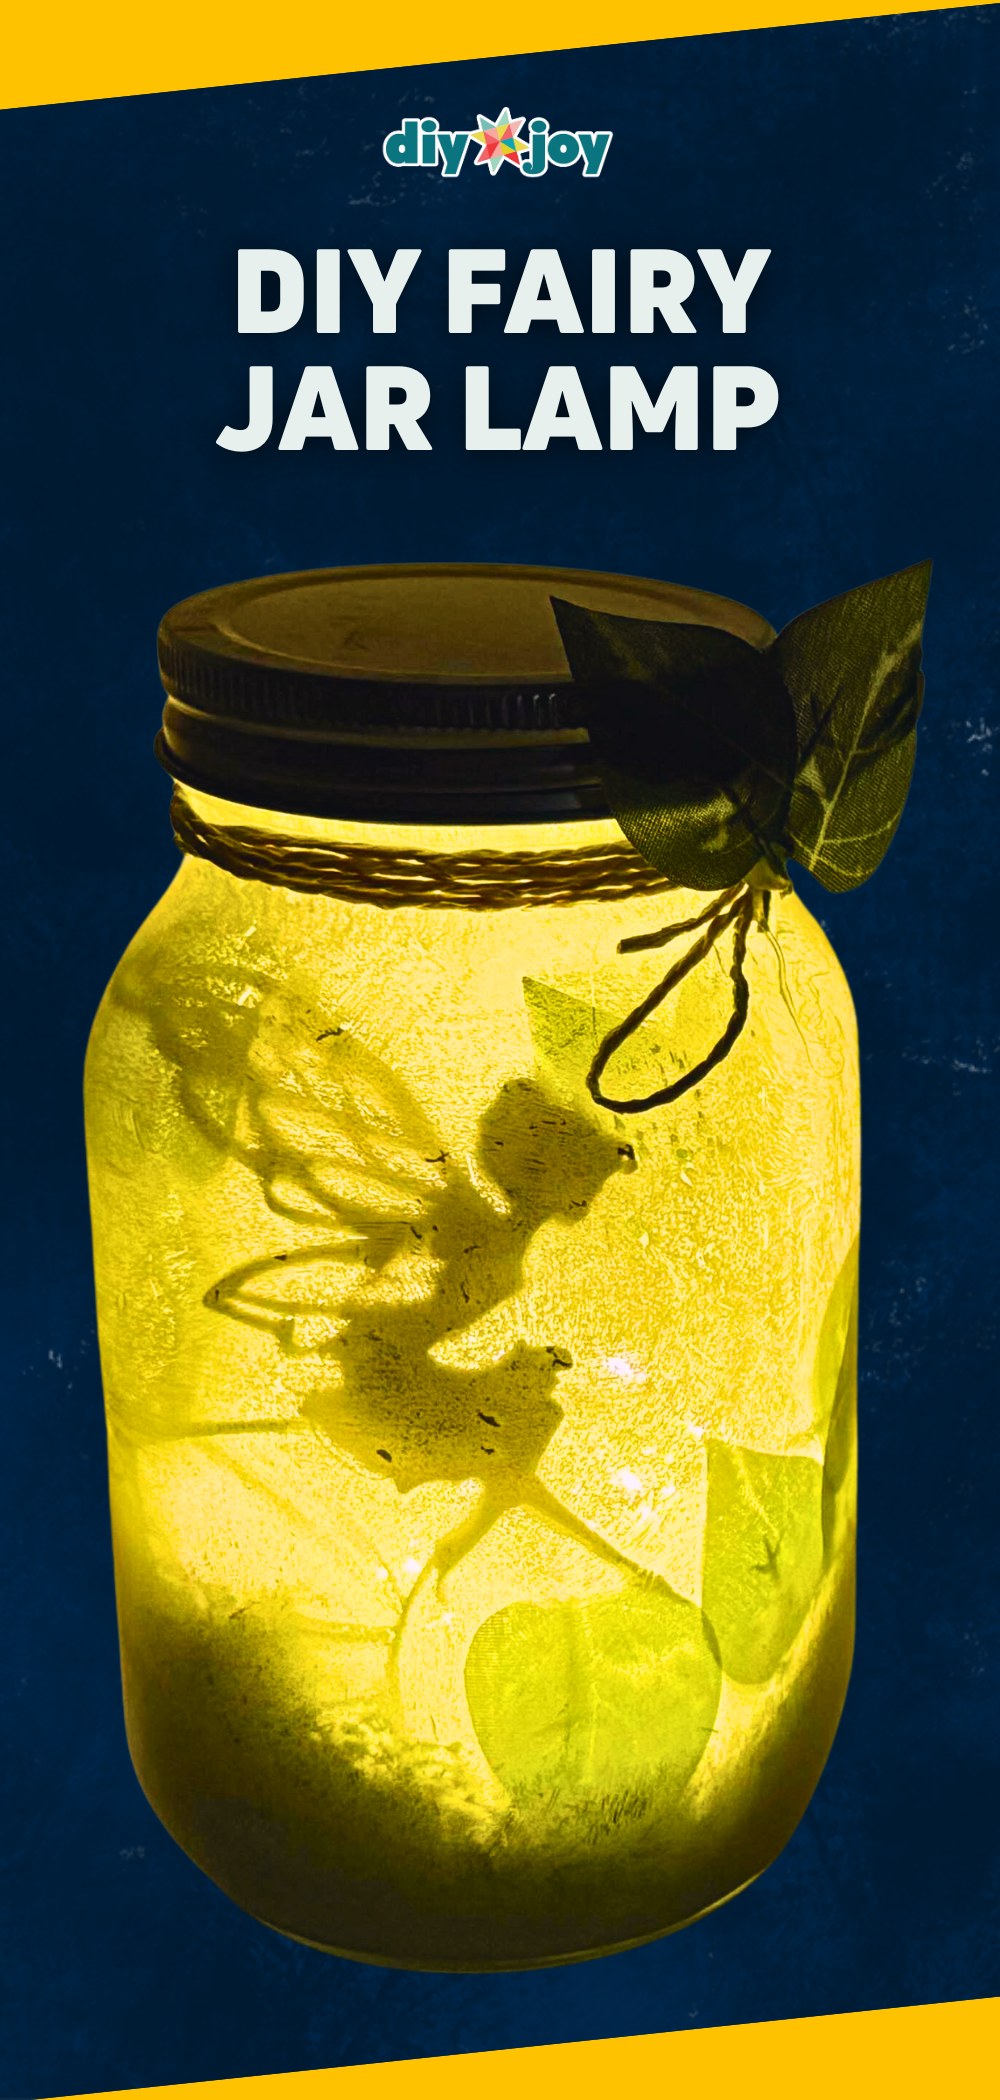
Easy DIY fairy jar lanterns turn an empty glass jar into a soft night light with a fairy silhouette inside. Print a fairy, tree or mushroom pattern on cardstock and cut it out. Paint the inside of the jar with white acrylic or primer, keeping the coat thin enough for light to pass through. Add fake moss or crumpled tissue to the bottom, hot glue the silhouette inside the glass and tuck in a few leaves. Drop in a tea light or fairy lights, then tie twine and faux leaves around the neck.
Get the full tutorial at DIY JOY.
15. Spray Paint Lamp Makeover

A spray paint lamp makeover is one of the easiest, cheapest and most foolproof ways to revamp a thrift store find. This lamp started as a $1 find and got a fresh look from one quick coat of Krylon Dual paint and primer in gray. Remove the shade and bulb, mask the cord, socket and anything else you want to keep with painter’s tape, then spray in light, even coats. The maker reports the paint stayed put on the glass parts too. A crisp white drum shade completes the look.
Get the full tutorial at Saved By Love Creations.
16. Update an Old Sconce

This old sconce update turns dated brown wall lights into industrial chic fixtures for about $4 each. Remove the old glass and tape off the wall around the base. Paint each sconce with ASCP Graphite, then mix a little silver craft paint into dark wax (about a dime sized dab of paint per tablespoon of wax) and rub it on for a rich, aged patina. Bubble glass shades from Lowe’s at $4 apiece replace the old glass and finish the look. It’s a smart fix before putting a house on the market.
Get the full tutorial at Maison de Pax.
17. Chic Pendant Light

This chic pendant light update proves a budget fixture can look custom with just two changes: paint and a new bulb. Flat matte black fixtures are hard to find at a good price, so start with an affordable pendant you sort of like (this one was on sale at Costco). Take the glass off and hang the fixture so you can spray it from every angle without blotches. Rust-Oleum flat black goes on smooth and even. Then swap the Edison bulb for a clear round one that suits the cleaner shape.
Get the full tutorial at Lindi & Russ.
18. Upcycled Copper Wire Pendant Lights

Upcycled copper wire pendant lights start as ugly lampshades headed for the trash. Cut off all the fabric and peel away the glued bits until only the wire skeleton is left. Spray it with Krylon Copper. Then wire a basic pull string light socket inside the frame using a 1/2 inch threaded nipple, a washer, a hex nut and the length of lamp wire you need (the socket was $3.49 at Home Depot). If you want the socket painted too, spray it before assembly. Hang a few at different heights.
Get the full tutorial at Vintage Revivals.
19. Updated 80's Light Fixture

This updated 80s light fixture began as a $20 brass lantern from the Habitat ReStore. Take it apart and clean it well. The tricky part is taping off 64 glass sections: lay painter’s tape over the glass, then trim each piece with a razor along the frame, which takes about an hour. Prime with black primer and spray paint the metal outside in good weather. The inside can stay brass, since nobody will see it. The dark finish makes the lantern stand out against white built in bookcases.
Get the full tutorial at Thrifty Decor Chick.
20. Birdcage Pendant Light

A birdcage pendant light makes a whimsical centerpiece for a playroom or nursery. This one was made for a surprise playroom makeover, based on an earlier nursery version, and it got its warm finish from Valspar gold spray paint, grabbed when the usual Rust-Oleum gold metallic was sold out. The Valspar gold reads more brassy and bronze than bright and shiny, which suits the vintage look. Little birds perched on twig branches inside the cage, around a bare bulb, complete the scene. It’s a happy accident worth copying.
Get the full tutorial at Dwellings By DeVore.
21. DIY Flush Mount Capiz Light

A capiz shell shade gives a builder grade flush mount ceiling light a coastal makeover in about five minutes, with no new wiring and almost no tools. Feed nylon zip ties up through the holes in the flush mount, then loop them through the top of the capiz shade. Tighten the ties a little at a time while leveling the shade, and snip off the excess once it hangs straight. The shimmering shell discs hide the old dome completely. The same method also works with a simple drum shade.
Get the full tutorial at The Heathered Nest.
22. DIY Industrial Farmhouse Pendant Light

These DIY industrial farmhouse pendant lights mount on the wall beside a bed, and two of them, brackets included, came to about $40. Each uses a plug in cord light kit and a wire cage pendant. Cut a 1×2 board into 13 inch and 10 inch pieces, plus two 11 inch pieces with 45 degree ends for braces. Sand, then wipe on a thin coat of ebony stain. The cord switch is too big for a drilled hole, so cut a groove along the top and back for the cord. Glue, then mount with pilot holes.
Get the full tutorial at Create and Find.
23. DIY Over The Sink Pendant Light

A DIY over the sink pendant light turns an old copper colander into a warm kitchen fixture for about $54. Look for a colander at least 12 inches across (eBay had one for about $30 with shipping). Pick up a pendant light kit at the hardware store for about $20, plus candelabra bulbs with the tiny base. Use a Dremel to cut a hole in the bottom of the colander; the existing holes make it easier. Assemble the kit through the hole and hang it over the sink. A store version cost about $85.
Get the full tutorial at Happily Ever Before & Afters.
24. Make a Basket Pendant Light

A basket pendant light costs a fraction of store bought woven pendants, and many ordinary baskets can work as the shade. This one used a rice basket. Choose a basket deep enough that the bulb doesn’t hang out the bottom, at least 5 to 6 inches in the center. Find the exact center with a tape measure so it hangs straight, then snip a small hole, no larger than 1/2 inch, with an X-Acto knife or scissors. Thread a pendant cord kit through the hole and follow its assembly instructions.
Get the full tutorial at Dalla Vita.
25. Vintage Camera DIY Lamp

Got an old camera sitting on a shelf looking cute and doing nothing? This vintage camera lamp turns the big flash attachment into the light itself. The flash comes off the camera and opens up, a candelabra keyless socket is trimmed down to fit inside, and a candelabra switch cord is wired to it and wrapped well in electrical tape. A nightlight bulb keeps it cool and cozy. The whole thing takes under an hour, and it makes the sweetest little accent light for a desk or bookshelf.
Get the full tutorial at Lovely Etc.
26. West Elm Inspired Bentwood Pendant Light

Love the look of a designer bentwood pendant but not the $189 price? This knockoff is built from quilting hoops for about $38. The hoops are sawn in half, stained and nailed around two stacks of glued floral rings to make that airy round cage. A pendant light kit hangs inside, held in place with stained twine, and a Y socket adapter lets it take two bulbs for extra light. Pick a darker or lighter stain to match the room. It looks straight out of the catalog!
Get the full tutorial at Designer Trapped.
27. DIY Industrial Pendant Light for Under $10

Have a plain builder grade mini pendant hanging over your kitchen bar? This industrial makeover costs just under $10 per light. The fixture is taped off and given two coats of oil rubbed bronze spray paint, then left to dry a full day. Sisal rope is wrapped tightly around the downrod with high temp hot glue (a dime size dab per wrap), and a metal lamp guard screws on over the bulb. An Edison bulb finishes the vintage look. Expect 30 to 40 minutes of wrapping per light.
Get the full tutorial at Bless'er House.
28. Music Tripod Lamp

Ever spot an old music stand at the thrift store and wonder what else it could be? This one became an industrial tripod floor lamp for around $30. The sheet music holder comes off, leaving a hollow shaft that hides the power cable. A lamp switch threads onto the top, a plug goes on the other end, and a linen shade finishes it. Twine covers the leftover thread. The best part is the adjustable height and leg splay, so it fits nearly any corner.
Get the full tutorial at The Painted Hive.
29. DIY Plug-in Sconces

Want bedside sconces but can’t hardwire anything into the wall? These plug-in sconces start as $1 pendant lights from a ReStore. The pendants get oil rubbed bronze spray paint, then hang from small wood arms with a routed channel down the back so the cord sits hidden against the wall. A candelabra cord set with a switch is joined to the pendant wiring, and wire baskets become the shades. All in, each one comes in just under $12. Perfect for renters!
Get the full tutorial at My Love 2 Create.
30. Industrial Sconce Light Makeover

Stuck with dated wall sconces and frilly glass shades? This makeover keeps the fixtures and swaps the glass for plastic lamp cages. The cages get two coats of iron paint, then a spray of rust activator that creates real rust (no faux finish here). The sconce arms keep just the iron paint for a graphite look. A brown permanent marker hides the yellow where the clasp rubs, and reproduction Edison bulbs finish it. About $20 per light, and it looks like a totally different fixture!
Get the full tutorial at The Painted Hive.
31. DIY Chicken Wire Light Fixture

Need a rustic light fixture for a laundry room or mudroom? This chicken wire version is made from four stained embroidery hoops, paired up and tied together with silver floral wire for a thicker rim. Chicken wire is cut to wrap the inside of the hoops (12 inches tall here) and wired on, with a flat piece trimmed for the top. A mini pendant light kit cord threads right through the center, and the wire is sturdy enough to hang steady. Farmhouse charm on a budget!
Get the full tutorial at The Inspired Hive.
32. Giant Macrame Rope Lights

Want a pendant light that doubles as a statement piece? These giant macrame rope lights use just one simple knot, repeated over and over along a lamp cord until it spirals on its own (great to do while watching a show). Thick rope covers about 15 feet of cord, and clear tape hides any joins. A thrifted cup or planter gets drilled to become the socket cover, then the rope is glued in place. Pair it with an oversized bulb and it’s a total showstopper!
Get the full tutorial at Vintage Revivals.
33. Tree Branch Lamp
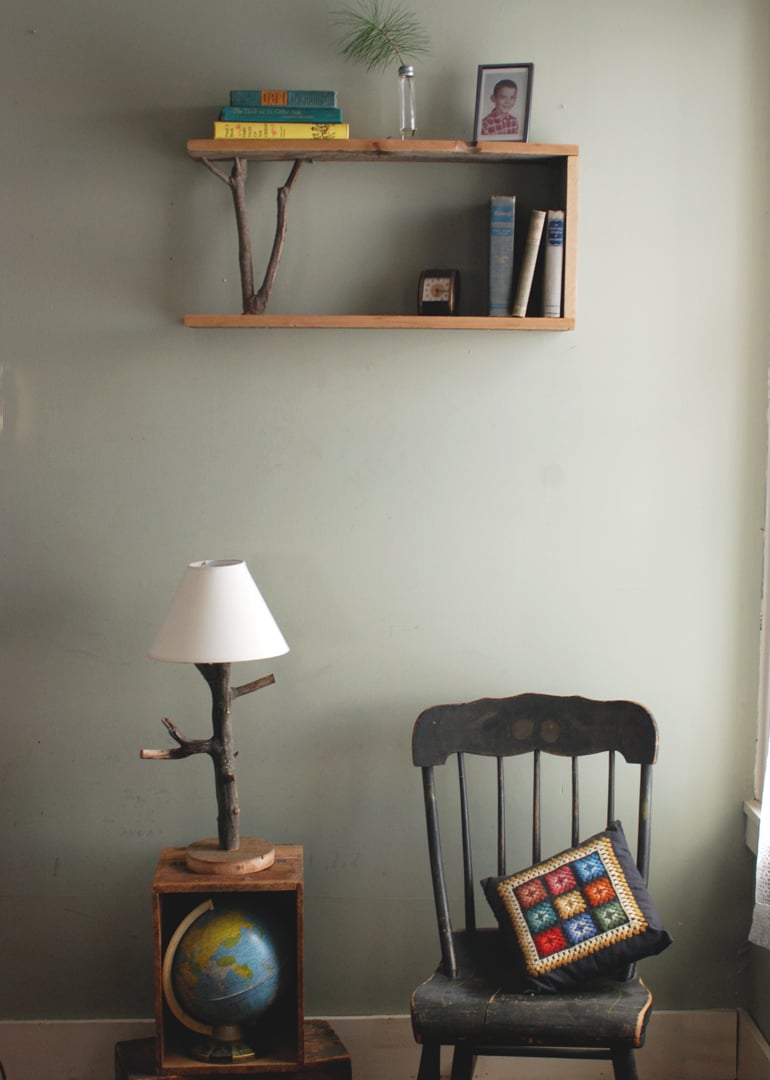
Can’t find a table lamp base you actually like? This tree branch lamp brings a little bit of the outdoors inside. A branch is cut to size and drilled straight down the middle with a long bit so the cord can run through it. A reclaimed wood base is shaped on a scroll saw and drilled with a forstner bit so the branch sits snug, then glued in. An extension cord gets wired to a light socket at the top. Add a shade and it’s done!
Get the full tutorial at The Merrythought.
34. DIY Stacked Wood Lamp

Fell for a $598 designer lamp? This stacked wood lamp gets the look for about $40. Birch wood slices are drilled through the center and threaded onto a lamp kit cord, with the bottom slice drilled from the side so the cord exits neatly. Stack as many as you need for the height you want. A threaded nipple screws into the top slice, the socket is wired, and the slices are glued together one by one. Finish with a harp or Uno adapter and a shade!
Get the full tutorial at Designer Trapped.
35. DIY Copper and Wood Hanging Light Fixture

Need more light than a single bulb fixture can give a big room? This copper and wood hanging light has four arms plus a top drop. Copper pipe and reducing fittings are epoxied to the bases of ceramic sockets, and a wooden utensil caddy becomes the hub, drilled on all four sides and the top. Each arm is wired with its own lamp wire, with every hot line on the same colored screw. For the install, hire an electrician if you aren’t sure. A real showstopper!
Get the full tutorial at Vintage Revivals.