DIY word art is the easiest way to put your name, your initial or one happy little word right on the wall, no frame and no board required. These 30 ideas start with a plain wooden, cardboard or paper mache letter and dress it up with whatever is in your craft stash: yarn, rope, moss, felt pom poms, faux flowers, embroidery floss, sequins or a thick swipe of paint. A few skip the letter blank entirely, like a cursive hello cut from poster board, a word bent from wire or a neon flamingo made with EL wire. Monograms make great nursery and dorm decor, and a floral initial doubles as a shower gift the guest of honor gets to take home (which beats another candle, honestly). Most of these need a hot glue gun and one afternoon, and the string art letters are the patience project of the bunch. Want lettering on a board instead? Browse these DIY signs for the porch and every room.
1. DIY Marquee Lighted Letters

DIY marquee lighted letters bring that old movie theater glow home, and this video shows how to make your own from a wooden letter. Paint the letter, then drill evenly spaced holes along its face with a spade bit sized to your string lights. Push a bulb through each hole from the back and the letter lights up with a warm vintage look. Spell out an initial or a whole word, then perch them on a shelf or mantel.
Get the full tutorial at DIY Joy.
2. DIY Marquee Letters

These DIY marquee letters skip the power tools completely. A craft store marquee letter kit comes with a tracing template, so you trace and cut your cardstock, then glitter it, Mod Podge it or use patterned scrapbook paper. Punch the bulb holes using the template as a guide, set the paper inside the letter and press each bulb in firmly. Every letter has its own battery powered lights running on two AAA batteries, so they hang on the wall with no cords to hide.
Get the full tutorial at A Pumpkin And A Princess.
3. DIY Rustic Letters With Flowers

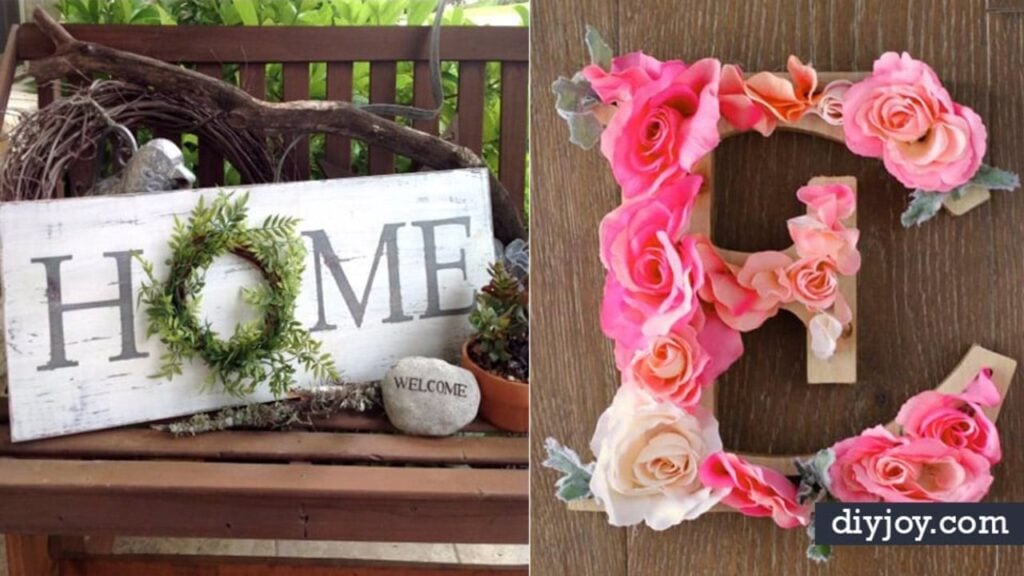
These DIY rustic letters with flowers start with 8 inch carved wood letters and a few floral bushes in coral, pink and cream. Pull the heads off the stems, trim the stem and add a generous dab of hot glue to the back of each bloom. If a flower falls apart once the stem holder is gone, glue the petal layers together first. Tuck in artificial lamb’s ear for soft contrast. A wood plaque behind each letter is optional. It spells a name easily.
Get the full tutorial at Design Dazzle.
4. DIY Burlap Monogram

This DIY burlap monogram layers a decorative wood plaque, a laser cut wood overlay and a wooden letter on a burlap covered canvas. Trace the plaque onto scrapbook paper and cut it out, then brush on Mod Podge, smooth the paper down to chase out air bubbles and seal the top with two more coats, letting each dry. Once it is dry, hot glue the plaque to the burlap canvas and stack the cutout, the letter and a striped bow on top. It is easy and inexpensive.
Get the full tutorial at Love of Family & Home.
5. Pearl Embellished JOY Letters

These pearl embellished JOY letters take wood cutout letters, two strands of pearl bead garland and some paint. Sponge paint the J and Y in metallic gold, and paint the O in a soft cream close to the pearl color so it blends. Once dry, wrap the garland around the J and Y several times and secure the ends on the back with hot glue. For the O, start at one edge and work around the whole letter, tacking the pearls down on the back as you go.
Get the full tutorial at Blooming Homestead.
6. Aged Metal Letters

These aged metal letters copy the look of pricey weathered zinc letters with craft store letters and a few paints. Start with a coat of black. Then dip a brush in metallic paint and work it on in small circles over a small section at a time, rubbing it in with a paper towel since it dries almost immediately. Blot on a very thin, very random layer of burnt umber acrylic with a sponge brush for that rusty flea market finish. Glue hanging hardware to the back.
Get the full tutorial at Dwelling Room Interiors.
7. DIY Rope Letters

DIY rope letters are a messy but easy project with jute rope and a homemade stiffener. Whisk 4 ounces of Mod Podge or school glue with 1/2 cup cornstarch and 1/4 cup warm water until smooth. Draw your word on wax paper inside measured guidelines; a short word works best so it does not sag. Dip the rope, let the excess drip and lay it along your lines, allowing loops and curls since rope will not make sharp corners. The glue dries clear and holds the shape.
Get the full tutorial at Love Grows Wild.
8. Love Letter Tiles

These love letter tiles are giant game tiles cut from scrap 1×6 boards, which are really 5 1/2 inches wide, so cut four 5 1/2 inch lengths for four square tiles. Sand the rough edges with an orbital sander or a sanding block. Make stencils from adhesive contact paper, either on a cutting machine or by printing the letters and cutting them out by hand, and press the edges down well so paint will not bleed. Paint the letters and little point values in black craft paint.
Get the full tutorial at Create and Babble.
9. Rhinestoned Chevron Letter

This rhinestoned chevron letter is a gentle first try at painting chevrons. Paint a plain wooden letter white in two coats. Once dry, trace a printed chevron template onto it with a pencil; be patient, because this is the slowest part. Tape off every other stripe with painter’s tape as exactly as you can, paint the open stripes in your color in two coats and peel the tape while you check the lines. For sparkle, super glue rhinestones along every other chevron line.
Get the full tutorial at Gettin' Crafty: Sorority Style.
10. DIY Pallet Wood Letter

This DIY pallet wood letter is about 23 by 21 inches, big enough to anchor a console table. Type your letter in a narrow font, enlarge it across several sheets with a free poster tool, then cut and tape the pages together. Trace that pattern onto pressed plywood and cut it out with a jigsaw. Cut pallet pieces to various lengths on a miter saw, sand them with 80 grit and glue them across the plywood letter, trimming the edges to follow its shape.
Get the full tutorial at Dream Design DIY.
11. DIY Sparkling Metallic Wedding Initials

These DIY sparkling metallic wedding initials start with paper mache letters and a wood heart. Brush on a thin coat of white acrylic in different directions for texture, then thin coats of silver until you like the look. Working one side at a time, spread decoupage on the edges and pour on very fine silver glitter. Stick on rows of self stick rhinestone sheets along the borders, then seal the glitter with watered down decoupage. Hot glue will not stick to glitter, so join the pieces differently.
Get the full tutorial at Lines Across Reviews.
12. Yarn Letters

These yarn letters are a personalized gift that takes one trip to the craft store. Wrap a cardboard letter in thick yarn, using hot glue to start and to hold it in place as you go; letters like E or L are easy, while K needs some double wrapping through the middle. Cover uneven ends with short glued pieces of yarn. Then make flowers: a rolled felt flower cut 1/4 inch apart, rick rack rosettes, layered burlap circles with a button and twisted fabric strips.
Get the full tutorial at Cooking With Ruthie.
13. Quilled E Monogram with Fringed Flowers

This quilled E monogram with fringed flowers is a handmade gift with flowers bursting out in different stages of bloom. Each flower pattern was designed and cut on a digital die cutter, then fringed, rolled and shaped by hand. A raised paper wall around the letter corrals the flowers and hides the quilled base from most angles, and tipping some blossoms on their sides adds depth. Soft pastels and a few quilled scrolls finish it. Expect a slow, relaxing project.
Get the full tutorial at Crafting Creatures.
14. Button Letters

These button letters need no real sewing skills, only a needle and thread. Print a large letter sized to an 8 by 10 canvas, cut it out and pin it to about 1/3 yard of fabric. Set the fabric in an embroidery hoop and stitch buttons of varying sizes inside the outline with matching embroidery thread; small beads fill the skinny parts. Remove the paper, then stretch and staple the fabric around the canvas. Red buttons pop, but pick any color that suits your fabric.
Get the full tutorial at Changing My Marbles.
15. Sequin Monogram Letter DIY

This sequin monogram letter DIY wraps a paper mache letter in elastic sequin cording for instant glam. Start with the edges you cannot wrap: cut cording to length and hot glue it around the perimeter. Then glue one end on the back and wrap the band snugly around the letter so there are no gaps, filling any small spaces with loose sequins. Change the wrapping direction as the letter’s shape demands; wrapping vertically on the outer edge saves time. Add a decorative flower.
Get the full tutorial at Catch My Party.
16. Tulle Wrapped Letter

This tulle wrapped letter turns a plain cardboard craft store letter into soft, frothy nursery decor. Wrap pink tulle around and around the letter until the cardboard disappears, securing the ends with a dab of hot glue. Then dress it up with a cluster of fabric flowers and a few strands of pearls. It started as a baby shower centerpiece and went home with the mom-to-be as a nursery gift, so it works double duty for a shower host.
Get the full tutorial at The Sweatman Family.
17. DIY Faux Copper Letter Aged with Blue Patina

This DIY faux copper letter aged with blue patina turns a banged up clearance wooden letter into one that looks like old weathered metal, in an afternoon. The secret is a metallic copper paint that contains real metal particles. Brush on a couple of coats, then spritz a blue patina solution over it while the paint is still workable, and the metal in the paint reacts and ages for real. The same trick works on frames, planters, hardware and light fixtures.
Get the full tutorial at Where The Smiles Have Been.
18. Washi Tape Monogram Canvas

This washi tape monogram canvas is a quick craft night project. Paint a wooden letter in a light acrylic shade, since a dark base shows through thin washi tape. While it dries, paint a rectangular canvas in a contrasting color; two coats, dried between, give full coverage. Cover the letter with washi tape, starting on a diagonal and wrapping the strips around the edges. Then hot glue the letter onto the canvas. Three coordinating tape patterns keep it from looking busy.
Get the full tutorial at A Little Craft In Your Day.
19. DIY Coastal Letter

This DIY coastal letter brings the beach indoors with a wooden letter, glass gems, seashells and white rope. Paint the letter a pretty ocean blue. Arrange teal and light blue glass gems on the face before gluing so you like the pattern, then super glue them down; a medium letter used about three tubes. Add a few shells and loop a piece of white rope around one side, knotting it like a nautical tie. Plan a few hours, since glue and gems take patience.
Get the full tutorial at Glamorous Addiction.
20. DIY Neon Wire Word Art

A DIY neon sign is easier than it looks, thanks to EL wire. Trace a flamingo shape on paper as one continuous line, then bend a thicker metal wire to match so it holds its form. Super glue pink EL wire along the frame and tuck the extra at the bottom. For a sign that stands up by itself, set the base in cement mixed to a peanut butter texture in a plastic container, then peel and sand once dry. A foam core leaf outlined in green wire works the same way.
Get the full tutorial at The Sorry Girls.
21. Brushstroke Monogram Letters
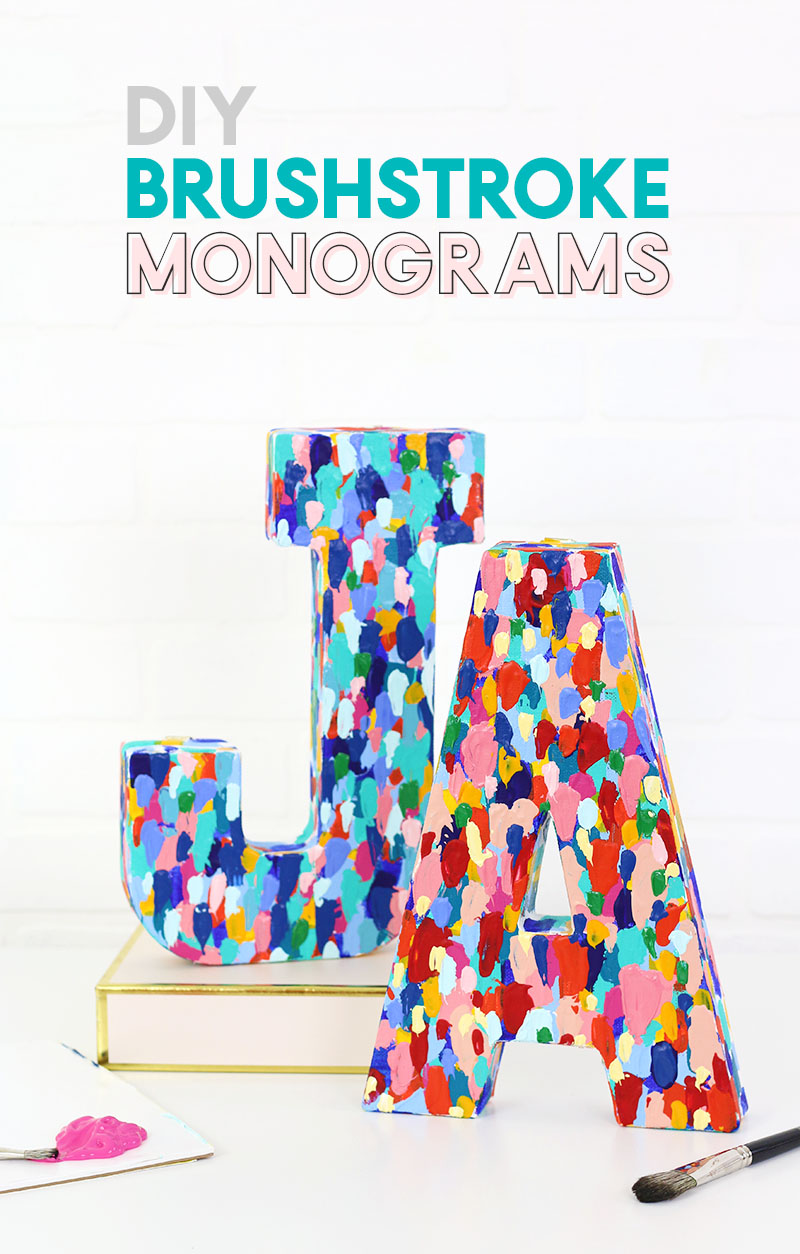
Love a big, juicy swipe of paint? These brushstroke monogram letters are all about texture. Pick a color palette first, then cover a canvas letter with a base layer of flat brush strokes, letting each color dry before the next so nothing muddies. Then the fun part: scoop thick paint onto a palette knife and scrape it down onto the letter for that chunky impasto look. Give each layer several hours to dry and keep stacking until you like it. Wooden or paper mache letters work too, and one bold initial brightens a gallery wall or shelf.
Get the full tutorial at Persia Lou.
22. String Art Wall Letters
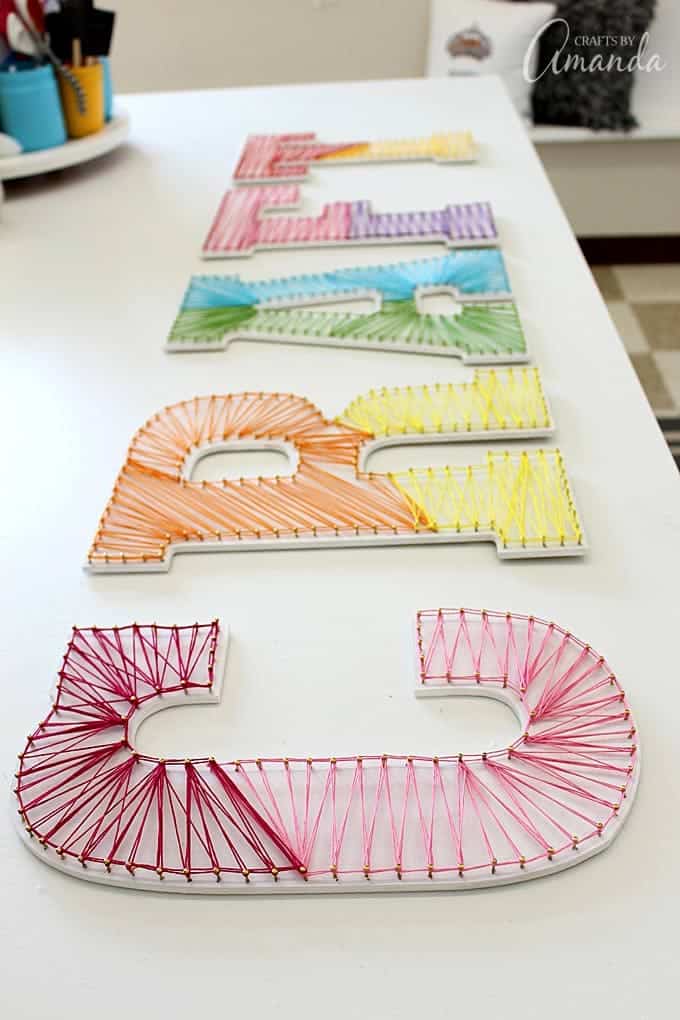
String art wall letters take patience, but wow, do they deliver. Paint MDF letters white, pencil dots about every half inch around the edges and drill tiny pilot holes partway in, since MDF is tough to hammer. Dip each small nail in white glue and tap it in. Tie embroidery floss to a nail, run a border around the letter, then zigzag back and forth across it, keeping the string taut the whole time. Plan on two or three skeins per letter (and a couple of days). Two colors per letter look extra cheerful.
Get the full tutorial at Crafts by Amanda.
23. Yarn Wrapped Wire Word Art
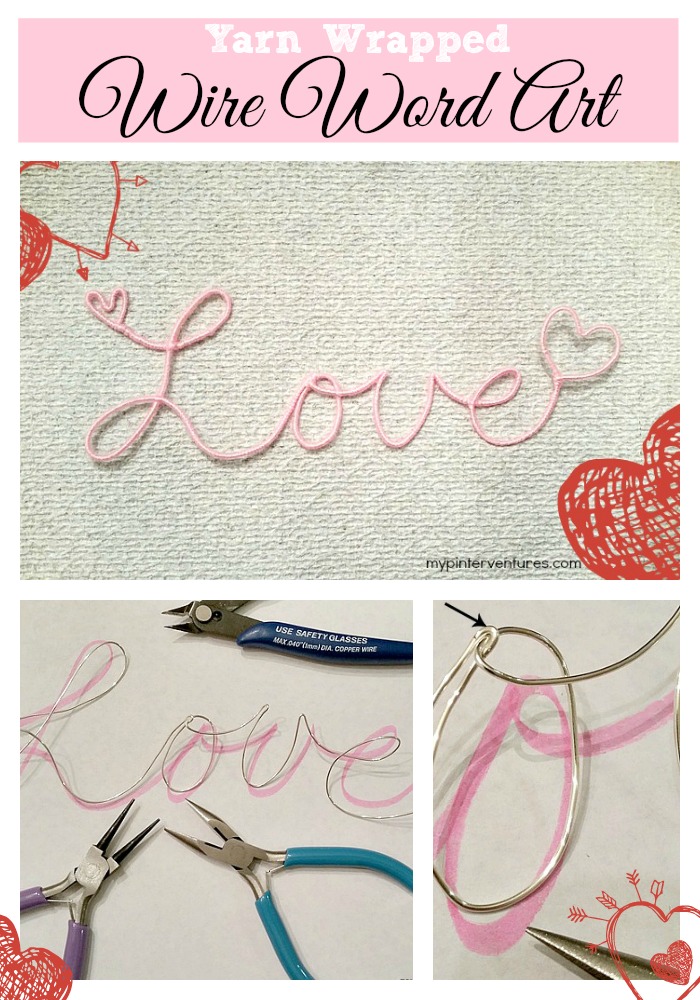
This yarn wrapped wire word art is so easy you can make it while watching a show. Write or print your word on a sheet of paper, then shape 16 or 18 gauge wire right over it, using round and flat pliers where the line doubles back (14 or 16 gauge makes a sturdier word). Don’t stress if it comes out a little wonky, since you can reshape it while you wrap. Hold a half inch of yarn behind the wire and wrap over it, going around twice wherever wires cross. A dab of hot glue on the back finishes it.
Get the full tutorial at My Pinterventures.
24. Pom Pom Wall Letters
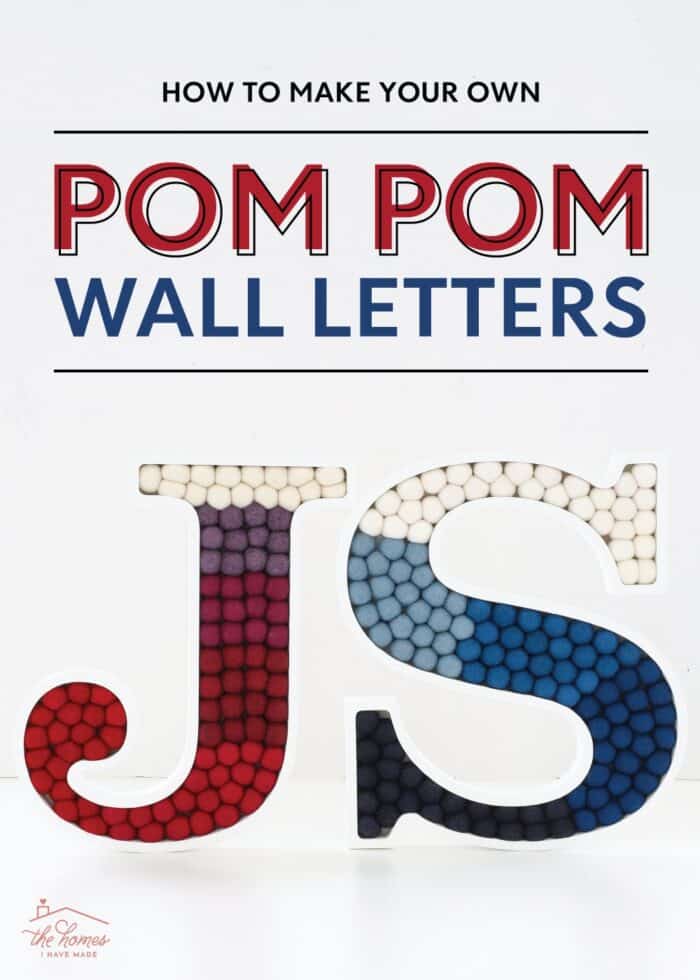
Pom pom wall letters are pure happy, and you can pick every color yourself. Start with a wood letter tray, prime it and paint the edges with a glossy spray or latex paint (raw MDF soaks up craft paint). Sort wool felt balls into color groups, then load them into the tray in any pattern, from ombre to totally random, before gluing them down with clear Gorilla Glue. A 15 inch letter takes nearly a full 120 count pack. Honest heads up from the tutorial: two big letters still cost about $70 each, so cardboard or paper mache letters are the cheaper base.
Get the full tutorial at The Homes I Have Made.
25. Floral Wood Letter
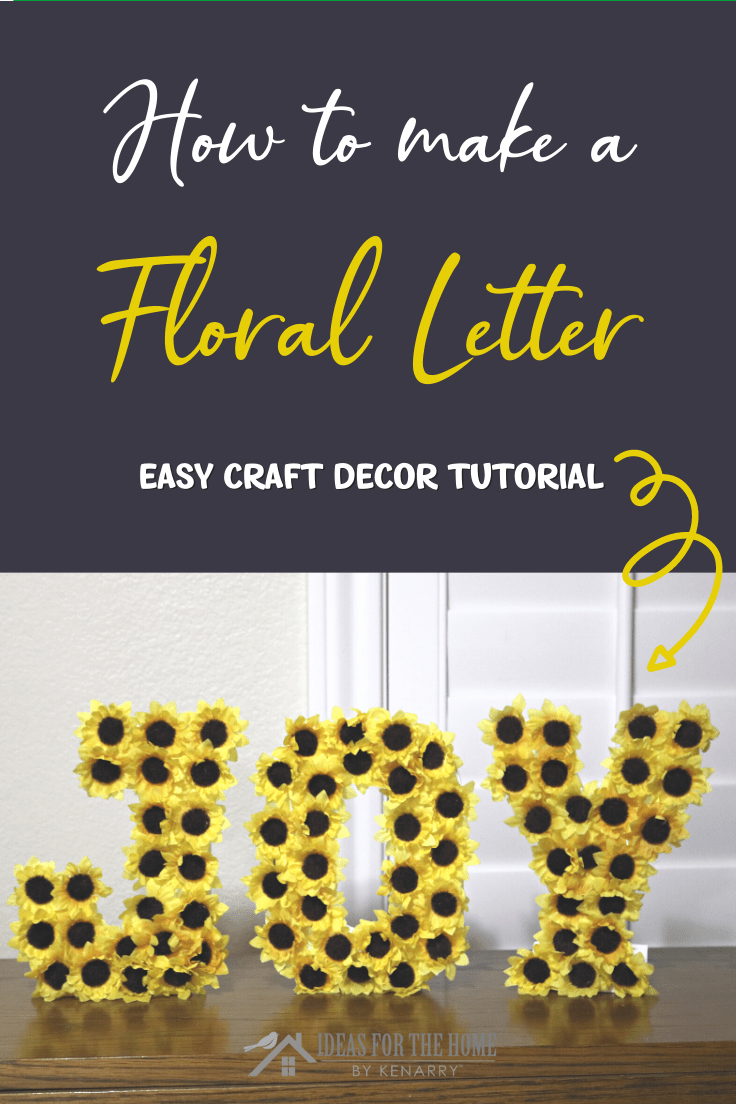
A floral letter looks like a pricey party decoration, but it takes about ten minutes. Pull artificial flower heads off their plastic stems, then snip the knobby bits on the back as close as you can so each flower sits flat. Hot glue the heads onto a wood letter until the whole face is covered. Paint the letter first if you want, or leave it white like the tutorial. Any size letter works the same way, so spell a word for a birthday party, baby shower, wedding or Easter table.
Get the full tutorial at Ideas for the Home by Kenarry.
26. Large Floral Word Art
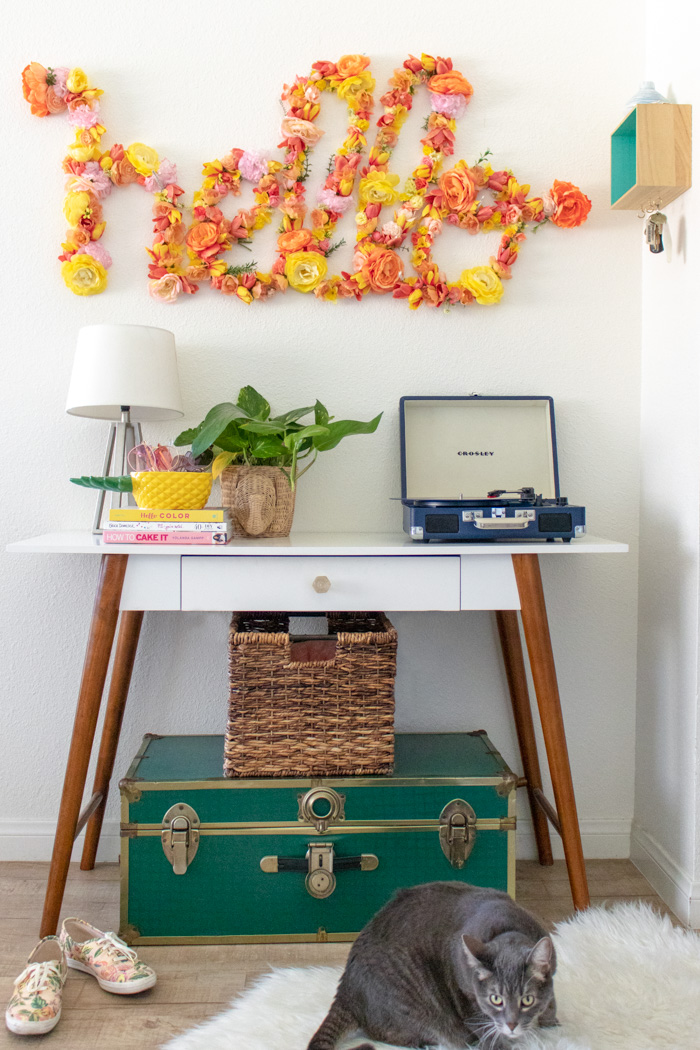
This large floral word art greets everyone at the door, and the secret is a giant pile of faux flowers (buy more than you think). Write your word in cursive as big as you can on thick poster board, using two sheets if needed, and cut it out with a craft knife. Messy lines are fine since flowers hide everything. Snip the blooms from their stems with wire cutters, hot glue the biggest ones first, then fill in with medium and small flowers. Keep the gaps between letters open so it still reads. Command strips hang it.
Get the full tutorial at Club Crafted.
27. DIY Moss Letter
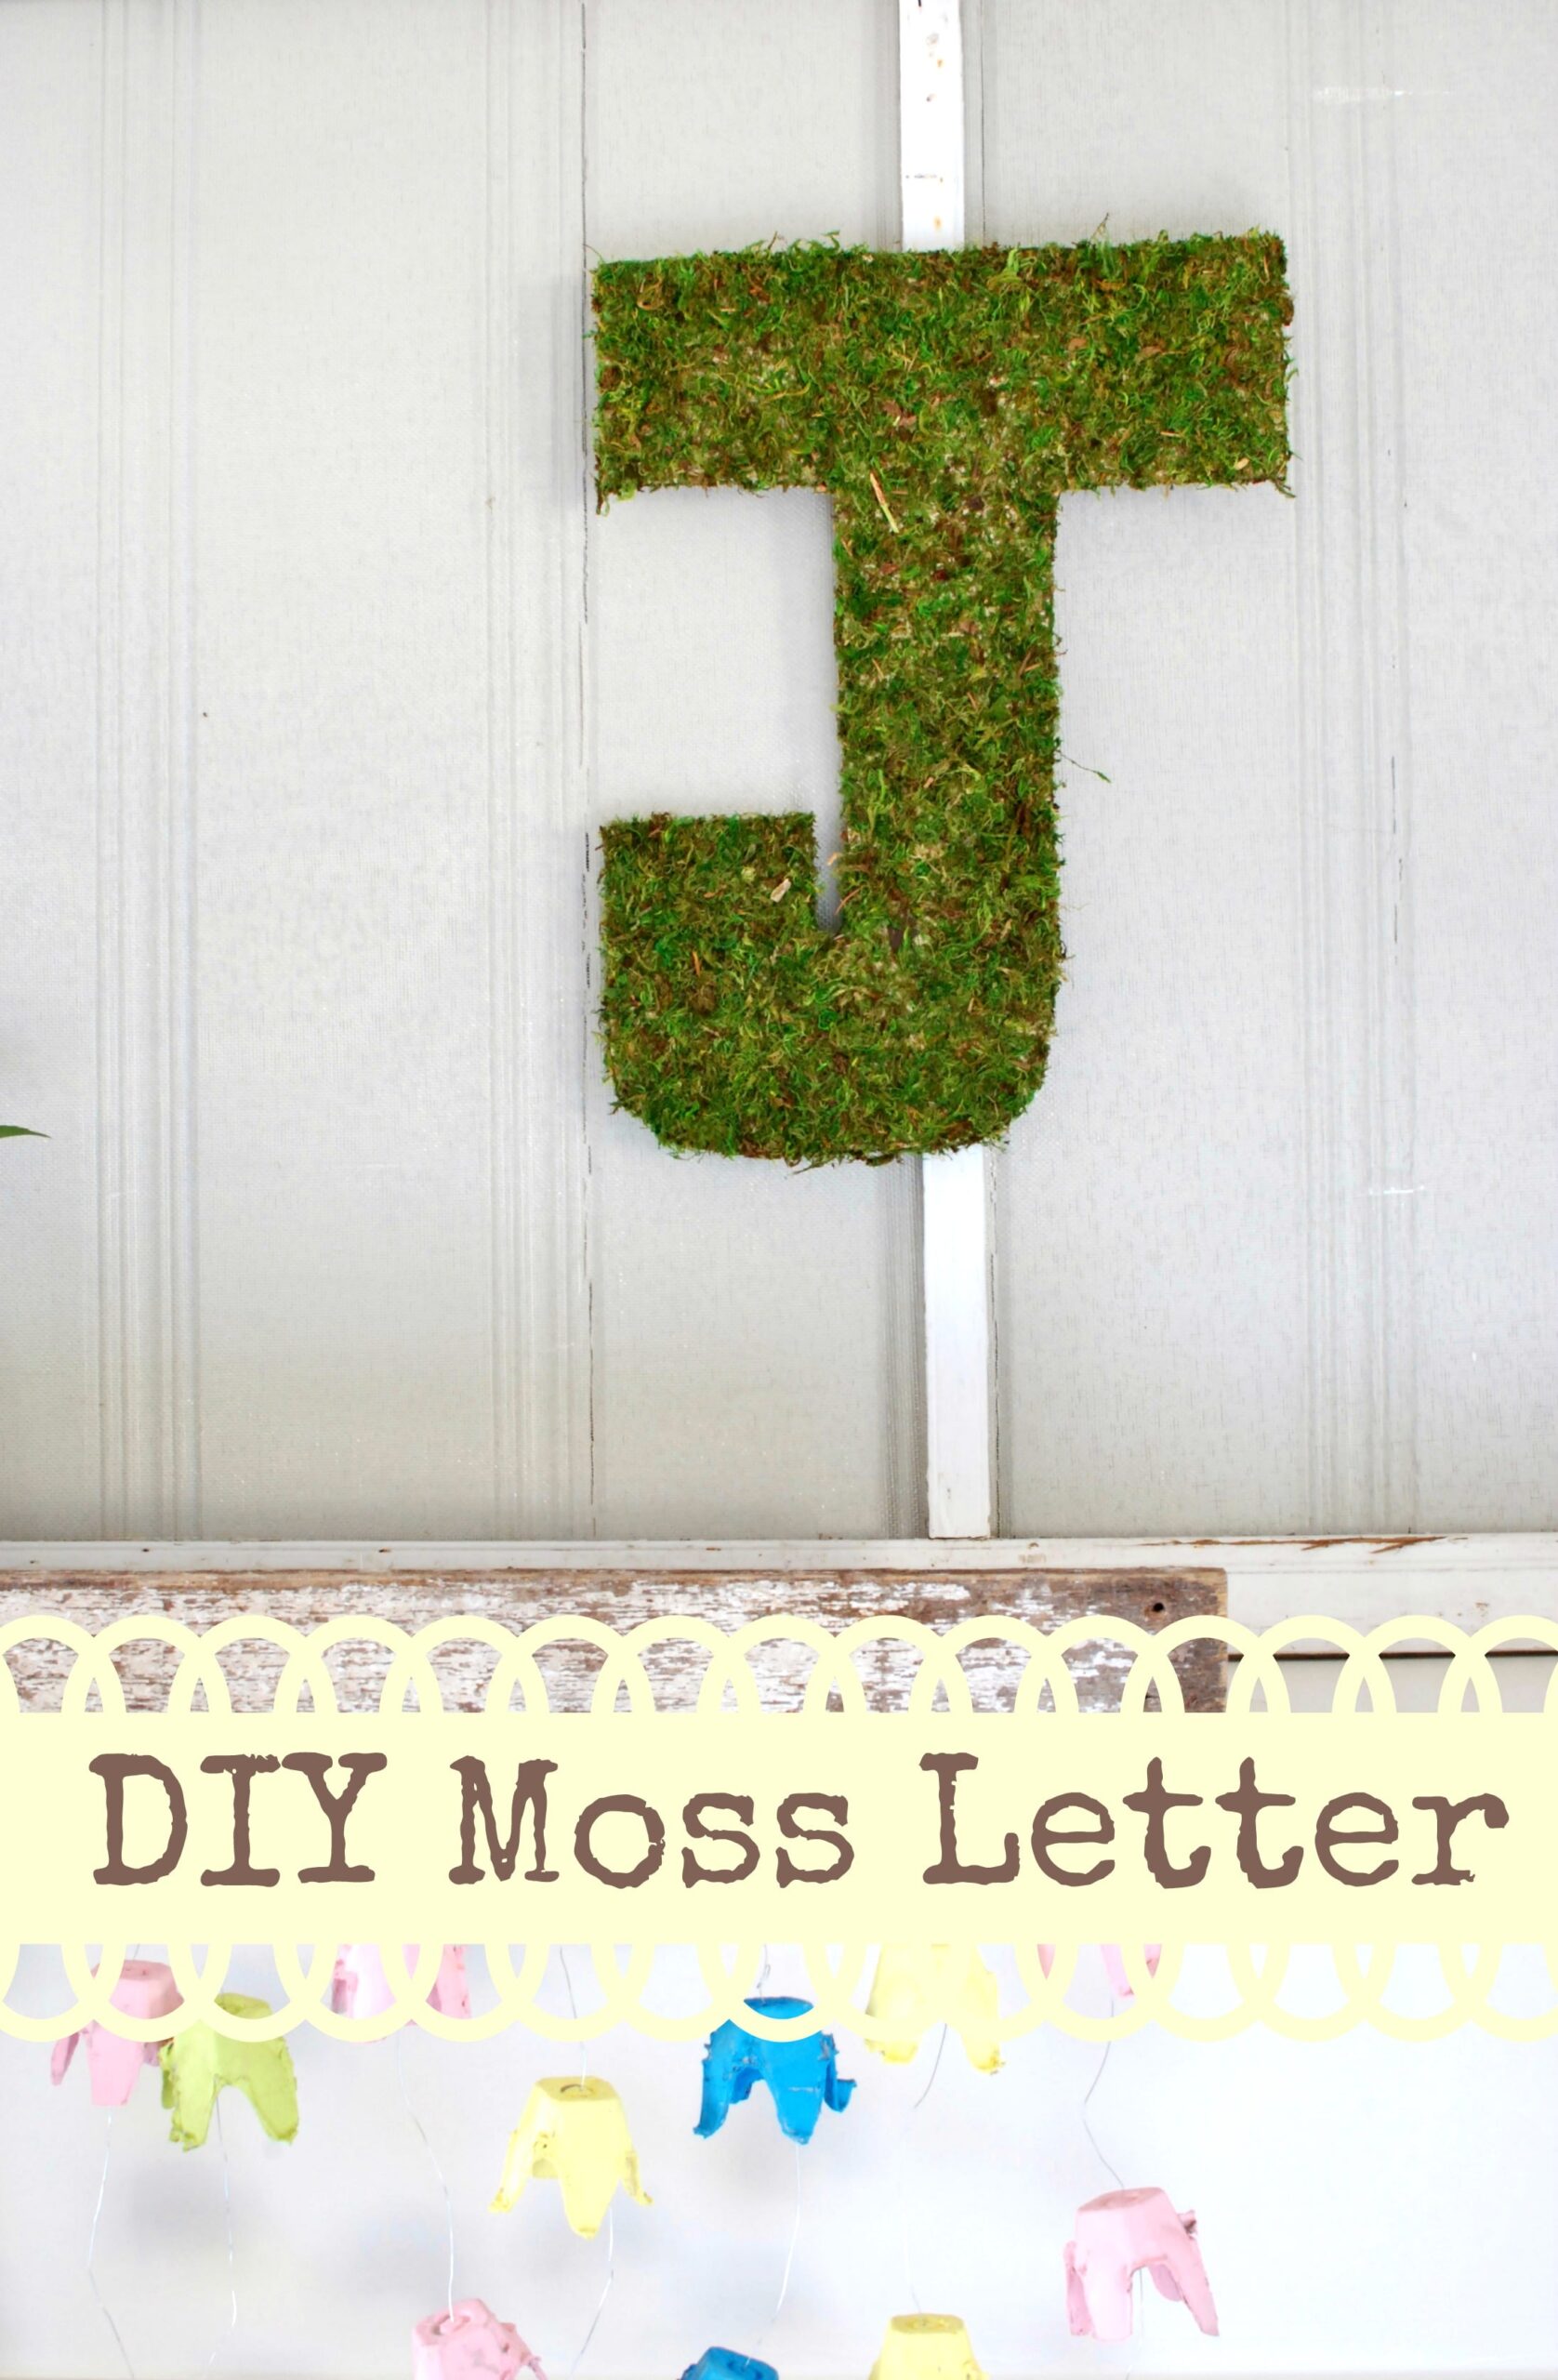
Want a monogram that looks straight out of a boutique? This moss covered letter starts with an empty cereal box. The letter is cut from the cardboard, then traced in reverse onto an adhesive backed moss sheet and cut about 1/2 inch wider all around. That extra edge wraps to the back, with the corners snipped so it folds flat, and Gorilla Glue holds it all in place. A paper clip glued on the back turns into a hanger. It’s a fresh, green touch for spring or a nursery wall.
Get the full tutorial at Kim Pepper.
28. Moss Filled Marquee Letters
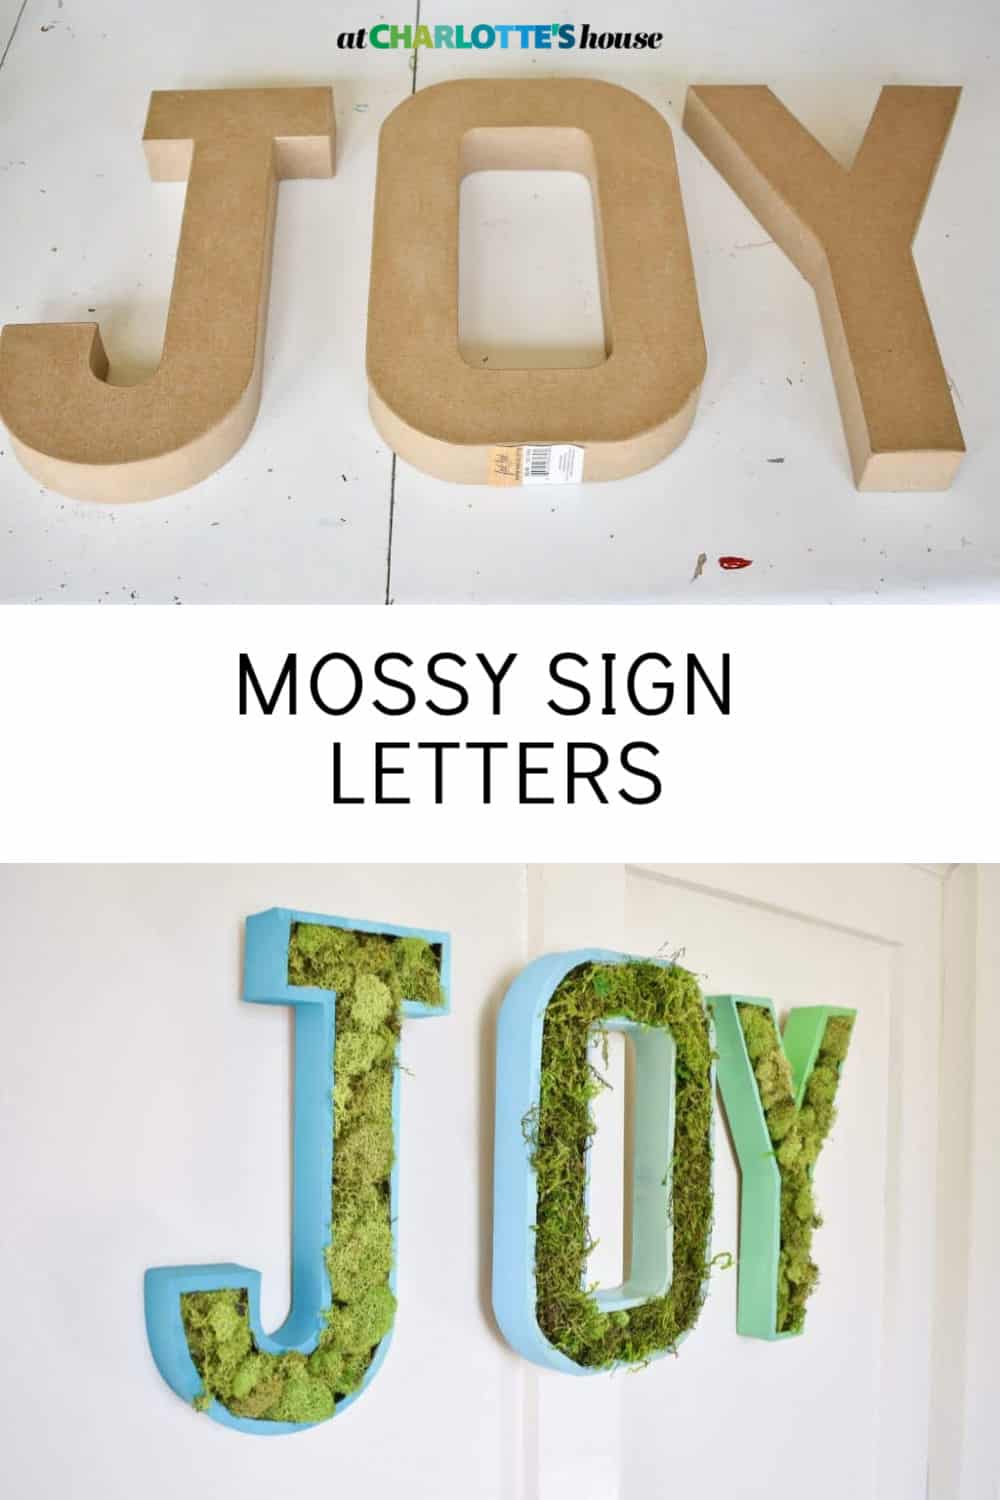
These moss filled marquee letters are a sneaky paper mache hack. Cut the front off each paper mache letter with a craft knife and pull out the little cardboard bits inside to hollow it out. Paint the outside (two blended blues give a soft ombre), then pack moss into the letter, securing it with hot glue and adding more on top. Add D-rings or paper clips to hang. One tip from the tutorial: some letters tilt if the ring is centered, so a bit of painter’s tape behind the hook fixes it.
Get the full tutorial at At Charlotte's House.
29. Fabric Letter Word Banner
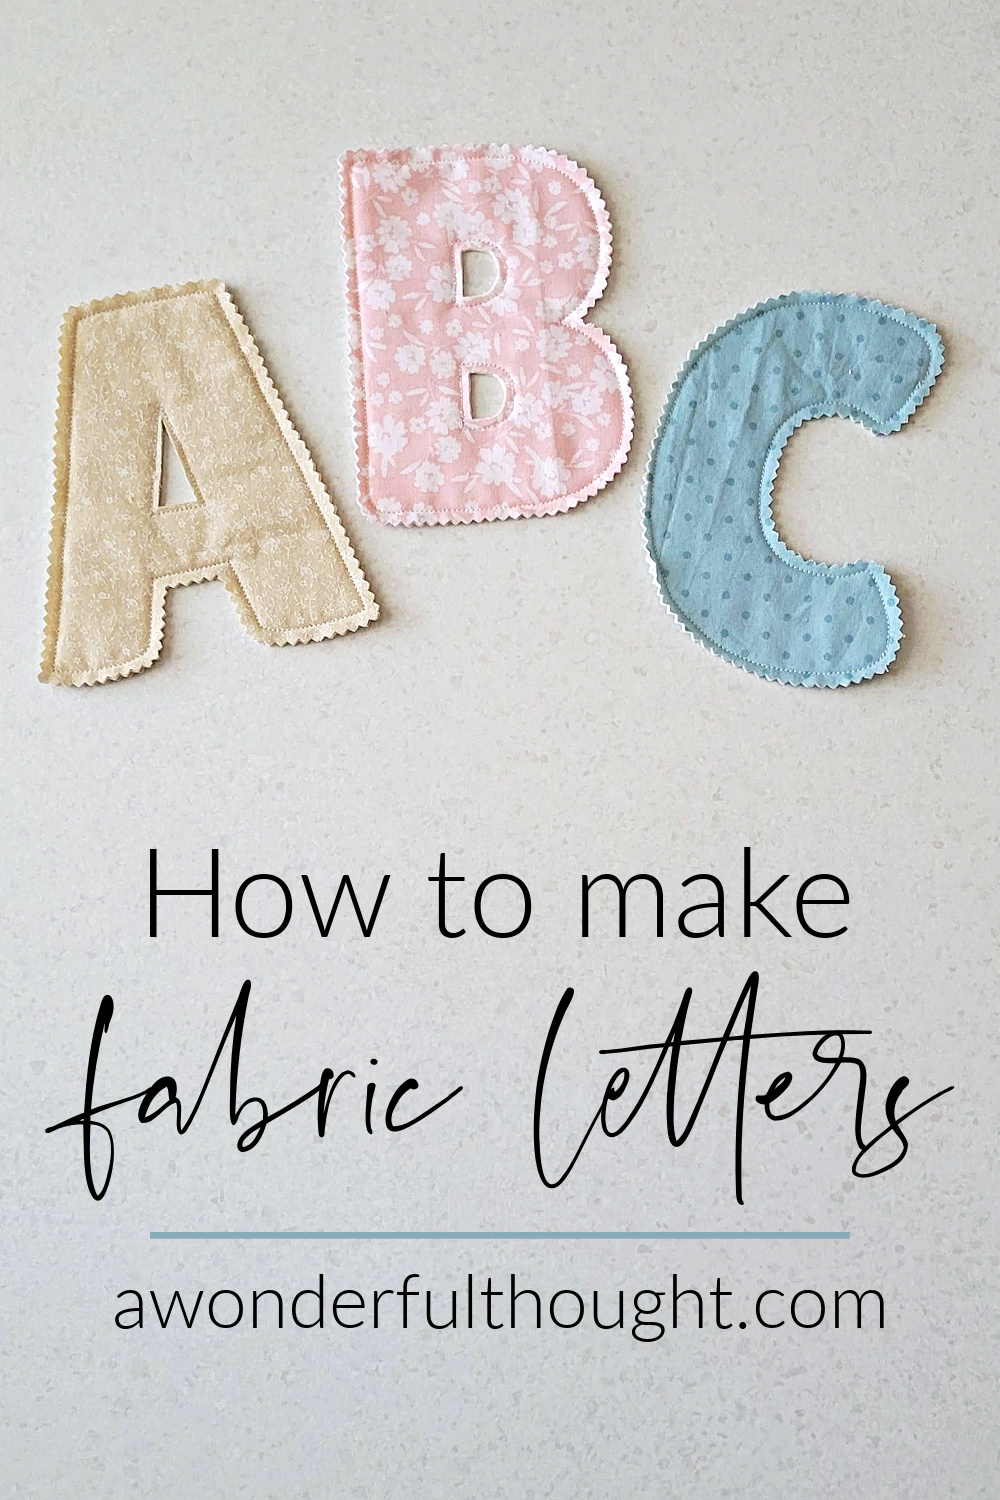
These fabric letters turn into a word banner you can spell any way you like: USA for the Fourth, MERRY for Christmas or a baby’s name over the crib. Print the free letter templates at 100 percent (finished letters are about 6.25 inches tall). Sandwich batting between two rectangles of fabric, pin the template on top and machine sew around the outline. No special skills needed, if you can follow a line. Trim with pinking shears and string the letters on jute twine with a large eye needle. Scrap fabric works great.
Get the full tutorial at A Wonderful Thought.
30. Floral Wooden Monogram Letter
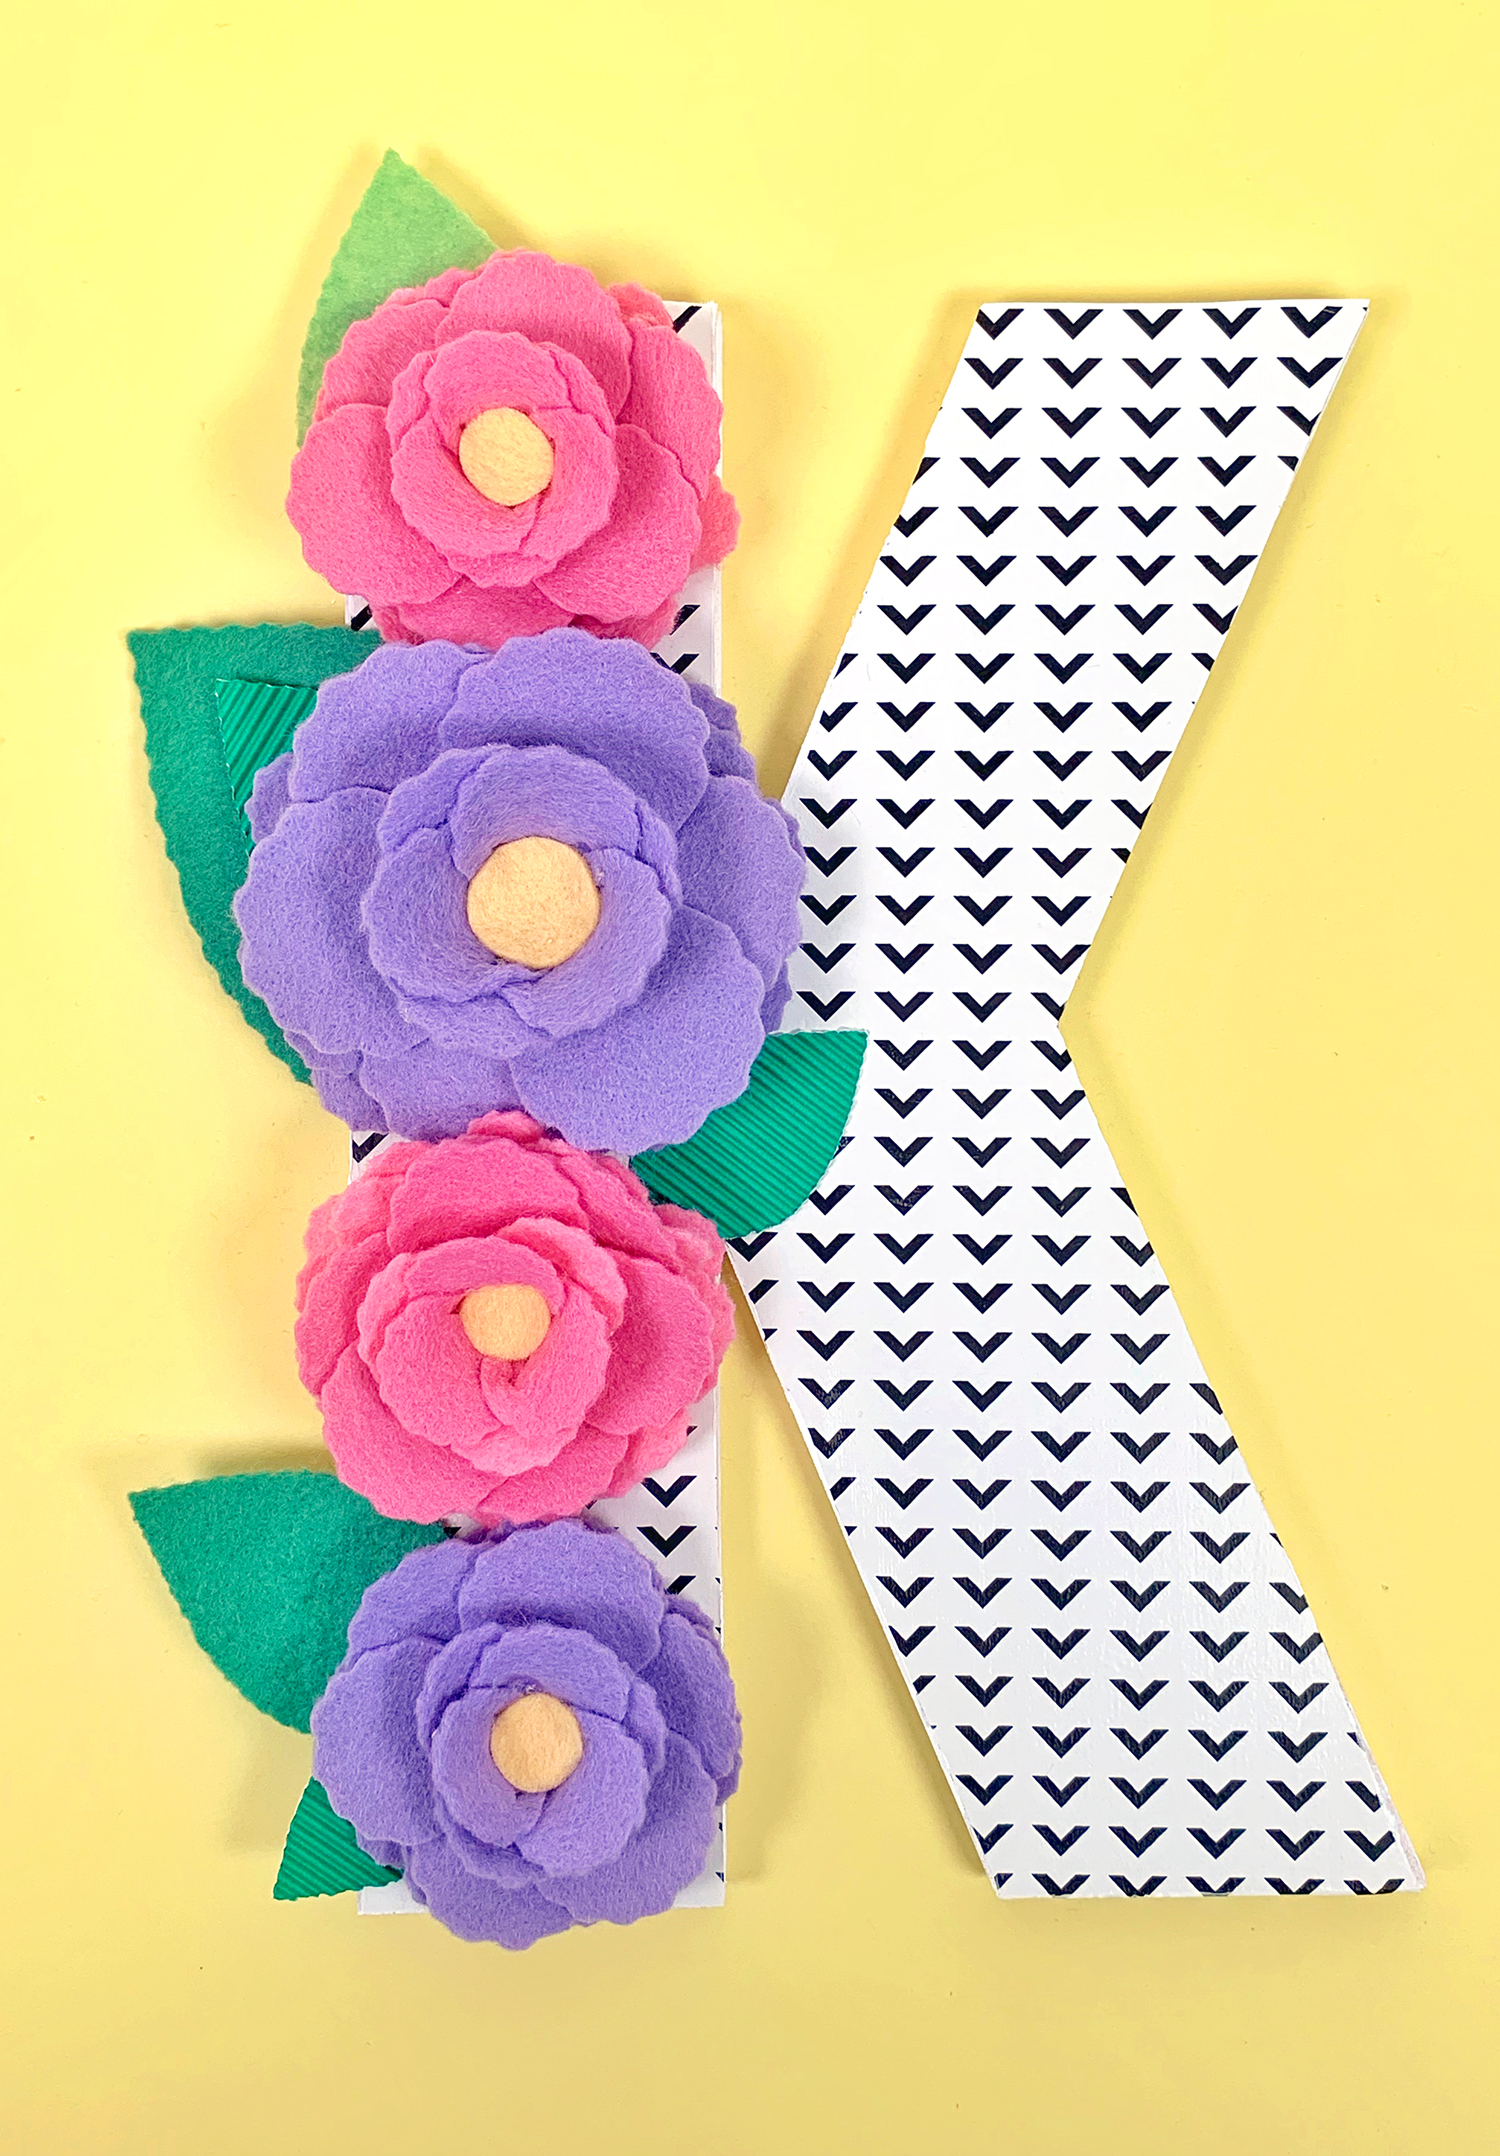
A floral wooden monogram makes a sweet baby shower or bridal shower decoration that the guest of honor gets to take home. This one is cut on a Cricut Maker: felt peony and leaf pieces with the rotary blade and four basswood letters with the knife blade, glued into one chunky monogram. Patterned iron-on goes on the front with an EasyPress (285 degrees for 25 seconds suits thin basswood), the edges get white paint and the layered felt flowers are hot glued on. You will need a cutting machine for this one.
Get the full tutorial at Happiness is Homemade.