
DIY signs are the fastest way to give a blank wall or a bare front porch some personality, and these 43 cover every room from the entry to the kitchen. A DIY sign is a wood or painted board you letter yourself, usually starting with a scrap board, a pallet, an old fence plank or a cheap canvas. You don’t need a cutting machine either. The classic trick is to print your words large, rub chalk or pencil on the back of the paper and trace them onto the wood like carbon paper, then fill the outline in with a small brush or a paint pen. Some of these are ten minute projects (stain a board, add letters, done), and a few are weekend builds with a saw and sander. One tip that works on all of them: distress the paint once it dries, because a little sandpaper hides a wobbly letter better than any eraser. Rather hang letters than a board? Try these DIY word art ideas.
1. Front Door Welcome Sign

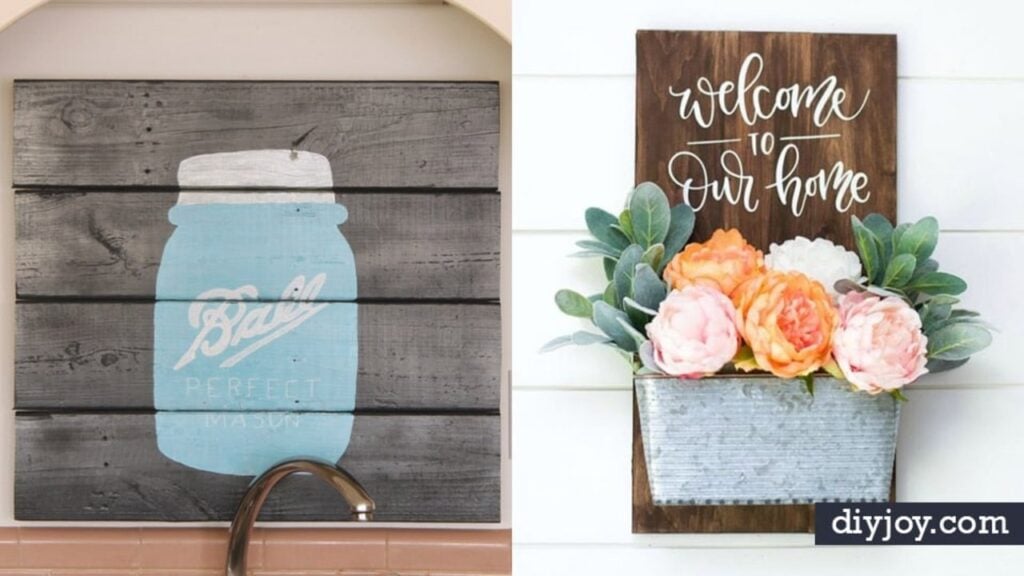
This front door welcome sign doubles as a planter, which makes it twice as cheerful as a plain plaque. A pallet board gets one coat of gel stain that dries in about 20 minutes, then a galvanized wall planter is screwed right onto the front. A “welcome to our home” phrase cut from vinyl goes on above it with transfer paper. Faux peonies tucked into a bit of floral foam stay pretty outdoors, and swapping the stems for each holiday keeps it fresh all year. Command Strips handle the hanging.
Get the full tutorial at Crafts by Courtney.
2. Golden Acorns Gather Sign

Real acorns get a golden glow-up on this fall gather sign. Bake cleaned acorns at 220 degrees for about two hours to preserve them, then rub a little gold Rub ‘n Buff on the bottoms and hot glue them to a length of leather cord. The wooden plaque gets two coats of chalky paint and a vinyl stencil where a squirrel silhouette stands in for the A. Letter stickers work if there’s no cutting machine. Clear wax seals it and a touch of dark wax adds age.
Get the full tutorial at Average But Inspired.
3. DIY Embroidered Pallet Wood Sign

Embroidery on wood sounds impossible until you see how simple this pallet sign is. Print a word in any font, tape it to a pallet board and punch through the paper every half inch with an awl, a little closer on the curves. Drill each mark with an eighth inch bit, wipe away the dust, then backstitch yarn through the holes like you would on fabric. It takes patience, but it’s relaxing work, and pallets are usually free. Pick a bright yarn so the letters pop against the rough wood.
Get the full tutorial at My So Called Crafty Life.
4. DIY 3D Sign

A 3D sign gives a plain porch board a modern twist with letters that float. Spray paint a $7 pine board bright blue, then paint wooden “hi” letters a contrasting yellow. The trick is plastic wall anchors with the pointy tips snipped off so both ends are flat, glued between the letters and the board to lift them off the surface. Hot glue isn’t strong enough here, so use heavy-duty adhesive and let it set a full 24 hours. Simple, bright color beats fussy stripes and ribbon every time.
Get the full tutorial at Tatertots and Jello.
5. DIY Hello Sunshine Sign

Leftover paint finally gets its moment on this hello sunshine sign. Freehand a big folk art sun across a pallet, and don’t worry about perfectly straight lines, because the wobble is part of the charm. Mix whatever paint is left in the garage into a range of oranges and yellows and fill each ray with a different shade. Stencil the word hello on top, then paint and sand so it looks like it’s been in the sun for years. It’s a happy piece for a porch or a bathroom.
Get the full tutorial at Life as a Thrifter.
6. Vintage Style Telephone Sign DIY

This vintage telephone sign is a throwback in the best way, and it’s all pallet wood. Lay out pallet boards about 25 inches square, nail cross braces on the back, sand the front smooth and roll on leftover white latex. Enlarge a classic Bell System logo across nine printed pages and tape them together. Scribble pencil over the back of the paper, then trace the front with a pen to transfer the design. Paint it, sand lightly with a palm sander and finish with tinted wax for age.
Get the full tutorial at Scavenger Chic.
7. Rustic Painted Arrows

Rustic painted arrows are proof that DIY wall art can be quick and still look great. Cut thin wood plank panels in half to about 16 inches, then give them a coat of dark gel stain. Freehand an arrow on each with white chalk paint, and don’t stress about wobbly lines. Sanding is the secret here, because distressing the paint hides every imperfection. A coat of clear wax seals it all. If the stain isn’t completely dry, the white picks up a warm tinge that actually looks aged.
Get the full tutorial at Canary Street Crafts.
8. DIY Painted Canvas Farmhouse Sign

A farmhouse sign doesn’t have to be wood. This one starts with a 10 by 20 inch craft store canvas, painted gray first, the color the letters will end up. A vinyl stencil goes on next, but vinyl doesn’t love canvas, so burnish it hard and peel the transfer paper slowly. Another coat of gray seals the stencil edges, then the antique white background goes on top. Peel the vinyl and the letters come out crisp. The whole sign costs a fraction of the $125 version that inspired it.
Get the full tutorial at unOriginal Mom.
9. DIY Weathered Rope Sign

This weathered rope sign takes just three items and looks like something from a coastal boutique. Start with a beat up board, or give a new one a driftwood finish. Write the word relax in chalk using a printed font as a guide, and redo it as many times as needed, because chalk wipes off with a damp cloth. Then hot glue short sections of garden cord along the chalk line, working quickly. Natural cord from the garden aisle gives the most beachy texture for a summer mantel.
Get the full tutorial at The Turquoise Home.
10. DIY EAT Sign

A vintage EAT sign is a classic for a farmhouse kitchen, and this one cost zero dollars. A thin scrap board gets painted white, then hand cut paper stencils of each letter are taped down and painted black. Printing the letters gives cleaner shapes than drawing them freehand. Sand around any wavy edges, tape off a border and paint it black to match. A light pass of dark wax ages the whole thing, and a few dings from a hammer and nails sell the thrift store look.
Get the full tutorial at Seeking Lavender Lane.
11. DIY Sign with GPS Coordinates

A GPS coordinates sign is like a fingerprint for a house, since no other home shares the same numbers. This one recycles an old sign that had gone splotchy, painted black in two coats. Glossy fresh paint looks too new, so rub it down with coarse sandpaper to distress it before any lettering goes on. Then the latitude and longitude go on in craft vinyl, with the word home in the middle. It’s a quick project that adds personality to a gallery wall.
Get the full tutorial at DIY Beautify.
12. DIY Pallet Anchor Sign

This anchor pallet sign is all about the ombre. Stain a pallet first, then paint it dark navy and, while it’s still wet, brush a lighter blue down from the top so the colors blend into each other. Print a large anchor on 11 by 17 inch paper, trace its outline in pencil on the back, then flip it and trace again on the pallet to transfer the design. Paint the anchor white and add rope trim for a nautical touch. It’s ideal for a lake deck or porch.
Get the full tutorial at The Happy Housie.
13. Mason Jar Pallet Sign

Mason jar pallet art brings farmhouse charm right above the kitchen sink. This sign is about 22 by 24 inches, made from four old deck boards cut to 24 inches and screwed together from the back with a couple of cross pieces. Three light coats of chalky spray paint cover it in about ten minutes. Transfer a jar outline with white graphite paper or freehand it, then paint it in soft blues with a metallic touch. Any design works, so try a pitcher or a rooster to match the kitchen.
Get the full tutorial at The Country Chic Cottage.
14. DIY Large Wooden Sign

Big signs make a big statement, and this one stretches a full 8 feet. A 10 inch by 8 foot strip of plywood is sanded and painted white, while 1×2 trim is stained Special Walnut and dry rubbed with gray milk paint to soften the brown. The lettering is a vinyl stencil cut on a Cricut, sliced in Design Space into sections about 11 by 23 inches so each fits a 12 by 24 inch mat. Line the pieces up on the board like a puzzle.
Get the full tutorial at The Crafty Blog Stalker.
15. Its Good to be Home Sign

A hand lettered sign doesn’t need a steady hand, just a cheap ballpoint pen. Print the phrase in two fonts, cut the words apart to space them and tape them to a painted board about 14 inches wide. Trace hard enough that the pen leaves a dent in the wood, then fill the outline with paint pens, a thin one for edges and a thick one for big letters. It feels like coloring, and small fixes are easy. A stained frame finishes the “it’s so good to be home” sign.
Get the full tutorial at Thrifty Decor Chick.
16. DIY Vintage Market Sign

A vintage market sign looks right at home above a kitchen window. Paint a piece of leftover plywood with white chalk paint, print the letters, tape them down and trace each one with a pen, pressing firmly to dent the wood. Fill the outlines with permanent marker, which works especially well on chalk paint, and use a ruler for straight lines. Dry brush dark gray on the edges, sand, then add wax and aging dust. Painting the letters solid black at the end gives the boldest look.
Get the full tutorial at Little House of Four.
17. Handmade Fried Green Tomatoes Kitchen Sign

This fried green tomatoes sign is a sweet nod to summer gardens. A thin piece of quarter inch plywood gets white paint, then printed letters are lined up with a ruler. For the script line, trace the letters in pencil on the back of the printout, flip it and trace again on the front to transfer them. The best detail? Each O in tomatoes is painted as a little green tomato. Outline lettering with a Sharpie to make it pop, and use painter’s tape on the edges to save time.
Get the full tutorial at Cottage at the Crossroads.
18. DIY Beach Sign

A yard sale find turned into a beach sign, and the whole stack of old shelves cost one dollar. Print a single word in a favorite font, size it to the board and tape it down. Trace the outer edge of each letter, lift the paper and paint between the lines. A coat of matte poly protects it, and a hanger on the back makes it ready for the wall. No cutting machine or vinyl needed, which makes this one of the simplest DIY wood signs to start with.
Get the full tutorial at Refresh Restyle.
19. Hanging Planter Welcome Sign

This hanging planter welcome sign pairs a chalkboard with a flower basket on one sturdy stand. The frame is 2x4s joined with wood glue and finish nails, set on a 2×6 base, with a 2×6 across the top painted as the chalkboard. A hook in the middle of a lower crossbar holds the hanging basket. The build takes about an hour. Stain everything except the board face in a weathered gray and seal with outdoor poly. It works best on a covered entry out of the wind.
Get the full tutorial at Decor and the Dog.
20. Custom Wood Name Sign

A custom wood name sign makes a nursery or kid’s room feel truly personal. A script name is cut from 3/4 inch birch plywood with a basic jigsaw, proof that the cheapest saw can do it. Use plywood scraps from another project to keep the cost down. Sand the edges, then paint it in a favorite color, which is often pink when the room’s owner gets a vote. Hung on the wall above a bed, the name becomes the focal point of the room.
Get the full tutorial at The House of Wood.
21. Simple and Easy DIY Bakery Sign

A tall bakery sign gives a hallway or kitchen that Magnolia market look for almost nothing. Start with a rustic barnwood board painted white, then print the letters of BAKERY large, in a font like Modern No. 20. Cut them out, tape them evenly down the board and trace each one with a pen. Fill them in with black acrylic and a small brush that reaches the corners. Fast drying craft paint keeps this quick. Sand lightly afterward for a more worn, vintage look.
Get the full tutorial at Sarah Joy.
22. Where the Wild Thing Are Pallet Sign

A storybook pallet sign is a sweet nursery touch. Cut four pallet pieces to make a sign about 14 by 18 inches, then nail two backing boards on at varying angles so they grip better. Hand sand the front lightly since it’s for a baby’s room. Paint the background in white chalk paint, which covers in one coat on porous pallet wood. A monster stencil cut from clearance vinyl on a Silhouette goes on next, smoothed down with a credit card. Paint it gray and add the lettering in white.
Get the full tutorial at Weekend Craft.
23. New Farmhouse Style Wood Signs

Quote signs in simple wood frames are a great way to surround a home with words that matter. These farmhouse style wood signs pair charcoal and linen colored paint with dark walnut frames, a combination that looks clean and timeless. The quotes come from a collection kept on a Pinterest board and in a journal, like a John Burroughs line about days being too short for every walk and every book. Aqua, turquoise, navy or apple green lettering gives the same idea a modern spin.
Get the full tutorial at A Fresh-Squeezed Life.
24. Simple DIY Bar Sign

This bar sign takes about 40 minutes, and most of that is drying time. Three 8 inch papier mache letters at $2.99 each get a coat of metallic gold spray paint. A free extra long paint stirring stick with the handle cut off becomes the base, sanded smooth on the edges. Gorilla Glue holds the letters on, and dampening the surfaces with a wet rag activates it, but too much water warps the stick. Use a little less glue than seems right so it doesn’t seep out.
Get the full tutorial at Peachfully Chic.
25. DIY Front Porch Welcome Sign

This front porch welcome sign stands on its own and holds flowers too. Cut three 2×6 boards to 31 inches for the face and two 2x4s to 42 inches for the legs, spaced 19 inches apart, then attach each board with two 2 inch screws. A 29 inch 2×6 makes a bottom shelf, with a 19 inch 2×4 for support. Spray paint it outside on cardboard. Once dry, paint the welcome message and fill the shelf with flowers in tin can pots.
Get the full tutorial at Daddy by Day.
26. Monogram Pallet Family Name Sign

A monogram pallet sign with a family name has rustic charm in spades. Build a pallet sign about 16 inches square from three boards, then stain it with a dark walnut and let it dry overnight. Dry brush white paint heavier in the middle, leaving about an inch of border, and sand lightly so wood shows through. Print a big initial and a smaller family name at full size, then transfer them with Saral transfer paper. Rubbing willow charcoal on the back of the paper works too.
Get the full tutorial at What's On My Porch.
27. Pineapple Wooden Upcycled Pallet Sign

A pineapple welcome sign is a classic symbol of southern hospitality, and this one uses a rescued pallet. Nail the pallet slats to a couple of cross pieces on the back. Design the sign full size in Silhouette Studio, cut each section small enough for the machine, and transfer the vinyl with clear contact paper. Seal the vinyl edges with matte Mod Podge so paint can’t creep under, then dry brush a light aqua over everything. Peel the vinyl and sand the rough spots.
Get the full tutorial at Architecture of a Mom.
28. DIY Gather Sign

This gather sign comes together in about 30 minutes. Metal letters from a craft store, about $2.99 each or less on sale, are glued onto a scrap 8 inch wide board with an adhesive made for bonding porous and non porous materials. Dry brush black acrylic over the board to weather it: dip the brush, blot it nearly dry, then glide it lightly across the surface. The farmhouse look is perfect for a fall mantel, and it stays up through Thanksgiving.
Get the full tutorial at Taryn Whiteaker Designs.
29. Patriotic Wood Flag

A wood flag is a statement piece for a summer porch. Join two pieces of 1×12 with wood glue and biscuits or pocket screws, then mark the blue field and the stripes. Tape off and stain the red stripes, move the tape for the white, then stain the blue. A V-groove router bit run against a straight edge cuts a line between each stripe and hides any bleed. Frame it with mitered trim and brad nails, then sand to distress. Vinyl stars and satin poly finish it.
Get the full tutorial at Her Tool Belt.
30. Modern House Number Sign

A modern house number sign updates curb appeal in an afternoon for about $30. Lay the numbers out on a flat surface first and keep the space between them equal, about 1.25 inches works well. Add that same spacing above the top number and below the bottom one to find the sign’s height. Cut 3.5 inch cedar boards to the width of the widest number plus spacing on both sides. Frame it with primed 1×2 trim and attach the numbers. Choosing cedar boards that match the height saves rip cuts.
Get the full tutorial at Pretty Handy Girl.
31. DIY Chalkboard Sign

This DIY chalkboard sign costs less than $10 and works for back to school photos or everyday decor. Cut 1×3 boards for the frame, two at 20 inches and two at 14.5 inches, each with a 45 degree miter. Drill pocket holes in the shorter pieces with a Kreg Jig, then stain or paint. The secret is the board itself, which is really thin MDF sprayed with chalkboard paint. It’s cheaper than a real chalkboard and much lighter to hold up for a first day picture.
Get the full tutorial at Our Home Made Easy.
32. Don't Worry Be Happy Signs

These don’t worry be happy signs started as thrift store prints in dated gold frames. Take them apart, spray the frames gold and turn the glass into a faux antique mirror. The lettering is a simple graphic cut as a stencil on a Silhouette, here using patterned contact paper because that was what was on hand, then sprayed gold. If the first try streaks, a paint stripper wipes it right off for a fresh start. Free printable versions of the graphics make it easy to copy.
Get the full tutorial at Artsy Chicks Rule.
33. DIY Wooden Sign Without a Stencil Cutting Machine

No cutting machine? This wooden sign proves it isn’t needed. Three 16 inch pieces of 1×5 board make a sign about 13 1/2 by 16 inches, with stringers 2 inches shorter than the height glued and nailed to the back. Sand, then stain in Golden Oak. Print the design in sections, tape it together like a puzzle, center it on the sign and cut out the letters with a craft knife. Small bridges keep looped letters intact. Dab paint from the edges inward, then touch up gaps afterward.
Get the full tutorial at DIY Huntress.
34. Easy DIY Wood Signs

These easy DIY wood signs use a transfer method that needs no special equipment at all. Pick a board (a broken pallet piece gives this one its rustic look; just check pallets for chemical treatment). Set your font in a photo editor, enlarge it onto letter size sheets with a free poster tool and tape them together. Rub white chalk over the back, lay it chalk side down and trace the letters with a pencil. Paint over the outline with an artist’s brush or a paint pen. Free printables included.
Get the full tutorial at Salvaged Inspirations.
35. Farmhouse Style Inspired Home Sign

This farmhouse style inspired home sign swaps the O in HOME for a miniature greenery and grapevine wreath. Cut an 8, 10 or 12 inch pine board to 24 inches, stain it gray, paint white chalk paint over it, wax and sand back the edges for a worn look. Stencil the letters, cut them on a craft cutter or print a large font and trace it. Painter’s tape keeps everything straight. Hot glue or strong craft glue holds the little wreath in place.
Get the full tutorial at 504 Main.
36. Floral Wood DIY Welcome Sign

This floral wood DIY welcome sign spells “hello” in gold hot glue, so there is no paint or lettering skill involved. Load a glue gun with gold glue sticks, squeeze out any old glue until it runs gold, then write your word slowly on a silicone craft mat. Let it cool, trim any rough spots with scissors and lift it off. A few dabs of the same glue attach it to an 8 by 8 inch wood sign, and paper flowers finish it.
Get the full tutorial at Mod Podge Rocks.
37. Happy Camper DIY Sign

This happy camper DIY sign was painted on the back of an old plywood sign, so start with whatever board you have. Dry brush on gray and white paint, wiping most of it off the brush first, then rub stain over it with a rag and quickly wipe it back with mineral spirits for a weathered gray finish. Paint a little vintage camper and the words on top using simple sign painting tricks. It is easier than it looks, and it suits a camping lover’s room.
Get the full tutorial at Lovely Etc.
38. DIY Monogram Address Plaque

This DIY monogram address plaque mounts your house numbers on a large wooden initial. Paint the big letter and the wooden numbers with satin enamel paint, then edge every piece with outdoor gold paint using a small detail brush and very little paint on the bristles. Glue the numbers onto the letter with a strong craft adhesive, keeping them as straight as you can, and add a few metal flowers. Use outdoor rated paint, since it lives by the front door.
Get the full tutorial at A Little Craft In Your Day.
39. DIY Weathered Sign

This DIY weathered sign spells grateful, thankful, blessed on a plain board pulled from the garage. Lightly sand the edges, then brush on several coats of a wood weathering finish, letting it dry a bit between coats until it is dark enough. A light wash of white chalk paint over the top softens it. Print your script font large with a free poster tool, shade the back with chalk, measure so it sits evenly and trace it with a pencil. Then paint the lettering.
Get the full tutorial at Artsy Chicks Rule.
40. DIY Farmhouse Style Home Sign

This DIY farmhouse style home sign cost about $12 and comes together quickly. Look for thick, straight wooden letters (these were $3.99 each) and spray paint them black. Pair two salvaged boards of different lengths with chippy white paint, then seal them with clear shellac spray so the paint stops flaking. Join the boards from behind with a thin strip of underlayment. Sand the letter edges for character, nail them on with a nail set to sink the heads and cover each nail with a black marker.
Get the full tutorial at Sarah Joy.
41. DIY Metal Letter Signs

These DIY metal letter signs are about the easiest word signs there are, since store bought metal letters already have hangers on the back. Cut a scrap sheet of beadboard (or any board) to fit your word, then build a simple frame from 2x2s on the back so the sign is sturdy, solid and easy to hang. Lay out the letters and hang them on nails. Mix colors, sizes and finishes for a collected look, or keep them matching for a clean, modern word.
Get the full tutorial at Liz Marie Blog.
42. Reclaimed Wood Love Rope Sign

This reclaimed wood love rope sign writes a word in heavy twine on old fence planks. Sketch your word on paper in a script that flows without breaks, since rope bends but will not make sharp corners. Chalk the word onto three loose planks, then lay hot glue along the chalk line a few inches at a time and press the twine into it before it cools. This one ends in a twisty heart. Screw two support boards across the planks to hold them together.
Get the full tutorial at Funky Junk Interiors.
43. DIY Hallway Signs

These DIY hallway signs hang over each doorway from plant brackets, like little shop signs. Each one is an oval wooden plaque (under a dollar each) with a cup hook screwed into the center of the top edge; check that the plaque swings under the bracket without touching it. Paint the plaques cream, brush dark brown around the edges, mist more cream in the center and sand lightly once dry. Add vinyl or rub on words like Bath, Office and Laundry to both sides.
Get the full tutorial at My Cottage Charm.






