
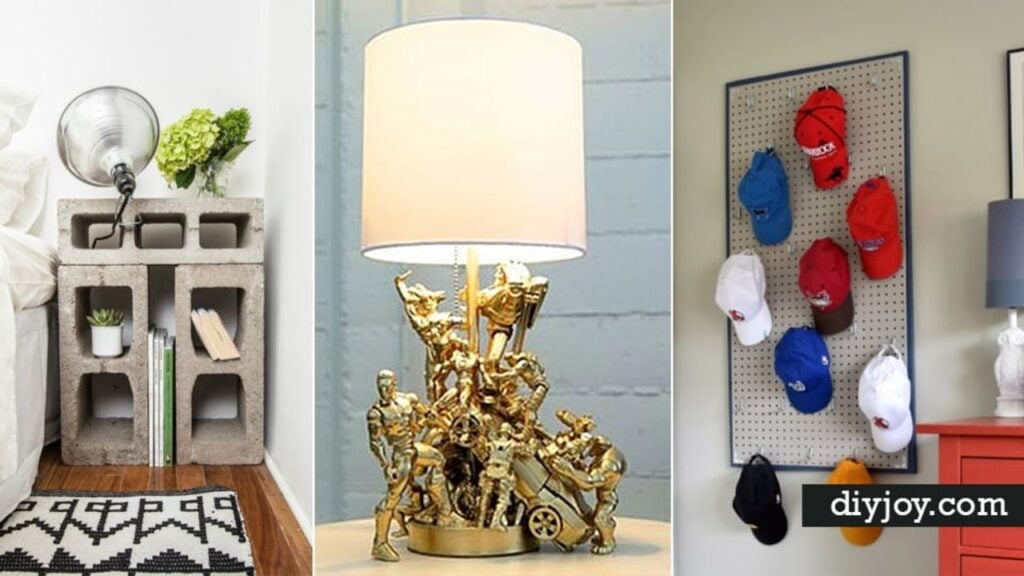
A boy’s bedroom should look like the kid who lives there, and these 30 creative DIY room decor ideas for boys make that easy on a small budget. Sports fans get a pallet basketball hoop over the bed, baseball bookends, a pegboard cap organizer and a hockey jersey shelf that hides the clutter. Superhero and Star Wars fans can pick from a comic fabric dresser, a foam Thor hammer and Lego specimen art. The lighting is just as fun, from a toy car lamp and a chicken wire pendant to glowing cloud lights. DIY JOY video tutorials cover a tin can desk organizer, a rolled paper pen holder and no sew roman shades made from a mini blind. Pick a theme and start with one wall.
DIY Room Decor Ideas for Boys
1. DIY Basketball Hoop

This DIY basketball hoop turns a bedroom wall into a backboard, so shooting hoops from bed is officially allowed. The backboard is built from boards salvaged from two free pallets: first a simple frame, then pallet boards cut to length to fill it in. A found hoop and a thrift store net finish the job. Old hoops can be surprisingly hard to track down, so check thrift shops, yard sales and online listings before you start building. Hang it over the bed or a reading nook for a rustic sports look.
Get the full tutorial at My Sweet Savannah.
2. DIY Lamp with Wood

A plain candlestick lamp gets a rustic, outdoorsy makeover with nothing more than sticks, twine and hot glue. Gather dry twigs from the yard (or buy driftwood if trees are scarce), wipe them with a damp paper towel and let any damp wood dry out so no bugs or mildew come inside. Cut the sticks to the height of the lamp base, hot glue them all the way around it and wrap twine at the bottom to hold everything snug. It takes about ten minutes, perfect for a camping or cabin themed boys room.
Get the full tutorial at The Heathered Nest.
3. Pegboard Baseball Cap Organizer

A pegboard baseball cap organizer gives a growing hat collection a home on the wall instead of the floor. A 2 by 4 foot piece of pegboard gets a coat of primer and two coats of paint, then sits on a frame of painted 1×2 boards cut so about an inch shows around the edge. L brackets join the corners, two screws with wall anchors hang it, and curved pegboard hooks hold the caps. This size fits about 25 hats, and the frame can be painted to match the room’s trim or closet door.
Get the full tutorial at Jenna Burger Design.
DIY Room Decor Ideas for Kids
4. DIY Life Preserver

This personalized life preserver does double duty as nautical party decor and a keepsake for a boys bedroom. A straw wreath form is padded with batting, then wrapped in a canvas drop cloth and pinned at the back. A name and birth date are traced onto the canvas in pencil and filled in with navy craft paint and a fine brush, which is the step that takes patience. White nylon rope wraps around four sides and gets hot glued in place, with longer pieces swagged between them. Buy more rope than you think you need.
Get the full tutorial at Life Love Larson.
5. DIY Baseball Bookends

Baseball bookends are a quick wood craft for any young sports fan, and the supplies run about $15. Each bookend uses two 5 inch wood squares screwed together in an L shape. Paint the wood, then decoupage paper or cardstock onto the faces with Mod Podge and finish with a top coat. A real baseball goes on top, attached with a strong glue like E-6000 or screwed in through the upright. Rubber pads on the bottom keep them from sliding around the shelf. Plan on a few hours, mostly drying time.
Get the full tutorial at Mod Podge Rocks.
6. DIY Pallet Dart Board

A pallet dart board backer gives stray darts somewhere to land besides the bedroom wall. This one measures 30 by 36 inches, which leaves plenty of room around the board for missed shots. All of the wood is recycled pallet boards, stained in Minwax Special Walnut for a warm, rustic tone, and the whole build came in around $20. A narrow ledge along the bottom holds the darts between games. Hang it in a game corner, a teen bedroom or a basement hangout.
Get the full tutorial at 1001 Pallets.
DIY Boys Room Decor Ideas
7. Vintage Suitcase Shelves

Vintage suitcase shelves turn thrift store luggage into wall storage with a lot of personality. Look for cases in different widths and colors with hardware in good shape; they don’t need to open or close. Pick a depth, wrap blue tape around each case and mark a line, pull out any lining, then cut along the line with a jigsaw or reciprocating saw fitted with a blade made for metal. Light loads can sit on angle brackets. For heavier ones, glue and nail a 1/2 inch plywood panel inside and screw through it into studs.
Get the full tutorial at manmadediy.
8. Tin Can Desk Organizer
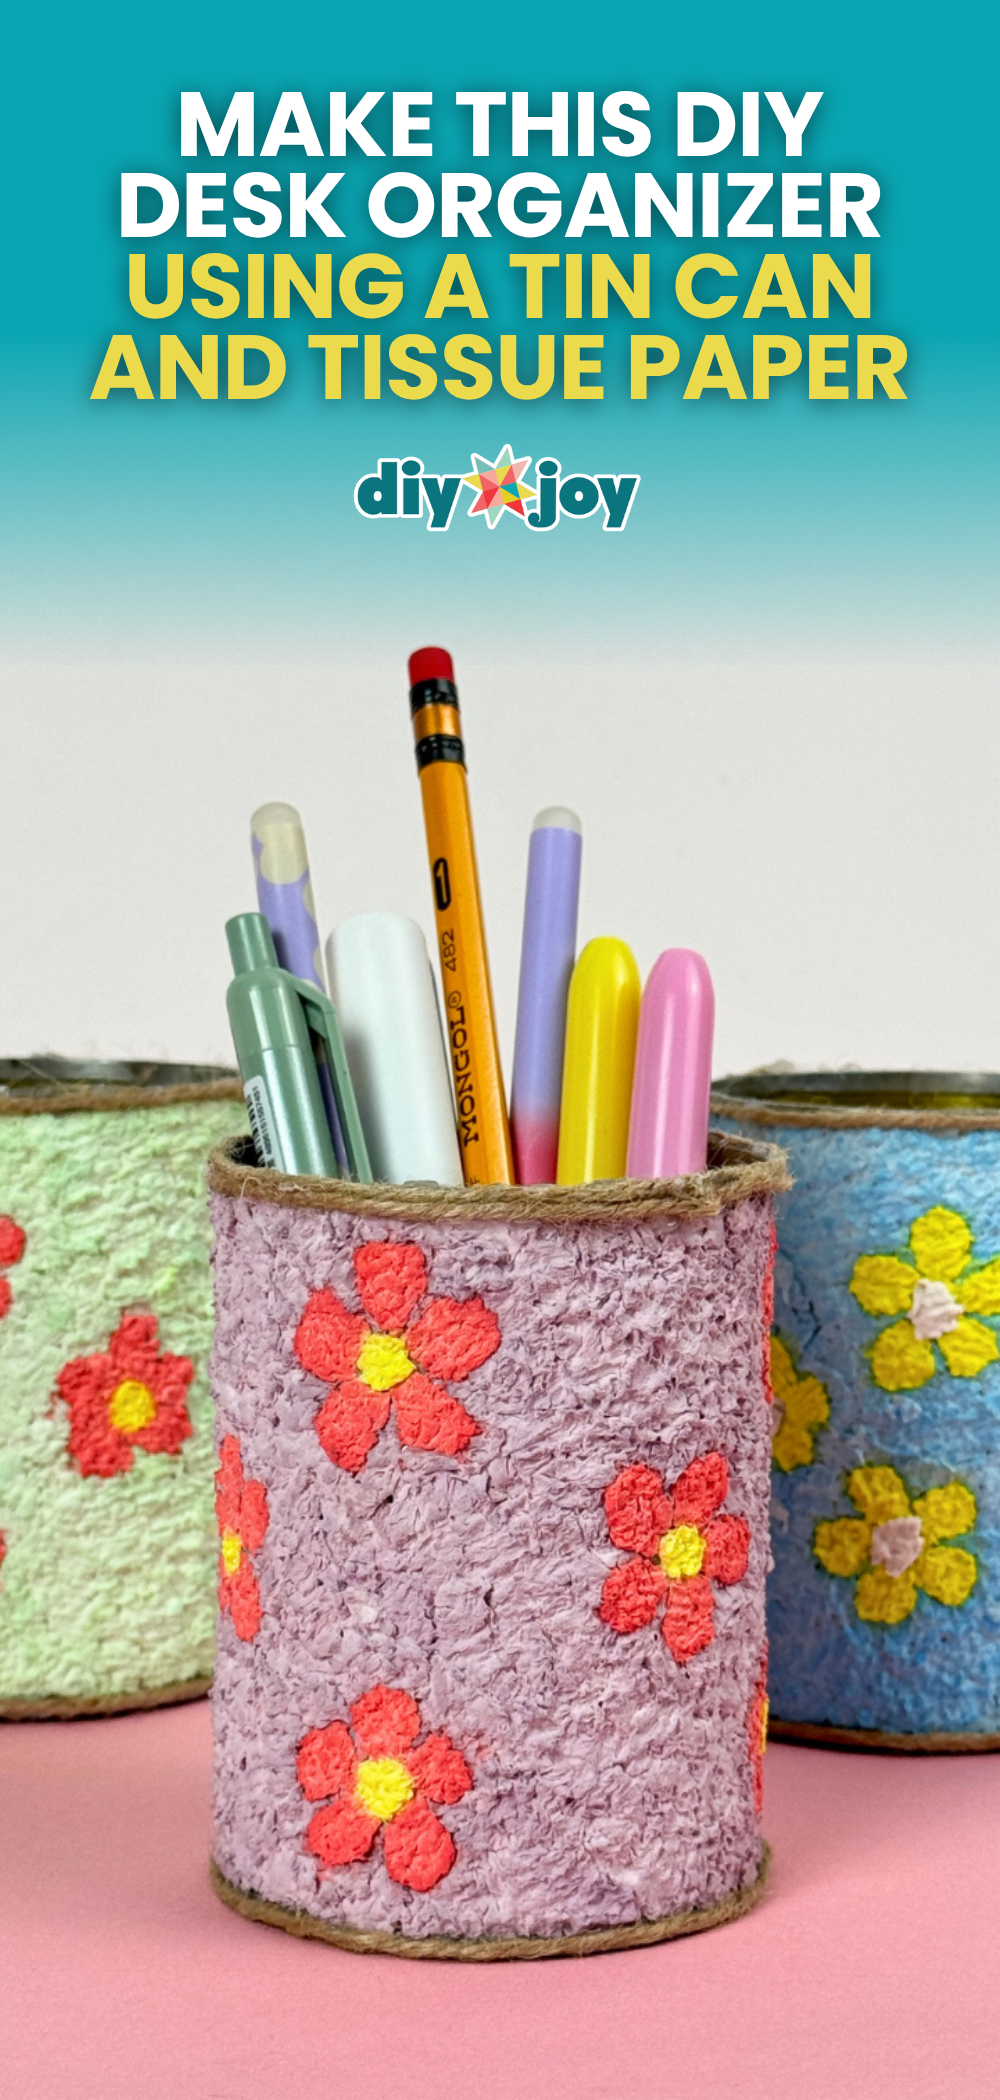
This tin can desk organizer turns empty cans into textured pencil cups using a homemade paper mache pulp. Soak torn tissue in water, squeeze it out, then mash it with glue and paint until it’s soft and evenly colored. Draw a big, simple design on the can, fill it in with the colored pulp, then fill in the background around it. Let each layer dry fully, up to 24 hours, so the colors don’t bleed together. Swap the flowers for stripes, stars or a big initial to suit a boys desk.
Get the full tutorial at DIY JOY.
9. DIY Baseball Curtain Rod Ends

Baseball curtain rod ends are one of the simplest sports room upgrades there is. Start with a curtain rod that has plain finials, plus two new baseballs. Drill a hole into each ball, beginning with a small bit and stepping up gradually until the hole matches the diameter of the rod. Pull off the old finials and push a baseball onto each end. That’s it. The same trick works with softballs, and it ties the window treatment right into a sports themed bedroom, playroom or game room.
Get the full tutorial at Trish Sutton.
10. DIY Hanging Cloud Lights

Hanging cloud lights make a ceiling feel like a storm rolling in, without the rain. The supply list is short: cotton batting, paper lanterns, hot glue and flameless candles or LED lights. Tease the batting apart into fluffy pieces and glue it over each lantern until no paper shows, then tuck the lights inside so the clouds glow from within. Hang a few at different heights over a bed or reading corner. Battery powered lights are the safe choice with this much fluff.
Get the full tutorial at DIY JOY.
11. Star Wars Specimen Art

Star Wars specimen art shows off minifigures like a museum display and keeps favorite characters off the floor. Take a shadow box frame apart, trace the backing onto a sheet of thin metal from the roofing aisle and trim it with metal snips. Set the metal inside and put the frame back together without the glass. Then arrange magnetic Lego figures in neat, evenly spaced rows across the metal. Already have figures? Magnet stands let you use the ones in the toy bin.
Get the full tutorial at Makoodle.
12. Sugar Skull Wall Art
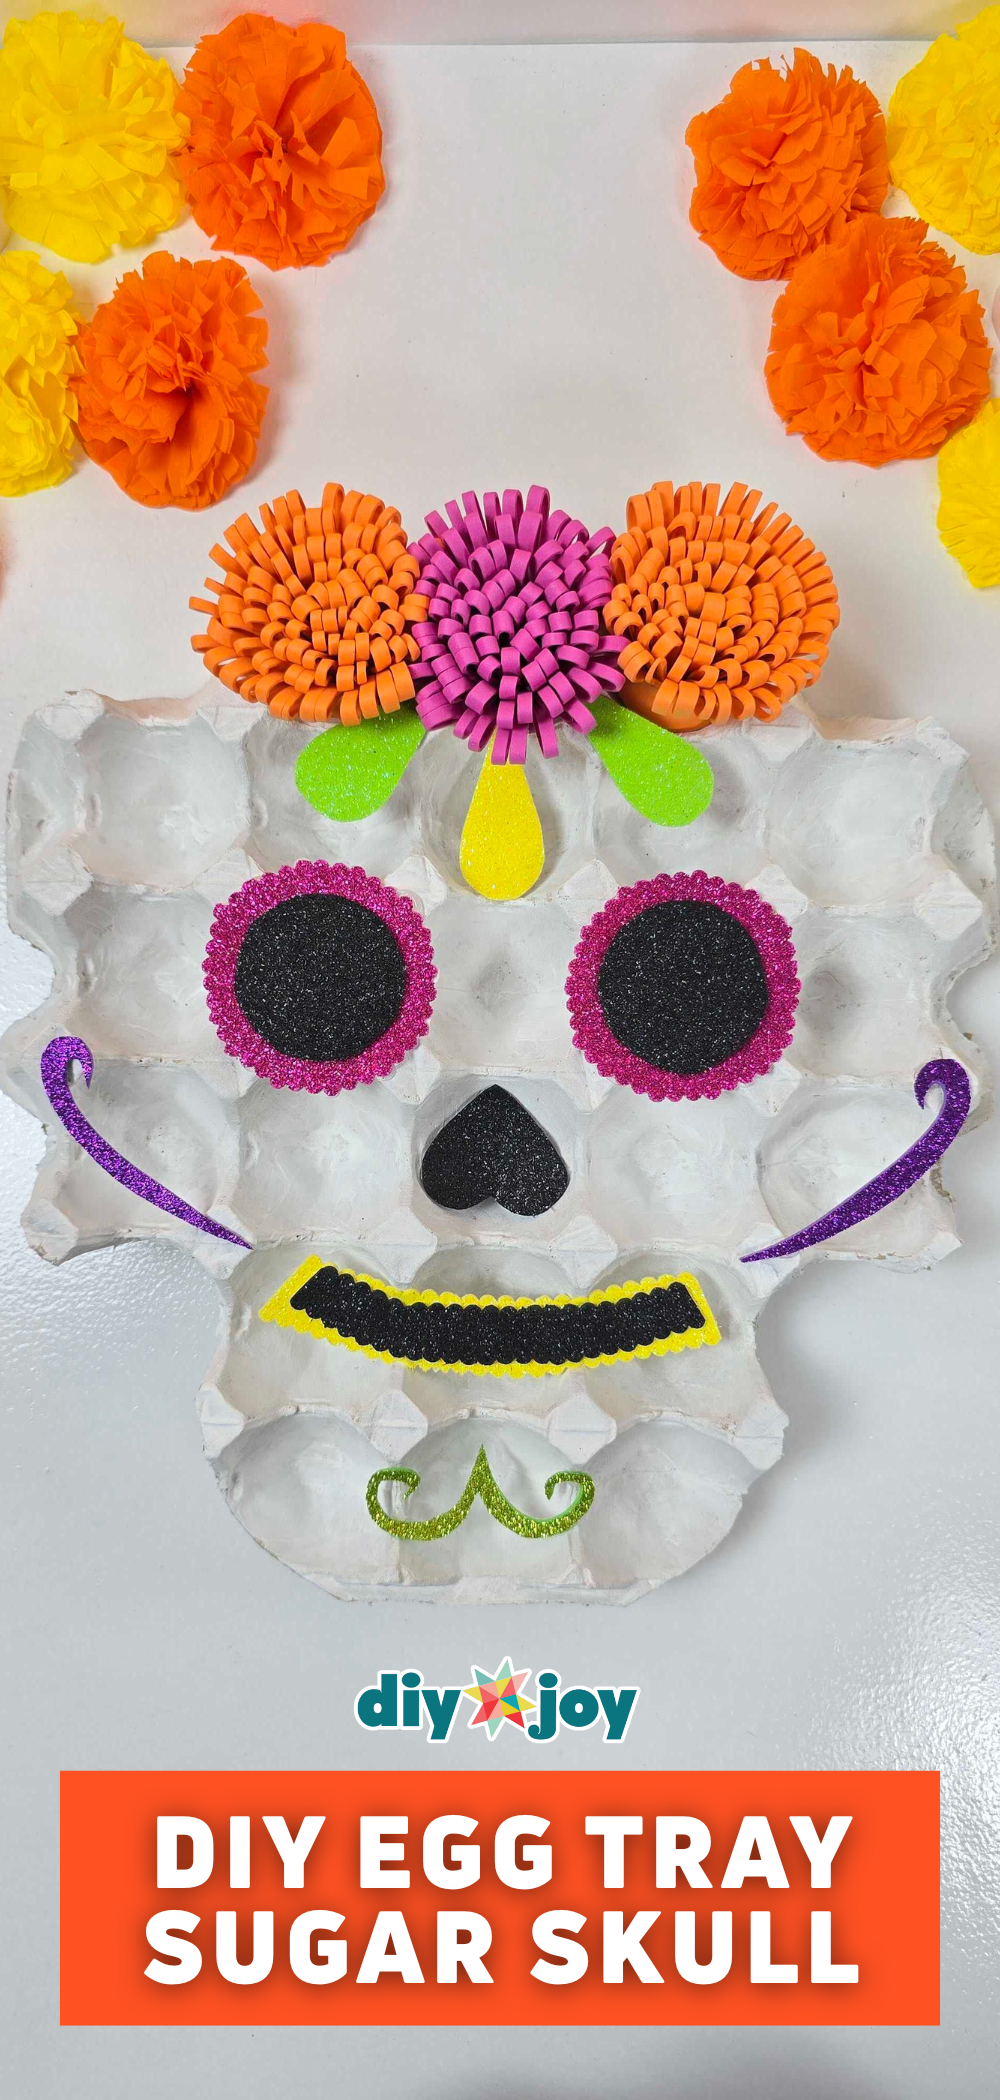
This egg tray sugar skull turns a molded pulp egg carton into colorful Dia de los Muertos wall art. Trim one cup from each top corner to round the crown and two from each lower side to shape the jaw, then round the chin. Cut a little short of the line, since you can always take more off. Glitter foam circles make the eyes, with teardrop shapes, swirls and a strip of teeth added on top. Choose plain glitter foam, not the peel and stick kind, so the hot glue holds.
Get the full tutorial at DIY JOY.
13. 3D Paper Mache Letters

Comic book letters spell out a name in the boldest way possible. Start with plain paper mache letters from the craft store and a stack of old comics. Cut strips from different pages, keeping fun details like the cover price and date, and glue them on with decoupage glue until every side is covered. Finish with a coat of varnish so the edges stay down. These 8 inch letters can sit on a bookshelf or mount on the wall, and superhero comics suit the idea perfectly.
Get the full tutorial at The Yewman Projects.
14. DIY Wire Basket Side Table

This wire basket side table comes together in minutes for about $30. Stain an 18 inch solid pine round with a wiping stain, which goes on with a rag and wipes right off, so it’s hard to mess up. Once it’s dry, flip a wire basket upside down and center it on the wood. Nylon cable clamps and short wood screws, spaced evenly around the rim, hold the basket to the top. The open wire adds pattern without looking heavy, which helps in a small bedroom or a dorm room.
Get the full tutorial at Oleander + Palm.
15. Chicken Wire Light Fixture

A chicken wire light fixture gives a ceiling pendant an industrial look for about the price of the pendant kit. Two 14 inch embroidery hoops form the top and bottom of the shade. Remove the clasp, fill the holes with wood filler and spray paint the hoops oil rubbed bronze. Wrap chicken wire around them, tie it on with thin wire and stitch the seam closed the same way. A round outlet cover forms the top. Dab hot glue on every cut wire end so nothing sharp pokes out.
Get the full tutorial at KrisKraft.
16. Paper Airplane Canvas

Paper airplane canvas art uses two canvases side by side: one with a looping dashed flight path and one with the plane itself. Print a paper airplane shape to use as a stencil, trace it lightly onto the first canvas and sketch the looping path across the second. Cover the plane and the path with masking tape, paint the background, then peel the tape to reveal crisp lines. Navy and teal make a bold pair, but any two colors work. Press every tape edge down well before painting.
Get the full tutorial at Can't Take Me Anywhere.
17. Colored Paper Pen Holder
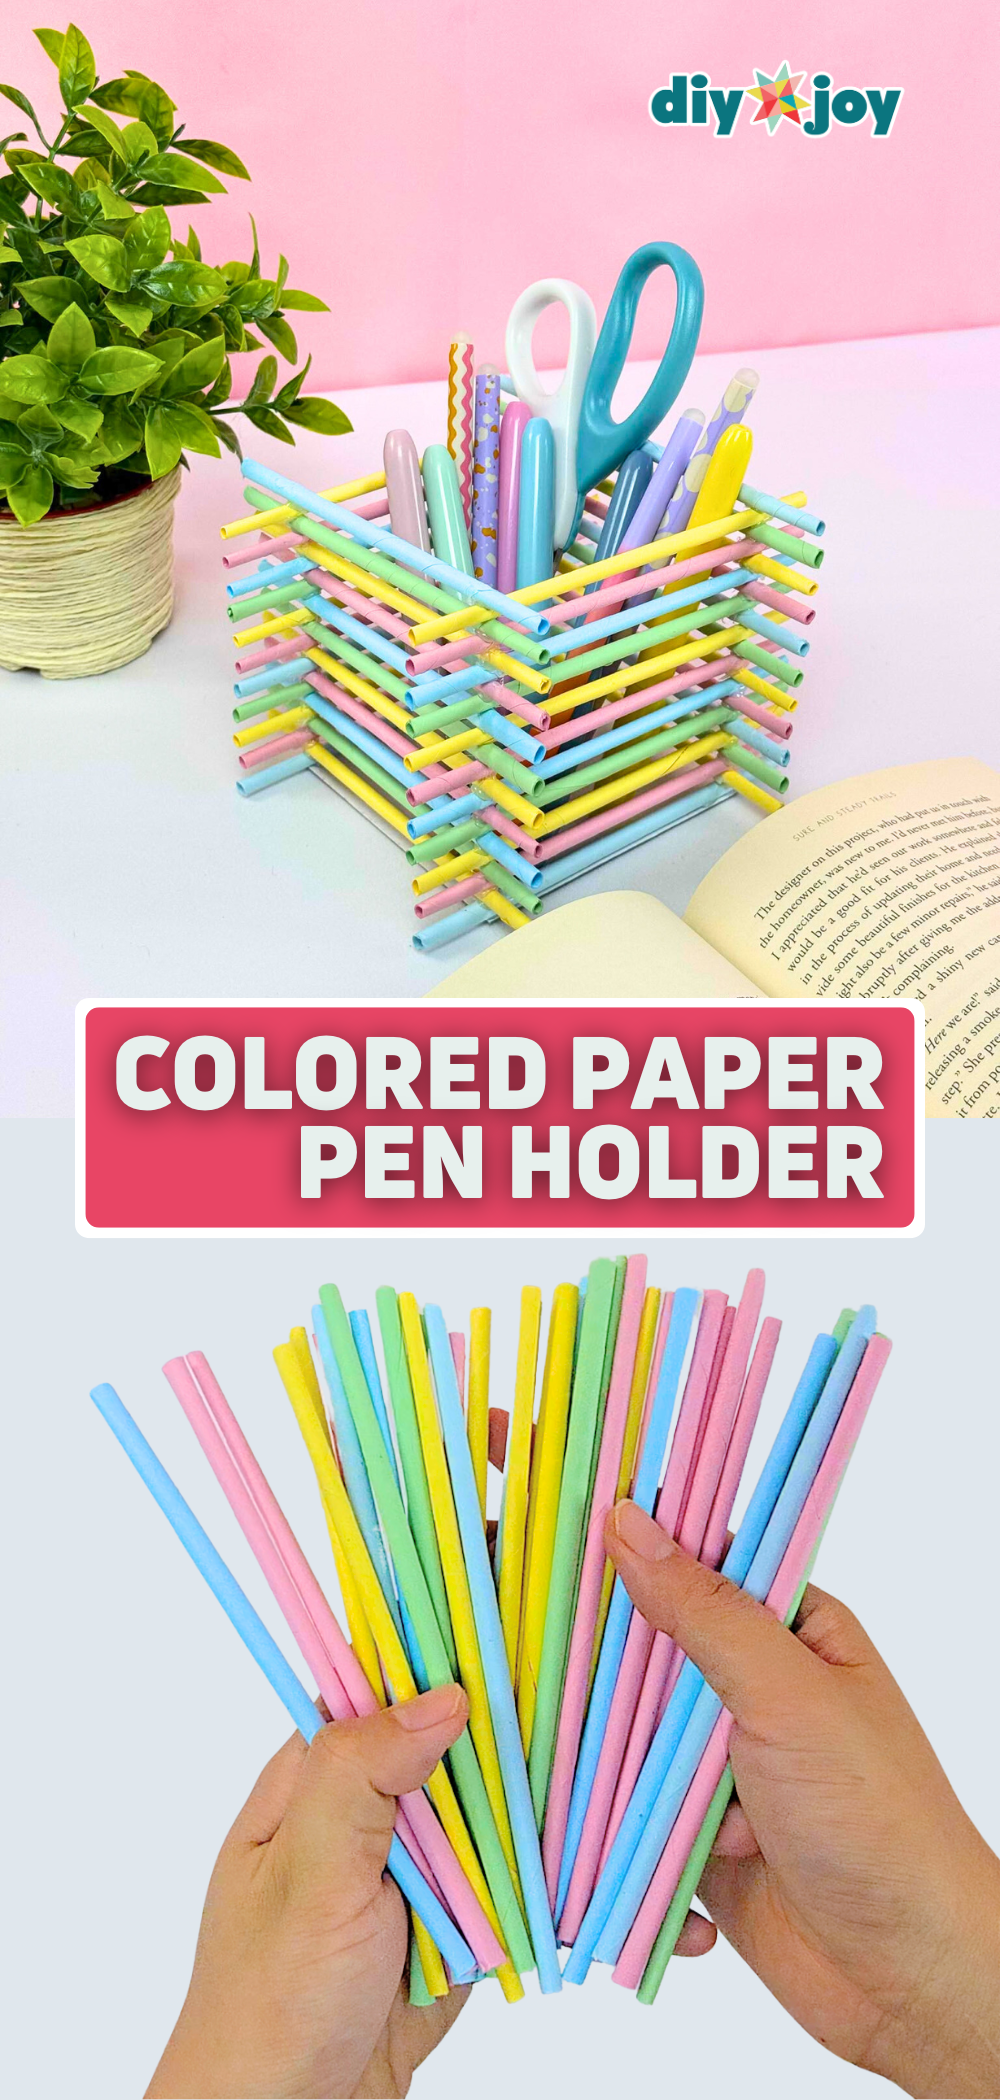
This colored paper pen holder is made from rolled paper tubes, and it’s sturdier than it looks. Roll colored paper tightly around a thin skewer on the diagonal, glue the flap and trim off the sharp tip. Make a pile of tubes in different colors. Cut a 4 inch cardboard square for the base, glue a matching pair of tubes on opposite sides, then add the next pair across them and keep stacking like a log cabin. Trim the ends to length and fill it with pens and markers.
Get the full tutorial at DIY JOY.
18. Hockey Room Shelf

Plain fabric bins become a wall of hockey jerseys on this cubby shelf, and the clutter hides inside. Cut vinyl stencils of player names and numbers, like the back of a jersey, and stick them to black fabric bins. Paint over the stencil in black first, which seals the edges so the next color won’t bleed. Then paint white, peel the stencil while the paint is still wet and sharpen the letters with a white paint pen. It takes a couple of hours, most of it drying time.
Get the full tutorial at Somewhat Simple.
19. Car Inspired Lamp

A car inspired lamp turns a plain black drum shade into a tiny highway. Cut white craft felt into small dashes, about 1 by 1/2 inch, and hot glue them in a line around the middle of the shade for the road stripe. Spacing is the trickiest part, so measure around the shade and divide evenly; on a 37.5 inch shade the dashes sit every 1.5 inches. Then glue small toy cars along the road, a few heading each way. The whole project takes about 20 minutes.
Get the full tutorial at Bliss Bloom Blog.
20. DIY Roman Shades

These DIY roman shades start with an ordinary mini blind and cost about $12, with no sewing at all. Cut fabric 3 inches larger than the blind on every side, fold and iron the edges and glue them down with fabric glue. Pull the cords out of the blind, holding them with two buttons, cut away the ladder cord and remove every slat except three. Glue the top rail, those three slats and the bottom rail evenly across the fabric, rethread the cord and hang it. A cordless blind works best.
Get the full tutorial at DIY JOY.
21. Photo Frame Magnets

These mini photo frame magnets look like ornate gold frames, but they’re made from clear hot glue and a wax seal stamp. Print photos at about 0.85 by 1 inch. Chill the metal stamp on an ice pack and wipe it dry, add a generous blob of hot glue right on the photo and press the cold stamp in. After 10 to 15 seconds, lift the stamp, trim the extra glue, paint the frame gold and stick a small magnet on the back. Use a low temperature glue gun to avoid bubbles.
Get the full tutorial at DIY JOY.
22. DIY Superhero Dresser

This superhero dresser makeover uses comic print fabric and Mod Podge to turn a plain pine dresser into the coolest piece in the room. Take off the drawer pulls, cut fabric to fit each drawer front and glue it on with a thick coat of Mod Podge until the fabric is soaked through. Let it dry clear, then add a second coat. Painting every other drawer a solid blue keeps the pattern from taking over. Reattach the pulls, give it a few weeks to cure and seal any tacky spots with acrylic spray.
Get the full tutorial at Dude Mom.
23. Thor Hammer Display

A foam Thor hammer is part costume prop, part wall display for any superhero fan. Hot glue sheets of foam into a block about 10 inches long, 7 tall and 6 thick, sand it smooth and bevel the front and back edges. Drill most of the way in and glue in a 24 inch broomstick handle. A ring cut from a margarine tub becomes the top detail. Use a water based spray paint, since regular spray paint eats foam, then wrap the handle in brown vinyl or cloth and add a strap.
Get the full tutorial at Storm The Castle.
24. Superhero Side Table DIY

A secondhand side table becomes a superhero nightstand with paint, printed art and Mod Podge. Sand the table, then paint it in bold red and blue; paint store sample pots are plenty for a piece this size. Print superhero backgrounds onto full page sticker paper, which helps them grip. Brush Mod Podge on the tabletop and lay the prints down right away, smoothing as you go with your fingers or a credit card to push out wrinkles. Seal the top with more Mod Podge and add a lamp for bedtime stories.
Get the full tutorial at C'mon Get Crafty.
25. Faucet Knobs As Wall Hooks

Old faucet handles make quirky wall hooks with a vintage, industrial feel. Cast metal handles with open spokes are the ones to look for, and a coat of spray paint in one color makes a mismatched set look planned. Mounted in a row, they’re just right for hats, backpacks, headphones or a hoodie. Navy or white looks crisp in a boys room. The same handles also work as one of a kind knobs on a dresser or cabinet doors.
Get the full tutorial at Rustic Crafts & DIY.
26. Photo Resin Coaster
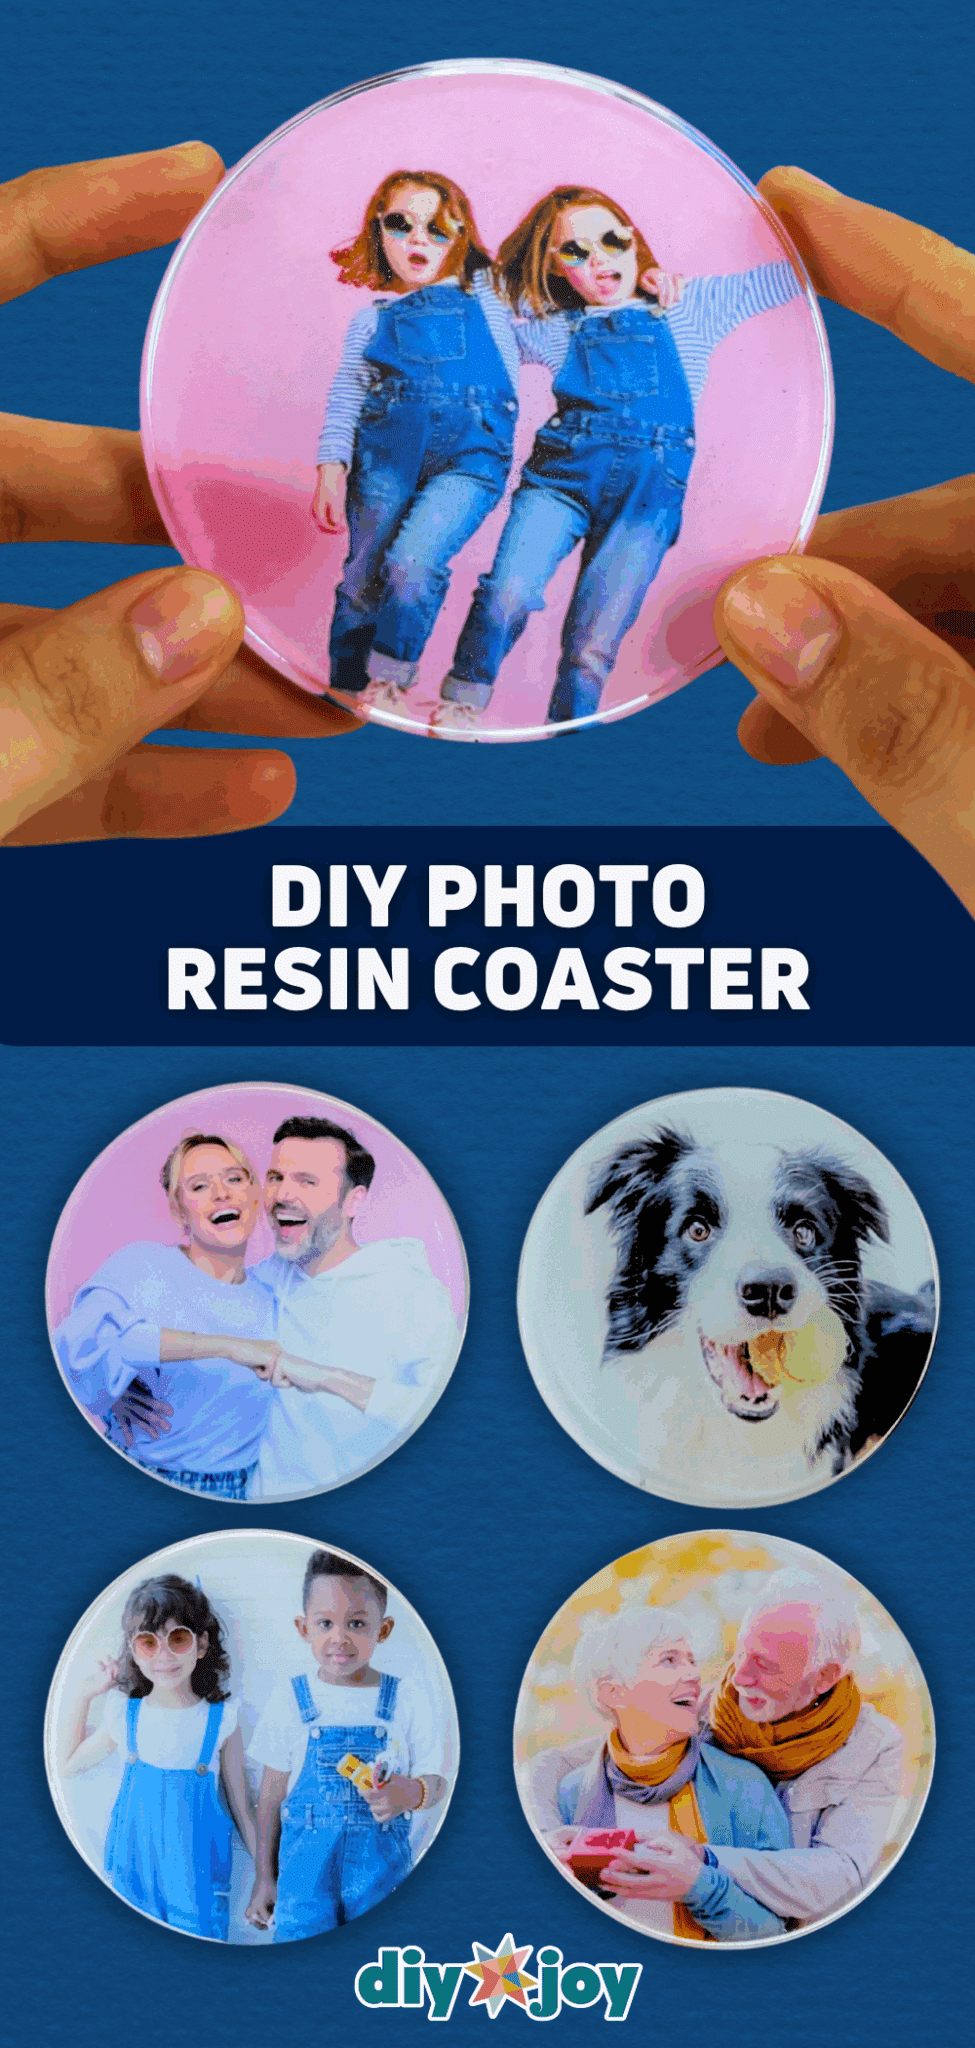
A photo resin coaster seals a favorite picture inside clear, glossy resin. Mix epoxy resin and hardener at a 3 to 1 ratio, about 36 grams to 12, stirring slowly for 5 to 10 minutes so bubbles don’t form. Pour a thin layer into a round silicone mold, trace and cut the photo to fit, set it in and pour the rest of the resin over it. Let it cure for 24 hours before popping it out. Wear nitrile gloves. A team photo or a pet picture makes a fun desk keepsake.
Get the full tutorial at DIY JOY.
27. Denim Faux Finish Paint Tutorial

A denim faux finish makes painted walls look like woven fabric, and it suits a nautical or outdoorsy boys room. Roll on a light base coat and let it dry overnight. Next, tape the walls into vertical panels 24 to 42 inches wide, using a level, and mark every other panel with a taped X. Mix blue paint into faux glaze, 1 quart to 1 gallon for Behr, roll it on one panel and drag a denim weaver brush through it right away. Finish the alternating panels over a few days.
Get the full tutorial at The Heathered Nest.
28. Painted Beach Rocks
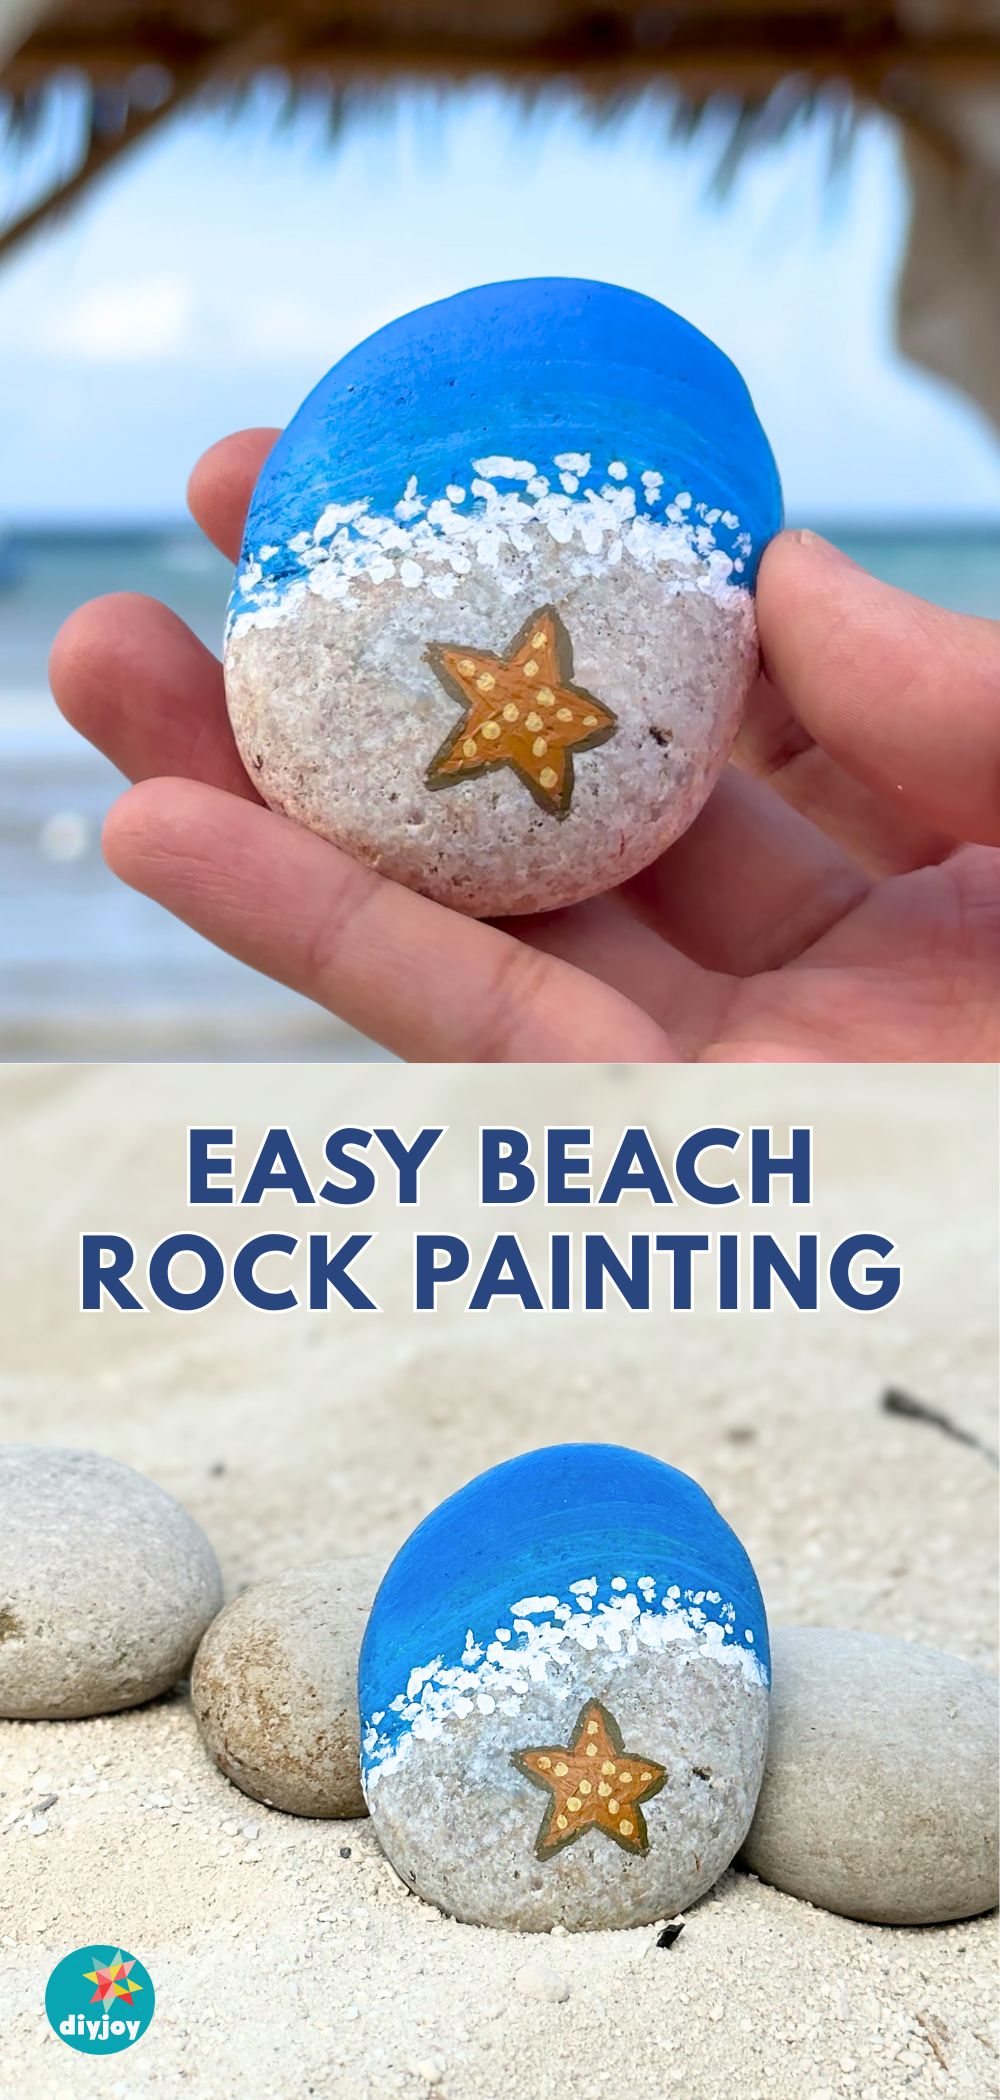
Painted beach rocks make an easy first painting project for kids or beginners. Choose smooth, flat river rocks, then clean and dry them. Paint the top section blue for the ocean, add a lighter blue wave below it following the curve and dot white foam along the shoreline with a small pointed brush. Mix brown with a little white for tan and paint a five pointed starfish on the bottom, then add yellow dots and a darker outline. Let every layer dry, and seal any rock headed outdoors.
Get the full tutorial at DIY JOY.
29. DIY Wood Pallet Arrow

A wood pallet arrow adds rustic texture to a gallery wall, and it only takes two pallet boards. If the boards won’t pry apart, a reciprocating saw cuts right through the nails. Cut a 24 inch body, a tip with two 40 degree cuts toward the center and two tail pieces on a 45 degree angle. Glue the tail pieces together, then set the tip over the end of the body instead of flush so a few screws can hold it from behind. Add two sawtooth hangers and leave the wood bare.
Get the full tutorial at Love Grows Wild.
30. Batik Canvas Art
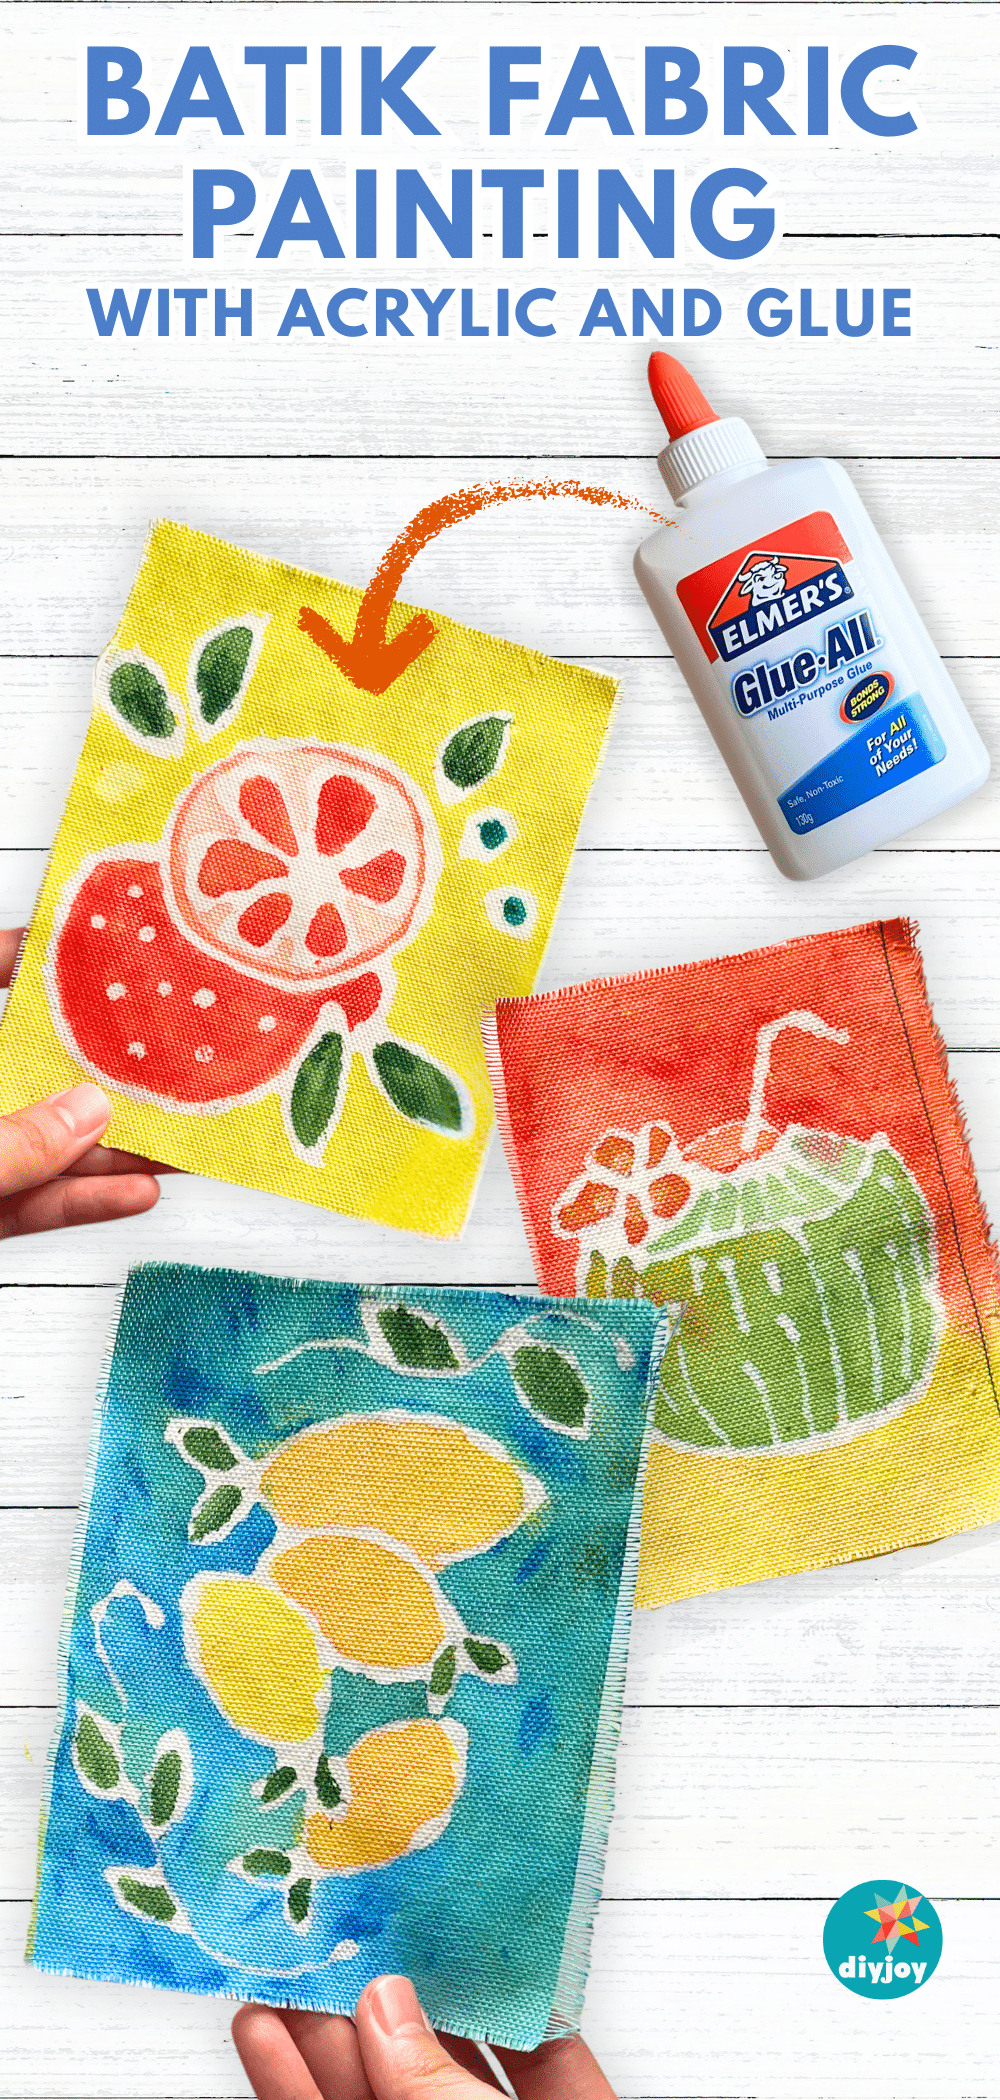
This batik canvas art swaps hot wax for white school glue, so it’s simple and safe enough for beginners of any age. Tape a piece of canvas fabric flat, trace a simple design in glue and let it dry completely. Paint the areas around the glue lines with acrylics and let the paint dry. Then soak the piece in water and rub gently until the glue dissolves, leaving crisp lines in the fabric’s original color. Dry it flat and hang it as bold, graphic wall art.
Get the full tutorial at DIY JOY.






