Those free swatches by the paint counter are some of the best craft paper around: sturdy, perfectly colored and already arranged in ombre gradients. These 16 DIY paint chip crafts put them to work, from punched circle wall art and a sunny clock makeover to popsicle party invitations, bookmarks, coasters and a pair of bold earrings. Most need only scissors, a punch and glue, so they’re perfect for a rainy afternoon, a kids’ craft table or a rental where the walls have to stay beige. A few go bigger, like a butterfly wreath for the front door or an owl print for a kids’ room. Here’s the tip that saves the most frustration: grab more shades than you think you need, because nothing stalls a project like running two circles short. And be kind to the paint aisle by taking only what you’ll really use.
1. Paint Chip Wall

A paint chip wall adds color to a room you aren’t allowed to paint, which makes it perfect for dorms and rentals. All you need are paint chips, double-sided tape and scissors. Collect a big stack of swatches, then tape them to the wall in a grid. Stick with one color family, run the shades from light to dark for an ombre effect, or arrange them into a simple scene like a sunrise or flowers. Use a removable tape and test a corner first so the wall and your security deposit both survive move out day.
Get the full tutorial at Her Campus.
2. Paint Chip Party Banner

A paint chip party banner is about as cheap and easy as bunting gets. Choose swatch pages about 4 inches wide, find the halfway point along the bottom and draw lines from the top corners down to it, working on the back so the lines don’t show. Cut out the triangles, punch a hole in each top corner and thread them onto yarn. Yarn works better than string because its fibers grip the paper and keep the flags from sliding together. Mix warm shades for fall or brights for a birthday.
Get the full tutorial at The Squirrel Next Door.
3. DIY Paint Chip Chevron Ombre Necklace

This DIY paint chip chevron ombre necklace gets its graduated color straight from a single paint chip. Cut the chip into pieces, draw a chevron on the back of one with a triangle ruler, cut it out and trace it for the rest. Mod Podge the chevrons in order onto a piece of thin plastic (recycled vertical blinds work well) and let it dry completely before cutting out the pendant shape. Punch holes in the top corners with a Crop-A-Dile, then add jump rings and hang it from a chain.
Get the full tutorial at By Wilma.
4. DIY Popsicle Party Invitations

DIY popsicle party invitations take just a few minutes and a few pennies each. Wide paint samples give every popsicle a built-in two-tone dip, like a real frozen treat. Draw a popsicle shape on the back of the sample and cut it out, then trace it onto white cardstock and cut a matching back. Tape or glue the two sides together with a craft stick slid between them. Write the party details on the back or print them out. They suit a sprinkler party, a pool day or any summer birthday.
Get the full tutorial at So Festive!.
5. Paint Chip Color Matching Activity

This paint chip color matching activity is a simple learning game for preschoolers. Glue a small swatch square from each shade onto a clothespin, then have kids clip each pin to the matching spot on its card. Self-laminating sheets make the cards last. It’s self-correcting, so let them find their own mistakes. Name the shades as they work, using words like light, lighter and lightest, or top, middle and bottom instead of pointing. Mini clothespins add extra fine motor practice for little hands.
Get the full tutorial at Munchkins and Moms.
6. Paint Chip Feather

Paint chip feathers turn leftover swatches into a simple kids’ craft, made here into darling feather crowns for a tea party photo shoot. Cut or punch feather shapes from paint chips in soft pinks, peaches, grays and creams, then snip a few small notches along the edges so each one looks like a real feather. Glue the feathers to a paper band sized to a child’s head for a crown, or string them into a garland. The source post shares the photos and points to a kids’ magazine for the full steps.
Get the full tutorial at Mer Mag.
7. DIY Paint Chip Bookmarks

These DIY paint chip bookmarks pair ombre strips with embroidery floss tassels for an old-school look. Trace ruler-wide strips down the middle of each paint chip, cut them out with scissors or a paper cutter and erase the pencil lines. Double-stick tape two strips back to back, then run them through a laminator, feeding it a few times in different directions to flatten any bubbles. Punch a hole at the top. For the tassel, fold and cut a skein of matching floss, knot it through the hole, wrap and tie it below the knot.
Get the full tutorial at Mama Miss.
8. Paint Chip Menu Planner

A paint chip menu planner turns arrow-shaped swatches and a frame into a dry erase meal board. Swatches that are square on one end and pointed on the other inspired this one. Make a template and trim each chip so both ends point, then cut seven skinny strips for the day headers. Lay everything out on a cutting mat with a ruler to keep the grid straight, two weeks of arrows plus room at the bottom for notes. Glue stick everything down rather than taping, since tape lifts the color. Frame it and write on the glass.
Get the full tutorial at Bombshell Bling.
9. Ombre Paint Chip Earrings

Ombre paint chip earrings are big, bold and made from free materials. Pick paint swatches in graded shades; rectangle swatches give you the most circles per card. Each pair needs four large circles, two medium and two small, cut on a cutting machine with a textured cardstock setting (the source offers a free cut file) or traced and cut by hand. Glue two large circles back to back with spray adhesive so both sides show color, then layer the smaller circles on top and attach jump rings and ear wires.
Get the full tutorial at The Thinking Closet.
10. Paint Chip Art With Ombre
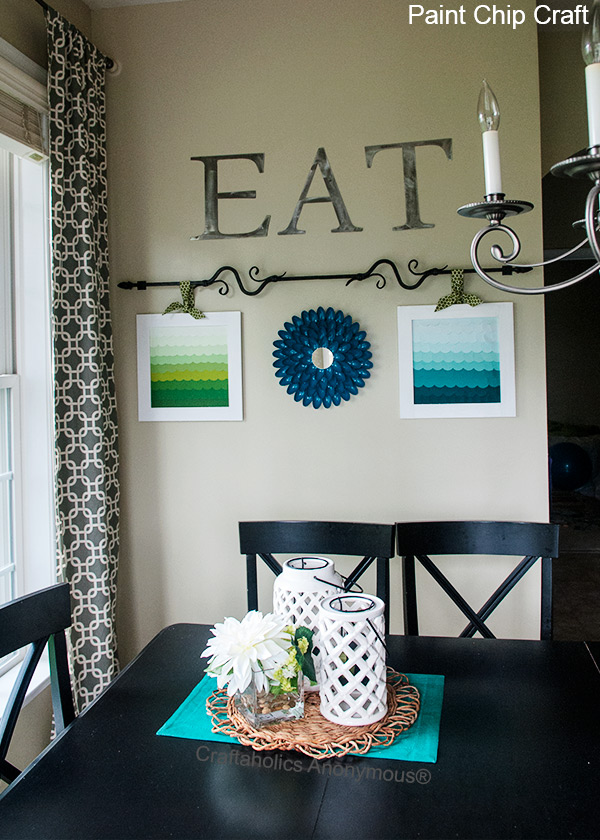
Paint chip art with ombre layers punched circles into rows of fish tail scallops. You’ll need paint chips, a 1.75 inch circle punch, a 12 by 12 frame, cardboard, a repositionable adhesive runner and scissors or a craft knife. Punch about 10 circles from each of 8 colors and decide the color order. Run a line of adhesive about 1.5 inches from the bottom of the cardboard, lay a row of overlapping circles along it and repeat upward until the board is covered. Trim the edges and frame it.
Get the full tutorial at Craftaholics Anonymous.
11. Paint Chip Business Cards

Paint chip business cards mix swatch color with vintage lace. Cut the lacy edge from paper doilies, which tear easily, and glue it across a corner of each paint chip. Stamp the front with a self-inking stamp, then print your details on adhesive mailing labels using a word processor’s label template and stick them on the back over a square of scrapbook paper. One heads up: stamp ink can smudge on the slick swatch surface, so test first or seal the front with a thin coat of Mod Podge.
Get the full tutorial at C.R.A.F.T.
12. Paint Chip Clock

A paint chip clock starts with a plain, inexpensive IKEA wall clock as a blank canvas. Cut paint chips into one inch squares, arrange them around the face to plan the pattern (a sunburst works beautifully), then glue them in place. Design a center graphic, here a You Are My Sunshine print, and use the original clock face as a template to trace and cut it to fit. Set it in the middle, put the hands back on, giving them a coat of metallic paint if you like, and replace the plastic cover.
Get the full tutorial at Kojo Designs.
13. Paint Chip Coasters

Paint chip coasters need tiles, Mod Podge, spray acrylic, paint samples and cork or felt for the bottoms. Square off any rounded corners on the samples, then measure and cut them to fit the tiles, keeping the paint names in view for a fun detail. Glue each square down with Mod Podge, then brush on about five thin coats over the top, letting each dry before the next. Finish with spray acrylic and add cork or felt underneath. Tiles without a beveled edge make the paper much easier to fit.
Get the full tutorial at The Crafty CPA.
14. Butterfly Paint Chip Wreath

A butterfly paint chip wreath welcomes spring at the front door. Use a 12 inch grapevine or foam wreath; wrap foam in 2 inch fabric strips secured with hot glue or pins. Download a butterfly template or sketch one in a few sizes, 2 to 4 inches wide, then trace onto the backs of paint chips in pinks, yellows, mint, lavender and sky blue and cut them out. A craft knife gives cleaner edges. Fold each butterfly in half along the body for a 3D effect, then hot glue a cluster to one side.
Get the full tutorial at Craftionary.
15. Paint Chip Place Setting

A paint chip place setting turns a swatch into a little pocket for napkins and flatware. Choose a paint chip in a color that suits your table, fold it or pair two cards, and sew around three sides, leaving the top open; hot glue along the three edges works too. Slide in a folded napkin with a fork, knife and spoon. Write each guest’s name on the chip and it doubles as a seating card. It’s a free, fun idea for a summer picnic, a kids’ party or a casual dinner.
Get the full tutorial at Sew Many Ways.
16. Owl Paint Chip Wall Art

Owl paint chip wall art layers rows of punched circles into a scalloped background with a cut paper owl on top. A 1 3/8 inch circle punch makes it quick; punch as many circles as you can from each chip, including half circles along the edges for the sides. Grab extra chips, because running short on one shade is the worst. For the owl, cut white and black circles for the eyes, two white ovals, three white hearts and two ears. Glue everything to a 13 inch square of cardboard to fit a 12 inch frame.
Get the full tutorial at The Homes I Have Made.