
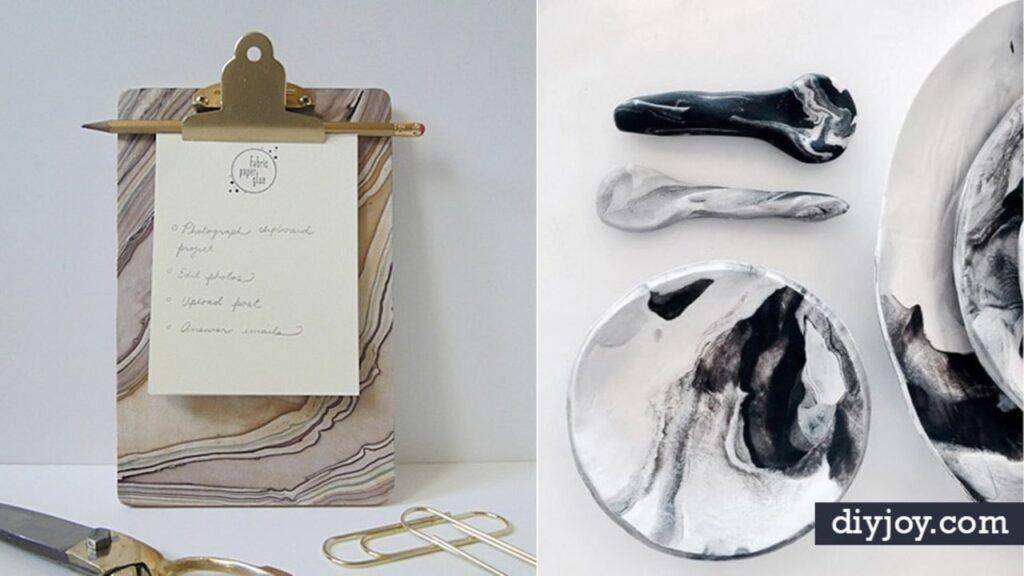
Real marble is gorgeous, but it’s heavy, it stains and it costs a fortune. These 21 faux marble DIY ideas give you that cool, veined look for a few dollars. Most start with a roll of marble contact paper, which wraps a lamp, a tray, a clock or an entire tabletop in about half an hour. Others use nail polish floated on water, swirled enamel or two colors of clay folded together. Two DIY JOY video tutorials are mixed in too: a marbled jewelry purse and a set of clay butterfly wands. Perfect for renters, dorm rooms, gift making and anyone who loves a luxe look on a budget! Quick tip: spend a little more on thick, glossy contact paper, because the cheap rolls look flat.
1. Faux Marble Table Top
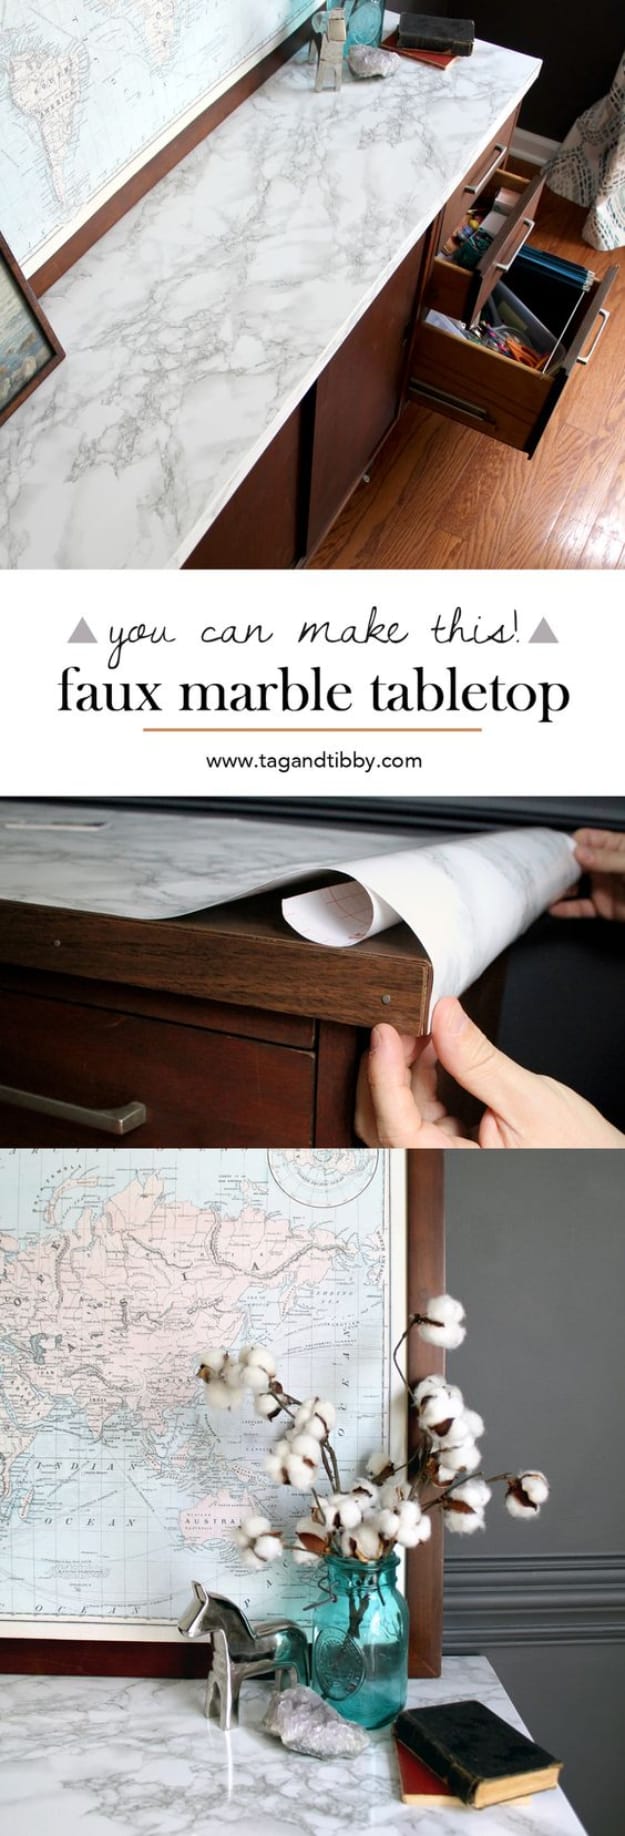
Got a thrift store buffet with a scratched-up top? A faux marble table top fixes it in about 30 minutes for under $10. This one was a $40 find with worn Formica. Peel back just a little backing, start at the bottom edge and press the marble contact paper down slowly as you go. Smooth out bubbles with a credit card. Then use the grid on the back of the paper to cut a thin strip for the front edge. Dated furniture looks fresh and bright instantly.
Get the full tutorial at Tag and Tibby.
2. Easy Marble Utensil Holder DIY

This easy marble utensil holder DIY is about as quick as crafts get. The secret is a realistic marble contact paper, so take a minute to pick a roll with soft, natural veining. Cut a piece a little taller than your crock and wrap it around the outside. If the placement’s off, just peel it up and try again. Run a craft knife along the top and bottom edges to trim the extra. It’s a sweet little kitchen update while you’re still dreaming about real marble counters.
Get the full tutorial at A Beautiful Mess.
3. DIY Faux Marble Shelf

Store bought marble shelves can run about £65 each, but these were made for under £20 apiece. Cut plain pine shelving to size, here 55 by 20 centimeters, and cover each board with marble contact paper. Bubbles are the tricky part, so work slowly and smooth from the center out. There’s a video that shows exactly how it’s done. Hang the finished shelves on brass brackets for a glam little bar or styling nook. It works on any flat surface, so you’ll want to marble everything.
Get the full tutorial at Swoon Worthy.
4. DIY Faux Marble Bed Tray

Breakfast in bed feels extra fancy on a marble tray. This DIY faux marble bed tray is built wide enough to cross your legs underneath, so it pulls double duty as a laptop desk on lazy mornings. Once the simple wood tray is built, wrap it in heavy duty marble contact paper, which costs a little more but looks far more luxurious. Finish with gold handles for easy carrying. It’s a sweet Valentine’s Day surprise, or just a treat for any slow Sunday.
Get the full tutorial at LA VACA.
5. DIY Faux Marble Lamp

An $18 lamp that looks like a $200 marble one? This DIY faux marble lamp is that easy. Measure the height of the base and how far it wraps around, adding a little overlap. Trace those measurements on the back of the contact paper and cut. Line it up straight, then peel the backing off bit by bit while you smooth it down with your fingers. A credit card pushes out stubborn bubbles. The paper’s forgiving, so you can lift and re-stick, and peel it off later if you want.
Get the full tutorial at Homey Oh My.
6. DIY Nail Polish Marbled Jewelry Purse
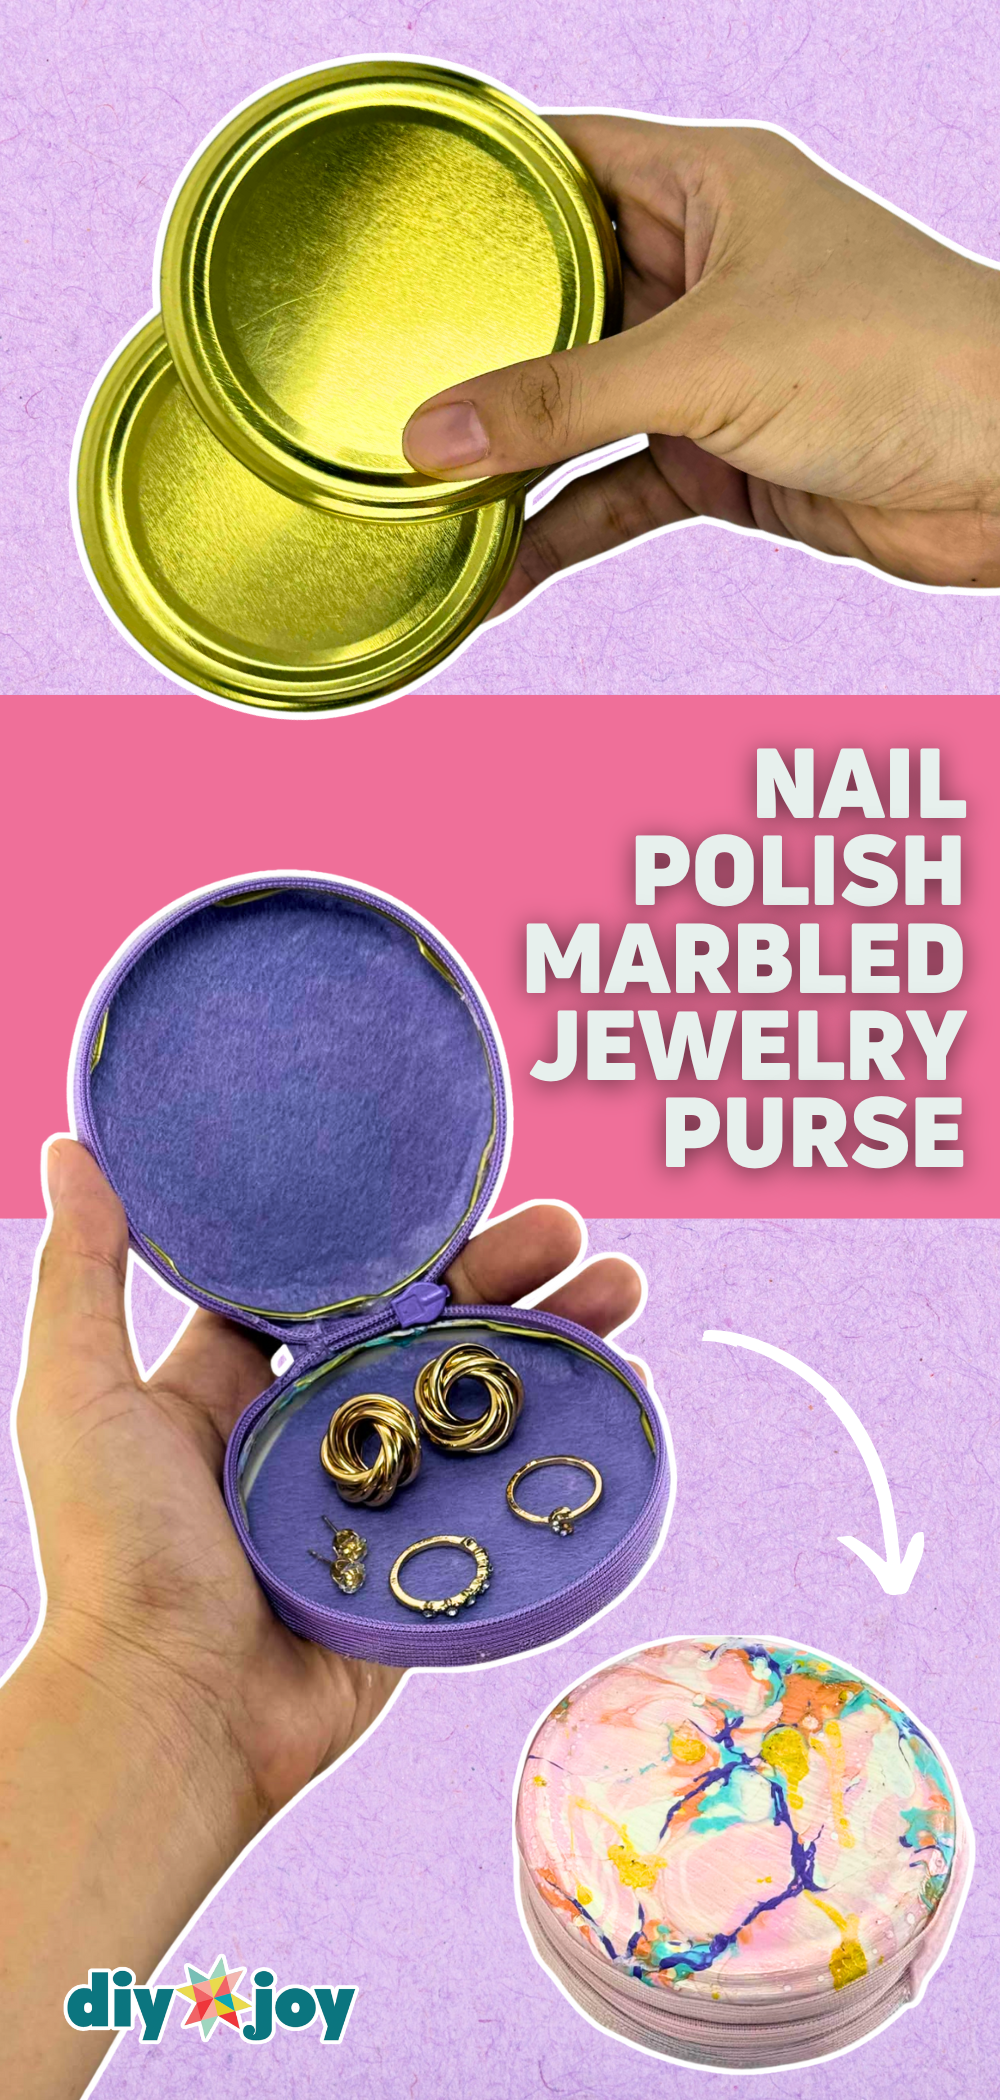
Don’t toss that old nail polish! This DIY nail polish marbled jewelry purse uses two metal jar lids as the shell. Prime the lids white so the polish grabs. Pour a few polish colors onto a container of water, dip each lid straight in, shake off the extra and let them dry. There’s no swirling needed, and every one turns out different. Glue a felt circle inside each lid, hot glue a zipper around the edge to join them and add a felt tab to hide the zipper end.
Get the full tutorial at DIY JOY.
7. DIY Copper And Marble Phone Case

The best crafts use leftovers, and this DIY copper and marble phone case is nearly free. Grab a clear case, which can cost about a dollar. Lay it on marble contact paper, trace around it and cut out the shape. Set it inside the case and trace the camera hole, then snip that out too. Add strips of copper tape on a diagonal across one corner. Here’s the key: leave the backing on the contact paper, or things get sticky fast. Slide it in and you’re done.
Get the full tutorial at Twinspiration.
8. Marbled Clay Butterfly Wand

Got leftover air-dry clay and a pile of nail polish? Make these marbled clay butterfly wands! Roll the clay flat and cut out butterfly and dragonfly wing shapes. Push a toothpick into each wing to use as a handle, then coat with primer so the polish sticks. Swirl a few polish colors together and dip each wing in. Let them dry, add a clear top coat and hot glue the wings to a stick. Wrap the center with twine, then tuck them into potted plants.
Get the full tutorial at DIY JOY.
9. Faux Marble Clipboard

A faux marble clipboard makes the most boring office supply feel special, and it’s fast. Start with an unfinished clipboard and unscrew the clip. Trace the board onto the back of a sheet of marbled paper and cut it out. Brush on Mod Podge with a sponge brush and press the paper down smooth. While that dries, give the clip a coat or two of gold spray paint. Screw it back on and you’ve got a desk accessory that looks straight out of a stationery boutique.
Get the full tutorial at Fabric Paper Glue.
10. Faux Marble Clock

Solid marble wall clocks can cost hundreds and weigh a ton. This faux marble clock is light, cheap and safe for any wall. You’ll need adhesive marble vinyl, a craft store clock face with a pre-drilled hole and a movement kit that fits your clock face’s thickness. Trace the face onto the vinyl, including the center hole. Wipe the face spotless, since every speck of dust shows. Stick it down, trim with a craft knife and add the hands. The vinyl lifts and repositions if needed.
Get the full tutorial at Twine & Table.
11. DIY Silver Set Marbled Enamel

Jewelry making with a marbled twist! This DIY silver set marbled enamel pendant uses a homemade bezel. Hammer about 3 inches of aluminum wire flat, bend it into a shape and curl the round end into a loop. Press the wire into flattened epoxy putty, trim the extra and let it harden. Mix small batches of black, white and gray liquid enamel, pour a little of each into the bezel and drag a cocktail stick through for swirls. Nail polish works too.
Get the full tutorial at Fall For DIY.
12. DIY Faux Marble Jewelry Display

Tired of digging through a tangled jewelry box? This DIY faux marble jewelry display takes about an hour, even if you’ve never used polymer clay. Soften white clay and a little black, blend a bit into gray, then fold it into more white just until it streaks. Roll it half a centimeter thick, cut a rectangle and poke a hole near each end with a skewer. Bake it, then glue in two skewer posts and a crossbar with small pegs for hanging necklaces.
Get the full tutorial at with relish.
13. Marble Top Coffee Table

Here’s a $50 IKEA coffee table with a marble top makeover. The trick is skipping the cheap contact paper. The bargain roll had beige streaks and almost no veining, so this table got the thicker, glossier, pricier paper instead, and it’s worth it. You’ll only need scissors, a squeegee and a small blade to trim the edge. It’s a two-person job, so one person can hold the glass while the other smooths. Poke leftover bubbles with a pin and press them flat.
Get the full tutorial at IHeart Organizing.
14. DIY Faux Marble Gem Ornaments

These DIY faux marble gem ornaments are so pretty you might leave them up all year. Print a diamond template onto card stock and stick marble contact paper to the back of the card. Cut out the shape, then score every fold line with an awl or a needle and a ruler so the folds come out crisp. Glue the tabs to close each gem, and thread a long string through the top before you seal the last side. Hang them on a branch or tree.
Get the full tutorial at Geneva Vanderzeil.
15. West Elm Inspired Marble Wood Blocks

Love those marble and wood catalog blocks but not the price? This West Elm inspired version costs about $1 per block. Grab plain wood blocks in a few sizes and measure each side, since they’re rarely perfect. Cut two squares of marble contact paper, plus one more square sliced corner to corner into two triangles. Put the triangles on opposite sides and the squares on the two sides between them. Now the block looks half marble, half wood, fused on the diagonal.
Get the full tutorial at Kristi Murphy.
16. DIY Faux Marble IKEA Tray

This DIY faux marble IKEA tray turns a cheap wooden tray into an entryway catchall that looks expensive. Unscrew one handle and slide out the bottom panel. Cut marble contact paper a little larger than the panel, stick it down and smooth out any bubbles, then trim the edges. Painting the wood is optional but worth it. Just keep paint out of the grooves, or the panel won’t slide back in easily. Add a clear varnish if you’ll carry it around a lot.
Get the full tutorial at Horses & Heels.
17. Faux Marble Planter DIY

A faux marble planter DIY is perfect for succulents, which hardly need any care. All you need is a planter you like and a roll of marble foil, both easy to find at the hardware store. Glue the foil carefully around the outside of the planter, smoothing as you go so the pattern lines up. Put a layer of stones in the bottom for drainage, fill with succulent soil and tuck in your plants. It’s a tiny project with a big, fresh look.
Get the full tutorial at itsprettynice.
18. Faux Marble Frame

Want art that looks pricey but costs next to nothing? This faux marble frame starts with a plain frame and some marble sticker film. Wrap the film around each side of the frame, pressing it smooth as you go and trimming the corners neatly. Then fill it with something free, like a black and white photo cut from a magazine. Set it on a dresser with a few pretty things around it. The marble pattern looks surprisingly real and takes very little effort.
Get the full tutorial at Plateful of Love.
19. Marbleizing Stationery

Marbleizing stationery with nail polish is one of those crafts that looks good no matter what. Fill a dish a little bigger than your card with an inch or two of water. Pour in a bit of two or three polish colors quickly, then drag a toothpick through once or twice. Dip the card just under the surface for a second and lift it out. Lay it face up on paper towels to dry. The first card takes the most color and each one after gets softer.
Get the full tutorial at Cup of Jo.
20. DIY Gold And Marble Tray

This DIY gold and marble tray costs less than $10 and looks like a boutique find. Start with an inexpensive cutting board and a pair of gold resin antler hooks. Unscrew the antlers from their base. Paint the edges of the board gold, giving it a few coats. Cover the top with marble contact paper, and if you spot an air bubble, prick it with a needle to let the air out. Hot glue an antler to each end, putting glue only where they touch the board.
Get the full tutorial at Twinspiration.
21. DIY Marbleized Makeup Brushes

Nail polish marbling works on makeup brushes too! Fill a tall glass or jar with warm water so the whole handle can go under. Drop in a few drops each of two polish colors and give the water a gentle swirl. Dip the brush handle in, keeping the bristles out, and turn it slowly while it’s under so the color wraps all the way around. Work fast, because polish dries quickly. Practice on a straw first if you’re nervous.
Get the full tutorial at A Bubbly Life.






