Plain glassware from the thrift store is one of the cheapest blank canvases around. These 12 DIY glassware ideas use paint markers, glass paint, gold vinyl, spray paint and even nail polish to turn ordinary tumblers, flutes, jars and bud vases into something worth setting on the table. Two DIY JOY originals with video tutorials lead the way: a napkin decoupage vase and a glowing fairy jar lamp. After that come custom Sharpie glasses, color block frosted tumblers, copper dipped vases, gold holiday flutes and marbled glasses dipped in a bowl of water and polish. Most painted designs last longest with gentle hand washing, so check each method’s cure time before the first toast.
1. Easy DIY Decoupage Vase
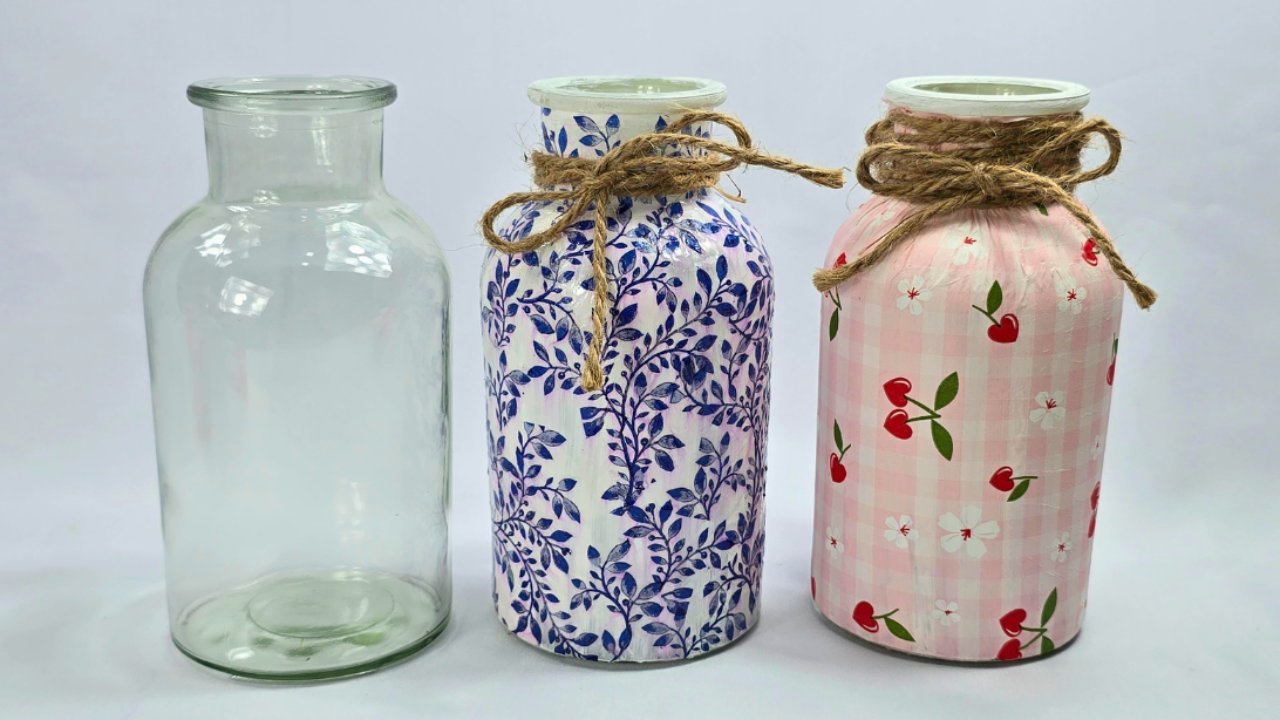
A plain glass jar from the dollar store turns into a decoupage vase that looks like something from a craft market. Paint the outside of the jar white, adding a second coat if the glass still shows through. Cut the prettiest parts from a patterned paper napkin, peel away the backing layers and press the design on with Mod Podge, brushing from the center outward so it does not wrinkle. Keep going until the jar is covered. For extra shine and durability, seal it with UV resin cured under a UV lamp, or use clear nail polish.
Get the full tutorial at DIY JOY.
2. Custom DIY Sharpie Glasses

Oil-based Sharpie paint markers make custom glasses easy, and anyone who can trace can do this. Wash the glasses, peel off any labels and wipe the outside with rubbing alcohol to remove fingerprints. Tape a printed pattern inside the glass, low enough that lips will not touch the design, and trace it on the outside. Wait 10 minutes before a second coat and press lightly. Let the glasses dry 24 hours, or set them in a cold oven heated to 350 degrees for 20 minutes. Always hand wash these.
Get the full tutorial at Bren Did.
3. DIY Metallic Print Glassware

Gold adhesive vinyl and a cutting machine turn plain old fashioned glasses into metallic print glassware that looks straight out of a home store. The inspiration set cost $34, while four plain glasses from a discount store cost $8. Geometric designs are cut on a Silhouette, and the source shares its cut files for free. Wash the glasses before applying the decals. Place the center of each decal first, then rotate the glass while smoothing outward. Hand wash after each use to keep the gold crisp.
Get the full tutorial at Sarah Hearts – Notions and Gifts for All Makers.
4. DIY Color Block Frosted Tumblers

Two kinds of glass paint overlap to make these color block frosted tumblers in pink and coral. Clean the tumblers with rubbing alcohol, then tape off the bottom at an angle so the glass looks dipped. Press out air bubbles under the tape for a crisp line. Dab on the lighter frosted paint with a foam pouncer, let it dry two hours and add a second coat. After it dries overnight, tape the opposite angle and repeat with the darker gloss paint. Cure them as the paint label directs, air drying 21 days or baking.
Get the full tutorial at Vicky Barone.
5. Easy DIY Fairy Jar Lamp
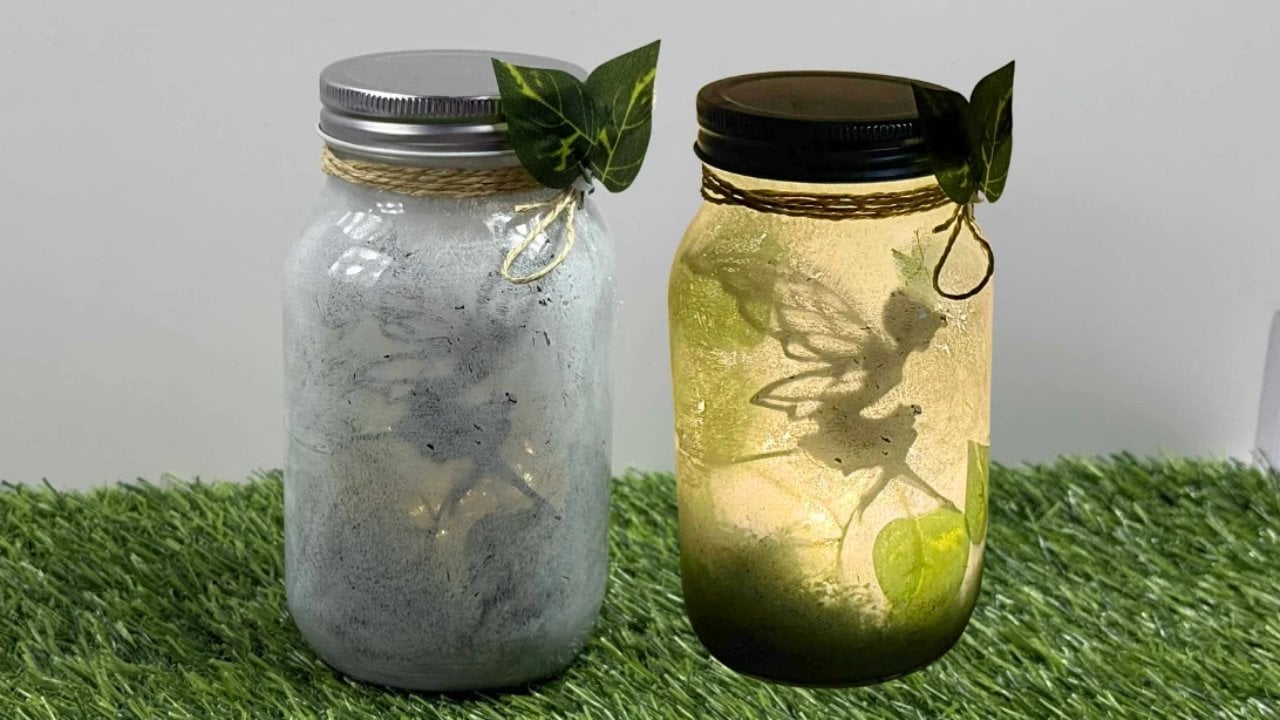
A painted glass jar, a paper silhouette and a tea light make a fairy jar lamp with a soft, magical glow. Print a fairy silhouette, or trees, mushrooms or a little house, and cut it out. Paint the inside of the jar with white acrylic or primer, just thin enough for light to pass through. Add fake moss or crumpled tissue to the bottom, then hot glue the silhouette inside along with a few leaves. Drop in a tea light or fairy lights, then tie twine around the neck with a bow.
Get the full tutorial at DIY JOY.
6. Thrift Store Glass Bud Vase

Five small square glass jars from a thrift store become a colorful bud vase set on a wooden base. Tape off the top of each jar and spray the lower edge with a bright green gloss spray paint. Sand a scrap board until the corners are soft and round. Age it with a homemade stain of white vinegar and steel wool, then paint the sides with green chalk paint in a slightly different shade. Heavy-duty epoxy attaches the jars to the top, following the package directions, and it is sturdy in about an hour.
Get the full tutorial at At Charlotte's House.
7. DIY Gold-Leafed Glasses

Painter’s tape and a small jar of liquid gold leaf turn plain rocks glasses into gold-leafed glasses with a vintage, southern porch feel. Wrap the tape around each glass to mask off a band near the base, or lay strips on a diagonal for stripes. Brush the gold over the bare glass with a small craft brush, then peel the tape away to reveal a crisp metallic edge. Mix solid bands and stripes for a set that still looks like it belongs together. Fill them with ice, a cool cocktail and a sprig of mint, and hand wash gently to keep the gold bright.
Get the full tutorial at W E S E E R A I N B O W S.
8. DIY Copper Dipped Vases

Bud vases from a discount store get a copper dipped finish with spray paint and careful taping. Wipe each vase with rubbing alcohol, then wrap painter’s tape about a third of the way up from the bottom. Run a finger firmly along the bottom edge of the tape, since that line becomes the dipped edge. Cover the top of the vase with aluminum foil taped above the line. Hold the vase by the neck and spray from the tape toward the bottom, three light coats about a minute apart. Peel the tape for a crisp line.
Get the full tutorial at Homey Oh My – Modern home and lifestyle.
9. DIY Festive Gold Holiday Flutes

Adhesive stencils and gold glass paint turn plain champagne flutes into a festive set that says HO HO HO and CHEERS. Stick the letter stencils onto the glass and paint inside them, moving letters around the glass as you go. For a dotted version, use the applicator tip on the paint bottle, keeping dots dense at the top and spreading them out toward the bottom. To cure, place the flutes in a cold oven, bake 30 minutes at 350 degrees and let them cool inside. Wait three days before using.
Get the full tutorial at Kristi Murphy | DIY Blog.
10. Alcohol Ink Votives

Alcohol ink makes glass votives glow like stained glass, especially in sunshine. Tuck paper towel inside each holder so the ink stays on the outside. Drip the ink onto the glass and blow it across the surface with a can of compressed air, as the source’s video shows, keeping the holder steady so the color does not run. Work outside or in a well-ventilated spot, and let the votives dry for two to four hours. Alcohol inks are flammable, so use only battery-operated tea lights inside these pretty holders.
Get the full tutorial at Bitz & Giggles.
11. Alcohol Ink Bottles

Empty bottles and jars from the recycling bin get a marbled, see-through finish with alcohol inks. Drip a few colors onto a felt pad in a random pattern, then stamp the pad onto the clean glass, getting several prints from each load of ink. For a softer marbled look, add a few drops of blending solution or rubbing alcohol to the pad and stamp over the color again. Metallic mixatives are not translucent, so use them sparingly. Rubbing alcohol wipes the design away to start over, and a thin coat of acrylic sealer locks it in.
Get the full tutorial at Bliss Bloom Blog.
12. DIY Marbled Glassware Using Nail Polish

Nail polish floating on water is the trick behind marbled glassware, and dollar store polish works fine. Wrap the glass with painter’s tape where the design should stop. Fill a plastic container halfway with water and pour in each polish color, one on top of the last. Drag a toothpick through the colors to swirl them, then dip the glass in, keeping the water below the tape line. Lift it out slowly and do not wipe it. Dry it upside down on paper towels, touch up with polish remover and brush on a clear coat.
Get the full tutorial at Today's Creative Life.