

That jar of corks on the counter isn’t clutter, it’s a craft supply, and these 41 wine cork crafts prove it! You’ll find quick projects like cabinet knob wine stoppers that take ten minutes, cozy ones like a cork garland strung with red bells and big weekend builds like a cork covered window bulletin board. Most need nothing more than a glue gun, a sharp knife and a few weeks of saved corks (or a bag from the craft store, no judgment). Champagne corks get a turn too, as circus lions and pincushions. 🍷 They’re perfect for:
- Christmas ornaments, wreaths and front door decor
- fall pumpkins and Halloween characters
- hostess, teacher and wine lover gifts
- party place cards and wedding tables
- easy kids’ crafts on a rainy afternoon
DIY Wine Cork Crafts
1. Wine Cork Reindeer
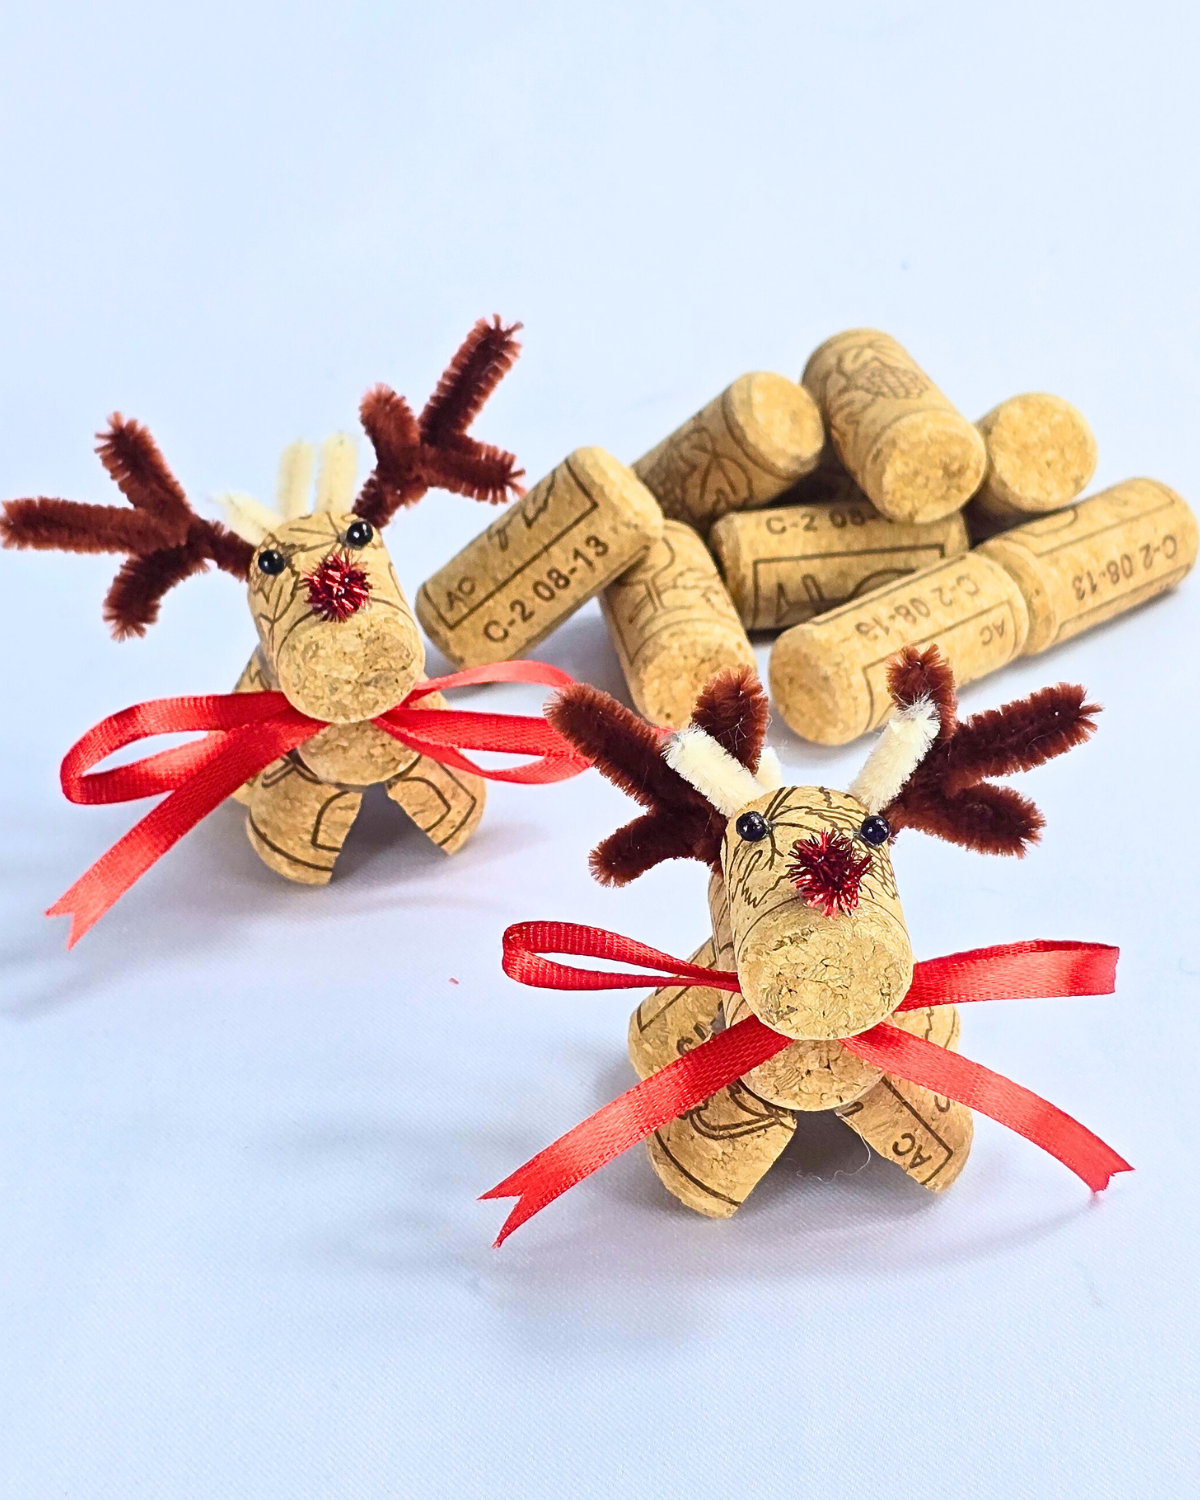
Wine cork reindeer are the holiday craft that looks best as a whole herd lined up on a shelf. You cut one cork lengthwise into four pieces for the legs, slice a short piece off another for the head and use a whole cork for the body, then hot glue it all together. Dark brown pipe cleaners bend into antlers, short light brown bits become ears and a tail, and a red pom pom nose and ribbon scarf finish the look. A toothpick between the head and body adds strength, and even legs help them stand (wobbly reindeer are cute, but only for so long).
Get the full tutorial at DIY JOY.
2. Wine Cork Ampersand Wall Art

Got a drawer full of corks? This giant ampersand puts every last one to work. The tutorial uses a 22 inch Baltic birch letter and 357 corks (yes, someone counted). Sort the corks by size first, dry fit about ten at a time so the spacing looks natural, then glue them back down with a dab of hot glue about the size of a pencil eraser. Go big, because small letters get swallowed by corks. And don’t trim corks to fit; let a little wood show or hang a cork over the edge instead.
Get the full tutorial at Craft Cuts.
3. DIY Wine Stoppers
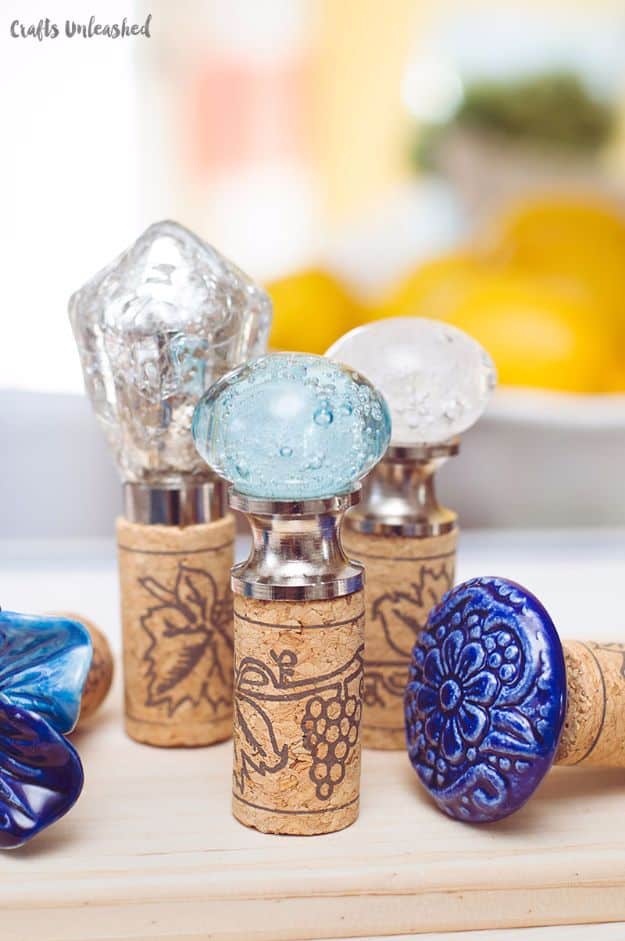
DIY wine stoppers are one of the fastest cork crafts there is, and decorative cabinet knobs do all the pretty work. Mark the center of a cork and drill a pilot hole with a small bit, around 3/32 or 7/64 inch, stopping well short of the far end. Then twist the knob’s screw into the hole and you’re done. Five stoppers take about ten minutes (picking the knobs takes longer than making them). They fit olive oil and decorative bottles too, so they make a sweet hostess gift even for a friend who doesn’t drink wine.
Get the full tutorial at Crafts by Courtney.
4. Wine Cork Trivet
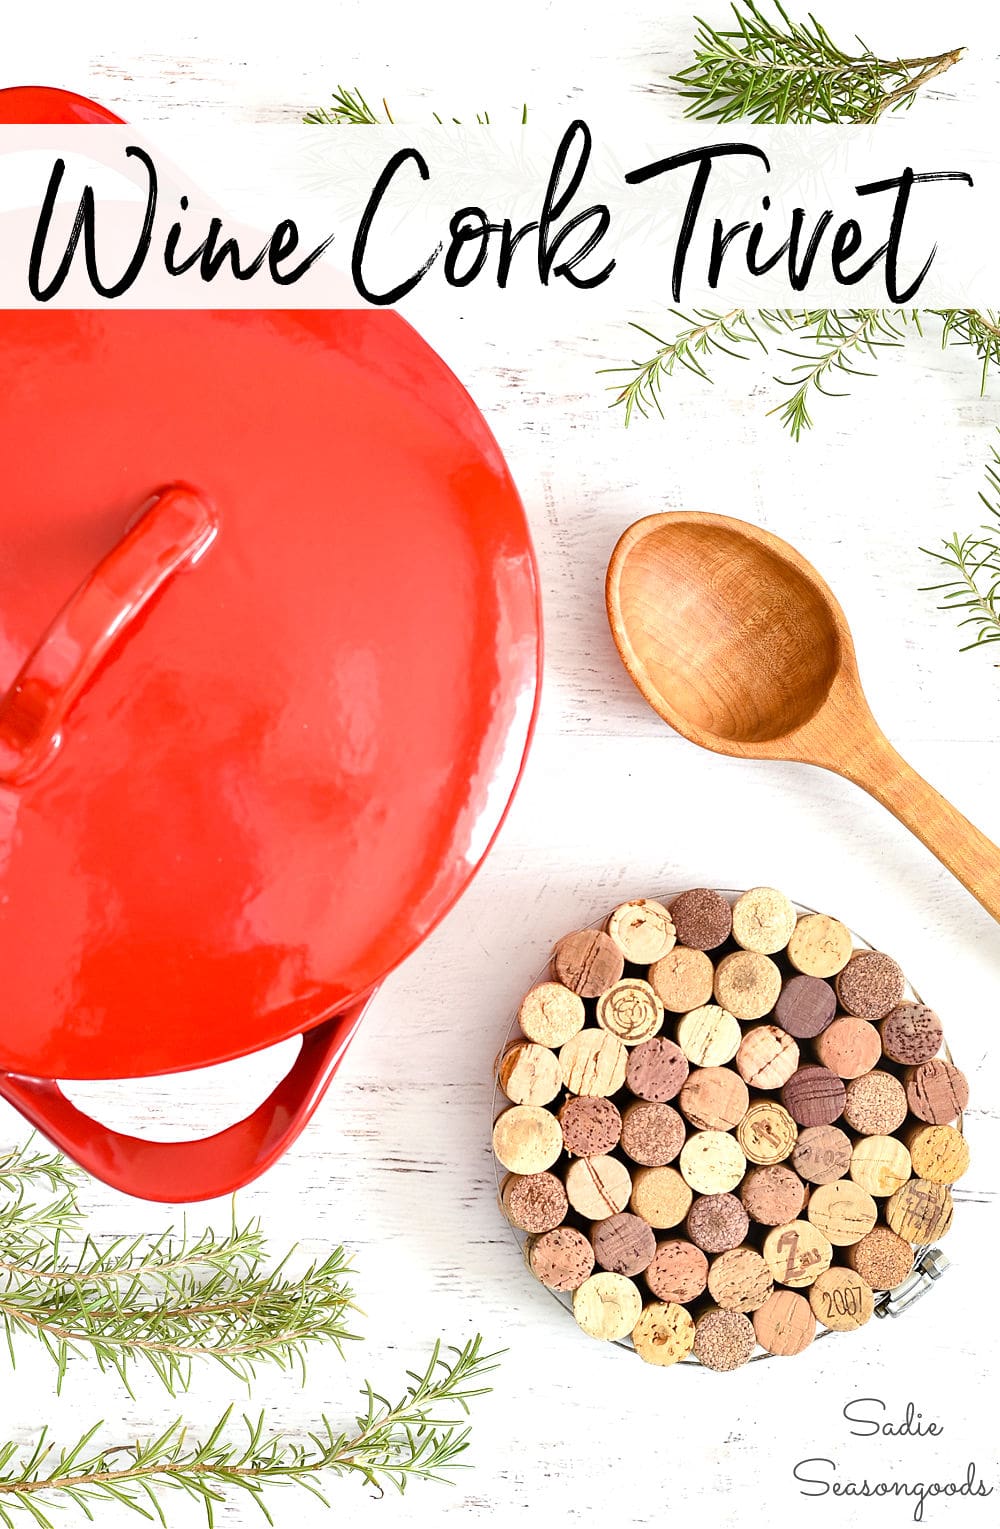
A wine cork trivet takes about five minutes and one hardware store part: a 6 inch stainless steel hose clamp. Gather 45 to 50 corks of the same height, since even corks keep the trivet from wobbling. Loosen the clamp and pack corks in from the outside edge toward the center, then tighten just enough to hold them. Flip it over, wiggle the clamp down toward the middle of the corks and tighten it the rest of the way with a flathead screwdriver. It handles a hot Dutch oven straight from the stove!
Get the full tutorial at Sadie Seasongoods.
5. Wine Cork Place Cards

Wine cork place cards are a lovely trick for a party table, and each one holds a tiny faux flower too. With a serrated knife or small saw, carefully cut a slit about a quarter inch deep down the side of each cork. Use a small Phillips screwdriver to bore a deep hole into the top, then push in a short snip of artificial blossom and stem. Cut a card stock name tag, trim it with washi tape and slide it into the slit. Every guest gets a tiny bouquet (and a favor to take home).
Get the full tutorial at Muslin and Merlot.
6. Wine Cork DIY Chandelier

This one started with a thrift store find: a pile of corks and an old fan grate. The fan grate becomes the frame, and 60 to 100 corks hang from it on strings tied to screw eye hooks. Decide how many layers you want (four looks great), tie the longest strings to the inner edge and work your way out. Bend picture hanging wire into an extra ring for the fourth layer and wrap it in rope to hide the ends. The whole chandelier came in under $15, which is honestly the best part.
Get the full tutorial at Mox and Fodder.
7. DIY Cork Wine Stoppers

DIY cork wine stoppers need just two things: leftover corks and small flat bottomed treasures to glue on top. Superglue a polished stone, a chunk of crystal or a little geode to the top of each cork and let it set. Any small object with a flat base works, so a button, a drawer knob or a pretty bead can stand in for the stones. Line a few up on bottles for a tasting party. They’re also a quick add on for a wine gift, especially with a cork from the same winery.
Get the full tutorial at Kendall-Jackson.
8. Wine Cork Monogram Letters

Wine cork monogram letters make a big statement at a shower, a wedding or a wine themed party. Start with large wooden craft store letters, about 13 inches tall and only a few dollars each. Hot glue the corks onto the letters standing vertically, letting the purple and red wine stains show here and there for color. Plan ahead and collect corks for a few weeks, because a big letter eats a lot of them. Extra corks can trim a picture frame to hold a printed wine quote for the same party.
Get the full tutorial at Popular with the Poplins.
9. DIY Wine Glass Charms

DIY wine glass charms from cork are a much prettier answer to the whose glass is this problem. Cut a cork into half inch thick discs with a sharp knife on a cutting board. Stamp each disc with a letter rubber stamp and pigment ink in a bold color. Hold the disc flat and twist a small eye screw into its side, then thread a strand of jute through the loop and tie it around a glass stem. Every guest gets an initial, and the rustic look suits a vineyard dinner or an anniversary party.
Get the full tutorial at Family Chic.
10. Wine Cork Sculpture

A wine cork sculpture is the ultimate project for a serious cork stash, and this one is a giraffe taller than most bar decor. The frame is wire clothes hangers bent into the body, legs and neck, then bulked out with newspaper and packing tape. Drywall seam tape over the top is optional but helps the corks grip. Hot glue the corks on starting at the body and working out to the neck and legs. Then squeeze wood glue between the corks; it dries cork colored and makes the whole piece sturdy.
Get the full tutorial at Lil Blue Boo.
11. Wine Cork Hair Clip

Wine cork hair clips are a cute, quick craft for a girls’ craft night or a party table. Slice corks into thin rounds with an X-Acto knife, then layer and hot glue the rounds into little flower shapes and glue them to a plain hair clip. The same cut cork pieces make earrings, a brooch or shoe clips that dress up a pair of sandals. Mix in rounds from stained red wine corks for natural color (no paint required). The project page shows a whole group of finished pieces from one crafting event.
Get the full tutorial at karapaslaydesigns.com.
12. DIY Easy Cork Planter Box
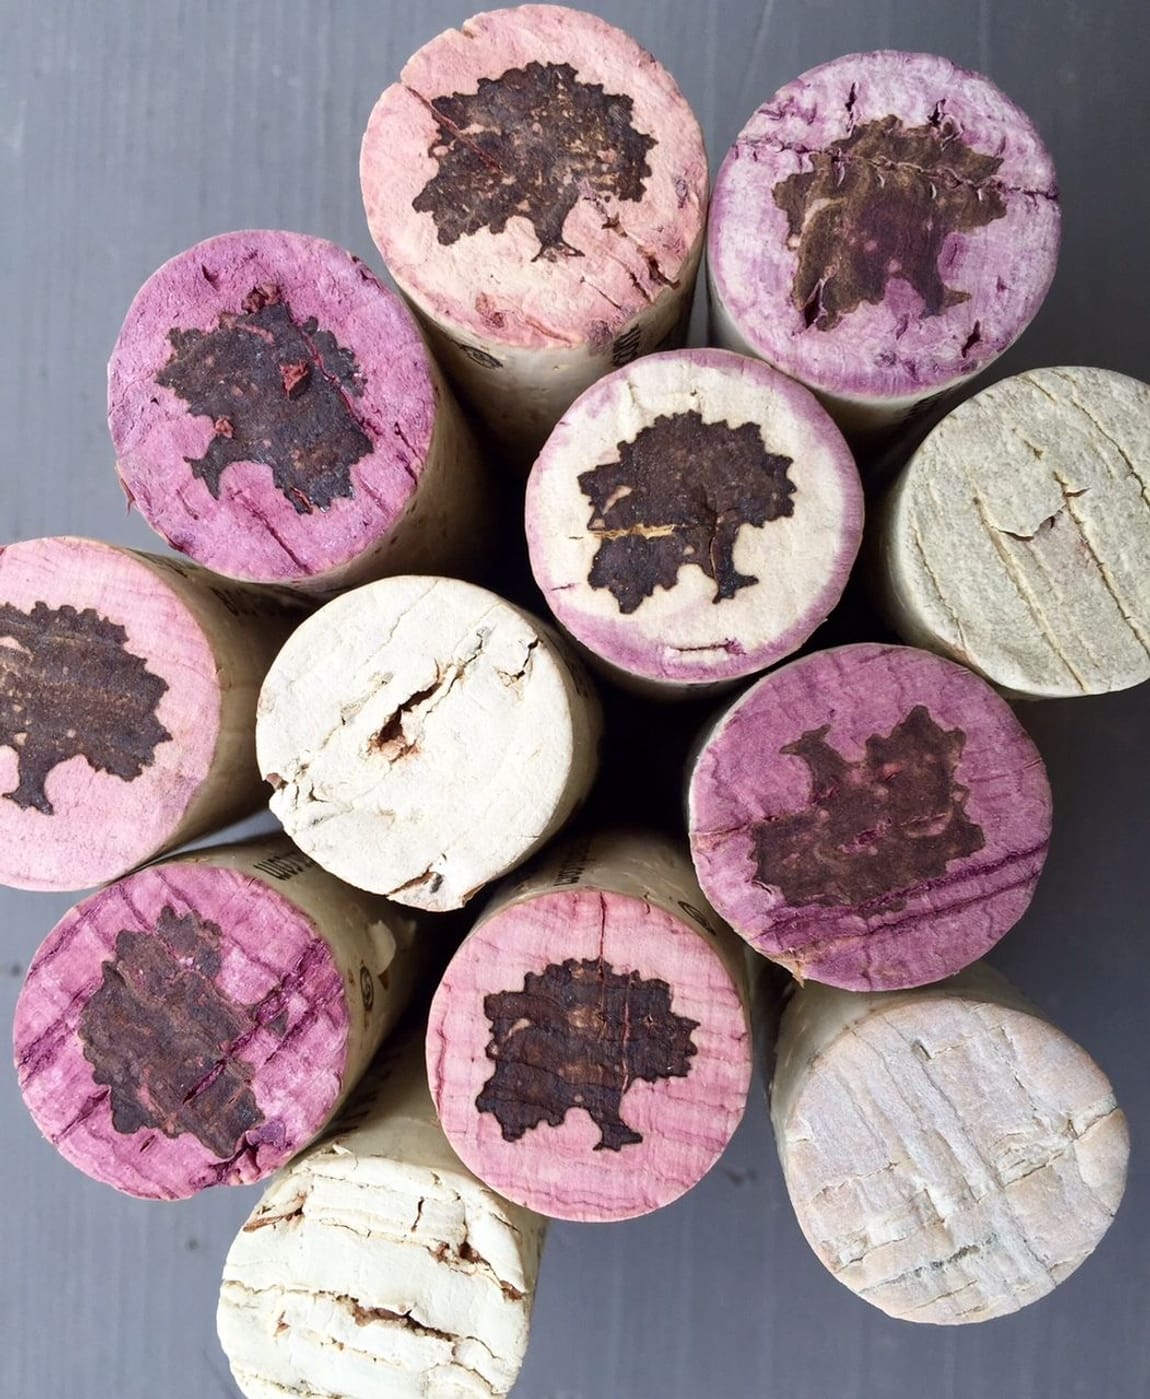
A cork planter box is an easy way to dress up a simple wooden box for a centerpiece. Choose a box sized for its spot, and add a plastic liner or drill drainage holes depending on the plants. Hot glue corks to the outside in pairs, alternating vertical and horizontal pairs as you go. White wine corks keep the colors calm, while red wine corks add pops of color (and a little history). Fill the box halfway with the right potting soil, then plant. Succulents look especially good against cork.
Get the full tutorial at Beckmen Vineyards.
13. Wine Cork Hooks

Wine cork hooks give a jumble of necklaces a tidy, good looking home. Sort the corks by size, putting the longest ones on the ends and alternating larger and smaller across the middle so the rack doesn’t look lopsided. Lay them label side down on a drop cloth and hot glue them together from the back, using plenty of glue to fill the gaps. Once dry, flip the strip over and add a hook to every other cork, larger hooks on the top strip and smaller ones below. Finishing nails hang it on the wall.
Get the full tutorial at Oh Purple Panda.
14. Wine Cork DIY Sailboat

Looking for a cork craft the kids will actually play with all afternoon? These little boats float! Line up three corks and hold them together with two thick elastic bands, one near each end. Poke a hole in the center with a nail, then push in a mini wooden dowel (a food pick or bamboo skewer works too) as the mast. Cut the sail from sparkly foam sheet, since foam is waterproof and paper gets soggy, make a tiny slit at the top and bottom and slide it on. A folded scrap of washi tape makes the flag.
Get the full tutorial at Mama Papa Bubba.
15. Wine Cork Angels

Wine cork angels are an easy Christmas ornament, and craft stores sell bags of corks if you haven’t been saving. Brush matte Mod Podge over small wooden balls and let it dry, which keeps marker from bleeding and helps blush stick. Add rosy cheeks with a little blush on a small brush and draw sweet faces with a fine tip marker. Hot glue a head onto each cork, tie twine around the neck, glue a twine loop to the back and finish with a ribbon bow for wings. They look adorable tied onto a gift.
Get the full tutorial at One Little Project.
16. Upcycle Wine Corks Into Place Card Holders

Wine corks become sturdy place card holders with nothing more than a cutter and a printer. Cut a thin slice off the bottom of each cork so it sits flat on the table without rolling. Then make an angled cut, about 45 degrees, down into the top to hold the card. Print the names in a pretty font, cut them out and slip them in. Four holders take well under an hour. They won’t break if a guest knocks one over, and they settle the nightly where do I sit debate for good.
Get the full tutorial at My Sweet Things.
17. Old Window Turned Wine Cork Board

An old window turned wine cork board is a thrift store bargain with serious charm. Paint the window frame white before adding any corks, so slips are easy to hide. Lay corks out in a pattern on one pane first and count them; each pane in this window took 54 corks. Hot glue the corks into each pane. For push pins with personality, hot glue dollar store tacks onto the backs of old buttons. Hang it over a desk for notes, reminders and favorite photos. Salvage shops often sell old windows cheap!
Get the full tutorial at Mom 4 Real.
18. DIY Vase from Wine Corks

Here’s a thrifty one: a $1 thrift store florist vase plus 40 to 70 corks becomes a gift worthy vase for about two dollars. Any cube or rectangular glass vase works, and a tall bud vase looks especially sharp. Lay corks of similar length along one side until the mix looks even, then glue them on with a heavy duty glue like E6000. Let each side dry completely before turning the vase. Save the thicker, shorter corks for the corners, and skip rubber corks (they just don’t look as nice).
Get the full tutorial at Design Improvised.
19. Wine Cork Basket
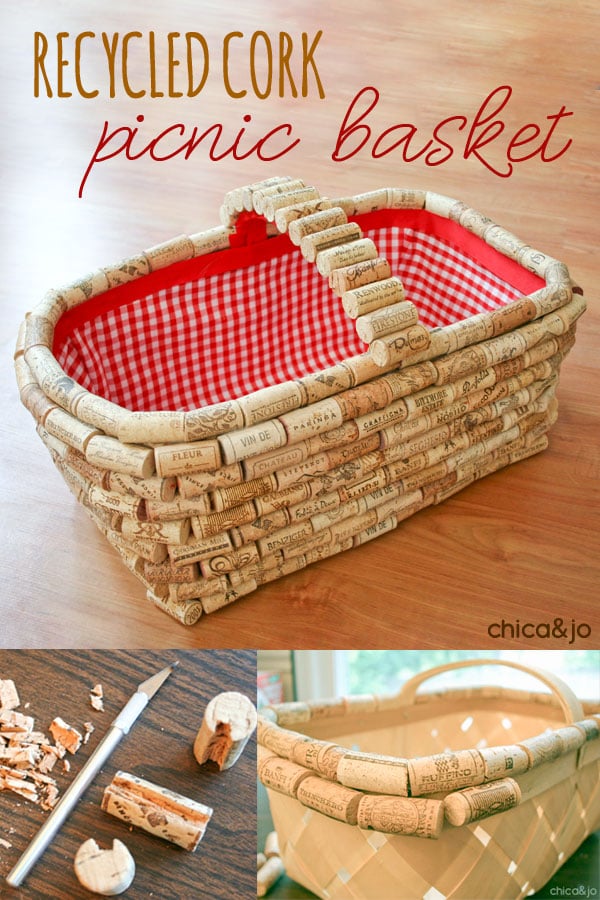
A wine cork basket turns a plain wooden basket into a charming picnic carrier. Choose one with flat, smooth sides, a wide opening and a flat handle. Corks won’t stick to a thin rim, so cut a groove into each one with a utility knife, dry fit it, then hot glue it over the edge. Angle cut the corner corks for a snug fit. Work row by row down the sides with plenty of glue, cover the handle and add cork sheet underneath. A gingham lining edged with grosgrain ribbon finishes it.
Get the full tutorial at Chica and Jo.
20. DIY Monogram Wine Cork Earrings
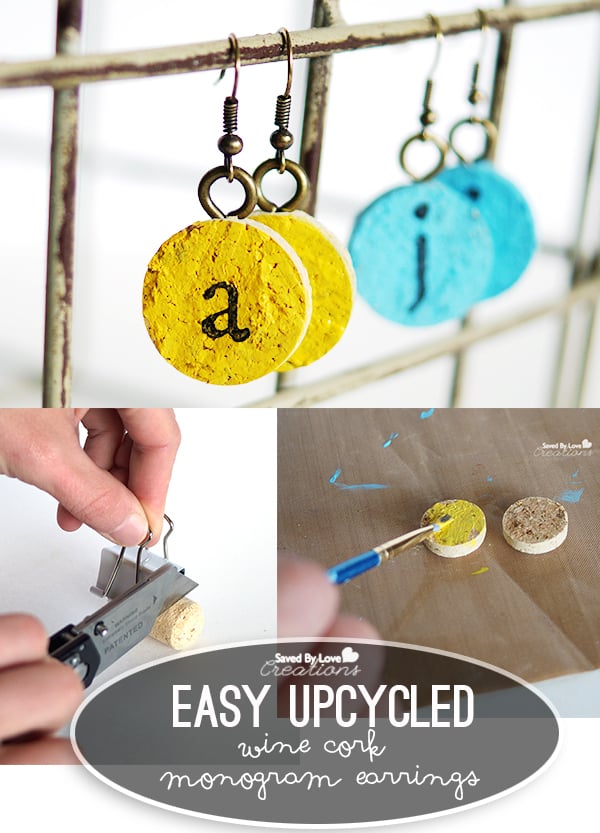
Wine corks slice into little disks that are perfect for lightweight earrings (seriously, you’ll forget you’re wearing them). Slice a cork into rounds, paint each one a bright color, then ink and stamp a single initial on the front. Twist in a small eye pin and hang the disk from an earring hook. Yellow, aqua and every color in between works, and the same process makes pendants, charm bracelets and wine glass tags. Make a pair with a friend’s initial and you’ve got a birthday gift sorted.
Get the full tutorial at Saved by Love.
21. Upcycled Wine Cork DIY Placemat
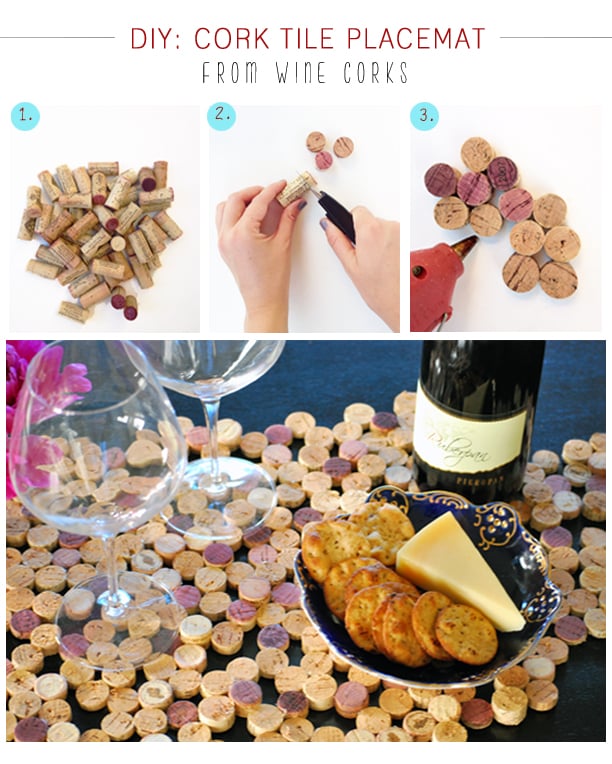
A cork placemat is the project for anyone who can work a glue gun, and it needs about 50 corks. Cut each cork crosswise into five or six slices with a utility knife, keeping them roughly the same thickness so plates sit level. Arrange the slices into your shape on a sheet of cardboard (stray glue will stick to the table otherwise) and hot glue them to each other with small dabs. Use as many red wine corks as you can for those gorgeous shades of red. If pieces pop loose, just use a little more glue.
Get the full tutorial at Creme de la Craft.
22. Wine Cork Coasters
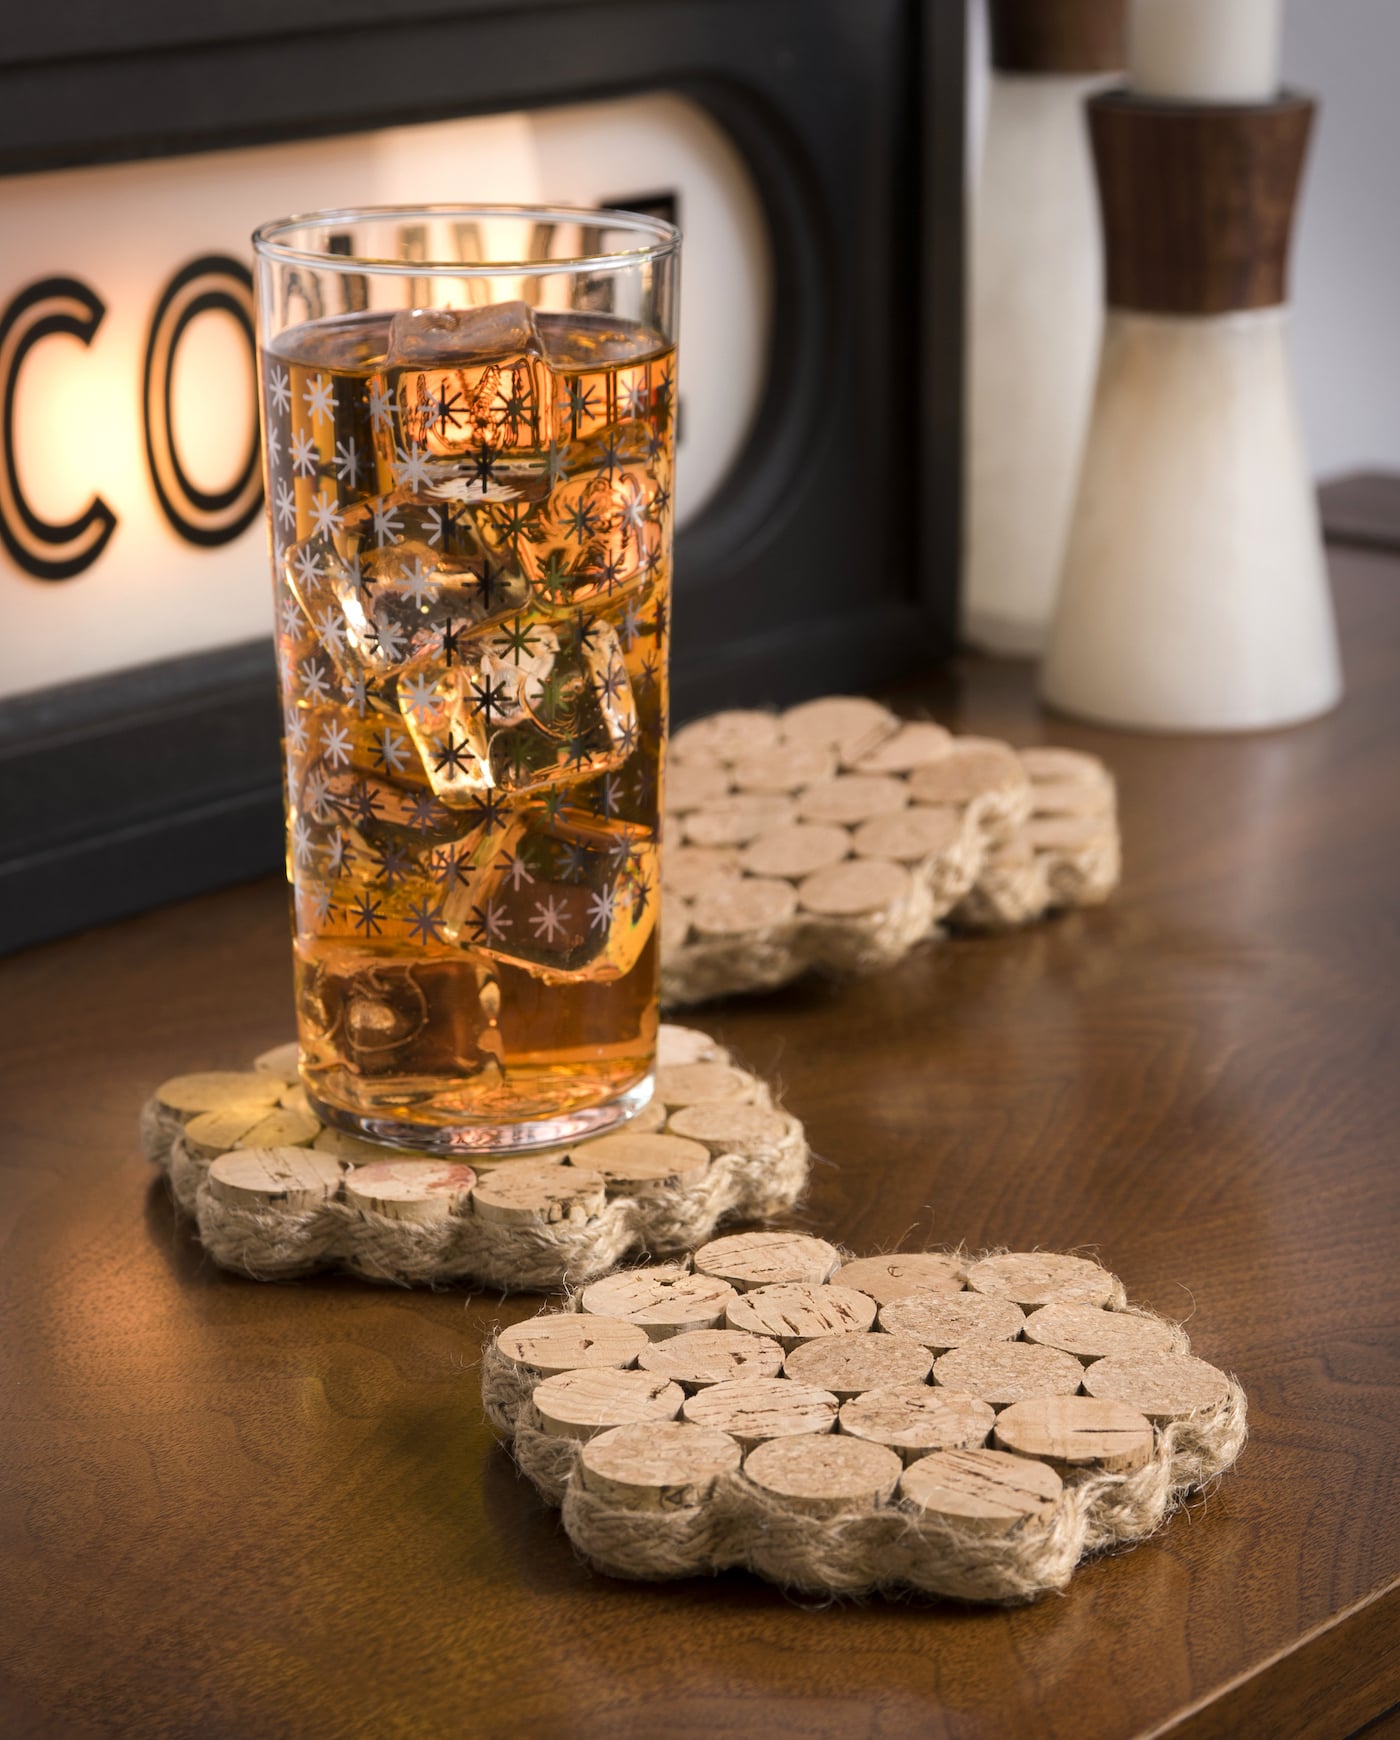
Wine cork coasters are a beginner project with a surprisingly polished finish. Boil the corks for about ten minutes first; it cleans them and softens them for cutting. Cut each cork into three pieces, then hot glue the pieces into rows of five, four and three until each coaster is a little flower shaped cluster (it takes 19 pieces, about seven corks). Glue felt to the back and trim the edge with braided twine or ribbon. Cork handles heat and moisture well, so they’re as useful as they are cute.
Get the full tutorial at DIY Candy.
23. DIY Wine Cork Garland
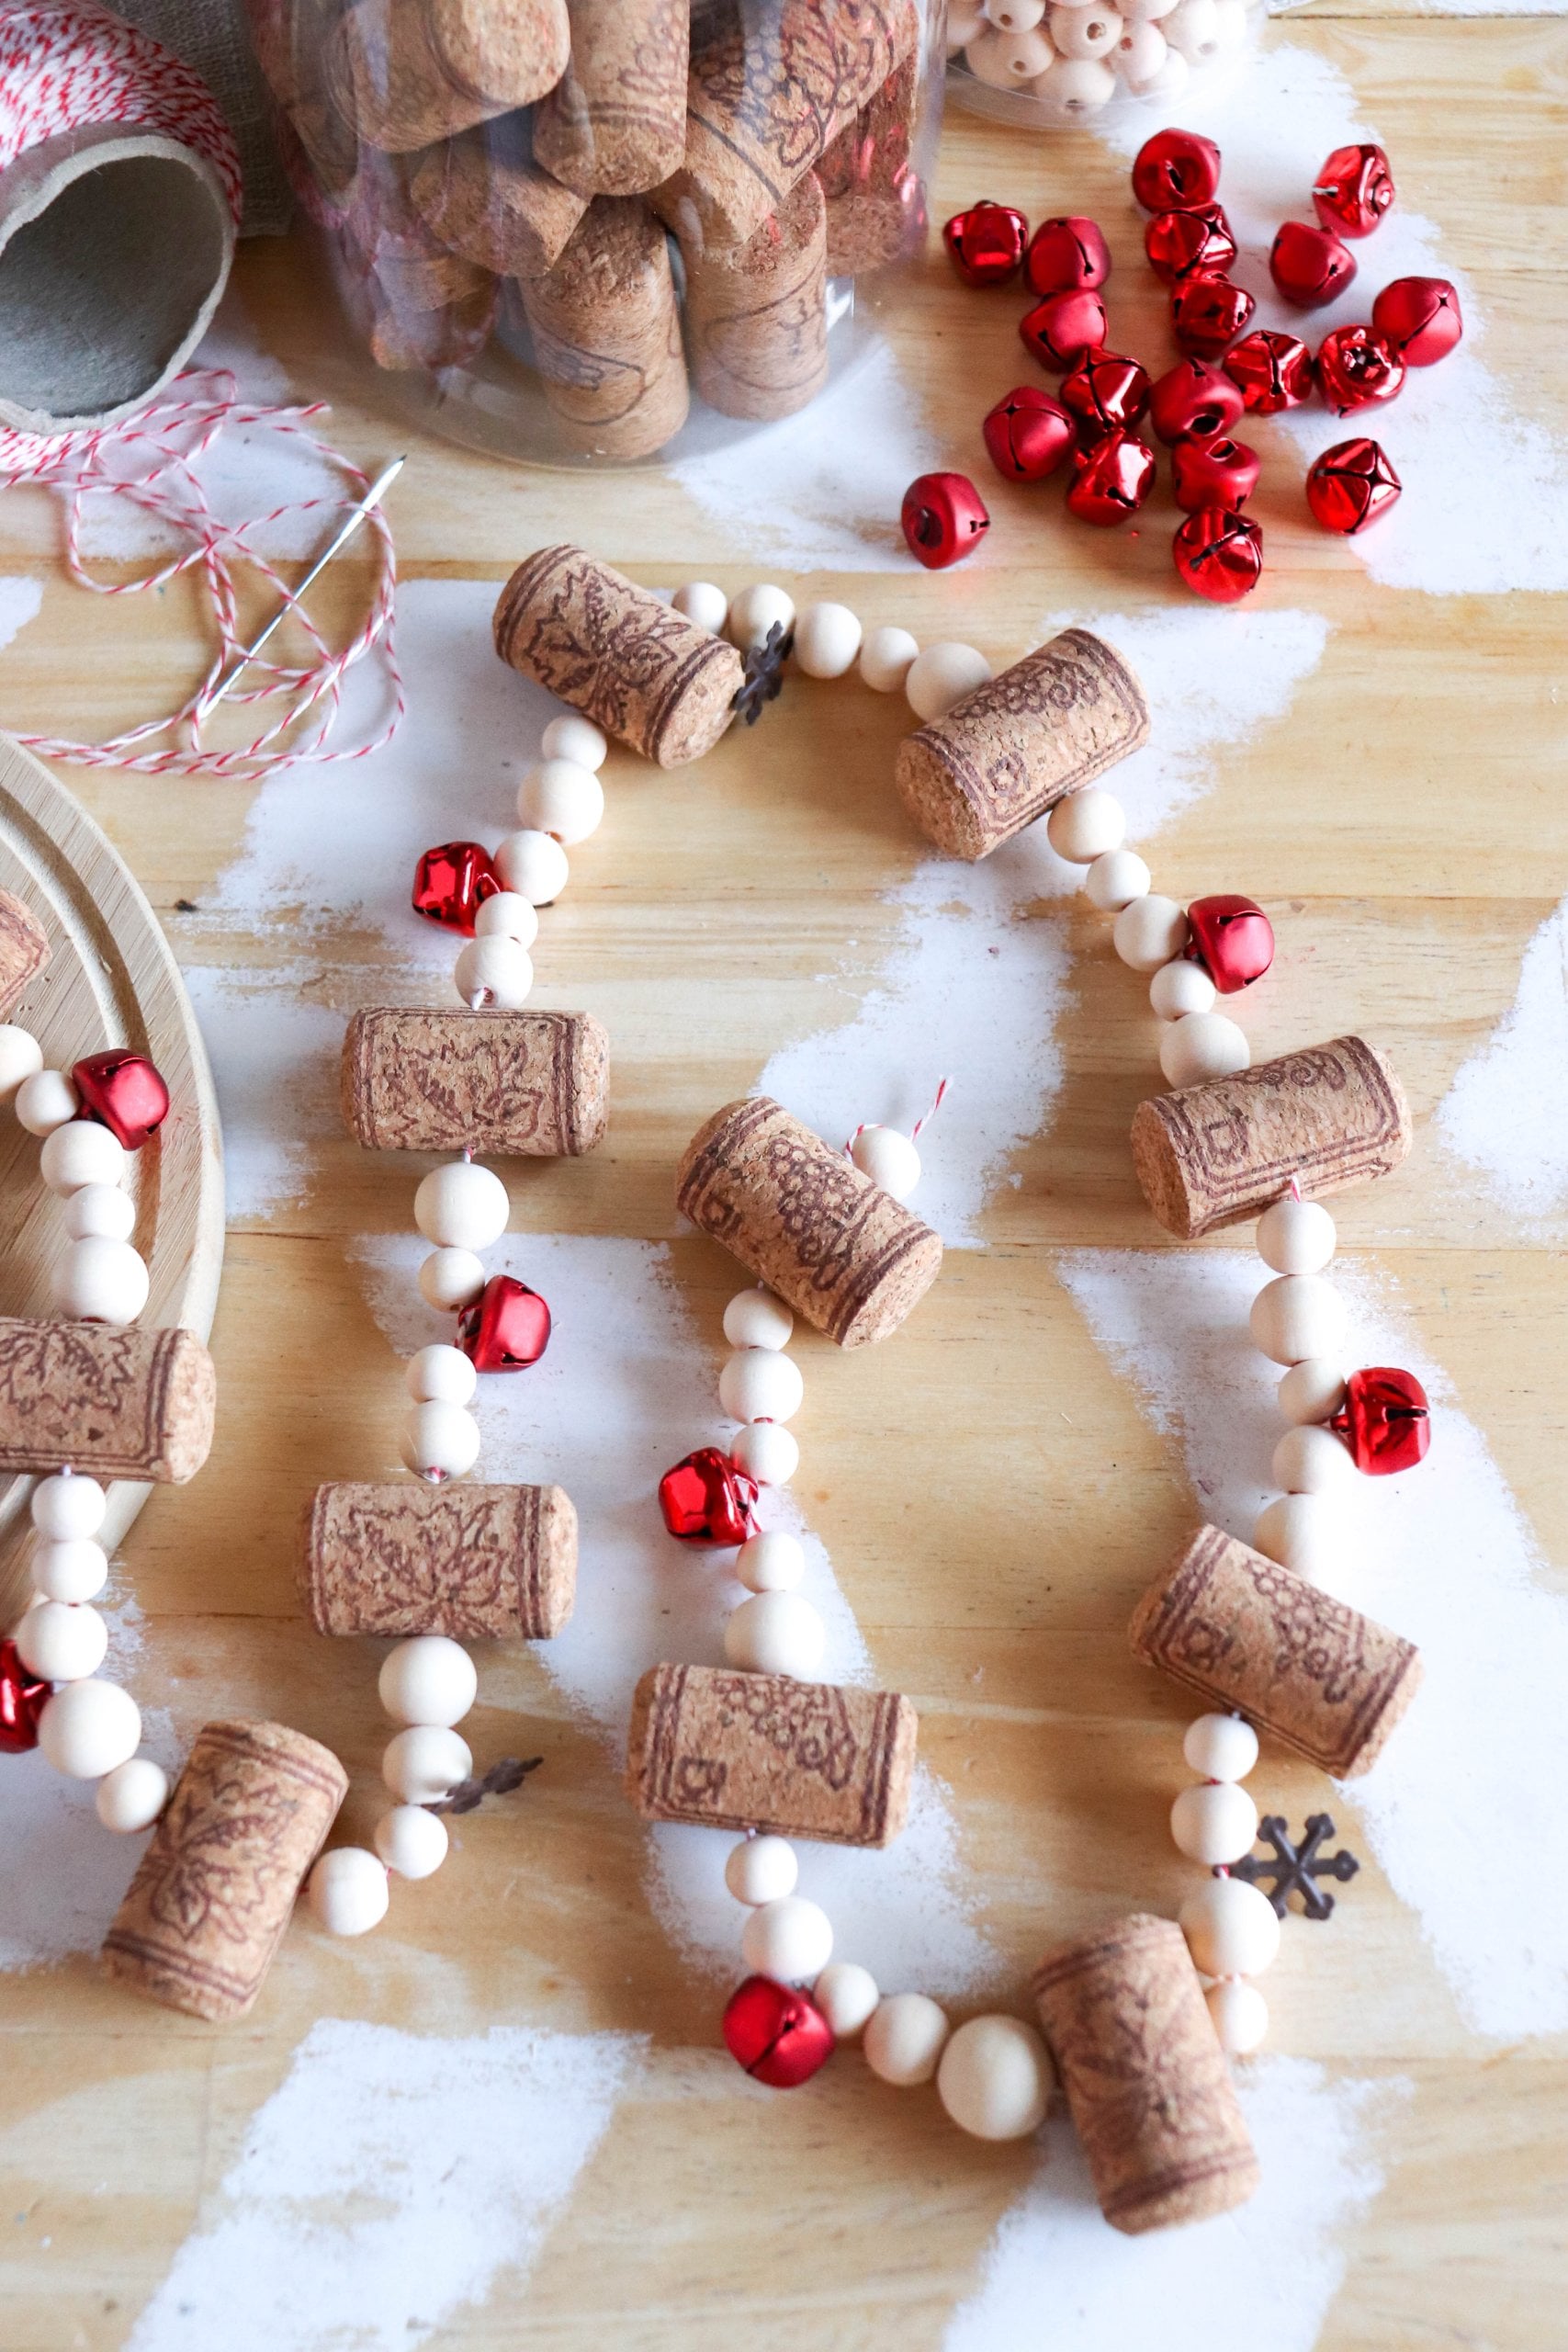
A wine cork garland is the easiest way to add warm, rustic texture to holiday decor. Thread baker’s twine onto a sharp yarn needle, then alternate corks, wooden beads, small red bells and snowflake embellishments down the line. To add a cork, push the needle straight through its center, and grab a pair of pliers if the needle sticks (it will, at least once). Keep going until the garland is as long as you like, then knot the end around the last bead. Drape it on the tree, the mantel or the kitchen cabinets.
Get the full tutorial at Homemade Heather.
24. Wine Cork Pumpkin Decor
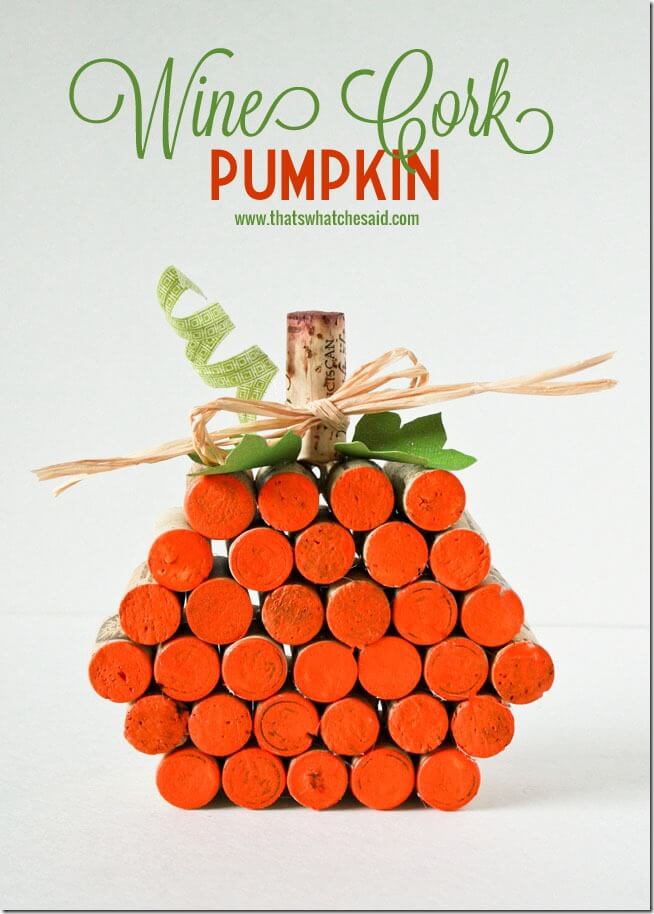
This wine cork pumpkin is the cutest fall decoration for under an hour of work. Dab one end of 34 corks into orange paint, blot off the extra and let them dry on newspaper. Hot glue them into stacked rows of 5, 6, 7, 6, 5 and 4 so the shape rounds out like a real pumpkin. One more cork glued on top becomes the stem. Bend a few paper leaves cut from green cardstock so they have some dimension, glue them in and tie a raffia bow. It looks great on a mantel or a small side table.
Get the full tutorial at That's What Che Said.
25. Wine Cork Christmas Tree Wall Hanging
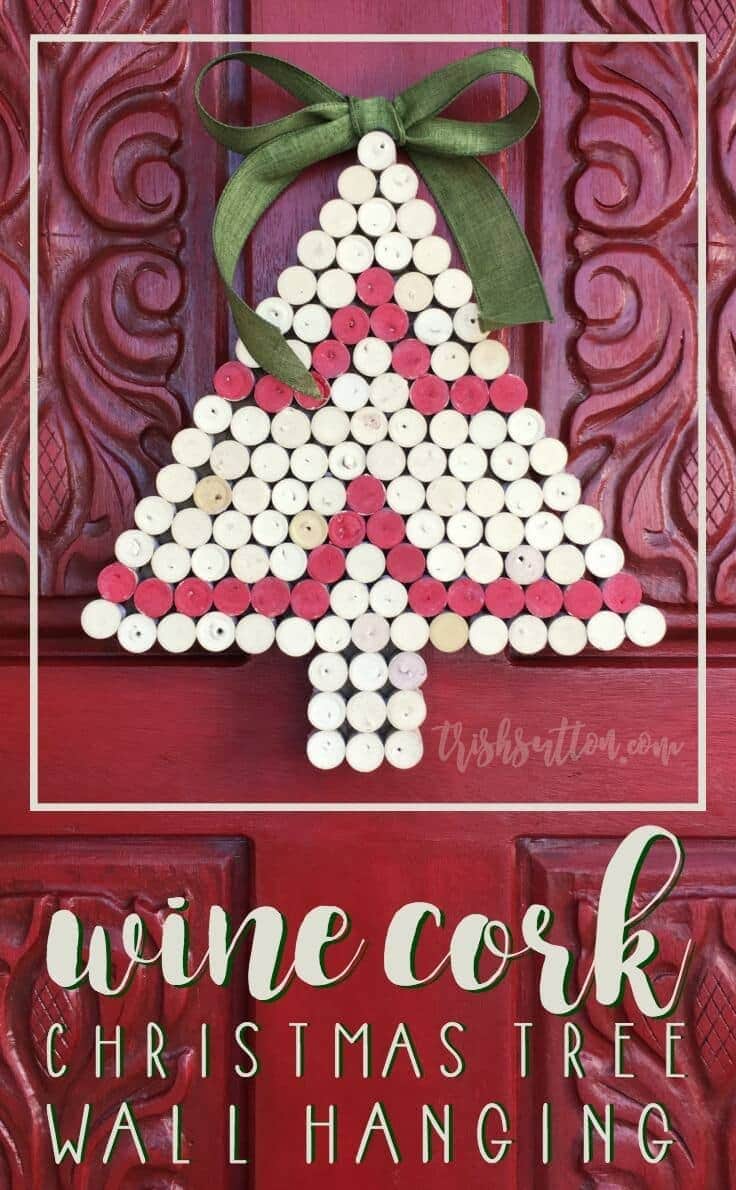
Want something besides a wreath for the front door? This wine cork Christmas tree hangs in the same spot. Fold craft paper in half, cut out half a tree and open it up to use as your guide. Cut corks in half with heavy duty scissors and lay them on the paper to count how many you need. Paint the flat tops if you like (alternating colors make it look like ornaments), then glue the corks together flat side down to keep the front even. A jute hanger, a paper backing and a big bow finish it.
Get the full tutorial at Kenarry (project by Trish Sutton).
26. Mini Cork Pine Trees
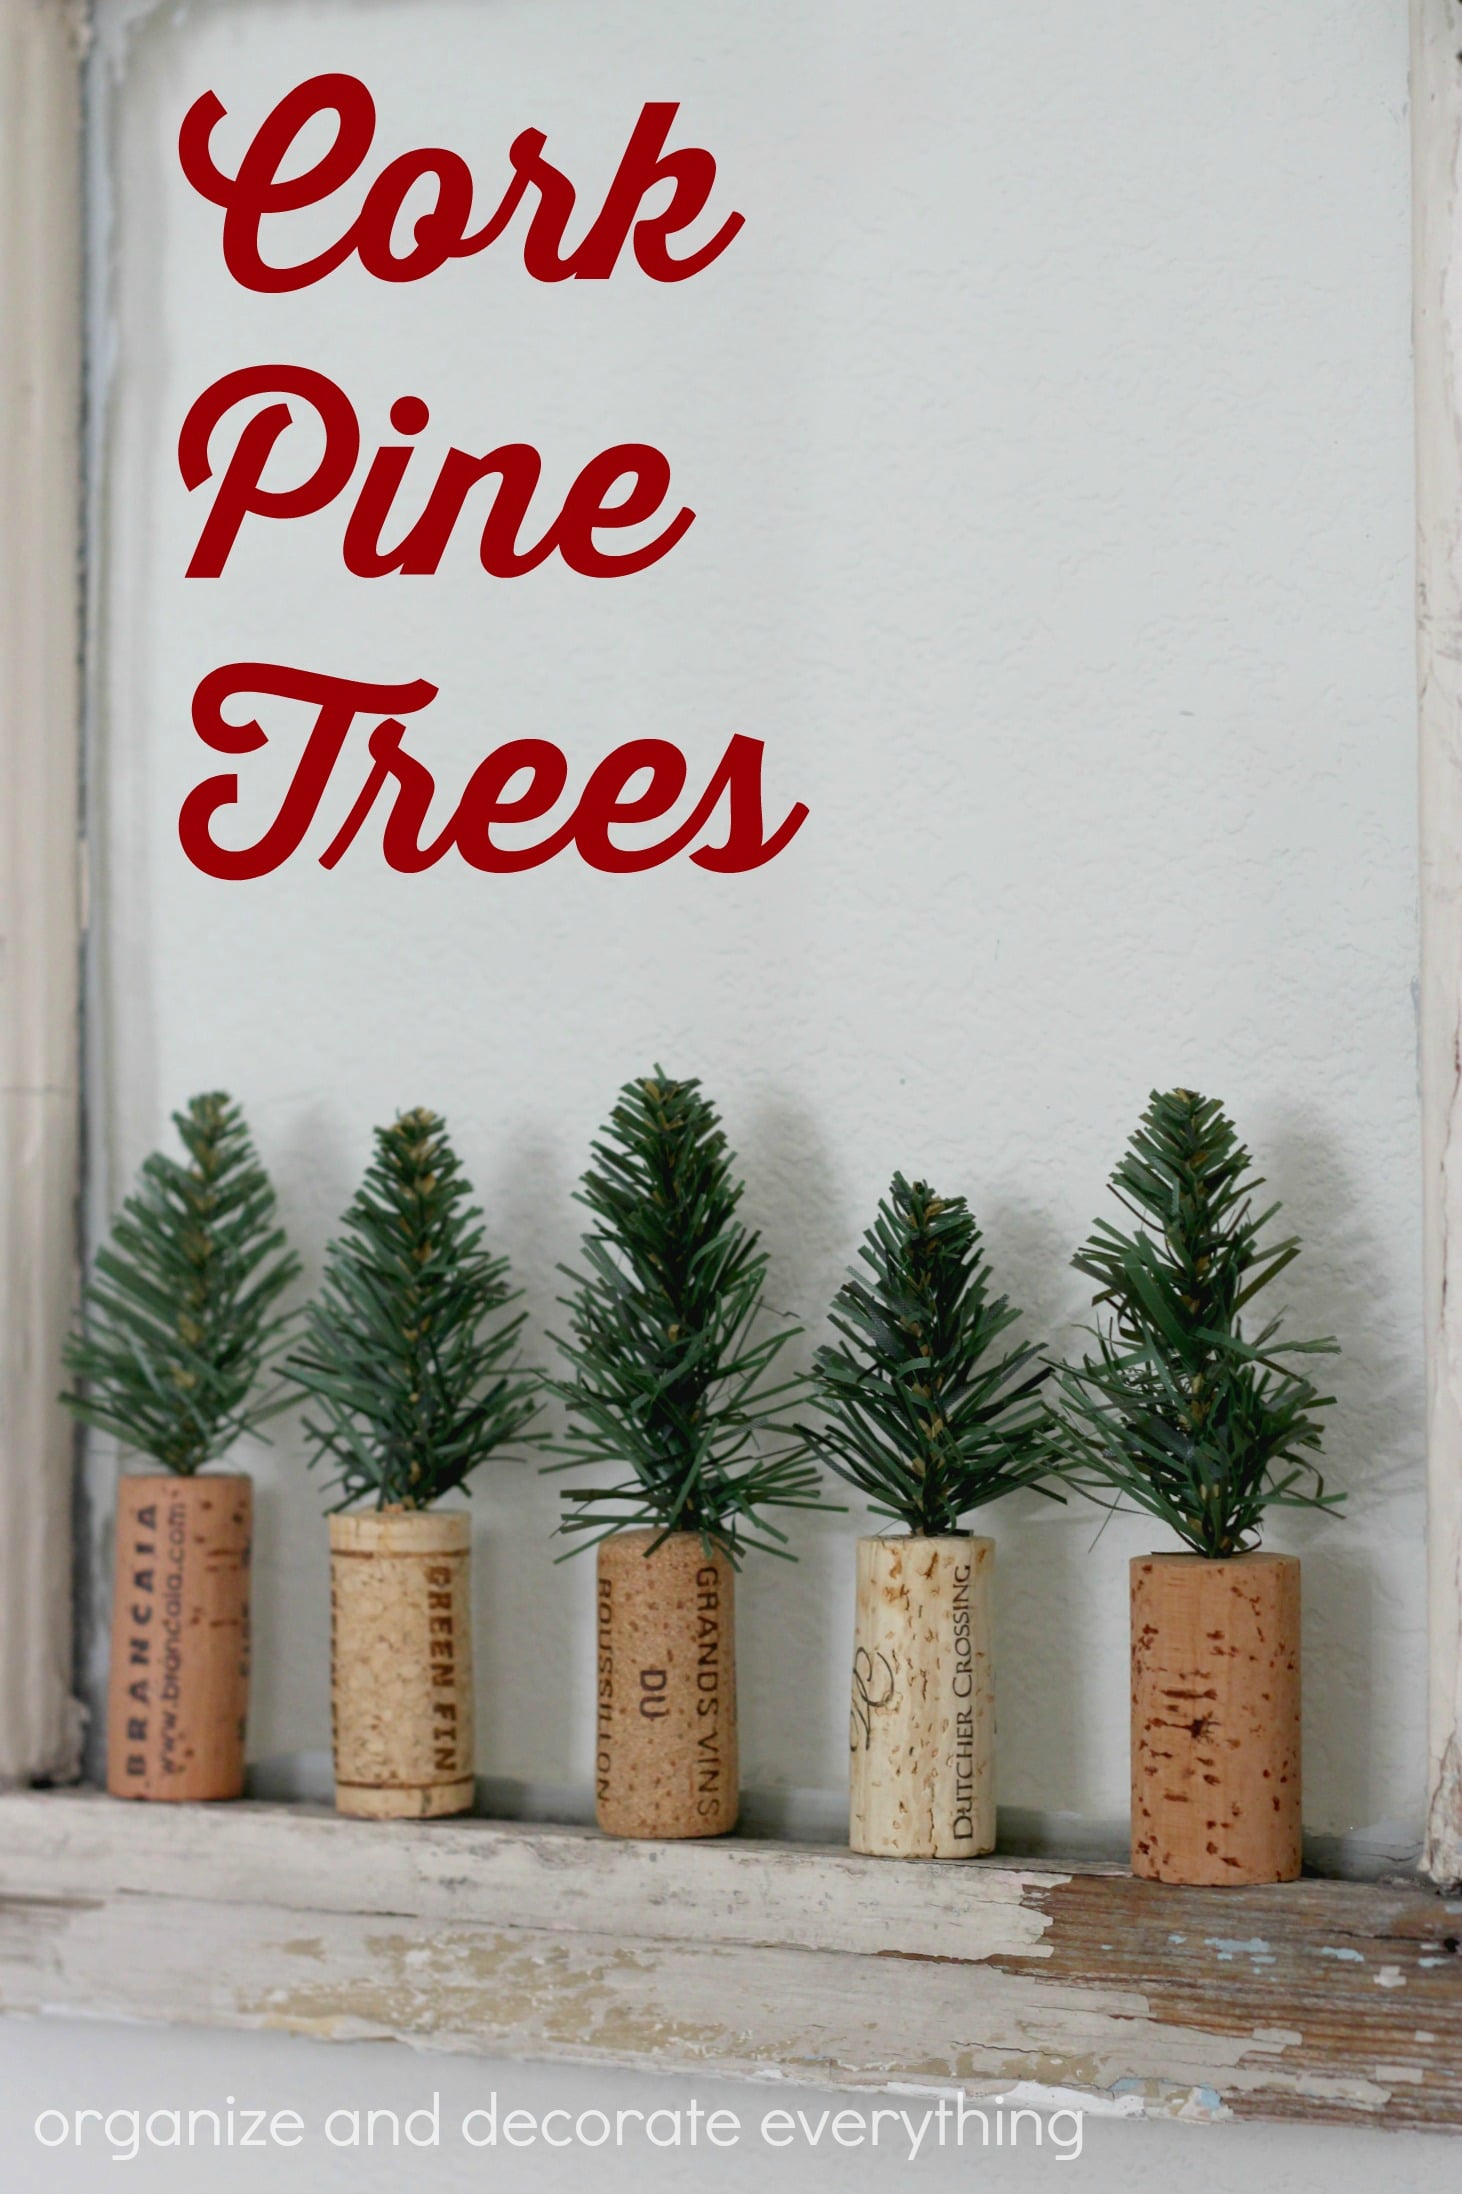
These mini cork pine trees are so cute it’s a little ridiculous. Decide how tall you want the trees, then cut real pine sprigs about a quarter to half an inch longer than that. Strip the needles off the bottom of each stem, drill a small hole 1/4 to 1/2 inch deep in the center of a cork and push the stem in. Then trim each sprig with scissors into a little tree shape (it’s oddly relaxing). Line them up on a windowsill, tuck them into a glass jar or build a tiny winter forest with fake snow.
Get the full tutorial at Organize and Decorate Everything.
27. Halloween Wine Cork Characters
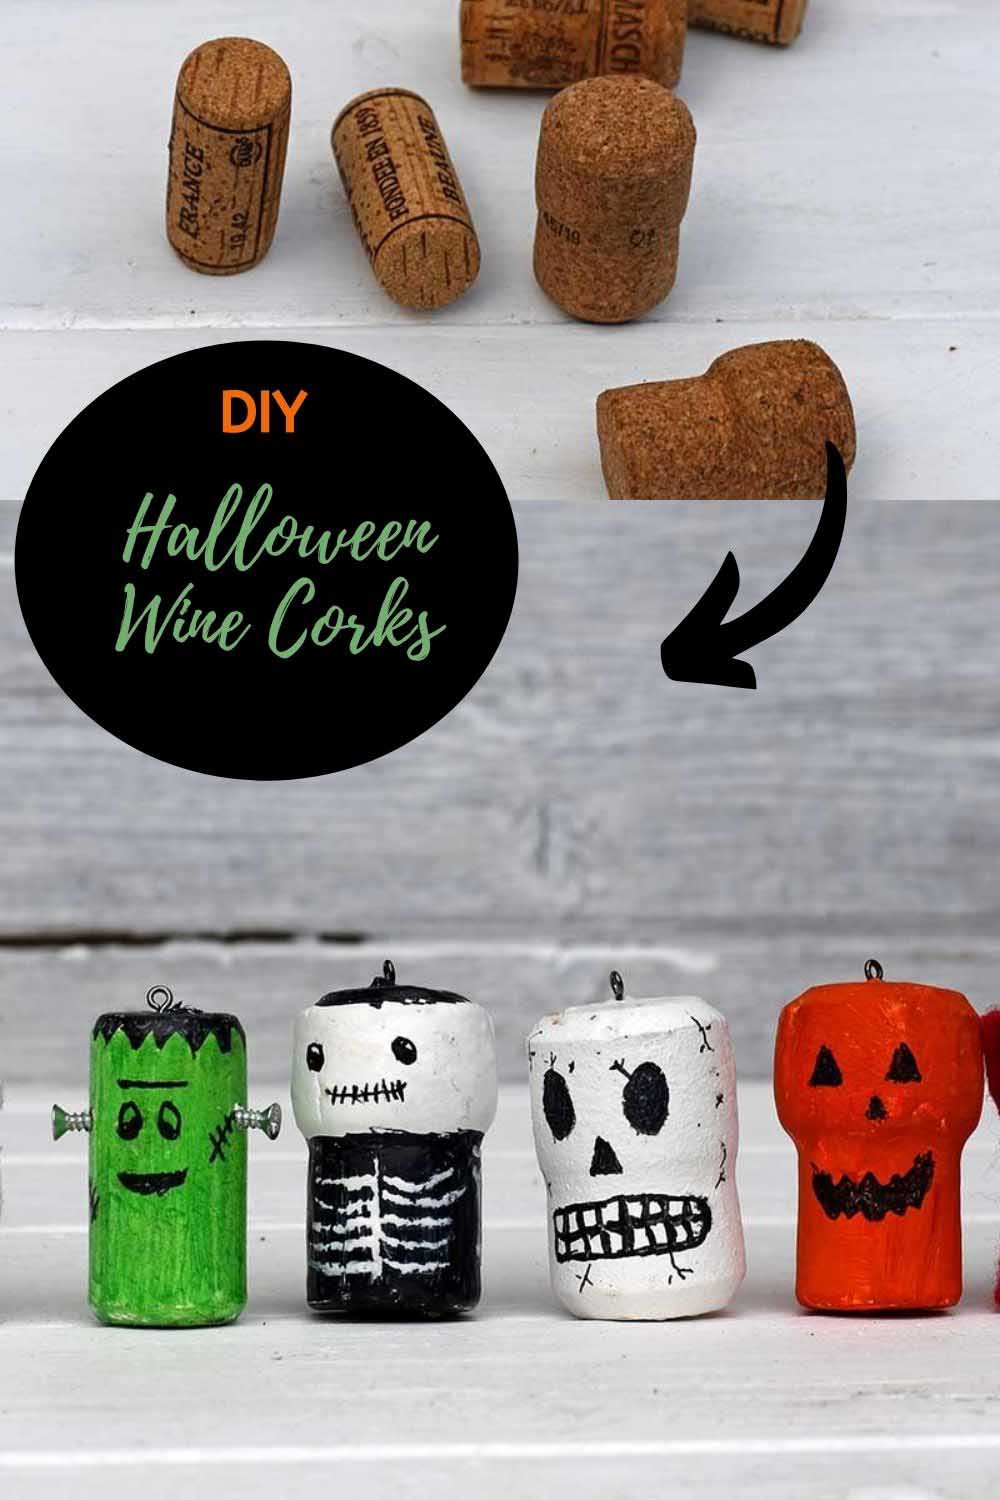
Halloween wine cork characters are adorable, a little spooky and only need nine corks (champagne corks work great too). Sketch your designs on paper first, then paint and Sharpie them onto the corks: Frankenstein, a ghost, a mummy, a skull, a skeleton, a jack-o’-lantern, Dracula, a bat and a pumpkin headed skeleton. Little felt bits add ears, wings and details. Line the gang up on a shelf or string them together into a garland. It’s a budget friendly kids’ craft that grownups will want in on too.
Get the full tutorial at Pillar Box Blue.
28. Champagne Cork Circus Lion
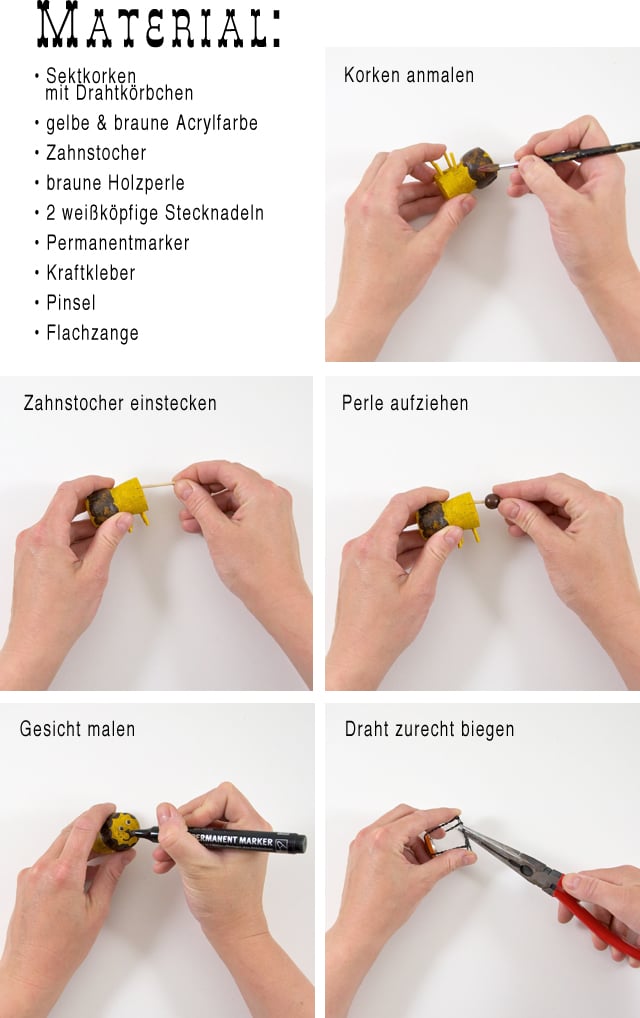
Pop a bottle of bubbly and save the cork and its little wire cage, because together they make this circus lion! Push four toothpicks into the bottom of the champagne cork for legs and one into the back for a tail, trimming them with pliers. Paint everything yellow, then add a brown mane. Snip pin heads short and push them in for eyes, draw the face with a permanent marker and slide a brown wooden bead onto the tail. Untwist and reshape the wire cage into a pedestal and glue the lion on top. It’s a darling cake topper.
Get the full tutorial at Johanna Rundel.
29. Wine Cork Candle Ornaments
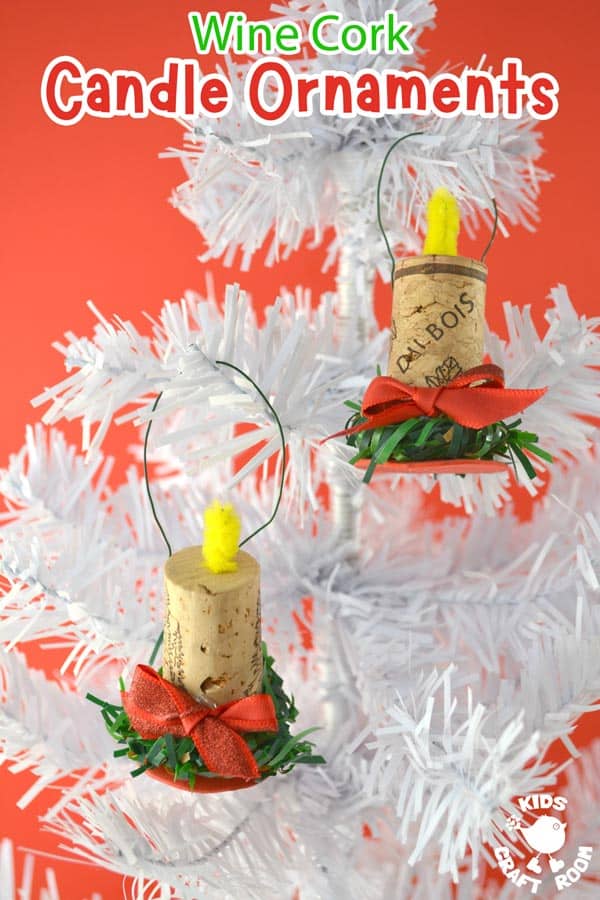
Wine cork candle ornaments are such a fun twist on a classic ornament. Cut a circle of red craft foam or cardboard a little wider than the cork, glue the cork on top and ring the base with faux green wreath stems. For the flame, fold a small piece of yellow pipe cleaner in half and push the ends into the top of the cork. Tie a short piece of red ribbon into a bow and glue it on, then add a floral wire loop for hanging. About 30 minutes makes a whole set for the tree.
Get the full tutorial at Kids Craft Room.
30. DIY Wine Cork Wreath
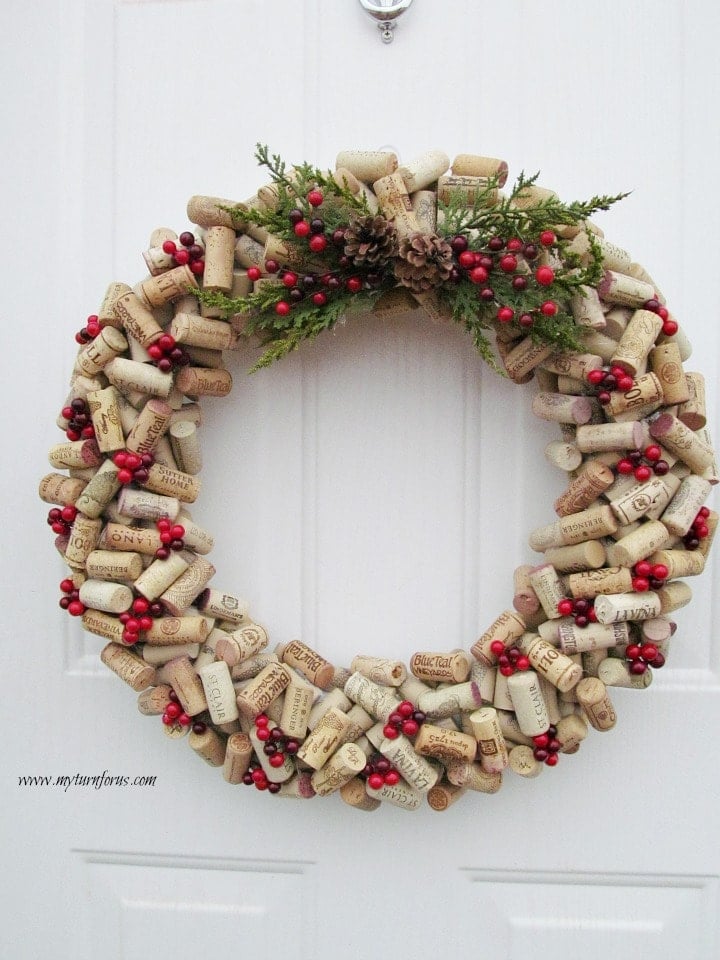
A wine cork wreath is a classic for a reason, and this one gets two layers for a full, lush look. Hot glue your plainer corks in a random, overlapping layer all over a styrofoam wreath form, then add a second layer using your best looking corks on top. Sort the corks by size first and glue five to eight at a time, pressing each section for a few seconds. Use a high temp glue gun and stock up on sticks (you’ll use more than you think). Christmas greenery and faux cranberries at the top finish it.
Get the full tutorial at My Turn for Us.
31. Wine Cork DIY Bulletin Board

A wine cork bulletin board is the prettiest way to stop taping lists to the wall. The tutorial fills a 12 by 12 inch shadow box with about 170 corks standing on end, so start saving now (or buy a bag online). Glue a piece of white foam board into the back first, then glue the corks in with a quick drying heavy duty glue so they stay put when you pull tacks out. Once they’re all in, brush a few cork ends with craft paint in your favorite colors. It’s a desk upgrade with real personality.
Get the full tutorial at A Beautiful Mess.
32. Wine Cork Valentine Heart Decor
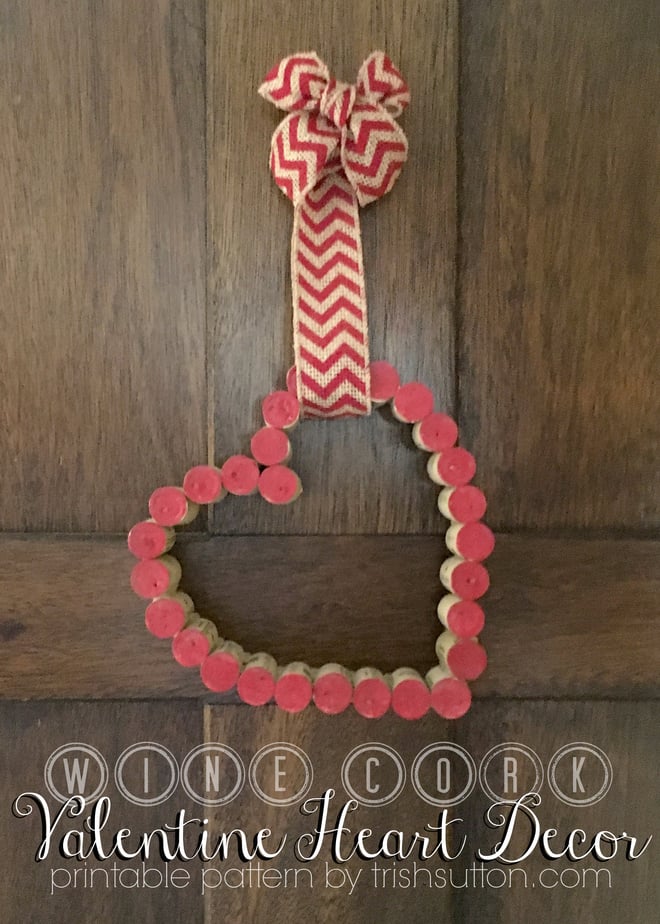
This wine cork Valentine heart is sweet, simple and comes with a free printable pattern. Print the heart, set it on a hard surface and stand about 28 corks on the outline (the count changes depending on whether you place them inside, outside or right on the line). Paint the cork ends your color of choice; dipping them is the quickest way. Once they dry, hot glue the corks together using the pattern as your guide so the heart stays a heart. Slip a wide ribbon through the opening and hang it on a door or wall.
Get the full tutorial at Trish Sutton.
33. Sweet DIY Pincushions from Wine Corks

Champagne corks have that perfect mushroom shape, and this tutorial turns them into the cutest pincushions. With acrylic paint and a little imagination, one becomes a mustached circus ringmaster in a striped shirt and another a red spotted mushroom. The soft cork top holds pins beautifully, so they’re as handy as they are fun on a sewing table. The tutorial is in Italian, but the photos show everything you need. Fair warning: once you make one, you’ll be hunting down champagne corks for a whole collection.
Get the full tutorial at School of Scrap.
34. Wine Cork Keychains
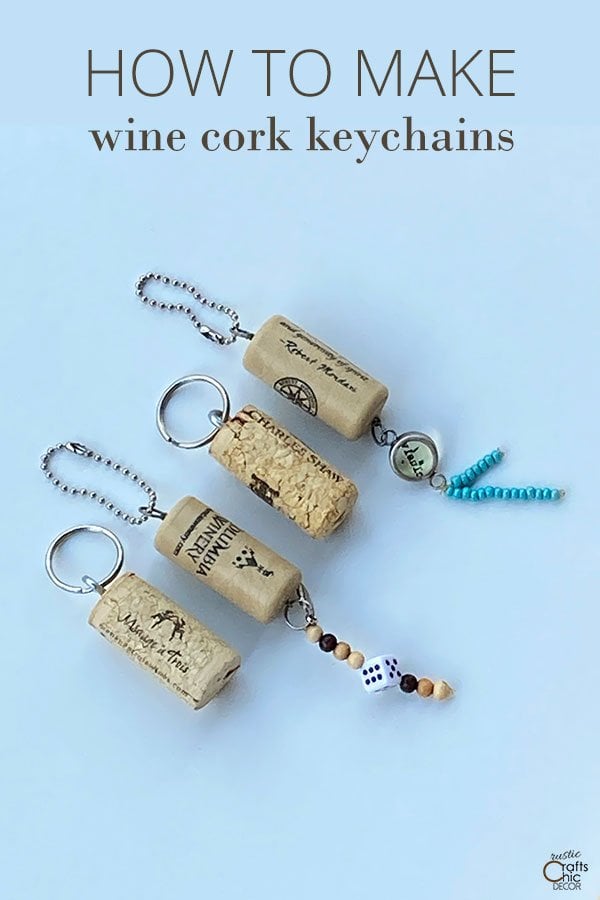
Wine cork keychains are a fast, useful way to thin out a big cork stash. Twist a screw eye into one end of a wine cork, attach a split key ring to the eye, then personalize it with beads and charms. A dab of E6000 keeps things secure where you need it. Make one with coastal colors and a shell bead for a beach bag, or a dice charm for a game night friend. Some synthetic corks feel a little rubbery, but they grip the screw eye even better. Bonus: corks float, so your keys might too.
Get the full tutorial at Rustic Crafts & Chic Decor.
35. Wine Cork Memory Preserver

Here’s the sweetest cork idea on the list, and it takes zero skill. Keep a glass pitcher or jar on a shelf, and every time you open a bottle for a celebration (or just a good night in), write what you were doing or celebrating right on the cork. Birthdays, weddings, moving day, good news and even a TV binge all go in. At first it feels like hoarding, but after a few years the jar becomes a little scrapbook of happy, funny and bittersweet moments. Start yours tonight!
Get the full tutorial at A Beautiful Mess.
36. Cork Lovebirds
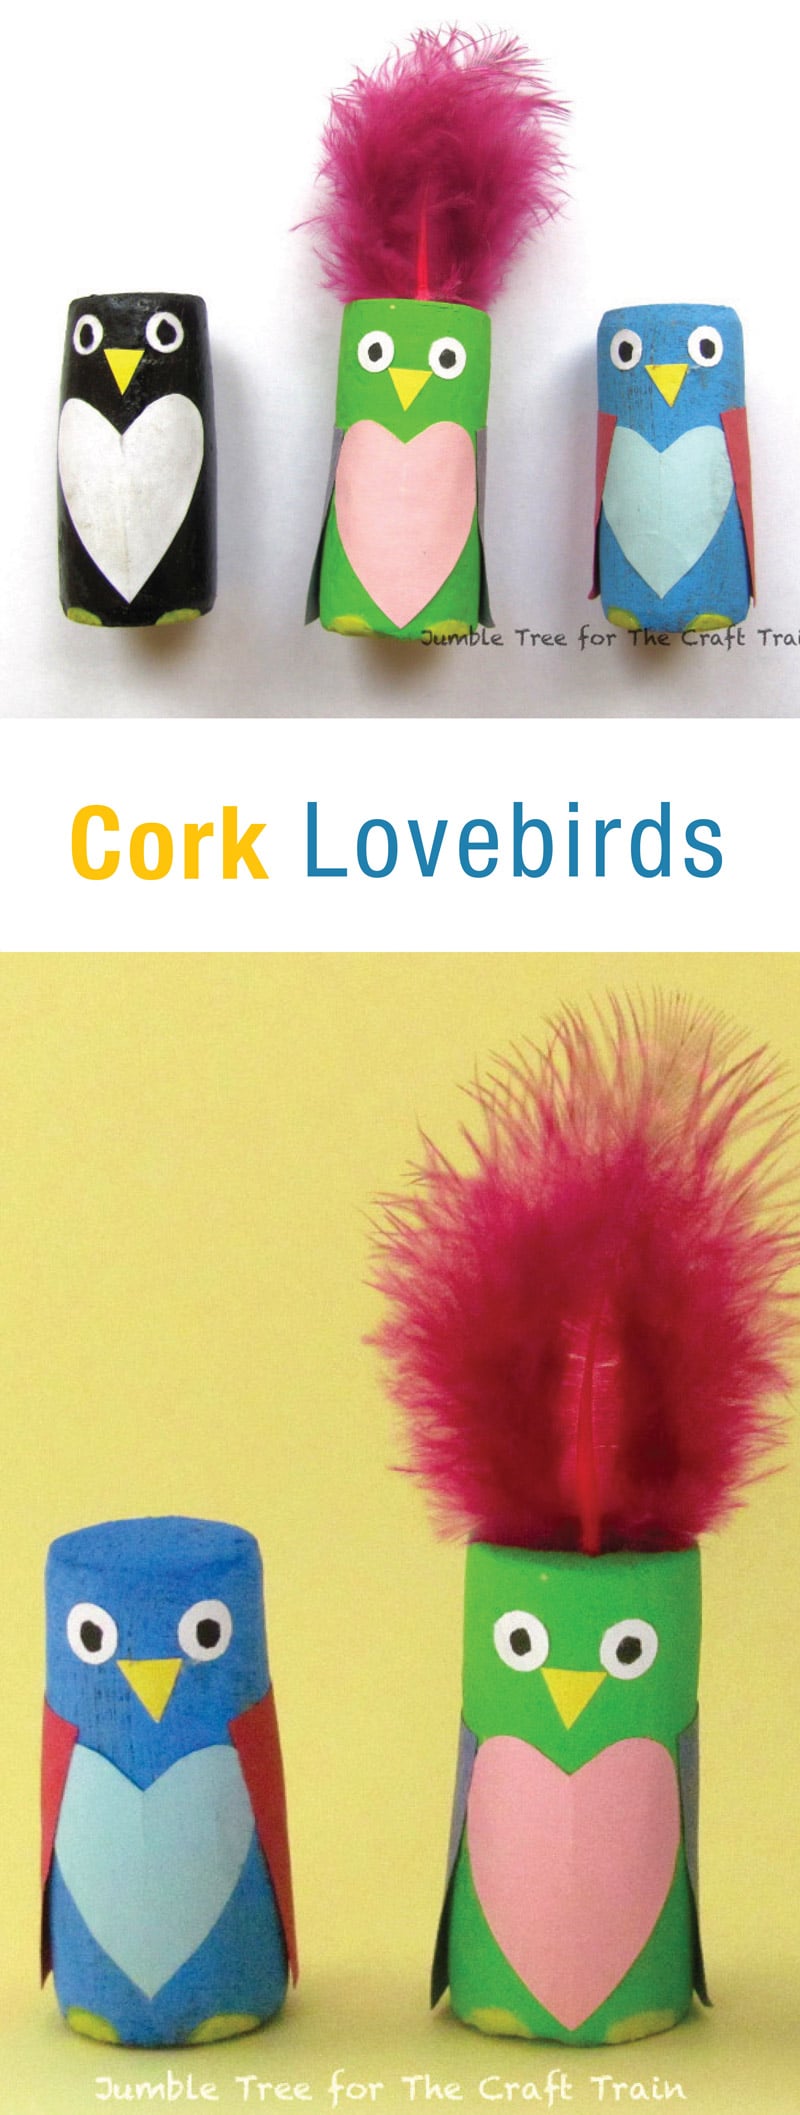
Cork lovebirds are a sweet little Valentine’s craft that kids can do almost entirely on their own. Paint a cork any color you like, then glue on a folded paper heart for the tummy with the point near the bottom. Wrap a strip of contrasting paper around the cork for wings, gluing only the top half so the bottom flares out. Hole punch circles for eyes, add pupils with a fine black pen and top with a feather if you want a little drama. Add a keyring or magnet on the back and they’re instant gifts.
Get the full tutorial at The Craft Train (project by Tracey of Jumble Tree).
37. Christmas Tree Wine Cork Ornaments
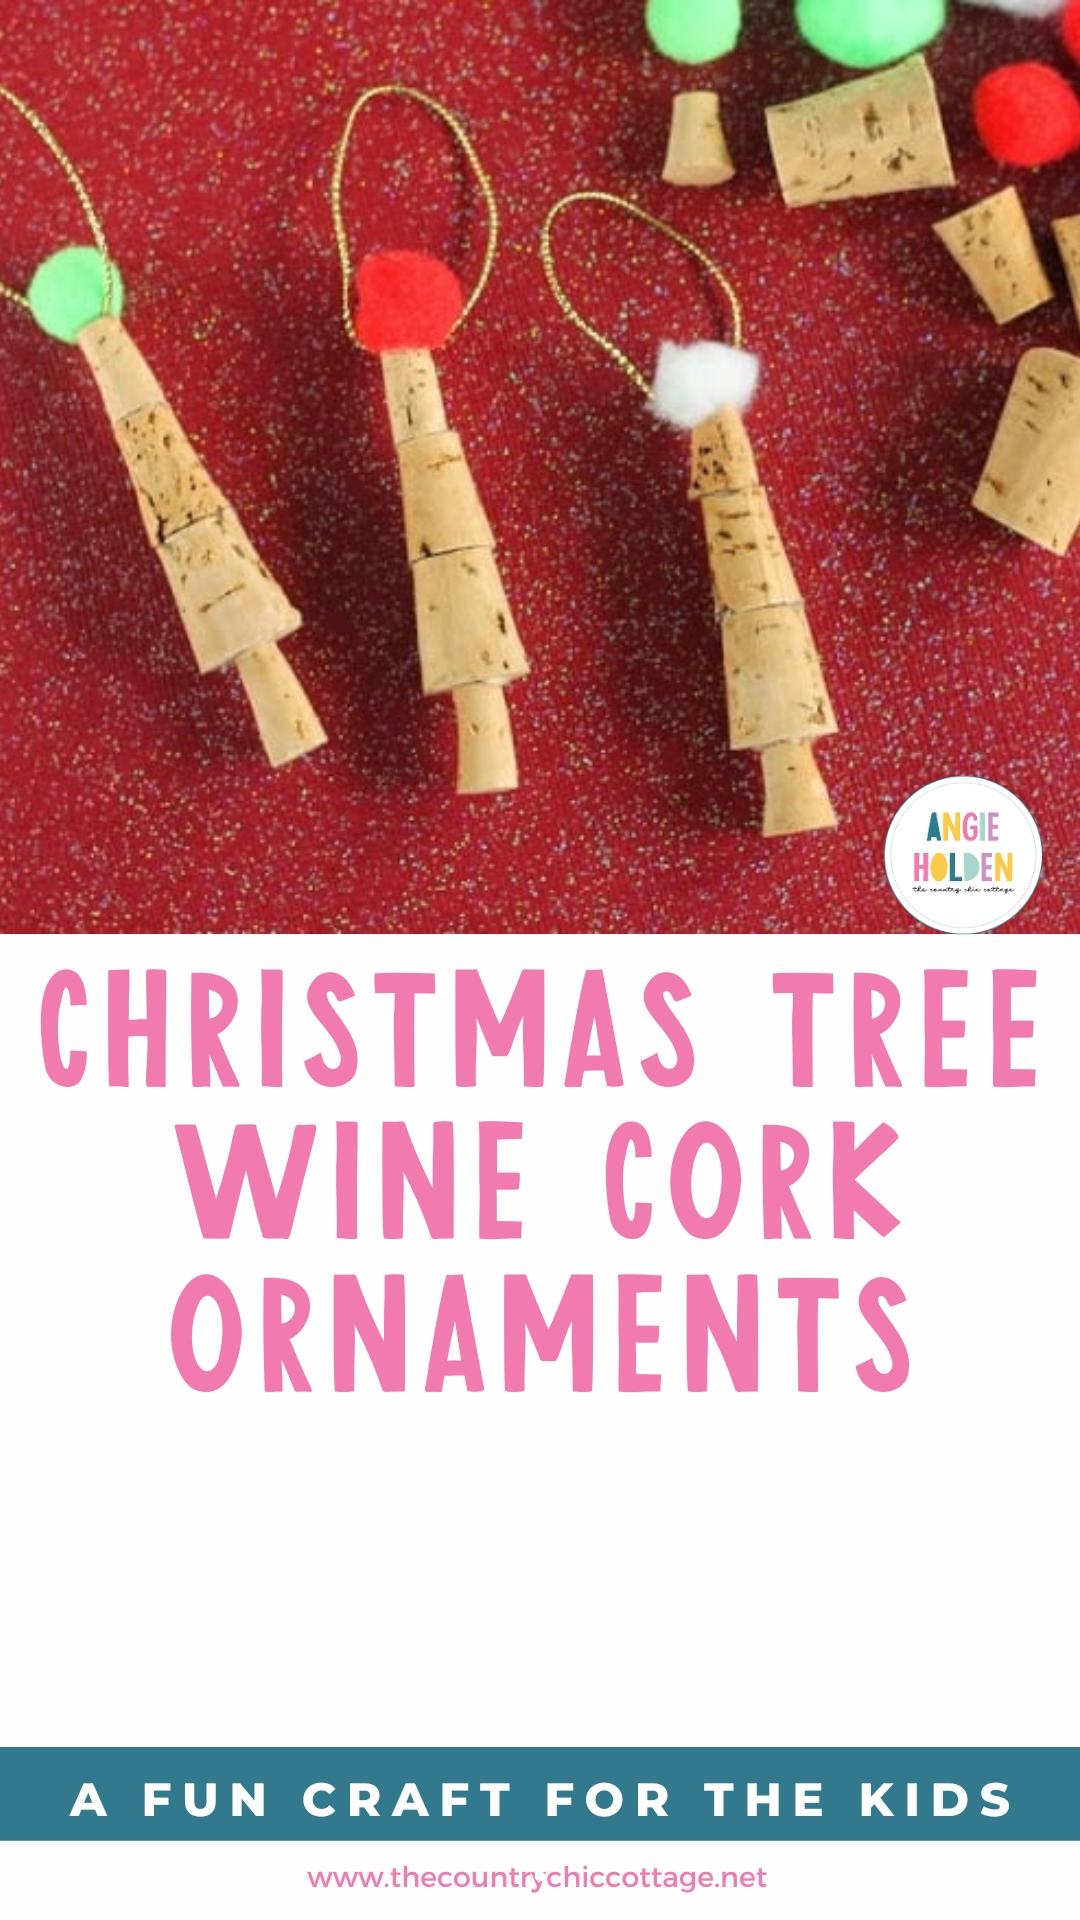
These Christmas tree wine cork ornaments are a kids’ craft that only takes six pieces. Glue three corks of different sizes together, stacking them from big to small into a tree shape, then add a base cork for the trunk. Top it with a colorful pom pom and hot glue on a loop of cord or ribbon for hanging. They’re quick enough to keep the kids busy over winter break (for at least a few minutes, anyway), and every one comes out a little different. Make a batch to hang on the tree or tie onto gifts.
Get the full tutorial at The Country Chic Cottage.
38. Cork Stamped Raw Edge Napkins
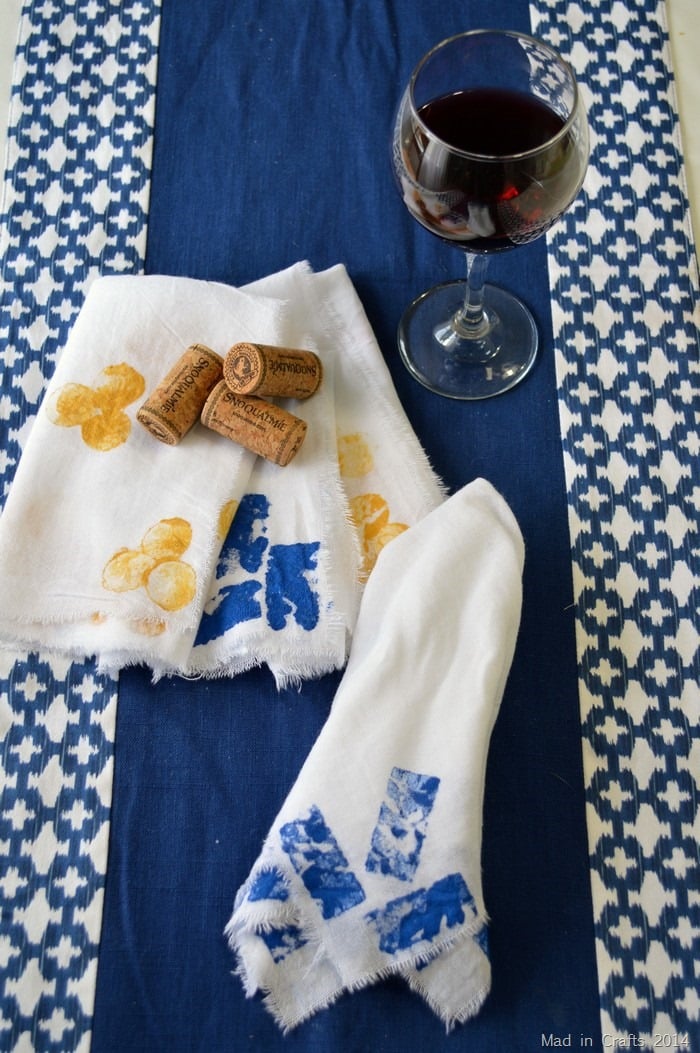
Cork stamped napkins are a clever way to make a whole set of cloth napkins from inexpensive flour sack tea towels. Iron a towel, snip notches at the halfway points and rip it into four pieces for that relaxed raw edge look. Then stamp polka dots using the end of a wine cork and fabric paint. Want rectangles? Cut a cork lengthwise, or tape several corks together for a bigger pattern. Let them dry flat, then wash as normal. They make a meal feel fancy without the fancy china.
Get the full tutorial at Mad in Crafts.
39. White Pumpkin Cork Wreath
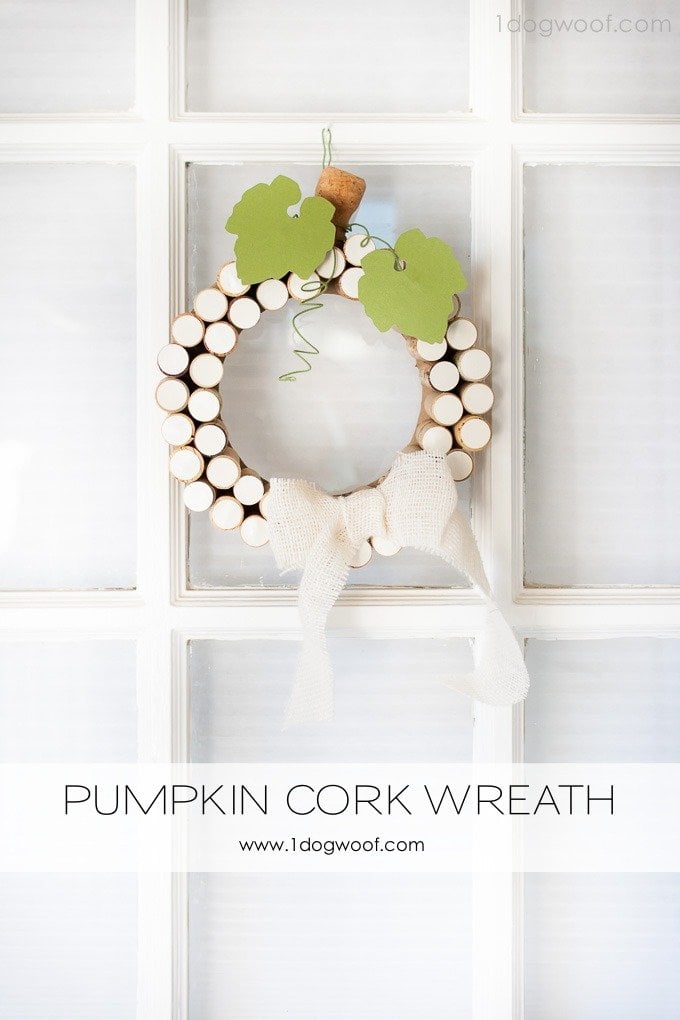
This white pumpkin cork wreath is a fresh take on fall decor. Cut two cardboard rings, about 8 inches across with a 5.5 inch center, and glue them together for a sturdy form. Stand corks on end and glue them all over the ring with a strong craft glue, shaping the outline into a pumpkin. Both real and synthetic corks work. Cut leaves from white and green cardstock, add a curly floral wire tendril and a cork stem on top. The tutorial notes the craft glue held far better than hot glue did.
Get the full tutorial at One Dog Woof.
40. DIY Wine Cork Ball

A wine cork ball is the kind of quirky little accent that makes guests ask about it. You’ll need about 60 corks, a 2.5 inch styrofoam ball and a glue gun. Set the ball on a short cup so it doesn’t roll, then glue the corks on standing out like a starburst, as close together as you can. To hide any foam peeking through, cut a cork down to a point so it wedges into the gaps. Logos, corkscrew marks and wine stains all add character, so no need for perfection. It takes about 30 minutes.
Get the full tutorial at Family Chic.
41. DIY Wine Cork Dart Board Wall

Love darts but hate the holes in the wall? This wine cork backing fixes that and looks like a bar centerpiece doing it. The project behind it took a year of collecting, more than 1,000 corks from family and friends and eight tubes of glue (yes, eight). The frame is built from scrap wood, trimmed out and spray painted black, then the corks get glued in tight around the dartboard. Ask a local restaurant or winery to save corks for you, or buy a bag online to speed things up.
Get the full tutorial at Wonder How To.
Love these DIY ideas? Pin this post to save and share on Pinterest






