Your entryway is the first thing guests see and the last thing you pass on the way out, so it should work hard and look good doing it. These 22 DIY entryway ideas cover both jobs. You’ll find hook walls and coat racks for the jackets that pile up on chairs, benches and hall trees that hide shoes and backpacks, a farmhouse console table, a wood and pipe entry stand and a mail and key holder so nothing goes missing at 7am. There are pretty touches too: a song lyric sign, a gallery of thrifted frames, a coir door mat cut to an oval and two DIY JOY door wreaths for fall and Valentine’s Day. Measure the wall and the walkway first, because a bench that blocks the door gets old fast. Pick one weekend project and start there!
1. DIY Door Hall Tree
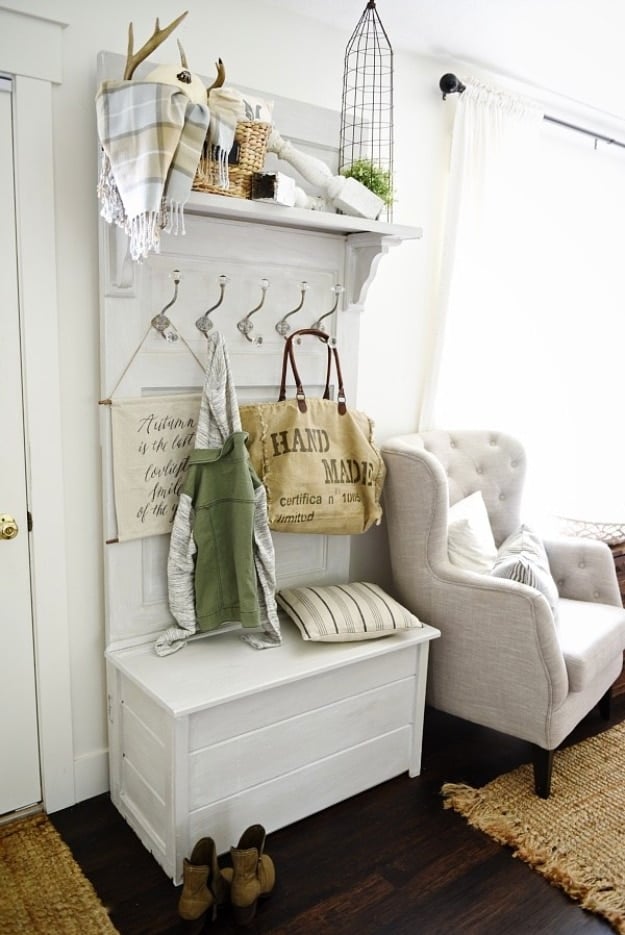
An old door makes a hall tree with a story, and this one hides the shoes too. Cut the bottom of the door square so it stands straight, then build a box across the base from tongue and groove scraps and cover the corners with leftover casing. Hinge the top of the box so it lifts for shoe storage. Screw a shelf onto store bought corbels up top and add a row of hooks for coats and bags. A coat of white lime paint finished with white wax gives it a soft, aged look. Perfect for an entry that’s really just a corner of the living room!
Get the full tutorial at Liz Marie Blog.
2. $40 DIY Farmhouse Entryway Console Table
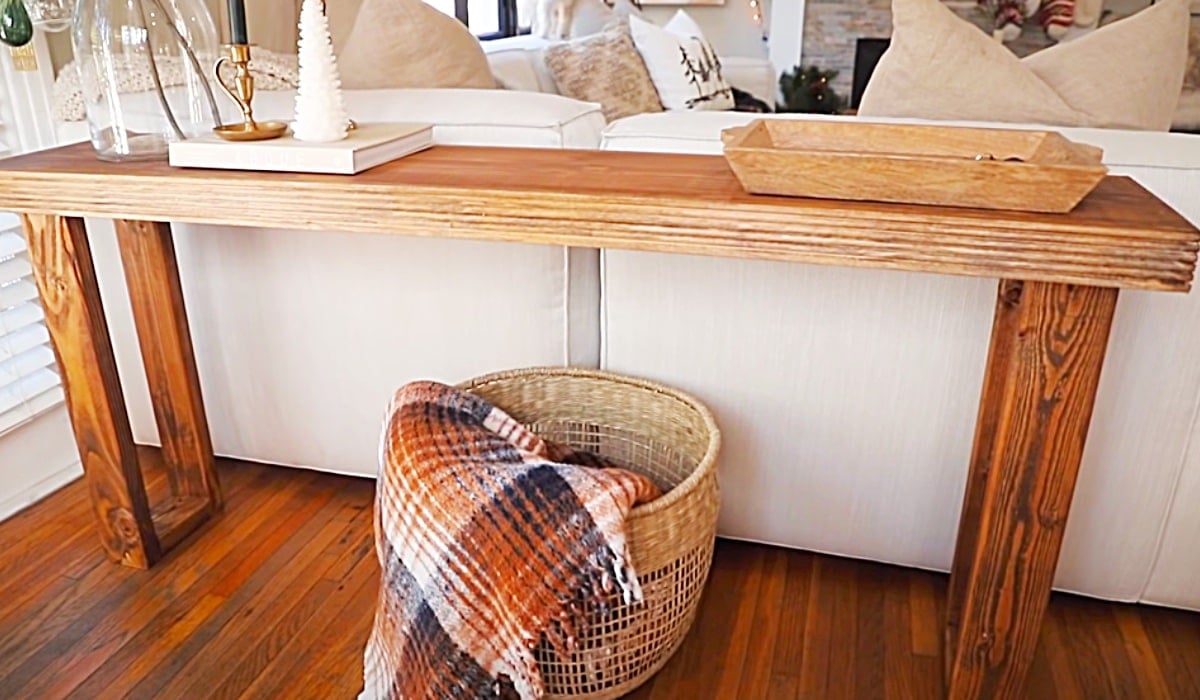
A DIY farmhouse entryway console table gives you a landing spot for keys, mail and a lamp without the furniture store price. Take your measurements to the hardware store and they’ll usually cut the boards for you, which makes the build go much faster. Screw the frame together with long screws, add the decorative trim with wood glue, then stain it with a warm Minwax shade. A coat of polyurethane adds strength and sheen, though the raw stained look is lovely too. The whole table comes in around $40.
Get the full tutorial at DIY JOY.
3. Entryway Song Lyric Sign DIY
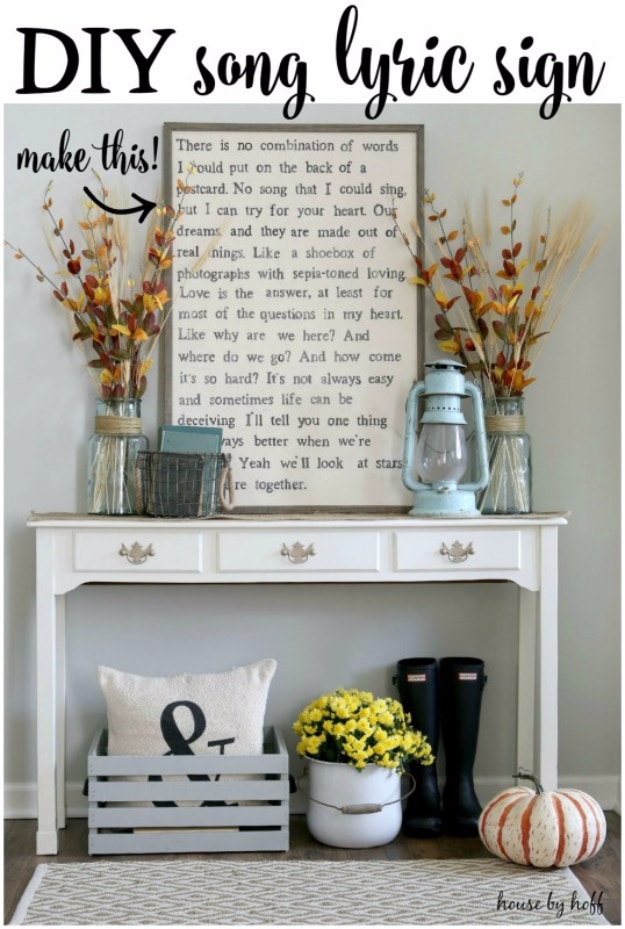
This entryway song lyric sign puts a favorite song right where everyone walks in. Start with a piece of edge-glued pine, then brush on three coats of off-white chalk paint and sand it smooth. Frame it with four strips of trim stained in a mix of Driftwood and Classic Gray for a soft weathered tone. Print the lyrics in a script font at a big size, tape them along pencil lines about 2 inches apart and trace hard with a pen to press each word into the wood. Fill the outlines in with a fine Sharpie.
Get the full tutorial at House by Hoff.
4. Vintage Theater Seat Entryway
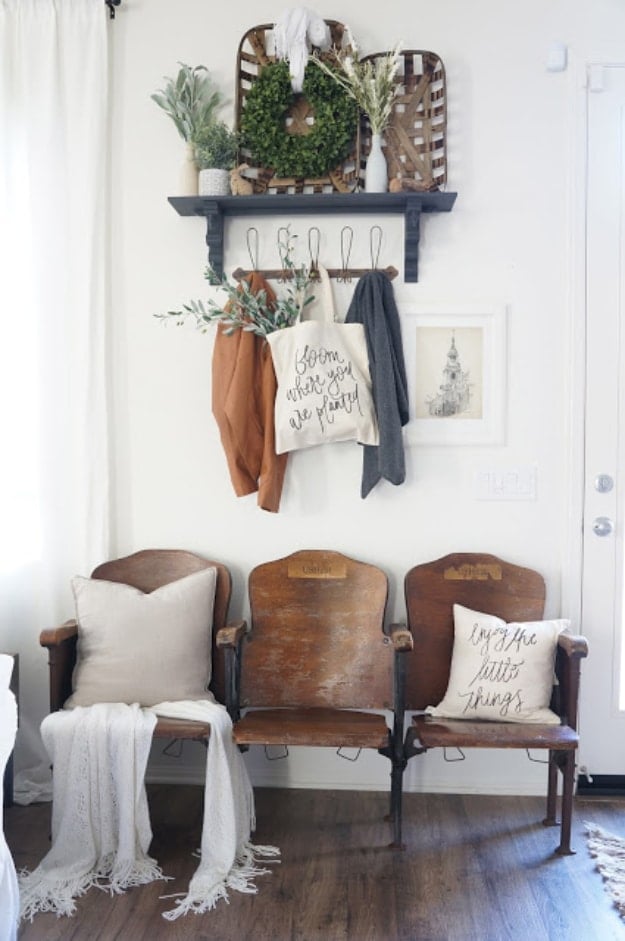
A row of vintage theater seats makes a back door entry feel like a little mudroom with a story. Old seats like these turn up at antique and thrift stores, and the worn wood and metal sides bring loads of character. The seats fold up, so the row tucks close to the wall when nobody’s sitting. Set them by whichever door your family uses most, then add a shelf with hooks above for bags and jackets. Keep any original details, like stenciled USHER labels, because those are the best part.
Get the full tutorial at Perfecting the Homefront.
5. How To Make A Wall Hanging Mail And Key Holder
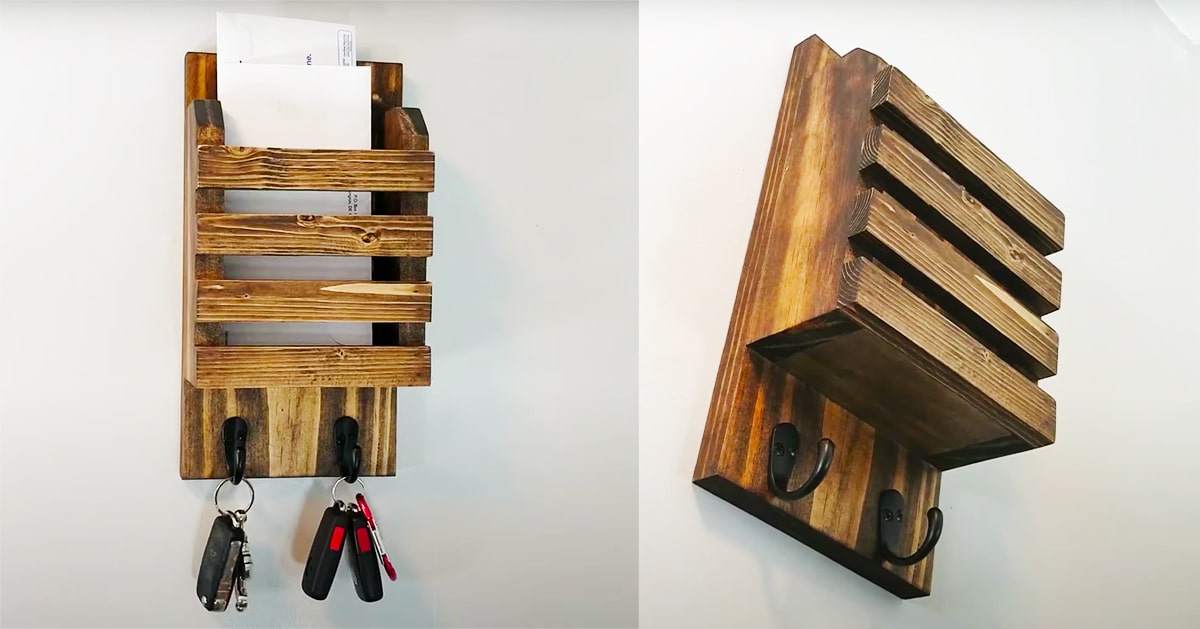
A wall hanging mail and key holder keeps bills off the counter and keys off the floor. Measure the slot with a real envelope before you cut, so the mail drops in easily. Cut the side and front pieces, then glue and nail them into a deep box with a nail gun. Sand everything smooth, wipe on Danish oil for a natural rustic finish and screw a row of key hooks along the bottom. Want to sort bills from letters? Make it a little wider and add a divider down the middle.
Get the full tutorial at DIY JOY.
6. Entryway Crates and Boards Organizer
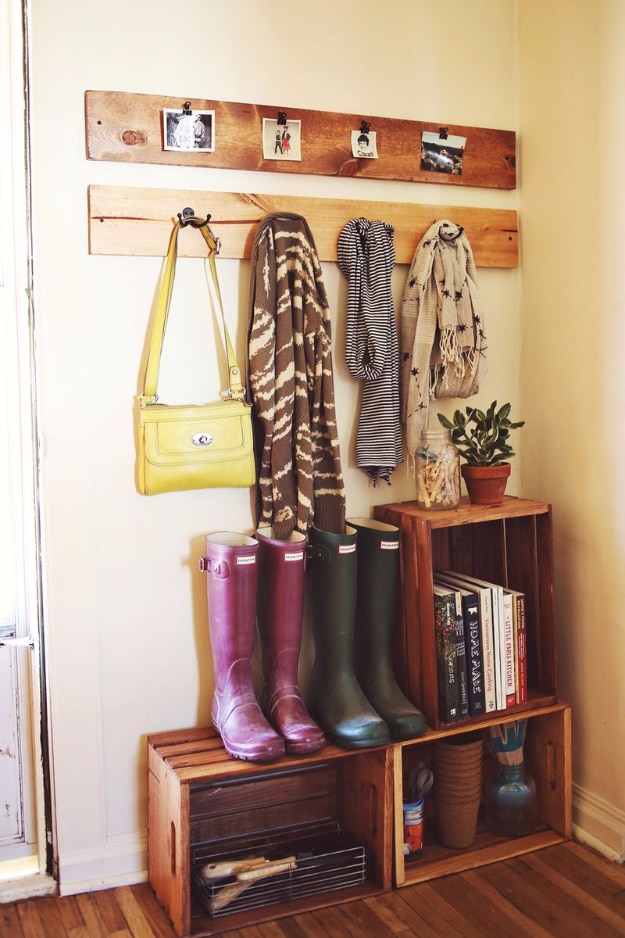
Wood crates and two simple boards turn a bare wall by the back door into a mudroom drop zone. Stain three large craft store crates in a warm pecan, wiping some right away for a lighter tone and giving others two coats for contrast, then stack them as open shelves for rain boots, garden tools and even cookbooks. Above them, hang two 5.5 inch boards: clips on the top one for family photos and hooks on the bottom one for coats and purses. Measure twice and use a level, because a crooked board shows!
Get the full tutorial at A Beautiful Mess.
7. DIY Fall Wreath With Felt Leaves
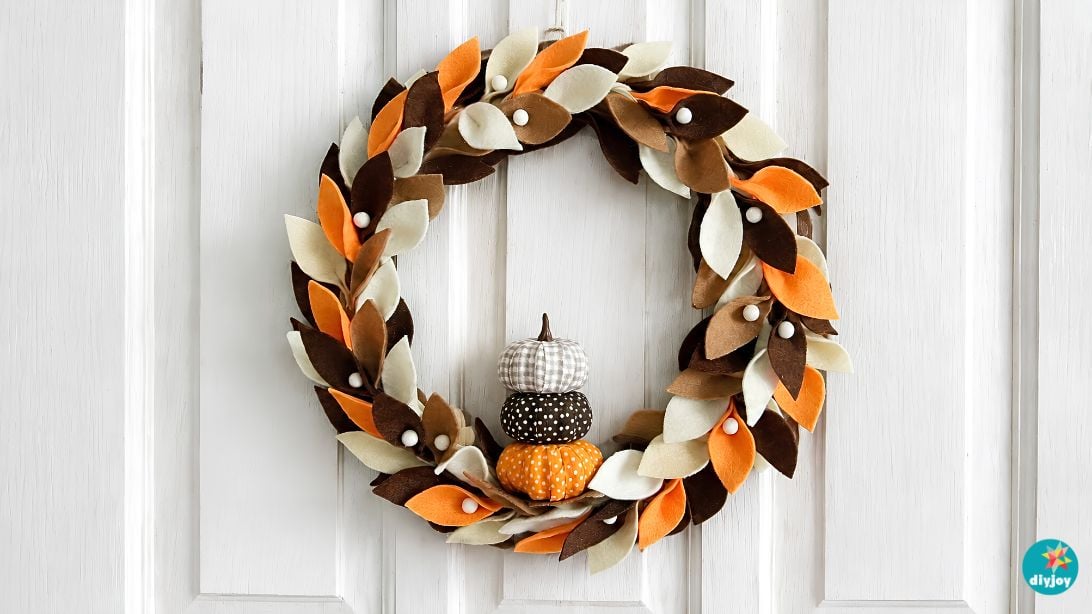
This DIY fall wreath with felt leaves is soft, colorful and won’t shed a single crumb on the porch. Stack felt sheets in orange, white and three shades of brown, trace a small leaf pattern and cut through all the layers at once. Hot glue the leaves around an 11 inch wreath so they all point the same way, starting with 14 orange leaves spaced evenly, then filling in color by color. Finish with tiny white pom poms and a few fabric pumpkins. It packs flat, so you can hang it again every September.
Get the full tutorial at DIY JOY.
8. Beachy Entry Tables
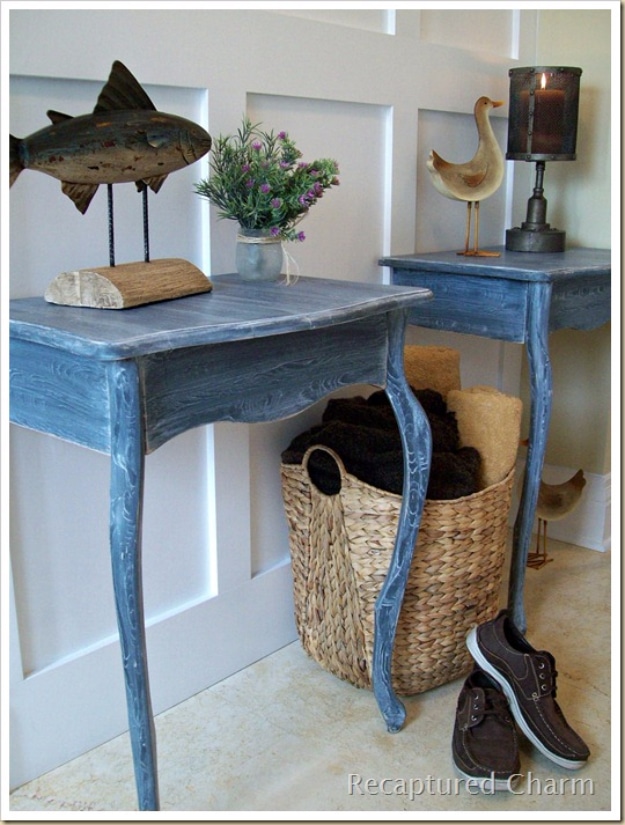
Beachy entry tables start as one round garage sale table cut into two halves. Clean off the old finish with a damp cloth, paint it Steel Blue milk paint, then brush on a white glaze that settles into the natural cracks. Wipe the glaze back and drag a wood graining tool through it for a weathered driftwood look, legs and all. Put the halves side by side against the wall as a pair of matching hall tables, or split them up for two narrow spots. A basket of throws underneath finishes the coastal look.
Get the full tutorial at Recaptured Charm.
9. Board And Batten DIY Hook Wall
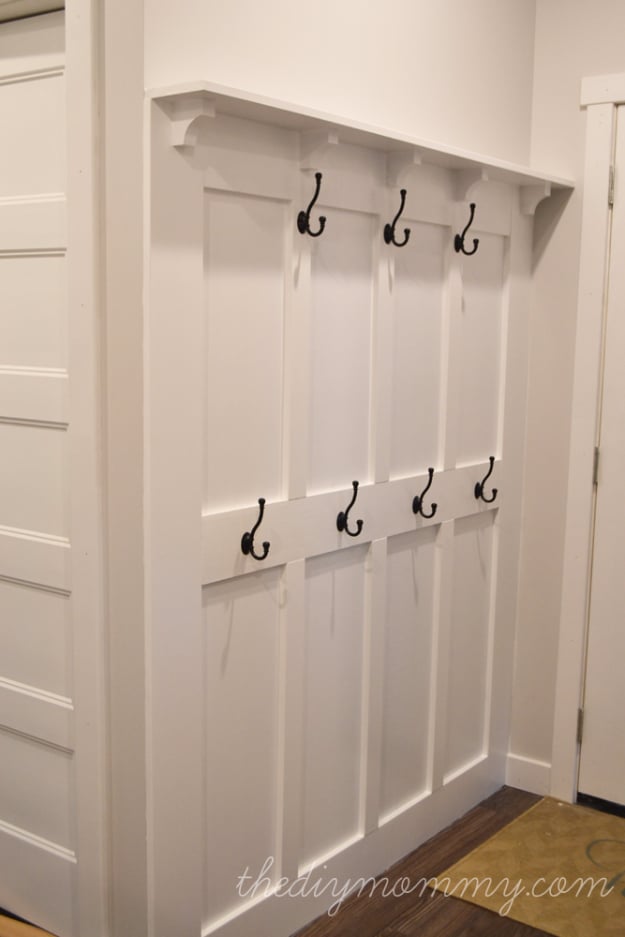
A board and batten DIY hook wall gives a back entry a built-in look for the price of MDF strips. Pull off the baseboard, then nail two 6 foot 1×6 uprights into the studs. Add three horizontal 1×6 rails between them and narrow 1×3 battens above and below the middle rail. Top it with a shelf on corbels or brackets. Caulk every seam, roll on white semi-gloss and screw in a row of hooks low enough for little ones to reach. Measure twice, because figuring out the material is the trickiest part.
Get the full tutorial at Cozy DIY Home.
10. DIY Paper Heart Wreath
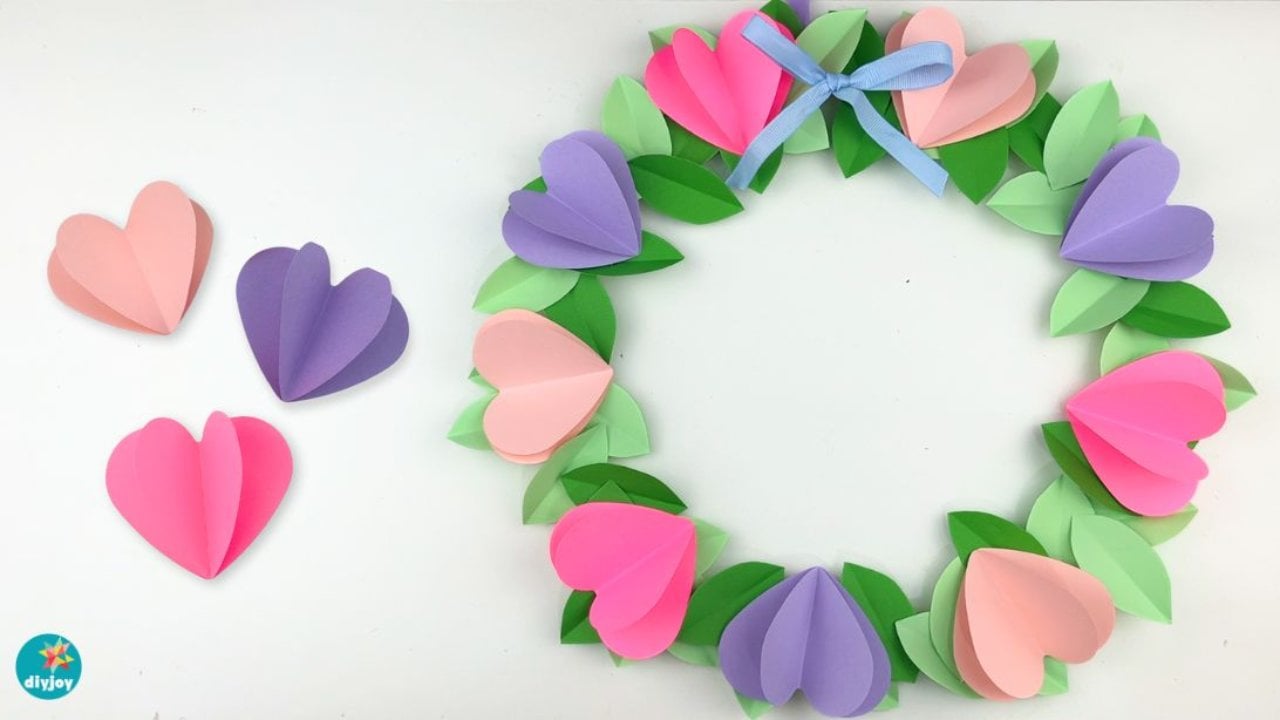
A DIY paper heart wreath goes 3D with just cardstock and a heart punch. Punch six 3 inch hearts from each color, fold one heart in half and glue its crease down the center of a flat heart to make it pop. Fold green paper several times, trace a leaf and cut a stack at once. Fold each leaf, then hot glue them around a wooden hoop, overlapping as you go. Space the hearts on top in alternating colors and add a ribbon loop. It works for Valentine’s Day, spring or a birthday.
Get the full tutorial at DIY JOY.
11. DIY Rustic Entryway Coat Rack
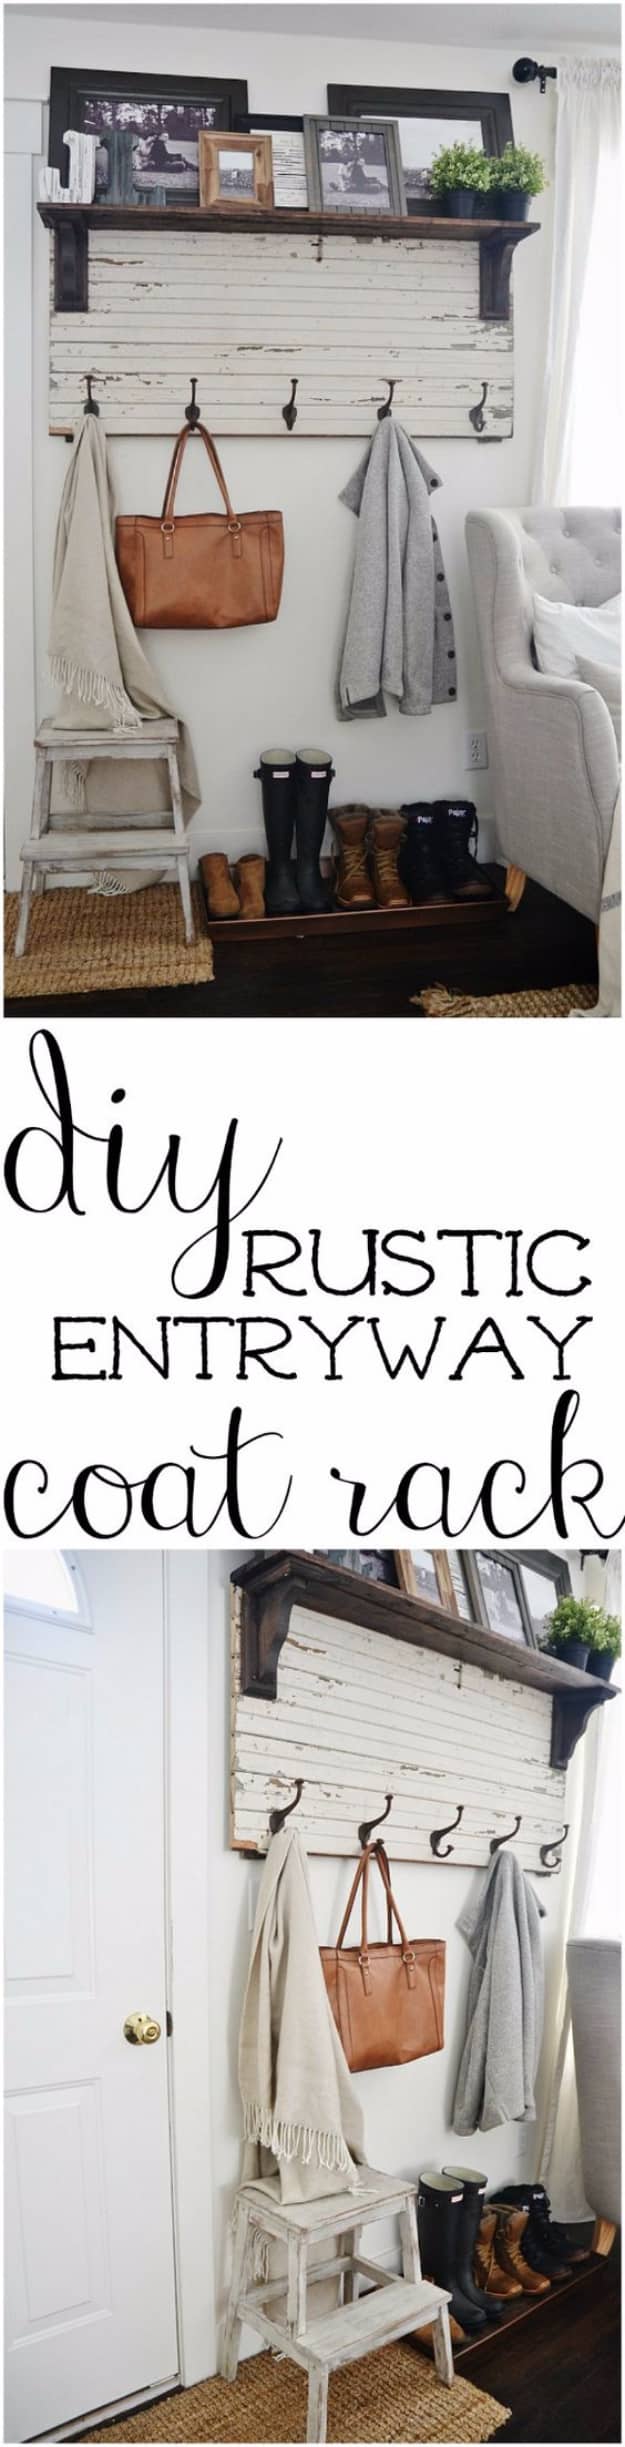
An antique barn door makes a coat rack big enough to anchor a whole wall. Screw wood brackets across the top of the door, lay boards on them for a shelf and stain the new wood dark walnut so it sits nicely with the old paint. For hooks, look for a clearance coat rack and take the hardware off it, which can land you five sturdy hooks for about $8. The finished piece is heavy, so hang it with a metal bar hanging system that holds the weight and lets you style the shelf. Love that chippy color!
Get the full tutorial at Liz Marie Blog.
12. Wooden Dowel Coat Rack
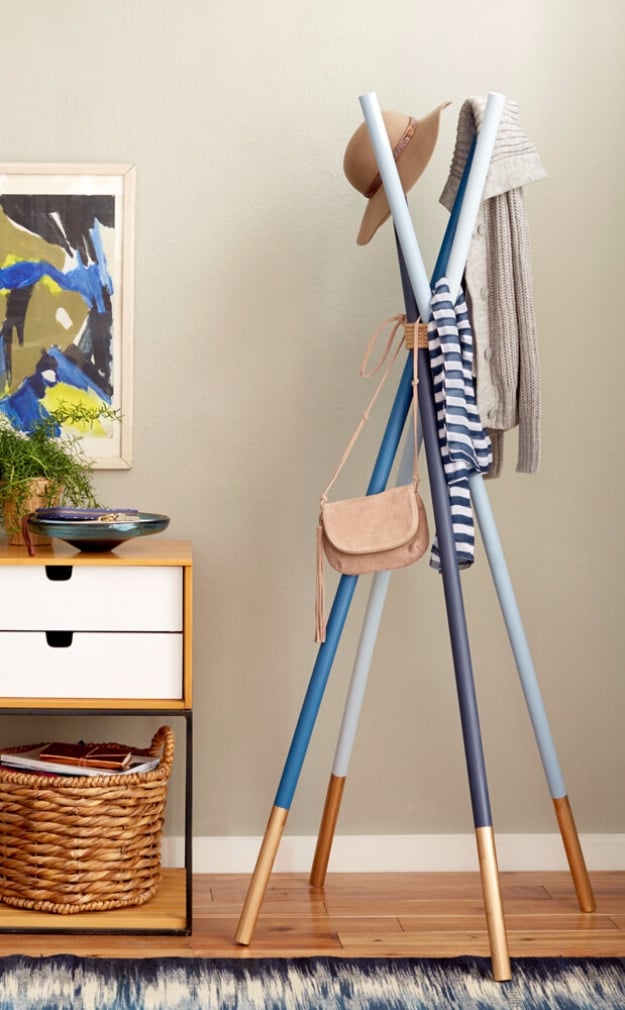
A wooden dowel coat rack is the simplest build here and one of the most sculptural. Pick up four 6 foot wood poles from the hardware store, then paint each one a different color, or keep them all one shade. Once dry, tape off the bottom foot of each pole and spray paint it metallic gold. Bundle the poles together near the top with rope, leather cord or wire, then splay the legs wide like a teepee. It needs a good amount of floor space to stand, so measure your corner first.
Get the full tutorial at Emily Henderson.
13. DIY Shiplap Walls For Your Entryway
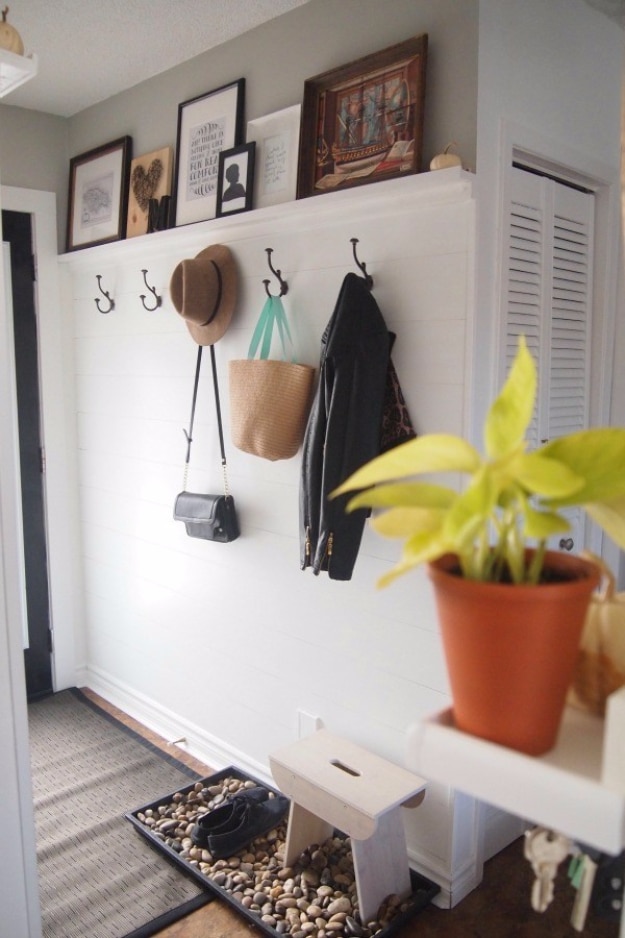
DIY shiplap walls give a narrow hallway entry texture without real shiplap prices. Prime the lower wall white so the old color won’t peek through the gaps, and paint the upper wall a light gray. Have the store rip 1/8 inch panel board into 6 inch strips, then attach them with paneling adhesive so they won’t warp, using nickels as spacers. A picture ledge built from 1×3 and 1×2 boards caps the top, nailed and screwed in for strength. Put the baseboards back and paint everything a bright white.
Get the full tutorial at The Learner Observer.
14. DIY Entryway Industrial Coat Rack
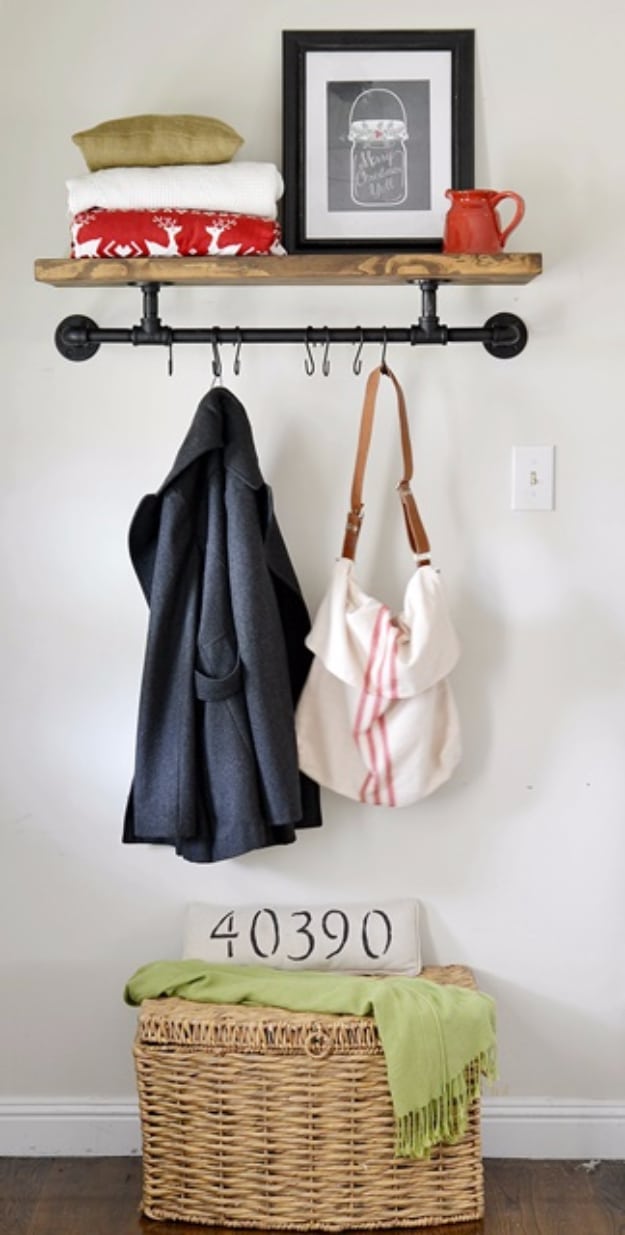
A DIY entryway industrial coat rack doubles as a shelf for baskets and seasonal decor. Thread 3/4 inch black pipe and fittings into a 32 inch rail, elbow to 4 inch pipe to T fitting and back, so the flanges land on studs 16 inches apart. Short pipes rise from the T fittings to flanges screwed under a board stained Dark Walnut and wiped with satin poly. Spray the pipe flat black. Plant hooks from the garden aisle are the trick here, since regular hooks won’t fit around the pipe.
Get the full tutorial at Beneath My Heart.
15. DIY Plank Wall Tutorial
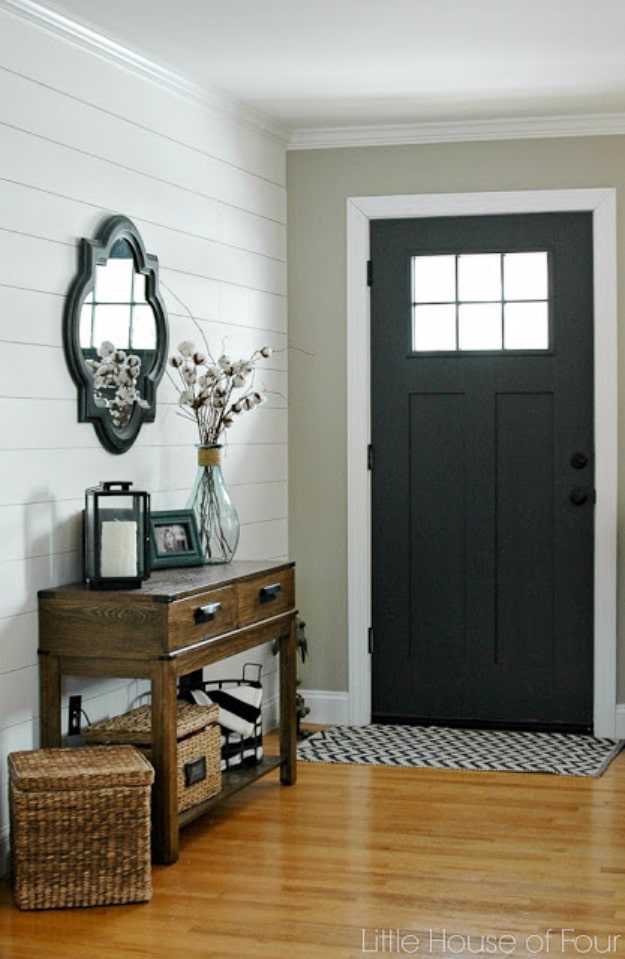
This DIY plank wall tutorial gets you the shiplap look for under $50. Paint the wall white first, then have the lumber store cut 1/4 inch primed plywood into 6 inch planks, and check each one, since the cuts aren’t always even. Sand the rough edges and mark every stud. Start at the top with a level, never trusting the ceiling line, and nail each board in place with nickels as spacers. Cut around outlets with a drill and saw, caulk any gaps at the edges, and touch up with paint.
Get the full tutorial at Little House of Four.
16. DIY Wood And Pipe Entryway Stand
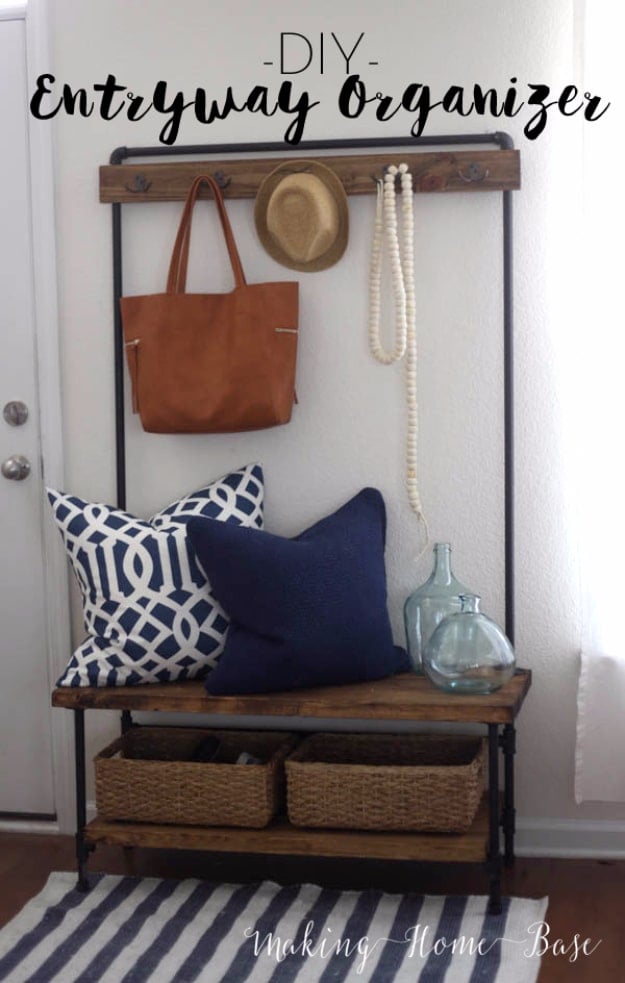
A DIY wood and pipe entryway stand gives you a bench, a shoe shelf and a coat tree in one piece. Join 2×6 boards with pocket screws into a seat and a lower shelf, sand the edges well and stain them with a stain and poly in one. Peel the labels off galvanized pipe, wipe it clean and spray it black. Assemble the legs so tee fittings form a ledge for the bottom shelf, then build the tree from two 48 inch pipes joined to a 36 inch top rail with elbows. It costs far less than store versions.
Get the full tutorial at Making Home Base.
17. Entry Storage Bench Shelf
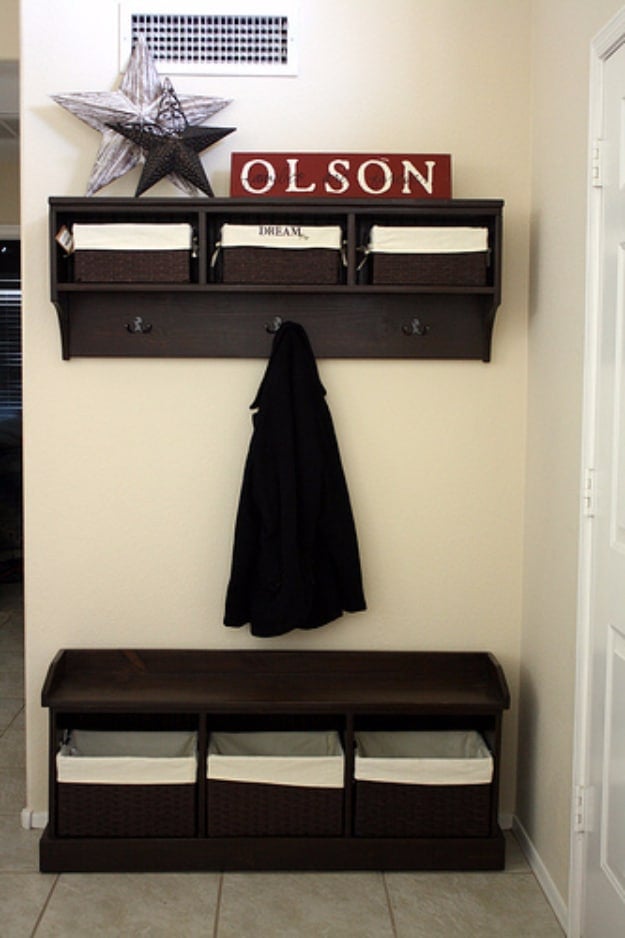
An entry storage bench and shelf set packs a lot of storage into a small wall. The free plan uses only 1x boards, so there’s no plywood ripping and no pocket hole jig needed. The bench is a 1×12 seat over two dividers that make three cubbies for baskets, with a 1×4 footer and a thin plywood back. The matching wall shelf is built from 1x8s with its own three cubbies on top and double hooks underneath for coats and bags. Want a deeper seat? Swap the 1x12s for a 16 inch project panel.
Get the full tutorial at Ana White.
18. Colorful Entryway Crates
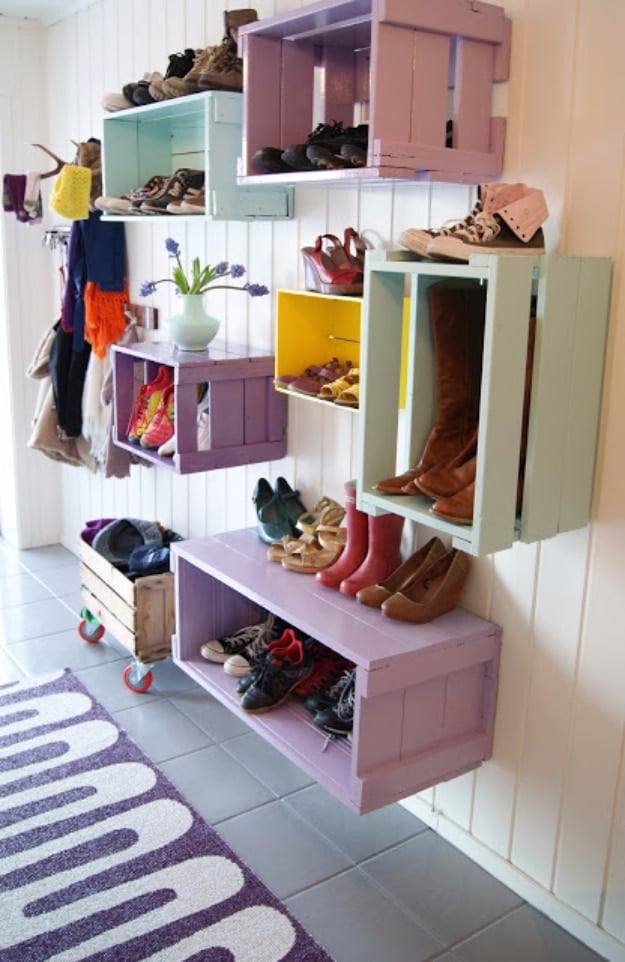
Colorful entryway crates turn a narrow side entrance into a cheerful shoe wall. Gather old wooden crates and paint them in soft, happy shades like mint, lilac, yellow and pink. Mount them on the wall at different heights, some upright and some turned on their sides, so the tall ones can hold boots. Every pair of shoes gets a spot off the floor, and a rolling crate below catches the rest. It works especially well near a laundry room, where muddy outdoor clothes can go straight to the wash.
Get the full tutorial at Thea's Mania.
19. Simple Entryway Solution
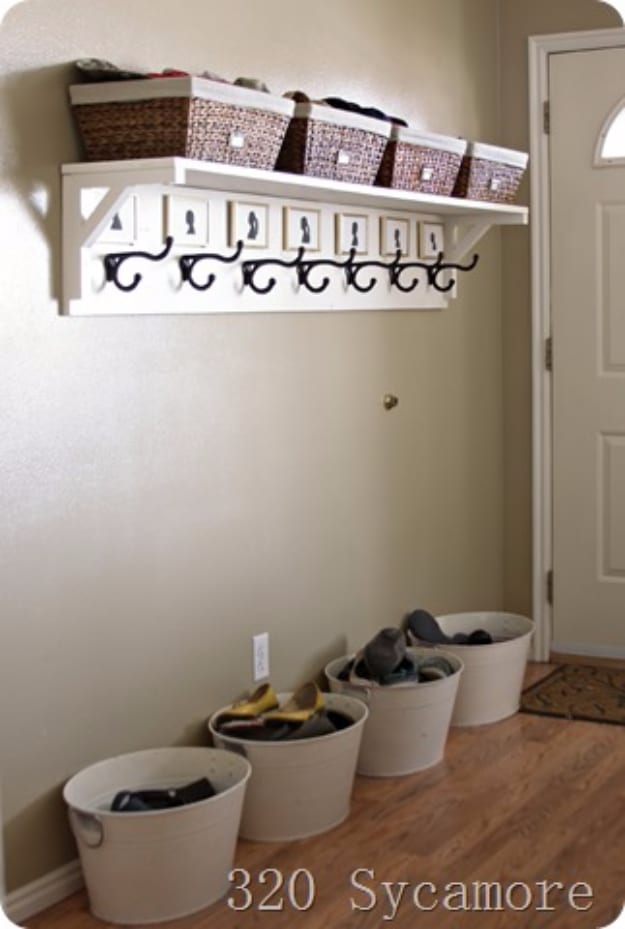
This simple entryway solution is renter friendly and leaves just four holes in the wall. Have the hardware store cut a 12 foot pine board in half for free, sand both pieces and paint them a creamy white. Screw the back board into two studs, attach two IKEA brackets to it, then fasten the top board through the brackets to make a shelf. Space black hooks evenly across the back board. Hot glue small frames to the wall above, since cheap poster putty won’t hold them. Baskets on the floor catch hats and shoes.
Get the full tutorial at 320 Sycamore.
20. Frame Gallery In The Entryway
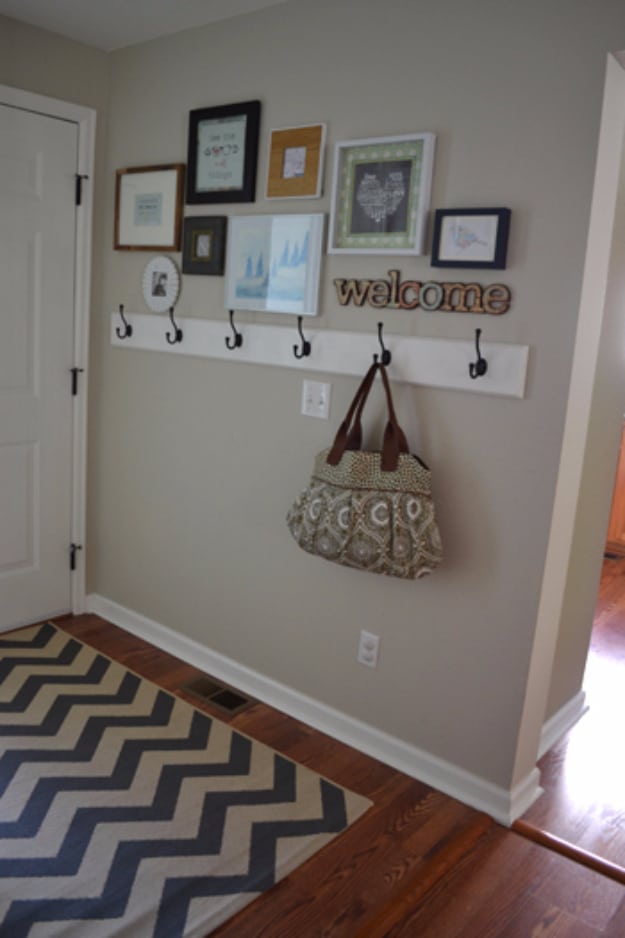
A frame gallery in the entryway turns a big blank wall by the door into the most personal spot in the house. Collect frames over time from thrift stores and sales, mixing black, white and wood. Fill them with art printed at home or your own DIY pieces, so the only real cost is the frames. Lay the arrangement out first, then hang it using the paint stirrer method for exact nail placement. Put a simple coat rack underneath and a washable indoor outdoor rug on the floor, and swap the art whenever you like.
Get the full tutorial at Suddenly Inspired.
21. Entryway Door Mat DIY
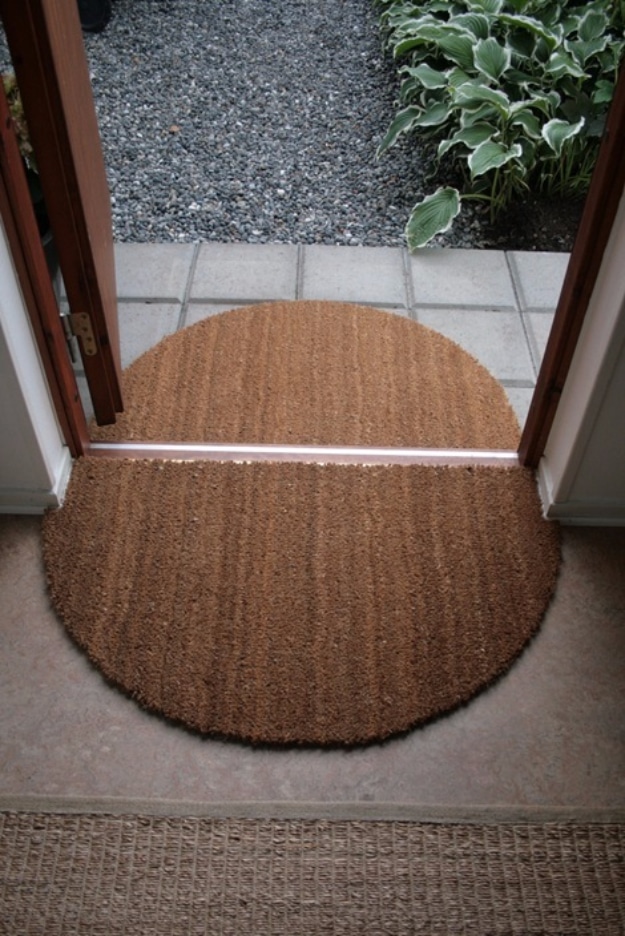
This entryway door mat DIY uses plain coir matting sold by the meter, cut to fit your own doorway. Buy one long piece and split it into an outside mat and an inside mat. For curved ends, make a simple compass with a pushpin, a length of string and a marker. On a long piece, set the pin about 4 inches in from center so you get softly flattened ovals rather than full half circles, then smooth the very tips freehand. Trim the inside mat narrower to suit the doorway and the hall.
Get the full tutorial at Chez Larsson.
22. River Rock Boot Tray
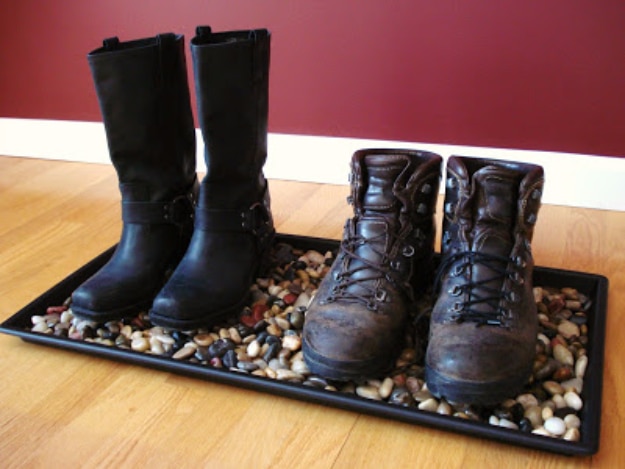
A river rock boot tray keeps snowy, muddy boots from sitting in a puddle by the door. Grab a plain plastic or metal boot tray and two bags of mixed river rocks, then pour the rocks in and spread them out evenly. That’s really it! Melting snow and slush drain down between the stones, so boots dry faster and the floor stays clean. Copper or metal trays look extra pretty, though a basic tray costs under $10. Rinse the rocks in the sink at the end of the season.
Get the full tutorial at Heart Maine Home.