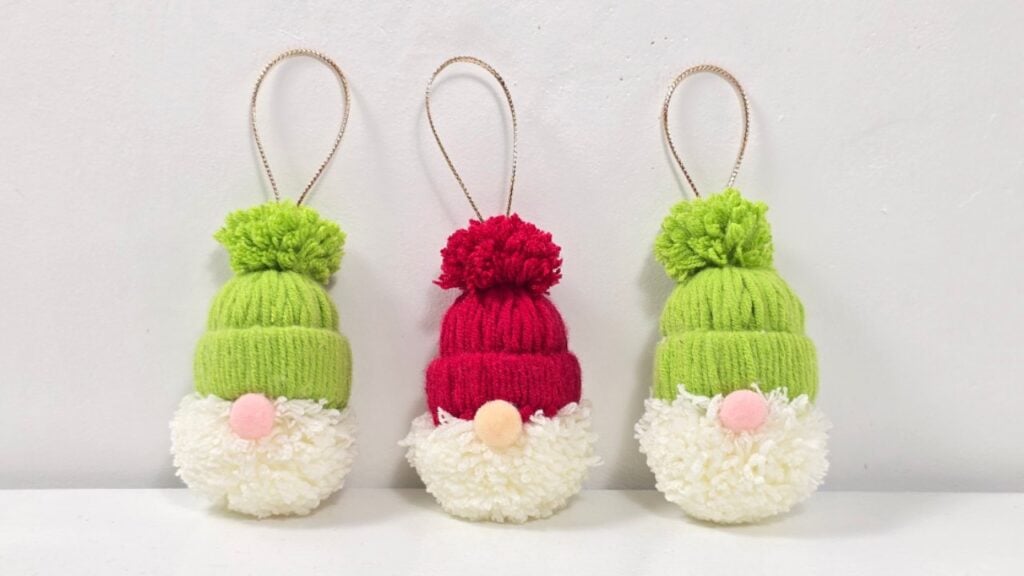
I just love making handmade Christmas decorations — there’s something so warm and festive about knowing you made them yourself, especially for the holidays. Over the years, I’ve tried many DIY Christmas decorations, but some quickly became favorites. One of my top picks is this adorable DIY Santa Gnome Ornament!

This ornament is super cute, fun, and easy to make. What makes it my favorite is how simple it is — all you need is yarn, an empty tissue roll, some fiberfill, and a little imagination. Don’t worry if it looks tricky at first; it’s surprisingly easy, and you can probably make several in one sitting.
RELATED: Easy DIY Wine Cork Reindeer
While these Santa Gnomes were originally designed as ornaments, their cuteness makes them perfect for other uses too. Turn them into a garland, hang them anywhere in your home, use them as gift bag fillers, or even make them into keychains. You can also customize them for gifts — swap yarn colors or add embellishments for different holidays, and they’ll still look adorable!

If you’re ready to get started, follow the step-by-step instructions below. I hope you enjoy making these DIY Christmas ornaments and that they add extra festive cheer to your holiday celebrations. Happy crafting and Merry Christmas!
▶ Watch this tutorial on TikTok
How to Make Santa Gnome Ornaments
Step 1: Cut the Roll
Cut the tissue paper roll into 1-inch sections.
Step 2: Cut the Yarn
Cut a piece of yarn about 30 cm (12 inches) long.
Step 3: Tie the Yarn Around the Roll
Pull the yarn and gently slip it under the tissue roll. Insert both ends of the yarn through the loop you formed, then carefully tighten it to secure. Repeat the process until the entire tissue roll is fully covered with yarn.
<strong>Step 4:</strong> Finish the Hat
Insert all the yarn through the opposite side of the tissue roll. Take another piece of yarn and tie it around the middle of the hanging strands, pulling it tight to shape the top of the hat. Add a small amount of fiberfill inside to give it structure. Finally, trim the ends of the yarn to form a round pom-pom on top, keeping it fluffy and even.
Step 5: Make a White Yarn Pom-Pom
Wrap white yarn around your hands about 100 times. Carefully slide it off, tie it tightly in the middle, then cut through the loops to create a pom-pom.
<strong>Step 6:</strong> <em>Add the Pom-Poms</em>
Put a small amount of hot glue at the bottom of the hat (on the fiberfill part) and attach the pom-pom securely. Carefully trim around the edges to make it fluffy, then attach a smaller pom-pom where the nose goes.


![]()
Why You’ll Love This
You’ll love this DIY Santa Gnome Ornament because it’s quick, easy, and fun for all ages. With just yarn, a tissue roll, and a little fiberfill, you can create handmade Christmas decorations that are adorable and customizable. Perfect as ornaments, garland accents, gift toppers, or even keychains, this project adds a personal, festive touch to your holidays in minutes.

What DIYs Are Viral Today


*If you love this craft, then visit our official website, follow our Facebook page, and subscribe to our YouTube channel for more!
Decorate Your Tree With Adorable 5 Minute Santa Gnome Ornaments