Modern decor doesn’t have to come with a design store price tag. These 24 modern DIY decor ideas lean on clean lines, natural wood, matte black, warm copper and plenty of white space, and most of the supplies come from the hardware store or the craft aisle. Build a midcentury plant stand or a chunky slab bench, wrap a paper lantern in folded geometric points, or bend quilting hoops into a bentwood pendant. Smaller projects suit beginners too: painted pinwheel placemats, a black tassel wall hanging, a leather strap magazine holder and a popsicle stick bunny. Planning tip: pick two or three finishes, like wood, black and brass, and repeat them around the room, so separate projects look like one collected style.
1. Modern Vertical Succulent Planter
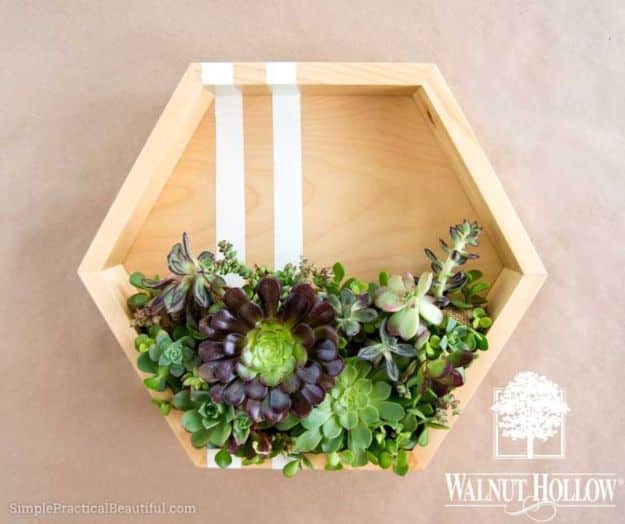
A modern vertical succulent planter hangs on the wall like living art. Tape three stripes down a wood hexagon box, paint between them in white and peel the tape. Seal the whole box with two or three coats of oil based polyurethane, since a water based finish wears off with watering. Staple craft chicken wire inside, tuck burlap behind it and pack the space firmly with sphagnum peat moss. Poke holes in the burlap and press in succulent cuttings: one focal rosette, a few trailing pieces and plenty of filler. Faux succulents work too.
Get the full tutorial at Walnut Hollow.
2. Midcentury-Inspired Plant Stand
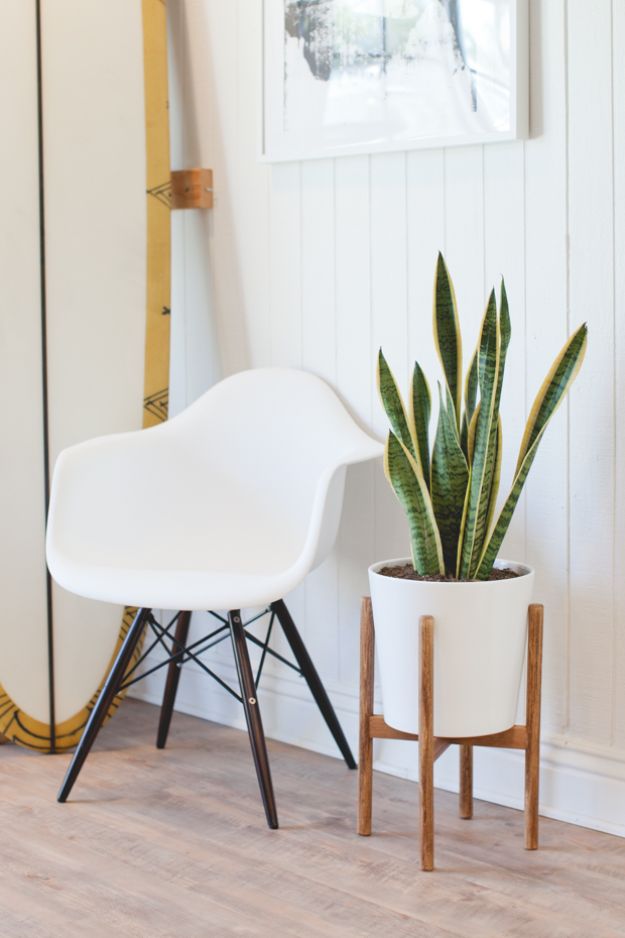
A midcentury-inspired plant stand lifts a ceramic pot onto slim wood legs, and no woodworking background is needed. Cut four 1 inch dowels to 17 inches for the legs. Cut two 10 3/4 inch cross braces from a 1 1/2 by 3/4 inch pine board, notch a 3/4 inch slot in the center of each so they lock together like an X, then drill quarter inch holes in each brace end and 7 3/4 inches up each leg. Join everything with dowel pins and wood glue, clamp it while it dries, then stain. Size it to your pot.
Get the full tutorial at Hunker.
3. DIY Pinwheel Placemats

DIY pinwheel placemats bring a burst of color to a summer table in about 30 minutes each. Start with round woven placemats, like the inexpensive ones from IKEA, and multi-purpose craft paint. Tape off one triangle wedge at a time, press the tape edges down with your finger and paint inside the lines, adding a second coat on darker mats. Peel the tape and let it dry before taping the next section. Paint one color across every mat in a batch, so the first one’s dry when you’re done. Seal them if the weave doesn’t absorb paint well.
Get the full tutorial at The Crafted Life.
4. DIY Copper Pipe Icosahedron Light Fixture

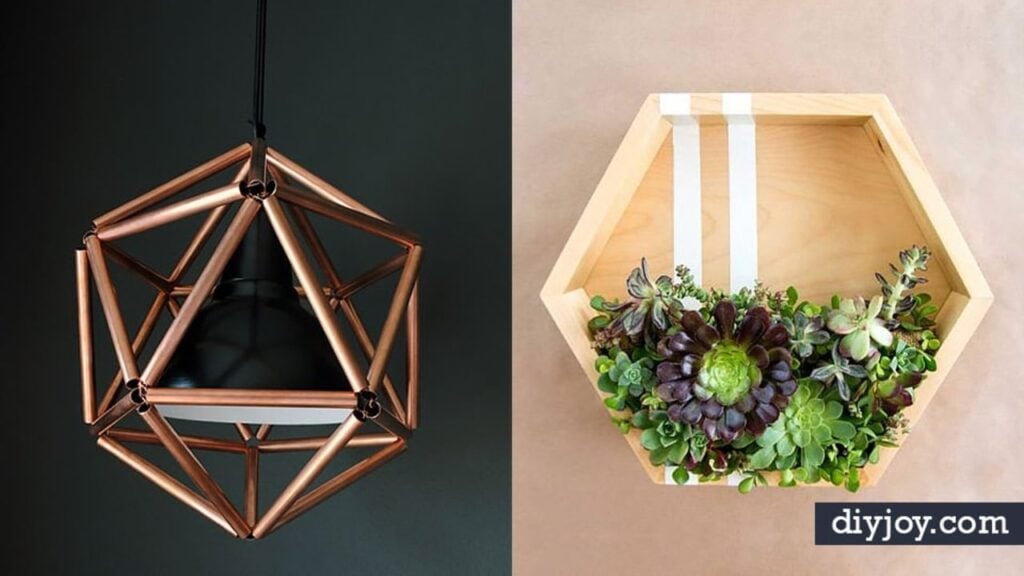
A DIY copper pipe icosahedron light fixture copies a designer pendant that sells for thousands, and this version costs about $50. Start with an inexpensive IKEA Foto pendant and spray paint it glossy black, taping off the cord. An icosahedron has 30 equal edges, so cut half inch copper pipe into thirty 7.5 inch pieces with a small pipe cutter; two 10 foot lengths are enough. Thread copper wire through the pieces to form the triangles of the 20 sided shape around the shade. Wear work gloves, since the pipe gets slippery as you turn it.
Get the full tutorial at The Gathered Home.
5. DIY Set of 3 Hanging Mirrors

For about $10, a DIY set of 3 hanging mirrors comes together with no drilling or glass cutting. Use small square mirrors or mirrored candle plates, which run under $3 each at craft and decor stores. Tape around the edges, cover the centers with paper and spray paint the borders, one black and two vintage gold. Once dry, glue two triangle hangers to the back of each with strong hardware glue, then attach a sturdy chain. Hang them at different heights in a group. They bounce light around and make a small room feel bigger.
Get the full tutorial at decor8.
6. DIY Faux Flower Monogram

A DIY faux flower monogram keeps a little spring on the wall all year. Pull faux blooms off their stems and snip off the plastic knobs as close to the petals as possible so they sit flat. Sketch a simple letter on foam board, or plain cardboard, and cut it out with a utility knife and ruler, using scissors for any curves. Hot glue the biggest flowers first, then tuck smaller ones into the gaps until no board shows. Pinks and whites with a touch of yellow feel fresh. Hang it inside an empty ornate frame for a finished look.
Get the full tutorial at Decoist.
7. DIY Rustic Nightstand

This DIY rustic nightstand fits a narrow gap between a door and a bed, with a built in lamp to boot. Cut a 1 by 8 back board to match the height of your headboard, about 50 inches here, then cut two 7 inch square shelves and a slightly deeper base. Screw the top shelves in from the back and attach the base with a pocket hole jig. Sand, stain and drill holes for the light cord, then wire in a lamp socket at the top with a vintage style bulb. Figure about $30 and an afternoon.
Get the full tutorial at Amber Oliver.
8. Office Memo Board
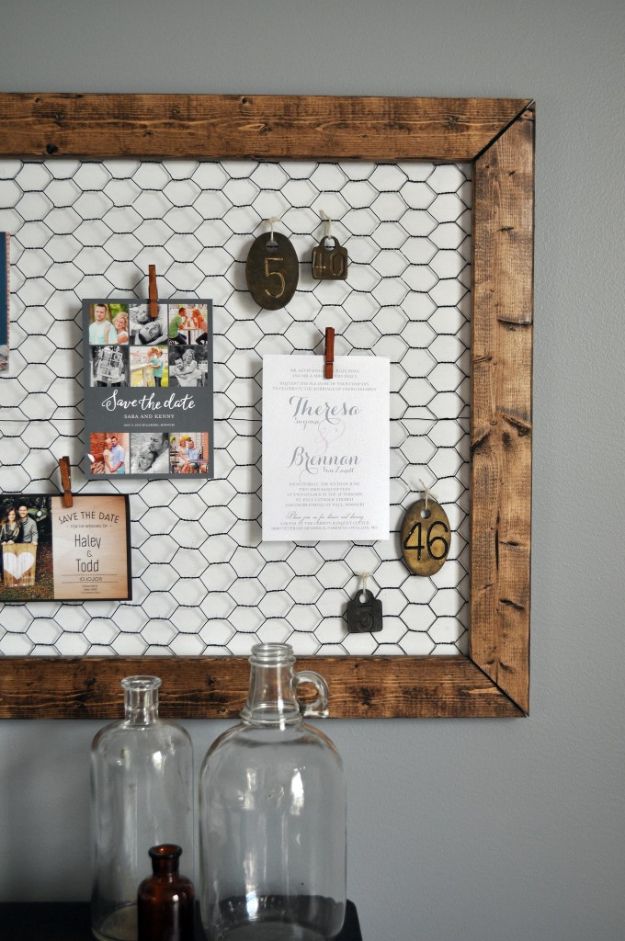
An office memo board in white, gray and stained wood works for a home office. Paint a 2 by 4 foot hardwood board white for the backing. Spray paint chicken wire black and staple it across the front, then build a frame from 1 by 3 boards, stain it and screw it onto the backing. Add hangers on the back and it’s ready for the wall. Little clothespins clip wedding invitations, cards and to do lists right onto the wire so they’re on display instead of lost in a pile. It’s a big upgrade from a plain black cork board.
Get the full tutorial at Little Glass Jar.
9. DIY Wood Lanterns

DIY wood lanterns made from scrap plywood look right at home on a porch or mantel. Rip plywood into 3/4 inch strips and cut lengths for three sizes, about 20, 16 and 14 1/2 inches, to build the posts and frames. Assemble the box with a little cap on top, then paint, whitewash or stain it. A dollar store glass vase works as a hurricane inside, though you can skip it. Outside, use paint made for outdoor use, and choose battery candles if the top sits close to the flame. A trio in three sizes looks great.
Get the full tutorial at 100 Things 2 Do.
10. DIY Metal Wall Grid

With a $3 salvage find, a DIY metal wall grid becomes a modern display for photos, notes and sunglasses. Look for an old store display grid at a building reuse center, or use wire remesh, cattle panel or hog panel from a farm store. Pry off any brackets, sand away rust, wipe it down and spray several light coats of black appliance epoxy outdoors. Let it cure 24 hours, then hang it on two cup hooks. Clip on postcards and prints with binder clips, and hang a clock or glasses right on the wires.
Get the full tutorial at DIY in PDX.
11. Giant Pegboard DIY

A giant pegboard DIY fills a huge, tall entry wall with shelves you can rearrange anytime. Decide on hole spacing first; 6 inches apart gives a clean grid. Use a sheet of standard pegboard as a template, marking every sixth hole, and stack it on 4 by 8 sheets of half inch plywood. Drill through with a 1 inch Forstner bit, then frame each panel with 1 by 2 strips so it stands off the wall. Cut 1 inch dowels for pegs and rest wood shelves across them. Plants, art, bags and purses all find a spot.
Get the full tutorial at Vintage Revivals.
12. Modern Spring Wreath

A modern spring wreath swaps a full round wreath for a sleek wooden hoop with a cluster of blooms. Start with a 14 inch embroidery hoop. Hot glue a few palm leaves along the bottom, covering the hoop screw, to form a graphic base. Pull the big flowers off their stems and arrange them before gluing, starting with the largest roses and filling in with small flowers, berries and greenery. Snap a phone photo of the layout so you can copy it. Hang it from a leather strip fastened with heavy duty snaps.
Get the full tutorial at Persia Lou.
13. DIY Modern Tassel Wall Hanging

A DIY modern tassel wall hanging goes all black for a chic, unexpected look. Paint seven wood beads black, holding each on a skewer with a little washi tape flag. For each tassel, wrap yarn 30 times around a hardcover notebook, tie it at the spine, cut the opposite side and knot a head near the top. Trim the ends even. Cut a half inch dowel to about 24 inches, paint it, then hang tassels at staggered lengths with a bead above each and add a hanging string. Colored yarn works too.
Get the full tutorial at Homey Oh My.
14. DIY Leather Magazine Rack Holder

In just a few minutes, a DIY leather magazine rack holder shows off covers instead of hiding them in a pile. Cut a leather strap into two pieces, about 25 inches each. Fold each one in half and punch a small hole through both ends so they line up. Hammer a nail through the holes to fix the strap to the wall, or nail straight through the leather if you don’t have a punch. Slide magazines into the loop. The same straps hold towels in a bathroom or rolls of paper in a craft room.
Get the full tutorial at Burkatron.
15. DIY Ladder Plant Stand
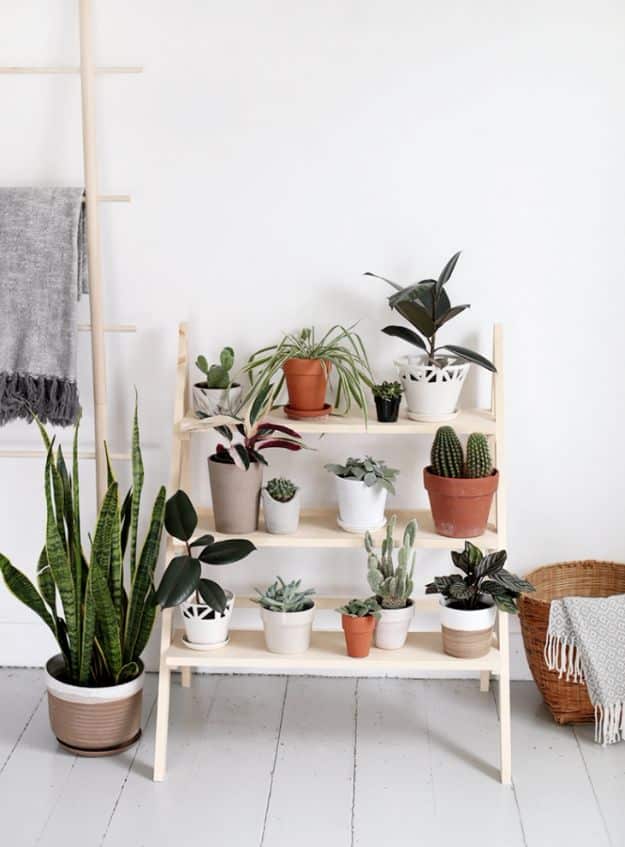
Running out of windowsill? A DIY ladder plant stand gives a growing houseplant collection three tiers of sunny shelf space. Cut three shelves from a 1 by 8 pine board at 28 1/2 inches. Cut the back legs from 1 by 2 at 36 inches and the front legs at about 40 3/8 inches, with a 60 degree angle at the top and 30 degrees at the bottom. Rip thin shelf supports from the leftover 1 by 8, glue and nail them to the legs, then add back braces and set the shelves in place. Sand and finish with polyurethane.
Get the full tutorial at The Merrythought.
16. Williams Sonoma Inspired DIY Outdoor Bench

This Williams Sonoma inspired DIY outdoor bench copies a $1,295 catalog piece for about $35, and it uses no screws or nails at all. Regular 2 by 4s are cut to length and glued side by side with exterior grade construction adhesive or waterproof wood glue, building chunky slab sides and a solid top. Use a table saw for the cuts and take your time. The finished size is 16 inches high, 40 inches long and 13 1/2 inches deep, but it’s easy to resize. Choose pressure treated lumber if it’ll sit out in the weather.
Get the full tutorial at DIY Candy.
17. Modern House Number DIY

A modern house number DIY makes it easy for guests to spot your place from the street. Build a shallow box from 3/4 inch wood, or skip the woodworking and use a shadow box with the glass removed. Glue and nail the sides to the back panel, fill the nail holes, sand and paint it with exterior paint. Line the inside with faux grass, then attach modern house numbers on top with multi-surface glue. Size the box to fit your numbers. Crisp white numbers really pop against the green.
Get the full tutorial at A Beautiful Mess.
18. Easy Wine Bottle Vase Trio

An easy wine bottle vase trio hangs fresh flowers on the wall in under an hour. Cut a scrap board to fit three bottles, around 25 inches, and paint or stain it, or leave weathered wood as is. Measure and mark even spacing for each bottle, centered on the board. Drill a pilot hole at each mark and screw on a 1 inch copper bell hanger from the plumbing aisle, which costs under $2. Add picture hanging hardware to the back, slip clean bottles into the rings and fill with flowers.
Get the full tutorial at Saved By Love Creations.
19. DIY Gold Animal Jars

A gold animal jar makes plain glass jars look like boutique storage for a vanity. Wash old jars well, removing labels and any sticky residue, then dry them thoroughly. Pick small plastic animals with distinctive shapes, like an elephant, a zebra and a lion. Lay the lids and animals on newspaper and mist them with a light primer, two thin coats. Glue an animal to each lid with clear plastic glue on the feet, then spray light coats of metallic gold. Skip a sealer, which dulls the shine. Fill them with cotton balls and makeup.
Get the full tutorial at Bang On Style.
20. DIY Modern Bunny Decor

DIY modern bunny decor is built entirely from popsicle sticks, and it works as a shelf, a sculpture or nursery art. Print a bunny template and tape it together. Glue a first row of full size and mini sticks along the outline, alternating every other one, then fill the gaps with a second layer. Keep stacking and gluing until the bunny is as deep as you like, about 16 sticks here. Finish with stain or a soft wash of paint, and add a popsicle stick tail or a yarn pom pom. Plan on roughly 120 large and 310 mini sticks.
Get the full tutorial at Make and Do Crew.
21. DIY Bentwood Pendant

A DIY bentwood pendant copies a pricey designer light for a fraction of the cost. Glue six floral rings into two stacks of three and stain them. Pull apart four 14 inch quilting hoops, inner and outer, and saw each in half for 16 curved strips, prying off the hardware blocks. Stain every strip, then nail one end of each around the first ring stack with a pneumatic nail gun and the other end to the second, about 14 strips in all. Feed a pendant light kit through the top, with a Y adapter for two bulbs.
Get the full tutorial at Kaleidoscope Living.
22. DIY Woodbox Centerpiece

Every dining table needs a go to centerpiece, and a DIY woodbox centerpiece with rope handles is a classic. Cut a 1 by 6 pine board into two 34 1/2 inch sides and two 18 inch ends, clamp them and screw them together, then cut a bottom from the leftover board to fit inside. Drill a hole 4 1/2 inches in from each side and 2 inches down at each end. Paint it white, seal it with dark wax for an aged finish and knot twine through the holes as handles. Fill it with flameless pillar candles and greenery.
Get the full tutorial at Liz Marie Blog.
23. Tea Light Wall Art

Tea light wall art turns mismatched spoons and an old board into a glowing sconce. Sand a long piece of wood, paint it a creamy white and sand over the top again once dry so it looks worn. Attach a sawtooth hanger to the back. Bend four large spoons up into a hook shape; a vise or a strong helper makes this far easier. Hot glue the spoons down the board, eyeballing or measuring the spacing, then glue a tea light into each bowl. Battery tea lights are the safest choice for a wall.
Get the full tutorial at Spruce Your Nest.
24. Faceted Pendant Light

Grab a stack of printer paper: a faceted pendant light covers a plain round paper lantern in hundreds of folded paper fortune tellers. Fold the fortune tellers from simple white printer paper; it’s repetitive but easy. Add a dab of hot glue to the center point on the back of each one and press it onto the lantern. Don’t try to glue all four corners, since the sphere is curved and the corners fit together on their own. Keep going until the whole lantern is covered in spiky texture. Newsprint or colored paper gives a different glow.
Get the full tutorial at the 3 R's blog.