Ready for a bedroom that looks like it came out of a design catalog? These DIY bed frames lean modern, with low platform beds, an upholstered bed, a mid-century CB2-inspired build, a walnut plywood bed with welded legs and a herringbone headboard. You’ll also find smart storage beds, an IKEA Expedit hack and a fluted Murphy bed that hides away when you need the floor. Most use standard lumber, pocket screws and bed rail brackets, so they cost a fraction of a store-bought frame. They’re perfect for first apartments, guest rooms, kids’ rooms and anyone who wants a custom bed without the custom price tag. For more low-profile builds, see these DIY platform beds.
1. Build Your Own King Slat Bed for $150

A full cedar king for about a hundred and fifty dollars including tax, with the whole cut list published: six 4×4 legs cut to 8 inches, head and foot boards at 80 and 78.5 inches, two 2×2 side rails at 77 inches, fifteen slats at 75, and a 2×4 center rail. The number to write down is 76 inches of interior width, which is what a king mattress needs. Cedar for everything that shows, pine for the slats nobody sees. Sand at 120 grit and then again at 220 to take out what the coarse paper left behind, and stain before you seal it.
Get the full tutorial at Kiwi and Peach.
2. DIY Poster Bed

Four tall posts and a paneled headboard, built on Ana White’s free plans with turned tapered posts ordered in rather than milled. The panels are the part worth stealing: in the photo the headboard covers a window behind the bed entirely, which is a problem most bedrooms have and almost nobody solves. It is pocket hole joinery throughout, so a Kreg jig is not optional, and the post wraps are cut at 45 degrees so no end grain shows. Finished in Minwax Jacobean with a wipe on satin poly, with six inches of clearance underneath.
Get the full tutorial at Jaime Costiglio.
3. DIY Beadboard Twin Bed

Tongue and groove boards do the work on this one. They have the strength of a 1x board but click together into a beadboard face, so you get a paneled headboard and footboard without building a frame and panel assembly, which is the step that stops most people. Add 4×4 posts at the corners, sand, and paint it white like the photo or match it to the room. It is drawn as a twin for a kid’s room or a guest room, and the same site publishes queen and king versions of the plan.
Get the full tutorial at Build Basic.
4. Expedit Re-purposed as Bed Frame for Maximum Storage

Two IKEA Expedit bookcases stood on their sides, spaced apart, with slats laid across the top. That is the entire hack, and it came to $268 with the slats. Every cube becomes storage, and the whole thing breaks down into flat pieces that fit in a small car, which is the real argument for it if you move often. Do fasten the slats down properly rather than leaving them taped, and plan on a third unit or a center box under the middle of the mattress before you sleep on it long term.
Get the full tutorial at IKEA Hackers.
5. Flush with Floor DIY Bed Frame

Two boards and twelve screws. For a queen you buy two 1x12x12 lengths and have them cut into two seven foot pieces and two five foot pieces, which Lowe’s or Home Depot will do at the store if you bring the measurements, so you never need a saw at home. Pine or whitewood keeps it cheap. Stand the boards around the mattress, drill three pilot holes at each corner and drive two inch screws. It barely lifts the mattress at all, it simply hides the box spring, and that alone is the difference between a made bed and a mattress on the floor.
Get the full tutorial at The Merrythought.
6. King Bed DIY

A king built off the same published plans as the cedar king at the top of this list, with two changes worth copying. The builders swapped in Pretty Pegs furniture legs in gold instead of wooden feet, which is the cheapest way to move a build from rustic to modern, and they staged the whole thing in the bedroom because a finished king frame does not go through a standard door. Their own warning is the best one on the page: do not forget the middle support legs, and stain after assembly so you are only finishing what shows.
Get the full tutorial at The Great Goodness.
7. Walnut DIY Plywood Bed Frame With Welded Legs

Underneath the finish this is a plywood box on metal legs, which is a freeing way to think about a modern bed. Three quarter inch walnut veneer plywood on the faces, edge banding on the exposed edges, glue and an air nailer to assemble, and Danish oil to bring the walnut up. The legs are 1.5 inch square steel tube welded into rectangles at 45 degree corners and sprayed flat black. The maker’s own expensive mistake, worth avoiding: buy cheap plywood for the parts nobody sees and save the walnut veneer for the faces.
Get the full tutorial at Dans le Lakehouse.
8. Simple Pine Board Bed Frame

A minimal queen frame in pine on hairpin legs, and the cut list is short: five 1x12x8 boards, one 1×3.5×8, two 1x4x6, and six four inch hairpin legs. Six legs, not four, because the two extra under the middle are what carry the weight safely. Use oak for the support boards even if the rest is pine. The build came to $210, and most of that is the legs, so cheaper legs move the number a lot. Fair warning from the maker: it ends up heavy, so have someone help you place it.
Get the full tutorial at A Beautiful Mess.
9. Mid Century Inspired DIY Bed

A CB2 bed at $899 rebuilt for $175, with the receipt shown side by side in the photo. It is a proper build: a 1×4 base with 45 degree cuts joined on dowel pins with glue and screws, 1×8 boards over the top for the finished face, corner braces and metal ties, eight slats, and angled legs made from paired 1x4s. The headboard is plywood, foam and fabric, and the maker used a discounted rug as the upholstery. She also says outright she built it with limited tools, no router and no Kreg jig.
Get the full tutorial at Bigger Than the Three of Us.
10. Build an Upholstered Bed

A $2,500 designer bed built for about $278, and the material list is the part to plan around: six yards each of upholstery fabric, muslin and eight pound batting for a queen, half inch and three quarter inch plywood, nailhead trim, and a pneumatic staple gun you will be glad you did not try to do by hand. Do not skip the muslin layer under the fabric. The maker is emphatic that it is the difference between a homemade looking headboard and one that passes for bought.
Get the full tutorial at View Along the Way.
11. DIY Herringbone Bed

Built on Ana White’s Cassidy shim bed plans, and the herringbone panels are glued, not joined. Find the center of the board, lay your first two pieces so they meet on the center line, trace them and glue them down with liquid nails, then keep laying pieces out from there until the board is covered. Leave it a full 24 hours to cure before you cut the overhang off with a circular saw, fill the gaps with offcuts, and sand it properly. Repurposed deck tiles or 1x2s cut to eleven or twelve inches both work. Stained in Jacobean and espresso, finished with paste wax, on a 2×4 frame. About $200.
Get the full tutorial at Half Baked Media.
12. Pipe and Flange Bed Frame

Galvanized pipe and flanges for the headboard and the legs, pine rails and slats underneath, and no woodworking beyond straight cuts. The genuinely useful part is that you do not have to work out the pipe lengths yourself: send the supplier your mattress dimensions plus the headboard height and the leg height you want, and they quote the parts cut to size. That removes the one step that goes wrong with pipe builds, since a pipe cut half an inch short cannot be fixed the way a board can.
Get the full tutorial at Alchemy Eclectic.
13. DIY Twin Storage Bed

A twin with a headboard, a footboard and deep drawers underneath, built to replace a dresser entirely in a small room. The detail worth copying is the hardware: soft close drawer slides, chosen so a kid cannot catch their fingers, which is not a luxury choice on a piece of furniture at that height. Free PDF plans are available from the site. If you are building for a shared room, the drawers are what make two twins fit where a twin and a dresser would not.
Get the full tutorial at Do It Yourself Divas.
14. DIY Pipe Bed Frame

Kee Klamp fittings slip over pipe and tighten with a set screw, so the entire frame assembles with one hex key and no welding, no threading and no plumber. Cost runs around $300 buying everything new or nearer $120 with recycled pipe, and if you have the pipe cut to length ahead of time the bed goes together in a matter of hours. Use 1×4 lumber for the mattress support. The plan is drawn for a twin or a full, and a larger mattress needs a center support added.
Get the full tutorial at Simplified Building.
15. Low Modern Bed Frame With Tapered Legs
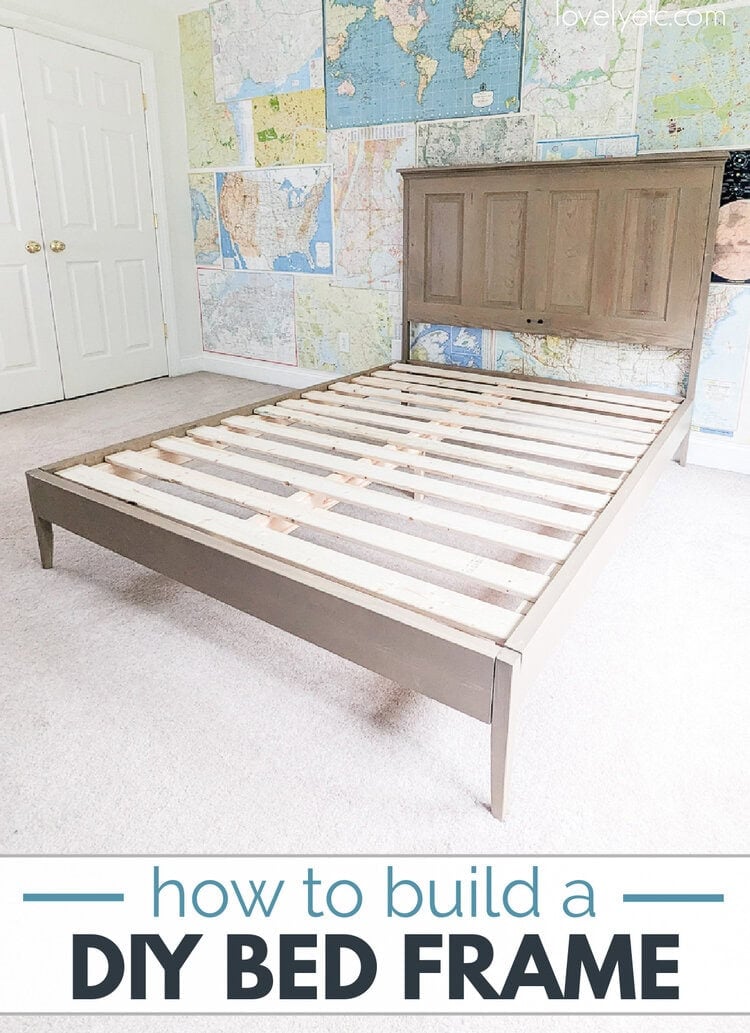
This low modern bed frame looks pricey but starts with inexpensive pine. The queen frame uses 2x6s for the rails, 2×2 legs tapered on a miter saw set to 7 degrees and furring strip slats on 2×4 supports. Everything gets sanded and finished with a stain and paint wash before assembly, which is so much easier than reaching between slats later. Pocket screws attach the legs, bed rail brackets hold the side rails, and a center leg keeps the middle from sagging. Want a headboard? Just cut the head legs to 54.5 inches instead.
Get the full tutorial at Lovely Etc.
16. Modern Platform Bed With a Geometric Headboard
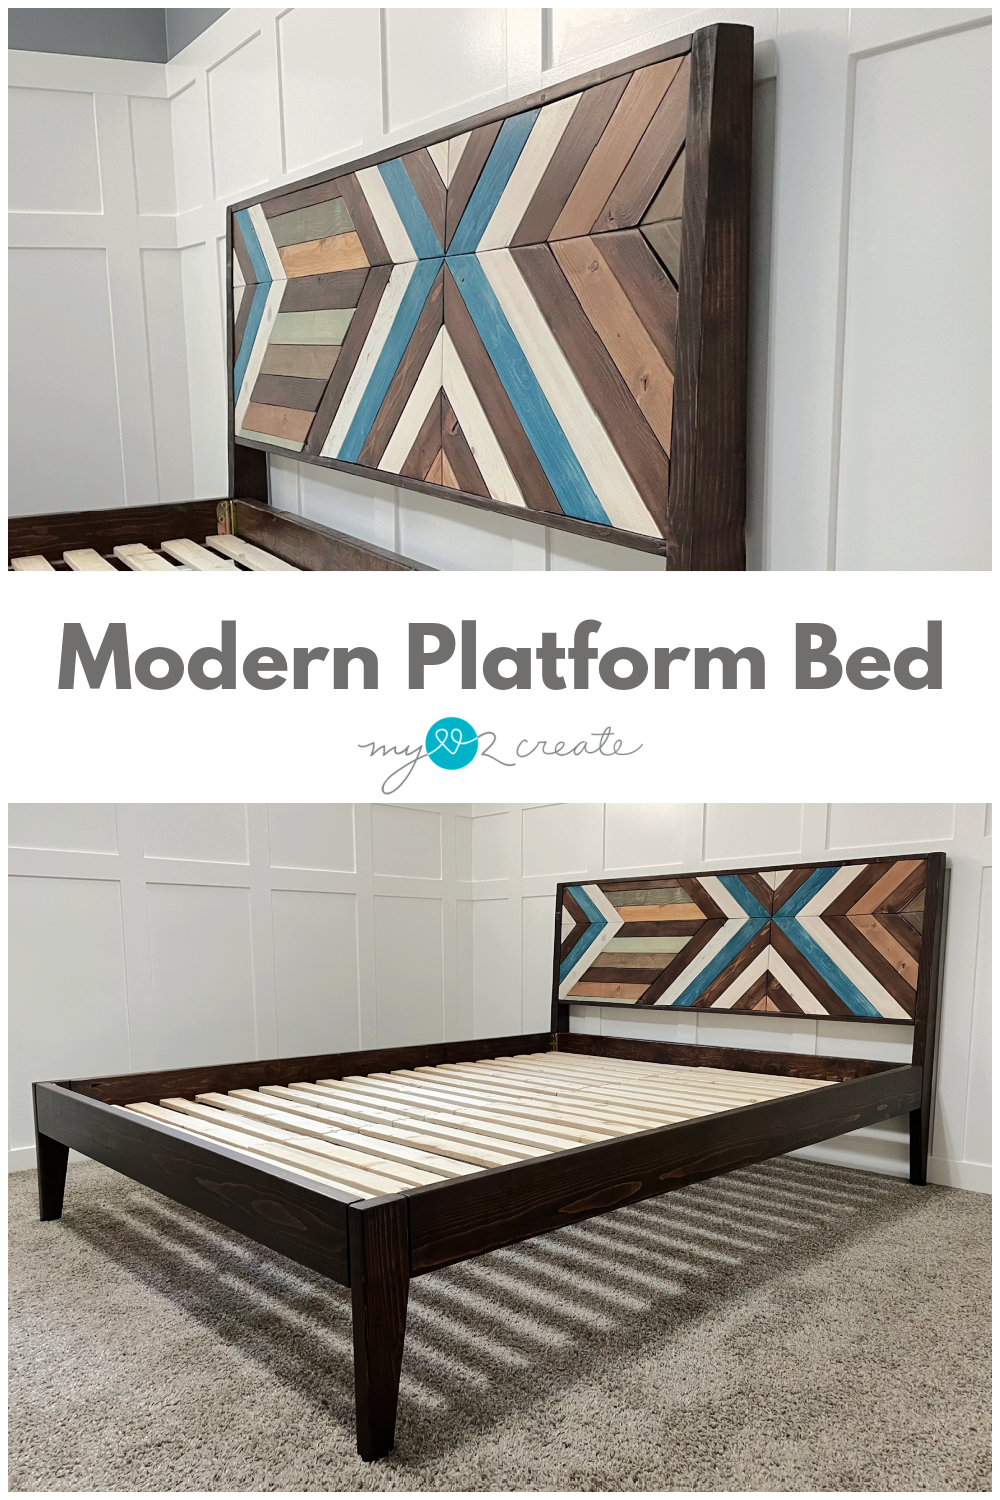
The headboard is the star here. Boards cut at 45 degrees are laid out from marked center lines, with the focal point offset a third of the way up, then glued to an MDF and plywood frame and trimmed flush with a circular saw. Most pieces get Rust-Oleum Kona stain, while a few get a white and blue wash or leftover stains for a patchwork of tones. The queen platform bed below has tapered 2×4 legs, bed rail brackets and 40 slats set with a spacer. It’s a showstopper that uses up your scrap pile (always a win).
Get the full tutorial at My Love 2 Create.
17. Murphy Bed With Fluted Doors
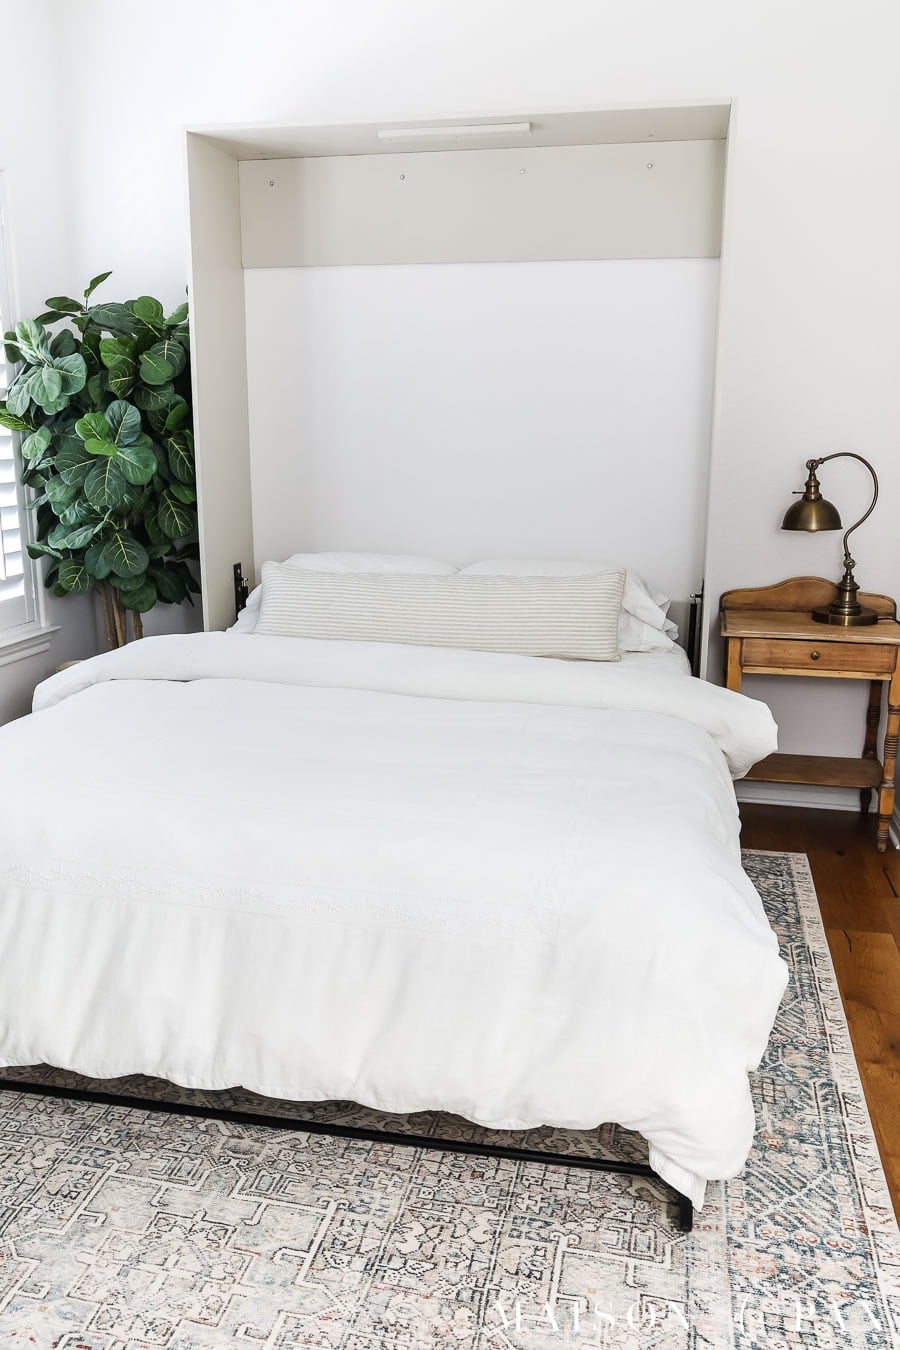
Need a guest room that’s also an office? This queen Murphy bed uses a Rockler kit inside a cabinet built from maple plywood and primed pine, and the doors are faced with fluted trim for that high-end look everyone’s chasing right now. The trim is shaved about 1/32 inch on a table saw so the pieces meet without gaps, then set with construction adhesive. Everything is caulked, primed and sprayed in a clay-toned satin paint before assembly, then finished with brass handles. Important: the cabinet must be attached to studs, and the kit calls for a mattress no deeper than 10 inches.
Get the full tutorial at Maison de Pax.