Sewing For Baby – Free Dress Pattern and Video Tutorial

Advertisement
Sewing For Baby – Free Dress Pattern and Video Tutorial | DIY Joy Projects and Crafts Ideas
Advertisement
Advertisement

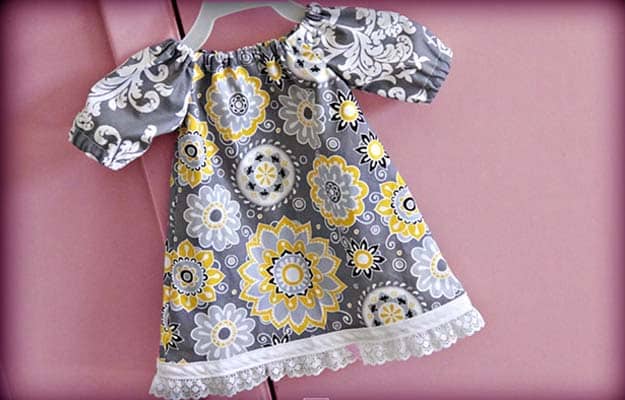
Learning to make your own baby dress is another great way to show love to your babies. With just basic knowledge in sewing, you can create cute baby dresses just by following these simple video tutorial by A Fate So Twisted.

Advertisement

Free DIY Baby Dress Easy Tutorial

What you need:

  • 2 designs of Fabric( for sleeves and body)
  • Sewing machine
  • Basic sewing tools like pins, safety pins, elastic garters. scissors, markers etc.
  • Iron to press those crease.

What to do:

Step 1

Fist thing that we need to do is to cut out the patterns for the body and sleeve.

DIY Projects & Crafts by DIY JOY at http://diyjoy.com/sewing-for-baby-free-dress-pattern-and-video-tutorial

Step 2

Next is deciding on the color or style of the cloth we want to use . In this tutorial, were gonna use two different designs for the body and the sleeves.

DIY Projects & Crafts by DIY JOY at http://diyjoy.com/sewing-for-baby-free-dress-pattern-and-video-tutorial

Step 3

Fold the cloth that we’re gonna use for sleeves and iron them so we could easily trace and cut once we put the patterns on top. Leave enough room for the pattern cut outs. Do this for the body patterns too.

DIY Projects & Crafts by DIY JOY at http://diyjoy.com/sewing-for-baby-free-dress-pattern-and-video-tutorial

Step 4

Cut the cloth using the pattern of the sleeve and leave a space about an inch and a half at the bottom part.

DIY Projects & Crafts by DIY JOY at http://diyjoy.com/sewing-for-baby-free-dress-pattern-and-video-tutorial

Step 5

Now let’s cut the 2 parts for the body out from the pattern that we have. Same thing from what we did on the sleeves.

DIY Projects & Crafts by DIY JOY at http://diyjoy.com/sewing-for-baby-free-dress-pattern-and-video-tutorial

They should now look like these.

DIY Projects & Crafts by DIY JOY at http://diyjoy.com/sewing-for-baby-free-dress-pattern-and-video-tutorial

Step 6

Lets unfold them’and iron those creases out.

DIY Projects & Crafts by DIY JOY at http://diyjoy.com/sewing-for-baby-free-dress-pattern-and-video-tutorial

Step 7

Now after were done with the creases the next step we need to do is pin the first sleeve to the body and start stitching it.

DIY Projects & Crafts by DIY JOY at http://diyjoy.com/sewing-for-baby-free-dress-pattern-and-video-tutorial

We’ll do that to the 2nd sleeve too.

DIY Projects & Crafts by DIY JOY at http://diyjoy.com/sewing-for-baby-free-dress-pattern-and-video-tutorial

They should now look similar to this.

DIY Projects & Crafts by DIY JOY at http://diyjoy.com/sewing-for-baby-free-dress-pattern-and-video-tutorial

Step 8

Flip it over and align it on the other part of the body.

DIY Projects & Crafts by DIY JOY at http://diyjoy.com/sewing-for-baby-free-dress-pattern-and-video-tutorial

Step 9

Let us now stitch those sleeves to the second pattern of the body.

DIY Projects & Crafts by DIY JOY at http://diyjoy.com/sewing-for-baby-free-dress-pattern-and-video-tutorial

They should now look like this.

DIY Projects & Crafts by DIY JOY at http://diyjoy.com/sewing-for-baby-free-dress-pattern-and-video-tutorial

Step 10

The next thing we need to do is iron the bottom part of the sleeves. This is part where we put a space at step 4.

DIY Projects & Crafts by DIY JOY at http://diyjoy.com/sewing-for-baby-free-dress-pattern-and-video-tutorial

Let’s do this also to the 2nd sleeve that we have.

DIY Projects & Crafts by DIY JOY at http://diyjoy.com/sewing-for-baby-free-dress-pattern-and-video-tutorial

Step 11

We’ll also put a space in the neckline for the same purpose but we don’t need to iron this part.

DIY Projects & Crafts by DIY JOY at http://diyjoy.com/sewing-for-baby-free-dress-pattern-and-video-tutorial

Step 12

Stitch the sleeves and the collar part. remember to leave an opening for the elastics to be inserted.

DIY Projects & Crafts by DIY JOY at http://diyjoy.com/sewing-for-baby-free-dress-pattern-and-video-tutorial

Step 13

Insert the elastics using safety pins to make it easier to go through the holes.

DIY Projects & Crafts by DIY JOY at http://diyjoy.com/sewing-for-baby-free-dress-pattern-and-video-tutorial

Step 14

Let’s stitch to lock those elastics.

DIY Projects & Crafts by DIY JOY at http://diyjoy.com/sewing-for-baby-free-dress-pattern-and-video-tutorial

Step 15

Check the measurement of the arm width.

DIY Projects & Crafts by DIY JOY at http://diyjoy.com/sewing-for-baby-free-dress-pattern-and-video-tutorial

Step 16

Stitch the other end of the elastic after figuring out the desired measurements for the arm width.

DIY Projects & Crafts by DIY JOY at http://diyjoy.com/sewing-for-baby-free-dress-pattern-and-video-tutorial

Cut the excess of the elastic bands.

DIY Projects & Crafts by DIY JOY at http://diyjoy.com/sewing-for-baby-free-dress-pattern-and-video-tutorial

This is how it should look by now.

DIY Projects & Crafts by DIY JOY at http://diyjoy.com/sewing-for-baby-free-dress-pattern-and-video-tutorial

Step 17

Let’s pin them up both sides from the arm pit area to the sides of the body so we could get ready for sewing.

DIY Projects & Crafts by DIY JOY at http://diyjoy.com/sewing-for-baby-free-dress-pattern-and-video-tutorial

Step 18

Let’s now start sewing the body of the dress to close it.

DIY Projects & Crafts by DIY JOY at http://diyjoy.com/sewing-for-baby-free-dress-pattern-and-video-tutorial

This is now how it should look like. I put markings on the sides to have a better view on where the stitch should go.

DIY Projects & Crafts by DIY JOY at http://diyjoy.com/sewing-for-baby-free-dress-pattern-and-video-tutorial

Step 19

Insert the elastic in the holes that we left on the neckline portion , similar to what we did with sleeves.

DIY Projects & Crafts by DIY JOY at http://diyjoy.com/sewing-for-baby-free-dress-pattern-and-video-tutorial

Step 20

Close the elastics by stitching them after we managed to get the exact measurement for the neckline.

DIY Projects & Crafts by DIY JOY at http://diyjoy.com/sewing-for-baby-free-dress-pattern-and-video-tutorial

Step 21

Neaten up the edge by stitching a zigzag line on the sides and at the bottom part of the dress.

DIY Projects & Crafts by DIY JOY at http://diyjoy.com/sewing-for-baby-free-dress-pattern-and-video-tutorial

Step 22

We can now add designs at the bottom of the dress to have that fabulous look!

DIY Projects & Crafts by DIY JOY at http://diyjoy.com/sewing-for-baby-free-dress-pattern-and-video-tutorial

Sew the design around the bottom of the dress.

DIY Projects & Crafts by DIY JOY at http://diyjoy.com/sewing-for-baby-free-dress-pattern-and-video-tutorial

And our pretty little Baby dress is done!

DIY Projects & Crafts by DIY JOY at http://diyjoy.com/sewing-for-baby-free-dress-pattern-and-video-tutorial

DIY Projects & Crafts by DIY JOY at http://diyjoy.com/sewing-for-baby-free-dress-pattern-and-video-tutorial

Don’t Miss Out! Sign up for the Latest Updates