

Got a blank wall that’s begging for a little warmth? Rustic wall art is the easiest fix, and you don’t need a big budget or a workshop to pull it off. These 31 rustic DIY wall art ideas lean on salvaged pallet boards, scrap lumber, driftwood, branches, jute and twine, so a lot of the supplies are free or close to it. You’ll find stenciled welcome signs, string art you can finish in an evening, a pallet board world map, painted citrus stripes, a windmill made from old ceiling fan blades and a few clever ways to show off photos. Rough edges and visible grain are the whole point, so don’t stress about perfect cuts. Perfect for a farmhouse kitchen, a cozy bedroom, an entryway or a porch!
Rustic DIY Wall Art Ideas
1. Rustic String Yarn Wall Art

Rustic string yarn wall art spells out LOVE in a way paint just can’t. Start with a slat board painted white, then brush a thinned brown and black wash into the cracks and wipe the middle of each slat so it looks old. Build a frame from molding the same thickness as the board and stain it in a few layered shades. Tape a cardstock letter template on top, mark dots about every half inch, pre-drill and drive in brass screws. Then wrap yarn back and forth between the screws until every letter fills in.
Get the full tutorial at My Simple Obsession.
2. Submerged Color DIY Wall Art Sconces

These submerged color wall art sconces put ocean blues and greens on two mini pallets made from thin wood slats. Paint ten 6 inch slats in five sample-pot colors, lay them out in the order you like and nail shorter slats across the back at the top and bottom. Sand hard so lots of paint wears away, then wipe on stain for a weathered, beachy finish. Wood-wrapped tealight holders attach with zip ties threaded through two drilled holes. Hang them on a patio wall and light them up on summer nights!
Get the full tutorial at Tatertots and Jello.
DIY Farmhouse Decor for Home
If you love DIY farmhouse style decor, try these 41 rustic ideas to furnish your entire house. The full step by step tutorials and instructions for these projects can be found here, DIY Farmhouse Home Decor Ideas.
3. Herringbone Pattern Wall Art

Herringbone pattern wall art starts with plain wood shims from the hardware store. Cut them in half while they’re still in the package, stain a few for contrast, then draw a center line down a black foam board. Dry-fit the shims in a herringbone pattern first, then hot glue each one down. Frame it with 1x3s or molding, trim the ragged edge with a jigsaw and glue ribbon around the border to hide any gaps. A loop of jute stapled to the back is all you need to hang it. It came in around $6.
Get the full tutorial at Thrifty and Chic.
4. DIY Rustic Barn Wood Corner Gallery Wall

A DIY rustic barn wood corner gallery wall wraps weathered boards around both sides of a corner for a cozy, collected look. These boards started life as old fence posts, so hunt for salvaged fencing, barn siding or pallet slats with plenty of character. Stagger them at different heights and hang each one with about three heavy-duty removable mounting strips, so there’s no big drilling job. Then layer on antlers, vintage signs, a metal letter and little keepsakes with nails and screws, either into the boards or right into the wall. Swap the details and it works in any room!
Get the full tutorial at Liz Marie Blog.
Farmhouse Style Wall Art Ideas
5. Cross Stitch Heart In Wood

A cross stitch heart in wood is a giant, playful take on needlework. Grab a wood slab with the bark still on, print a heart cross stitch template and tape it where you want the design. Drill through the paper at every hole, then sand both sides smooth. Melt the end of some neon cord with a lighter so it won’t fray and threads easily, then stitch each row diagonally one way and back across the other. Two holes at the top and a leather cord finish it. It’s great for a teen’s room!
Get the full tutorial at Oleander + Palm.
6. Wooden Mosaic Wall Art DIY

Wooden mosaic wall art looks like a pricey designer piece, but it’s completely power tool free. Grab a bag of 2 inch unfinished wood blocks, a scrap of 1/4 inch plywood cut a little smaller than your block layout, wood glue and stain. Rub stain on every side of each block and notice how the end grain soaks it up darker. Arrange the blocks on the backing with your favorite sides up, then glue them down row by row, tucking wood shims under a few to raise them for texture. Use sturdy hangers, because it’s heavy!
Get the full tutorial at A Beautiful Mess.
7. Pottery Barn Inspired Cut Out Wood Star Art

This Pottery Barn inspired cut out wood star art costs nothing if you’ve got scrap lumber lying around. Glue five 17.5 inch lengths of 1×4 onto a plywood square and weigh them down overnight. Print a star template at 170 percent, trace it with a ruler, drill a large hole on each inside line and jigsaw out to the points. Add a mitered 1×2 frame with wood glue, sand the edges and use a pre-stain conditioner before a warm stain. Small gaps and wobbly lines only add to the rustic charm.
Get the full tutorial at The Happier Homemaker.
DIY Farmhouse Art Projects
8. DIY Basket Wall Art

DIY basket wall art turns old rattan paper plate holders into a cheerful graphic grid. They turn up at thrift stores all the time, often in big bundles for a few dollars. Mask off part of each plate with painter’s tape, pressing the edges down hard so paint can’t creep under. Give them one even coat of spray paint, let them dry for a few hours and peel the tape. Play with stripes, halves and wedges. Map out the grid with a pencil first, then hang each plate on one small nail.
Get the full tutorial at Design Improvised.
9. Easy DIY String Art Ideas
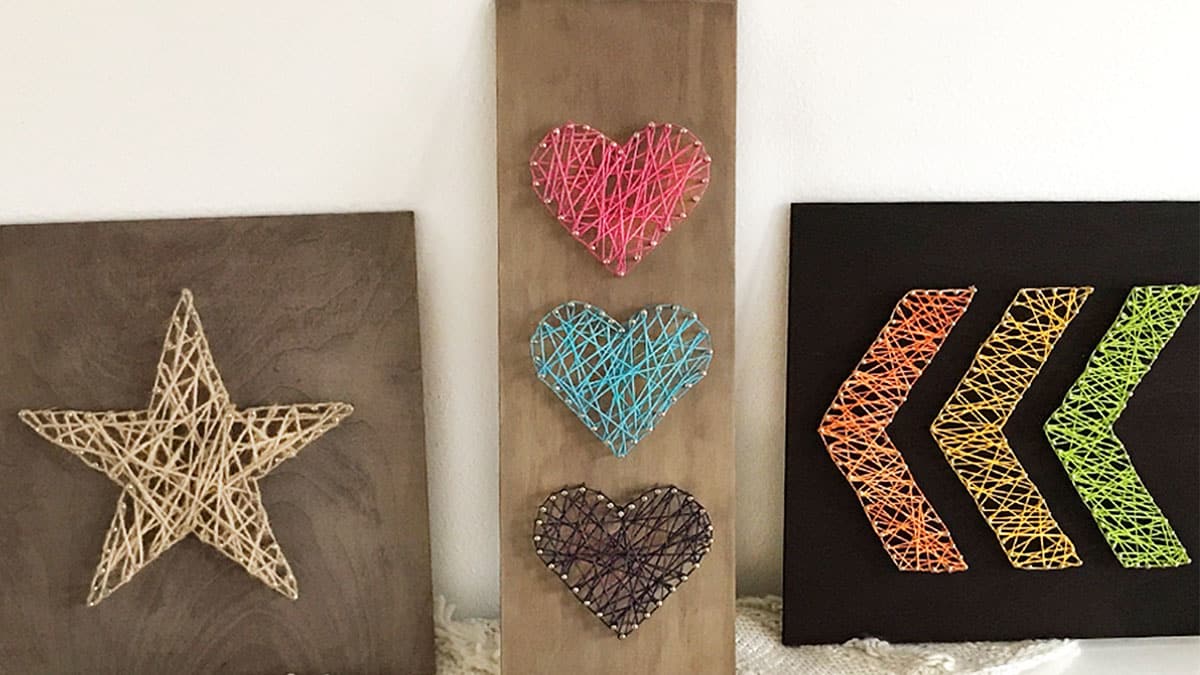
Easy DIY string art ideas prove you don’t need any artistic skills to make striking wall decor. Grab a wood plank, a hammer, small nails, twine or embroidery thread and a printed graphic. Tape the printout on the board, hammer nails around the outline, then pull the paper away. Tie on your string and crisscross it from nail to nail until the shape fills in. One technique makes a twine-wrapped rustic star, a column of colorful hearts and a row of bright chevrons. The full video walks you through every step!
Get the full tutorial at DIY JOY.
10. Dollar Tree Farmhouse Crate Wall Art
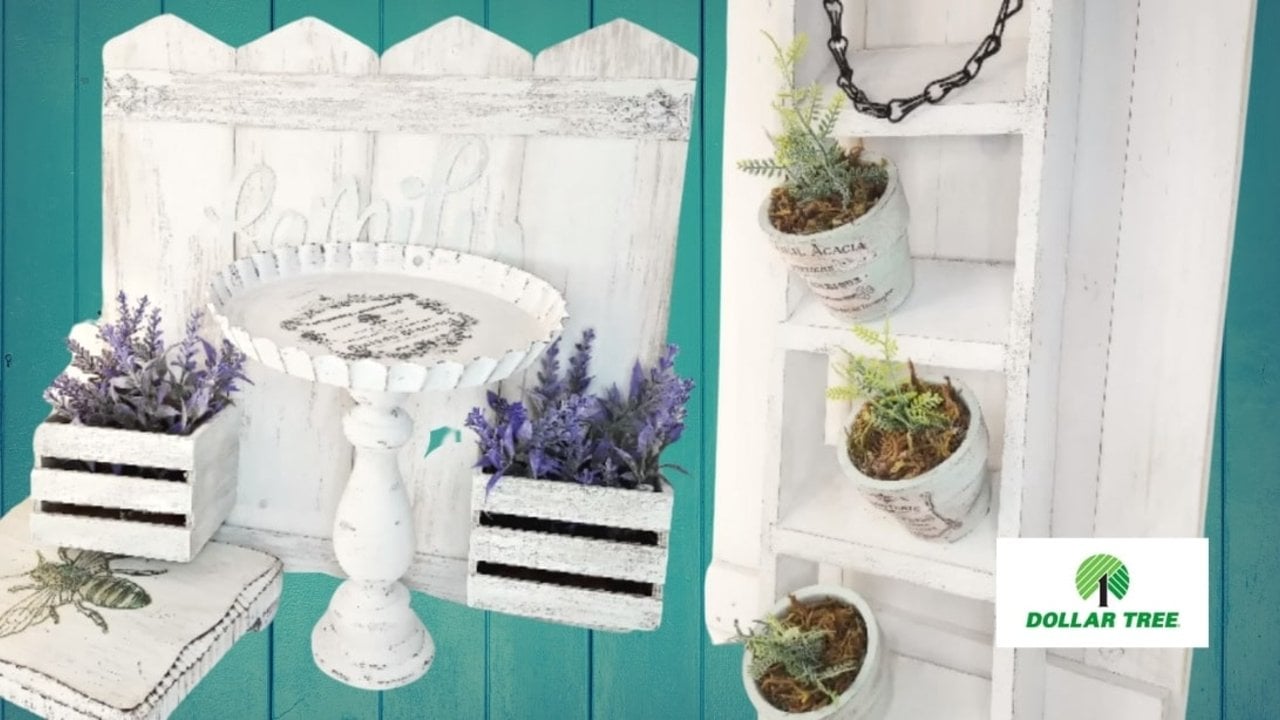
Dollar Tree farmhouse crate wall art starts with a cheap printed wood sign. Peel off the picture and the hanger so you’re left with the bare backing, then give it one quick coat of white paint so it looks like an old fence. Pencil in plank lines and distress them with a damp paper towel. Two tiny crates get antiquing wax and a white dry brush, and two paint sticks trimmed to size frame the top and bottom. Glue the crates above the bottom stick, add a word sign and tuck in faux lavender.
Get the full tutorial at DIY JOY.
11. Rustic DIY Wreath

This rustic DIY wreath hangs a fresh boxwood ring inside a weathered wood frame backed with chicken wire. The mix of old barn-style boards, galvanized wire and soft greenery gives you that cozy farmhouse look in one piece, and the whole project came in at about $13. It’s equally pretty on a living room wall, over a mantel or hanging on the front or back door. The photo shows the easy part: boxwood sprigs tied onto a plain grapevine form, a little at a time, until it’s full.
Get the full tutorial at DIY JOY.
12. DIY Embroidery Hoop Wall Art

DIY embroidery hoop wall art fills a big, empty wall for very little money. Start by laying hoops of different sizes on the floor in front of the wall, with the largest ones first and little 3 and 4 inch hoops tucked into the gaps. Fill them with patterned fabrics, or make your own by stenciling acrylic paint onto plain white cotton with a tapping motion so it doesn’t bleed. Let the paint dry, stretch the fabric in the hoops and trim. Then just eyeball the layout and hang!
Get the full tutorial at Home Stories A to Z.
13. Geometric Heart DIY Wall Art

Geometric heart DIY wall art is built from about 95 popsicle sticks, tacky glue and a little stain. Print the heart template and tape the pieces together. Glue sticks end to end in layers, log cabin style, until each wall of the heart is three sticks deep, and make three hearts in all. Stain one, paint one pink and leave one natural, staining two extra sticks too. Slide the loose sticks between the layers to join the hearts in a stack and let it dry well. Two small nails hold it up by its peaks.
Get the full tutorial at Make and Do Crew.
14. Coastal Pallet Art

Coastal pallet art is about as quick as rustic decor gets, since it comes together in under 30 minutes. Pull apart a small section of pallet until you’re left with three boards. Tie them together by wrapping and knotting white rope across the front, then screw a couple of wood shims across the back so it stays sturdy. Add a string for hanging, flip it over and attach one big seashell in the middle. It brings a little bit of the beach to a bathroom, a porch or a front door.
Get the full tutorial at Yummi Haus.
15. Rustic Arrow Wall Art

Rustic arrow wall art mixes bright painted arrows with soft, weathered wood. Transfer an arrowhead and fletching template onto wood with carbon paper, then cut the pieces out on a scroll saw. Drill a hole in each arrowhead and straight through each fletching so a wood dowel slides in. Paint the pieces in bold colors, trace on the little interior designs and paint those too. Sand four long wood plaques and give them a watered-down paint wash so the grain shows, then mount the arrows across them.
Get the full tutorial at The DIY Dreamer.
16. Pallet Antler Wall Art

Pallet antler wall art pairs light and dark boards with a white ornate frame for a modern lodge look. Cut free pallet wood to size, then tea-stain the darker boards so the stripes really contrast. Brace the panel from behind with a few thicker boards and use 1.75 inch screws, since pallet wood strips easily. Spray an inexpensive black frame white and screw it to the front. A pair of faux antlers hangs on screws inside the frame. A heavy-duty wire picture hanger holds the finished piece above a bed.
Get the full tutorial at Blitsy.
17. Mounted Paper Flowers

Mounted paper flowers are the easiest wall art on this list, and they never wilt. Pick up a few crepe paper stems, like cherry blossoms, dogwood or a single rose, or make your own if you love paper flowers. Lay one stem diagonally across a small unfinished wood plaque and secure it with a few beads of hot glue on the front and back. Make three for a pretty trio. Lean them on a shelf, or add picture hangers to the backs and hang them in a little row.
Get the full tutorial at Fabric Paper Glue.
18. DIY World Map Wall Art

DIY world map wall art gives a nursery or travel-lover’s room a rustic focal point. Lightly sand a 10 by 14 inch board, just enough to round the edges, and brush on one light coat of stain. Cut a world map from adhesive vinyl, weed out all the land to make a stencil, and use transfer paper to lay it neatly on the wood. Smooth out every bubble with an old gift card. Paint the continents white, peel the vinyl while it’s fresh and add a sawtooth hanger.
Get the full tutorial at All Things Bright and Beautiful.
19. Driftwood Fish

Driftwood fish are free wall art you collect on a walk. Gather pretty pieces from a beach, a lake or a riverbank and let them dry. Sketch a simple fish shape on scrap cardboard, keeping the outline very basic, and cut it out. Hot glue the driftwood pieces across the cardboard so they all run in the same direction, letting the ends overlap the edges a little. Add a small round piece of cork or wood for the eye. Make two and hang them swimming in opposite directions.
Get the full tutorial at Cut Out + Keep.
20. DIY Jute Rope Love Sign

A DIY jute rope love sign looks like hand lettering, but it’s really just rope and glue. Paint a long board a light silvery gray, then whitewash it. Write your word on waxed paper with a marker. Mix 1/4 cup corn starch with 3 tablespoons of water, stir in a whole bottle of wood glue, then dip the jute a little at a time. Wear gloves for this part! Shape the rope over your letters, weigh it down until it sets and tack it to the board with small finish nails.
Get the full tutorial at Hymns and Verses.
21. Braided Mirror DIY

This braided mirror DIY dresses up plain thrift store mirrors in just a couple of hours. Cut three pieces of cotton cording, each about 1.5 times the mirror’s diameter. Knot them at the top, tape the knot down and braid the whole length. Run a bead of hot glue along the mirror’s edge a few inches at a time and press the braid into it while it’s warm. Keep going all the way around, trim the end and glue it down. Group several shapes and sizes together on one wall.
Get the full tutorial at Curbly.
22. Pineapple Wooden Welcome Wall Art

This pineapple wooden welcome wall art gives a rescued pallet a second life. Pull the pallet apart and nail the boards to a couple of cross pieces on the back. Cut the pineapple and lettering from scrap vinyl, lay it out and press each piece down hard on the uneven wood, then seal the edges with matte decoupage glue. Dry brush the whole sign in a soft aqua, peel the vinyl once the paint is dry and sand any rough spots. The pineapple is a classic sign of welcome.
Get the full tutorial at Architecture of a Mom.
23. Revamped Ceiling Fan Blades

Revamped ceiling fan blades make a farmhouse windmill for a fraction of what a salvaged one costs. Trace a blade onto cardboard, sketch an angular windmill blade inside the outline and cut it out as a template. Trace it onto each fan blade, cut and sand. Drill matching holes through the blades and a quarter section of a floral craft ring, then spray everything with galvanized finish paint. Rub on a touch of rust-colored paint with a rag and seal it matte. Bolt it together with chunky industrial hardware.
Get the full tutorial at Sadie Seasongoods.
24. Popsicle Stick Hexagon Shadow Box

This popsicle stick hexagon shadow box is a mini shelf and wall art in one. You’ll need about 100 popsicle sticks, tacky glue and a warm wood stain. Put a drop of glue on both ends of three sticks and lay them out, then layer three more on top to close the hexagon. Keep gluing and stacking until it’s as deep as you like, around 16 layers. Once the glue dries, brush stain into every gap. Hang it on two small nails and tuck a tiny succulent inside. A printable template keeps the angles even!
Get the full tutorial at Make and Do Crew.
25. Pallet Board World Map

A pallet board world map makes a big statement on an office wall, and the pallet itself was free. Pry the boards apart (older pallets come apart easier), line them up and saw them to size, then nail three boards across the back. Print a world map outline at 500 percent for a 3 by 4 foot piece and trace it onto taped-together tracing paper. Rub carpenter pencil on the back, retrace it onto the wood, outline in permanent marker and fill the continents with one thick coat of paint.
Get the full tutorial at The Merrythought.
26. Citrus Stripes Wall Art

Citrus stripes wall art is pure summer on a board. Cut 3/8 inch plywood to 22 inches square, stain it Early American and base coat white, leaving the edges a little patchy. Tape off stripes about 4 3/8 inches wide, paint them and run a fine black line along the tape before you peel it. Trace a 16 inch circle, prime and paint it white, then stencil a lemon, lime or orange slice with darker shading on the right and bottom. Wood burn the segment lines and sand.
Get the full tutorial at Lake Girl Paints.
27. DIY Branch Art Headboard

A DIY branch art headboard is a fun way to fill the wall above a bed when a real headboard won’t fit. Measure the space and cut two 1×2 boards into a frame, matching the width of the bed. Sand the pieces, then whitewash them in a 1 to 1 mix of white acrylic paint and water so the grain still shows. Nail the frame together with a helper. Collect fallen branches on a walk, cut them to fit and hot glue each one inside the frame. It’s lovely over a sofa too.
Get the full tutorial at Emorie Kidder.
28. Geometric Himmeli Heart

A geometric himmeli heart looks like metalwork, but it’s made from cocktail straws and 20 gauge wire. Cut 12 straws in half and leave the rest whole. Thread three short pieces onto about two yards of wire and twist the ends into a triangle. Keep adding straws two at a time, bending them into new triangles and pyramids and threading back through the last straw to lock each shape. Patience is the main ingredient here. Spray the finished heart black or copper and hang it on a nail.
Get the full tutorial at Vintage Revivals.
29. DIY Wood Pallet Arrow

This DIY wood pallet arrow needs only two pallet boards and a miter saw. If the boards won’t pry loose, a reciprocating saw cuts straight through the nails and saves a lot of muscle. Cut a 24 inch body, an 8.5 inch tip with two 40 degree cuts and two 45 degree tail pieces about 7.5 by 5.75 inches. Glue the tail halves together and the tip to the body, clamp them, then screw a few support boards across the back. A sawtooth hanger finishes it.
Get the full tutorial at Love Grows Wild.
30. Inspirational Message Rustic Board Art

Inspirational message rustic board art puts a favorite saying on salvaged pallet wood. Seven pallet boards make a nice big sign. Cutting through the nails with a saw is far quicker than prying, and wear real shoes around old pallets! Lay the boards out, leave a few broken nails for character and nail two boards vertically across the back. Cut a cardstock stencil on a cutting machine and tape the pieces together. Paint the letters white with a few words in yellow, then wrap hanging wire around the back braces.
Get the full tutorial at Blooming Homestead.
31. DIY Pallet Plaques

DIY pallet plaques work like oversized clipboards with a rustic, worn finish. Cut a 3 inch craft board into three 12 inch sections and a 2 inch board into two 8 inch strips per plaque. Sand every edge and corner, then brush on gray chalk paint thinned half and half with water so the grain shows. Glue the narrow strips across the top and bottom of the three boards. Staple a jute hanger to the back, screw a bulldog clip to the front and clip on a photo or a kid’s latest masterpiece.
Get the full tutorial at Oh My! Creative.

DIY Farmhouse Decor for Home
41 rustic ideas for your entire house. The full step by step tutorials and instructions for these projects can be found here, DIY Farmhouse Home Decor Ideas.





