Tired of the same fizzy tablet kit every spring? These 24 Easter egg decorating ideas use things you probably already have in the pantry, from rice and food coloring to Kool-Aid packets, onion skins, baking soda and even Cool Whip. Some are edible dyes for hard-boiled eggs you’ll peel later, and some are for craft eggs that stay out as decor all season, like nail polish marbling, Sharpie tie dye and stenciled ceramic eggs. There are natural dyes with herbs and red cabbage, sparkly galaxy eggs and a silk necktie trick that prints patterns right onto the shell. Grab a dozen eggs, cover the table and pick a favorite! Find more on the Easter crafts hub.
Table of Contents
- 1. Dye Easter Eggs with Rice and Food Coloring
- 2. DIY Dyed Robin Eggs
- 3. DIY Galaxy Easter Eggs
- 4. Homemade Easter Eggs Naturally Dyed with Onion Skins
- 5. Kool-Aid Dyed Easter Eggs
- 6. Nail Polish Swirl Easter Eggs
- 7. Paper Towel Tie Dye Easter Eggs
- 8. Rice Shake Dyed Easter Eggs
- 9. Dye Easter Eggs with Kool-Aid
- 10. DIY Marbled Indigo Eggs
- 11. Sharpie Tie Dye Easter Eggs
- 12. Food Coloring Eggs With Resist Designs
- 13. Easter Egg Dyeing with Grass and Flowers
- 14. Natural Herb Stenciled Easter Eggs
- 15. Sharpie Tie-Dye Easter Eggs
- 16. Melted Crayon Easter Eggs
- 17. Baking Soda Easter Eggs
- 18. Rainbow Easter Eggs the Easy Way
- 19. Watercolor Easter Eggs
- 20. Baking Soda Paint Easter Eggs
- 21. 5-Minute Painted Easter Eggs
- 22. Tissue Paper Dyed Easter Eggs
- 23. Cool Whip Dyed Easter Eggs
- 24. How to Decorate Easter Eggs With Silk Neckties
1. Dye Easter Eggs with Rice and Food Coloring

Dyeing Easter eggs with rice and food coloring takes about a minute per egg and almost no mess. Pour 1/4 cup of long grain rice into a container with a lid, add 5 or 6 generous drops of food coloring and shake until every grain is tinted. Drop in a hard-boiled egg, cover and shake again. The rice leaves a pretty speckled finish that looks like stone. Lift the egg out, let it dry, then do the next one. Gel colors give the boldest results.
Get the full tutorial at It All Started With Paint.
2. DIY Dyed Robin Eggs

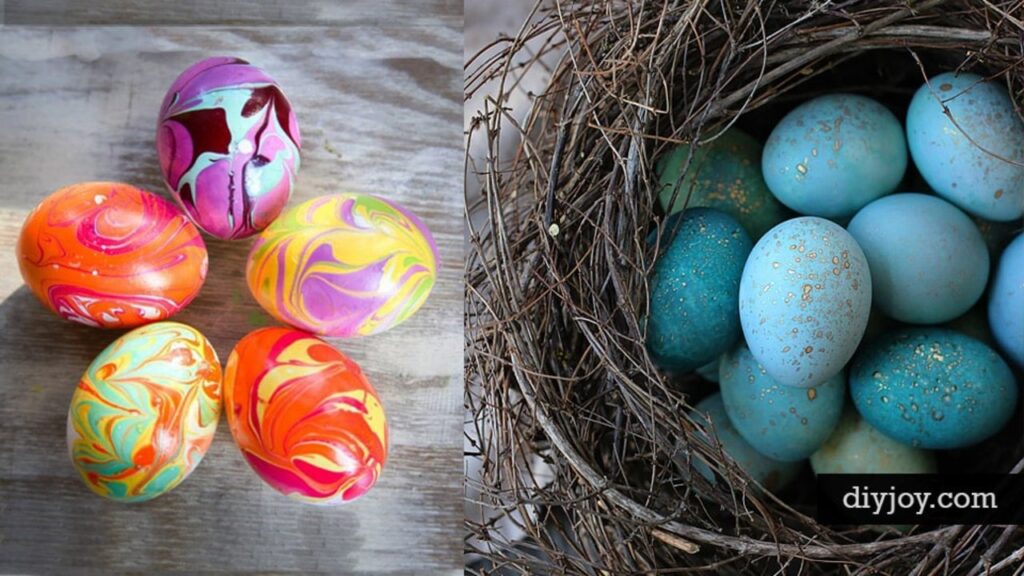
DIY dyed robin eggs get their gorgeous blue from red cabbage. Roughly chop a head of cabbage, simmer it in 5 cups of water for 30 to 45 minutes, cool, strain and stir in 4 tablespoons of white vinegar. The dye looks purple, but trust it. Submerge a dozen white hard-boiled eggs and turn them every half hour. One or two hours gives a pale blue, longer gives deeper teal, and the color darkens as they dry. Flick edible gold paint from a toothbrush for speckles.
Get the full tutorial at HonestlyYUM.
3. DIY Galaxy Easter Eggs

DIY galaxy Easter eggs swap pastels for deep space. Start with eggs painted black, then sponge on patches of purple, magenta, teal and royal blue so the colors blend into cloudy nebulas. Let each layer dry before adding the next. Flick white paint from a stiff brush for stars, and add a few bigger dots for the bright ones. A little glitter while the paint is wet gives them extra sparkle. Use craft or blown eggs if you want to keep them, since painted shells aren’t for eating.
Get the full tutorial at DIY JOY.
4. Homemade Easter Eggs Naturally Dyed with Onion Skins

Homemade Easter eggs dyed with onion skins come out a warm rusty gold with leaf prints like botanical art. Soak about 3 packed cups of onion skins ahead for richer color, and add a sliced red beet if you want red eggs. Press small leaves of parsley, dill or chervil onto damp raw eggs, wrap each in a square of nylon stocking and tie it tight. Simmer the skins with 2 teaspoons of vinegar, add the eggs and boil 8 to 10 minutes. Rub with oil for shine.
Get the full tutorial at Ciao Florentina.
5. Kool-Aid Dyed Easter Eggs

Kool-Aid dyed Easter eggs are bright, cheap and safe to eat. Set out one glass per color and add boiling water, then stir in a packet of Kool-Aid until it dissolves. Add a little vinegar to help the shell grab the color, but don’t overdo it, since too much eats the dye right off. Lower one egg at a time into each glass for 1 to 2 minutes, then lift it out with a spoon onto a paper towel. The colors brighten as the eggs dry.
Get the full tutorial at Artsy-Fartsy Mama.
6. Nail Polish Swirl Easter Eggs

Nail polish swirl Easter eggs look like marbled paper and take seconds each. Fill a plastic cup with room temperature water, since water that’s too hot or cold won’t let the polish spread. Drip in a few colors of cheap nail polish and drag a toothpick through them to make swirls. Put on a glove, then roll the egg across the surface as you dunk it so the polish grabs on. Use craft eggs or blown eggs for keeping, and set them on a rack to dry.
Get the full tutorial at A Thrifty Mom.
7. Paper Towel Tie Dye Easter Eggs

Paper towel tie dye Easter eggs are surprisingly tidy for something called tie dye. Wrap each hard-boiled egg in a small piece of paper towel, twist the end tight and secure it with a tiny elastic. Squeeze drops of food coloring straight onto the towel, leaving a little white space between colors. Spritz each spot with water until no white shows, then gently squeeze so the color soaks through. Set the eggs in a dish to dry, with a fan to speed it up, then unwrap. Wear gloves!
Get the full tutorial at One Little Project.
8. Rice Shake Dyed Easter Eggs

Rice shake dyed Easter eggs come out speckled and are easy to do with kids. Fill a sandwich size zipper bag with 1/2 cup of rice and 10 to 12 drops of food coloring per color. Roll each hard-boiled egg in a small bowl of vinegar first to help the color set. Drop the egg in the bag with another 1/2 teaspoon of vinegar, seal it tight and gently roll and shake until it’s coated. Set the eggs on a paper towel lined tray. Reuse the rice with fresh drops.
Get the full tutorial at On My Kids Plate.
9. Dye Easter Eggs with Kool-Aid

This Kool-Aid egg dye uses no vinegar at all, just drink mix and water. Hard boil the eggs, then mix each packet with 2/3 to 1 cup of water in a container deep enough for dipping. Cherry and Mixed Berry give the best reds and pinks, and Orange works well too. Lemon is weak, so yellow eggs need a long soak, and Grape turns out a muddy color, so skip it. Use a spoon or dipping tongs to lift the eggs out. A packet runs about 20 cents.
Get the full tutorial at Passion for Savings.
10. DIY Marbled Indigo Eggs

DIY marbled indigo eggs use a single shade of navy nail polish for a calm, shibori style look. Fill a plastic container three quarters full with room temperature water, since cold water sinks the polish. Add a few drops of fresh polish and stir lightly to make a marble pattern. Dip a faux or blown egg under the surface and swirl it out, wearing gloves. More drops give darker coverage. Push pins into a block of foam for a handy drying rack. Don’t eat polish-covered eggs.
Get the full tutorial at Alice and Lois.
11. Sharpie Tie Dye Easter Eggs

Sharpie tie dye Easter eggs borrow the classic t-shirt trick. Start with room temperature eggs, since cold ones sweat and the ink won’t behave. Color the whole egg with bright permanent markers, and the more you cover, the better it looks. Then slowly drip rubbing alcohol over it with an eye dropper and watch the colors bleed and blend. Work over a tray in a well ventilated room. Metallic markers won’t bleed, so skip those. These are decoration only, not for eating.
Get the full tutorial at Housing a Forest.
12. Food Coloring Eggs With Resist Designs

Food coloring eggs with resist designs start with a basic homemade dye. Mix hot water, vinegar and 10 to 20 drops of food coloring per cup, using 2 teaspoons of vinegar for dark shades, 1 for medium and none for pastels. Before dipping, wrap eggs with rubber bands, draw on them with white crayon or press on stickers. Dip for 30 to 45 seconds for pastels or up to 6 minutes for deep color. Peel off the stickers and bands to reveal stripes, hearts and bunnies.
Get the full tutorial at Happiness is Homemade.
13. Easter Egg Dyeing with Grass and Flowers

Easter egg dyeing with grass and flowers leaves white leaf prints on a deep green egg. Pick small leaves, ferns, clover and flower heads from the garden after a spring rain. Press each one flat against a damp egg, wrap it snugly in a piece of stocking and tie it off so the leaf stays put. Dye the eggs in a single green bath, because one color shows the prints most clearly. Unwrap them once dry and every egg carries its own little botanical silhouette.
Get the full tutorial at Krokotak.
14. Natural Herb Stenciled Easter Eggs

Natural herb stenciled Easter eggs use three dyes straight from the kitchen. Boil 1 tablespoon of turmeric in 3 cups of water for yellow, and 2 cups of chopped red cabbage in 3 cups of water for blue, then cool and add a tablespoon of vinegar to each. Lay damp cilantro, dill or parsley flat on hard-boiled eggs and hold them on with stocking and rubber bands. Soak in jars in the fridge for 8 to 24 hours. Onion skins give fast rusty red.
Get the full tutorial at Upstate Ramblings.
15. Sharpie Tie-Dye Easter Eggs

This Sharpie tie dye version wraps the egg in color instead of drawing on it. Lay a piece of plastic wrap on a tray and color three or four separate patches on it with permanent markers. Spray the ink with rubbing alcohol so it starts to blend. Set a white hard-boiled egg or plastic egg in the middle, wrap the plastic around it and wiggle it so the color transfers. Unwrap and let it dry. Keep to three or four colors so they don’t turn muddy.
Get the full tutorial at One Little Project.
16. Melted Crayon Easter Eggs

Melted crayon Easter eggs work best on eggs fresh from the pot. Shave old crayons into small pieces first. While the eggs are still hot, sprinkle the shavings on top and watch them melt into bright streaks and splotches. If your eggs have cooled, rewarm them in boiling water for a minute. A paper plate keeps the mess contained, and a pinch of glitter on warm wax adds sparkle. Little ones need help here, since hot eggs and melting wax can burn fingers.
Get the full tutorial at Housing a Forest.
17. Baking Soda Easter Eggs

Baking soda Easter eggs turn egg dyeing into a fizzy science experiment. Cover the bottom of a container with about 1/2 cup of baking soda and mix in a tablespoon of powdered tempera paint. Set a hard-boiled egg on top, then slowly pour in 1/4 cup of vinegar. The mix bubbles up in colored foam that coats the whole egg. When the fizz settles, fish the egg out with tongs and dry it in an egg carton. Tempera isn’t food safe, so don’t eat these.
Get the full tutorial at Mess for Less.
18. Rainbow Easter Eggs the Easy Way

Rainbow Easter eggs the easy way skip the dipping cups altogether. Set a few dry hard-boiled eggs in a stainless steel colander in the sink and pour white vinegar over them. Right away, before the vinegar dries, drop food coloring straight onto each egg and swirl the colander gently to coat. For ultra vibrant color, lift them out with tongs and dry them on a paper towel lined baking sheet without rinsing. Rinse first for lighter, brighter shades. Neon colors work beautifully here.
Get the full tutorial at No. 2 Pencil.
19. Watercolor Easter Eggs

Watercolor Easter eggs are made by spooning dye over the egg instead of dunking it. Soak cooled hard-boiled eggs in half water, half vinegar first. Mix at least three colors, about 10 to 12 drops of food coloring per cup of water, adding extra water for lighter tints. Rest each egg on a bottle cap, spoon the darker colors over most of it and let it dry. Then fill the gaps with lighter shades. A hair dryer speeds up the drying between layers.
Get the full tutorial at Spoon Fork Bacon.
20. Baking Soda Paint Easter Eggs

Baking soda paint Easter eggs end up swirled like tie dye and are still safe to eat. Mix 2 tablespoons of baking soda with 4 or 5 drops of food coloring and splash in water until it’s like runny school paste. Stick to red, blue and yellow so the blends stay bright, and use plenty of yellow. Brush the paint all over a hard-boiled egg, slip it into a sandwich bag and refrigerate 4 to 12 hours. Rinse until clear, dry and buff with a little oil.
Get the full tutorial at Dream a Little Bigger.
21. 5-Minute Painted Easter Eggs

Five minute painted Easter eggs start with colored ceramic eggs, so there’s no boiling and no smell. Press a peel-and-stick stencil onto the egg, smoothing it down as best you can around the curve. Fill in the open areas with a white paint marker, let it dry and add a second coat. Peel the stencil off and clean up any seepage with a toothpick or cotton swab. A Cricut can cut custom stencils from vinyl. Wooden eggs work too once painted a base color.
Get the full tutorial at The Country Chic Cottage.
22. Tissue Paper Dyed Easter Eggs

Tissue paper dyed Easter eggs need just eggs, water and the right kind of tissue. Look for bleeding tissue paper, because the gift wrap kind won’t transfer any color. Dip small pieces in water and smooth them onto the egg, overlapping until it’s covered. Cut a paper towel tube into rings to hold the eggs upright while they dry. Once they’re completely dry, peel the tissue away to reveal soft blotches of blue, purple and pink. It’s far less messy than a dye bath.
Get the full tutorial at Moments of Mommyhood.
23. Cool Whip Dyed Easter Eggs

Cool Whip dyed Easter eggs come out with soft, swirly tie dye colors, and they’re safe to eat. Soak cooled hard-boiled eggs in vinegar for 5 to 10 minutes, then dry them. Spread whipped topping about an inch thick in a flat dish, dot food coloring all over and swirl it lightly with a knife, stopping before it all turns one shade. Roll each egg in the cream until covered and chill for 10 to 15 minutes. Wipe off with paper towels instead of rinsing.
Get the full tutorial at On My Kids Plate.
24. How to Decorate Easter Eggs With Silk Neckties

Silk neckties can print their patterns right onto an Easter egg. Look for 100% silk ties at a thrift or consignment shop, because the fabric has to be pure silk for the colors to transfer. Wrap each egg in a piece of the tie fabric and wind thread around it to keep everything snug and intact. Boil the bundles in a water and vinegar solution, let them cool and unwrap. Every egg turns out different depending on the fabric and how you wrap it, so each one is a fun surprise. Silk shirts and scarves work too!
Get the full tutorial at DIY JOY.