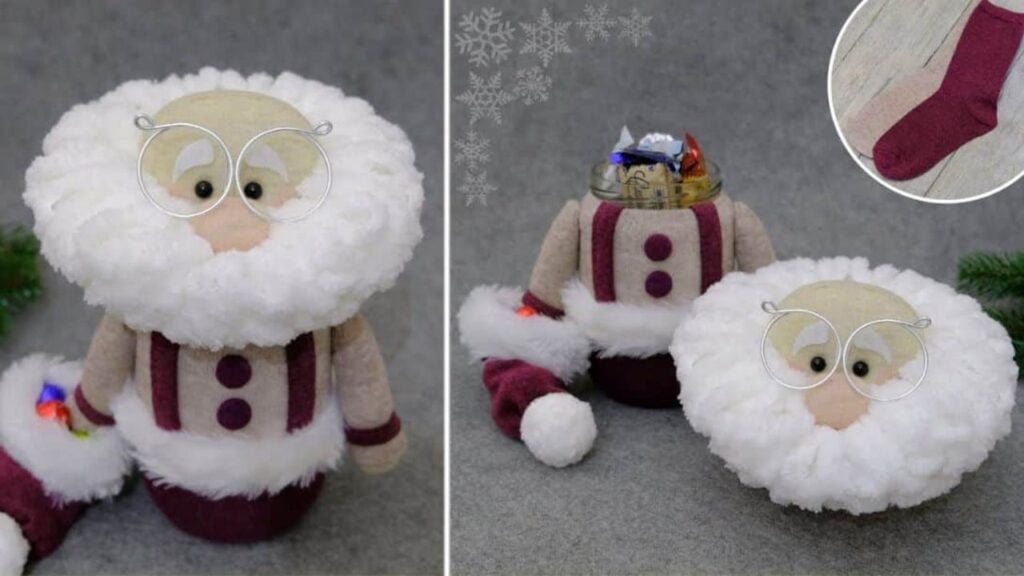
Recycle your old jars and socks and turn them into this DIY Santa chocolate gift jar! This adorable and creative idea is by Moth Art on Youtube. Kids will surely love and appreciate this cute little present for Christmas! You can put their favorite chocolate, candies, or even small accessories inside. Watch the video below for full instructions.
Materials:
- jar with lid
- 2 burgundy socks
- 1 light beige sock
- 1 dark beige sock
- filler
- artificial fur
- felt
- black beads
- yarn
- aluminum wire
- buttons
- hot glue
- paper
- thread and needle
[social_warfare buttons=”facebook,pinterest,twitter,whatsapp”]
Instructions:
Step 1:
Cover the sides with filler. Use hot glue to secure it in place. Trace the jar on a piece of paper and make a smaller one inside. Cut the small circle and glue it on the bottom of the jar.
Step 2:
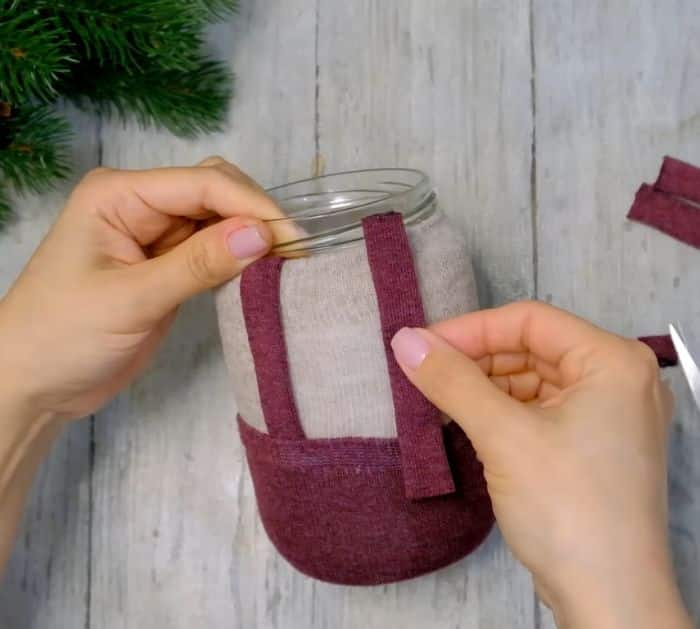
Cover the jar with the dark beige sock, and insert it from the bottom. Use a needle to fix the filler. Cut the excess fabric and glue it on the bottom of the jar.
Step 3:
Take one of your burgundy socks and flip it right side out. Measure from the middle of your jar to the center on the bottom, then mark it on your sock. Draw a curve on that end. Secure it with a pin and sew the curve. Put it into the bottom of the jar. On the foot part of your sock, remove the heel and the curved front. Cut it into pieces. Get one and cut it again in half – do the same for the other. Glue it on one end and fold the other end to make strips. Glue one strip on the left of the jar from the top of the light beige sock to the burgundy. Repeat on the right side. Make the last two strips into a cross on the back.
Step 4:
Place the lid and mark the center of the two strips. Remove it again. Get the curve part of the dark beige sock and fill it with fillers. Glue the ends around the lid.
Step 5:
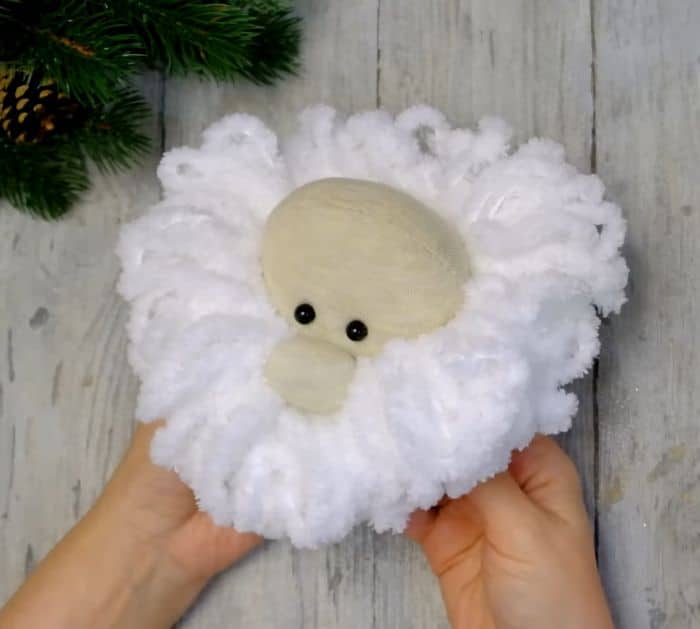
Get the light beige sock and make the nose of Santa. Cut a small oval, stitch the edges, fill it with filler then sew to close. Stitch to the head. Next, sew the beads for the eyes.
Step 6:
Wrap artificial fur around rectangular cardboard and sew one edge from top to bottom. Remove it from the cardboard and glue it on the head of Santa for his beard. Cut two small oval shapes from felt for his eyebrows then glue them in place.
Step 7:
Make Santa’s arm using dark and light beige socks.
Step 8:
Wrap artificial fur around the middle of the jar for its belt.
Step 9:
Make the hat using the other dark burgundy sock. Use the artificial fur on the top for the pompom and around the bottom of the hat.
Step 10:
Glue the buttons o the body of Santa. Lastly, form an eyeglass using an aluminum wire.
Step 11:
Fill the jar with chocolates and place the hat on the head.
DIY Santa Chocolate Gift Jar


