Store-bought pots add up fast, and these 43 DIY outdoor planters prove your flowers can look better for less. Hang an old tire on chains and fill it with petunias, stain a set of window flower boxes or paint cinder blocks for about a dollar each. There’s a wooden truck planter, a vintage colander on the porch, a tiered herb tower of terra cotta pots and planters that hold up string lights over the yard. Every idea here lives outside, in the garden, on the porch or along the fence. Grab your potting soil, because these are too fun to stop at one! Looking for something for your houseplants? See these DIY indoor planters.
1. DIY Tripod Planter

This DIY tripod planter comes from a project in the book The New Bohemians, and the clever part is the bowl: an old wooden salad bowl set on three tapered wooden legs, the kind you can find in the vintage section on Etsy. Drill a hole in the center of the bowl for drainage, then spray the inside with a weatherproof varnish so it holds up to watering. Fill it with succulents, portulaca and trailing creeping Jenny so something spills over the rim. It sits at side table height, which makes it perfect between two patio chairs.
Get the full tutorial at In Honor Of Design.
2. DIY Solar Light Planters

DIY solar light planters stack two terra cotta pots with a garden solar light rising out of the top. Use a 10 inch or larger pot for the base and an 8 inch or smaller pot on top, both with drainage holes. Paint them first with multi-surface acrylic: house numbers make a handy porch marker, or drag a nearly dry chip brush across for a weathered look, then tape off the rim and paint a solid band. Fill the big pot with soil, push the light’s long stake through the small pot’s hole, set it in place, then plant both tiers.
Get the full tutorial at Average But Inspired.
3. Rope-Wrapped Pots

Rope-wrapped pots dress up plain terra cotta with nothing more than rope, hot glue and a little leftover paint. Start at the top rim and glue the rope down as you coil it around the pot, working all the way to the bottom. Snip the end and tuck it under a dab of glue so it doesn’t unravel. Then brush a band of latex paint over the lower rows of rope for a pop of color; leftover front door paint is perfect here. A pair makes a simple centerpiece for an outdoor table.
Get the full tutorial at House by Hoff.
4. Three Tiered Summer Planter

A three tiered summer planter stacks three spray painted terra cotta pots into a tower of blooms. Put rocks in the bottom of the largest pot for drainage and extra height, then flip a plastic pot liner upside down inside it as a stand for the middle pot. Fill with potting soil, set the middle pot on the liner and repeat for the top tier. Plant the bottom ring first, then the middle, then the top. A pinch of fertilizer in each hole helps. Terra cotta dries fast, so plan on daily watering in full sun.
Get the full tutorial at House by Hoff.
5. DIY Floating Planter For Water Gardens And Ponds

This DIY floating planter for water gardens and ponds is cut from 2 inch polystyrene board. Glue two circles together for the base, then build a 2 inch wide rim from more board and glue it on top. Drill four weep holes in the sides for rain, spray paint it black with water-based paint and line the bottom with capillary matting. A strip of matting threaded through a 1 inch hole wicks pond water up to the roots. An eye bolt underneath, tied to a concrete block, keeps it from drifting. Sun-loving annuals thrive here.
Get the full tutorial at Garden Therapy.
6. DIY Criss Cross Outdoor Planters

DIY criss cross outdoor planters are tall square boxes with an X on every side, built from pine and poplar. Each one uses twelve 1×6 side boards at 21.5 inches, four 2×2 legs at 24 inches and 1×2 strips cut at angles for the criss cross pattern. The sides go together with a brad nailer, then pocket holes from a Kreg Jig join the four panels. A slatted shelf about 14 inches below the top holds the pot, so you need far less soil. Sand the corners, prime and paint. They frame a pair of French doors beautifully.
Get the full tutorial at Centsational Style.
7. $40 Tiered DIY Planter Box
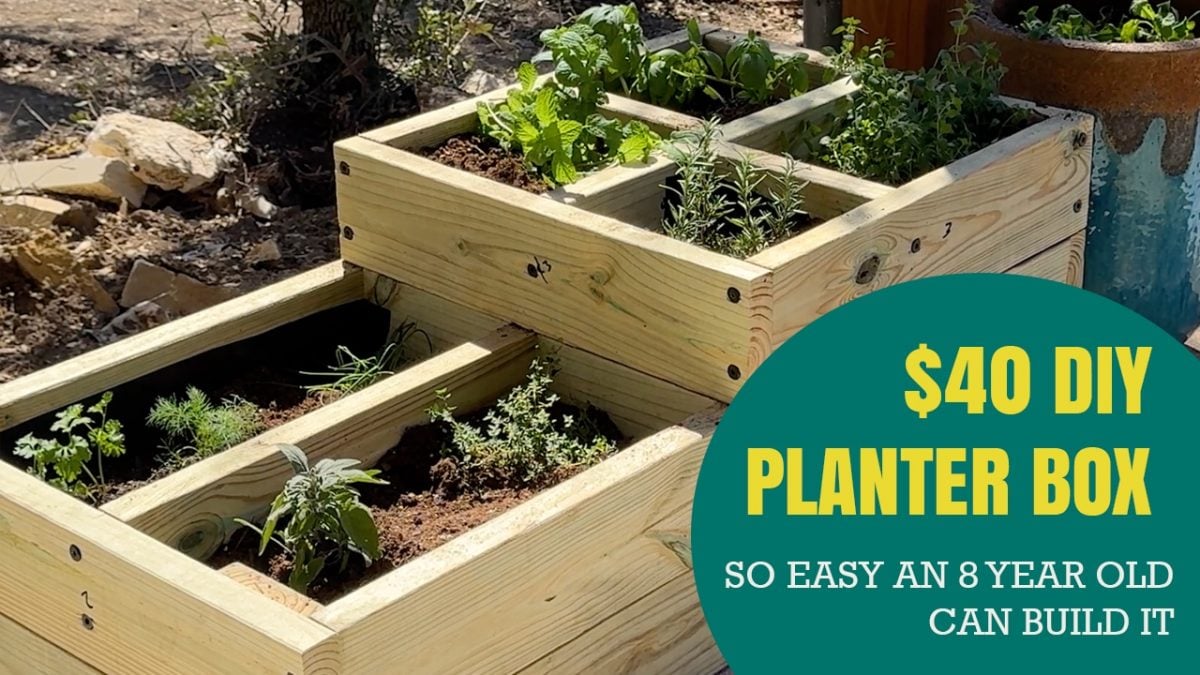
This $40 tiered DIY planter box looks like a high end garden bed, but it’s built from just five 2×6 boards, a saw, a drill and some screws. Two stacked tiers with dividers give you separate pockets, so herbs, vegetables and flowers each get their own space. The raised top tier puts plants within easy reach, and the design is simple enough for a beginning woodworker to finish in about an hour. It fits a patio, a balcony or a small yard. The full video walks through every cut.
Get the full tutorial at DIY JOY.
8. Winter Porch Pots

Winter porch pots are one of the quickest holiday decorations there is, and you can make them from greens bought at a nursery or trimmed from your own yard. Home improvement stores will often hand over Christmas tree cuttings if you ask. Push curly willow or twigs about 3 to 4 inches into the center of a pot of soil, then add noble fir at the back, pine through the middle, cedar draping over the edge and juniper for blue berries. An old fall container works too; cut the mums down and use them as an anchor. Water once and the freezing locks everything in place.
Get the full tutorial at House of Hawthornes.
9. Pallet Bird House Planter

This pallet bird house planter puts a little birdhouse in the middle of a wooden planter box, with a flower bed on each side. Reclaimed pallet wood gives it a rustic, weathered look and keeps the cost close to free. Since a birdhouse lives outdoors year round, the build needs to be sturdy and durable enough to stand up to sun, rain and wind. Plant vinca, petunias or herbs in the side boxes and set it on a deck rail, a garden bench or a fence post where the birds can find it.
Get the full tutorial at DIY JOY.
10. $20 Tall Planters

These $20 tall planters are tapered wooden boxes built from dog ear fence pickets, about $1.58 each, plus a few scrap 2x2s. Cut each board with a slight 3.5 degree angle on both ends so the box narrows toward the bottom. Glue and brad nail the pickets into six stackable squares, overlapping one end and underlapping the other so each square stays even. Rip a few more pickets into strips to hold the stack together. A 15 inch square plastic pot sits inside, so you never fill the whole tower with soil.
Get the full tutorial at Bower Power.
11. DIY Flower Tower

A DIY flower tower turns one big pot into a column of blooms about 4 feet tall. Roll welded wire fencing (14 or 16 gauge) into a tube, line it with landscape fabric and close it with zip ties, then stand it in a pot at least 12 inches wide. Fill the tube with potting soil, and buy the big bag. Cut small slits in the fabric and tuck in plants all the way up; one porch tower held 115 pansies. Good tin snips make the wire much easier. Petunias are another great option.
Get the full tutorial at Simply Designing with Ashley.
12. DIY Vertical Plant Hanger

A DIY vertical plant hanger strings potted plants one above another on rope, perfect for a small porch or balcony. Cut scrap wood into squares about an inch wider than each pot on every side, then trace the pot’s rim and cut a circle 1/4 inch smaller so the pot drops in and rests on its lip. A jigsaw does the curve once you drill a starter hole. Drill a 3/8 inch hole in each corner, sand and stain, then thread rope through all four corners and gather it at a metal ring.
Get the full tutorial at The Inspiration Board.
13. Chevron Two-Tiered Vertical Planter

This chevron two-tiered vertical planter is a free-standing wooden stand with two long planter boxes, so you don’t need a fence to mount it on. The frame is pressure-treated lumber, which handles life outdoors; cedar and redwood are good alternatives. Diagonal boards on the front, back and sides form the chevron pattern, and every piece is cut at 45 degrees, so there are no tricky angles. Measure, mark and cut as you go for the best fit. If you want to paint or stain treated wood, let it dry out for several weeks first.
Get the full tutorial at The House of Wood.
14. DIY Pig Planter From Plastic Bottles
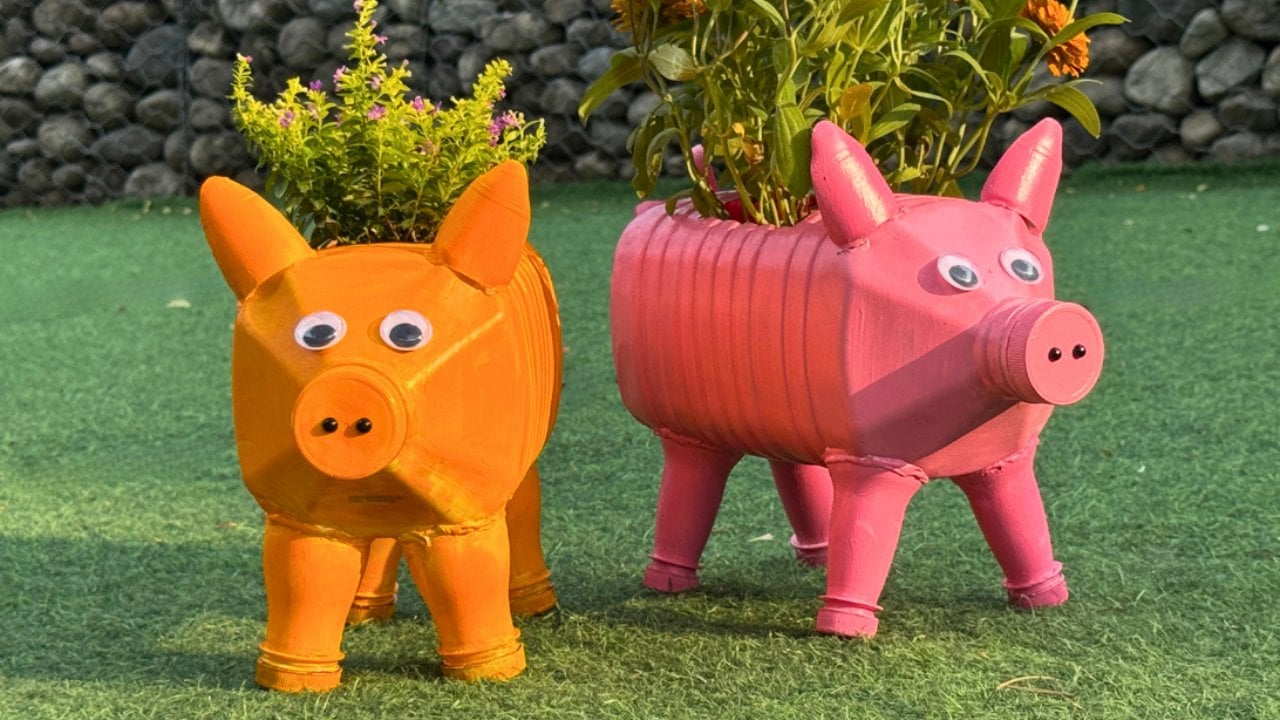
This DIY pig planter starts as an empty plastic gallon jug, with four small plastic bottles cut down for the feet. Prime the whole thing first, caps and gaps included, so the paint grips the plastic and lasts outdoors. Then paint it any color you like and add the eyes and snout details. The gallon size leaves plenty of room for flowers, herbs or small succulents, and a piece of cardboard inside cuts down on soil and weight. Kids can help paint and plant, but an adult should handle the cutting.
Get the full tutorial at DIY JOY.
15. DIY Garden Planters Using The Front Of Locker Drawers

These DIY garden planters use the fronts of old metal locker drawers, the kind you can find at a Habitat for Humanity ReStore. Each front becomes the face of a wooden box. For a 21 inch locker front, cut a 1×8 at 21 inches for the bottom, two 1×6 pieces at 7.5 inches for the sides and a 1×6 at 21 inches for the back. Drill through the metal lip and screw it to the bottom board, then build the box behind it. Paint each locker a bold color for a cheerful stack.
Get the full tutorial at Within the Grove.
16. Repurposed Corner Cabinet Planter

A repurposed corner cabinet planter gives an old pair of kitchen cabinet doors a second life on the porch. The two doors stand at a right angle, and scrap wood shelves fit between them, traced and cut with a circular saw. Faux drawer fronts cut from 1×4 with 45 degree ends finish the front, and a pocket-hole jig joins each corner shelf to the doors. Sand everything, paint it in bright colors and tuck potted flowers onto the shelves. It fits neatly into a porch corner that usually goes unused.
Get the full tutorial at My Love 2 Create.
17. DIY Colorful Vertical Garden On A Fence

A DIY colorful vertical garden on a fence is one of the fastest ways to brighten a dull wooden fence. Tape off the rim of each terra cotta pot with painter’s tape and spray paint the body, varying the colors from pot to pot. Once they’re dry, peel the tape for a crisp natural band at the top. Screw flowerpot hangers to the fence with a cordless drill and wood screws, measuring as you go so the rows line up. Drop the pots into the rings and plant herbs, flowers or trailing greens.
Get the full tutorial at Shelterness.
18. Pretty Picket Planter

A pretty picket planter is a bottomless box made from leftover fence pickets that slips right over a plain pot. Cut the pickets to 14 inches and trim the tops to mimic the original pointed shape. Three pickets make each side, 12 in all. Build a simple square frame from scrap wood, measuring your three pickets side by side to size it, then nail the pickets on. A little construction adhesive on the frame helps it stand up to hot, humid weather. Add a bottom and liner if you’d rather plant it directly.
Get the full tutorial at Clover House.
19. DIY Garden Planter And Birds Bath

This DIY garden planter and bird bath threads painted terra cotta pots onto a length of rebar. You’ll need one 8 inch pot for the base, four 6 inch pots, one 4 to 5 inch pot, primer and spray paint, and a glass globe from an old ceiling light for the bath. Add 24 inches to the total height of your pots to get the rebar length, then hammer it at least two feet into the ground. Tilt the pots as you stack them, plant, then glue the globe on top with aquatic adhesive.
Get the full tutorial at Home Stories A to Z.
20. Garbage Can Flower Planter

A garbage can flower planter might be the easiest and cheapest planter here, about $5 and 15 minutes. Old galvanized trash cans get hammered copper spray paint on the handles and rim for a little shine. The smart part is what goes inside: rather than filling a huge can with heavy dirt, flip a 5 gallon bucket upside down in the bottom and set a pre-planted hanging basket on top. When summer ends, lift out the basket and the cans stack for winter storage. Keep an eye out at the curb and at garage sales.
Get the full tutorial at The Lilypad Cottage.
21. $10 Cedar Tiered Flower Planter or Herb Garden

This $10 cedar tiered flower planter or herb garden is built from three 5-1/2 inch cedar fence pickets and two 1×2 boards. Build three simple boxes, stapled, brad nailed or screwed together, then attach them to the 1×2 supports stepping down like stairs. A scrap spacer keeps the gaps even when you add the lower boxes. Drill drainage holes in every bottom. Cedar handles the weather on its own, so you can skip the finish entirely, or paint or stain it if you like. It makes a handy herb garden by the door.
Get the full tutorial at Ana White.
22. Custom Potted Hanging Herb Garden DIY

This custom potted hanging herb garden is a set of floating wood shelves strung on threaded rod. It uses five 24 by 5.5 inch planks of old pallet wood, eight 36 inch threaded rods, couplings, nuts, washers and crown bolts. Cut 3.5 inch holes with a hole saw so small pots drop in, and drill a hole an inch in from each corner for the rods. Bolt the rods to a ceiling or porch beam and thread the shelves on, locking each with a washer and nut. White pots with a gold dipped edge finish it.
Get the full tutorial at Fresh Mommy Blog.
23. Chalkboard Planters With Folk Art Stencils And Paint

Chalkboard planters with FolkArt stencils start as plain terra cotta pots with a light coat of white spray paint. Brush on acrylic paint in soft colors, building up thin coats until the coverage looks even, then seal with gloss Mod Podge. Trim the top of a bird stencil so it wraps flat around the pot, mist the back with spray adhesive and dab chalkboard paint over it with a spouncer. Go light, because heavy paint seeps under the stencil. Condition the dry chalkboard with chalk, wipe it clean and label each pot.
Get the full tutorial at Tried & True Creative.
24. Pallet Planter Box For Cascading Flowers

This pallet planter box for cascading flowers is built to grow a wall of wave petunias under a window. Four 2×4 legs at 40 inches hold a 2×2 support 20 inches down, with 1×4 boards across for the bottom. Pallet slats at 40 inches form the front and 16 inches the sides; screws hold up better than brad nails once the wood gets wet. Drill rows of 2 inch holes in the front with a hole saw, then plant a row, cover with soil and repeat. Water daily, since the holes dry the soil fast.
Get the full tutorial at Her Tool Belt.
25. $12 DIY Planter Boxes

These $12 DIY planter boxes follow a classic square planter plan with finials, and a pocket-hole jig makes them go together like a kit. The cut list is four 2×2 legs at 18 inches (20 inches looks even better), sixteen 1×4 side boards at 15 3/4 inches and ten 1×2 slats for the bottom. Drill pocket holes on the side boards, start the top board just below a mark 1.5 inches down each leg, and use a spacer to keep the rows even. Stain them dark and set one on each side of the garage door.
Get the full tutorial at Gathered In The Kitchen.
26. Stained Window Flower Boxes

Plain white window boxes are fine, but these grooved, stained ones are so much prettier! Each box takes about three 1×4 boards, roughly $15 in lumber. Rip the boards into strips and round over every front and side edge with an orbital sander to get that shaped look, sizing the bottom, back and trim to your own window. Two coats of walnut stain and three of spar varnish, inside and out, protect the wood. Line with landscape fabric and hang on galvanized L brackets. Perfect for trailing flowers under a sunny window.
Get the full tutorial at Kruse's Workshop.
27. Pallet Wood Planter Box

Here’s the trick to a pallet wood planter box: build it around a plastic planter you already own. Two L-shaped end pieces hold the plastic liner from underneath, and four equal pallet boards nail across them with a brad nailer. Stick on vinyl stencil letters, dry-brush paint over the whole box, then peel the letters away and the bare wood shows through as rustic lettering. A few coats of polycrylic help it handle watering. Perfect for a deck railing, porch steps or a farmhouse garden look.
Get the full tutorial at House by Hoff.
28. Vintage Colander Planter

An old enamel colander makes the sweetest hanging planter, and the drainage holes are already done! Clip a carabiner onto each handle, then twist heavy gauge jewelry wire around the clip and handle so nothing slides. Line the bowl with a couple of layers of cheesecloth to hold the soil without stealing planting space. Cut a chain with an odd number of links so the center link hangs from your porch hook. Enamel is heavy enough that it won’t swing around in the wind. Perfect for a thrifted porch makeover.
Get the full tutorial at Sadie Seasongoods.
29. Black and White Striped Pots

Want your front door to look like it belongs in a magazine? Black and white striped pots do it fast. Any square planter with flat sides works. Tape off the stripes using a scrap of wood as a spacer so the lines stay even, and press every edge down firmly. Painter’s tape is best, though duct tape works on a sturdy pot. Spray primer, two or three coats of glossy white and a clear glossy sealer, then peel the tape right after the last coat. Perfect for a bold, modern entry.
Get the full tutorial at Dimples and Tangles.
30. Painted Cinder Block Planters

Cinder block planters are the ultimate budget garden win, since each block costs about 99 cents in the hardscape aisle. Mark off a color block design with painter’s tape and brush on acrylic paint, giving it a couple of coats because the cement is porous. Gold and black both look sharp. Stuff the bottom of each opening with crumpled newspaper, set your succulents in plastic bags so the soil stays put, then press them in. Top with white rocks for a clean finish. Perfect for a patio corner or garden border.
Get the full tutorial at Little Miss Momma.
31. Front Porch Planter With Gold Dipped Legs

A classic porch planter box gets a little glam at the feet with gold dipped legs! Cut four 2×2 legs at 30 inches, then nail 1x4s between them to make two square frames, checking for square at every corner. Join the frames with more 1x4s and add cedar fence pickets cut to 20 inches for the side panels. Paint or stain it outdoor ready, then spray the bottom of each leg gold. Build two at once so both sides of the door match. Perfect for welcoming guests in style.
Get the full tutorial at Home Heart and Hands.
32. Old Kettle Planters

Old kettle planters might be the easiest project here, and they look adorable on a porch table or garden shelf. Dig through your junk stash or the thrift store for kettle-style containers, add potting soil and plant herbs like spearmint and thyme. A little Spanish moss over the soil adds texture and hides the dirt. Set a few kettles on rusty gears or other salvaged bits to vary the heights. Keep them close to the kitchen door for easy snipping. Perfect for a junk-chic herb garden!
Get the full tutorial at Funky Junk Interiors.
33. Pallet Trough Planter

Short on patio space? This pallet trough planter is about 4 feet long and only 6 inches wide, so it slides right up against a wall. Cut the two ends off a pallet, use one slat for the bottom and screw it all together in an afternoon. Give it a quick sanding and a light stain, but leave some of the shipping ink showing for character. Line it with landscape fabric, fill with container soil and plant tall rushes in the middle with geraniums around them. Perfect for a narrow deck!
Get the full tutorial at Sow & Dipity.
34. Terra Cotta Vertical Planter

Want a whole herb garden in one small spot? This vertical planter stacks five terra cotta pots, from 14 inches down to 6, on a matching base. Build it right where it will stay. Fill the biggest pot three quarters full, push a rod through the center holes and plant around the outer edge. Set the next pot inside, sitting a couple of inches down, and repeat all the way up. A wooden stake works as the rod, or try a tension rod if the stake is too thick. Perfect for parsley, thyme and basil by the steps.
Get the full tutorial at Grace and Good Eats.
35. Cedar Window Planter Box

No yard for an herb garden? A cedar window planter box brings fresh herbs right up to the glass. It’s built around a planter insert, so measure that first and add an inch to each side for the fence pickets that line the frame. Cedar 1×4 frames go on top and bottom with wood glue and brad nails, and the pickets leave a ½ inch gap below and ¼ inch above so the insert’s lip sits on the rim. Decking screws mount it under the sill. Perfect for lettuce, basil and kitchen herbs!
Get the full tutorial at DIY JOY.
36. Raised Planter Box on a Stand
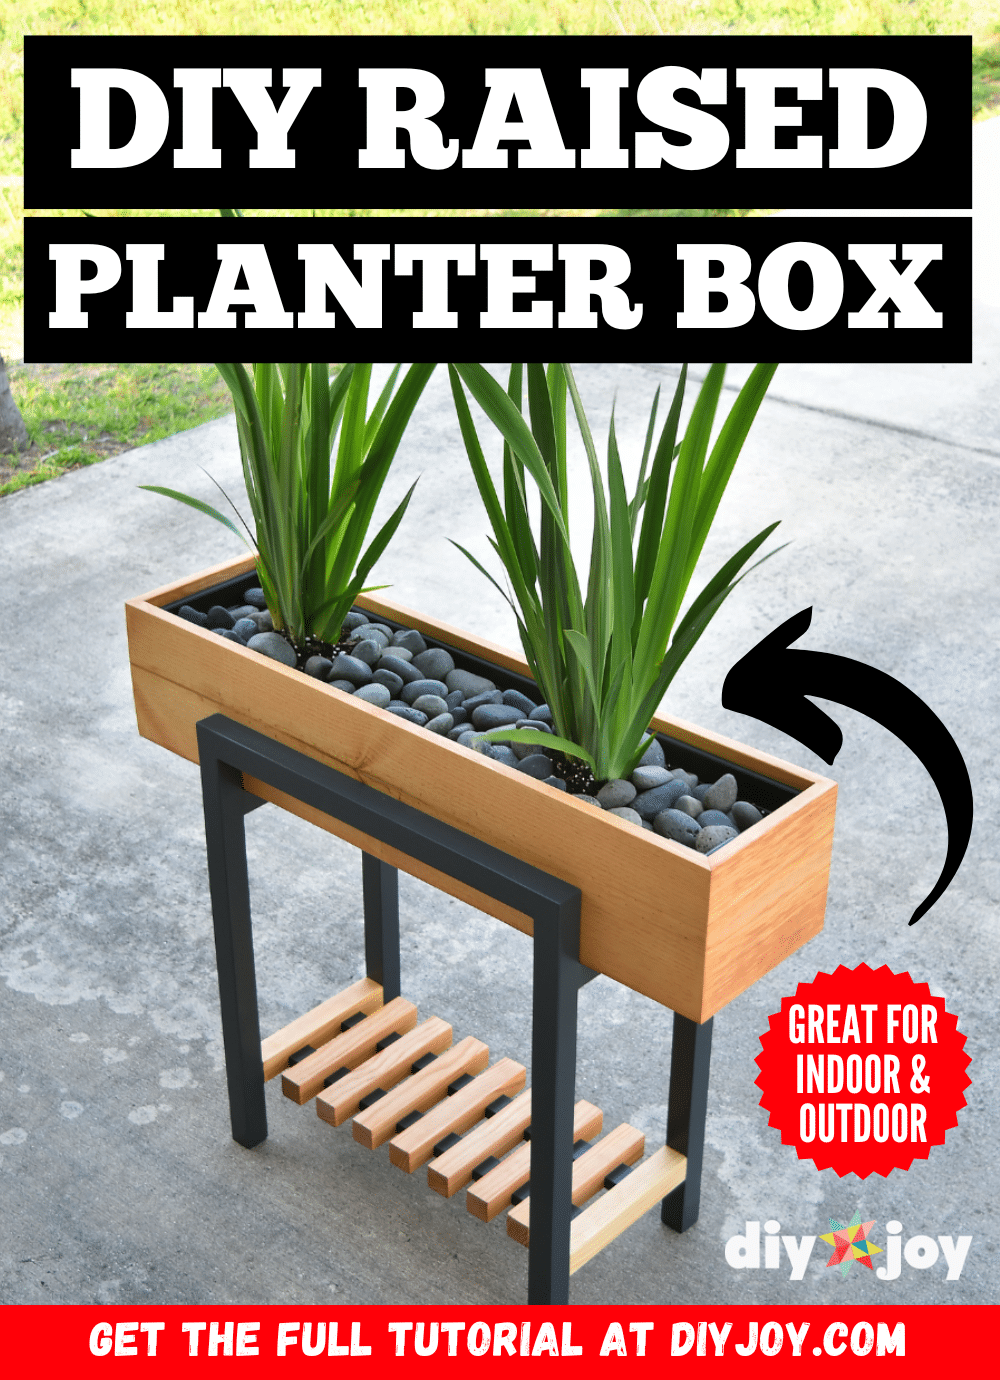
This raised planter box looks like it came from a pricey modern shop, and it’s a fun weekend build! A 2×2 stand gets glued, doweled and clamped, with a slatted shelf below for watering cans or extra pots. The box itself is board pieces joined with pocket holes and wood glue, then band clamped until dry. A pond liner and a plastic planter inside keep the wood dry. Sand, stain or paint, and you’re done. Perfect for a patio, porch or even indoors.
Get the full tutorial at DIY JOY.
37. Hanging Tire Flower Planter

That bald tire in the garage has one more job to do! Clean it well, cut it in half and paint each half any color you like. Punch holes at both ends, front and back, plus a few in the bottom for drainage. Run a chain through bolts at each hole and tighten with nuts, then repeat on the other end. Fill it with soil and cascading flowers, or plastic blooms if you’d rather skip the watering. Perfect for a porch beam or a big backyard tree!
Get the full tutorial at DIY JOY.
38. Concrete Vintage Camper Planter
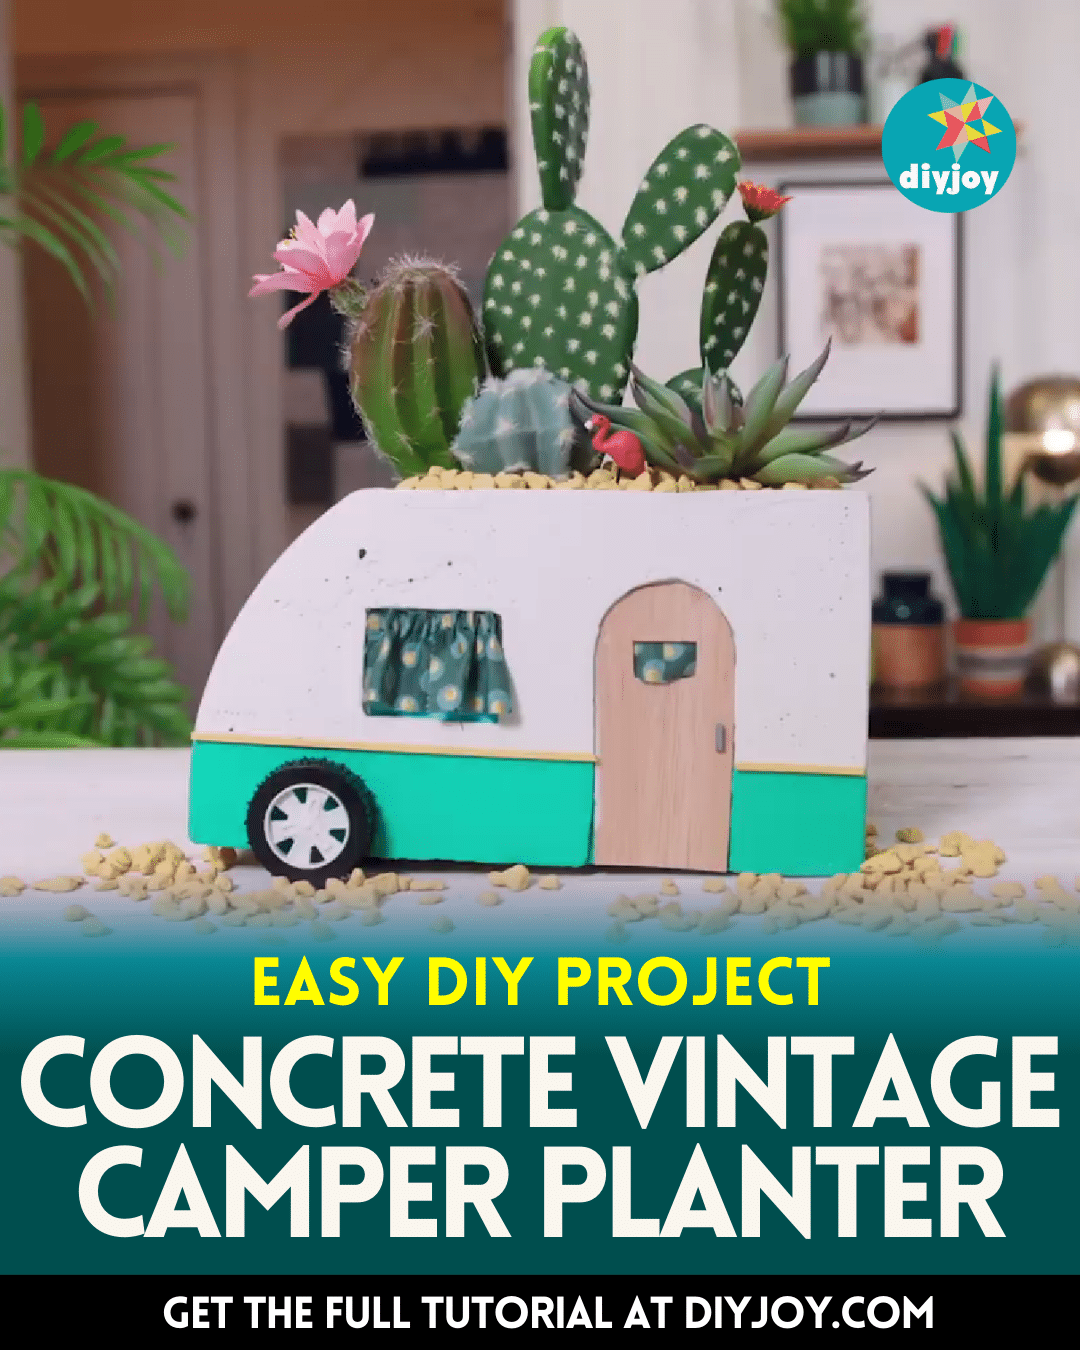
Is there anything happier than a tiny vintage camper full of cactus? This concrete planter is cast in a mold made from insulation board and scored cardboard, with a curved back traced from a round object. Oil the mold, pour in rapid set concrete and press a plastic container in to form the planting well. Sand it smooth, then paint on stripes, a door and a window, and add little wheels and a fabric curtain. Perfect for a patio table, porch shelf or anyone who dreams of road trips.
Get the full tutorial at DIY JOY.
39. String Light Planters

No trees or beams to hang string lights from? These planters solve it, and no digging required! Attach corner braces to the end of each wood post, screw a hook into the top and fasten the post to the bottom of a big planter. Pour fast-setting concrete around it, stopping several inches below the rim, and let it cure. Top with rocks, potting soil and plants, then drape string lights from hook to hook. Three posts make a cozy circle. Perfect around a fire pit or backyard seating area.
Get the full tutorial at DIY JOY.
40. Wooden Truck Planter
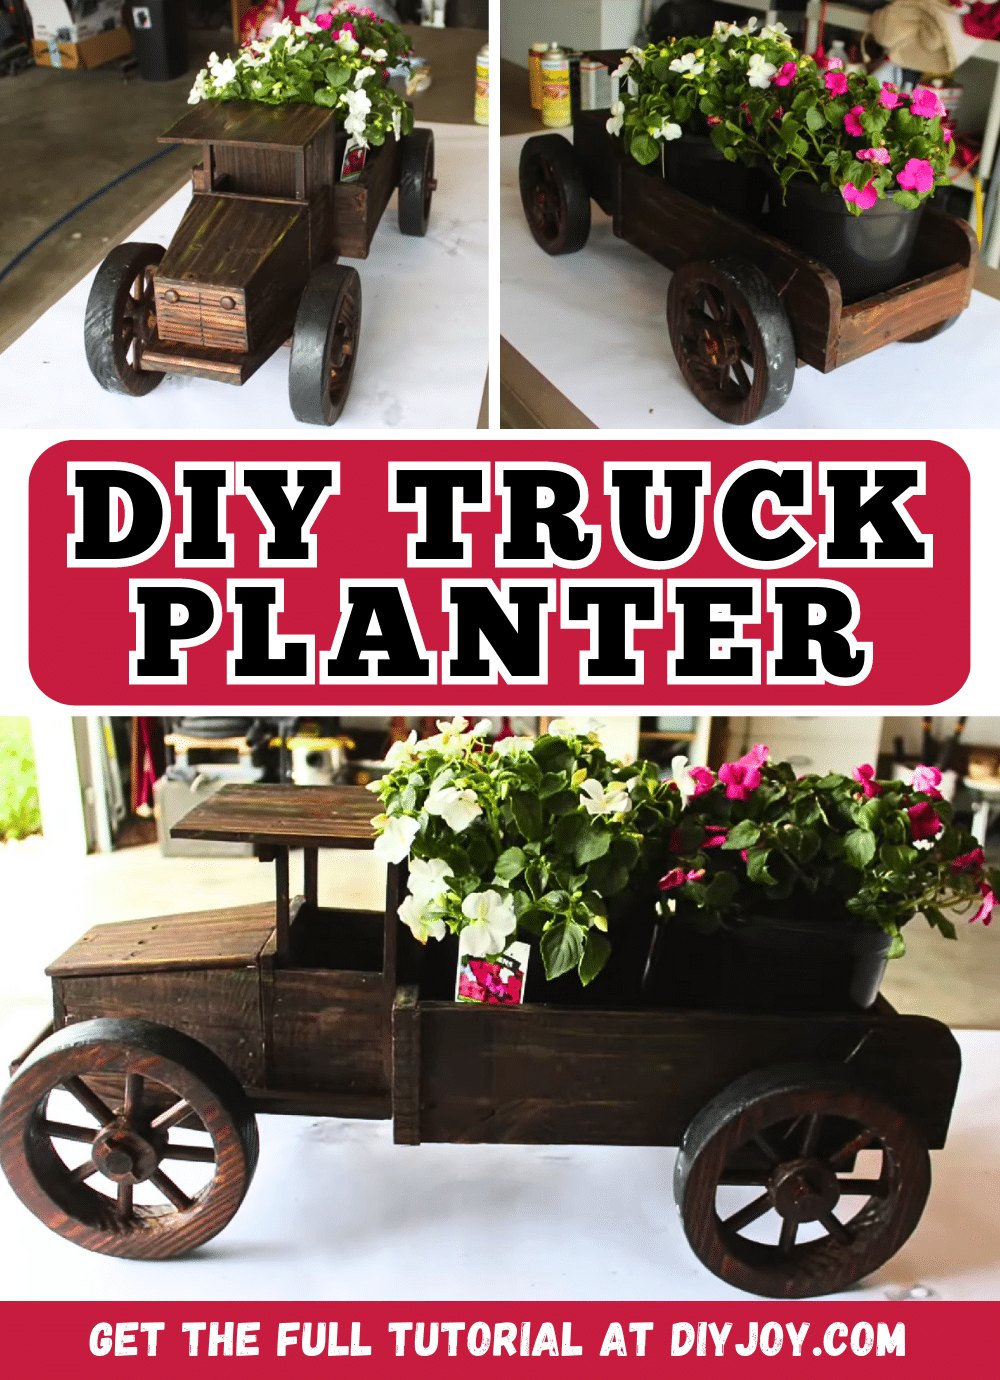
This wooden truck planter is charming, cheaper than store-bought and a great use for scrap wood! Pull any old nails and screws, cut the pieces to size and sand every edge. Glue up the base, then build the cab, the bed and the wheels, with a wooden rod as the axle and small wood pegs in place of nails. Pre-stain conditioner, wood finish and a water sealer protect it. Set a planter in the bed and fill it with flowers. Perfect for a porch step or garden bed.
Get the full tutorial at DIY JOY.
41. Vanishing Waterfall Planter

Want the showstopper of the garden? This vanishing waterfall pours water through three polyresin planter pots and disappears into a bed of rocks. Dig a flat four by four foot hole, line it with geotextile fabric and an LDPE pond liner, and fill the bottom with pea pebbles around a pump. Cinder blocks and galvanized mesh support the pots, and PVC fittings carry the water up. It’s a bigger project, but not as hard as it looks. Perfect for a garden that needs a focal point!
Get the full tutorial at DIY JOY.
42. Glowing Lit Planters

Want your planters to glow after dark? This viral idea makes an ordinary pot look high-end, and most of the supplies come from the dollar store. Tape remote-controlled fairy lights around the inside of a large planter, set a smaller planter in the center and wedge in a block of floral foam. Add your potted plant, then cover the gap with decorative rocks and artificial leaves. Click the remote and the whole pot lights up. Perfect for a porch, patio or front walk at night!
Get the full tutorial at DIY JOY.
43. Outdoor Macrame Plant Hanger
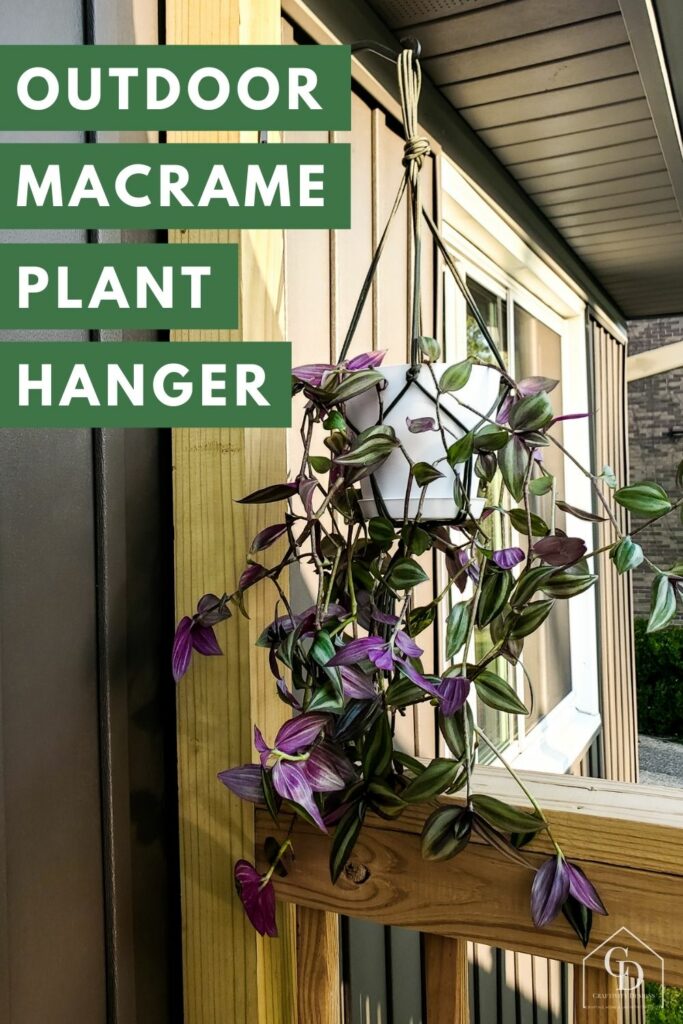
Macrame for the porch? Yes, when you make it with paracord! It won’t fade or fray in the weather, and the whole hanger takes about 25 minutes. Cut four strands at double the length you want, fold them and knot a hanging loop. Tie four knots near the pot’s rim, then four more lower down using strands from different knots, and gather all eight at the bottom. Melt the cord ends with a lighter so they stay neat. Perfect for trailing plants on a covered porch.
Get the full tutorial at Craftivity Designs.