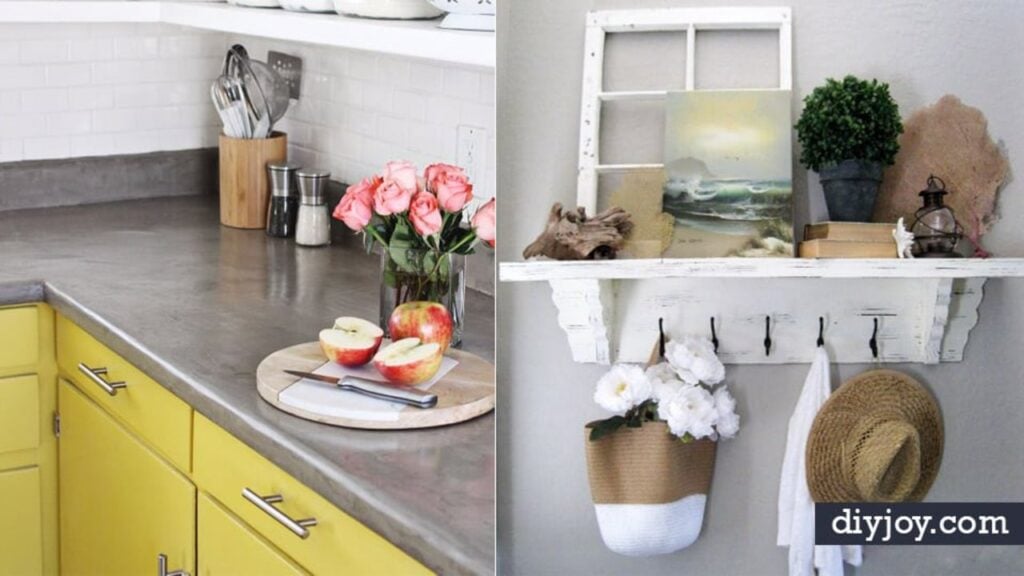
Cheap home improvement ideas have a reputation problem, because most of them still look cheap when they are done. These 35 do not. I am fluent with a sander, a jigsaw and my Dremel, I refinish and repaint constantly, and I have never built much of anything from lumber, so I judge a DIY home improvement project by one thing: can a normal person finish it over a weekend without buying a table saw. That is this whole list. Painted cabinets, a window shade made from a mini blind for twelve dollars, a concrete vanity top for about twenty, a builder grade mirror framed in an afternoon, a whole fireplace redone for one hundred ninety six dollars in materials, and the caulk trick that makes plain trim read as custom. Kitchen, bathroom, stairs, curb appeal, plus a few renter friendly ones that come straight back off the wall on moving day. Pick the room that bothers you most and start there.
Table of Contents
- DIY Home Improvement Projects
- 1. Paint Your Cabinets
- 2. Peel ‘n Stick Faux Shiplap Backsplash
- 3. DIY Budget Kitchen Cabinet Makeover
- 4. Easy DIY Window Trim
- 5. DIY Vanity Concrete Countertop
- 6. Dresser To Kitchen Island
- 7. DIY Reclaimed Wood Accent Wall
- 8. DIY Kitchen Cabinet Makeover
- 9. Concrete Countertop DIY
- 10. $60 DIY Barn Door Hardware
- 11. Chalkboard Paint Makeover
- 12. DIY Pendant Light Makeover
- 13. DIY Tile Backsplash
- 14. Old Door Upcycle
- 15. Paint Your Linoleum Floors
- 16. DIY Fireplace Makeover With Stone
- 17. Stenciled Floors
- 18. Paint Your Old Sink
- 19. The Trick to Caulking Baseboards
- 20. Make A Pallet Wall
- 21. DIY Staircase Makeover
- 22. Frame A Bathroom Mirror
- 23. Update Your Ceiling Fan
- 24. Temporary Board and Batten Accent Wall
- 25. $12 DIY Roman Shade Made From A Mini Blind
- 26. DIY River Rock Accent Wall
- 27. Easy DIY Patterned Drawer Makeover
- 28. Faux Thick Baseboard
- 29. Paint Your Stairs
- 30. Patch Drywall Like A Pro
- 31. DIY Garage Door Makeover
- 32. DIY Pendant Light Fixture
- 33. Front Door DIY
- 34. DIY Fireplace Makeover For Under $200
- 35. DIY Kitchen Island
DIY Home Improvement Projects
1. Paint Your Cabinets
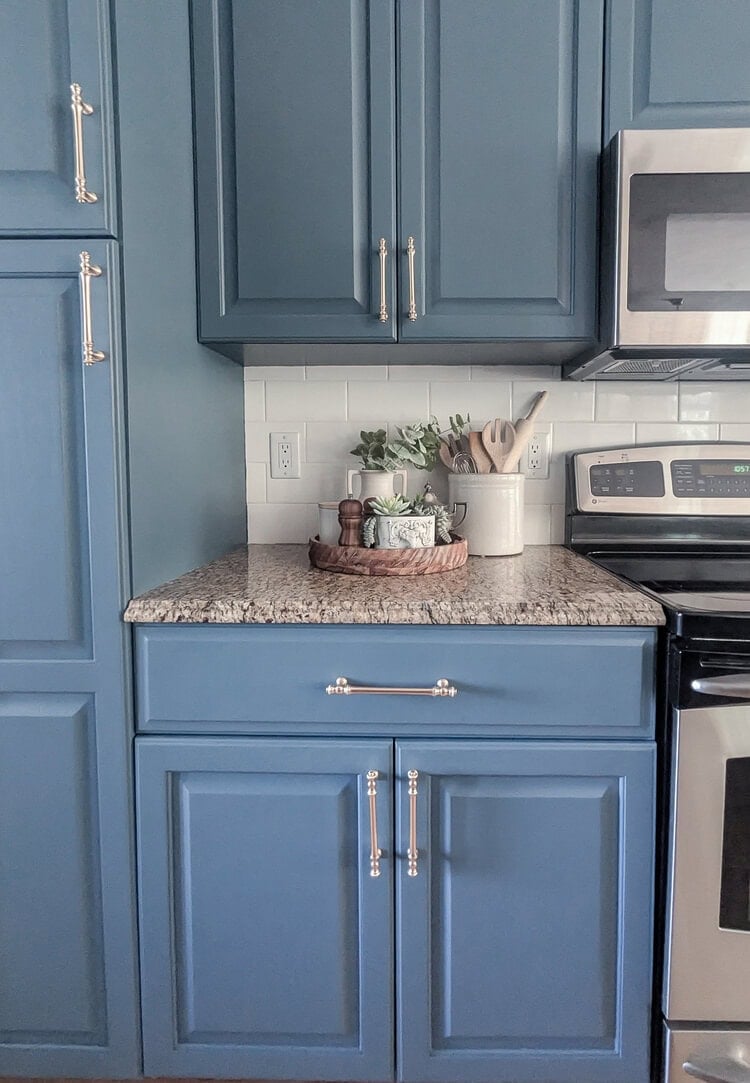
Repainting cabinets that were painted before is a different job from painting bare wood, and Lovely Etc. is one of very few blogs that says so out loud. Her prep is conditional rather than automatic: get the grease off first, then sand only if the old finish is glossy or failing, and prime only if something about your cabinets actually calls for it. Two to three coats of paint get you even coverage. She repainted her own white cabinets in Sherwin Williams Waterloo, a deep blue, and the room changed with nothing else in it touched.
Get the full tutorial at Lovely Etc..
2. Peel 'n Stick Faux Shiplap Backsplash
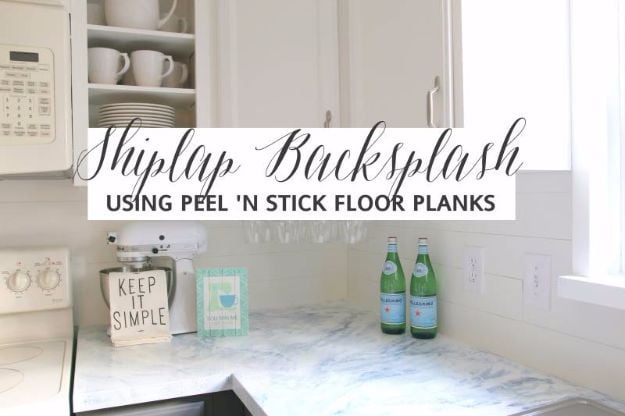
Sarah Lemp built a shiplap look backsplash out of vinyl peel and stick floor planks, and the whole package cost her about twenty dollars. She started on a clean dry surface, lined the first plank up with the counter and worked along to the corner, cutting the vinyl by scoring it with a craft knife. For the next row she cut a plank in half so the joints stagger, and spaced the rows using a penny. No tile, no tile cutter, no wet saw, no grout. It works on an island or a mudroom wall too.
Get the full tutorial at All Things with Purpose.
3. DIY Budget Kitchen Cabinet Makeover
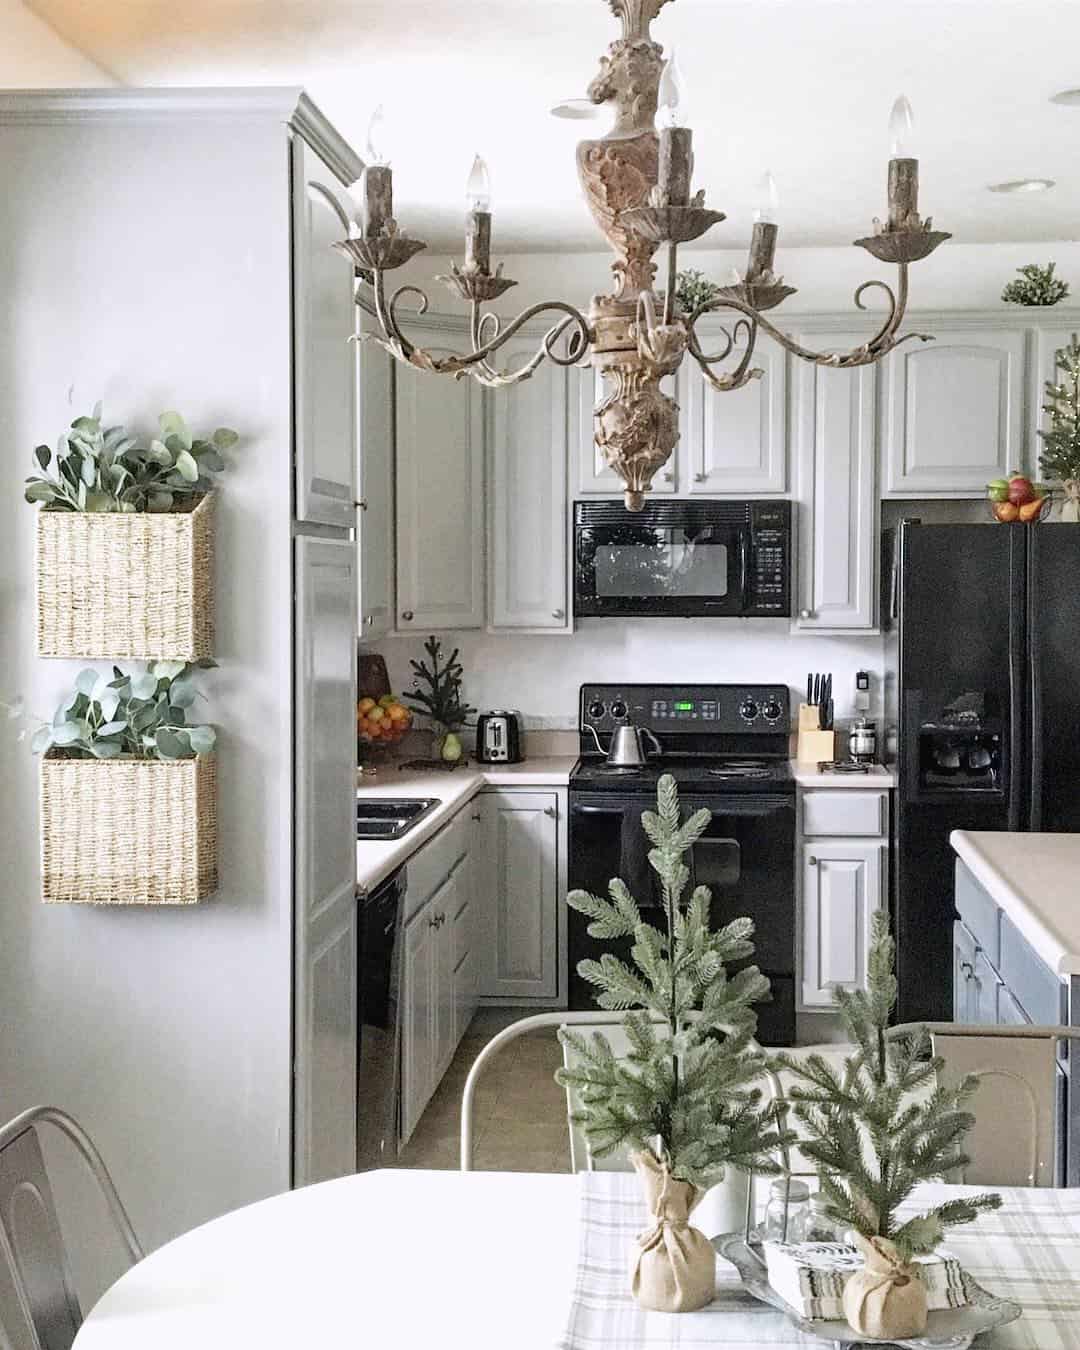
Ninety five dollars. That is what the paint supplies came to on this kitchen refresh from Snazzy Little Things, and it was her fifth cabinet painting project, so the advice is earned. She lightly sanded and cleaned, went over everything with a coat of Kilz 2 primer, then two coats of Valspar Cabinet Enamels from Lowe’s tinted to Benjamin Moore Graystone, with the island in Peppercorn. Her one firm recommendation is enamel over latex, because it dries harder. Smooth grain doors saved her a lot of time; open grain oak needs a different approach.
Get the full tutorial at Snazzy Little Things.
4. Easy DIY Window Trim
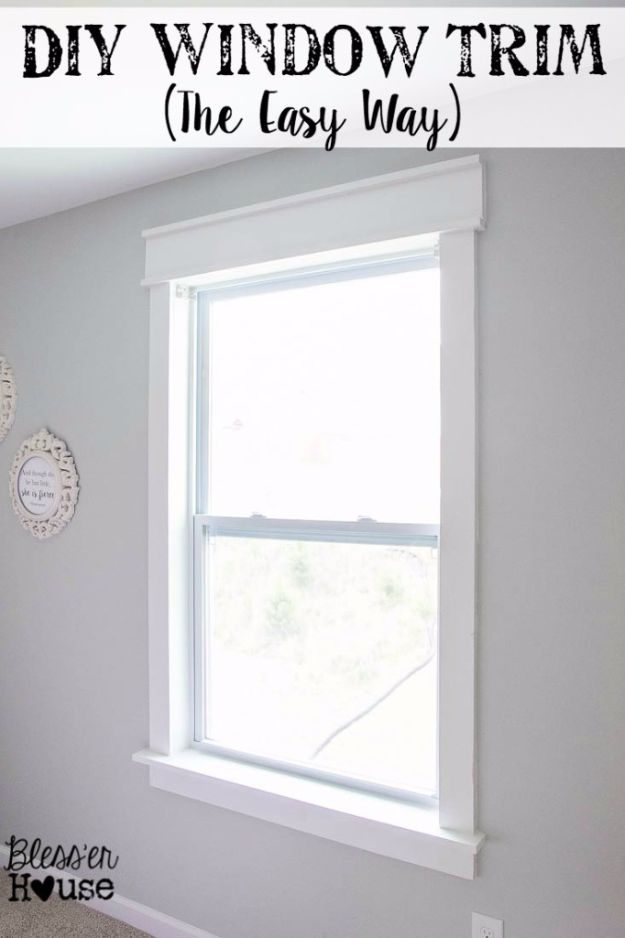
Chunky window trim is the fastest way to give a builder grade room some architecture, and the version at Bless’er House needs no miter cuts at all. Straight cuts only, so a hand saw will do it if you own no power tools. The supply list is a 1×2, two 1×4 boards, a 1×6, brad nails, wood screws, wood filler for the knots and nail holes, paintable caulk, primer and paint. She used a sample size of Valspar Du Jour and it was enough for one window. Caulk and filler do the rest.
Get the full tutorial at Bless'er House.
5. DIY Vanity Concrete Countertop
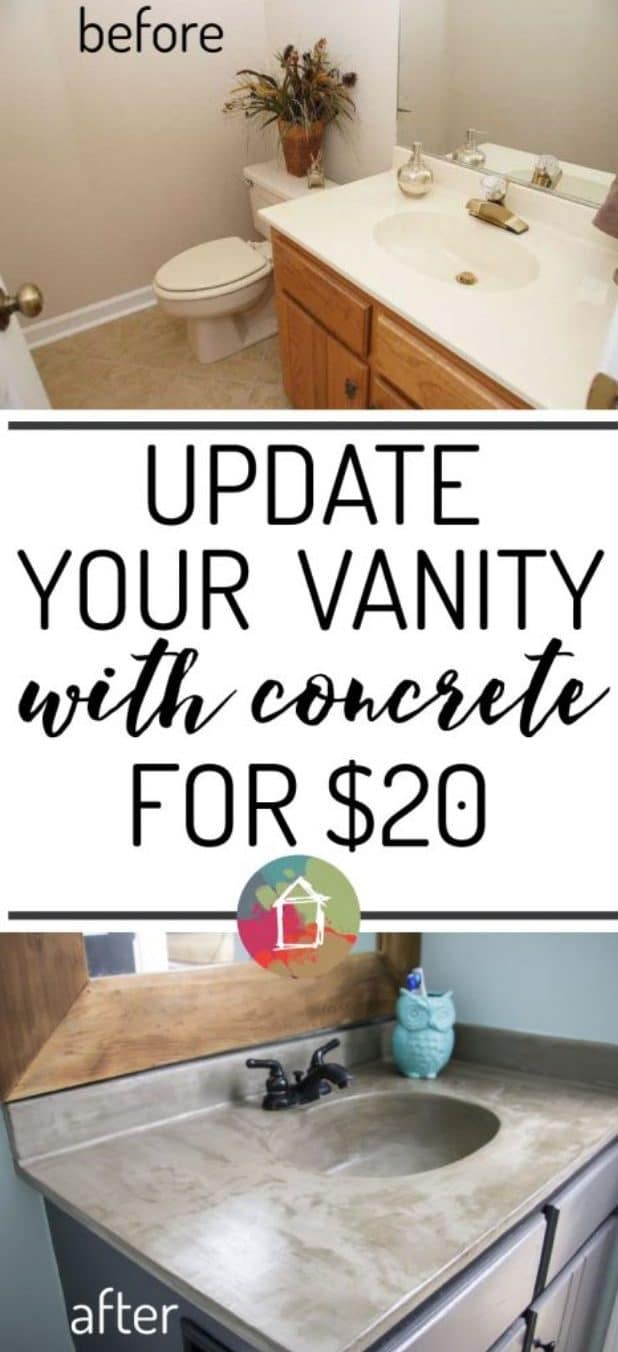
No forms, no pouring, no lifting a slab. Designer Trapped skims a feather finish concrete over the cultured marble vanity top that was already there, sands it smooth and seals it, for under fifty dollars. The kit is Ardex or Henry’s Feather Finish, a drywall tray, a six inch drywall knife, a two inch putty knife, 150 and 220 grit paper, latex gloves and an acrylic concrete sealer. She first did hers in 2014 and updated the post in 2019 to report it had held up beautifully for more than five years.
Get the full tutorial at Kaleidoscope Living.
6. Dresser To Kitchen Island
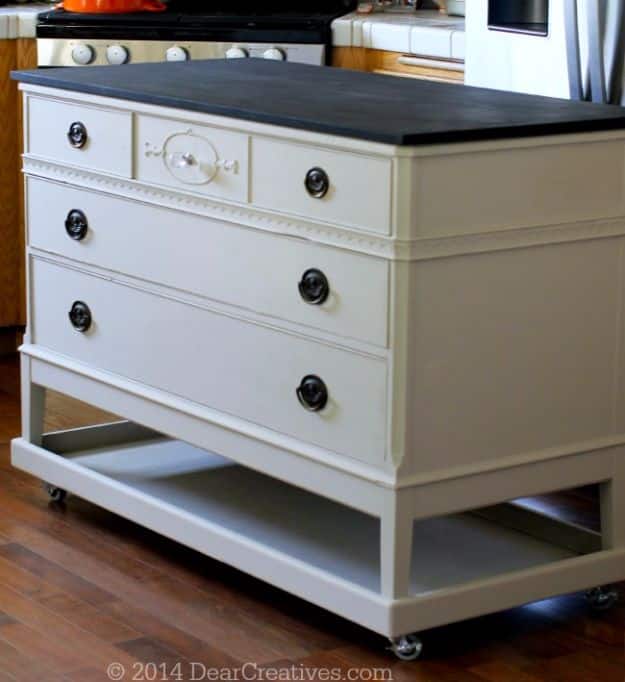
A vintage dresser sat in the garage at Dear Creatives for twelve years, which is the most relatable sentence on this page. It came out because the kitchen had almost no counter space, and it went back in as a rolling island: prepped, fitted with a lower shelf and wheels for mobility, given a new top with a fold down leaf to save space, and finished in Americana Chalky Finish paint. Big deep drawers are what made this dresser worth saving. Look for the same thing at a yard sale before you look at the price.
Get the full tutorial at Dear Creatives.
7. DIY Reclaimed Wood Accent Wall

Grandma’s House DIY walks this one through with replica planks rather than salvage, and the sequence is the same either way. Lay every board out before you start so the color variation is spread across the wall instead of pooling in one corner, and let the material sit in the room for a day first. Snap a chalk line and get the first row dead level, because every row above it inherits that line. Stagger the lengths so no two joints meet, cut around the outlets, then construction adhesive with a few pin nails to hold each board while it sets.
Get the full tutorial at Grandma's House DIY.
8. DIY Kitchen Cabinet Makeover
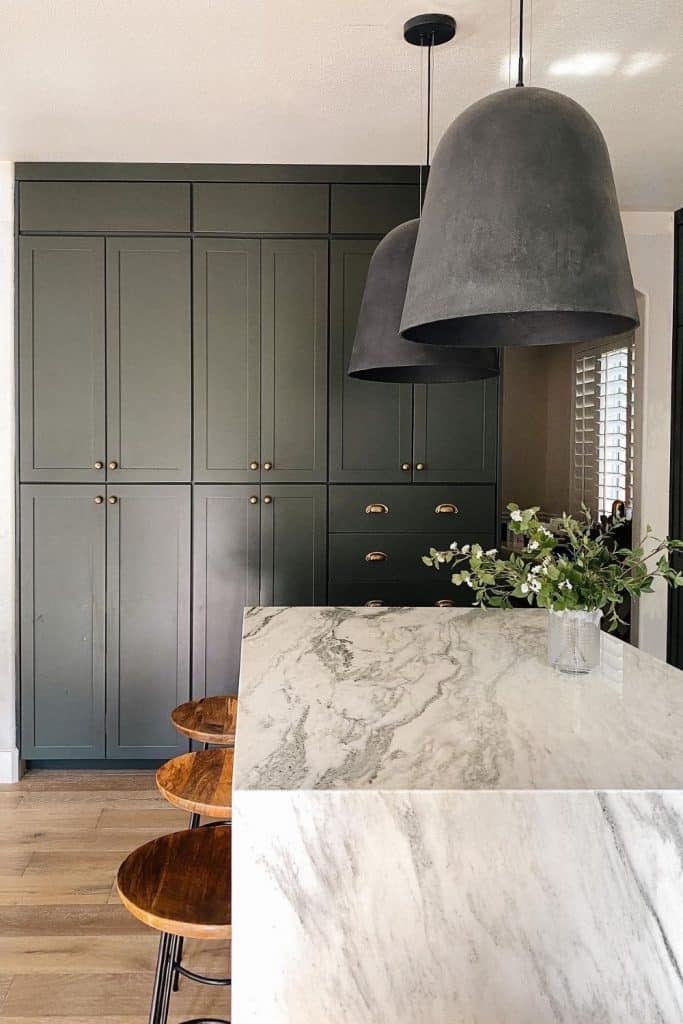
Angela Rose did not replace a single cabinet box. She pried the decorative molding off the tops with a hammer, hitting upward to loosen it, then built simple boxes from straight lumber to carry the cabinets all the way to the ceiling. New doors and drawer fronts went on the existing boxes, and paint finished it. That is refacing, and it is a fraction of the cost of new cabinetry with none of the months living without a kitchen. Saturated colors also hide daily wear better than white does.
Get the full tutorial at Angela Rose Home.
9. Concrete Countertop DIY
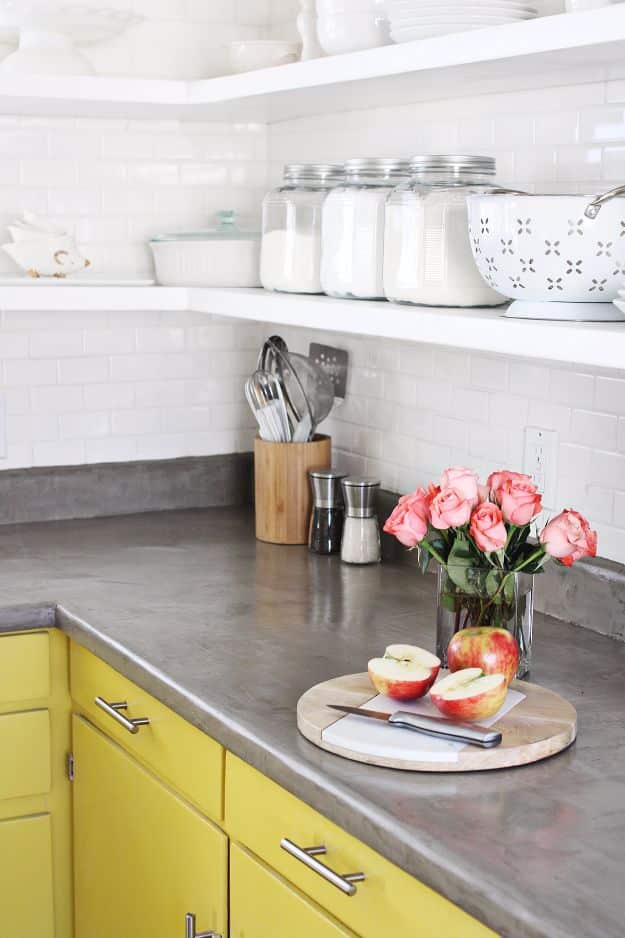
Laura Gummerman skimmed feather finish concrete over an existing formica counter for a studio space, and the method is almost identical to the vanity higher up this list. Sand the formica with a coarse paper first, because the cement grips a rough surface. Wipe it clean, tape above the backsplash to protect the tile and grout, then mix small batches in disposable containers and work it on with putty and drywall knives. Two bags did the job. One honest note from her: she could not find a food safe sealer locally, so she uses cutting boards.
Get the full tutorial at A Beautiful Mess.
10. $60 DIY Barn Door Hardware
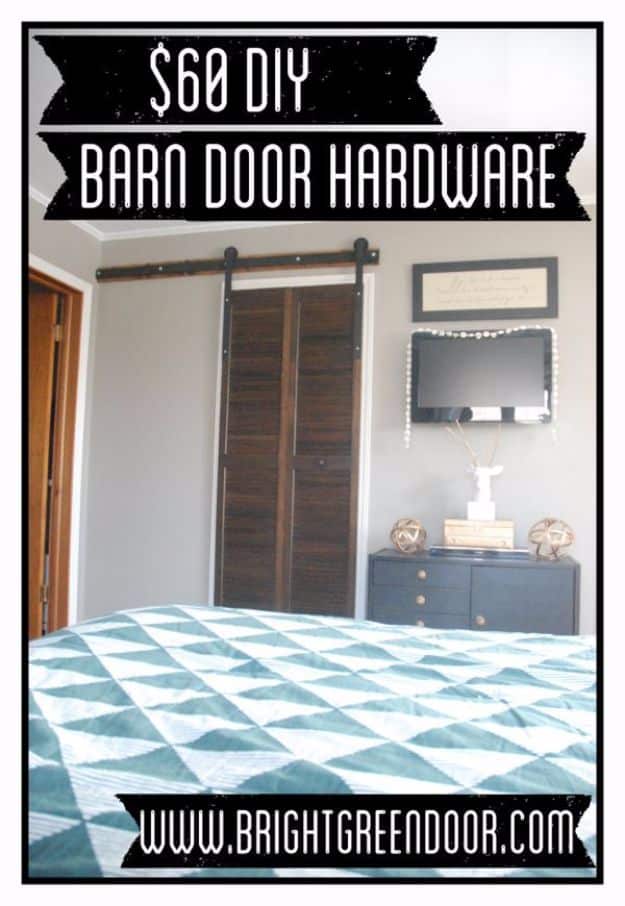
Commercial barn door track runs three hundred to five hundred dollars. Bright Green Door got the same thing for about sixty by buying flat steel bar cut to length at a steel yard, two three inch garage door wheels, a piece of stain grade 1×4 and a pile of washers. The steel and the wheels get two coats of black primer, the bar bolts through the 1×4 into the studs with washers as spacers, and the wheels mount to the door itself. An L bracket at the end is the stopper. Drilling quarter inch steel is the only part that sounds hard, and it is not.
Get the full tutorial at Bright Green Door.
11. Chalkboard Paint Makeover
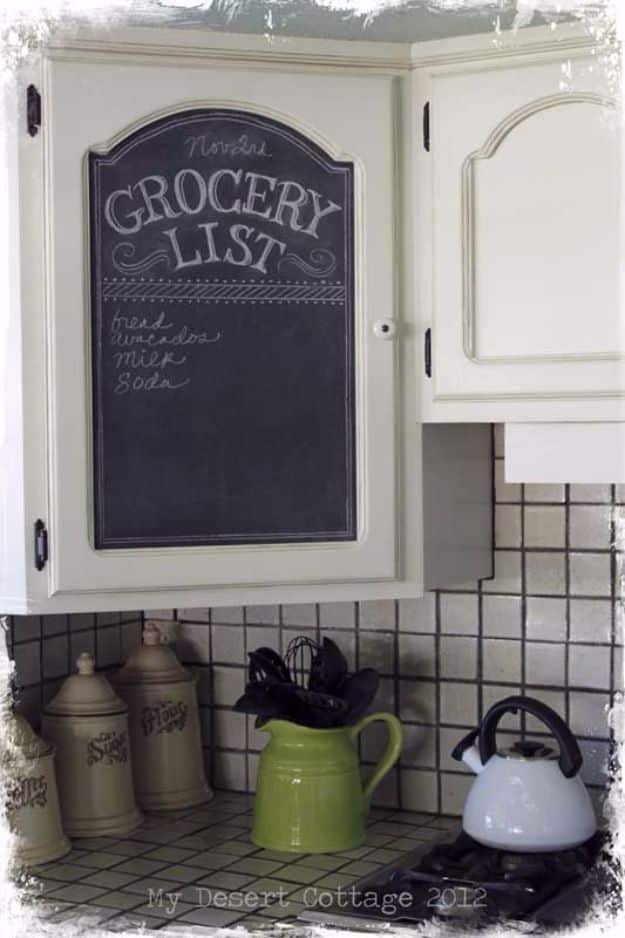
Karen Valentine did not paint her cabinet. She made a paper template, traced it onto thin masonite from the hardware store and her husband cut the panel out, then a little sanding on the edges and it dropped into the recessed panel of the cabinet door, where friction alone holds it. Three coats of Rustoleum black chalkboard paint with a foam roller finished it. Two smart reasons for doing it that way: chalkboard lettering is far easier on a flat horizontal surface, and nothing permanent happened to the cabinetry. A little velcro is the backup if it ever loosens.
Get the full tutorial at My Desert Cottage.
12. DIY Pendant Light Makeover
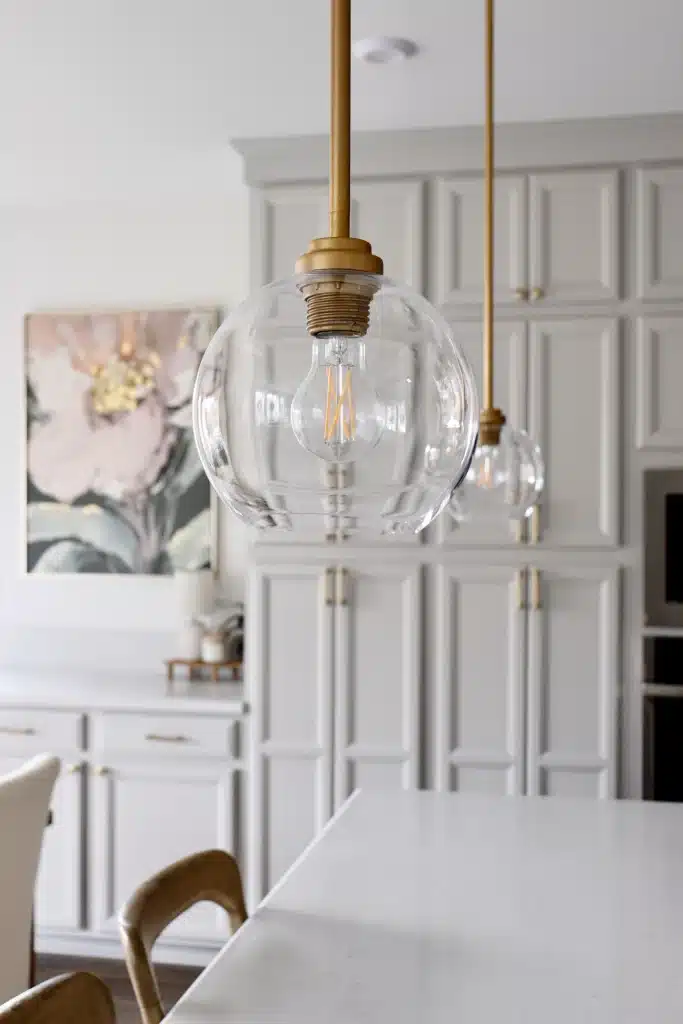
Builder grade brushed nickel pendants with opaque shades, and no budget to swap them for the brass ones she wanted. Emily Jean covered the existing fixtures in Rub ‘n Buff, starting with Antique Gold and finishing with a layer of Gold Leaf, and put new shades on from Lowe’s. She taped off the canopy where the fixture meets the ceiling first, and took the bulbs and shades off before she started. No wiring, no electrician, which is exactly why she chose this route. Rub ‘n Buff over a large surface is the fiddly part.
Get the full tutorial at Home with Emily Jean.
13. DIY Tile Backsplash
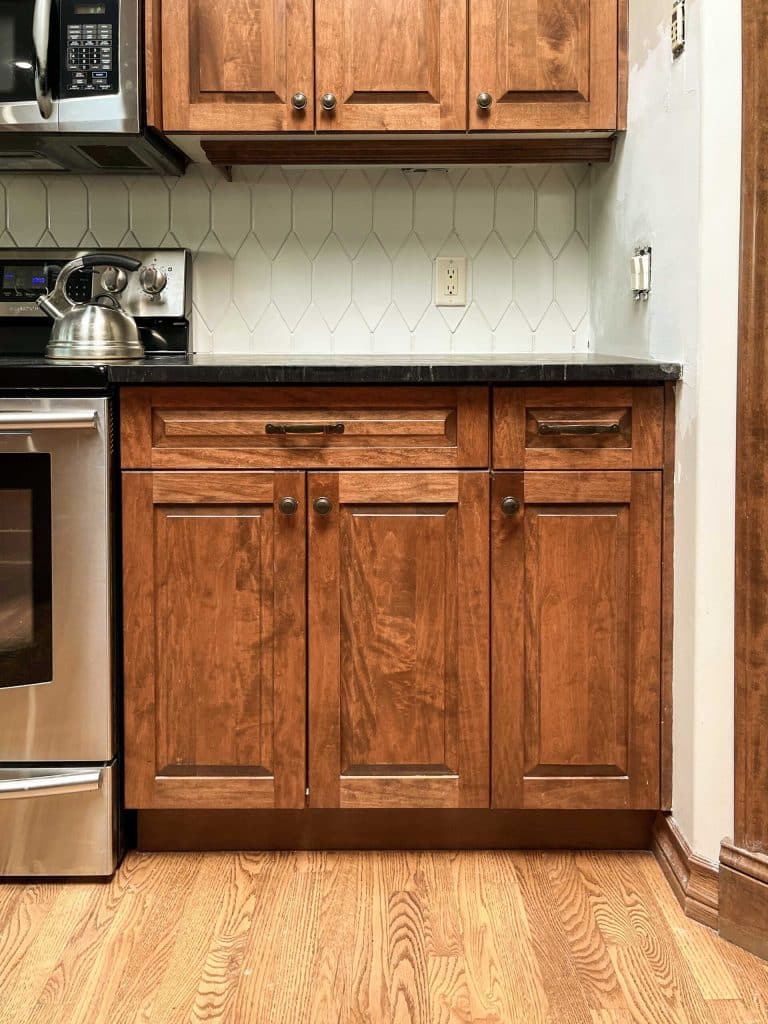
Erin Zubot tiled her mother’s backsplash with leftover tile from her own ensuite, then wrote the whole thing down because so many people asked. It runs from measuring and supplies through demo, replacing the drywall behind it, layout, tiling, cutting, grouting, caulking and sealing, and it also answers the two questions everybody has: how to handle outlets, and whether you can tile straight over the old backsplash. A backsplash is genuinely the right place to learn, because the runs are short and most of it sits at eye level where you can see what you are doing.
Get the full tutorial at Erin Zubot Design.
14. Old Door Upcycle
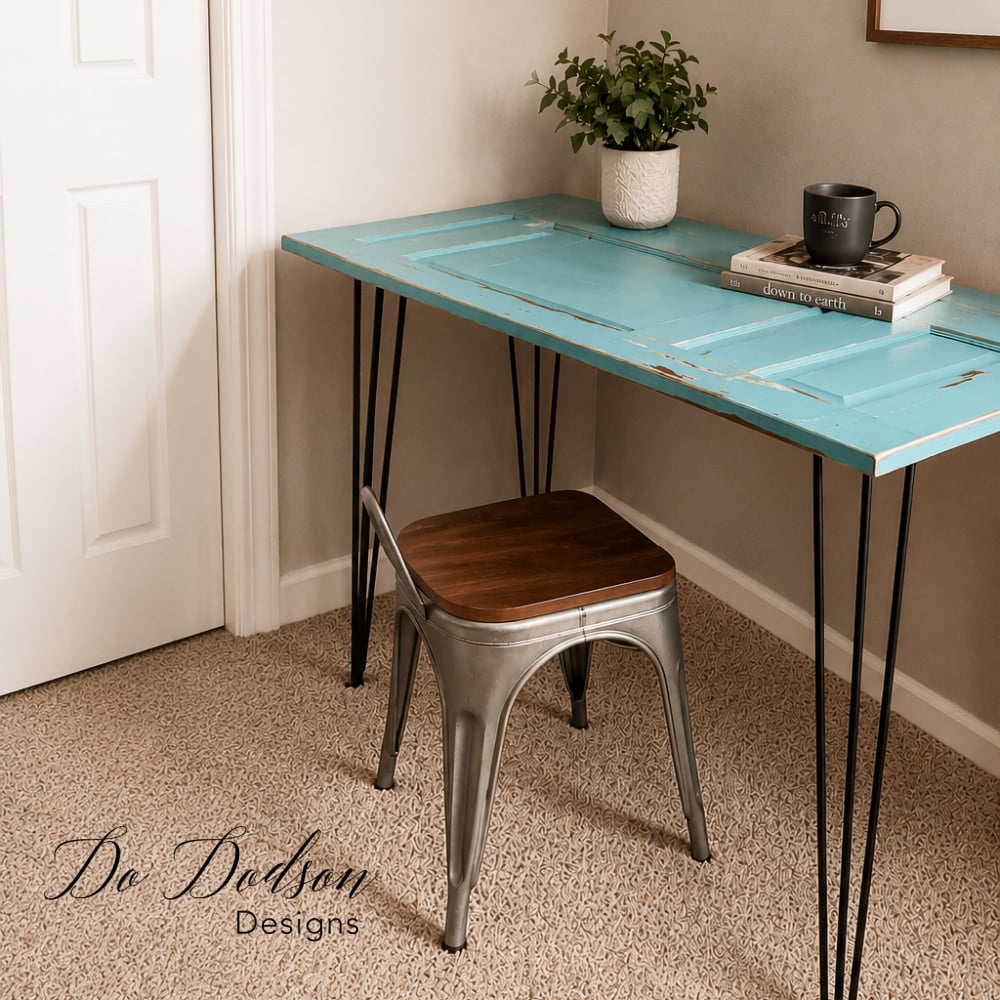
Two steps, which is the honest count on this one. An old door gets a coat of chalk mineral paint, four twenty eight inch hairpin legs bolt to the underside, and it is a desk. The warning from Do Dodson Designs is worth more than the instructions: pre drill your holes, and bring the legs in from the corners rather than out to them on a heavy solid wood door, because she used this same door as a desk years ago with the legs badly placed and it bowed in the middle. A glass top is optional.
Get the full tutorial at Do Dodson Designs.
15. Paint Your Linoleum Floors
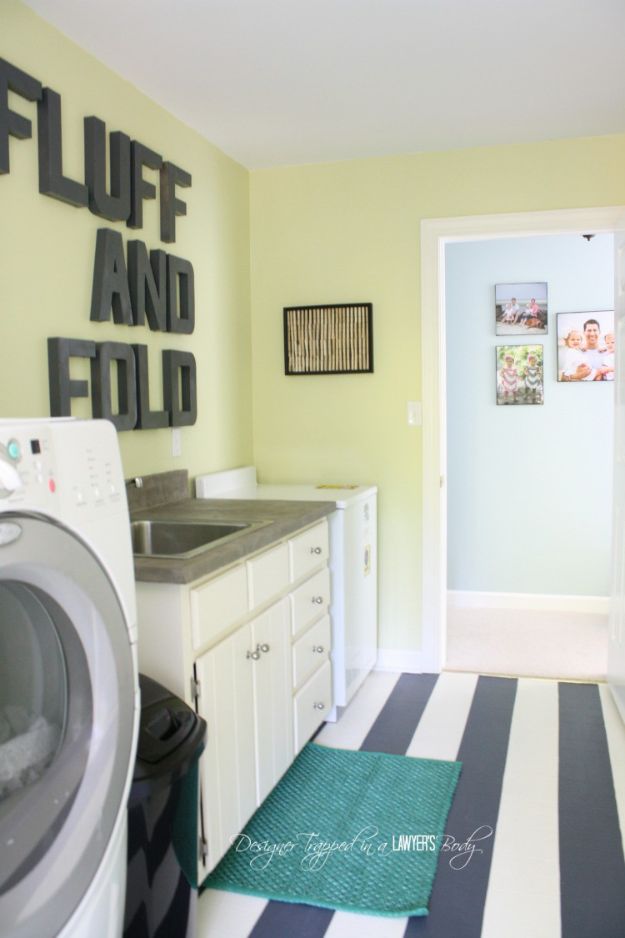
Seven years and still no chipping or peeling. That is the report from Kaleidoscope Living on the painted floor in her seventy one dollar laundry room, which is a longer track record than most flooring warranties. The materials are Kilz general purpose interior primer and porch and floor latex satin enamel, which is the part people get wrong when they reach for ordinary wall paint instead. She had two colors mixed at Lowe’s, dark grey and creamy white. Her floors are technically vinyl, as she cheerfully notes, not linoleum.
Get the full tutorial at Kaleidoscope Living.
16. DIY Fireplace Makeover With Stone
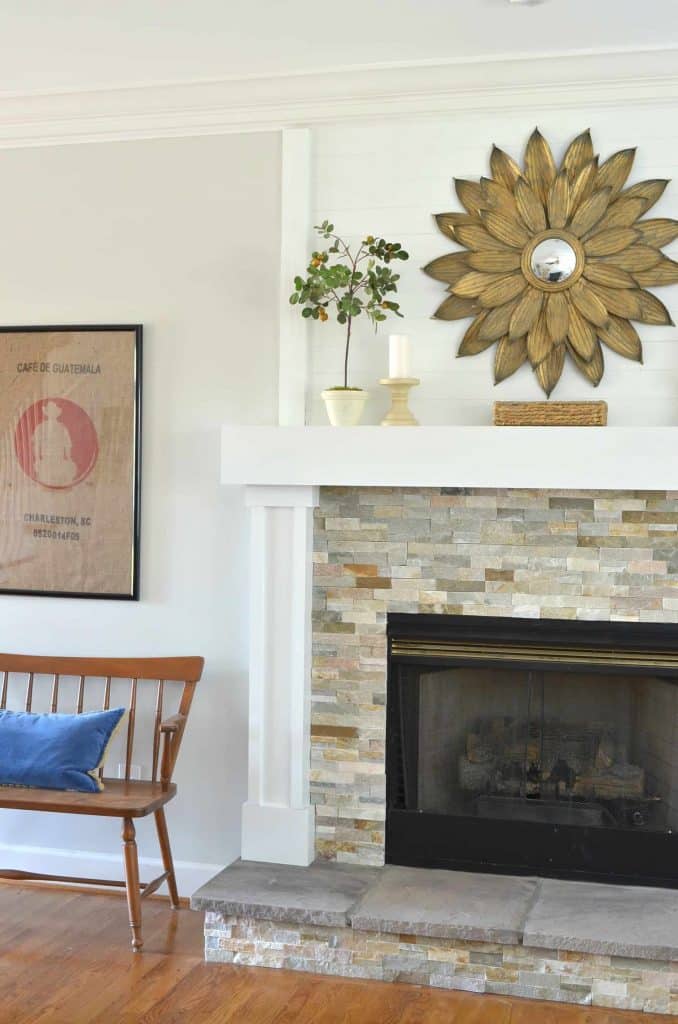
The fireplace at At Home With The Barkers worked on gas and smelled so bad every time they lit it that they stopped using it entirely, which is the honest reason this project happened. Replacing the insert meant redoing the tile, so they built a raised hearth and faced the whole thing in natural stone wall tile, keeping the wood plank above the mantel from an earlier mini makeover. She drew the plan out on paper and colored it in so her husband could see what was in her head before anyone picked up a hammer.
Get the full tutorial at At Home With The Barkers.
17. Stenciled Floors
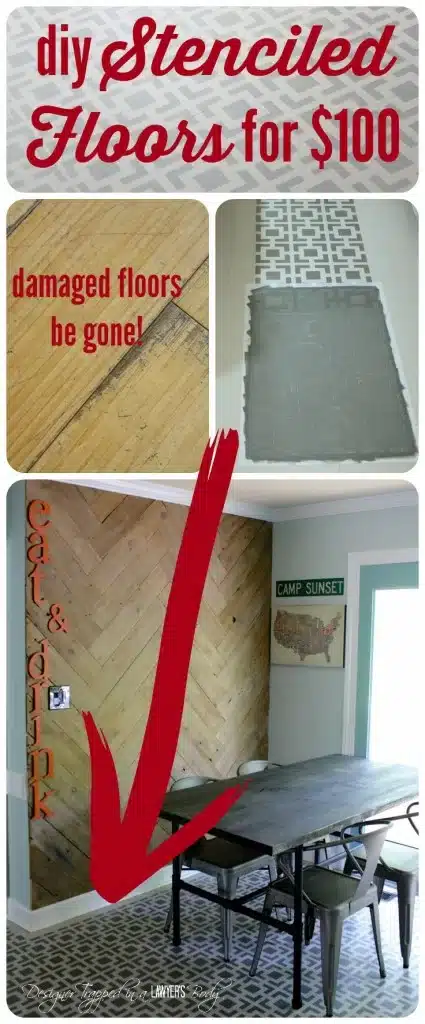
Badly damaged bamboo floors, no budget to refinish them, and a stencil. Kaleidoscope Living scrubbed the floors with TSP on hands and knees and hand dried them, which she calls the step that decides the whole project, then primed the entire floor with a latex primer, cutting in at the baseboards with a brush. Two colors of porch and floor latex paint follow, and the paint type is not negotiable. Her own materials list ends with “a whole, whole, whole lot of patience”. The pin graphic puts the total around one hundred dollars.
Get the full tutorial at Kaleidoscope Living.
18. Paint Your Old Sink
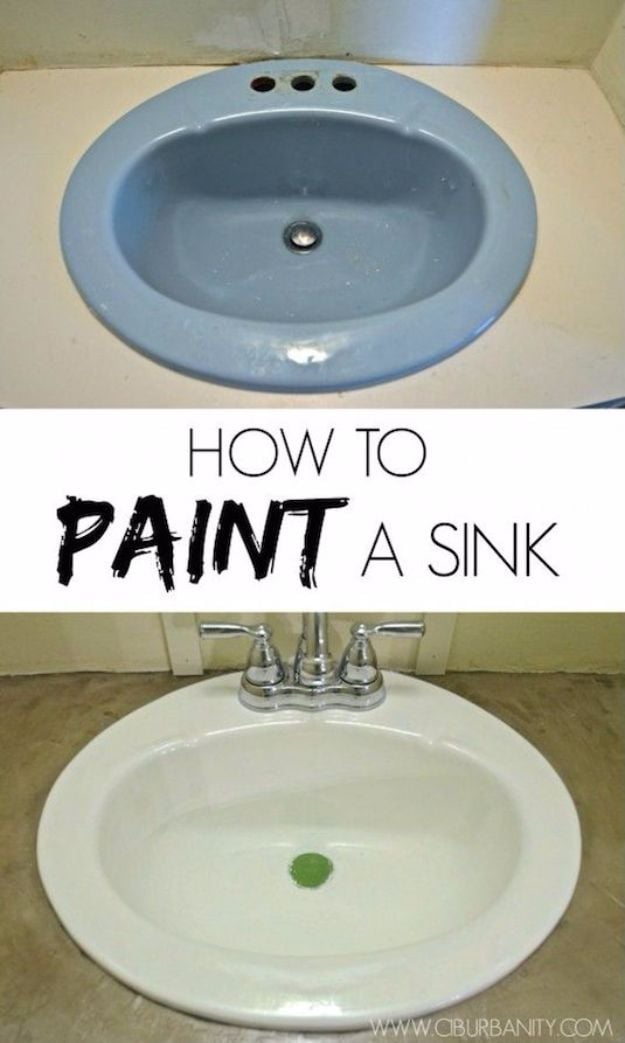
At Charlotte’s House repainted a turquoise powder room sink rather than replace it, after finding that even a pedestal sink was too big for the space. The first job is removing the faucet: shut the water off, disconnect the supply lines, then unscrew the two nuts underneath that hold the faucet to the bowl, which need a basin wrench. After that it is cleaning and epoxy paint. Her own verdict is the useful part, that it will not pass for new porcelain, and that for the cost and effort involved she is very glad she did it.
Get the full tutorial at At Charlotte's House.
19. The Trick to Caulking Baseboards
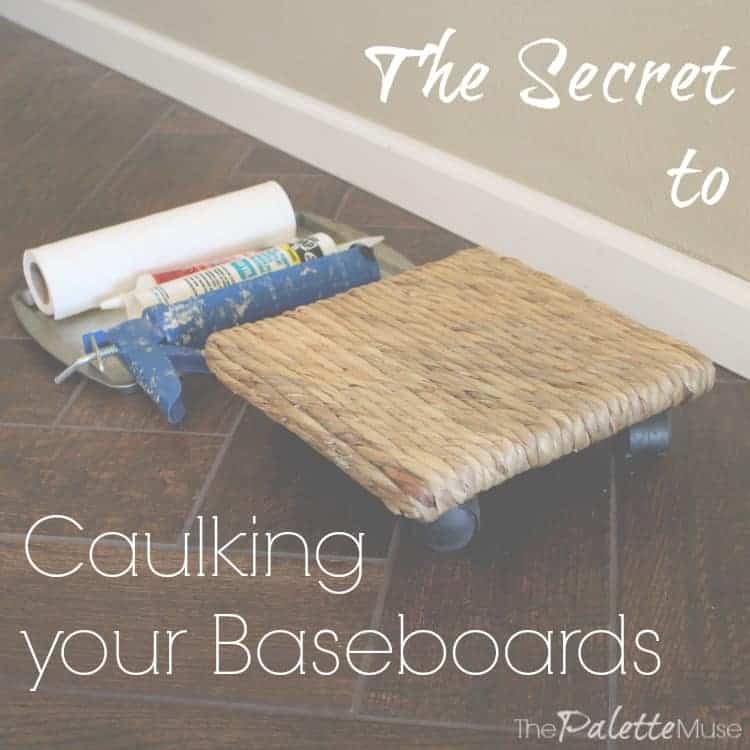
The trick is not a caulking technique. It is a rolling seat. The Palette Muse stood looking at what she calls miles and miles of baseboards that needed caulking, all of it at ankle height, and solved it by sitting on a low wheeled stool and scooting along the wall with the caulk gun and a roll of paper towels beside her. Caulking the seam where trim meets wall is the step that turns measured, cut, nailed baseboards into finished ones, and skipping it is why so much new trim never looks right.
Get the full tutorial at The Palette Muse.
20. Make A Pallet Wall
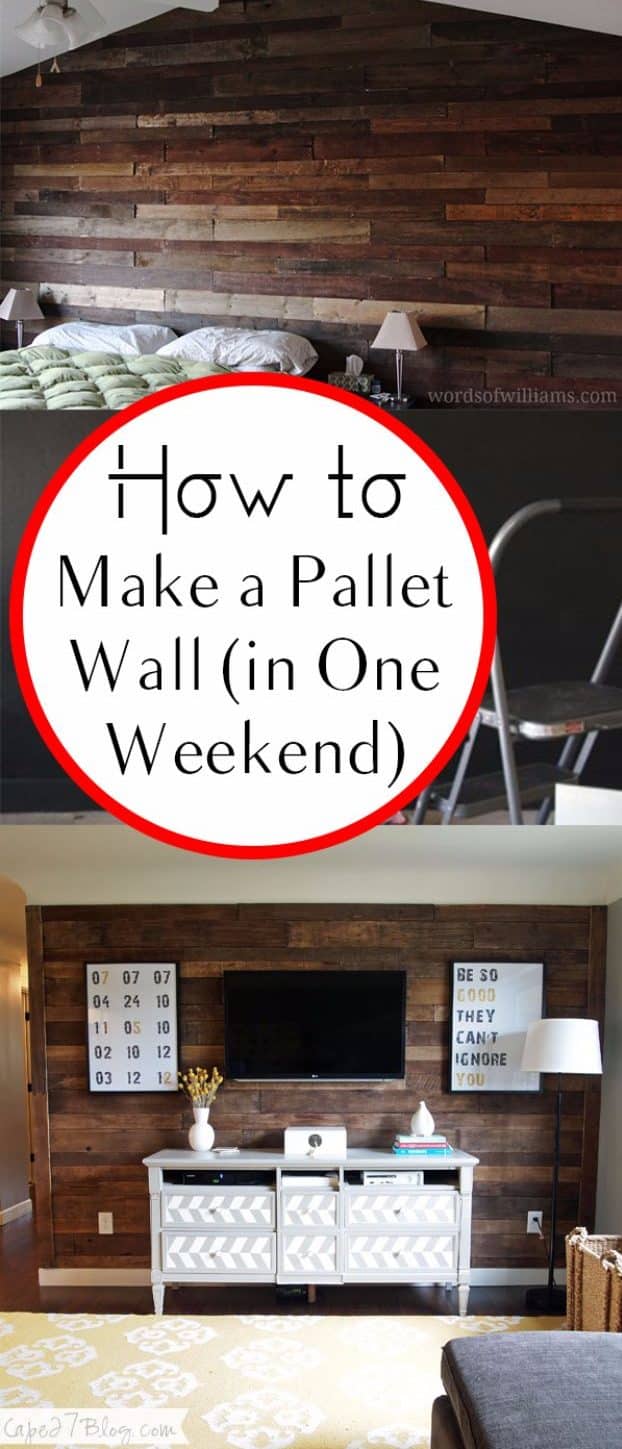
One step here matters more than all the others, and almost nobody does it. Paint the wall a dark color before a single board goes up. Pallet boards are never perfectly straight, so there will be gaps and uneven spots, and a dark wall behind them disappears where a white one glows through. Sand every board to 220 grit first so nobody gets a splinter off the wall, then liquid nails and a brad nailer, starting at the ceiling and working down, varying the pattern so it looks natural rather than laid out.
Get the full tutorial at How To Build It.
21. DIY Staircase Makeover
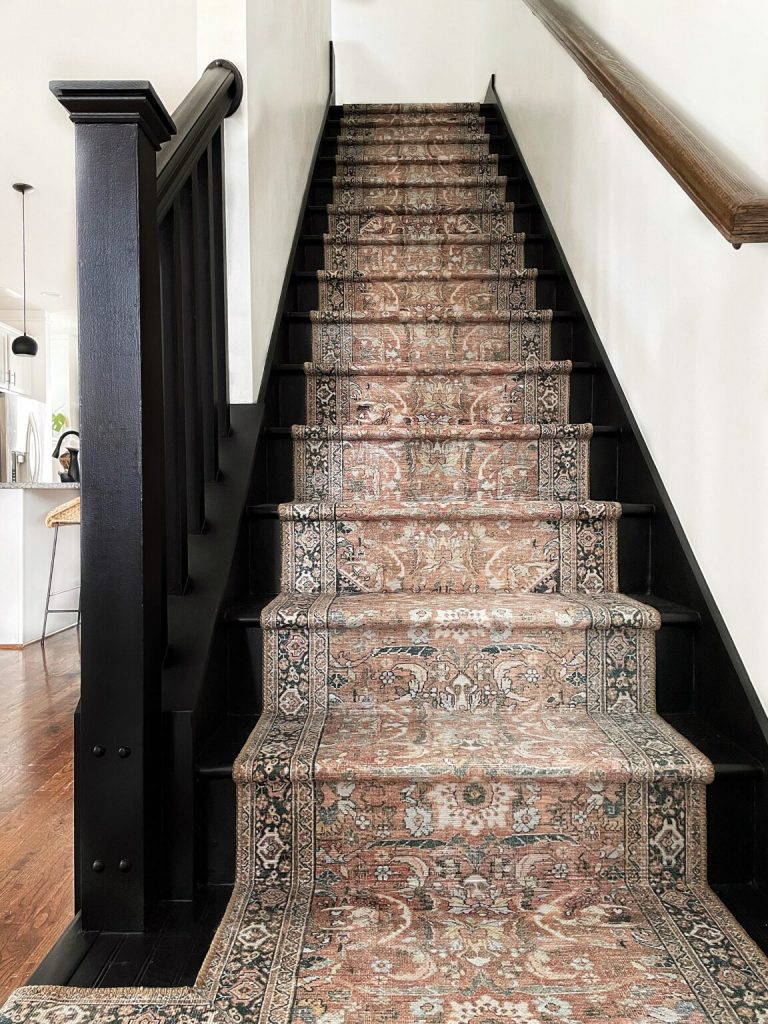
Elisha at Our Aesthetic Abode pulled up beige carpet without knowing what was underneath, which is the real risk in this project and she says so before anything else. Budget for the possibility of new treads. Once the carpet was off, the gaps between treads and stringers got filled with backer rod, wood filler and Bondo, then sanding, paintable caulk, primer, paint and two coats of water based polycrylic, and a runner went down over the middle. A crown stapler and a pry bar do most of the work. Stairs take more punishment than any floor in the house.
Get the full tutorial at Our Aesthetic Abode.
22. Frame A Bathroom Mirror
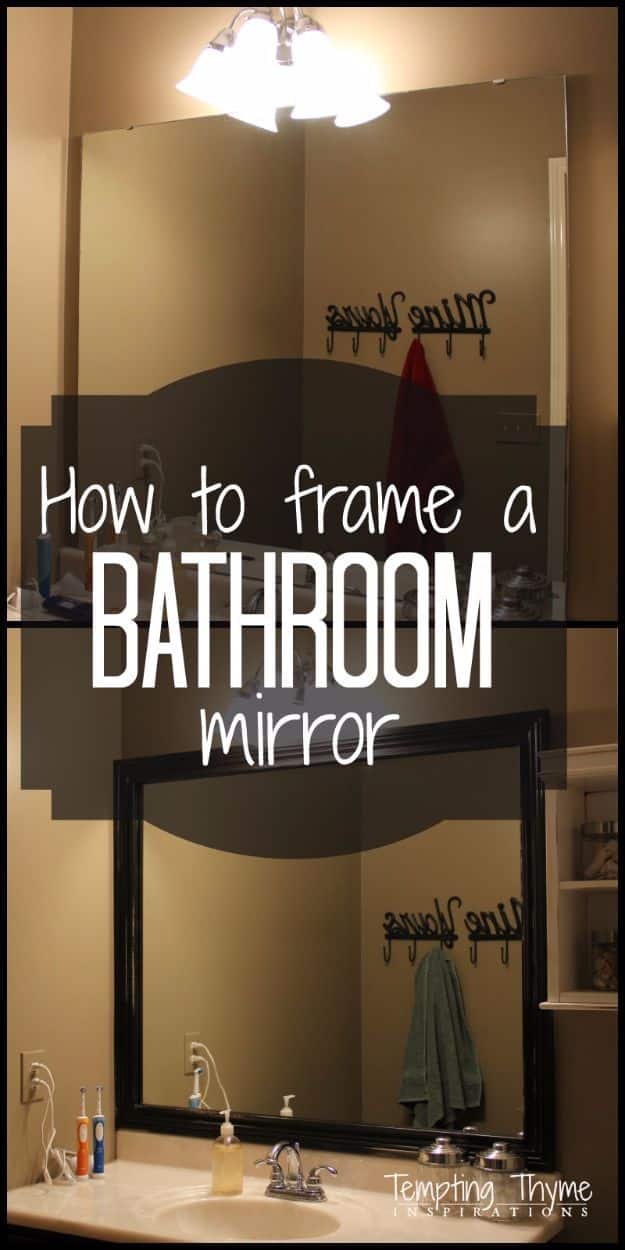
Tempting Thyme opens by warning that the pretty pictures promising quick and easy are not always quick and easy, and then proves it: two hours spent holding one end of the molding with her hip and the other with her foot while the adhesive set. That is the part every other version leaves out, and it is also why she stopped trusting the glue alone. She found the studs, screwed 1×2 boards to the wall around the mirror and nailed the molding to those instead. Measure the mirror, measure it again, and buy stock molding.
Get the full tutorial at Tempting Thyme.
23. Update Your Ceiling Fan
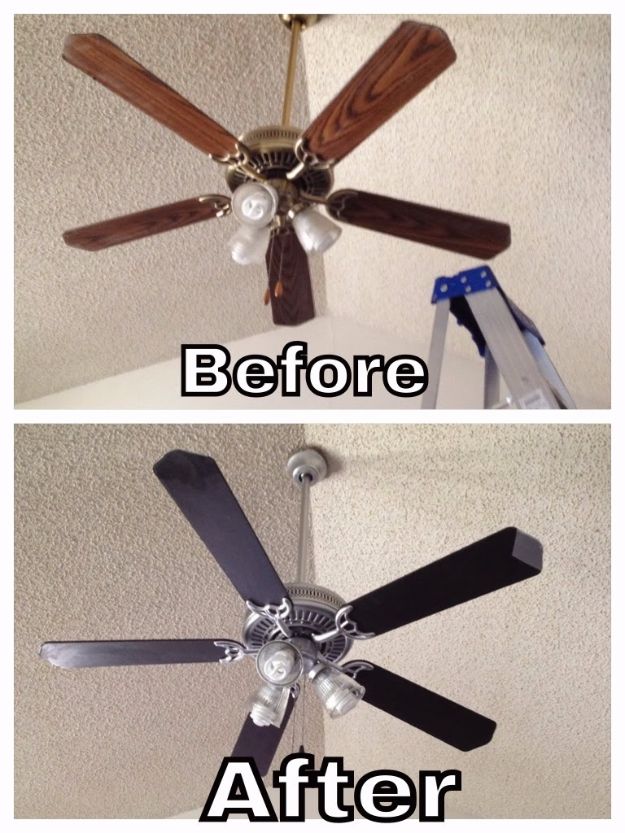
A working brass ceiling fan is not rubbish, it is a fan that needs a coat of paint. The tutorial at My DIY projects starts with the only step that is not optional: turn the breaker off, not the switch. Then remove everything that comes off, blades, shades and bulbs, photographing as you go and bagging the screws so it reassembles. Clean it properly, because nobody has cleaned a ceiling fan recently. Tape off the ceiling if the motor stays up, tape the bulb sockets so paint cannot ruin them, and build light coats.
Get the full tutorial at My DIY projects.
24. Temporary Board and Batten Accent Wall
My Wee Abode wanted a feature wall in a rented loft, so the whole thing has to come back off at the end of the lease. Quarter inch by inch and a half trim from the hardware store is light enough that tiny seven eighths inch wire brads hold it, which means no studs and almost nothing to patch. Mark your spacing across the whole wall before you cut anything, and measure every piece separately, because no wall is the same height at both ends. Paint the trim the same color as the wall, sand with 320 grit between coats, then nail it up.
Get the full tutorial at My Wee Abode.
25. $12 DIY Roman Shade Made From A Mini Blind
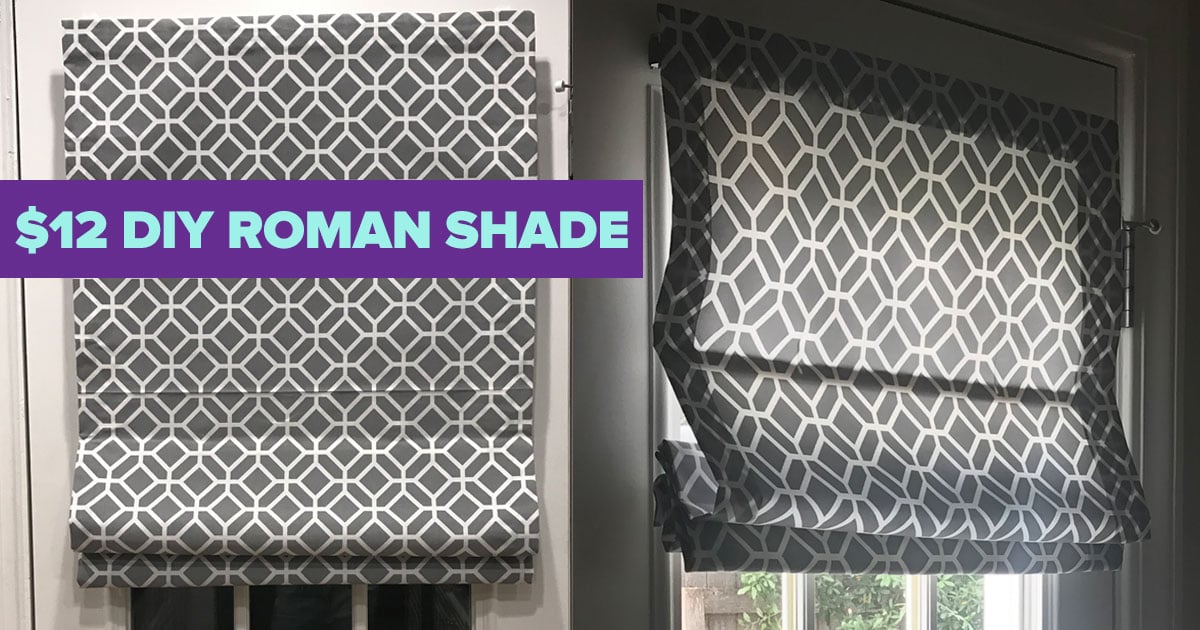
Roman shades are the window treatment nearly everyone wants and almost nobody budgets for, and this one costs twelve dollars because the mechanism is already built. You start with a cordless mini blind cut to your window, tie a couple of buttons onto the pull cords so they cannot reel back in while you work, then strip most of the slats out and glue your own fabric to what is left with Fabri-tac. No sewing, and no sewing skill either. Measure the window, buy the blind cut to size, pick fabric you love, and watch the video before you cut.
Get the full tutorial at DIY Joy.
26. DIY River Rock Accent Wall
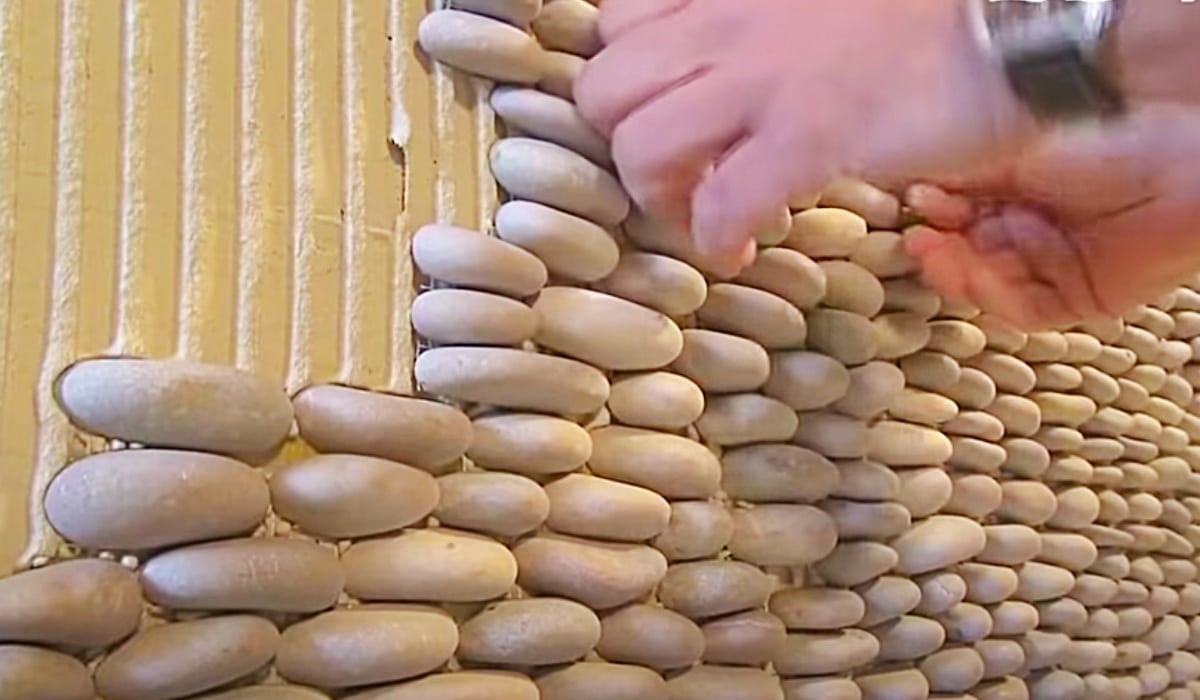
River rock walls turn up in rustic European farmhouses and modern lake cabins alike, which is a wide enough range that one will suit your room. The reason it belongs on a budget list is that it is done with rock tiles rather than loose stone, so there is no stonemasonry involved. You grout the wall first, then set the stones into it with a float and a trowel. Tiny lights tucked into the rock at the end are the detail that makes people ask who did it.
Get the full tutorial at DIY Joy.
27. Easy DIY Patterned Drawer Makeover
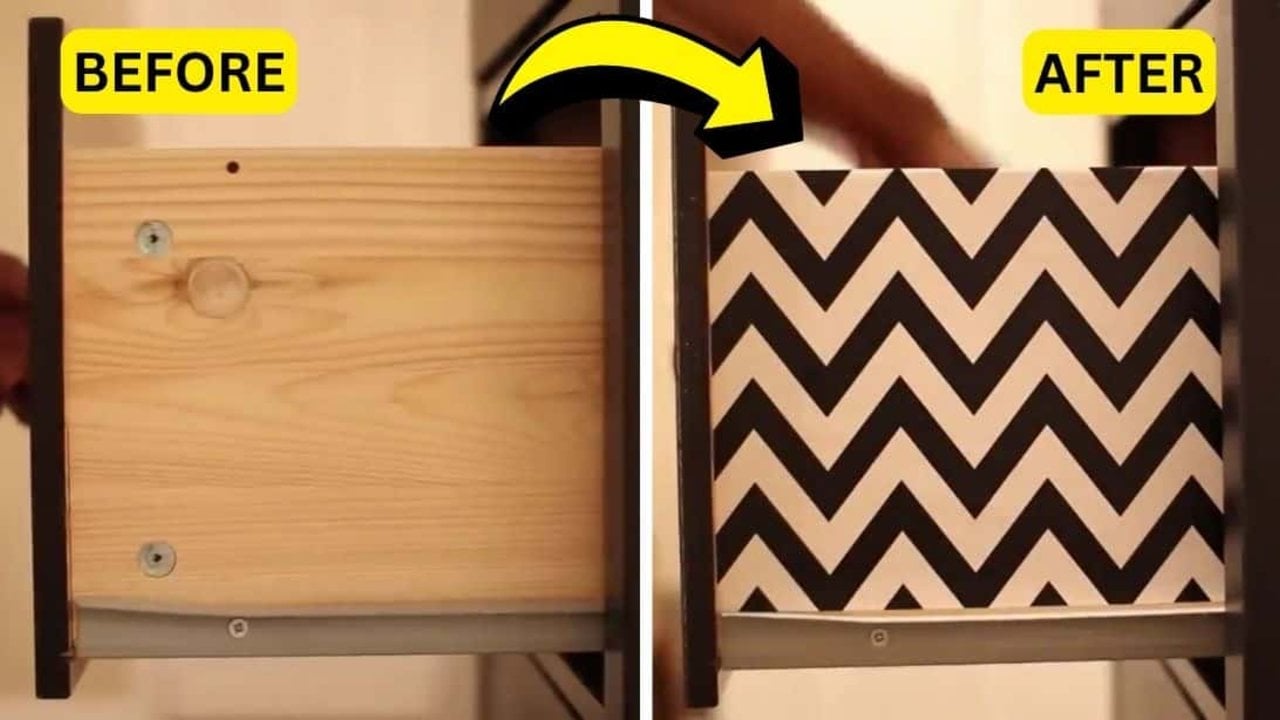
This is the cheapest project on the list and possibly the most satisfying. Measure the length and width of each drawer side, trim wrapping paper to match, spray adhesive on the drawer, lay the paper down and press it flat. Leftover wrapping paper from a birthday works, which makes the whole job close to free. The same trick runs across table legs, cabinet sides and anywhere else that needs pattern, and it peels off later far more easily than paint comes off.
Get the full tutorial at DIY Joy.
28. Faux Thick Baseboard
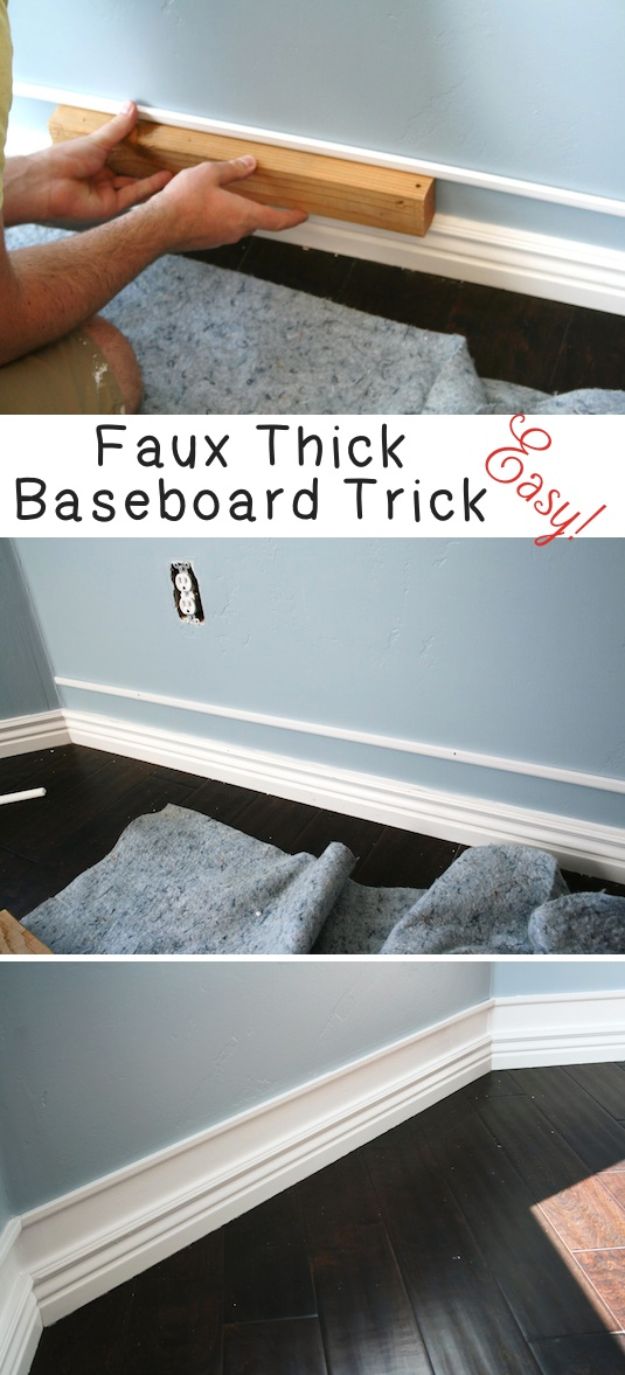
Tall baseboards cost a fortune to buy and a weekend to install. The House of Smiths gets there by cheating: a strip of thin trim runs along the wall a few inches above the existing baseboard, and the gap between the two gets painted the same white, so the eye reads one tall board. Caulk both edges, fill the nail holes, prime and paint it all together and the seam disappears. It is a builder grade fix that works best against a colored wall, where the contrast does the heavy lifting.
Get the full tutorial at The House of Smiths.
29. Paint Your Stairs
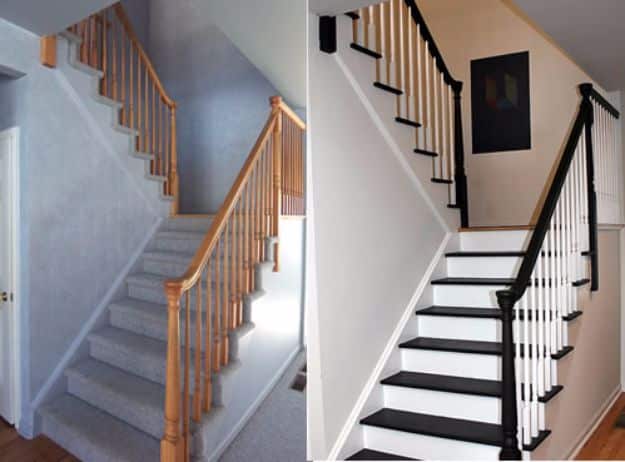
Worn grey Berber carpet over yellow pine, on the staircase you see from both the foyer and the family room. A full renovation was not in the budget at Your Home Only Better, so the carpet came up and the treads went espresso, in Behr Stealth Jet, with the rails painted to match and the risers and spindles white to tie into the rest of the trim in the house. The contrast is what sells it. Stairs are the first thing a visitor sees, and this is the cheapest way to change that impression.
Get the full tutorial at Your Home Only Better.
30. Patch Drywall Like A Pro
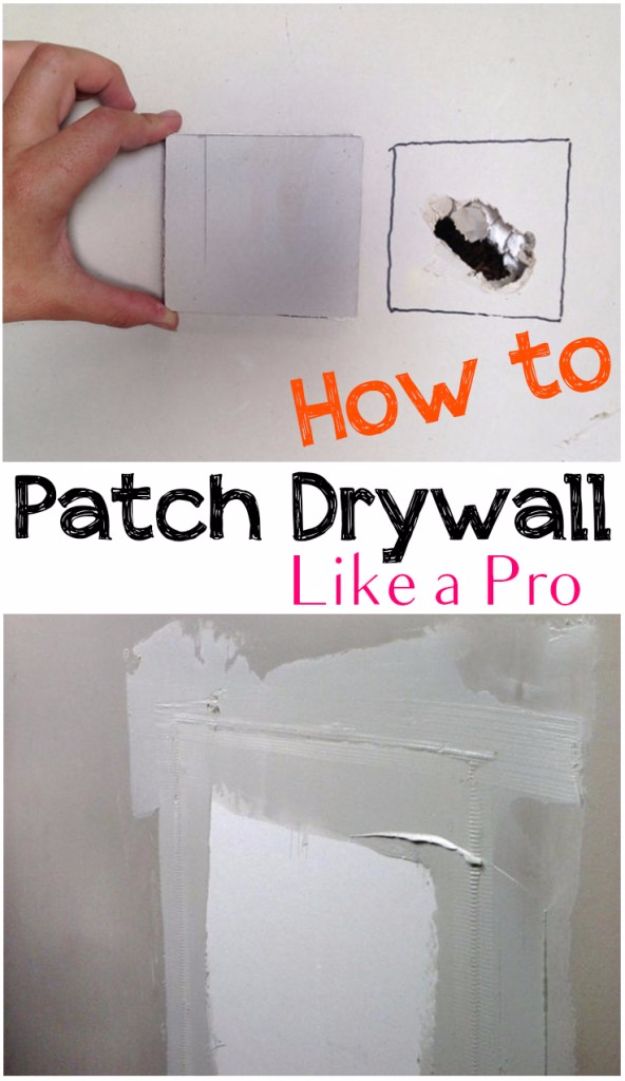
Cut a square patch of drywall first, then cut the hole to fit the patch rather than the other way around, which is the step that makes this easy instead of fiddly. Trace the square onto the wall in pencil and cut the outline with a drywall saw. If there is no stud behind the hole, slip a small piece of wood through and screw it to the existing drywall on both sides so the patch has something to bite into. Screws in all four corners, fiberglass mesh over the seams, then mud and sand.
Get the full tutorial at Picky Stitch.
31. DIY Garage Door Makeover
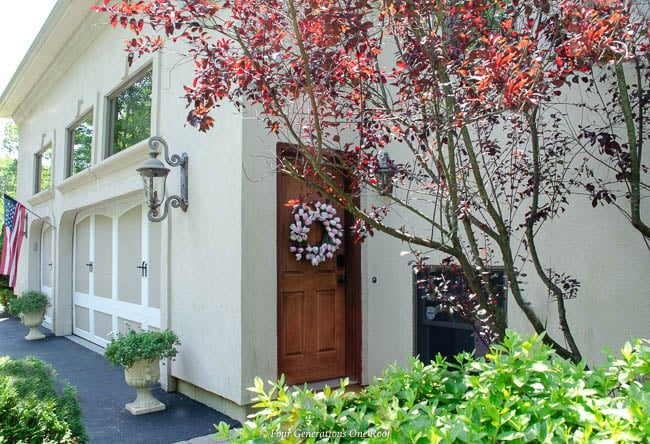
A side entrance with a tired door, discolored stucco and an old mat, at Four Generations One Roof. The stucco got washed down, the nicks in the wooden door were touched up with stain, and a wreath and a new welcome mat finished it. The lock is the real upgrade here, a Schlage Encode smart wifi deadbolt that went in in under ten minutes with no hub required. She is honest that the door really needs full sanding and restaining, and that this refresh bought her the time.
Get the full tutorial at Four Generations One Roof.
32. DIY Pendant Light Fixture
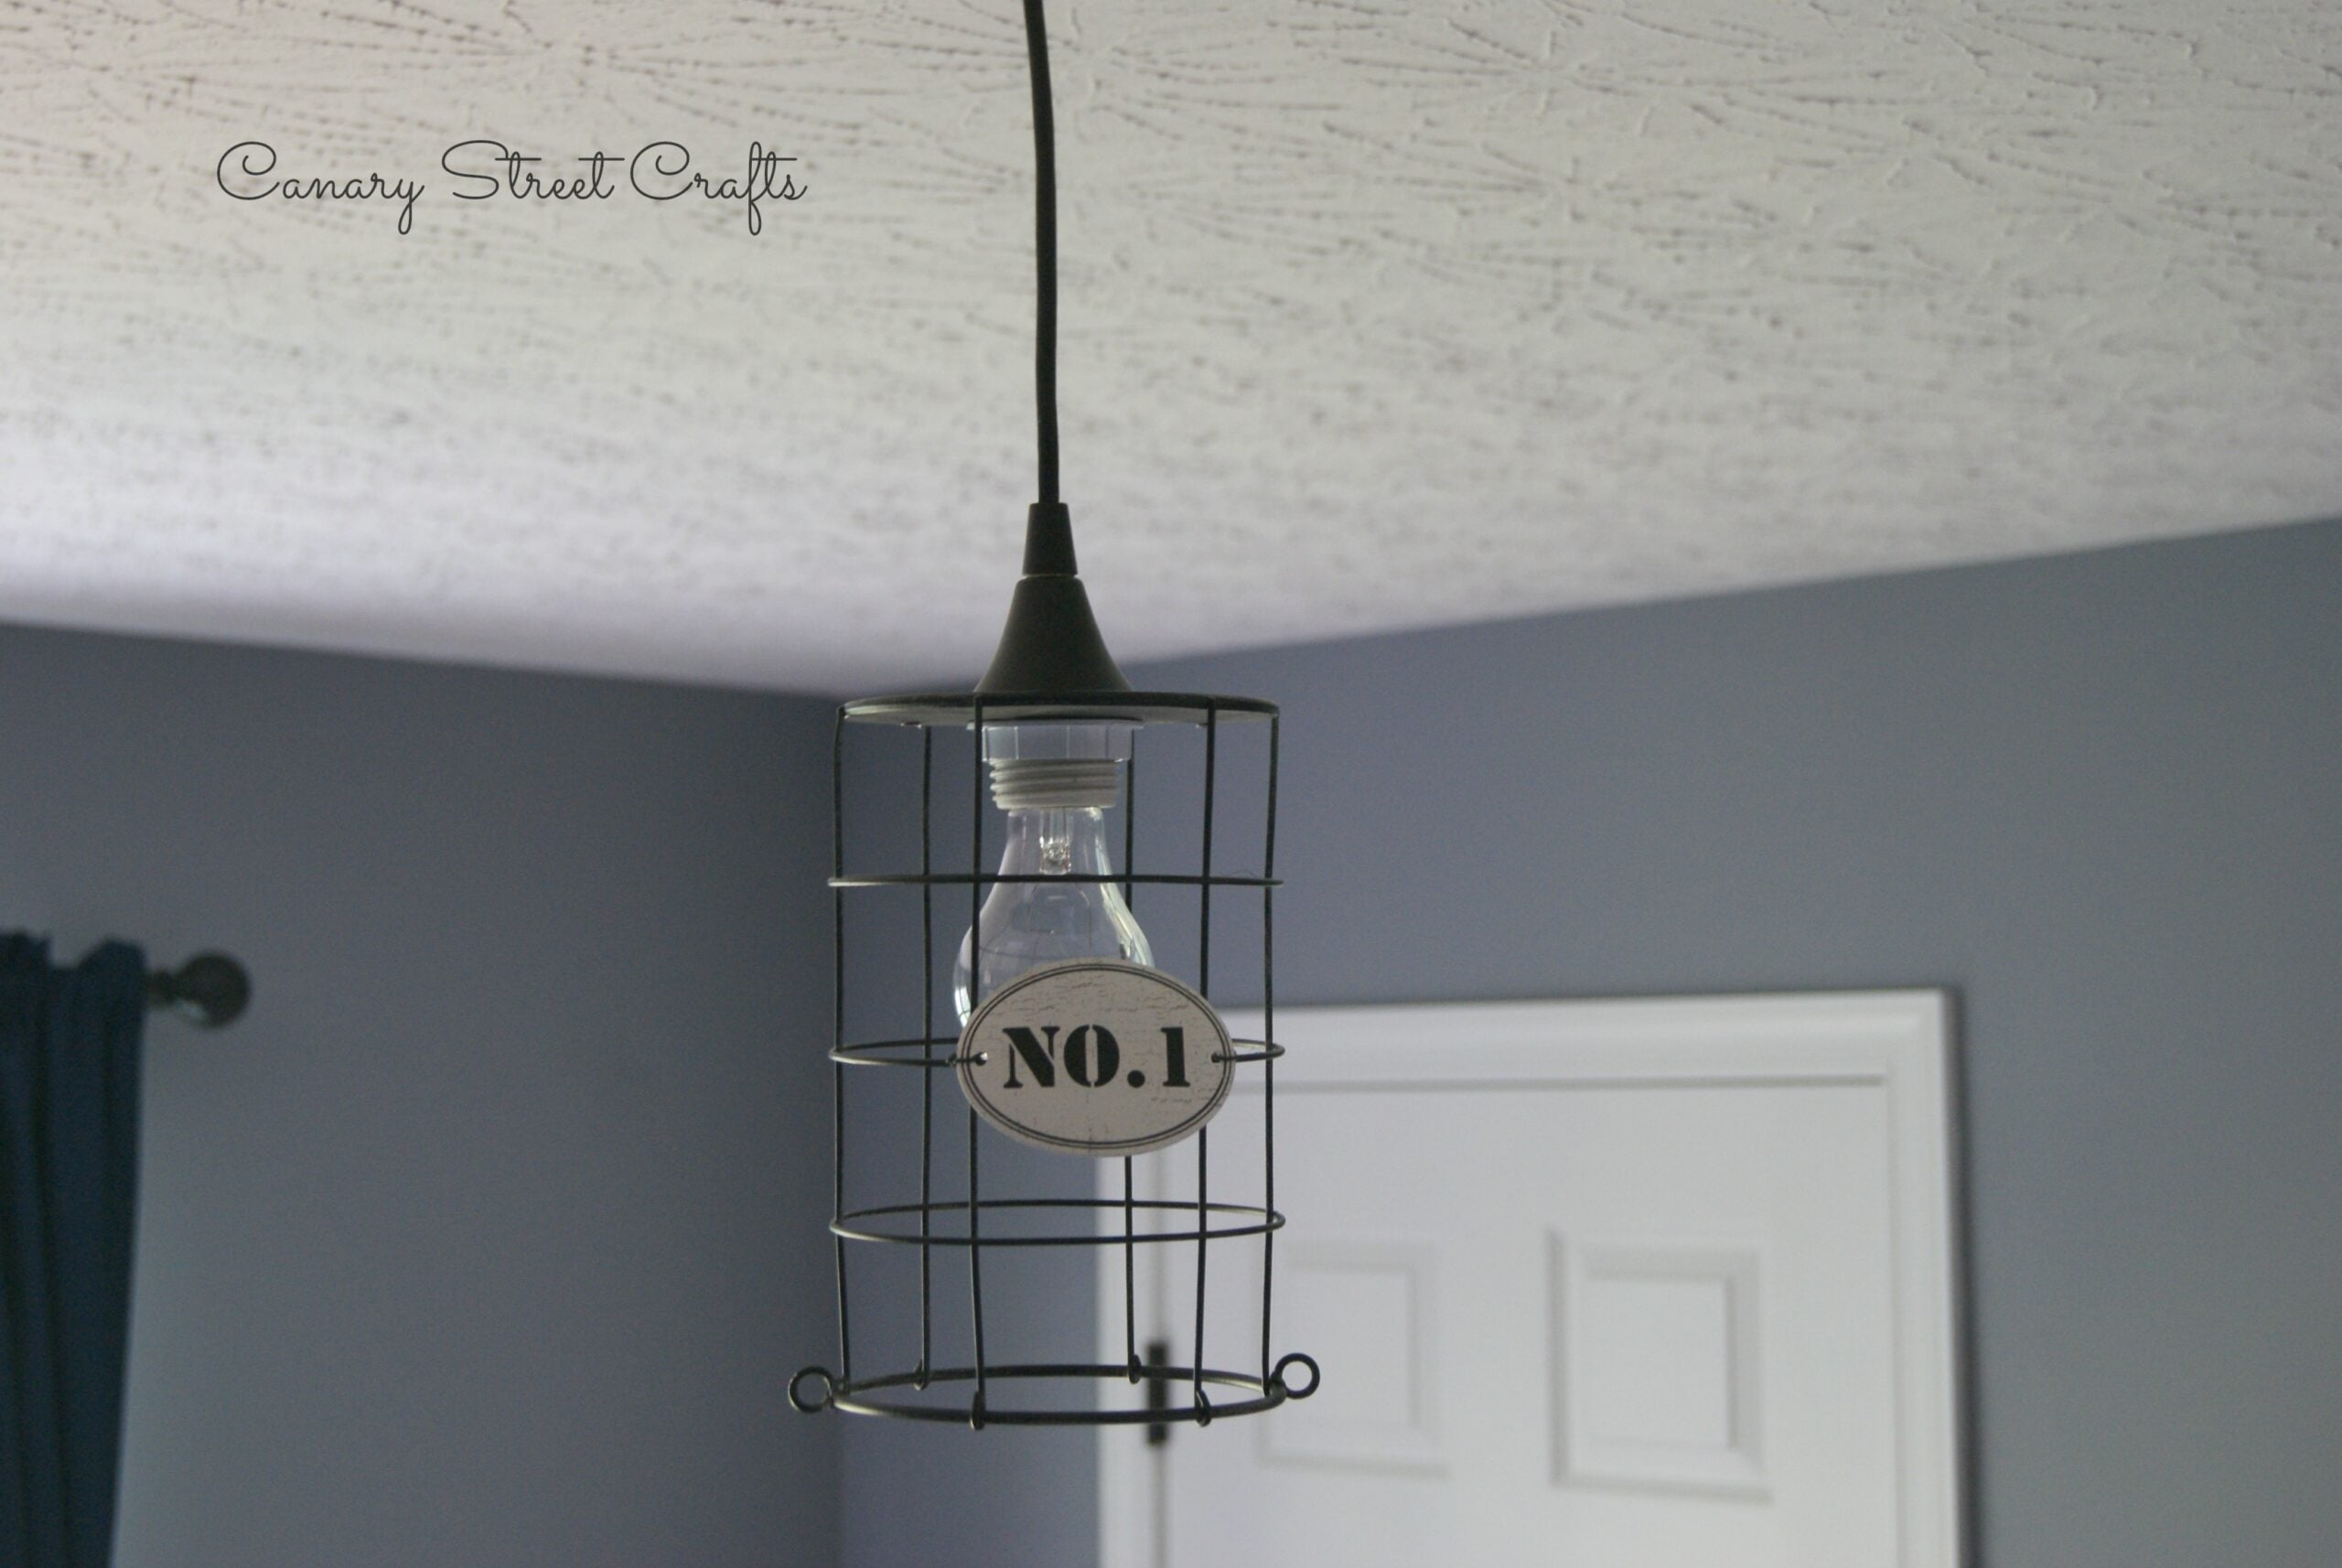
A wire basket becomes the shade, a pendant cord kit supplies the rest, and a plain overhead light becomes something you would pay for. Canary Street Crafts found her metal wire container on a clearance rack for six dollars, drilled a ring of holes in the base and finished the cutout with tin snips, then fitted a sixteen dollar pendant light kit from the hardware store. Kill the power at the breaker before you touch the fixture, and her own advice is the right advice: if wiring is not something you are comfortable with, call an electrician.
Get the full tutorial at Canary Street Crafts.
33. Front Door DIY
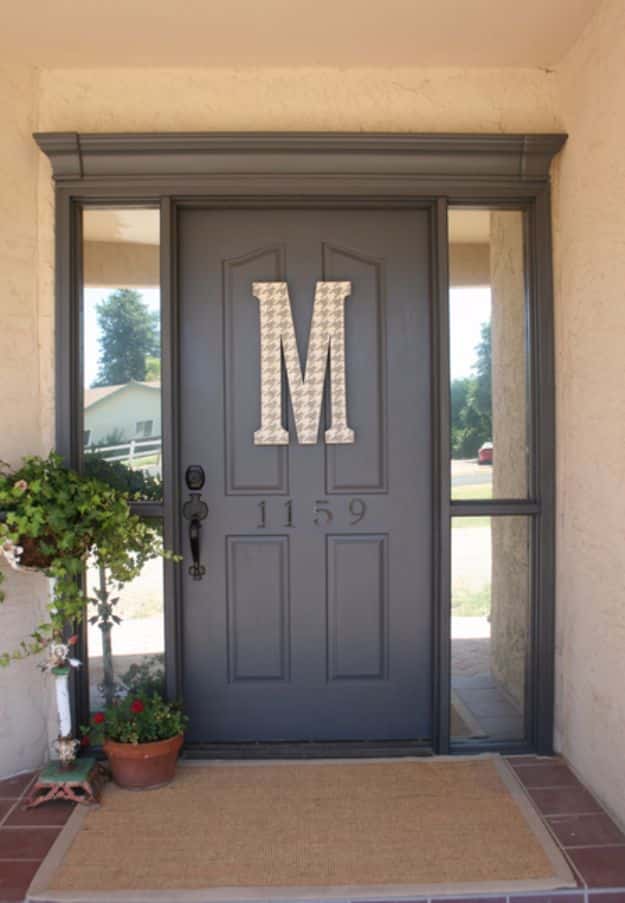
Thirteen dollars of clearance foam crown molding from Lowe’s, fitted above the door, is what starts this one. Then a quart of Benjamin Moore Iron Mountain in satin exterior on the door itself, a dark muddy grey, and Rustoleum Oil Rubbed Bronze spray on the handle. Four inch house numbers from the mailbox aisle went on at just under four dollars each. It is a rental, which is why she stopped short of anything structural, and it is a good reminder of how much a doorway changes for very little.
Get the full tutorial at me and jilly.
34. DIY Fireplace Makeover For Under $200
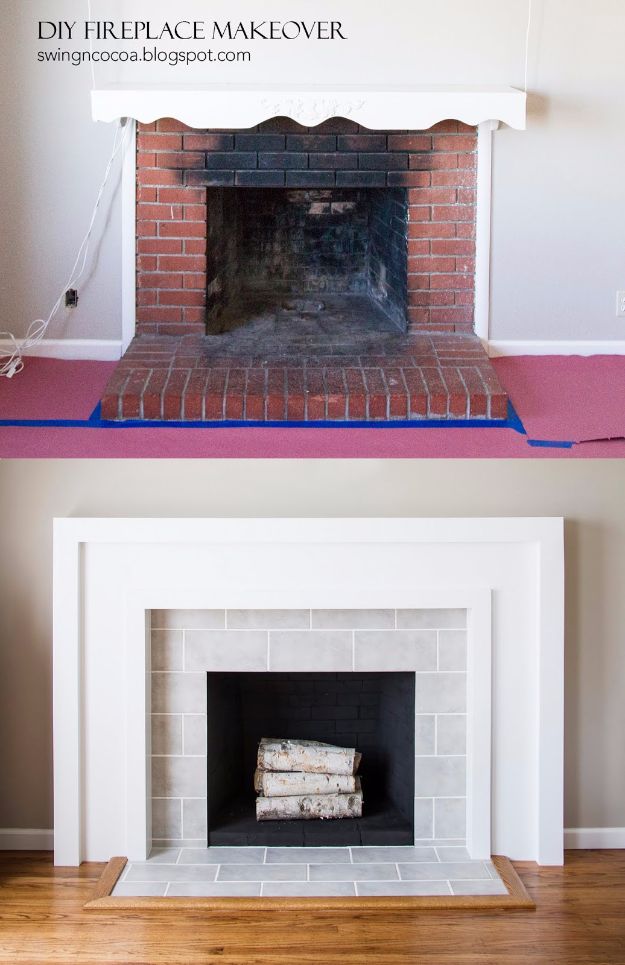
One hundred ninety six dollars, and she published the whole receipt. Tile from Craigslist for fifteen dollars, poplar at forty six, a sheet of MDF at thirty five, rapid set mortar, sanded grout, wood stain, polycrylic and a can of high heat spray paint for the firebox. SwingNCocoa took a red brick fireplace through brick demolition, tiling, rip cutting, bench planing and trim installation to get there. Tools added another ninety four dollars, and she bought most of those once. Read all three parts before you swing anything.
Get the full tutorial at SwingNCocoa.
35. DIY Kitchen Island
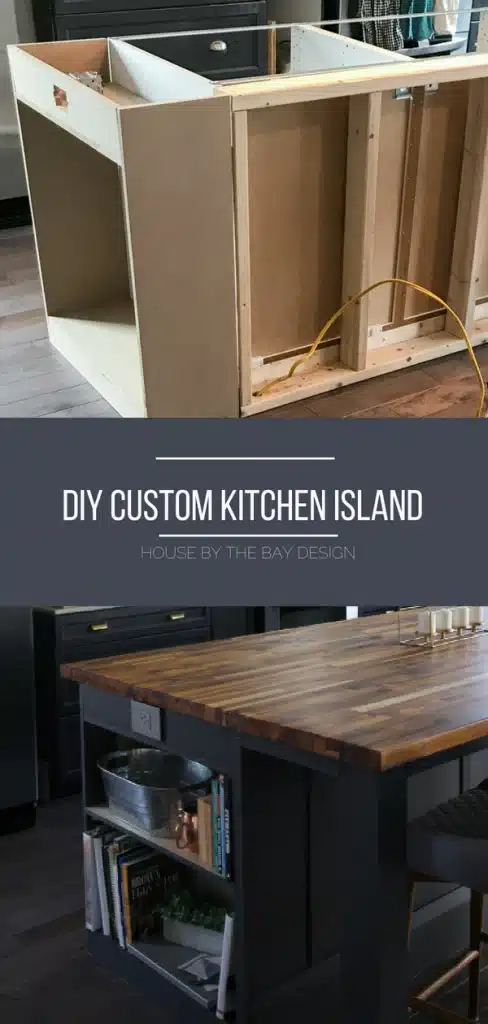
Ninety two inches by forty seven, bigger than any island House by the Bay Design could find to buy and far cheaper than the ones they could. The base is three IKEA kitchen base cabinets, one thirty inch and two twenty four inch, plus a small built bookcase on the end for open storage. Two unfinished butcher block tops were joined end to end to reach the length, with extra support under the seam so it could not split. MDF panels, trim and baseboard wrap the outside so it reads as cabinetry rather than boxes. Level the base before anything gets fixed down.
Get the full tutorial at House by the Bay Design.