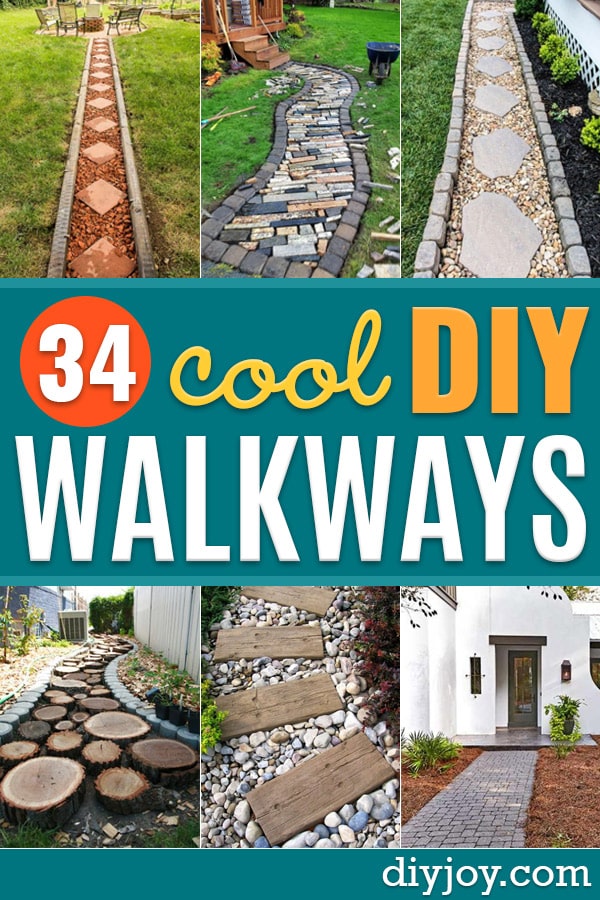
Need a way to get to your favorite spot in the backyard without arriving with your shoes caked in mud? A walkway is the fix, and it does not have to mean a landscaping quote and a weekend of regret. These 28 DIY walkway ideas run from stepping stones you cast in a cake pan on a Saturday morning to a proper paver path with a gravel base under it, plus gravel, brick, granite offcuts, pallet wood and log rounds. Several cost nothing at all beyond your time, because free brick and scrap wood are genuinely everywhere once you start asking. Some are pure garden decoration and some are real hardscaping with a shovel involved. Get the kids or a friend in on the stepping stones and you end up with a path and a keepsake in the same afternoon.
Table of Contents
- 1. Stenciled Garden Stepping Stones
- 2. Inexpensive Mulch and Stone DIY Walkway
- 3. Patio Blocks
- 4. DIY Stepping Stones
- 5. Build a Beautiful Brick Pathway
- 6. DIY Pathway of Cedar Stepping Stones and River Rock
- 7. DIY Gravel Garden Path
- 8. DIY Large Paver Walkway
- 9. DIY Barefoot Sensory Path
- 10. Make Lace-like Stepping Stones
- 11. Rhubarb Leaf Stepping Stones
- 12. Cement Stepping Stones
- 13. Make A Walkway Using Recycled Counter Top Granite Scrap
- 14. Lay A Slate Walkway
- 15. How To Install A Paver Walkway
- 16. Wood Pallet Walkway
- 17. DIY Garden Stones
- 18. Build A Concrete Walkway
- 19. Paved & Stenciled Walkway
- 20. Pebble Mosaic Stepping Stone
- 21. DIY Brick Path
- 22. Hillside Sidewalk
- 23. Recycled Wood Slice Garden Pathway
- 24. Lay a Stone Path
- 25. DIY Mosaic Garden Stepping Stone Walkway
- 26. DIY Pathway With Gravel Drainage
- 27. DIY Solar Path Light
- 28. Make Your Own Brick Pathway For Under $50
1. Stenciled Garden Stepping Stones
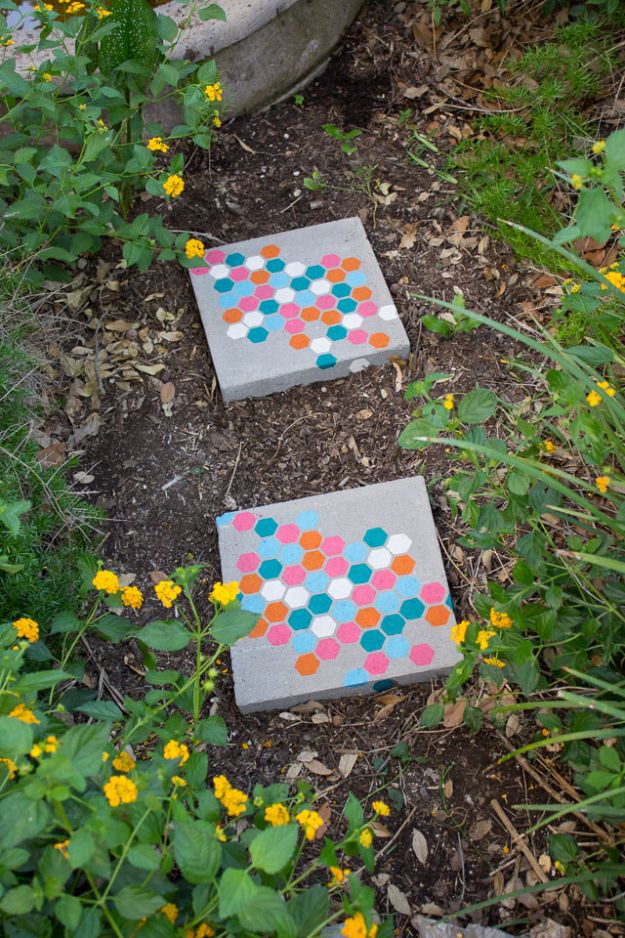
Plain concrete pavers, about $1.30 each from the home center, turned into something worth looking at with a stencil and weather-resistant acrylic. Tape a Stencil1 Honey Bee stencil down on the stone with painter’s tape, then fill the honeycomb cells one color at a time with a foam brush, repositioning the stencil and leaving some cells empty so the pattern scatters instead of tiling. Five FolkArt multi-surface colors, a bit over an hour a stone. It is the cheapest way on this list to get color into a landscaped bed.
Get the full tutorial at Design Improvised.
2. Inexpensive Mulch and Stone DIY Walkway
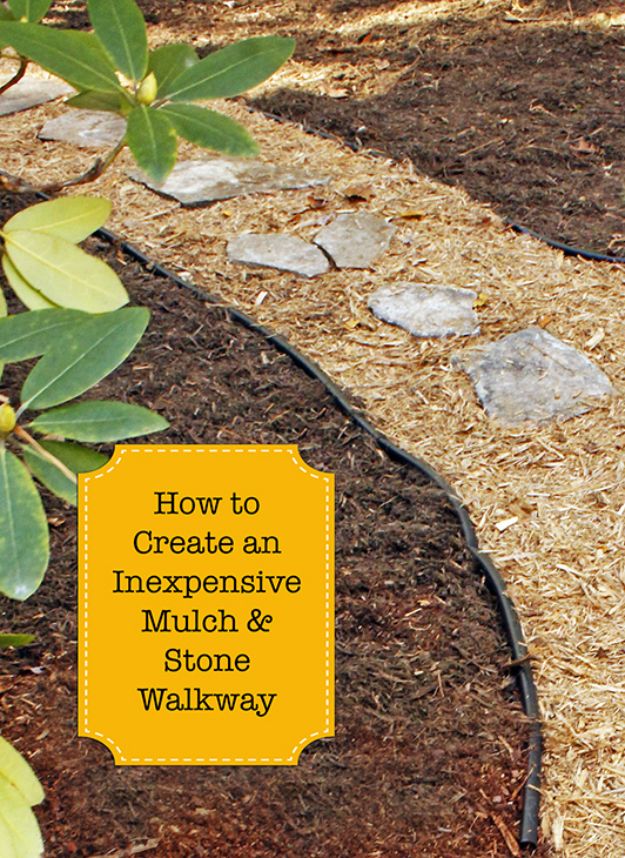
Mulch, a run of stones down the middle and plastic edging on both sides, which is about as cheap as a proper path gets. The pale stones against dark mulch is what makes it read as designed rather than dumped, and the edging is what stops the mulch migrating into the lawn by the second rain. It is aimed squarely at the mud pit every yard has, the worn patch that turns to red clay and walks into the house on everybody’s shoes. A weekend job with no concrete anywhere in it.
Get the full tutorial at Pretty Handy Girl.
3. Patio Blocks
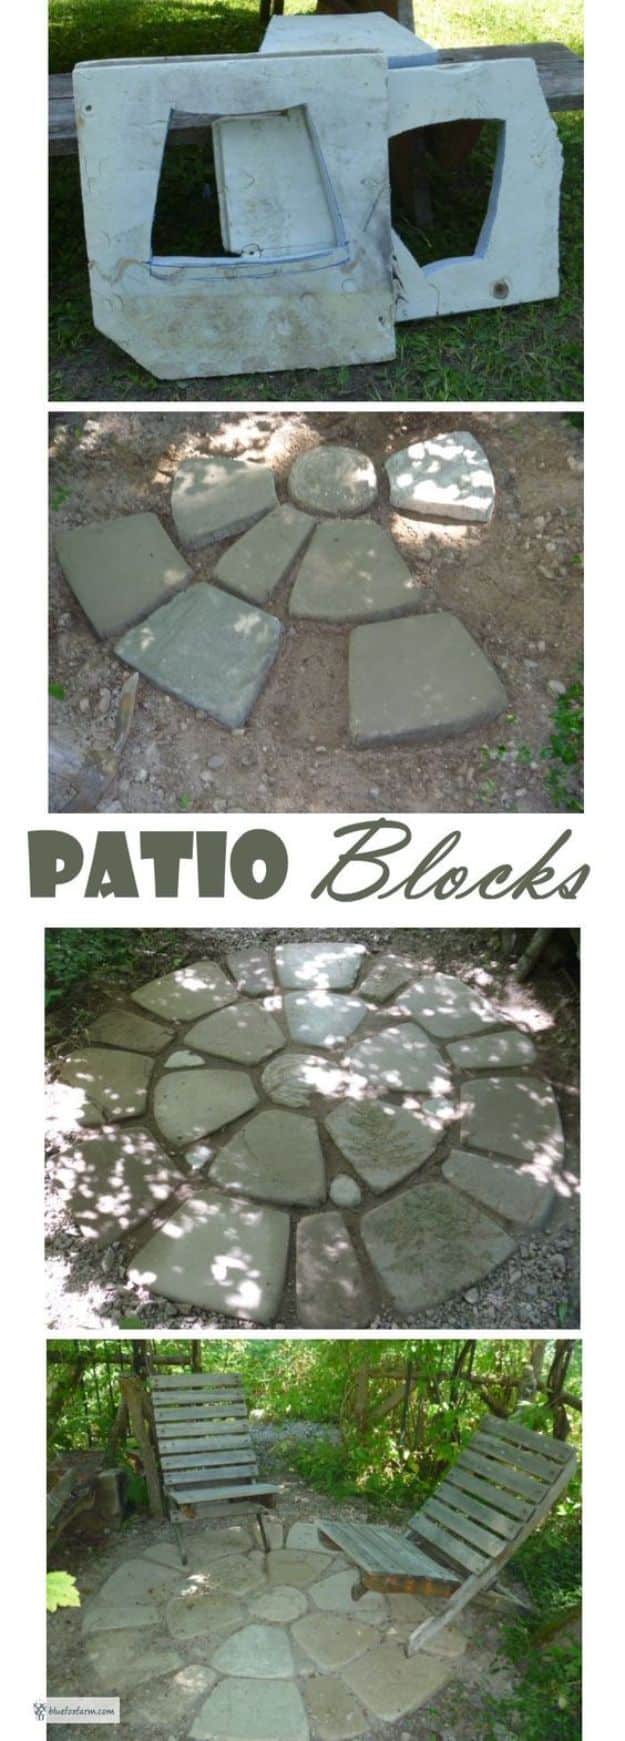
Soil cement poured into a mold cut from Styrofoam blueboard, which is a much friendlier route than a concrete mixer and a bought form. Blueboard cuts with a serrated knife, so the mold shape is entirely up to you, and a batch of soil cement mixes in a wheelbarrow in a few minutes. The finished blocks run about 35 to 40cm long in varying widths so they fit together as a medallion, and the round center block is cast in a plastic bag inside a bucket so it lifts straight out.
Get the full tutorial at Blue Fox Farm.
4. DIY Stepping Stones
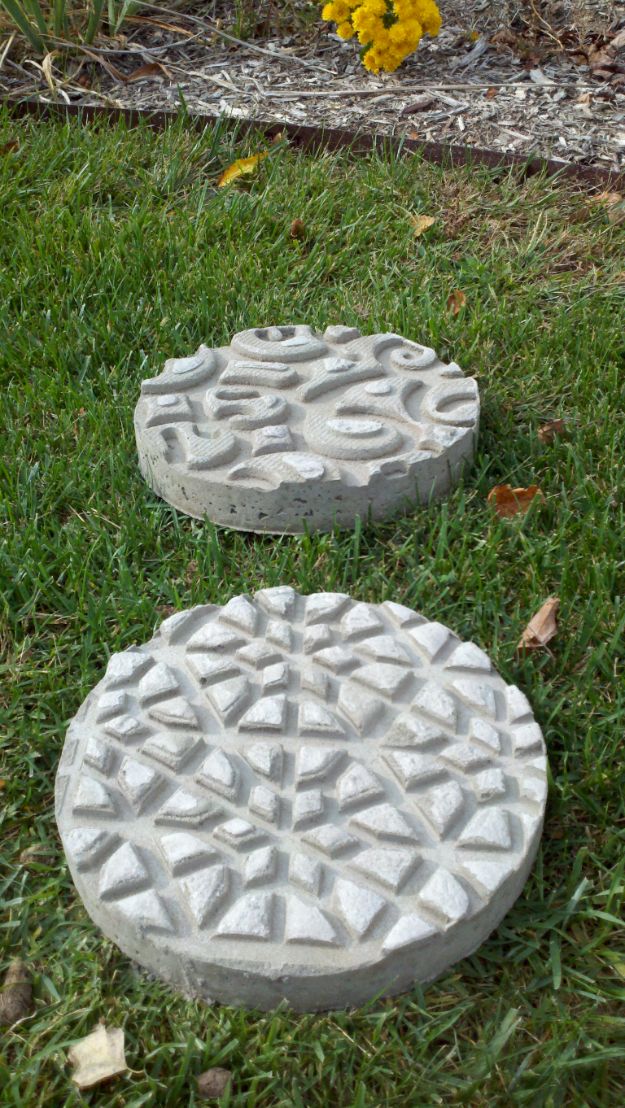
Cardboard tubing sawn into three inch rings becomes the form, and a rubber doormat with a raised pattern becomes the texture. Oil the board and the inside of the rings, pour fine concrete mixed to a thick putty, let it sit forty five minutes, then press an oiled piece of doormat onto the top. Twenty four to forty eight hours later the mat peels off and the stone slides out of the tube with the pattern printed into it. Cheap tools, a very good finish, and every stone comes out different.
Get the full tutorial at The Mizelle Group.
5. Build a Beautiful Brick Pathway
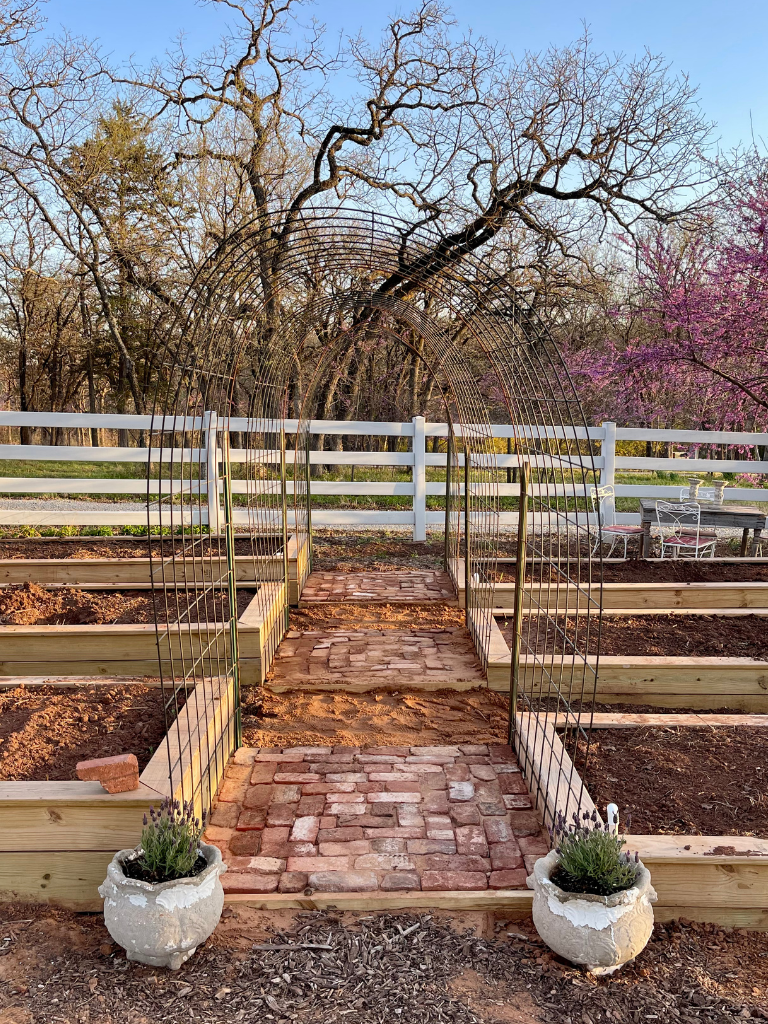
Weathered brick framed in with simple boards, bedded in sand, and swept full of more sand until the whole path locks itself together. This one came out of a pile of bricks left over from the original build of the house, sitting outside weathering for twenty five years, which is the ideal starting material and more common than you would think. The pattern is deliberately not fussy, because working around odd-sized old brick gives a path that looks collected over time rather than bought in one go.
Get the full tutorial at Penny Pennington Weeks.
6. DIY Pathway of Cedar Stepping Stones and River Rock
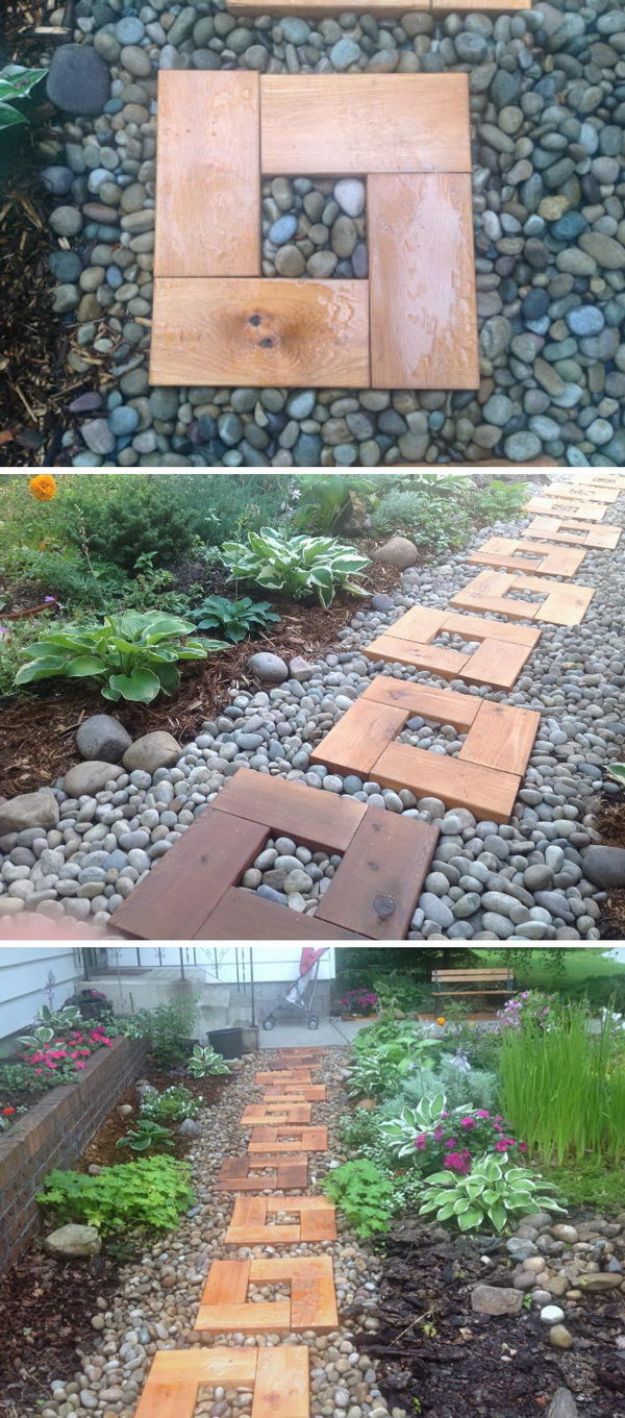
Cedar 2 x 6 cut into 11.5 inch boards, four of them joined with wooden dowels and exterior wood glue to make each square, finished in a penetrating oil stain and laid straight onto an old concrete walk. Inch and a half river rock fills the gaps over landscape fabric. The maker is refreshingly honest about the drawbacks: the pebbles shift underfoot, a lawnmower will not cross it easily, and the winter traction is an open question. Use it on a decorative run, not a route you walk every day.
Get the full tutorial at Backyard Garden (greenhousecarol.blogspot.com).
7. DIY Gravel Garden Path
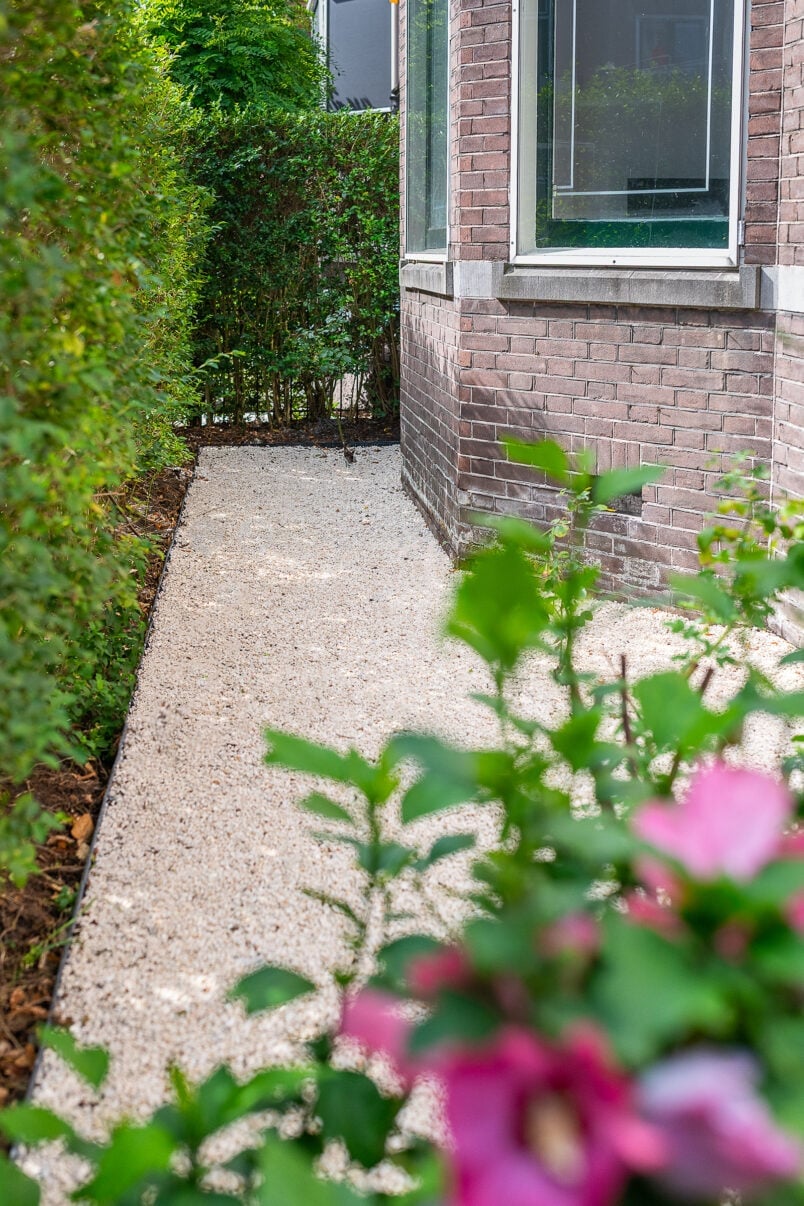
Excavate, edge, lay landscape fabric, then top with gravel: the four steps that turn a muddy, weed-infested strip into a clean path. The numbers are the useful part here. A garden path runs 60 to 120cm wide and 10 to 25cm deep depending on the loads it carries, and you should order 10 to 15 percent extra gravel for wastage and settling. Pea gravel is lovely underfoot but rolls on a slope; crushed stone interlocks and stays put. Check what your gravel looks like wet before you commit to a color.
Get the full tutorial at Little House On The Corner.
8. DIY Large Paver Walkway
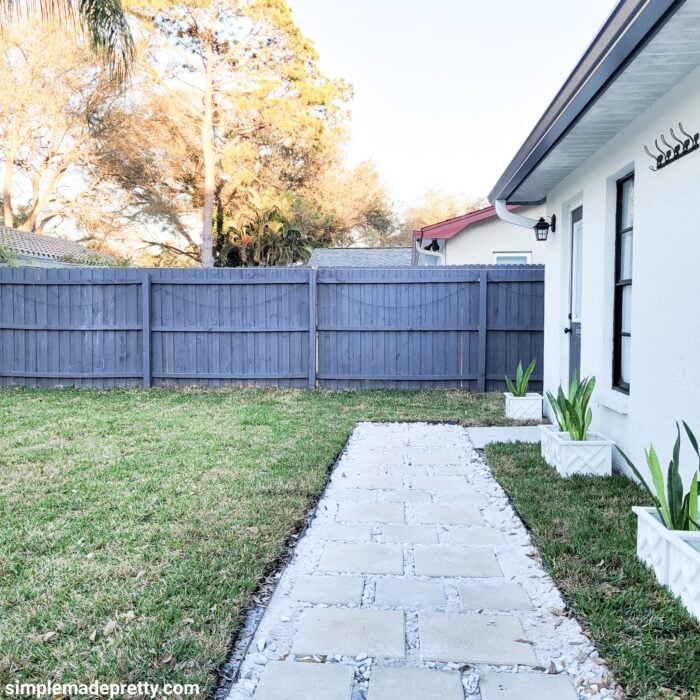
Big pavers laid straight into leveled ground, which is the simplest real walkway on this list. The maker mixed 12 x 12, 16 x 16 and 3.5 x 7 inch pavers with about an inch of gap between them, tapped each one down with a rubber mallet, then swept leveling sand into the joints. Her costs are worth quoting: paving companies quoted $10,000 to $15,000 for the whole job, and the side yard walkway came in around $150 doing it herself. Skip the weed barrier and just dig down properly instead.
Get the full tutorial at Simple Made Pretty.
9. DIY Barefoot Sensory Path
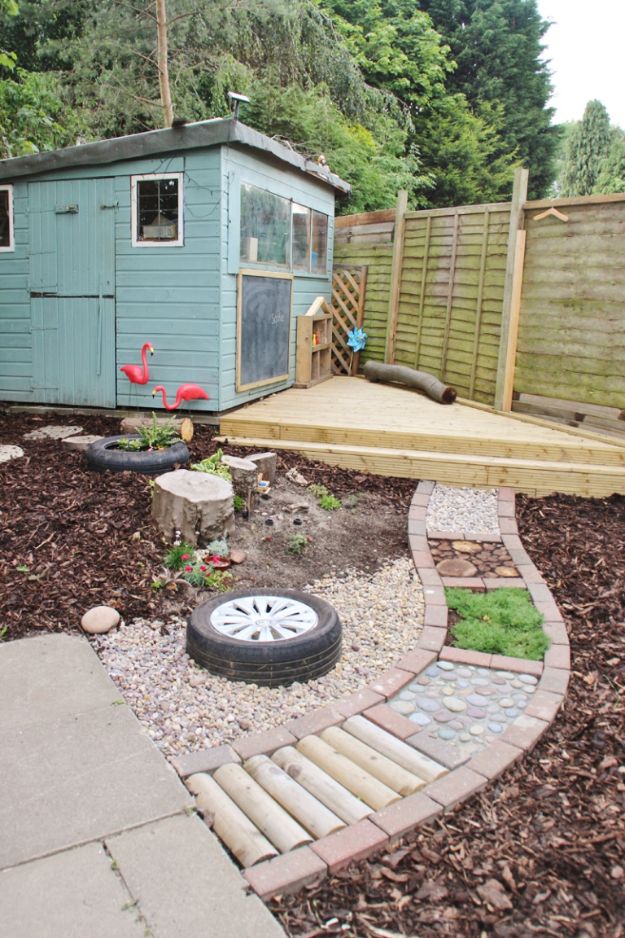
Paving blocks cemented into a dug-out curved ditch make the border, and each section inside gets a different surface so bare feet feel something new at every step. This one uses chamomile lawn in one section, which gives off a scent when trodden on and never needs mowing, plus loose pebbles, gravel and wood rounds in the others. Six chamomile plants spaced out filled a whole section in one season. It is a genuinely good use for the awkward strip of yard nobody has worked out what to do with.
Get the full tutorial at Play at Home Teacher.
10. Make Lace-like Stepping Stones
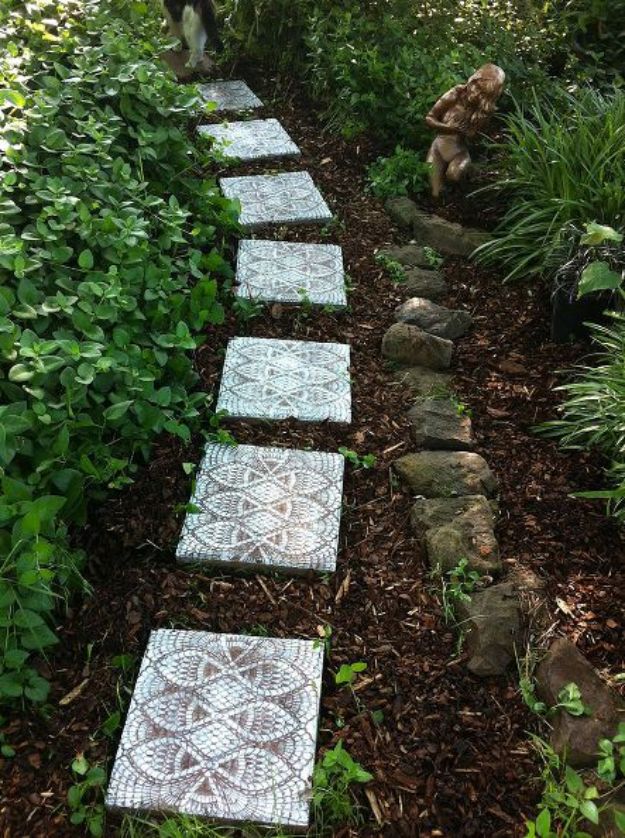
Not concrete work at all, which is the surprise: this is spray paint through a vinyl doily onto plain stepping stones you already own. Lay the doily flat on a scrubbed dry stone, mist exterior spray paint over the top in a shade that contrasts, lift the doily and the lace pattern is printed in. Seal with exterior clear coat. One can covers six or seven stones, and the maker found her doily in a second-hand shop for fifty cents. Fifteen buried stones came back out of the garden looking like heirlooms.
Get the full tutorial at Mindful Matters (the-wuvie.blogspot.com).
11. Rhubarb Leaf Stepping Stones
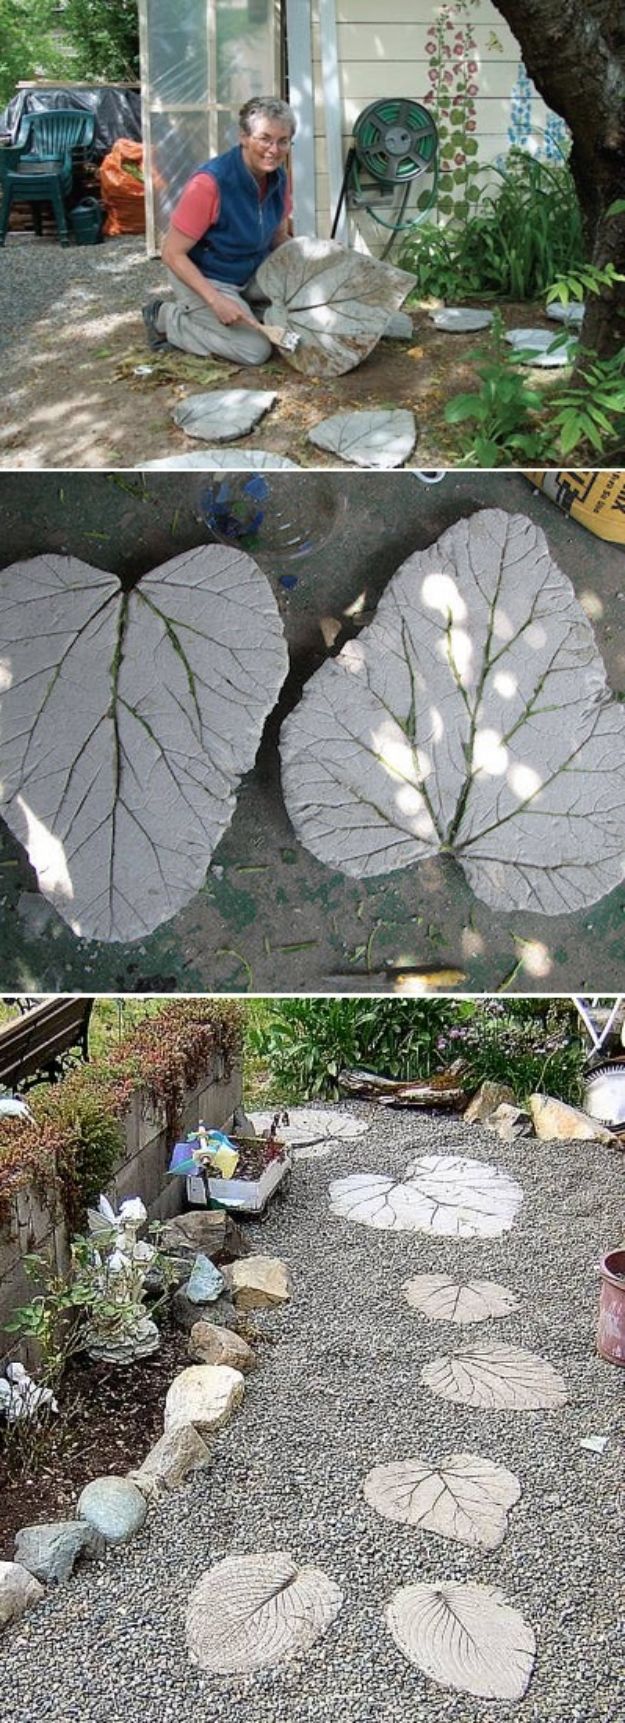
Lay a rhubarb leaf vein side up on plastic, trowel concrete over it about an inch thick keeping half an inch back from the edge, press a piece of wire two inches smaller than the leaf into that layer as reinforcement, then add another inch on top. Wrap the plastic up around it, prop it with sand or dirt and leave it to cure for forty eight hours. Every rib and ripple prints into the underside. No two leaves match, so no two stones match, and the wire is what stops them cracking later.
Get the full tutorial at Alternative Energy Gardening.
12. Cement Stepping Stones
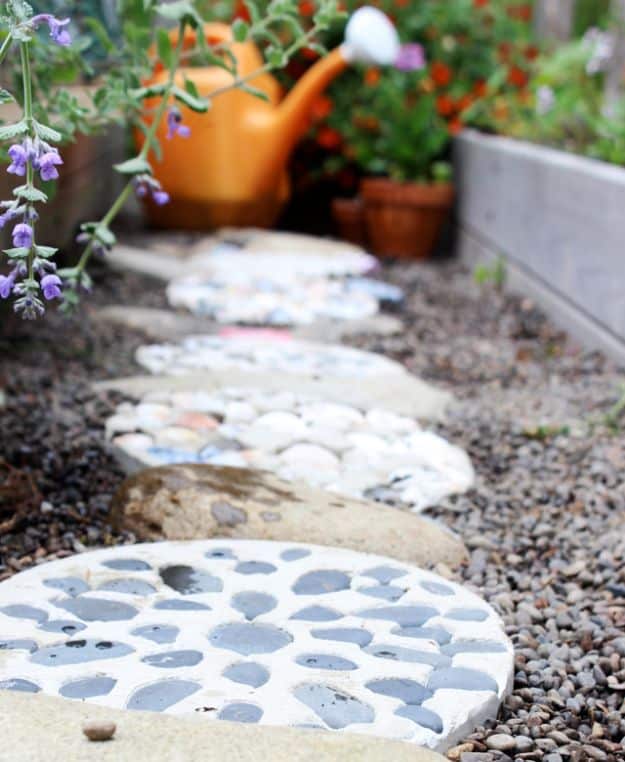
The family shell and rock collection finally gets used. Slices of Quick-Tube, the fiber tube meant for concrete columns, get traced onto a sheet of plywood and used as round forms, an old cake pan works just as well. Shells and stones are arranged face down in the form, then Cement All with a little pea gravel mixed in is poured over the top and the forms braced with scrap 2 x 2 so nothing shifts. Twenty four hours later they pop out. Set the arrangement before you mix, because cement waits for nobody.
Get the full tutorial at Alisa Burke.
13. Make A Walkway Using Recycled Counter Top Granite Scrap
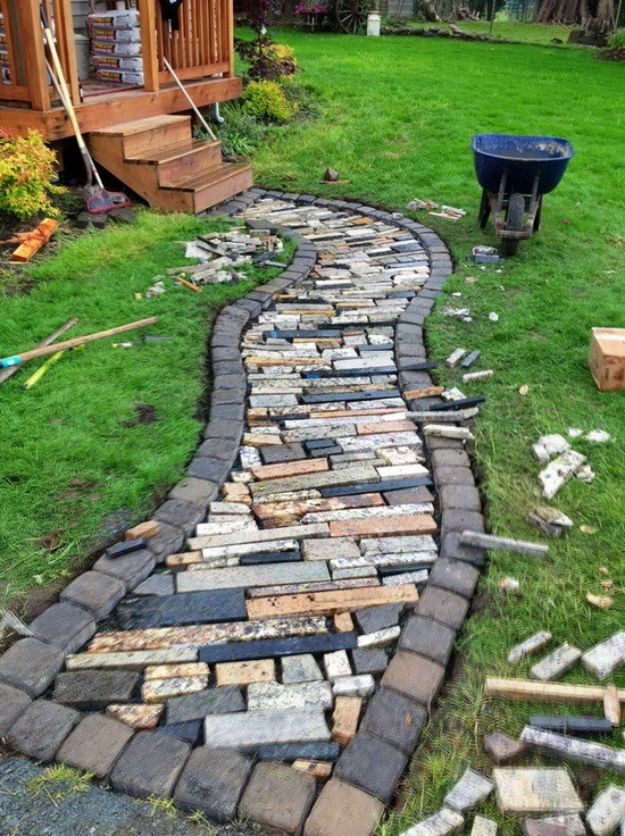
Granite countertop fabricators pay to dispose of their offcuts, so most will hand over a batch cheap or free to anyone willing to take it away. This path used three pallets of pieces ranging from 1 x 2 inches up to 2 x 3 feet, sorted for the best ones and laid like flagstone between rows of ordinary cobble pavers. Polished stone catches the light after rain in a way a plain paver never will. One genuine safety note from the source: wear a dust mask if you cut granite yourself.
Get the full tutorial at Remove and Replace.
14. Lay A Slate Walkway
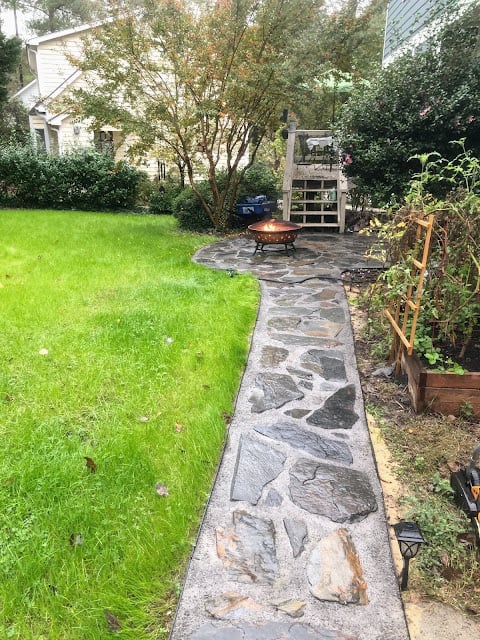
An honest account of what real slate actually costs you in effort, written by someone who titled the post “and why we’d never do this again”. Gravel goes down for drainage, sand gets leveled over it, each stone is set by hand, and the joints are locked with polymeric stone dust. The demolition alone meant wheelbarrowing forty to fifty loads of old brick. The finished walkway looks like it belongs in a magazine, and the write-up is worth reading in full before you commit, precisely because it does not pretend the job is pleasant.
Get the full tutorial at Ring Around The Rubins.
15. How To Install A Paver Walkway
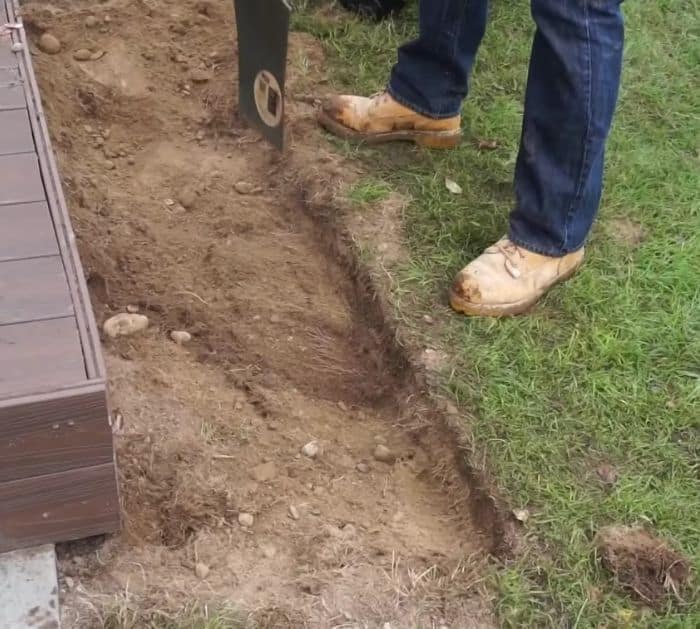
A full paver installation, start to finish, on a DIY JOY post with the video to follow along with. Out comes the old path, in goes garden edging, paver base and paver sand, then the stones themselves set level and tight. The finishing move is filling the gaps with exotic pebbles and mini white pebbles rather than leaving bare sand, which is what gives the run a clean edge and keeps daily foot traffic from working the joints loose. A weed barrier roll goes down before any of it.
Get the full tutorial at DIY Joy.
16. Wood Pallet Walkway
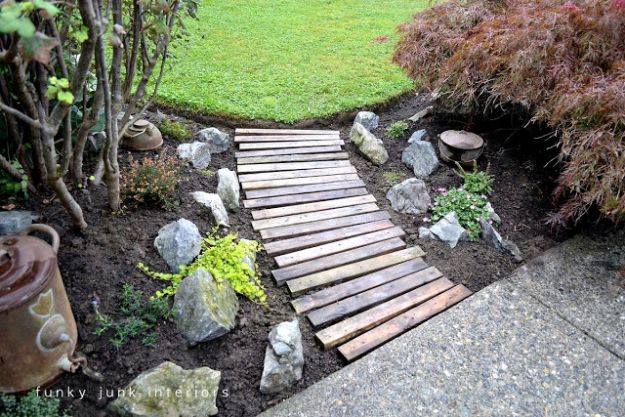
Reclaimed boards laid side by side over raked topsoil, with pea gravel or mulch underneath if you want it, and the whole thing can go down in an afternoon. It is free if the wood is scrap, and it is easily pulled up and replaced later, which is a rare quality in hardscaping. A gentle curve is what turns a row of boards into something that looks like it meanders through a garden rather than cutting across it. Mixed weathering across the boards is the part that makes a free path look deliberate.
Get the full tutorial at Funky Junk Interiors.
17. DIY Garden Stones
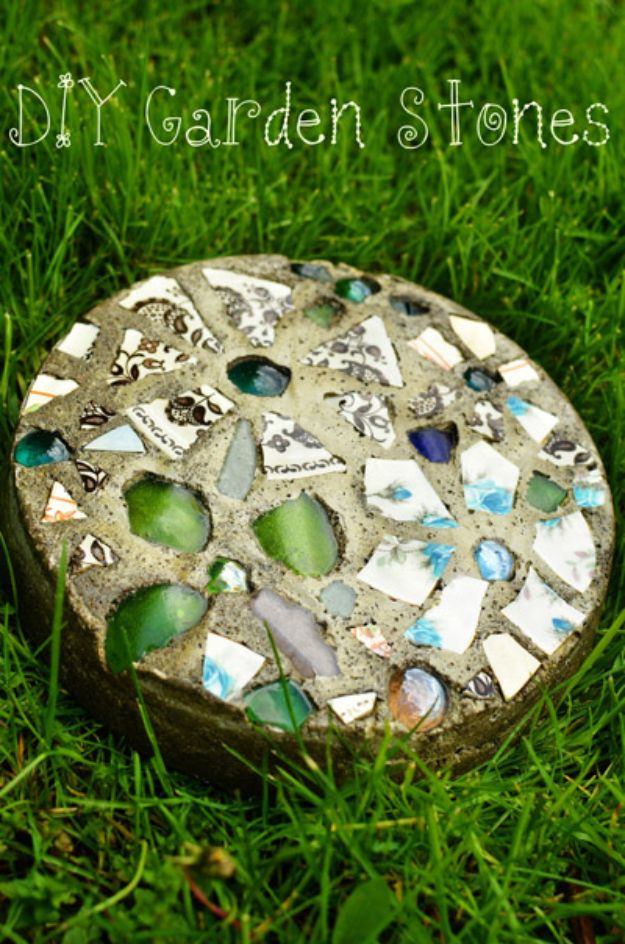
No mold needed, just a non-stick round cake pan and a circle of contact paper laid in it sticky side up. Smash old thrift store plates inside a cloth bag, then lay the pieces face DOWN onto the contact paper, which is what makes this the easy indirect method: you are building the design in reverse and you can lift the sheet to check it before anything sets. Vaseline around the rim, an inch of concrete, a square of chicken wire, another inch on top. Two days, then tap it out and peel the paper away.
Get the full tutorial at Intimate Weddings.
18. Build A Concrete Walkway
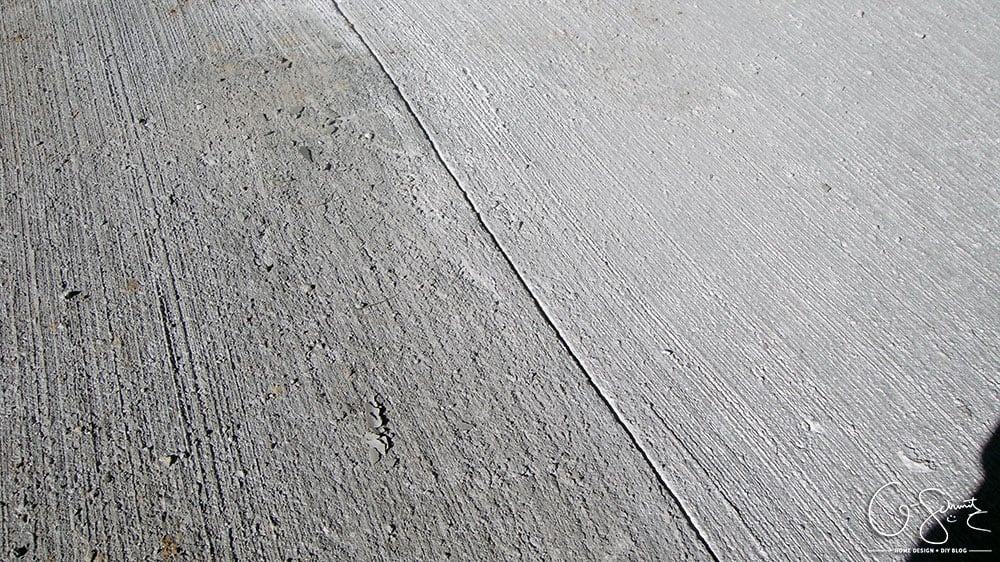
Framing, pouring and finishing a poured concrete walk, told with the mess included: concrete splashed onto the patio and a freshly painted front door, color variation across the slab depending on how set each section was when it got brushed, and an honest pros and cons list at the end. There is also a proper expansion joint cut into it, which is the step that decides whether the slab cracks where you chose or where it feels like. Read the framing and pouring post first, then decide.
Get the full tutorial at Madness and Method.
19. Paved & Stenciled Walkway
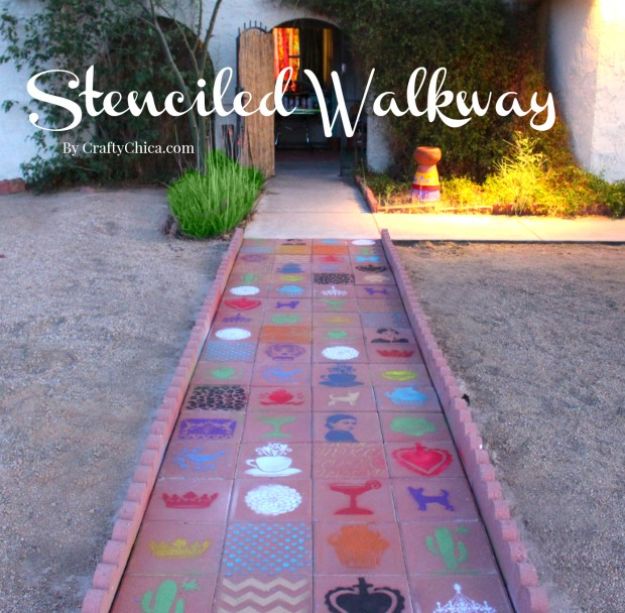
Eighty-odd 12 x 12 pavers at $1.32 each, seven bags of fine grade sand, a mallet and a length of string is the entire materials list for the paving. Six bags of sand go under, one goes over the top and gets swept into the joints then misted with water so it sets. The stencilled designs come after, in exterior spray paint, and the finished run looks like a talavera market spilled down the garden. String anchored in a straight line is what keeps the pavers honest as you tap them together.
Get the full tutorial at Crafty Chica.
20. Pebble Mosaic Stepping Stone
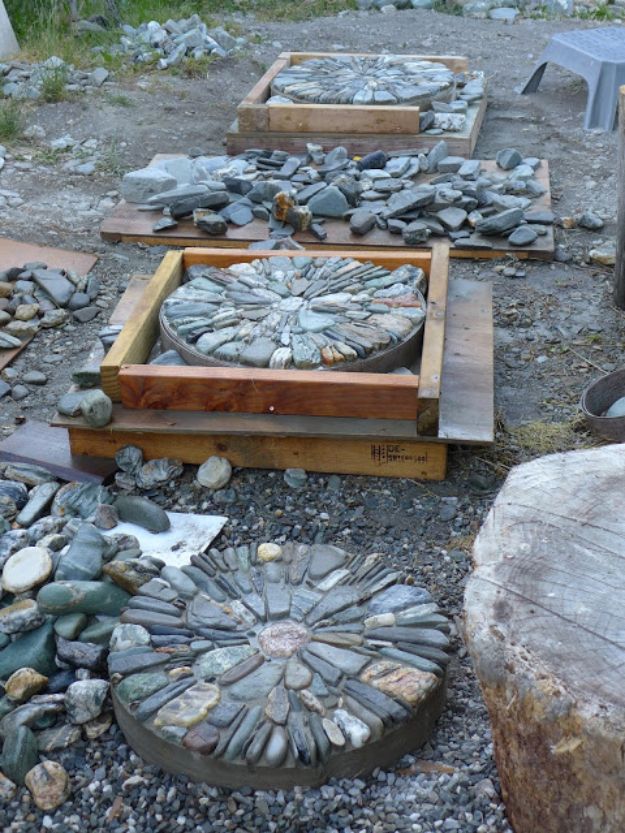
River pebbles sorted by size and shade, then set on edge into mortar inside a wooden form, in spirals and starbursts. This comes from a mosaic artist who has taught the technique in workshops, and his numbers give the scale away: twenty people need twenty forms, twenty bags of mortar and another ton of sorted pebbles. That is what a mosaic actually consumes. Set the pebbles deeper than feels right, over half buried, or a hard winter will lift them out one at a time. Start with a single accent stone.
Get the full tutorial at Jeffrey Bale's World of Gardens.
21. DIY Brick Path
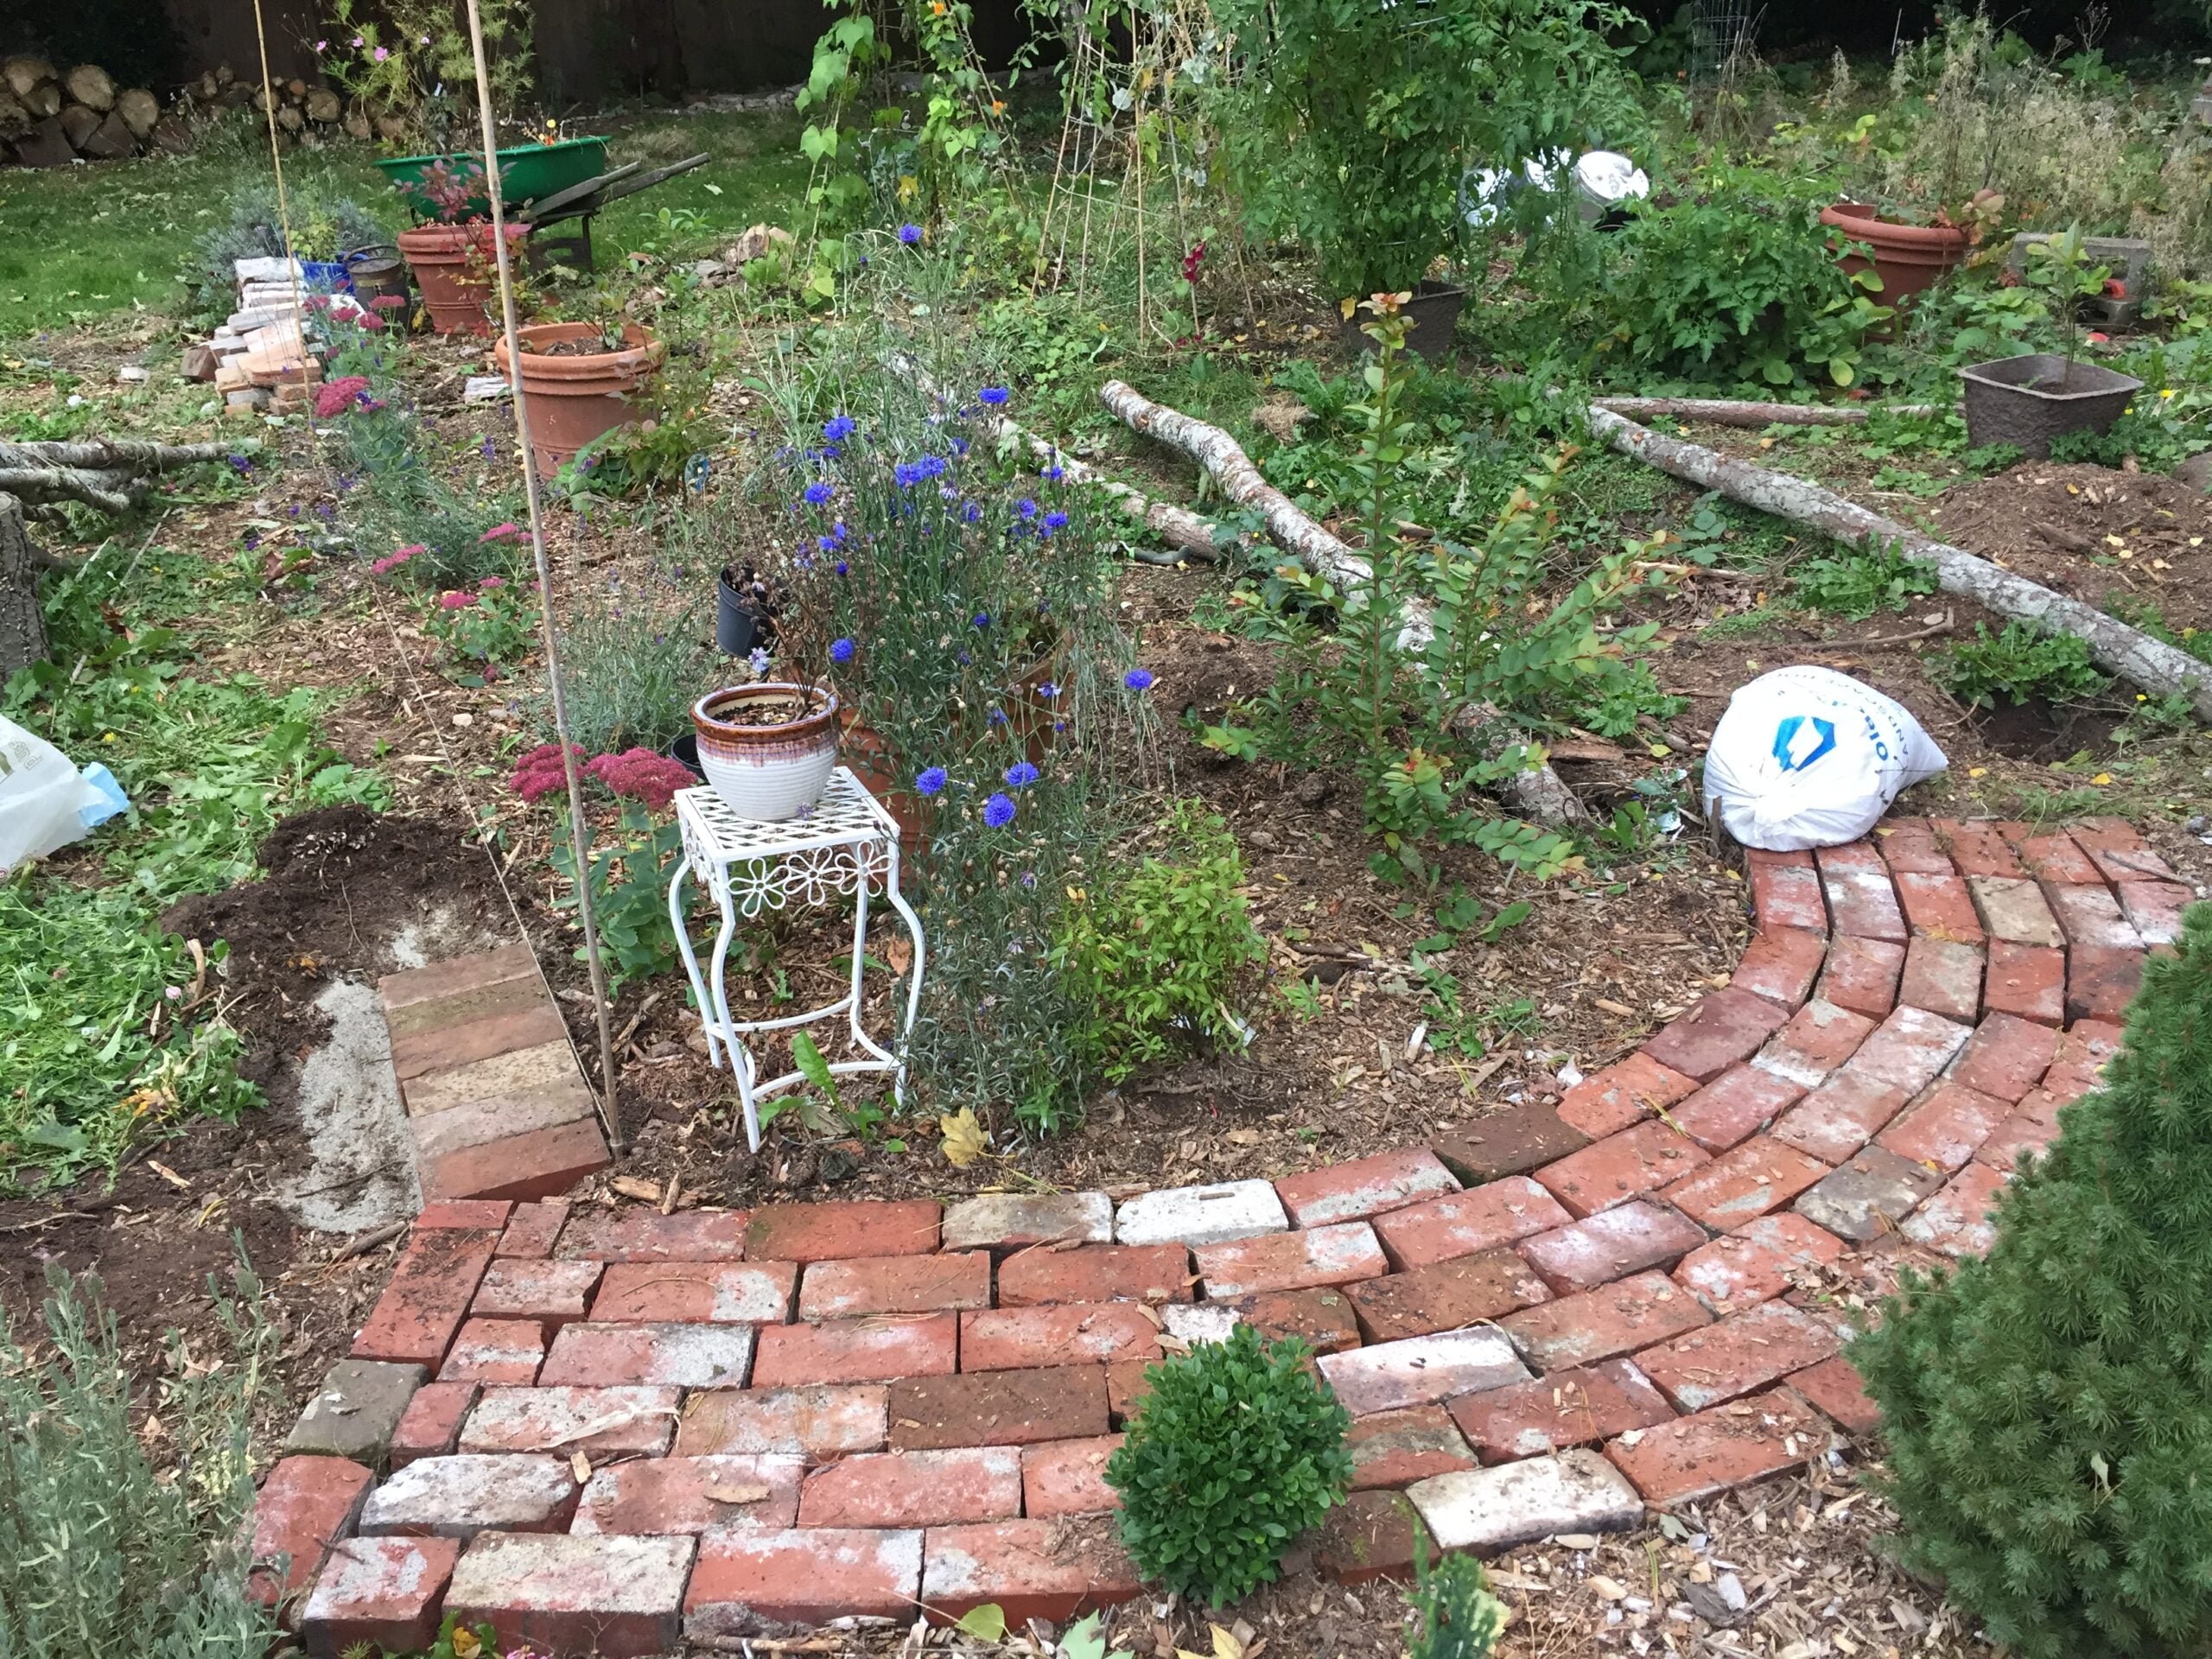
Free brick off Craigslist and Facebook Marketplace, usually from somebody removing a fireplace or re-facing a house, which means an evening or two chipping off old mortar first. Sometimes a listing is brick already pulled from a garden path, and those come clean. The maker deliberately did not excavate or level, just raked the ground and laid the bricks on bagged sand in a loose staggered pattern. A slightly imperfect brick path only adds to the charm, and it makes a new yard look established in a single weekend.
Get the full tutorial at Suburban Farmer Mom.
22. Hillside Sidewalk
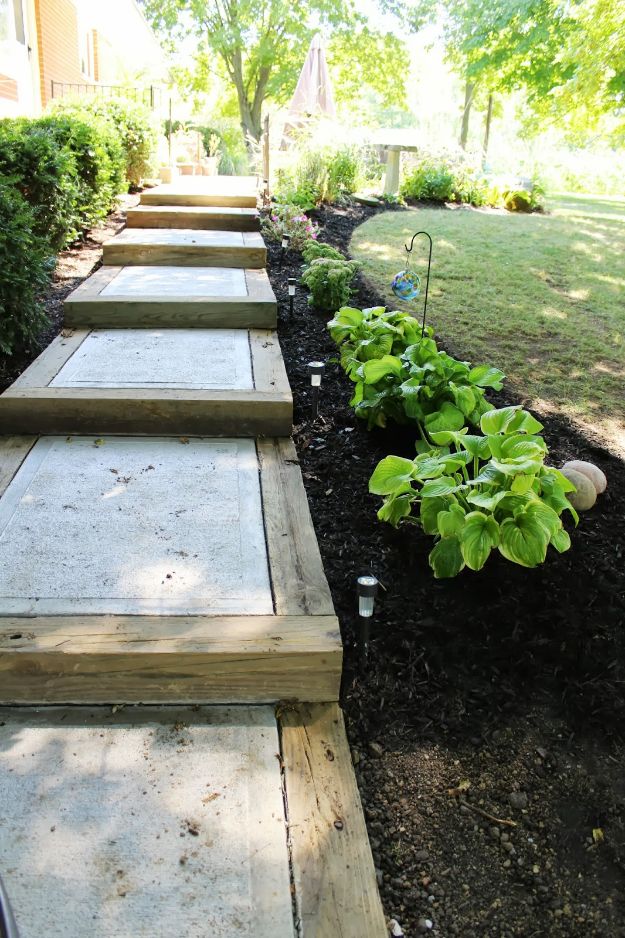
The problem most path tutorials quietly skip: a yard that is not flat. This one steps down a slope in concrete sections retained by salvaged 6 x 6 pressure treated beams, thirty five of them rescued from a playground that was being torn out. Seven steps over about a 42.5 inch drop, with a couple adjusted so everything sits level. Worth knowing before you buy lumber: a 6 x 6 actually measures 5.5 by 5.5 inches, which changes the math. Compact the base hard, because shortcuts at the bottom surface within a year.
Get the full tutorial at Ohio Thoughts.
23. Recycled Wood Slice Garden Pathway
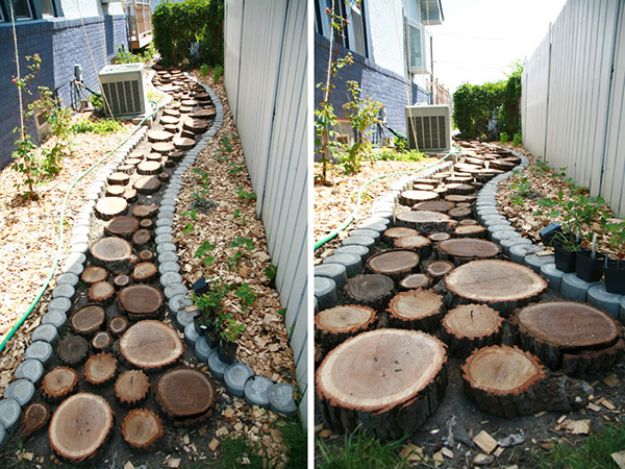
Thick rounds cut from a black walnut that came down in a tornado, the pieces too small or too irregular for the mill, laid like pavers with gravel filling the gaps. That is the honest origin of this one and it is worth knowing, because the material is usually free: ask a tree service about their next removal and many will leave you rounds rather than haul them away. Sealing the slices properly is the step that decides whether the path lasts five years or two. Hardwood rounds wear best.
Get the full tutorial at Celebration Generation.
24. Lay a Stone Path
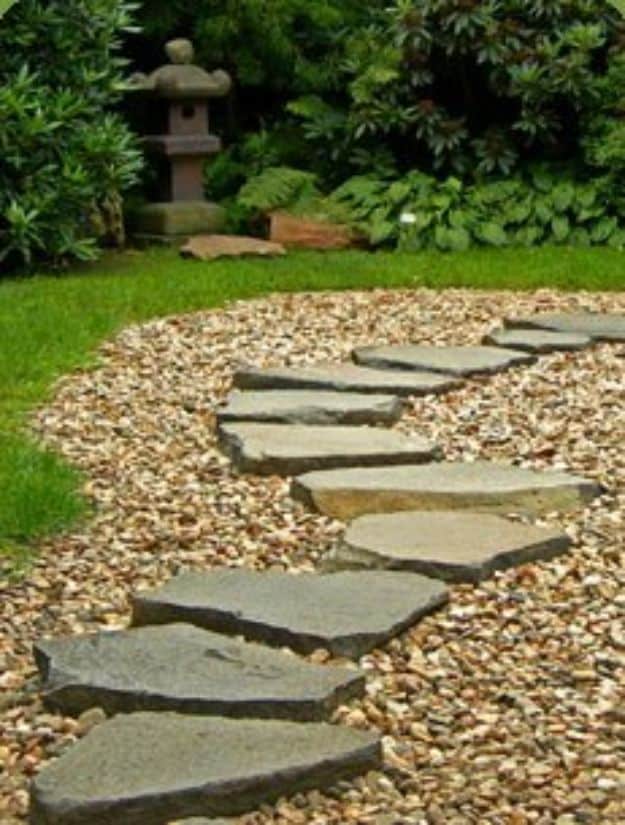
The foundational version, and the one to read first, because the technique carries over to half the other projects here. Walk the route and drop a landscaping spike where the center of your foot lands at each step, which sets the stone spacing to a real stride instead of a guess. Then dig the beds, level crushed limestone or sand under each stone, seat it with a rubber mallet and check it with a spirit level. Most paths are really a sand path with a pretty top layer, so the prep is the whole job.
Get the full tutorial at Bob Vila.
25. DIY Mosaic Garden Stepping Stone Walkway
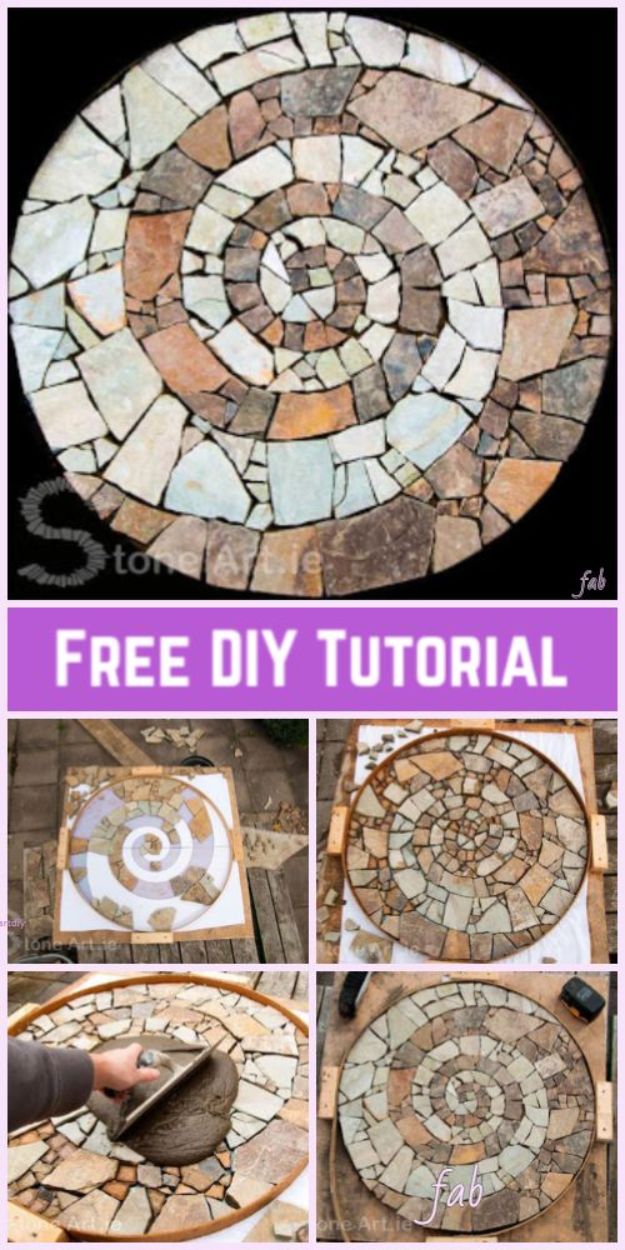
A spiral of small cut stone tiles worked out from the center of a concrete round, photographed step by step so you can see how the rings tighten as they go. The page is honest that the technique is straightforward and the planning is not, and it hands you off to a stone art blog for the full method rather than pretending to teach it. Take the spiral as the pattern to copy and the collage as the proof it works. Any broken tile, china or glass you already own will behave the same way in the concrete.
Get the full tutorial at FabArtDIY.
26. DIY Pathway With Gravel Drainage
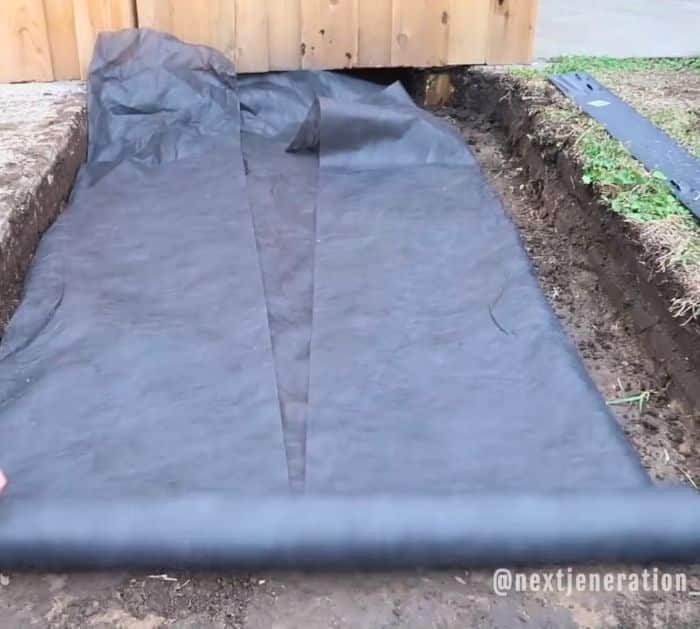
A path built so it actually drains, which matters in the corner of the yard that never dries out. A layer of coarse number 57 limestone goes in at the bottom to carry water away, mason sand levels everything, finer number 8 limestone goes around and over the pavers, and 24 x 24 inch pavers sit on top. Metal edging holds the whole build in place. A sod cutter takes the grass off cleanly and a tamper is not optional at any stage.
Get the full tutorial at DIY Joy.
27. DIY Solar Path Light
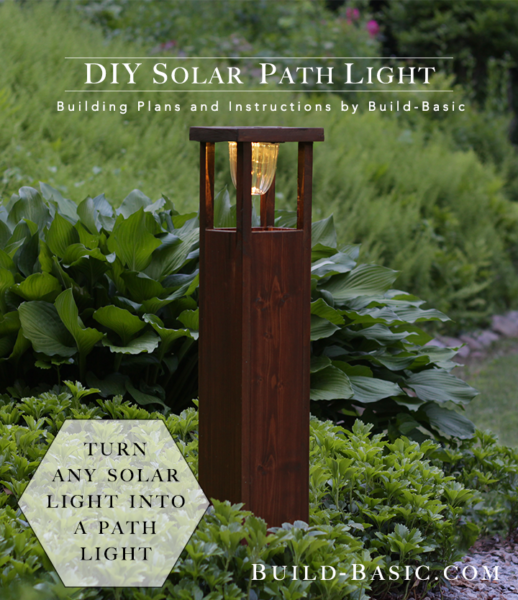
A cheap off-the-shelf solar light dropped into a stained wood box frame, which lifts it to a height where it actually reads as landscape lighting instead of a plastic stake. The build is four 1 x 4 sides cut at 27 inches, four square dowel edgers at 33 inches and a 1 x 8 cap cut to 7.25 inches so it overhangs. Twenty dollars and two hours, by the maker’s own count, with no wiring anywhere. A whole row of them down a walkway changes the front of a house after dark.
Get the full tutorial at Build Basic.
28. Make Your Own Brick Pathway For Under $50
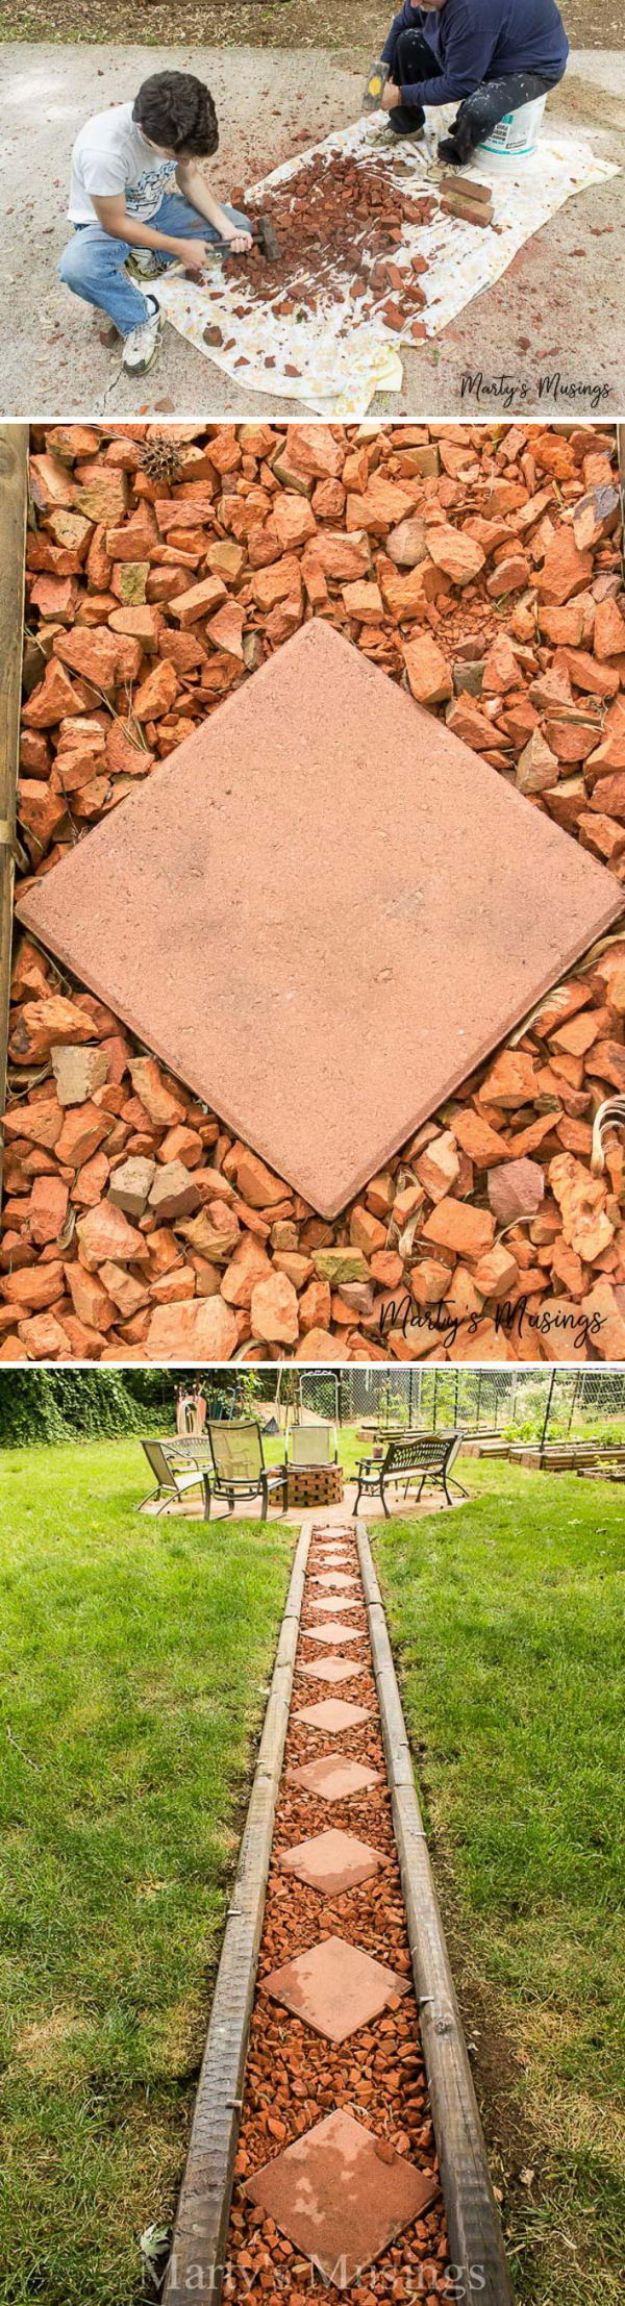
The reddish bed this path sits in is not bought gravel: it is brick chips, made by taking sledgehammers to the bricks that were too broken to lay. The maker’s verdict on that job is worth having before you copy it, because he says he will never make brick chips again. Square pavers then sit on point down the middle of the chips, with stained landscaping timbers holding the edges. It runs from the deck to the fire pit, around the patch of lawn two dogs had already claimed, and it is a fitting last entry: the best paths get made, not bought.
Get the full tutorial at Marty's Musings.