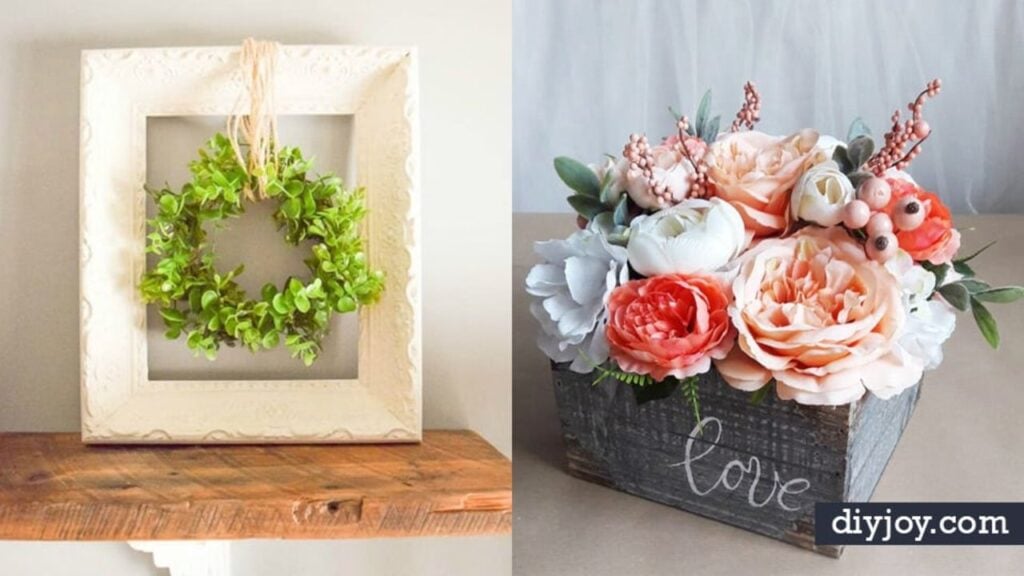
Love the Fixer Upper look but not the price tags that come with it? These 35 Joanna Gaines inspired DIY farmhouse decor ideas get you there with paint, scrap wood, thrifted frames and a little patience. Farmhouse style mixes worn wood, galvanized metal, chippy white paint and plenty of greenery, and almost every piece of it can be made at home. You’ll find plank walls and window trim for the big weekend upgrades, plus quick wins like a wood bead garland that takes about ten minutes and costs less than five dollars. A few DIY JOY favorites with step by step videos are mixed in too, from denim pocket placemats to a beaded chicken wire suncatcher. None of these are official Magnolia designs, just the same cozy feel made by hand. Find even more rustic projects in these DIY farmhouse decor ideas.
1. Upcycled Frame and Wreath

An upcycled frame and wreath turns a dingy thrift store frame into a farmhouse wreath hanger. This one cost $1 at a yard sale and got two coats of an off-white chalky paint, which makes the carved details pop. A 6 inch grapevine wreath is filled with faux boxwood sprigs and hot glue, working from the inside edge out so the gaps close neatly. Twine wrapped a few times around the frame holds the little wreath centered. For extra depth, rub a little antique wax over the carving before hanging.
Get the full tutorial at Making Joy and Pretty Things.
2. Make a Wood Bead Garland with Tassels

A wood bead garland with tassels takes three supplies, less than ten minutes and under $5. Wrap jute around your palm about 15 times, tie it off a quarter inch from the top and snip the loops to make the first tassel. Thread a long piece of jute through it, slide on roughly 60 round wood beads, then finish with a second tassel. Look for the beads in the unfinished wood aisle of the craft store rather than the jewelry section. Drape it around glass jars, a vase or a stack of books.
Get the full tutorial at Little House of Four.
3. DIY Fixer Upper Cathedral Window Frame

This DIY Fixer Upper cathedral window frame starts as an unfinished arched window cutout, the kind sold on Etsy for far less than the store version. Wipe on a medium brown stain like Provincial with a foam brush, then rub it off with a rag, testing the color on the back first. Mix a little white paint into clear finishing wax and rub it over the wood for a whitewashed, antique finish, adding more in some spots and dry brushing others. Prop it on a mantel and hang a magnolia wreath in front.
Get the full tutorial at The Turquoise Home.
4. DIY Farmhouse Wooden Box Centerpiece

A DIY farmhouse wooden box centerpiece is a great way to use up scrap 1×6 boards. The finished box here measures 27.5 inches long, 7 wide and 5.5 tall, built from three 26 inch boards for the sides and bottom and two 7 inch end pieces. Join everything with pocket holes and 1 1/4 inch screws. Cut the ends last, after the sides and bottom are assembled, so they fit exactly. Finish with dark walnut stain, a coat of paint and a light sanding, and add a drawer pull to each end.
Get the full tutorial at The Turquoise Home.
5. Rustic DIY Chalkboard Wall Art

Rustic DIY chalkboard wall art only needs a board or canvas, chalkboard paint and a white chalk marker. Paint two coats for even coverage, then season the surface by rubbing the long side of a piece of chalk over everything and smoothing it in with your hand. Sketch a favorite quote and some laurel leaves in plain chalk. Not confident freehanding? Print the design, chalk the back of the paper and trace over it to transfer the lines. Fill everything in with the marker, wipe off the guide lines and hang it with binder clips.
Get the full tutorial at Dwell Beautiful.
6. Magnolia Inspired DIY Wood Shopping List Pad

This wood shopping list pad uses a roll of receipt paper, so the list tears off and goes to the store. Cut birch plywood to fit the roll (a 1/4 by 6 by 12 inch piece works). Trim a strip of steel plate with tin snips, drill each end and screw it to the wood with washers underneath so paper slides through. Eye hooks hold a bent galvanized wire that runs into the roll, and refilling is just a matter of easing one wire out. Glue magnets on the back for the fridge.
Get the full tutorial at The Merrythought.
7. Jeans Pocket Placemats
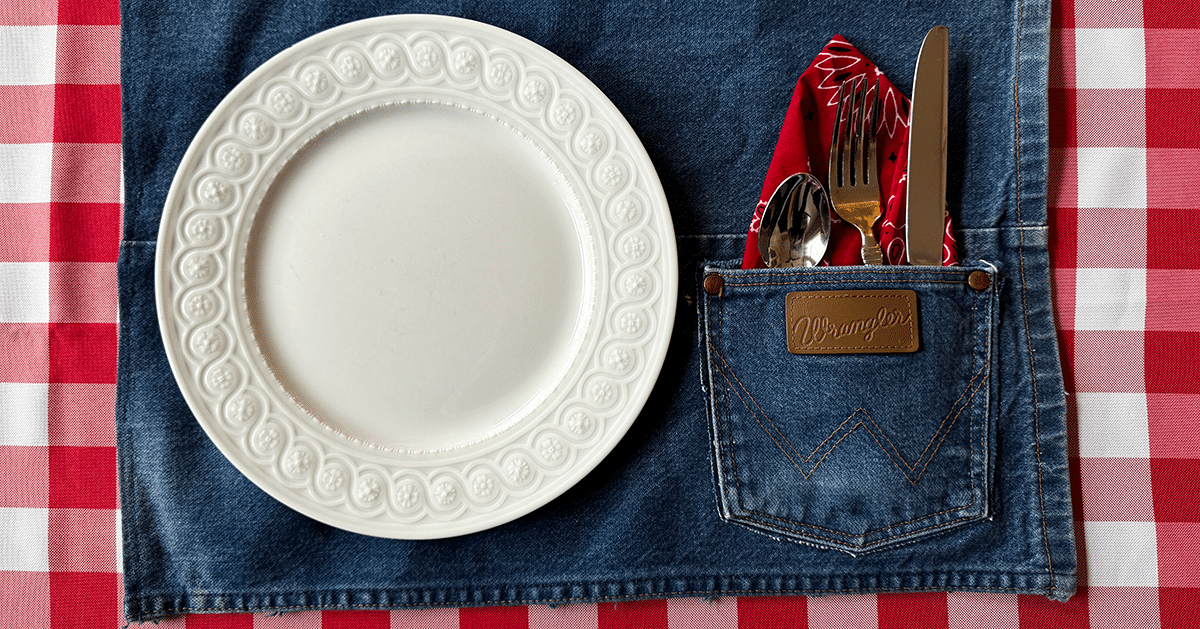
Jeans pocket placemats are a no-sew farmhouse table idea made from old denim. Each pair of large, non-stretch jeans makes two. Cut up the outside seam, cut the leg off at about 22 inches and trim the flat piece to 14 by 19 inches. Cut out a back pocket, staying close to its seam. Fold every edge of the mat a quarter inch, iron it and secure with fabric glue and clips. Glue the pocket on one side, then tuck in silverware and a napkin. Mix washes for a fun set.
Get the full tutorial at DIY Joy.
8. Windmill Wall Decor using Ceiling Fan Blades

Windmill wall decor made from old ceiling fan blades costs a few dollars instead of the big prices on salvaged windmills. Trace a blade onto cardboard, sketch an angular windmill shape inside and cut it out as a template. Trace it onto each blade and cut them down. Drill holes and bolt the blades to one quarter of a floral craft ring with chunky hardware. Galvanized spray paint makes them look like weathered metal, a rag of rust paint adds age and matte sealant tones down the shine. A wire behind the blades finishes it.
Get the full tutorial at Sadie Seasongoods.
9. Get a Farmhouse Style Finish

A farmhouse style finish is all in the layers, and it works on raw wood. Rub on Special Walnut stain with a lint free rag. Paint the base dark bronze without worrying about full coverage, then sand it with steel wool while the paint is dry to the touch but not cured, so it rolls away easily. On the top, dry brush gray paint and wipe it right off with a damp rag so it settles into the grain. A very thin coat of a darker stain adds warmth. Distress the edges with a sander and seal with clear wax.
Get the full tutorial at The Crafty Blog Stalker.
10. DIY Painted Window Panes

DIY painted window panes give you a vintage look for well under the $150 that catalog window mirrors cost. Old window frames from a garage sale or flea market are perfect. Give them about four coats of a warm white paint, then lightly distress the corners with a sanding sponge. Old windows are heavy, so add a heavy duty hook to the back of each one and screw them into the wall rather than relying on nails. Hang a boxwood wreath on the center pane with a heavy duty adhesive hook stuck to the glass.
Get the full tutorial at Burlap + Blue.
11. Restoration Hardware Inspired DIY Curtain Rods

These Restoration Hardware inspired DIY curtain rods cost less than $15 for a 6 foot rod. Use a 1 1/4 inch dowel cut a foot or two wider than the window plus simple wood brackets. Cut a half circle into each bracket with a hole saw and sand the edges. Beat them up a little with a hammer, wipe on walnut stain and drag a stainless steel wire brush hard along the wood while the stain is still soft to fake a deep grain. Dry brush a warm light gray paint over the top, then seal with dark wax.
Get the full tutorial at Maison de Pax.
12. Chalk Painted Herb Planters

Chalk painted herb planters turn orange terra cotta pots into soft, farmhouse style planters. Brush on one coat of light gray chalk paint, then one or two coats of white. Let the paint dry overnight before distressing. A dampened sanding sponge works best for rubbing back the white so the gray shows through without reaching the clay. Stamp each pot with the herb’s name using a small alphabet stamp set and black ink. Crooked letters only add to the charm. Fill them with basil, cilantro, thyme and lavender.
Get the full tutorial at Rustic & Woven.
13. DIY Shutter Mirror

A DIY shutter mirror pairs an old chippy shutter with a basic door mirror. If the mirror has a frame, peel off the paper backing and slice through the glue line with a utility knife, pulling the frame straight off so the glass doesn’t crack. Cut out the middle louvers with a reciprocating saw or a hand saw, leaving a few slats at the top and bottom. Lay the mirror face down on the back and hold it with plastic mirror clips and short screws. Dry brush white paint over any yellowed spots.
Get the full tutorial at Love Grows Wild.
14. DIY Rustic Shutter Bench

A DIY rustic shutter bench sets an old shutter on top of a simple base so it is sturdy enough for everyday sitting. Measure the shutter (this one is 14 5/8 by 66 1/4 inches) and cut a base board slightly smaller. Cut a notch in the board with a table saw so the shutter pull can sit flat. Screw straight leg mounting plates to each corner and the center of the underside, twist in the legs, then wipe away the sawdust. Paint the base and give the shutter a light coat so the two blend.
Get the full tutorial at Liz Marie Blog.
15. Easy Shiplap Wall DIY

This easy shiplap wall DIY uses plywood underlayment instead of real shiplap, which is lighter, cheaper and easy to pull down later. Have the store rip the sheets into 8 inch strips, then give them a light sanding. Brad nail each strip into the studs, using two pennies glued together as a spacer between rows. Cut around outlets and switches with a jigsaw before nailing, then fill nail holes with putty. Underlayment soaks up paint, so plan on paint with built in primer and an extra coat with a mini roller.
Get the full tutorial at Kristin Eldridge.
16. Reclaimed Wood Beam DIY With New Wood

This reclaimed wood beam DIY wraps an existing header in new 1 inch whitewood boards so it reads as one old timber. Glue and nail a board to each side, then add a bottom board as wide as the header plus both side boards. Plan the seams so they land symmetrically. Then beat the wood up with hammers, chisels and anything else on hand, paying the most attention to the corners and carrying each gouge across the seams to hide the joins. Finish with stain and metallic painted straps over the seams.
Get the full tutorial at The Weathered Fox.
17. Farmhouse Window Trim

Farmhouse window trim makes a small window look big and charming for under $10 in lumber and one afternoon, with only straight cuts. Set 1×4 side pieces on the sill and add a 1×4 apron underneath. Stack the header: a 1×2 an inch longer than the apron, a 1×6 the same length as the apron, another 1×2, then a 1×3 cap two inches longer than the apron. Brad nail as you go. A stubborn old sill can stay put; the new trim works around it.
Get the full tutorial at Love Grows Wild.
18. Repurposed Galvanized Side Table

A repurposed galvanized side table can start as almost any metal vessel. This one was a vintage honey extractor barrel found at a favorite vintage shop, with great embossed lettering and texture. For the top, an old metal side table that was never quite right got unbolted from its base, and the black round top was set right on the barrel. It grounds the gray metal, though a wood round would work too. Look for old milk cans, washtubs and barrels at flea markets, then add a lamp.
Get the full tutorial at Finding Home Farms.
19. DIY Chicken Wire Suncatcher
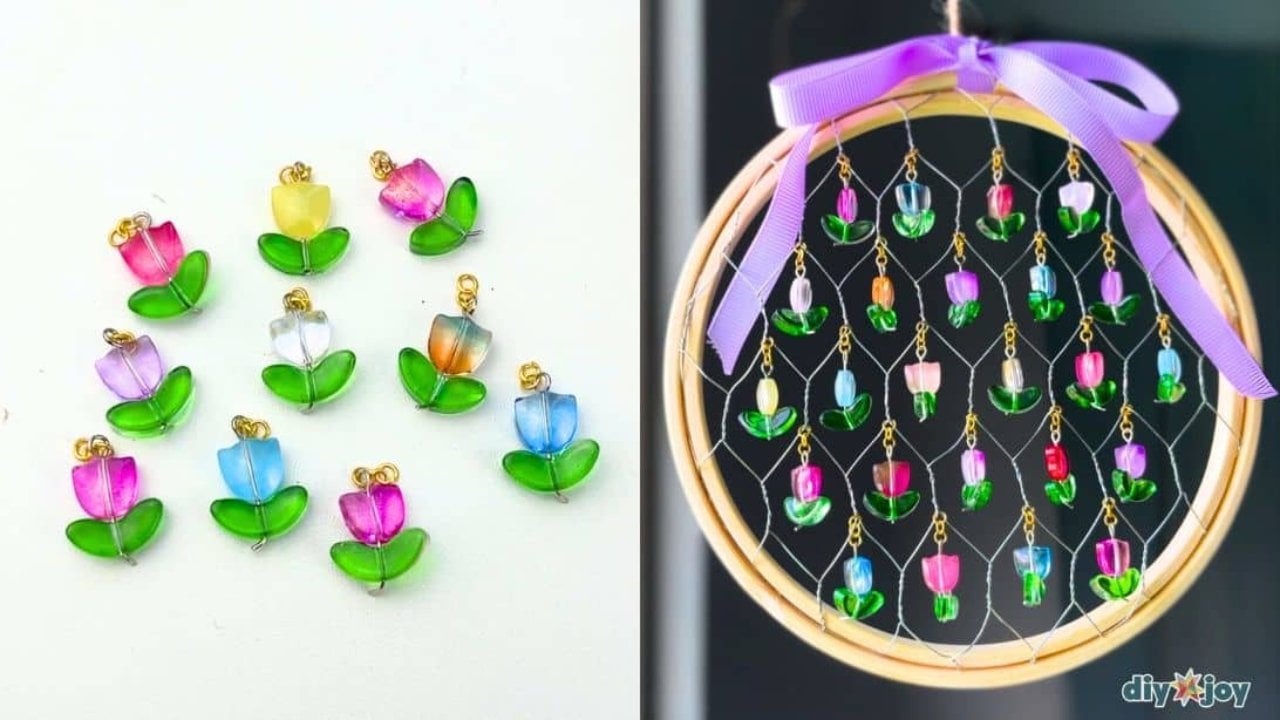
A DIY chicken wire suncatcher mixes a farmhouse staple with glass tulip beads. Take the inner ring out of an embroidery hoop and lay it on the chicken wire so the diamonds line up, then cut a circle with a little extra all around. Bend the edge over and lock the wire into the outer hoop. Thread a tulip bead and a leaf bead onto each head pin and bend the end into a loop. Hang the charms from the wire with short jump ring chains, then add a ribbon.
Get the full tutorial at DIY Joy.
20. DIY Painted Canvas Farmhouse Sign

This DIY painted canvas farmhouse sign uses a 10 by 20 inch craft store canvas instead of wood. Paint the whole canvas the letter color first. Cut the words from vinyl with a cutting machine and press the stencil on with transfer paper. Vinyl does not grip canvas well, so burnish it hard and peel the transfer paper slowly. Paint over the stencil in the letter color again to seal the edges, then add the background color in a couple of coats. Peel the vinyl for crisp lettering.
Get the full tutorial at unOriginal Mom.
21. DIY Farmhouse Style Mason Jar Planter

A DIY farmhouse style mason jar planter pairs painted jars with a wood and chicken wire carrier. Brush the mason jars with white chalk paint, using a couple of coats for full coverage. Paint the whole carrier metallic silver, two coats if needed. Once it dries, dab small amounts of gray paint over it with a crumpled paper towel for a weathered galvanized look. Too much gray? Go back over it with more silver and keep layering. Fill the jars with real or faux flowers, succulents or greenery.
Get the full tutorial at The Craft Patch.
22. DIY Chicken Wire Light Fixture

A DIY chicken wire light fixture starts with the inner rings of four thin embroidery hoops, stained and wired together in pairs with silver floral wire so they look thicker. Unroll chicken wire around the inside of one hoop to find the length and cut it about 12 inches tall. Attach it to both doubled hoops with more floral wire, then cut a flat circle for the top, leaving extra to bend down and tuck into the hoop. Thread the cord of a simple pendant light through the center and hang.
Get the full tutorial at The Inspired Hive.
23. Hardware Cloth Picture Frame

A hardware cloth picture frame turns a thrift store frame with no glass into a rotating photo display. Lightly sand the frame to clean it up and bring back the natural wood color. Measure the opening, then cut hardware cloth to size with wire cutters, wearing gloves because the wire is stiff and sharp. Staple the mesh to the back of the frame. Mini clothespins clip old family photos to the grid, so they can be swapped whenever you like. A long, skinny frame holds three pictures stacked.
Get the full tutorial at anderson + grant.
24. DIY Entryway Plank Wall

This DIY entryway plank wall cost less than $50 using three sheets of quarter inch primed plywood ripped into 6 inch strips at the home improvement store. Check every strip before it goes up, since store cuts are not always even. Paint the wall white first so gaps don’t show. Mark the studs, start at the top and level every board, because ceilings are rarely level. Nickels make easy spacers. Caulk any gap at the corner, give the planks a quick sanding and a coat of paint, and the entry is transformed.
Get the full tutorial at Little House of Four.
25. DIY Farmhouse Style Moss Topiary Tree

This DIY farmhouse style moss topiary tree is made from one 17 inch foam cone. Slice off the bottom 4 1/4 inches to become the pot and carve a rim into its top edge. Coat both pieces with a smoothing compound twice and sand with 220 grit paper. Paint the pot a putty color and dry brush a pearly white in a crosshatch for texture. Paint the cone green so gaps don’t show white, then glue on sheet moss from the bottom up, pressing each piece. Join the two with a skewer.
Get the full tutorial at The Happy Housie.
26. Chunky Farmhouse Coffee Table

This chunky farmhouse coffee table is built from free plans with a printable cut list. Each side starts with 4×4 legs joined by 2×4 braces using pocket holes and wood glue, with the lower brace 2 inches off the floor. Angled 4×4 pieces form the big X on each end. A bottom shelf of three 2x8s joined with biscuits connects the sides. The top is a run of 2x10s glued up with biscuits, finished with breadboard ends attached by dowels. Measure the X pieces against the assembled side before cutting.
Get the full tutorial at Handmade Haven.
27. Faux Zinc Leaf Sphere

A faux zinc leaf sphere is made from an 8 inch foam ball, thin cardboard, hot glue and spray paint. Fold the cardboard to crease it and cut a half circle across the fold, then unfold it into a leaf. Repeat until you have a big pile. Hot glue the leaves to the top of the ball and work down, overlapping each row. Glue a cardboard loop to the bottom as a stand. Spray it with metallic silver, then mist a few random bursts of black for texture so it passes for real zinc.
Get the full tutorial at Craftberry Bush.
28. Rustic DIY Shelf

This rustic DIY shelf is built from scrap reclaimed fence boards. Cut two 5 1/2 inch wide pieces about 18 1/2 inches long, then glue and nail short scrap cleats across them to make the back panel, nailing from the front if you like the look of the nail heads. Cut triangle supports from a board end, attach them and add a small top shelf. For the basket, bend hardware cloth into shape, staple it to a plywood bottom and frame it with free paint stir sticks. Hooks underneath hold towels or keys.
Get the full tutorial at Oh My Creative.
29. DIY Mason Jar Vanity Light

A DIY mason jar vanity light upgrades a builder grade bathroom fixture for about $6 in roughly 20 minutes. Take off the glass shades, remove the fixture and give it two coats of oil rubbed bronze spray paint. Trace the fixture’s flange onto the center of each jar lid, then punch nail holes close together around the circle. Pop the center out with a screwdriver, never a thumb, because the metal edge is sharp. Paint the lid rings, slide the ring on before the cut lid, then add Edison bulbs.
Get the full tutorial at Bless'er House.
30. Tobacco Basket DIY

A tobacco basket DIY gets the look of a real woven basket using a roll of wood veneer. Unroll the veneer and stain both sides, using two walnut tones mixed together. Stain makes the veneer bendable, so work before it dries completely and wear rubber gloves. Cut 2 inch strips along the grain with a ruler and utility knife, here five at 41 inches and seven at 21 inches, plus a few extra long strips for the edges. Lay the long strips flat, weigh the ends down and weave the short ones over and under.
Get the full tutorial at Craftberry Bush.
31. DIY Farmhouse Message Board

A DIY farmhouse message board keeps school papers and reminders in one pretty spot, and this one cost nothing but leftover materials. Pull pallet boards apart and sand them smooth. Assemble a simple frame with wood glue or construction adhesive, since thin pallet wood holds better glued than nailed. Staple chicken wire across the back of the frame, then superglue a pair of vintage style clips along the top. Papers clip up top, and notes tuck into the wire. A chalkboard insert would work too.
Get the full tutorial at Seeking Lavender Lane.
32. How to Make a Jute Rope Tray
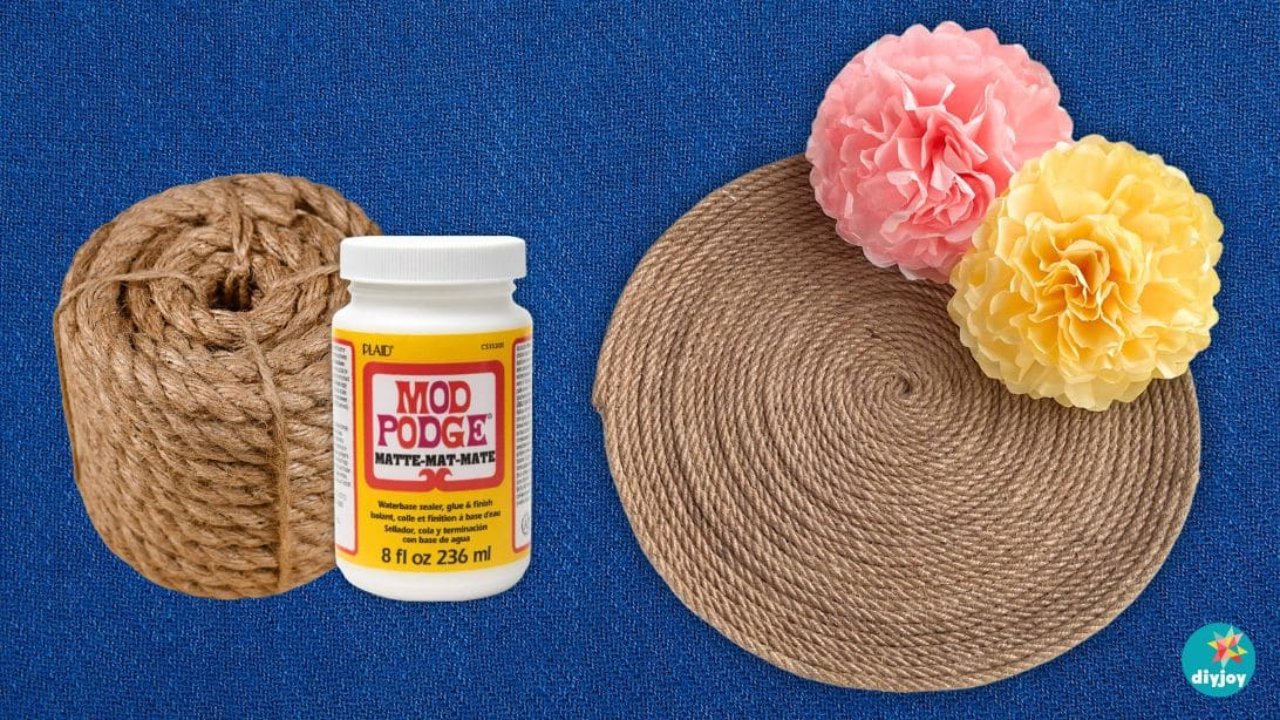
A jute rope tray needs only jute rope, Mod Podge and a tray to use as a form. Cover the tray completely in cling wrap and brush on a generous layer of Mod Podge. Coil the rope end into a tight spiral and keep winding it outward, adding glue as you go and pressing it flat. Cut the rope once the form is covered and glue the end down. Coat everything again and let it dry in a ventilated spot, weighting it flat. Peel it off the plastic once it holds its shape.
Get the full tutorial at DIY Joy.
33. Oversized Rustic Chalkboard

This oversized rustic chalkboard uses the cheapest 1×2 boards at the hardware store, so dig through the pile for straight ones. Cut two at 42 inches and two at 38 inches and stain them Special Walnut. Cut a 38 by 45 inch piece of quarter inch plywood with a rip cut guide on a circular saw, then roll on a couple of coats of chalkboard paint. Join the frame with pocket holes, run a thin bead of wood glue on the inside edge and nail the plywood down, leaving a small reveal.
Get the full tutorial at The Crafty Blog Stalker.
34. Deer Antler Chandelier

A DIY deer antler chandelier costs far less than store versions if you collect antlers, buy faux ones or hunt for sheds in the woods in January. A free used chandelier makes the base. Strip it down to the wires, electrical box and hanging hardware, or just to the part that holds the bulbs. Paint everything if you want white antlers, taping off the sockets first. Start with the largest antlers at the base, predrill wherever they overlap and screw them together. Drill outdoors, because antler dust smells awful.
Get the full tutorial at The Mom of the Year.
35. Butcher Block and Pipe Work Table

This butcher block and pipe work table pairs a 5 foot butcher block workbench top with a base of 3/4 inch black pipe, which the store cut for free. The pieces: four 22.5 inch pipes, four 9 inch pipes, one 48 inch pipe, tees, short 6 inch legs and flanges. Thread two tees onto the long pipe, add the 9 inch pieces, then more tees with the legs up and down to form the base. Flanges screw into the top. Short dowel sections let casters fit into the pipe ends.
Get the full tutorial at House by Hoff.