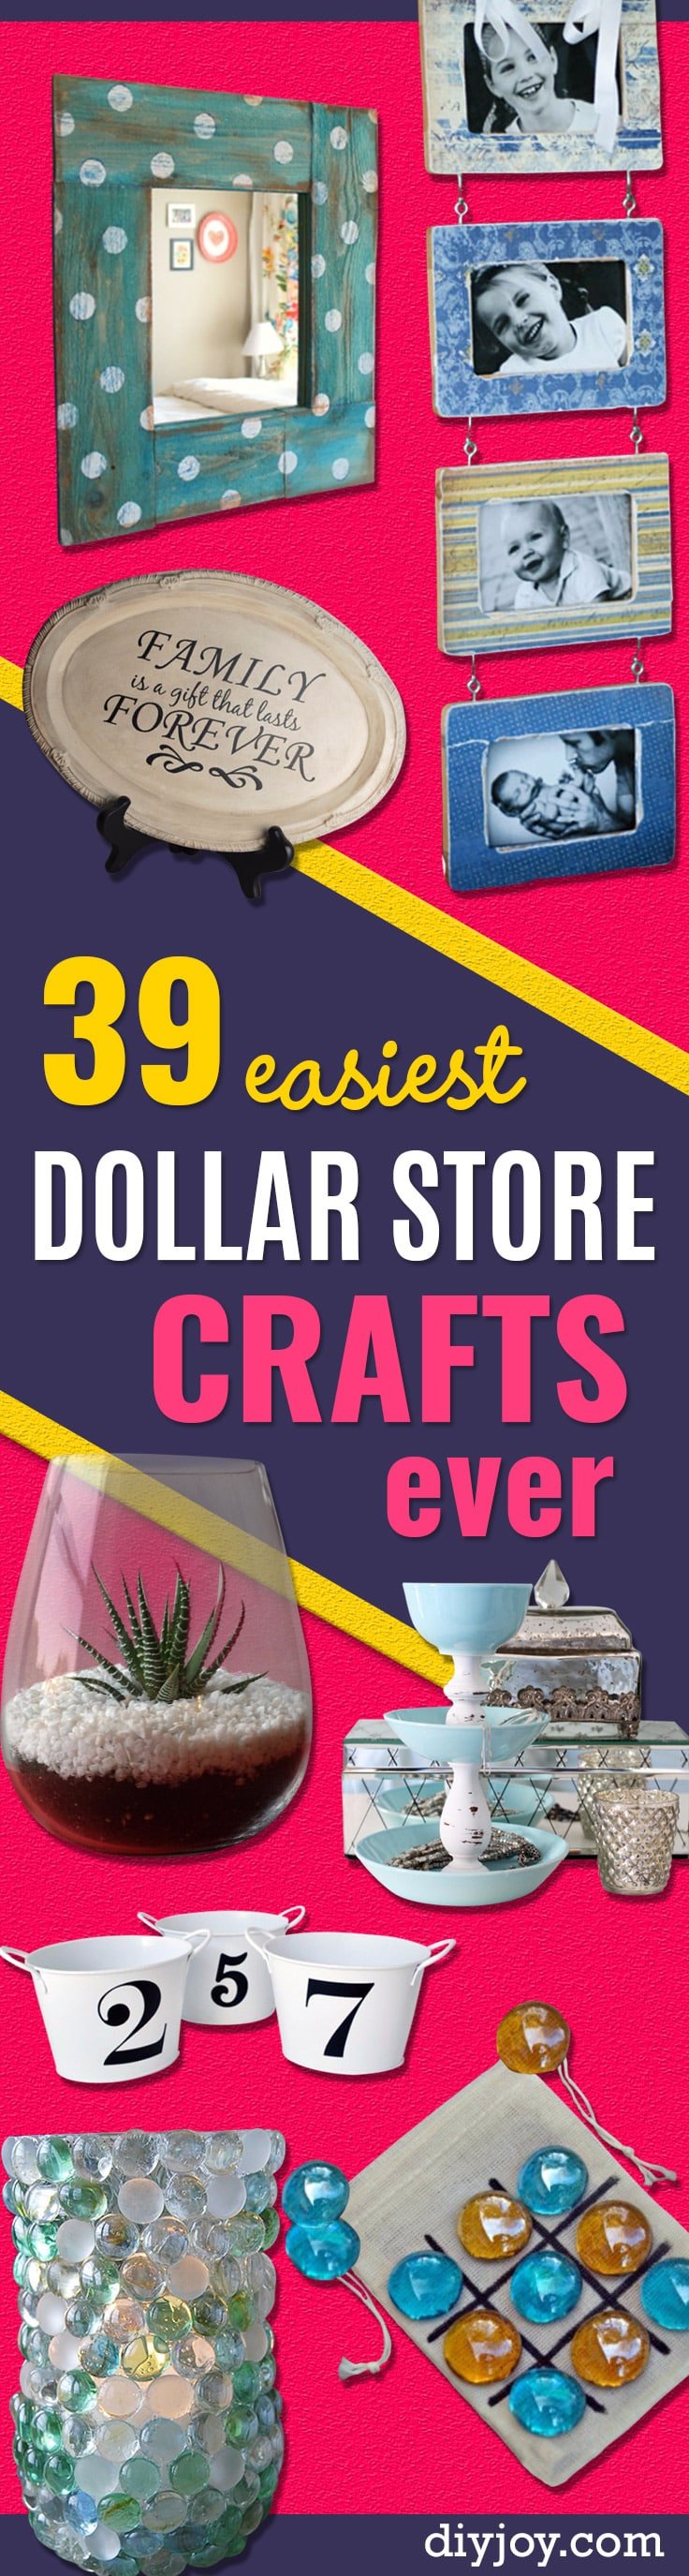
Five dollars and a free Saturday can go a lot further than you’d think, and these 29 easy dollar store crafts prove it. A dollar store craft is any project built mostly from bargain bin basics, like glass vases, foam pumpkins, bandanas, plastic baskets and picture frames, plus a little spray paint, Mod Podge or hot glue to make them look like a boutique find. Some take ten minutes (the owl bank needs nothing but spray paint and patience), while others, like the book page topiary, are a cozy two hour project for a movie night. A few DIY JOY favorites with step by step videos are mixed in too, from a coiled jute rope tray to clothespin snowflakes. The best tip for every project here? Buy one extra, because the first try is practice and the second one goes on the mantel. Find even more ideas on the dollar store project hub.
1. Dollar Store Clipboard Craft

A plain dollar store clipboard becomes a desk accessory worth showing off. Paint the edges white and the back a solid color, then tape off a design and paint inside the lines. Peel the tape at an angle while the paint is still slightly tacky for the crispest edges. Trace the metal clip onto scrap paper to make a template, cut scrapbook paper to match and Mod Podge it to the front, smoothing out bubbles. A thin top coat seals both sides. Two clipboards came in at about $2, since the paint and paper came from the craft stash.
Get the full tutorial at The Crazy Craft Lady.
2. Thumbtacks Ampersand Art

Thumbtack ampersand art takes a 12 by 12 inch canvas and roughly 700 gold thumbtacks, and the result looks like expensive metal wall decor. Sketch the ampersand onto the canvas in pencil, either freehand or traced from a printed template, and keep a good eraser handy. Fill the shape in small sections, working in rows so the spacing stays even. Tacks near the edge of the canvas tend to sit high, so tap every one flush with a hammer at the end. Budget about three hours and a bandage or two for your thumbs.
Get the full tutorial at LiveLoveDIY.
3. How to Make Bandana Pillows

Bandana pillows are one of the easiest sewing projects there is, and dollar store bandanas keep each pillow to a few dollars. Lay two 20 inch bandanas right sides together, chalk a quarter inch seam all around and sew three sides plus part of the fourth, leaving about 8 inches open. Backstitch at both ends. Turn it right side out, push in an 18 inch insert or fiberfill and close the gap. No machine? Glue along the same seam lines with fabric glue and clip with clothespins until dry.
Get the full tutorial at DIY JOY.
4. DIY Gold Striped Vases

DIY gold striped vases start as $1 Dollar Tree glass and one $4 can of gold metallic spray paint. Wrap painter’s tape or washi tape around the vase in stripes, a swirl or vertical lines, then mist on two light coats. Go easy, because heavy coats drip. Peel the tape after about five minutes, before the paint fully sets, so the edges stay clean. Any clear vase already hiding in a cabinet works too. Pop in grocery store flowers and they make an easy hostess gift that looks far pricier than it was.
Get the full tutorial at Two Twenty One.
5. Dollar Store Book Topiary DIY

This dollar store book topiary is built entirely from Dollar Tree supplies: a glass candleholder, a 4 inch foam ball and a $1 book, or a thrifted one with meaning. Tear out about 50 pages, trim off the margins and skip chapter openers with too much white space. Cut 2.5 by 3 inch rectangles, edge them with pinking shears, fold each into quarters and pinch the center like tissue paper, then hot glue them over the ball. Plan on about two hours. Use epoxy for the ball if pets or kids are around.
Get the full tutorial at Sweet T Makes Three.
6. Plastic Elephant Bookends

Plastic elephant bookends are a playful knockoff of pricey designer animal bookends. Cut four 5 inch blocks from scrap 1×4 and sand the edges smooth. Prime and spray paint the wood and two dollar bin plastic elephants the same color, then add a few coats of clear gloss so everything matches and wipes clean. Wood glue joins each pair of blocks into an L shape. A dab of E6000 on the elephant’s feet centers it on the base. Even this light, they hold a shelf of picture books upright.
Get the full tutorial at Love Grows Wild.
7. DIY Decoupage Vase Using Napkin Paper
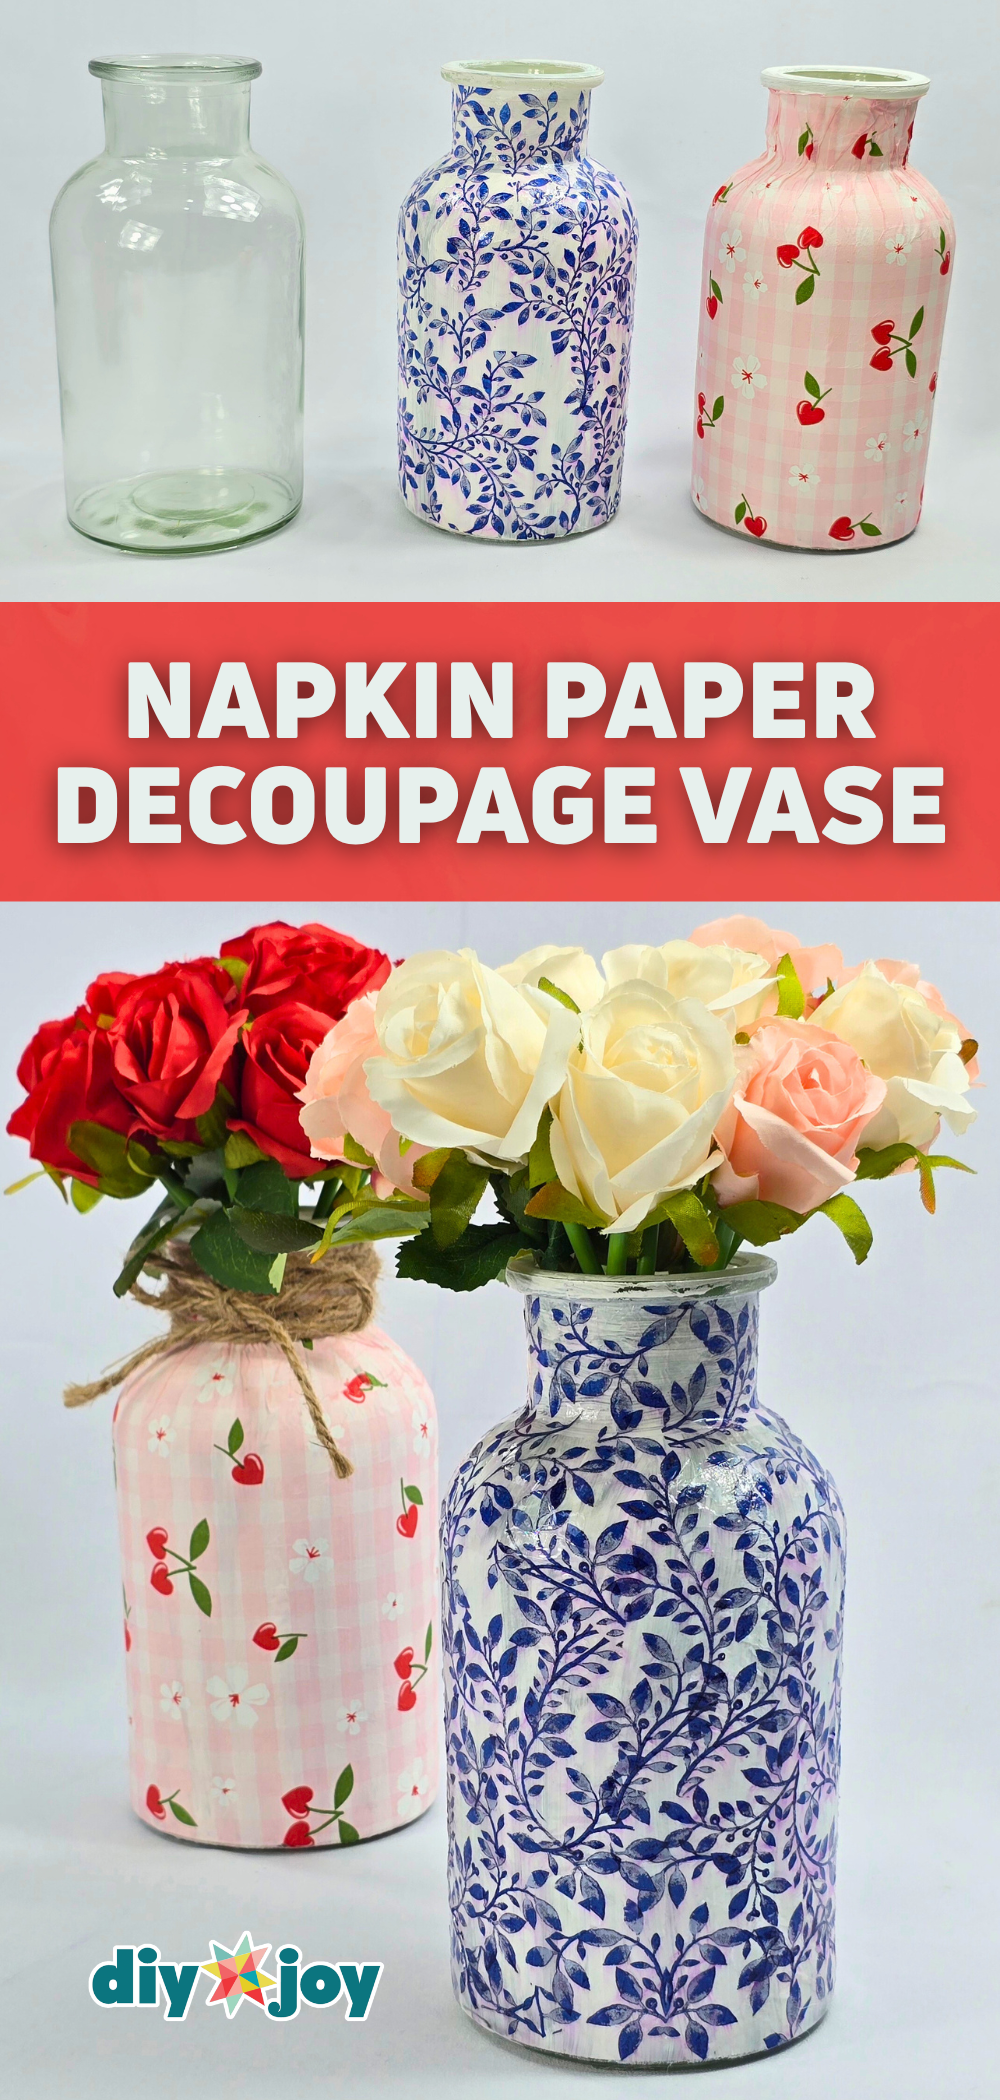
A decoupage vase with napkin paper turns a plain dollar store jar into something that looks hand painted. Clean the outside of the jar, then paint it solid white, adding a second coat if any glass shows through. Cut out the napkin pattern as close to the design as you can and peel away the backing layers so only the thin printed ply is left. Brush Mod Podge onto the jar, lay the napkin on and smooth it gently, then seal over the top. A twist of jute twine at the neck finishes it.
Get the full tutorial at DIY JOY.
8. Dollar Store Terrariums

These dollar store terrariums copy the look of a designer fishbowl planter for about $2 each. Glue a dollar store glass fishbowl to an upturned glass candlestick and the stand becomes a pedestal. Once it sets, fill the bowl with moss, lichen and a few small stones for a no fuss bit of green. Pick a strong clear adhesive made for glass and let it cure fully before you load the bowl. The source page is a short feature that links on to the original maker’s post for the full details.
Get the full tutorial at KnockOffDecor.
9. Dollar Tree Buckets To Chic Decor

Bright Dollar Tree buckets get a farmhouse makeover with white paint and big black numbers. Spray each pail with a white protective enamel, letting coats dry between passes, then add vinyl numbers cut on a die cutting machine. No cutter? Stencil the numbers or try an image transfer instead. The finished set looks like vintage enamelware, and the buckets are sturdy enough to hold plants, utensils or craft supplies. It is a fast afternoon project, and nobody will guess the starting colors were neon green, blue and coral.
Get the full tutorial at Just Vintage Home.
10. How to Make a Clay Flower Mirror
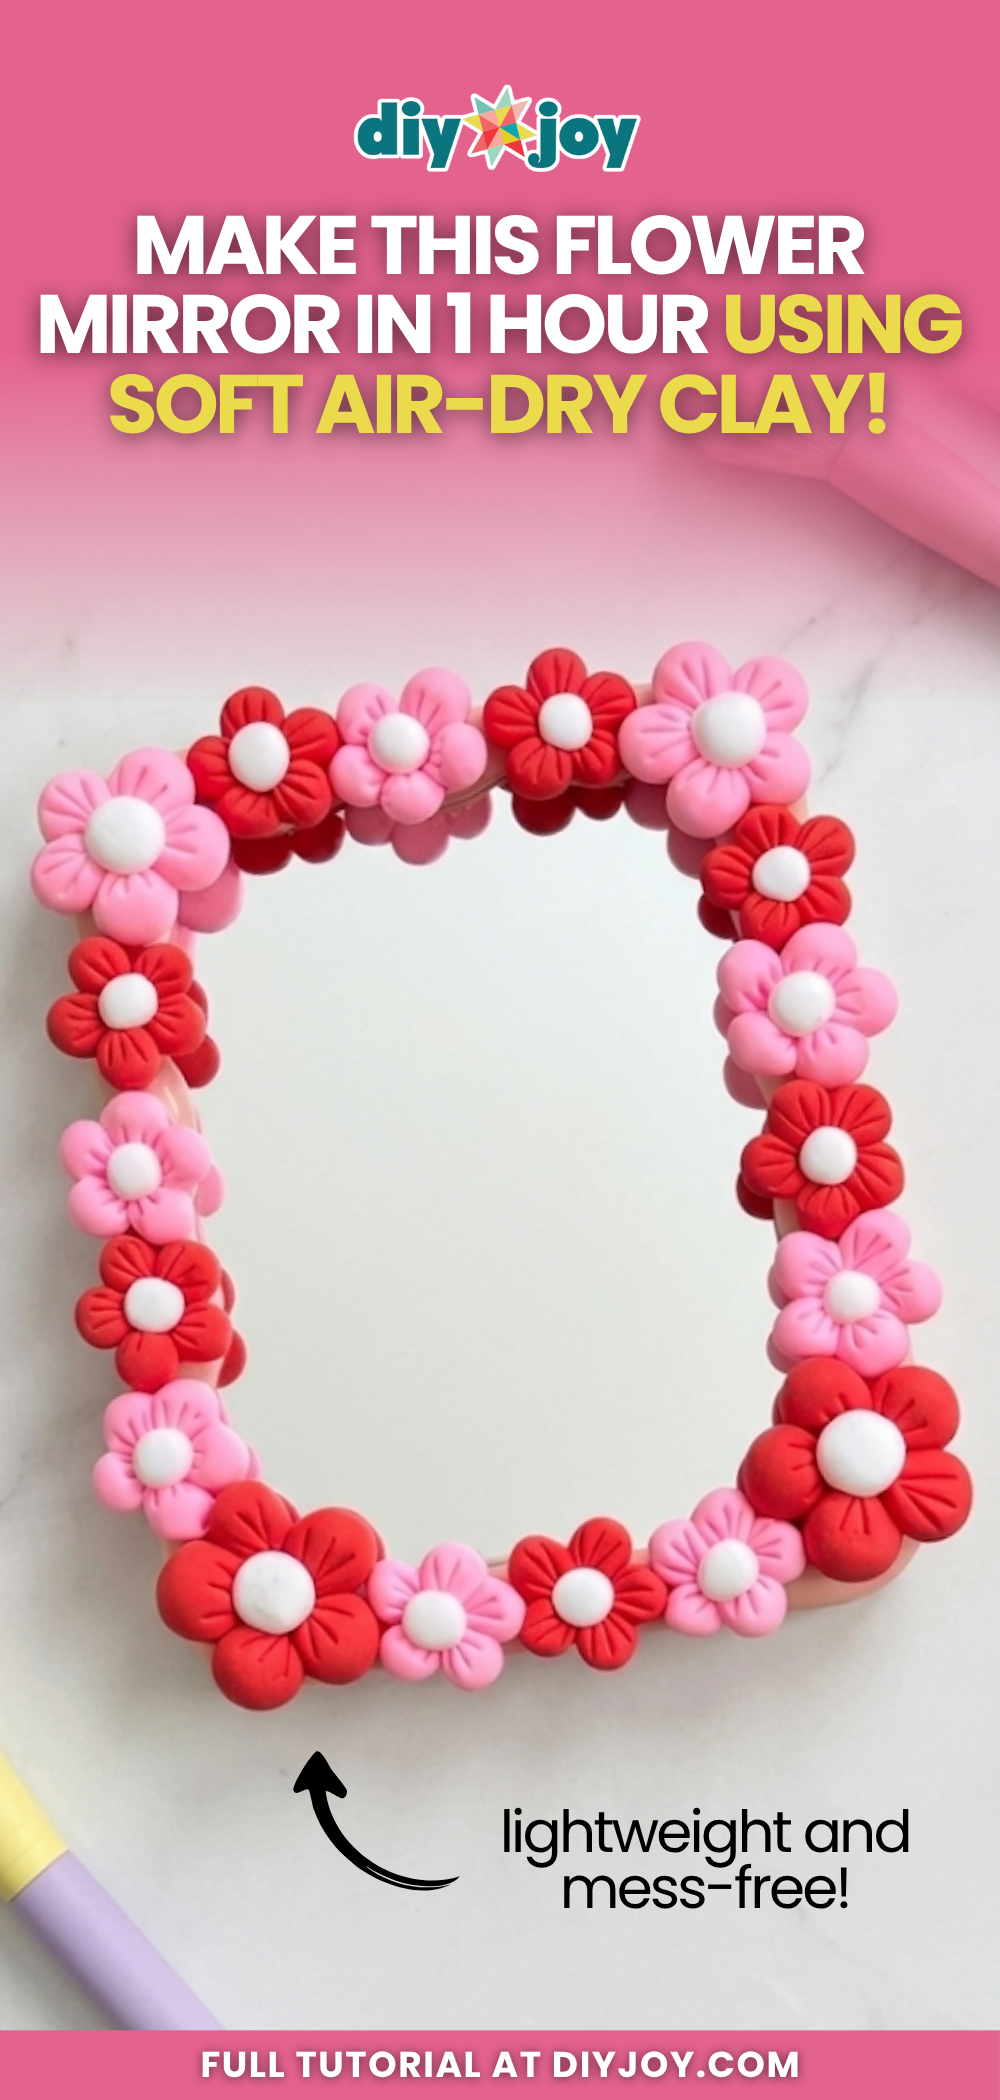
A clay flower mirror gives a basic dollar store mirror a cute, custom frame in about an hour. Soft clay is lighter and cleaner to work with than air dry clay, and the pieces stick together on their own before they set. Roll a small ball, press three lines into the bottom so they meet at a point, and repeat to make five petals. Arrange them into a flower, add a tiny white ball in the center and make more flowers in different colors and sizes to cover the frame. A gloss varnish helps prevent cracks.
Get the full tutorial at DIY JOY.
11. Elegant Votive Candle Holders

Elegant votive candle holders take plain glass cups, a pack of rubber bands and white matte spray paint. Wrap bands of different widths around each glass, angling some and stacking thicker ones near the middle. Turn the glasses upside down and spray two coats. Once dry, peel the bands off slowly over a trash can, because the elastic flings tiny paint flakes everywhere. Wipe the glass, drop in tea lights and the bare stripes glow through the frosted white. A 4 pack of cups came to about $3.
Get the full tutorial at The Hyper House.
12. DIY Twine Pears

DIY twine pears start with dollar store light bulbs, a ball of twine and a short twig. Smaller, shorter bulbs give the best pear shape. Clip a twig about three quarters of an inch long and hot glue it to the center of the bulb’s narrow end for a stem. Glue the twine end at the base of the stem, wrap once upward to cover the top, then wind down around the bulb, adding a dab of glue every so often. Burnt out bulbs work fine, and the whole set came to about $2.
Get the full tutorial at My Love of Style.
13. Dollar Store DIY Terrarium

This dollar store DIY terrarium came to $6.75 by keeping it simple. A wide glass vase from the dollar store holds layers of dark soil and bright white gravel, also from the dollar store, with one spiky succulent from a garden centre on top. One plant instead of a crowd keeps it looking grown up, and it stays small inside the glass. Water sparingly, since a closed vessel holds moisture and succulents rot fast. Skip marbles as drainage unless you want a kid craft look.
Get the full tutorial at The Devil's Punchbowl.
14. DIY Mirror Boxes

DIY mirror boxes need only five square craft store mirrors and a hot glue gun. Use beveled mirrors for the four sides and a flat one for the base. Run a thin line of hot glue along the back edge of a side mirror and line it up with the outside edge of the base, working fast before the glue sets, then hold it for a few seconds. Repeat on all four sides and add glue to the inside seams if needed. Stick cork pads underneath to protect furniture. A plant inside hides the seams.
Get the full tutorial at Hi Sugarplum!.
15. Dollar Store Painted Pumpkins

Dollar store painted pumpkins start with carvable foam pumpkins about 6 inches across. Primer is optional, so skip it if you do not already have some. Paint the top two thirds with chalk paint in a deep blue, adding a second coat only if your paint needs it. Then brush a metallic paint around the bottom third, leaving the brush strokes rough instead of a hard line where the colors meet. Once everything is dry, paint the stem metallic too. Buy extras, because they disappear fast.
Get the full tutorial at The Crazy Craft Lady.
16. DIY Gold Leaf Vase

This DIY gold leaf vase gets its look from model enamel paint, not real leaf. Clean the glass with rubbing alcohol so the paint grips, then tape off stripes with quality painter’s tape and burnish the edges with a credit card to stop seepage. Brush on a thin first coat of gold enamel with a narrow foam brush, going in one direction, and let it dry at least two hours. A second coat thickens the color but stays slightly translucent, which reads as gold leaf. Two vases cost about $3.50 each.
Get the full tutorial at The Creativity Exchange.
17. How to Make a Jute Rope Tray

A jute rope tray costs a couple of dollars, since most of the supplies are at Dollar Tree, and Mod Podge is the only glue. Cover a tray completely in cling wrap so nothing sticks to it, then brush on a generous layer of Mod Podge. Coil the end of the rope into a tight spiral and keep winding outward, pressing it flat with your palm and adding glue as you go. Do not build the sides too tall or they will not hold their shape. Coat the whole thing in more Mod Podge and let it harden.
Get the full tutorial at DIY JOY.
18. DIY Dollar Store Bandana Pillows

DIY dollar store bandana pillows need two bandanas per pillow, so each cover costs about $2. Large 22 inch bandanas made 16 inch pillows. The easiest sewn version places two bandanas right sides together, stitches three and a half sides, turns it right side out, stuffs it with fiberfill and closes the gap by hand. Use three bandanas for an envelope cover that slips off for washing, or a fabric adhesive version for the no sew route. Bandanas come in dozens of colors, so matching any room is easy.
Get the full tutorial at The Heathered Nest.
19. Cake Stand Kitchen Organizer

A cake stand kitchen organizer is a dollar store candle holder glued under a metal tray. Spray both pieces the same color, an oil rubbed bronze in this case, and let them dry. Run a strong super glue around the rim of the candlestick, center the tray on top and set something heavy on it while the glue cures. That is the whole build. Next to the sink it corrals dish soap, hand soap and a bowl of washcloths, and it still works as an actual cake stand.
Get the full tutorial at Liz Marie Blog.
20. Polka Dot Mirror

This polka dot mirror starts with a $1 store mirror and a simple wood frame. Cut the frame boards about 5 inches longer than the mirror so they overlap it, which a home improvement store can do for you. Wood glue the frame together and reinforce the back seams with hot glue. Water down the paint and slop it on, then sand once dry to distress it. Stamp white dots with a circle cut from cardboard, add a brown wash on the edges and hot glue the mirror to the back.
Get the full tutorial at A girl and a glue gun.
21. Clothespin Snowflake Ornaments
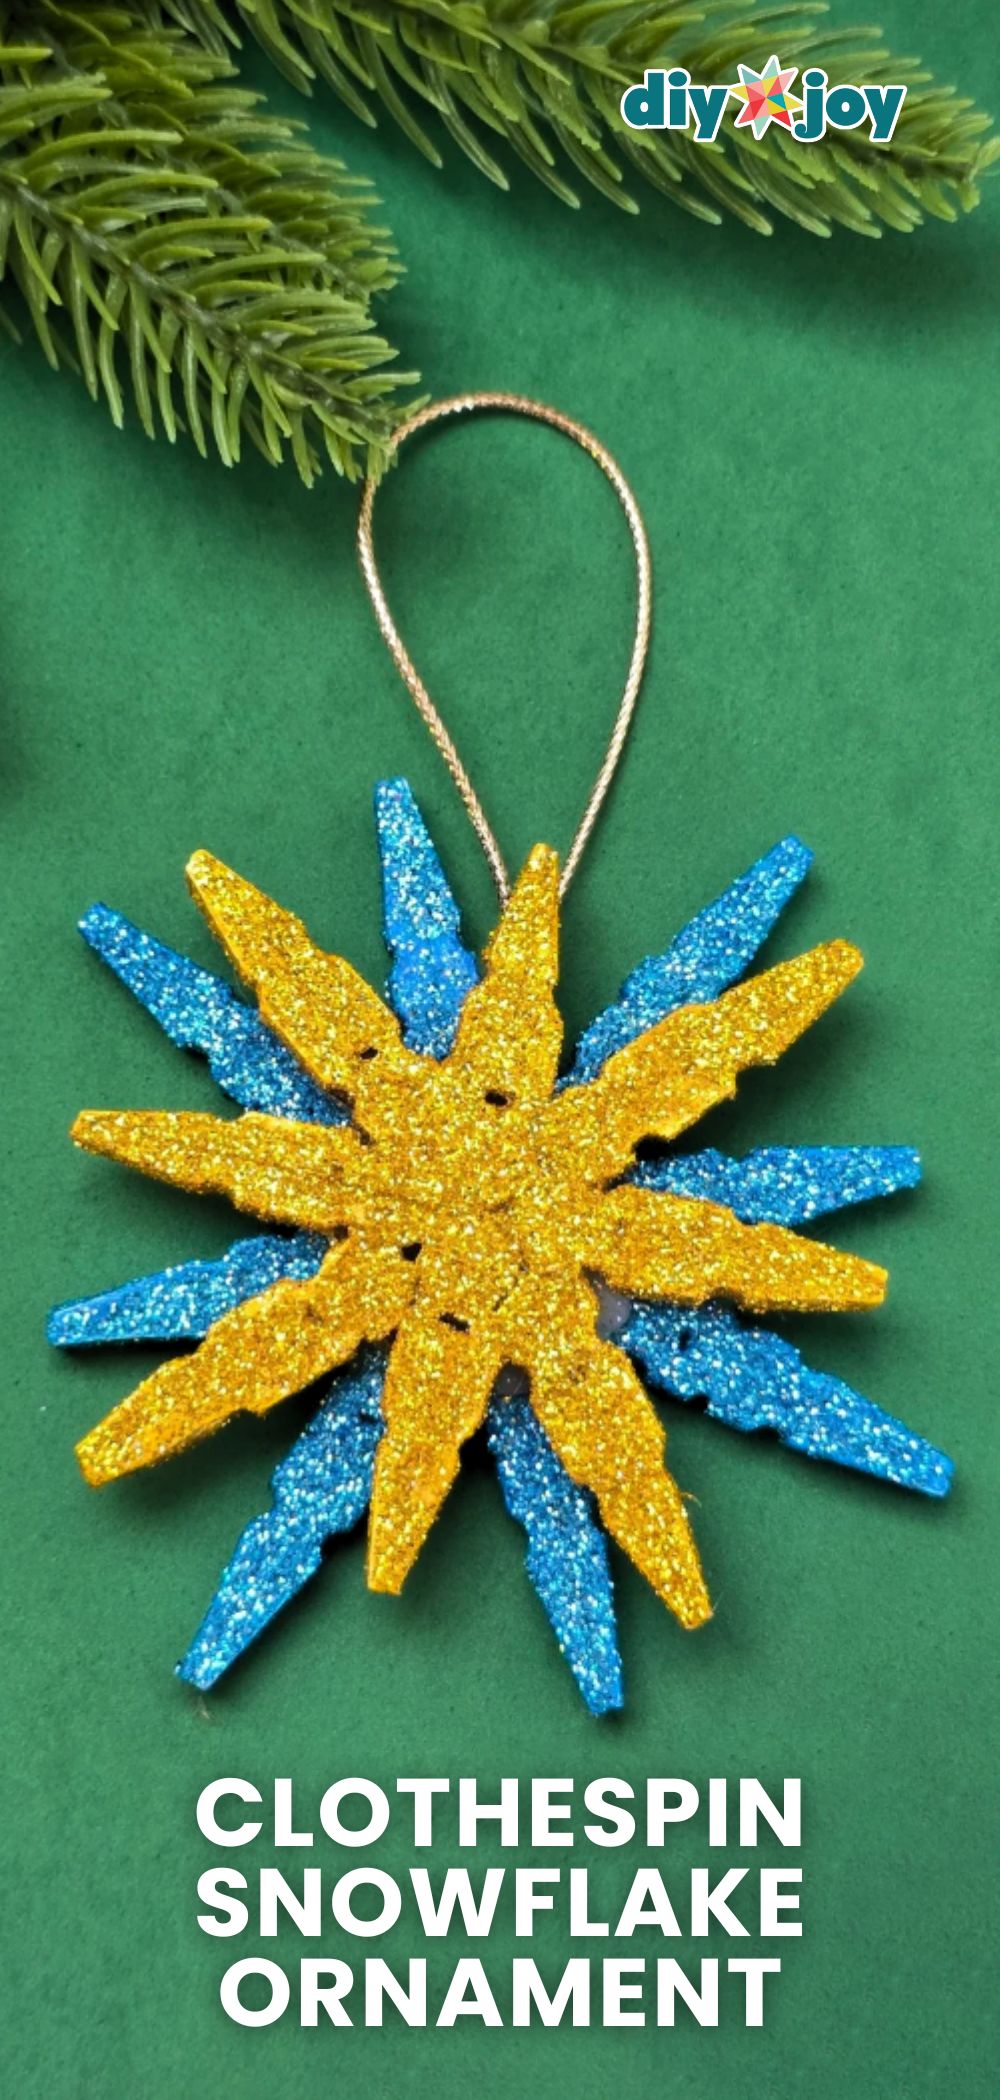
Clothespin snowflake ornaments start with a pack of wooden clothespins, which are easy to find at the dollar store. Pull out the metal springs and separate the wooden halves, then sort them into 8 pairs of 4.8 cm pieces and 4 cm pieces. Hot glue each pair flat side to flat side. Arrange the pairs into a snowflake, glue every joint, then paint the whole flake with acrylic paint. Brush on white glue and pour glitter over it for sparkle, then tie on a loop of metallic elastic cord to hang.
Get the full tutorial at DIY JOY.
22. DIY Framed Moss Shamrock On Glass
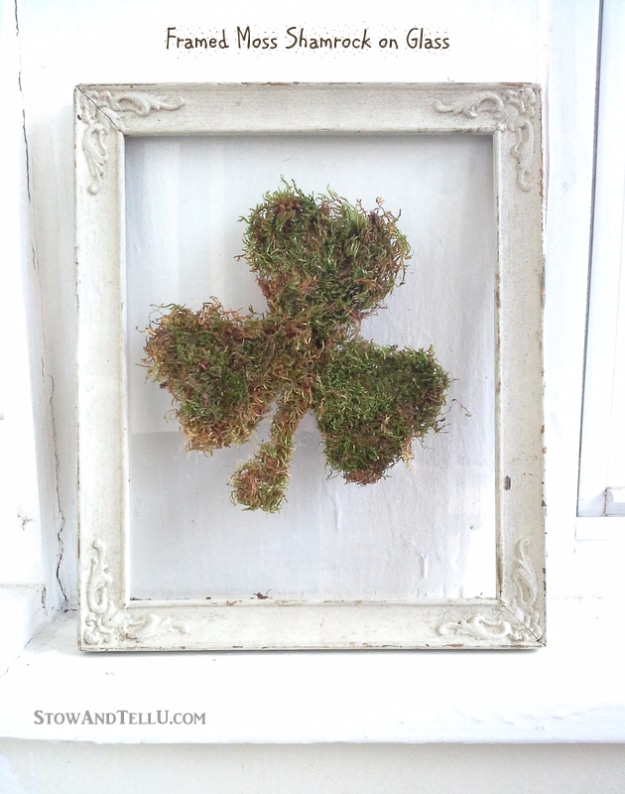
A framed moss shamrock on glass is a quick St. Patrick’s Day decoration made from an old frame. Clean the glass and glue it into the frame from the back so it floats with no backing. Tape a printed shamrock image behind the glass as a guide. Cut five pieces of sheet moss, a center, a stem and three leaves, pinching the edges so they look fringy and natural. Glue the center first, then the stem and leaves, using a toothpick and very little clear craft glue.
Get the full tutorial at Stow&TellU.
23. Embellished Plastic Container
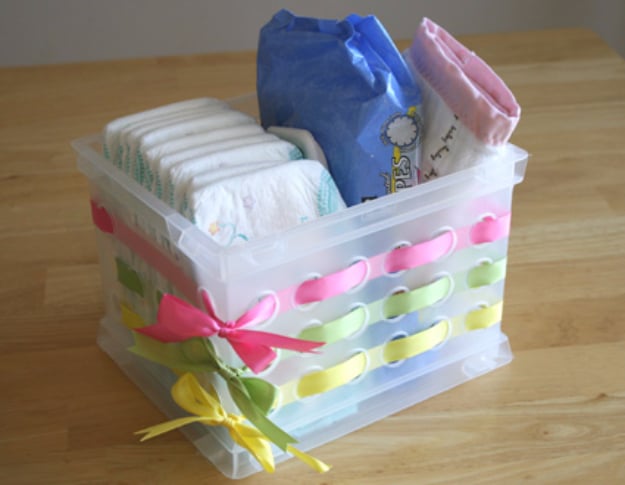
An embellished plastic container takes a dollar store basket with holes along the sides and about 9 feet of ribbon. Cut three 3 foot pieces to give each row of holes its own color, or use one long piece for the whole basket. Start at the top and weave the ribbon in and out of every hole, leaving 4 to 5 inches loose at the end. Tie the two ends into a bow. Kids can handle the weaving, and the baskets work for diaper supplies, CDs or a teacher gift.
Get the full tutorial at Make and Takes.
24. Four Dollar Store Frames
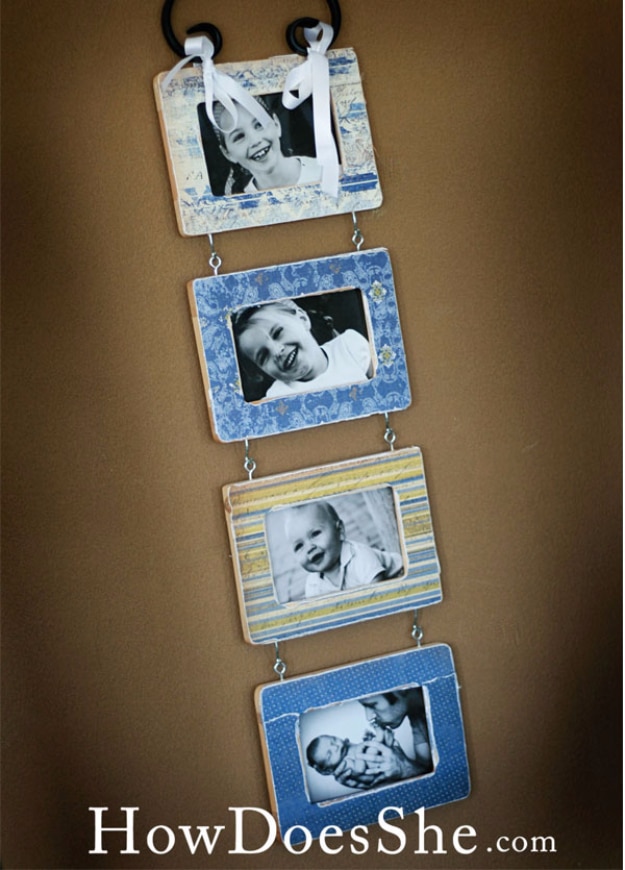
Four dollar store frames link into one hanging photo display with paper, Mod Podge and some hardware. Cover each frame in patterned paper with Mod Podge and leave the wood raw elsewhere. Predrill small holes about an inch from each end, smaller than the screw size, then twist hooks into the bottom of each frame and eyelets into the top. Only three sets are needed, since the top frame gets a handle. Drill larger holes there to thread ribbon through, then hook the frames together.
Get the full tutorial at How Does She.
25. Decoupage Photograph Plates
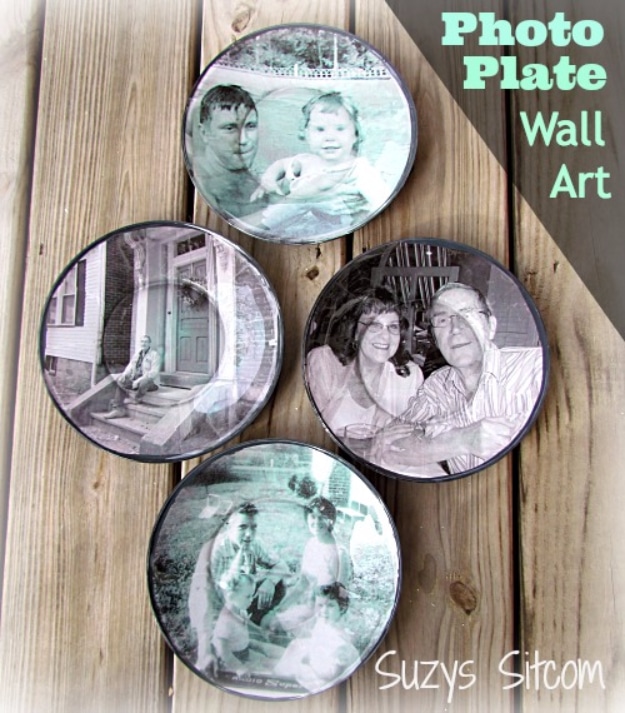
Decoupage photograph plates turn $1 clear glass plates and printer copies into a gallery wall. Print photos on a laser printer, since inkjet ink bleeds under Mod Podge. Trace the plate onto the photo, cut it out and snip short slits around the edge so it bends with the curve, keeping cuts away from faces. Brush matte Mod Podge on the back of the plate and press the photo face down, smoothing wrinkles. Once dry, seal the back, paint it dark gray where the photo stops and seal again.
Get the full tutorial at Suzy's Artsy Craftsy Sitcom.
26. DIY Tic Tac Toe Game Board

A DIY tic tac toe game board fits in a pocket and costs pennies. Draw the grid on a small muslin drawstring bag with a black paint marker. Then mark a set of glass stones or marbles as the playing pieces, using X and O or two colors. Everything tucks inside the bag, so no pieces go missing in the car or a purse. Customize the stones with favorite colors or hearts for Valentine’s Day. A batch makes cheap party favors, class treats or goody bag stuffers that are not plastic junk.
Get the full tutorial at Suburbia Unwrapped.
27. Rubber Door Mat Wall Art

Rubber door mat wall art fakes the look of a vintage iron panel using a black outdoor door mat from the dollar store. Spray the mat with an antique white paint and let it dry fully. Run a hand sander over the raised scrolls to wear through to the black so it looks aged, sanding harder in some spots for character. Leave it simply painted if you prefer. Mats come in several sizes, and they can be cut into smaller pieces or shapes for a larger wall grouping.
Get the full tutorial at Salvage Dior.
28. Dollar Store Antiqued Plaque

A dollar store antiqued plaque begins as a cheap metal or ceramic tray. Spray it with a few coats of antique white and let it dry completely. For the glaze, mix brown and black craft paint, then thin it with water until it runs like ink. Work in small sections: brush the thin paint onto the edge and immediately wipe it back with a soft rag, since paper towels leave fuzz. Keep going until the whole tray is aged, then add vinyl lettering, a monogram or vintage keys.
Get the full tutorial at Creations by Kara.
29. Easy Dollar Store Owl Bank Makeover

This easy dollar store owl bank makeover takes a few hours, most of it drying time. Spread out a large drop cloth so it does not blow into the wet paint. Spray the busy multicolored piggy bank evenly with a bonding primer and let it dry at least 30 minutes, or use a paint and primer in one. Then spray your color from the top down in steady sweeping passes, keeping the can moving. Let it dry 30 to 60 minutes between coats and repeat once or twice.
Get the full tutorial at My Mommy Style.