Shoes piling up by the door? These 11 DIY shoe racks give every pair a spot, from ten minute fixes to weekend builds. Pallets turn into a slatted entry bench and a giant rack that holds 60 pairs, and rough pine becomes a super-sized rack for cleats and ski boots. Short on floor space? Try a plywood wall rack with shelves that move up and down, wire hanger shoe hooks or an IKEA LACK unit cut into floating shelves. Heels look great hooked over crown molding or a wire grid, and hexagon cubbies tuck neatly inside a bookcase. Pick one and clear that entry this weekend!
1. DIY Grid Shoe Storage Display

A wire grid panel makes a minimal shoe display that doubles as wall decor. Prop a 4 foot mesh grid against the wall near the door and hook heels over the wires by their heels. A panel this size holds 10 to 12 pairs, and a few pairs of boots can hang too, though heels work best. Bigger grids are easy to find if the collection is larger. It’s a smart fix for anyone who wants shoes out of the closet but still tidy and easy to see.
Get the full tutorial at Burkatron.
2. Wall Mounted Shoe Rack

This wall mounted shoe rack is built from a single sheet of 3/4 inch plywood and rated easy, with about three hours of work. Rip the plywood into a long back panel, nine shelves and two widths of cleats using a circular saw and a straightedge guide. Glue a narrow cleat to the edge of each shelf, then glue and screw stacked cleats down the back to form slots. The shelves rest in those slots, so they move up or down as shoes and boots change with the seasons.
Get the full tutorial at Kreg Tool.
3. Ladder Shoe Shelf
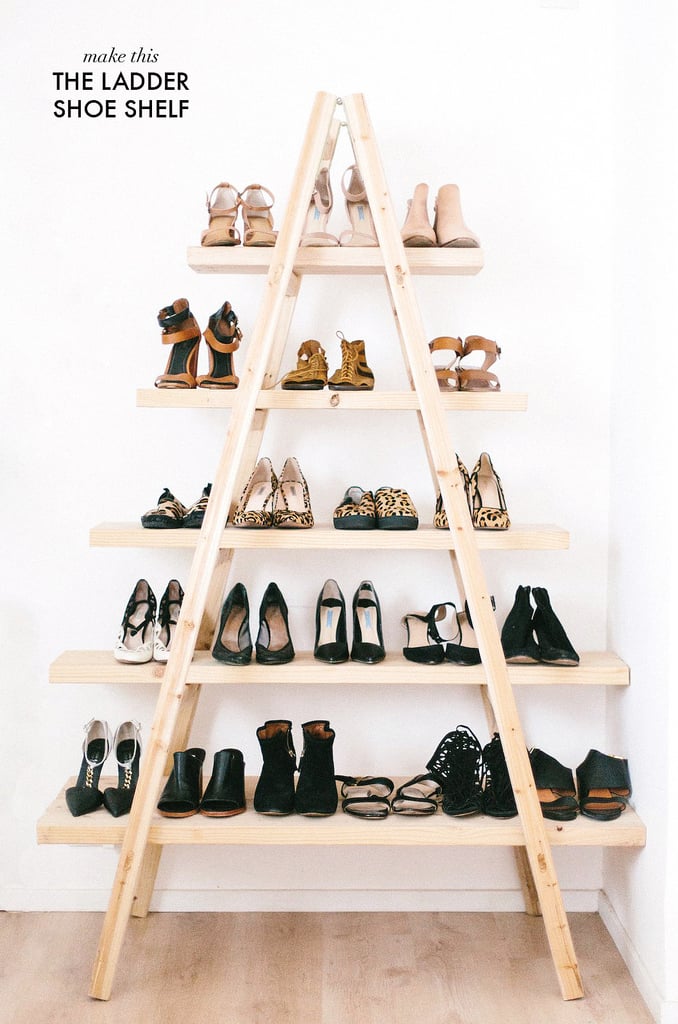
A ladder shoe shelf turns a simple timber A frame into an open display pretty enough for the living room. Plain pine planks rest across the frame at three heights, so heels, sandals and boots sit in neat rows at eye level. Line the shoes up by color for a boutique look, then swap them around whenever the mood changes. It works best for a curated collection of favorite pairs rather than the whole family’s sneakers, and it frees up the closet for everything else.
Get the full tutorial at Geneva Vanderzeil.
4. Giant Shoe Rack Made Out Of Discarded Pallets

This giant shoe rack holds up to 60 pairs, enough for a big family or one very serious shoe collector. It’s built from discarded pallets and planks that were roughly sanded and brushed, then finished with a gray wash that keeps the reclaimed grain visible. Tall sides and lots of narrow shelves run nearly floor to ceiling, so it uses wall height instead of floor space. Anchor a rack this tall to the wall. It fits an entry, a mudroom or a garage.
Get the full tutorial at 1001 Pallets.
5. Super-sized Shoe Rack

This super-sized shoe rack is built for a sports family’s pile of cleats, skates and boots. Nine 1×12 rough pine boards become two 58 1/4 inch sides and seven 55 inch shelves joined with pocket hole screws. The bottom two shelves sit flat and 16 inches apart for tall boots. Above that, each shelf is marked 7 inches up in front and 9 in back, so shoes tilt forward for display. Skip MDF, which swells with damp shoes, and rub the rough pine with tung or mineral oil.
Get the full tutorial at The House of Wood.
6. DIY Pallet Shoe Rack Bench

This pallet shoe rack bench gives an entry a place to sit plus a slatted shelf underneath for shoes. Take pallets apart with a flat bar and hammer, and wear eye protection, since stubborn nails can snap and fly. Cut the boards down, using three for a seat about a foot deep, and rip a few wider boards into narrow slats for the lower shoe shelf. Sand with 60 and then 100 grit, assemble with new nails and small headed screws and finish with a dark stain.
Get the full tutorial at NDW Design Blog.
7. DIY Shoe Hanger

DIY shoe hangers turn plain wire hangers into hooks for flats and sandals, perfect for a small room with no floor space. Clip the bottom wire of each hanger near the ends, then bend the cut wires down and back up into two hooks that cradle a pair of shoes. The leftover bottom piece can be bent into an A shape for another hanger. Screw three hooks into the wall in a line, string yarn between them and hang the shoe hangers along it. Dry cleaner hangers work fine.
Get the full tutorial at Hey Wanderer.
8. Crown Molding as Shoe Rack

Crown molding as a shoe rack is a closet trick for heels: mount a strip of molding on the wall and hook each shoe over it by the heel. A scrap piece may already be waiting in the garage. Shorter heels sit best on the molding, while a plain drapery rod holds taller ones. Flats and wedges can go on simple shelves below, and a metallic gold oil based paint pen on the corners gives them a campaign style look in under 10 minutes, no primer needed.
Get the full tutorial at Our Fifth House.
9. Lack Shoe Unit – IKEA Hack

An IKEA LACK TV unit can be cut in two and hung as a pair of floating shoe shelves in a hallway. Remove the legs, then saw the unit in half, cutting slightly off center to miss the metal bolts inside. Mount brackets to the cut sides and screw the shelves to the wall, pre-drilling so the wood doesn’t crack. LACK pieces are hollow inside, so glue scraps of wood plank into the cavity where the screws go. The result looks custom and keeps shoes off the floor.
Get the full tutorial at IKEA Hackers.
10. DIY Hexagon Shoe Rack

Hexagon cubbies turn a basic bookcase into a honeycomb shoe rack that’s just right for kids’ shoes. Five 6 foot 1×10 boards make eight cubbies sized to fit inside a 30 inch wide bookcase opening. Cut 48 pieces at 5 3/4 inches, then trim each end at 30 degrees. Glue and nail six pieces into each hexagon, stain them and stack them inside the shelf. A 1×10 is really about 9 1/4 inches deep, which suits kids and smaller adult shoes, so build deeper for big sneakers.
Get the full tutorial at Kaleidoscope Living.
11. DIY Shoe Rack from Scrap Wood

An old wooden shipping box and scrap bead board become a tall, narrow shoe rack with plenty of character. Scrub the box clean with dish soap and a brush, then cut 6 inch scrap pine boards to fit snugly inside, side to side. Allow about 6 inches per pair; that spacing gave this box seven shelves. Stain the shelves before installing them, using a walnut stain with polyurethane mixed in to match the old wood, then nail them in at 6 inch intervals. Kids can help with the wiping and staining.
Get the full tutorial at Call Me PMc.