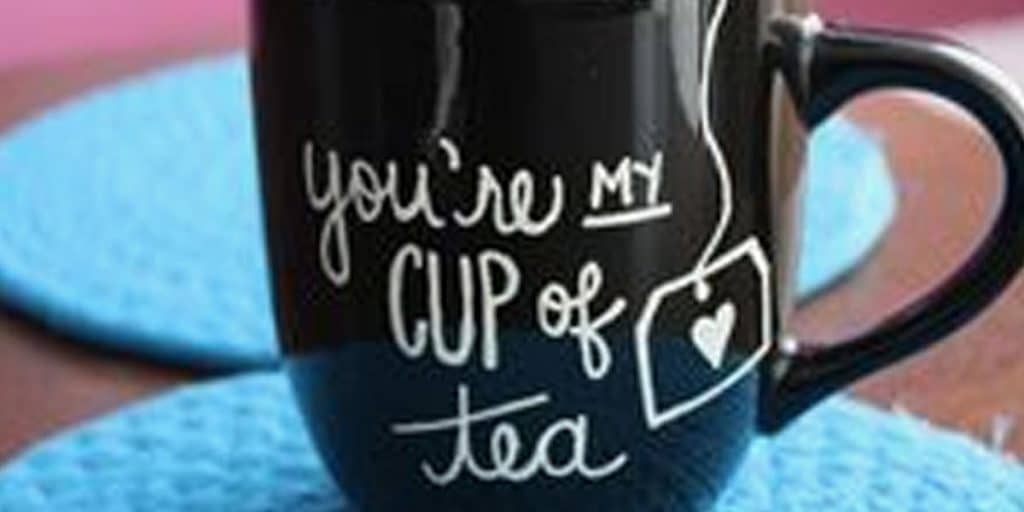
Ellie Everett has the right idea! This is one of the best DIY crafts! Everyone loves making Sharpie Mugs! With Valentine’s Day just around the corner, these DIY Sharpie Mugs are the perfect gift for that someone special! Customize them for your sweetheart using an oil-based Sharpie. Once you make one, you’ll be making them for everyone and every occasion!Easy DIY Gfts! Who doesn’t love a personalized mug? Check out the full tutorial at the bottom of this post.
Although, in the video Ellie does, you don’t see what the temperature of the oven is or how long you should put the mug in the oven for.I know the diy sharpie mug has been around Pinterest a ton lately, but beware, NOT all sharpie mug tutorials work…I searched long and hard for a tried and tested method, and now that I’ve done the testing myself — it has been confirmed — this method really works!
Materials you need:
– ceramic mug (or dish), cheap dollar store or Walmart kind works better
– Sharpie oil-based paint marker, available at Michaels or any craft store (non-toxic)
– oven
Make sure the mugs are clean and no oil or residue is on it before you start painting. If you want to, as an optional step, clean the mug with alcohol to triple check its cleanliness.
When you are done designing your mugs, let them sit and dry, preferably over night~a full 24 hours. It helps to set the paint for the baking process. Place the dried mugs onto a cookie sheet upside down, and set it in the middle rack of the oven. DO NOT preheat the oven! Once the mugs are in, set the temperature to 425 degrees F. Start timing 30 minutes once the oven reaches 425. While in the oven it did seem to give off a weird smell, so if you are sensitive, make sure you let the kitchen air out while the mugs are baking.
Let the mugs cool in the oven as much as you can before removing them. I just left mine until the oven was completely cool. This is to prevent any cracking from sudden changes in temperature.
After they were completely cooled, I tested my mugs by lightly scratching it AND hand washing it in warm soapy water, and they seemed to hold up well. I did not, however, put them in the dishwasher — I was just too scared to. From everything I read online, it’s best to hand wash them, just to be safe.
Watch how Ellie Everett makes her mug in her step by step tutorial!
Photo Credit: Inspiration DIY
A special thanks to Inspiration DIY for the use of their photo of their Sharpie Mug. Check out their blog site for more terrific ideas!