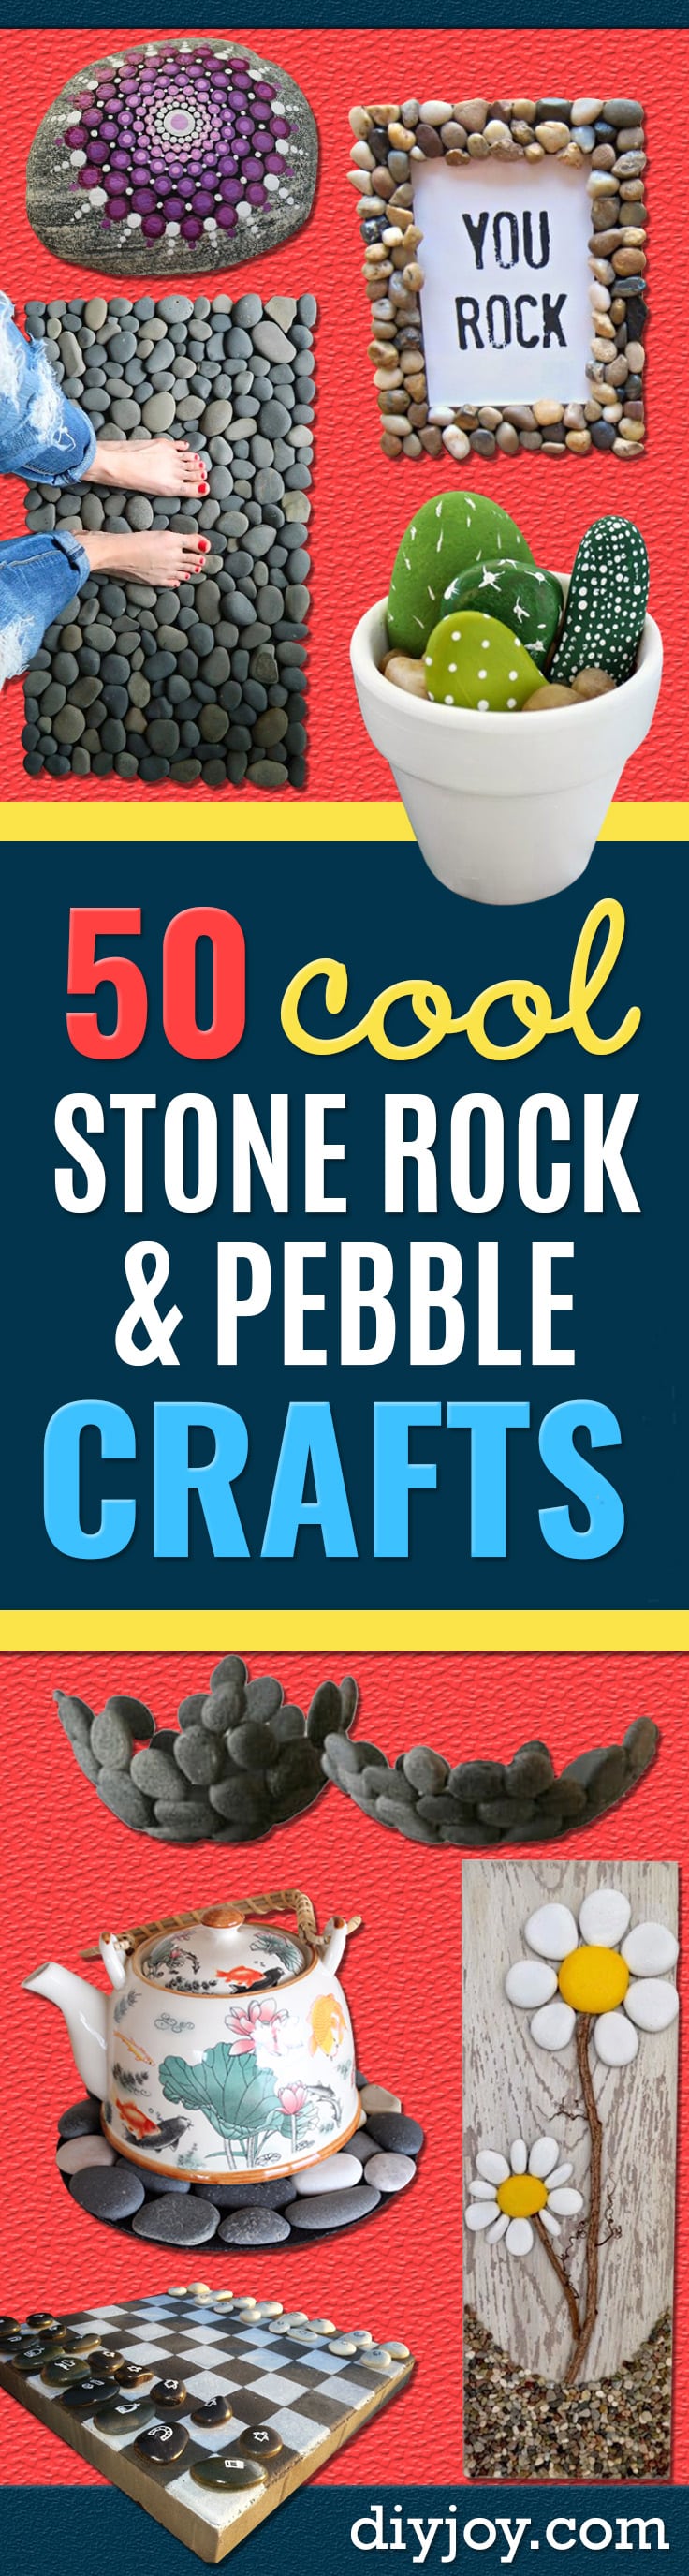
Rocks are free, which is most of the appeal, and the rest of it is that almost nothing here needs a skill you do not already have. These 24 pebble, stone and rock crafts sort into three piles. Painting, which is dot mandalas built outward from one white center, ladybugs dotted with the wrong end of a brush, vegetable garden markers, and a whole beach scene on one stone. Gluing, which is a bath mat, coasters, wall sconces, a birdhouse and a boot tray, all of them stones on a flat base. And setting, which is mortar and stepping stones and edging, the only part that asks for a Saturday and a bag of Type S. Pick your pile. Almost everything on this list costs the price of a tube of acrylic.
1. Beach Rock Painting For Beginners
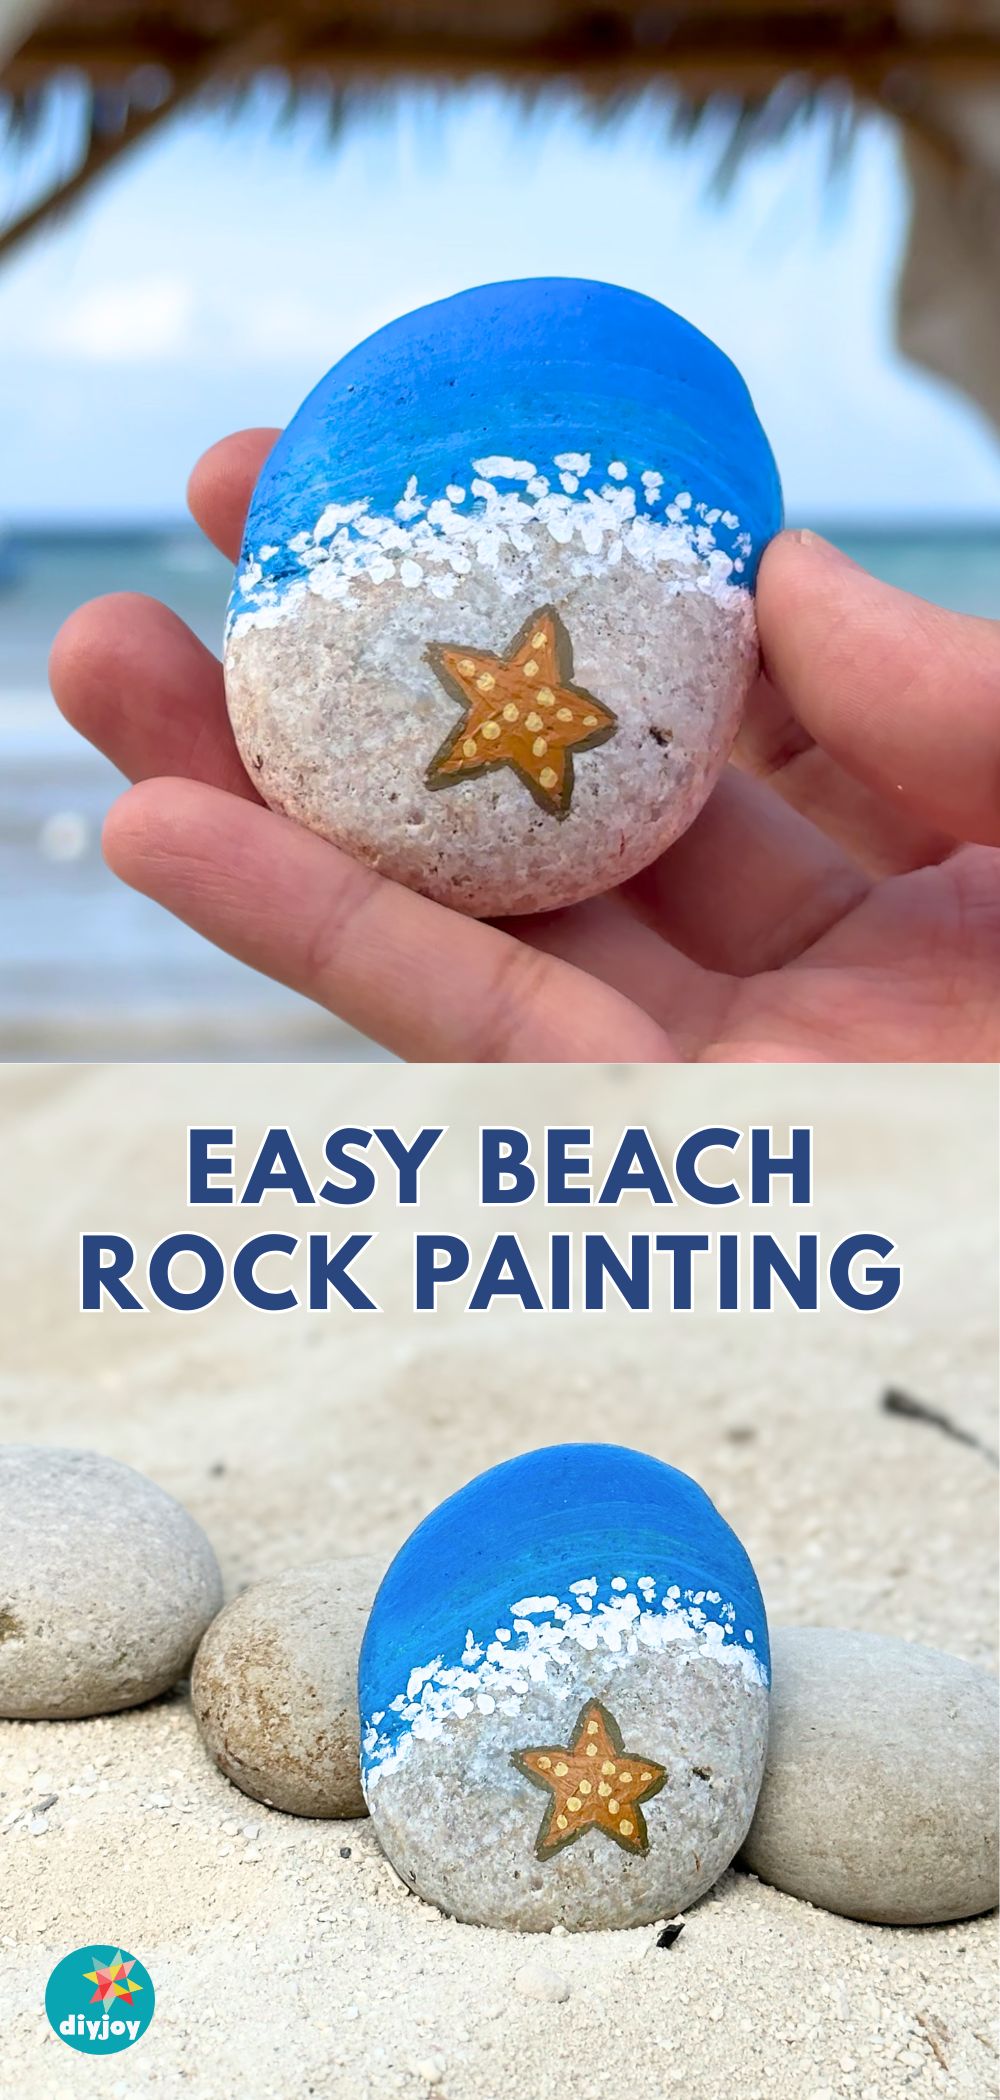
A whole beach scene on one flat river rock, built in bands so nothing has to be drawn freehand. Dark blue across the top for the ocean, dried completely, then a lighter blue through the middle in curved waves, then a line of small white dots where the water meets the sand, placed with a fine pointed brush. Mix brown with white for tan, paint a five pointed starfish, add yellow dots across it and outline the whole star in a darker brown so it lifts off the sand. Seal it if it is going outdoors. A hair dryer between layers speeds the whole thing up enormously.
Get the full tutorial at DIY Joy.
2. How to Paint Flowers on Rocks
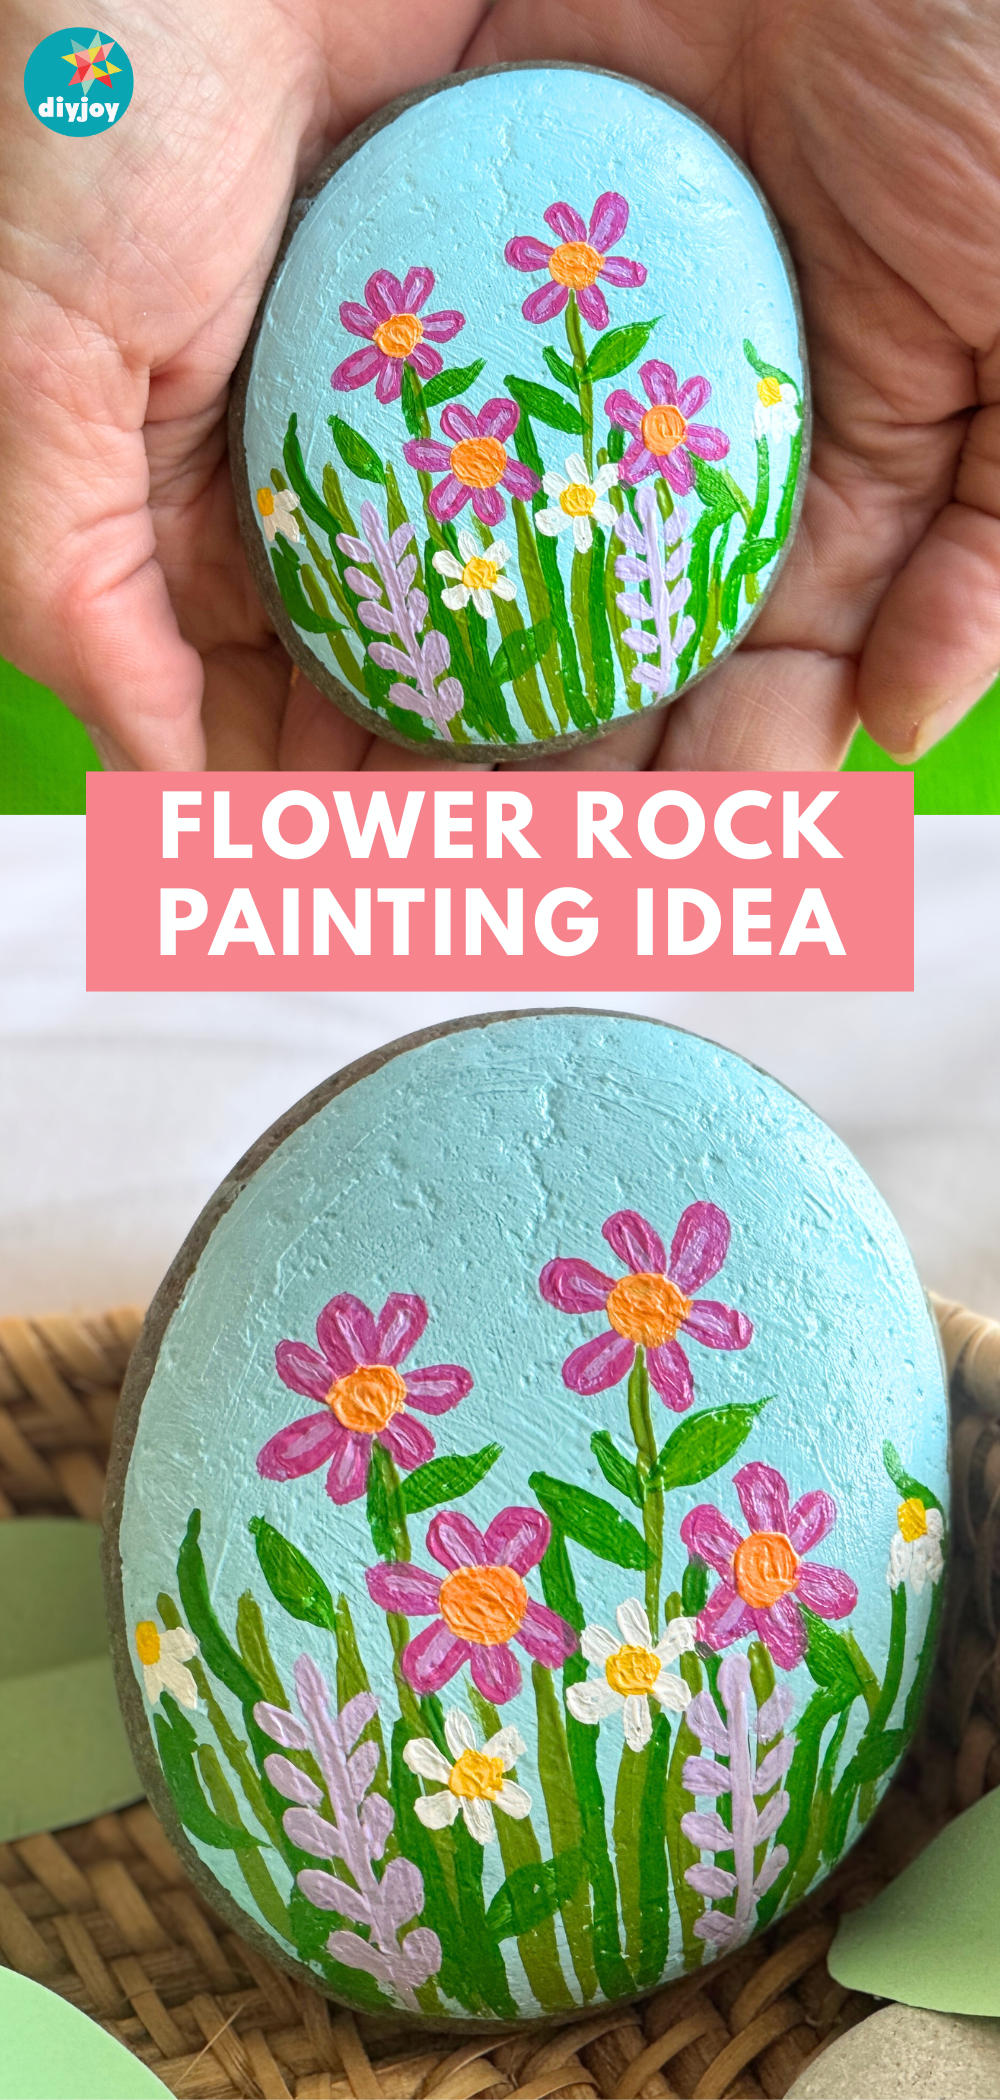
Scrub the rocks with soapy water and an old toothbrush first, because paint sits badly on the film a river leaves behind, and dry them completely. Block the whole surface in blue, then build a garden on top of it: pink flowers of six or seven petals, green stems in two different shades so they do not read flat, purple lavender spikes, white daisy petals with yellow and orange centers, then leaves and lighter detail last. Anchor your little finger on the rock to steady a shaky hand, fix mistakes with a toothpick while they are wet, and seal it at the end.
Get the full tutorial at DIY Joy.
3. Stone Footprints
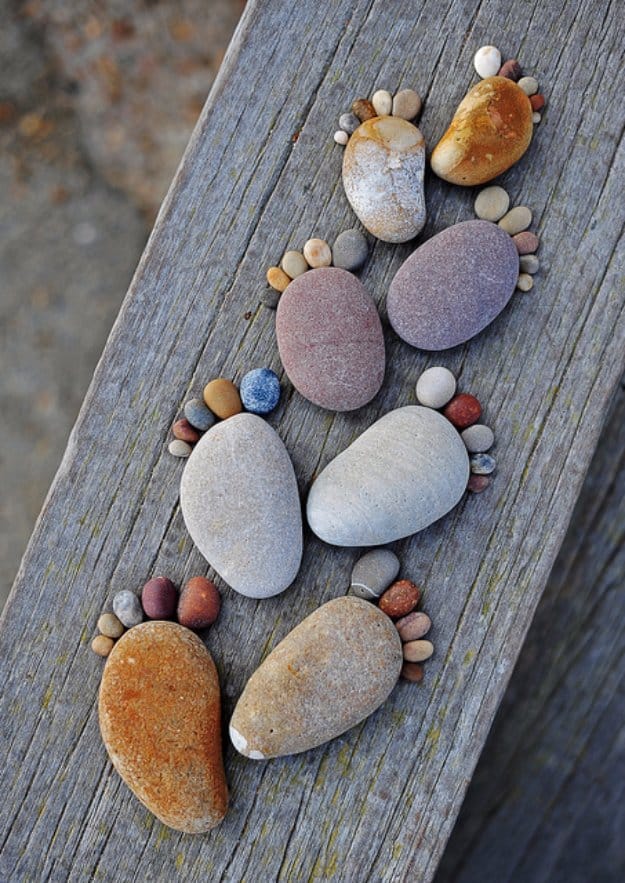
Scottish photographer Iain Blake’s series, and it is a composition rather than a craft: one large smooth stone for the sole, five tiny ones set above it for toes, repeated in pairs walking away down a weathered plank. The stones are unpainted and unglued, just placed, and the sizes and colors are chosen so each pair reads as a left and a right. It takes about four minutes on a beach and it photographs beautifully, which makes it the best thing on this list to do with children who are bored of looking for shells.
Get the full tutorial at Iain Blake, featured at My Modern Met.
4. Rock Magnets
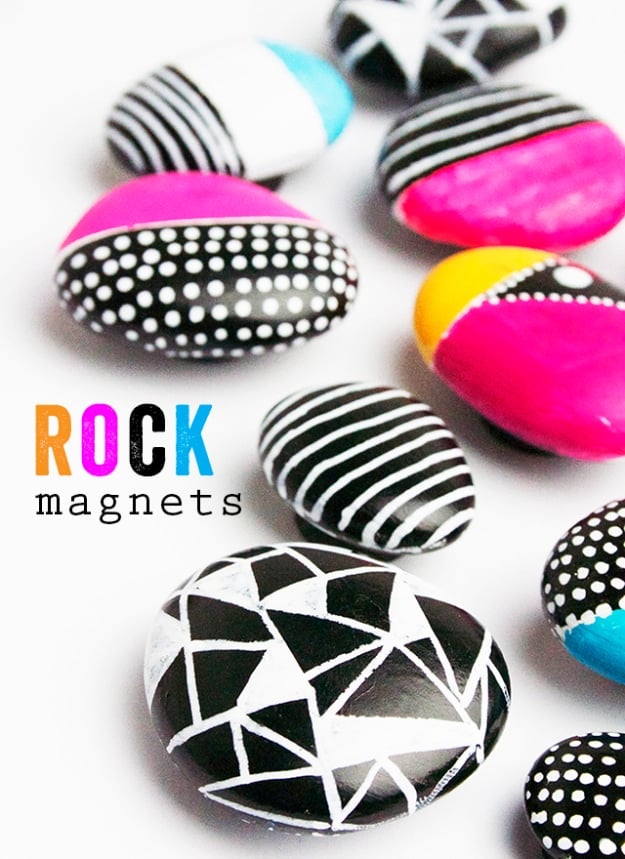
Smooth flat stones painted in flat blocks of hot pink, black, white, turquoise and yellow, then patterned over the top in fine white dots, stripes and shattered triangles, with a magnet glued to the back. The graphic quality is the whole point: these are not gentle painted pebbles, they are solid color and hard edged line, which is why they look like something bought rather than something made. A dip of half the stone in one flat color and dots over the other half is the simplest of the set and still the best looking.
Get the full tutorial at Alisa Burke.
5. Rock Chain Decor
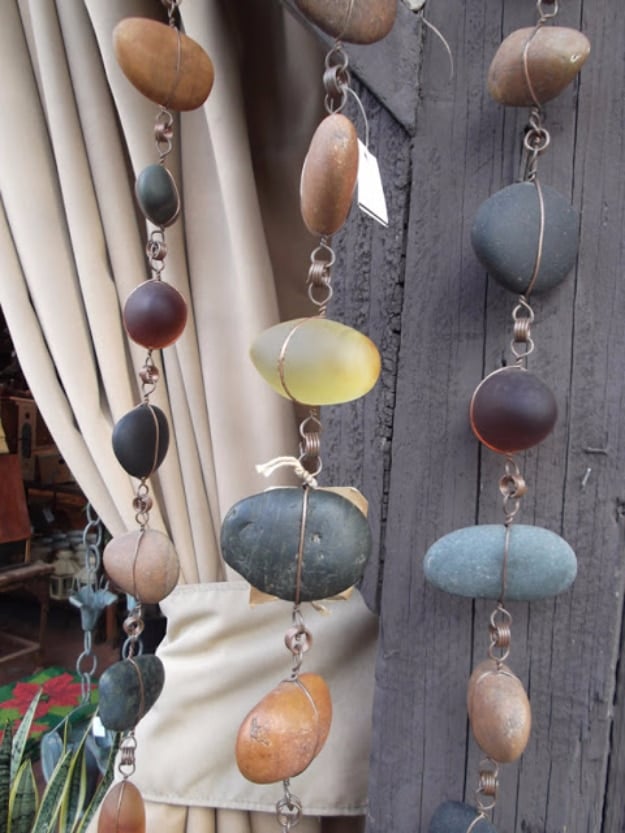
This is a rain chain, the Japanese kusari doi idea, which hangs where a downspout would and gives the water something to run down instead of a pipe. What you are looking at is a display Elderberry Street photographed at Roger’s Gardens, smooth oval stones in slate, olive, amber and rust, each caught in a loop of wire and joined into long vertical strands, with the shop’s price tags still hanging on them. Copper is the metal to use because it weathers green rather than rusty, and a stone with a bit of a waist is what lets the wire seat in the middle without sliding off.
Get the full tutorial at Elderberry Street.
6. Mandala Stones DIY
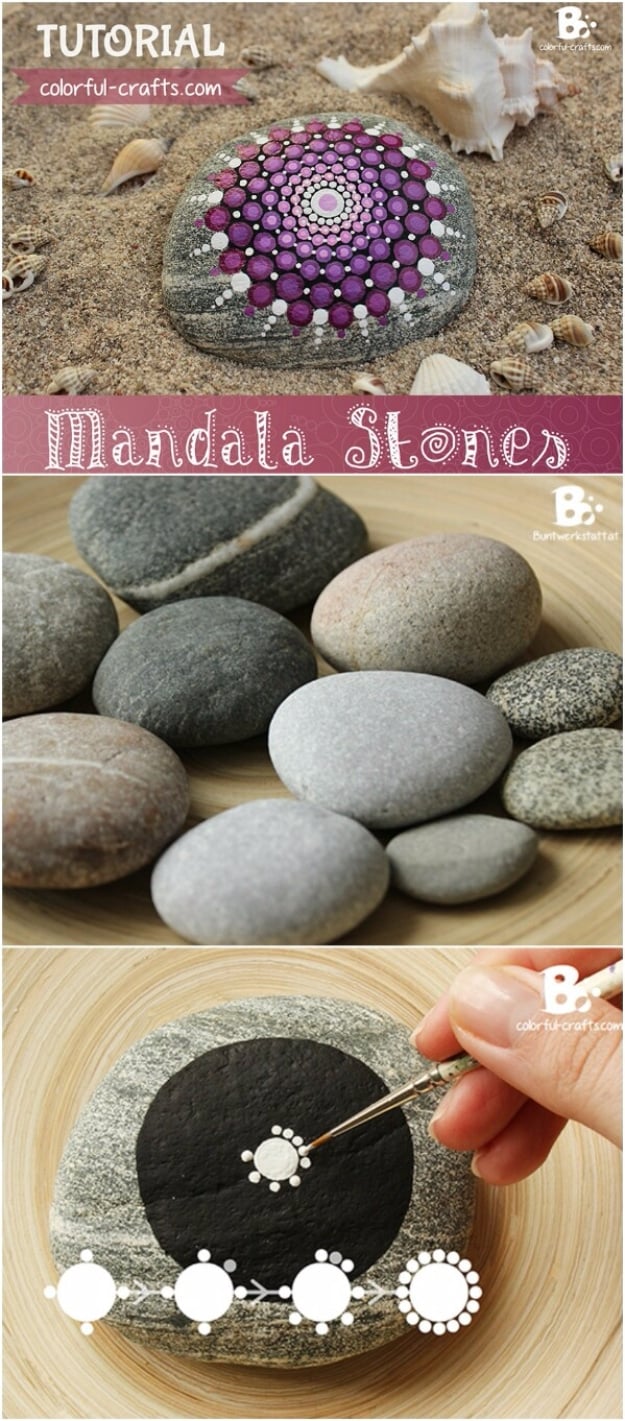
Thin your acrylic or tempera with water until a loaded brush forms a rounded dot on its own, because dot consistency is the entire craft and nothing else matters as much. Base coat the stone black, let it dry, then place one large white dot in the center and build outward in concentric rings, changing dot size and color as you go and leaving small gaps between dots. Add darker pigment progressively for a gradient. Use a pointed round synthetic brush, size 0 and 2, or a dotting tool. Practice on paper first. It is as addictive as everybody says.
Get the full tutorial at Colorful Crafts.
7. Pebble Coasters
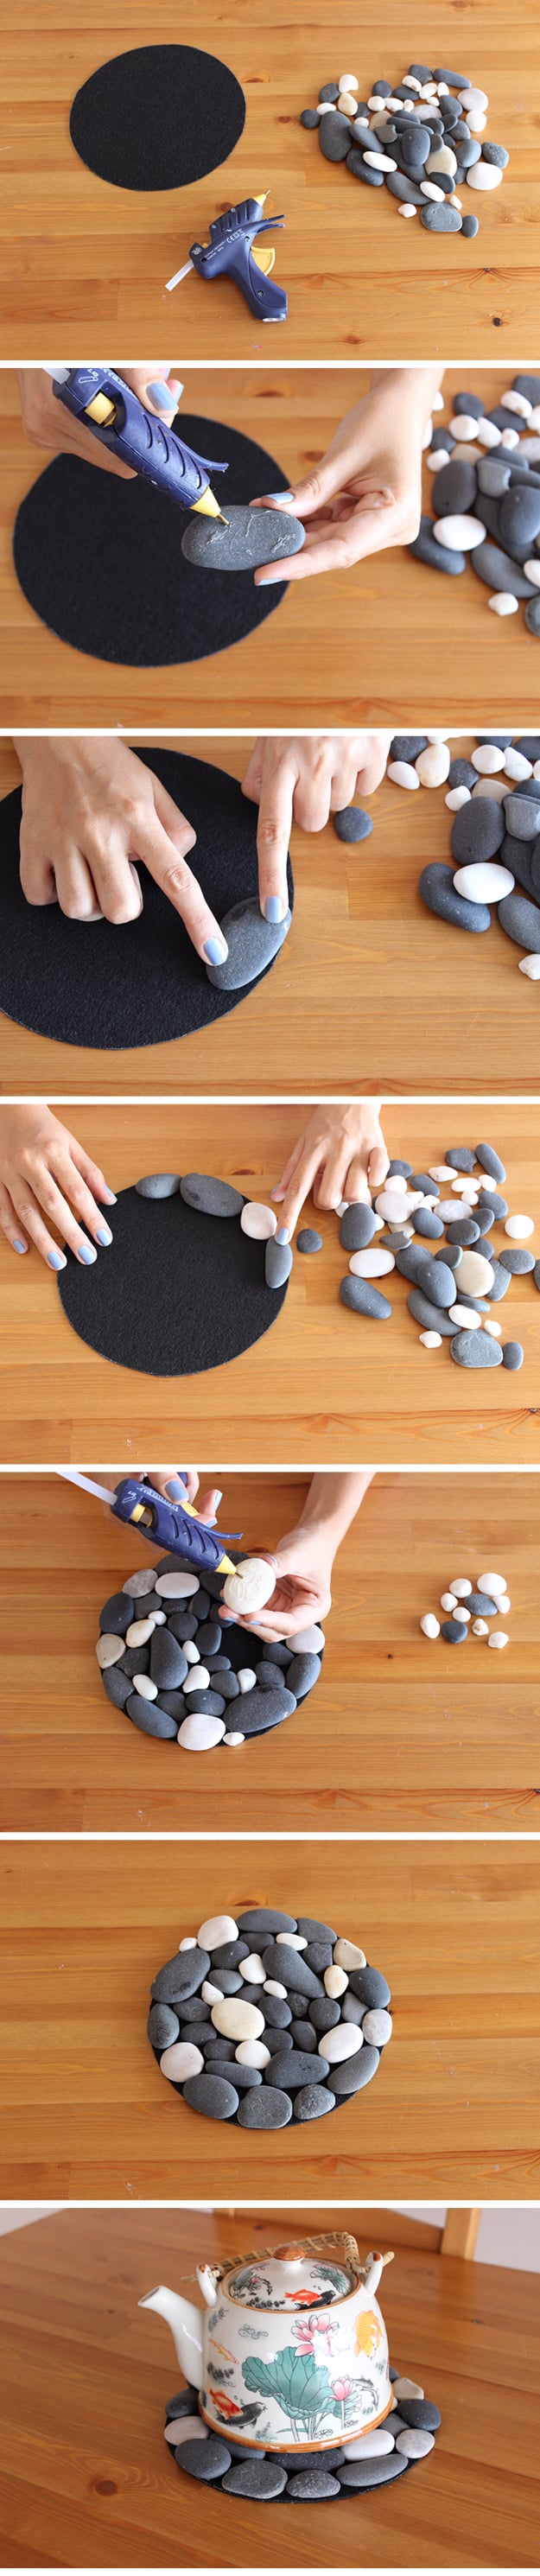
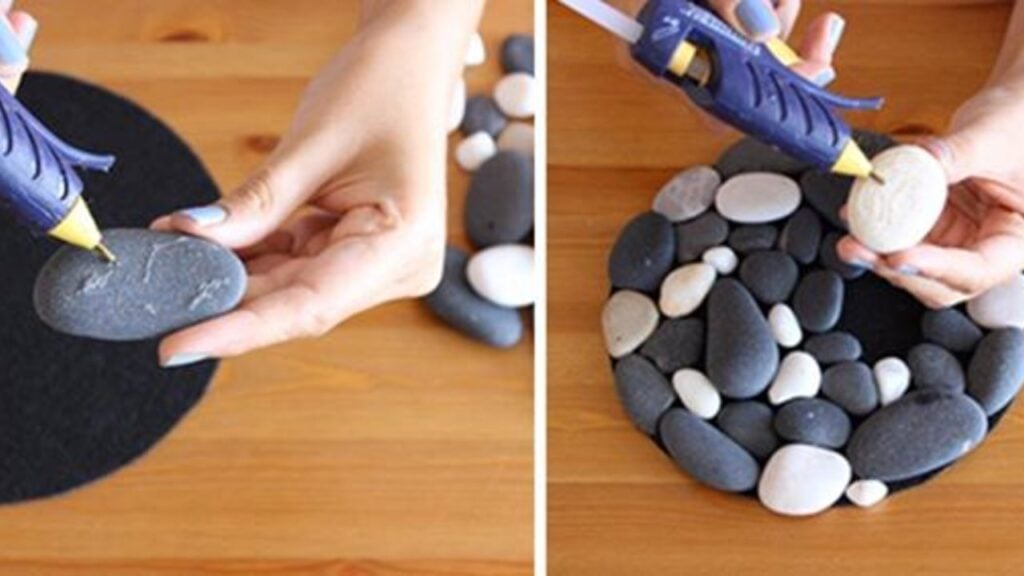
Cut a circle of thick felt, then hot glue smooth flat pebbles onto it working from the outside edge inward, mixing gray and white so the finished disc has variation instead of reading as one lump of gravel. The tutorial is in Turkish and it is a seven panel photo sequence, so you can follow every step without a word of it. Flat is what matters when you pick the stones, because one domed pebble in the middle will tip every mug you put on it, and something rigid under the felt is worth the extra two minutes so it holds the weight.
Get the full tutorial at Tarz Meselesi.
8. DIY Garden Markers From Rocks
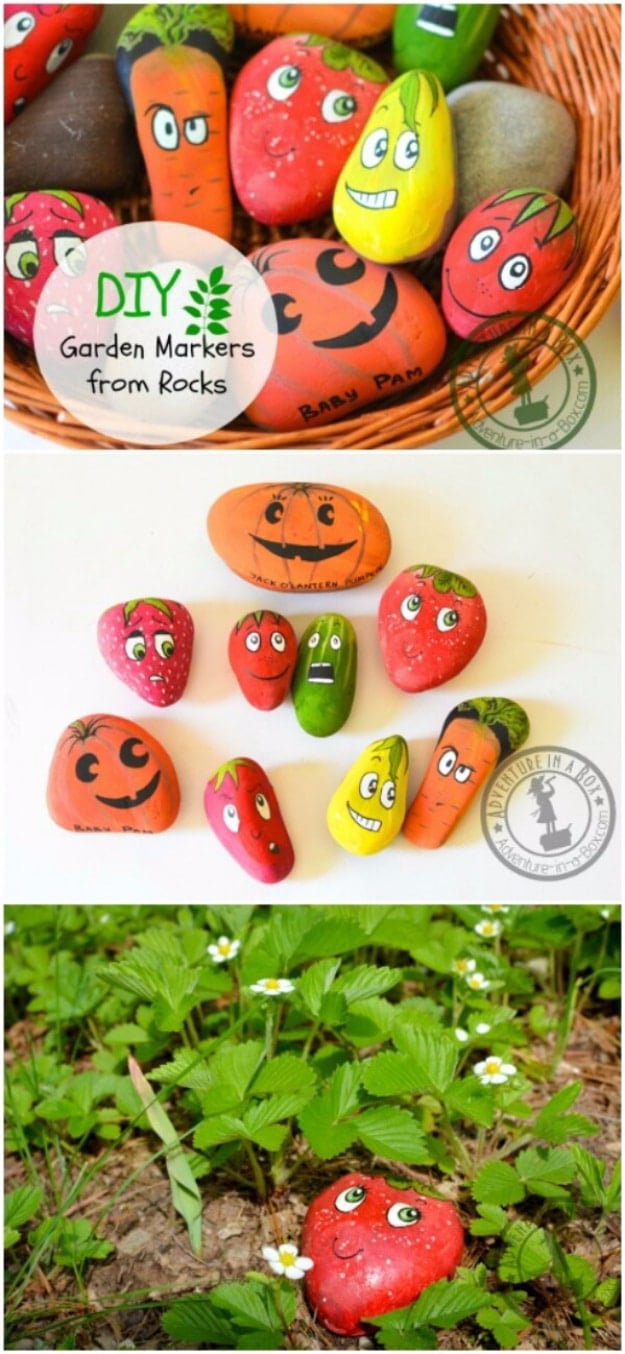
Base coat a smooth rock in the color of the vegetable, orange for pumpkin, green for cucumber, red for tomato, then add the shape details and a small face, so a child can find the strawberry row without reading. Gouache washes off easily and is non toxic, which suits children, but it must be varnished. Acrylic dries water resistant on its own and only needs varnish for a marker that has to survive more than a few weeks outside. Yellow needs two or three coats over anything. Let each coat dry fully before the next.
Get the full tutorial at Adventure in a Box.
9. DIY Stone Sconces
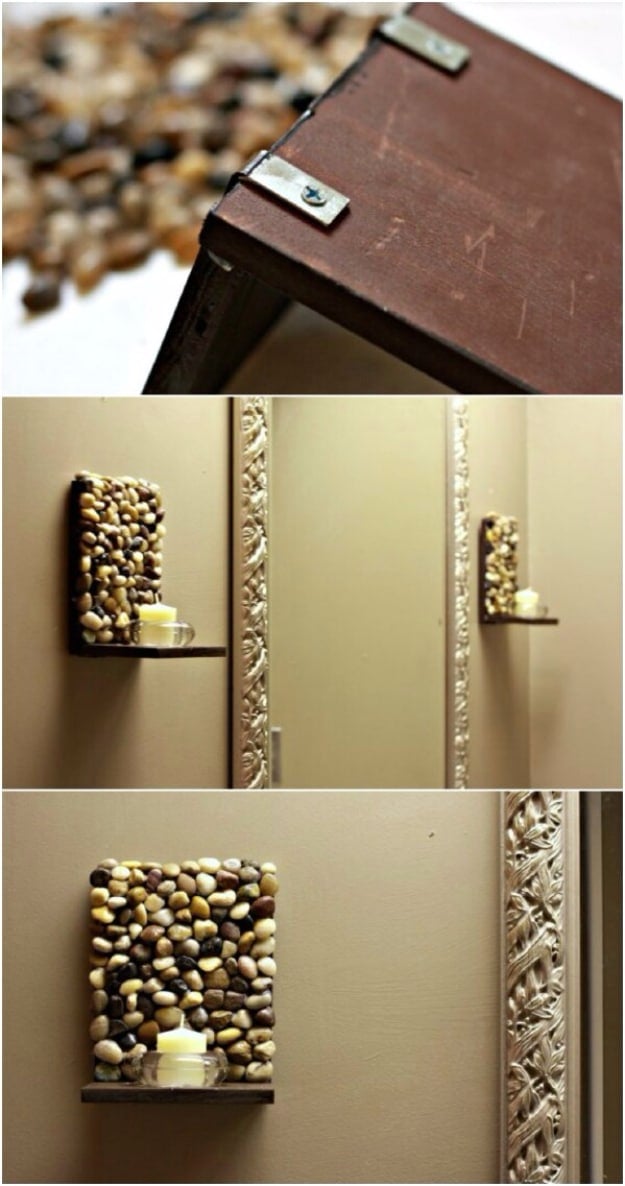
Four sconces for about twenty dollars. Each one is a 7 by 5.5 inch piece of half inch wood, sanded, painted dark brown on the front and sides, with a smaller 3.5 by 5.5 inch block hot glued to the back as a spacer and picture hanging hardware above it. Then decorative stones get glued to the face, starting at the bottom and working up, packed as tightly as you can so there are no mortar gaps, and a tealight holder goes on at the base. Use far more hot glue than feels reasonable, because a stone dropping off a wall at head height is a bad afternoon.
Get the full tutorial at The Noshery.
10. DIY Succulent Planter With River Stones
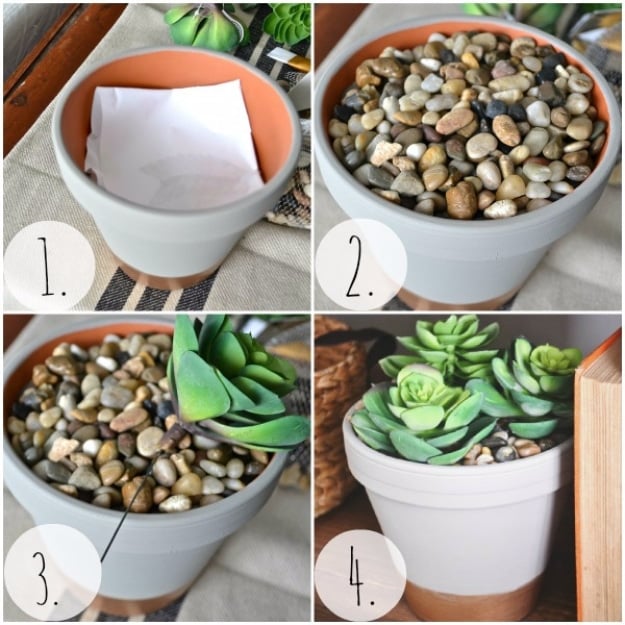
Four steps and no soil. Fill the bottom of a painted pot with scrunched grocery bags, lay a sheet of paper over them to catch the stones and make the pot read as full, then pour river stones in almost to the rim. Strip the stems off faux succulents with scissors, leaving just the wire, which is the step that lets the rosettes sit low and tight against the gravel instead of standing up on plastic stalks. Nothing needs water, nothing needs light, and it stays exactly as good in a dark bathroom as it does on a sunny windowsill.
Get the full tutorial at Liz Marie Blog.
11. DIY Air Dry Clay Jewelry Organizer Using Pebbles
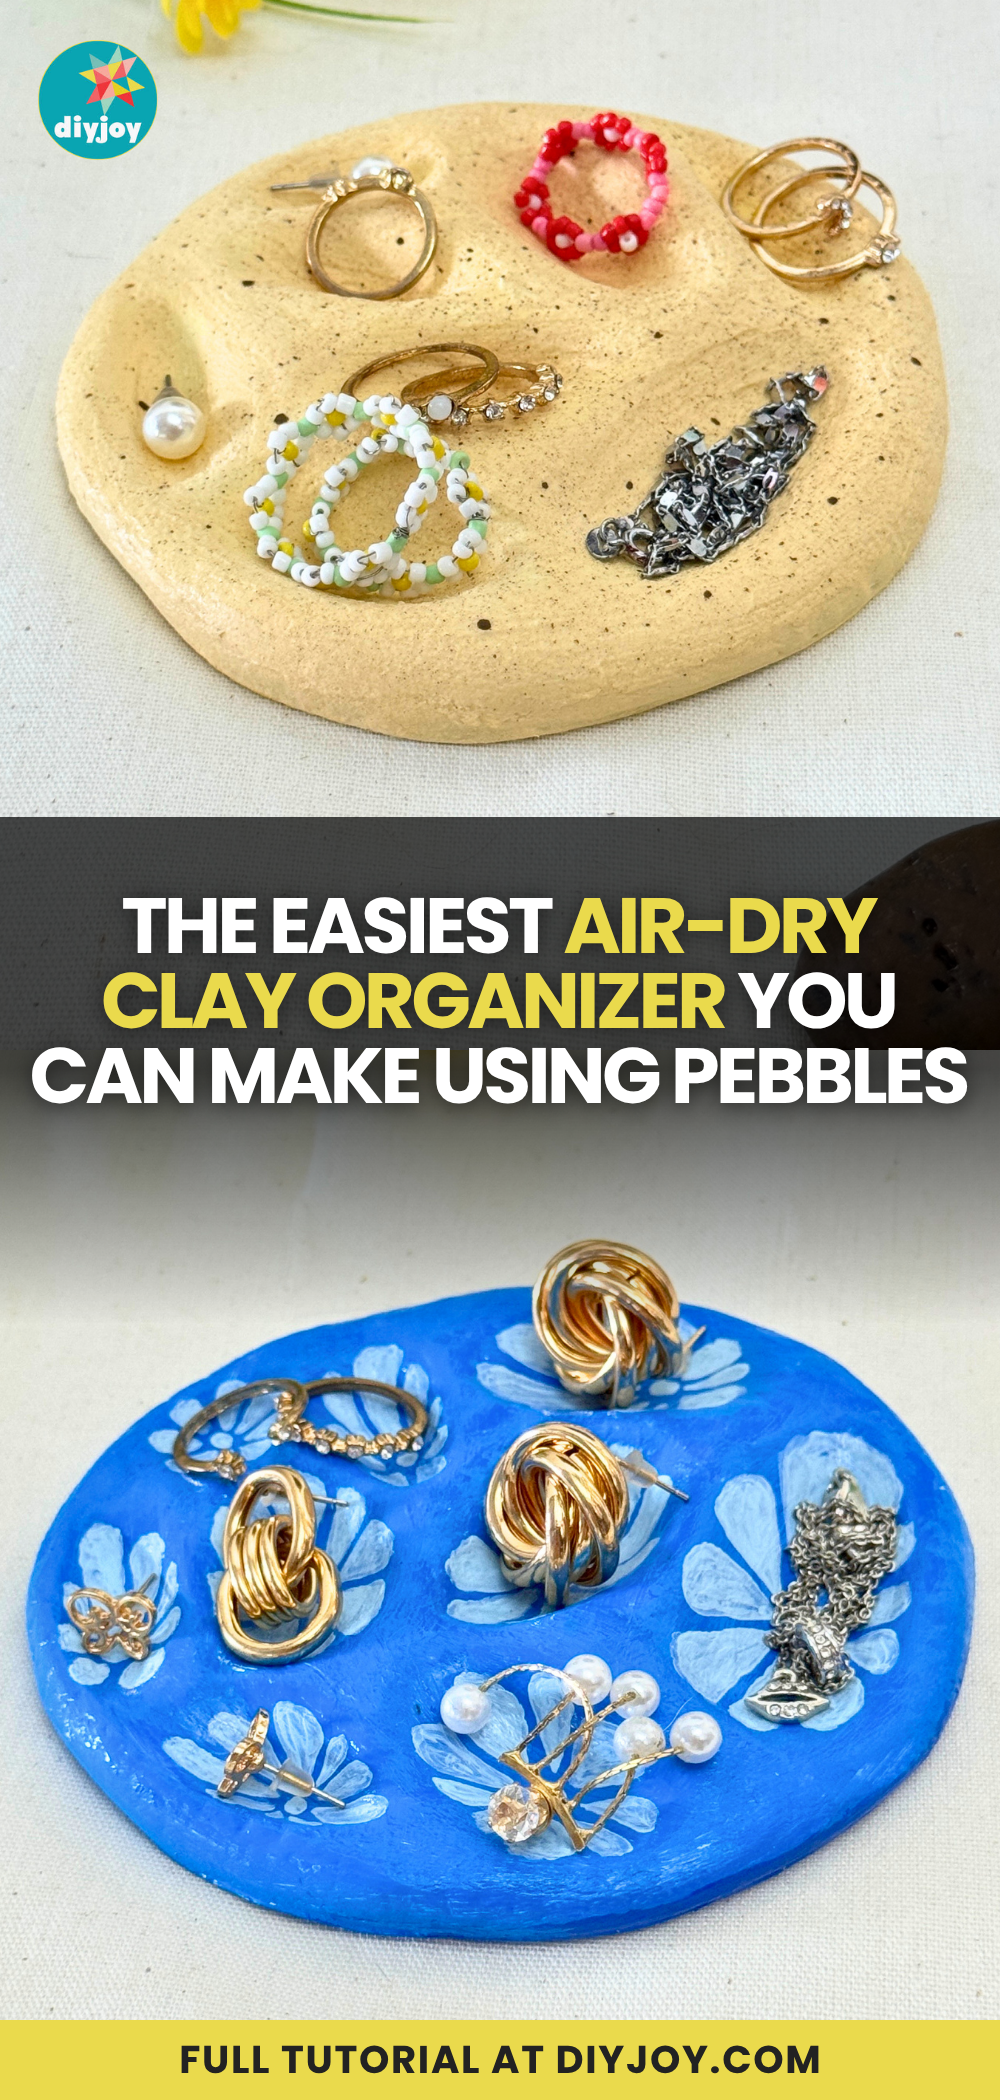
Roll air dry clay flat into a circle, then press pebbles into the surface and lift them straight back out, which leaves a pattern of rounded hollows the clay will keep forever. Smooth the edges with a damp finger, then let it dry, which takes anywhere from overnight to several days depending on the clay and the thickness, and rushing it leaves soft spots. Prime it, paint the base color, then paint into the sunken shapes so the pattern reads. Mixing baking soda into the paint gives a stone like texture. Seal with thin coats so it does not streak.
Get the full tutorial at DIY Joy.
12. Carved Rocks
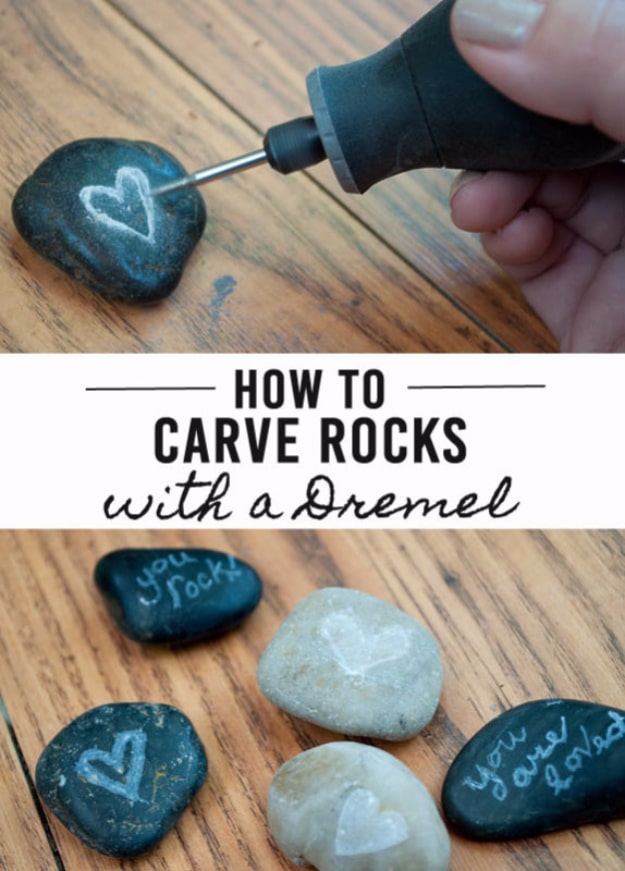
A Dremel with a diamond carving tip, run at a slower speed with light strokes held at about 45 degrees rather than straight down, which is what gives a smooth groove instead of a chewed one. Switch to a grinding tip and make several passes to even the carved surface out. Dunk the rock in water to cool it every so often rather than running water continuously, which rests your eyes too. For lettering, one slow single pass beats going over a line twice, because the second pass never lands in the first. Wear eye protection and expect dust.
Get the full tutorial at Clumsy Crafter.
13. Pebble Mosaic Stepping Stone
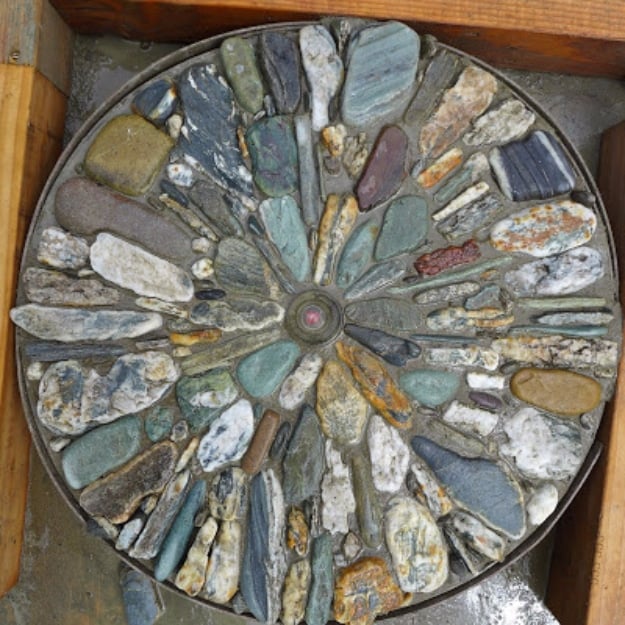
Type S mortar, not concrete mix, because concrete dries too fast to set stones into. One 18 inch square form takes about one and a third 80 pound bags, mixed to a stiff pudding. Build the form from 2x4s and plywood, mock the design up in sand first, spread the mortar to about half an inch below the rim and lay rebar half an inch off the bottom. Wet each stone, set it on edge at least an inch deep, then lay plywood on top and stand on it to level everything. Cure two or three days before you strip the form. Work in shade.
Get the full tutorial at Jeffrey Gardens.
14. Painted Ladybug Rocks
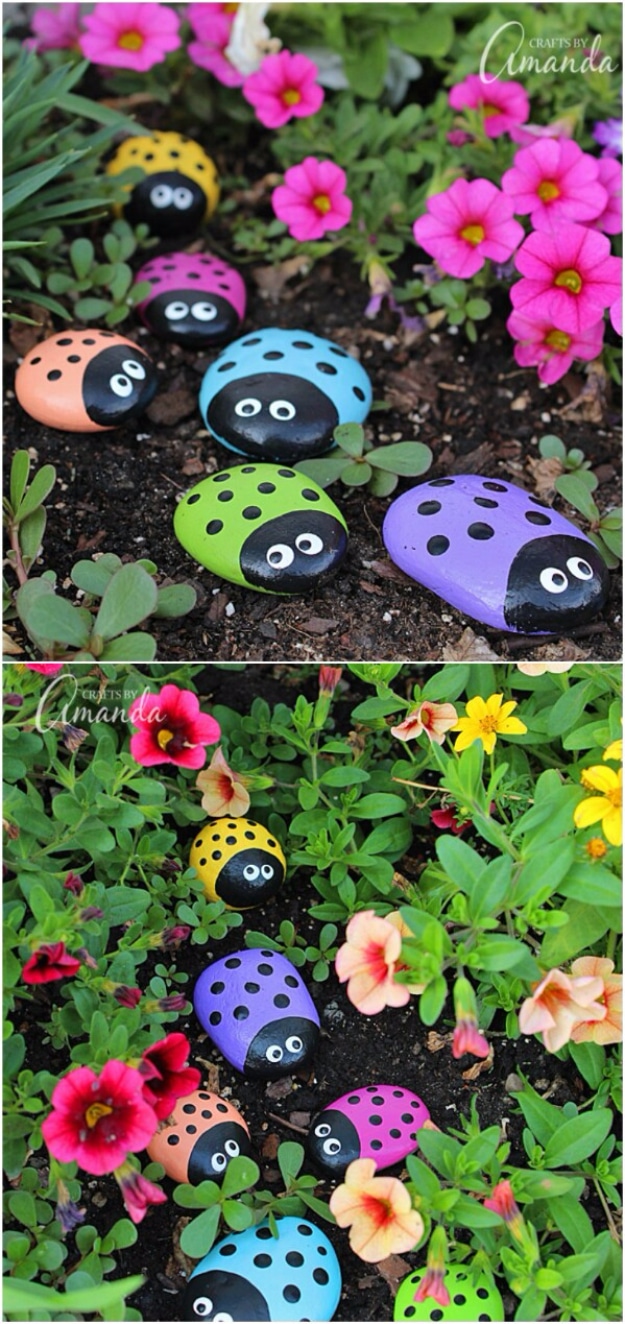
Wash and dry the rocks first, then base coat in bright colors, skipping the bottom if the rock is going into soil. Paint the black head once the base is dry, then use the blunt end of the paintbrush handle dipped in black to dot the spots, which is what keeps them round and even. The same handle end does the white eyes, and a cut toothpick does the black pupils. Patio paint is the right product here, and a clear coat or outdoor sealer at the end is what gets them through a winter in a flowerbed.
Get the full tutorial at Crafts by Amanda.
15. Stone Gem Tree
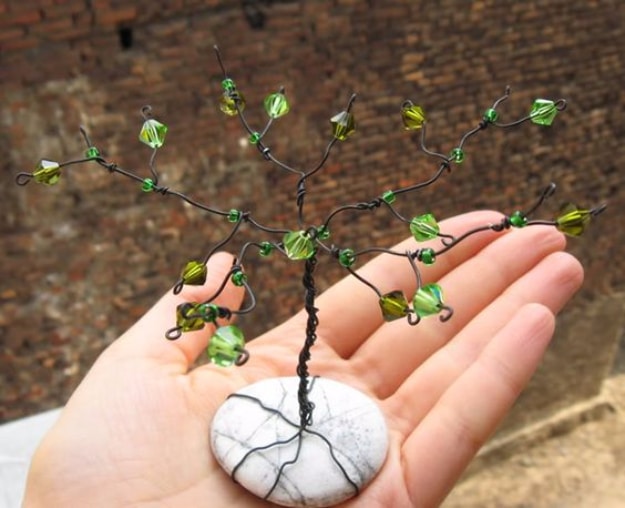
Cut five 20cm lengths of black jewelry wire and bend each into an L with 5 to 6cm left for roots. Twist two together at the bend to make a 6cm trunk, then add the other three around it as branches. Wrap the roots around a flat pebble, about 5 by 4cm, with round nose pliers until the tree stands up on its own. Then add roughly fifteen smaller 4cm branches with looped ends, thread green faceted beads and seed beads on, and wrap each one tight. If the wire looks too smooth, twist and part straighten it first to rough it up.
Get the full tutorial at Windy Sunset.
16. Stone Birdhouse
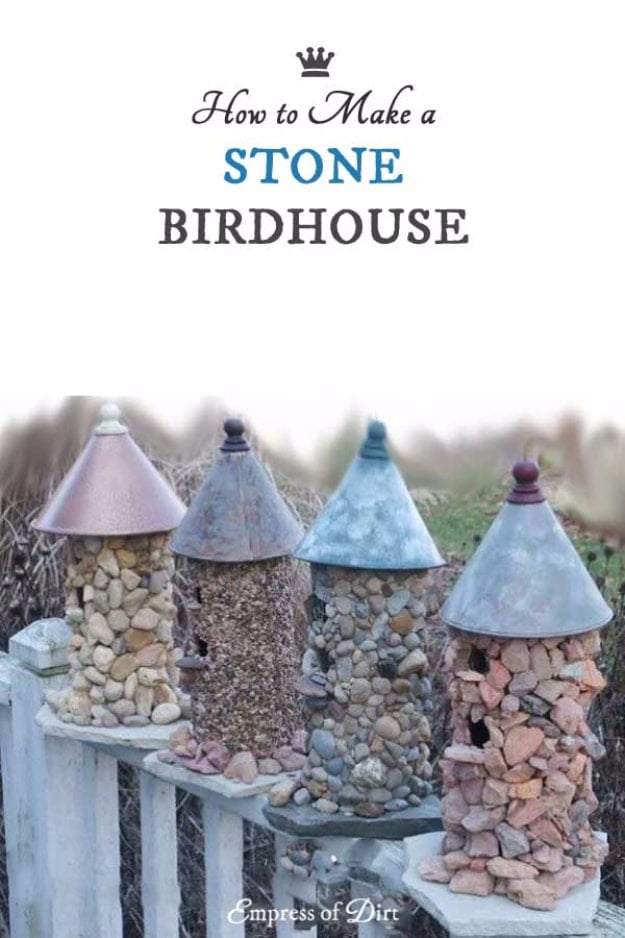
A wooden birdhouse prepped properly first, sanded and primed with an exterior sealer, then stoned from the bottom up with thick dabs of clear drying GE II silicone sealant, edges and openings first and the middle filled in after. Stones about the size of a nickel or a thumbnail. A metal funnel makes the roof, and two or three coats of exterior polyurethane finish it. The bird safety note is not optional: these are decorative, so screen every opening with fine mesh, because a bird that gets in cannot get out and wasps will take it over.
Get the full tutorial at Empress of Dirt.
17. DIY Pebble And Cabinet Knobs
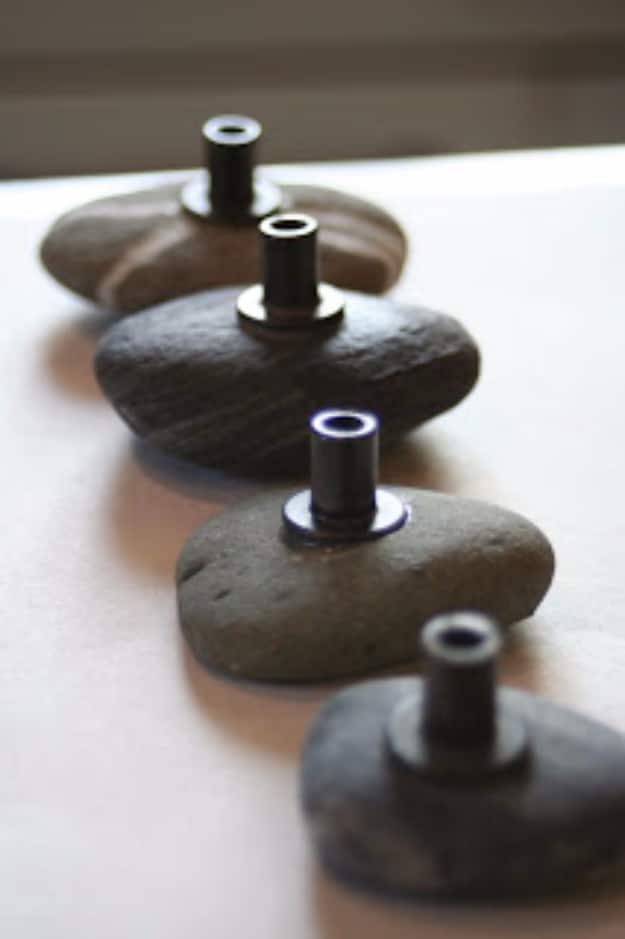
Clean the rocks in hot soapy water and let them dry for several days, then wipe both glue faces with rubbing alcohol before you touch the epoxy, because a damp or dusty stone is the only way this fails. Five minute epoxy onto the back of the rock and the flat face of an oil rubbed bronze machine bolt, press, leave it a few minutes, then turn it rock up and leave it overnight. Pick hard stone, not the conglomerated mud kind, and test by trying to scratch it with a knife. Clear coat makes them look permanently wet.
Get the full tutorial at Lillie Dale.
18. Mudroom Pebble Mat
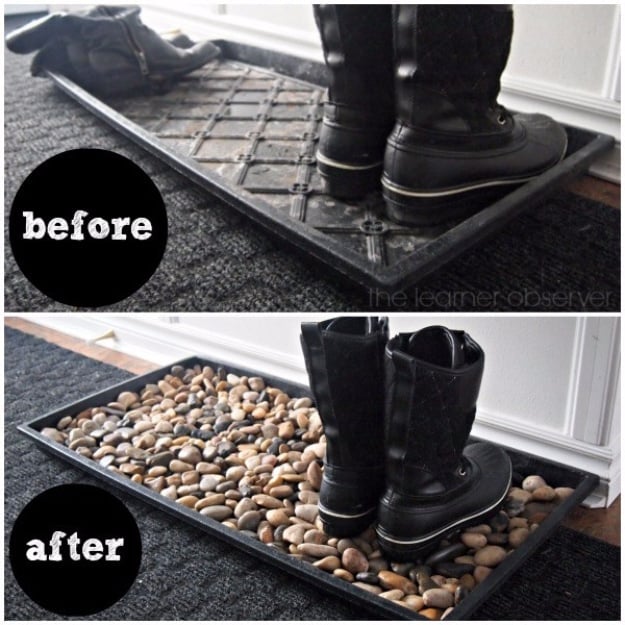
A cheap rubber boot tray filled edge to edge with mixed river rocks, and it is on this list because the before and after photo explains it better than any instruction could. Wet boots sit on top of the stones and drip through, so the soles dry instead of standing in a puddle, and the melted snow collects invisibly underneath in the tray. The gravel is also considerably better looking than the ridged rubber it is covering. One bag of rocks, one tray, no glue, no drying time, no skill.
Get the full tutorial at The Learner Observer.
19. Pallet And Pebble Art
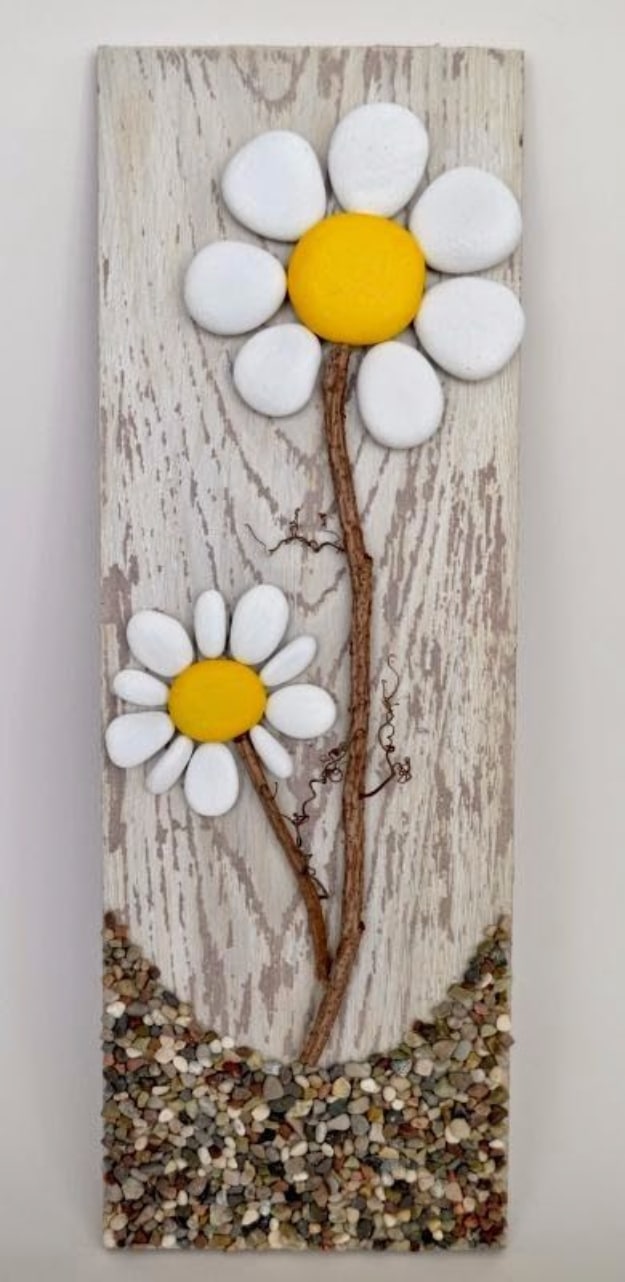
Two daisies built on a whitewashed pallet board, the petals made from flat white stones laid in a ring, the centers painted solid yellow on a single larger stone, with real twigs glued on as stems and a drift of fine gravel along the bottom edge as ground. Simple, and the reason it works is that every stone is chosen for shape before it is placed: eight petals need eight stones of the same length, or the flower looks wrong in a way you cannot immediately name. Whitewashed wood is what keeps the pale stones visible.
Get the full tutorial at Pallet Projects.
20. DIY Pebble Hangers
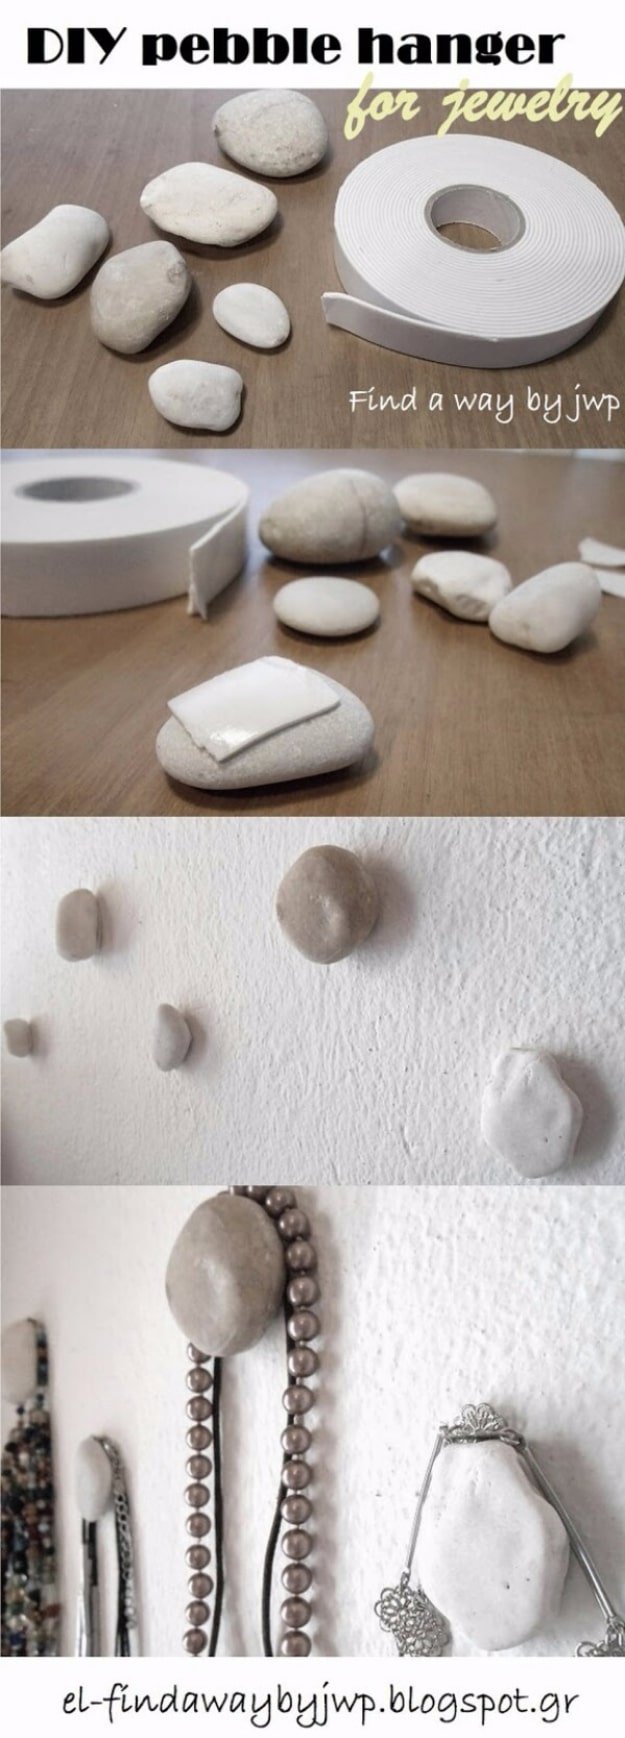
Lightweight pebbles with one genuinely flat side, a square of removable double sided wall tape on each flat face, pressed onto the wall wherever you want a hook. That is it. They hold necklaces, bracelets and small bags, they come off the wall without taking the paint with them, and from any distance they read as a decorative arrangement rather than as storage. Lightweight is doing real work in that sentence: a heavy stone plus a heavy chain will peel off the wall overnight and take a flake of plaster down with it.
Get the full tutorial at Find a Way by JWP.
21. Stone Photo Transfers
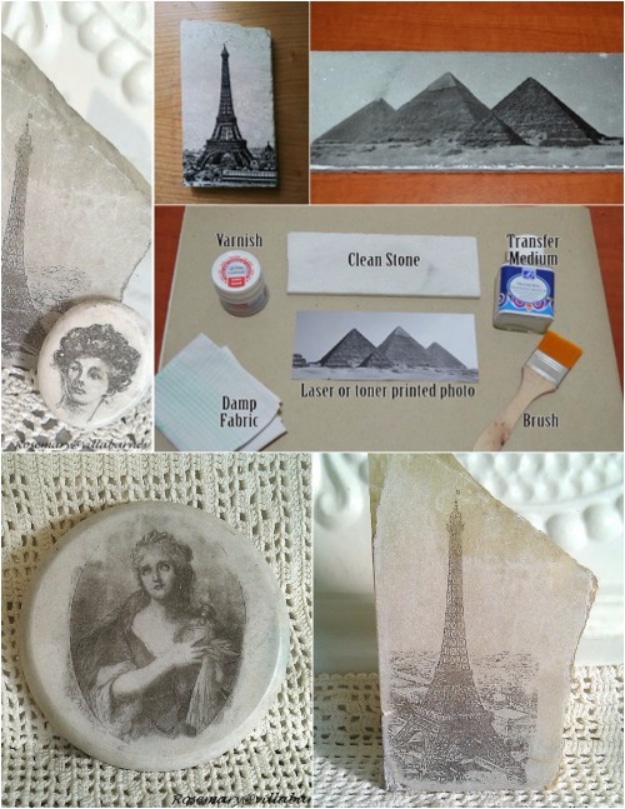
Six supplies: a clean stone, a laser or toner printed photo, transfer medium, a brush, varnish and a damp cloth. Coat both the stone and the face of the print with medium, lay the print down and push every air pocket out from the center, then leave it about eight hours to cure. Rub the paper backing away with the damp cloth, slowly, and seal with varnish. Black and white transfers far better than color, because colored ink lifts unevenly. It must be a laser or toner print; an inkjet photo will dissolve into a smear.
Get the full tutorial at DIY and Crafts.
22. Stone Rock Edging
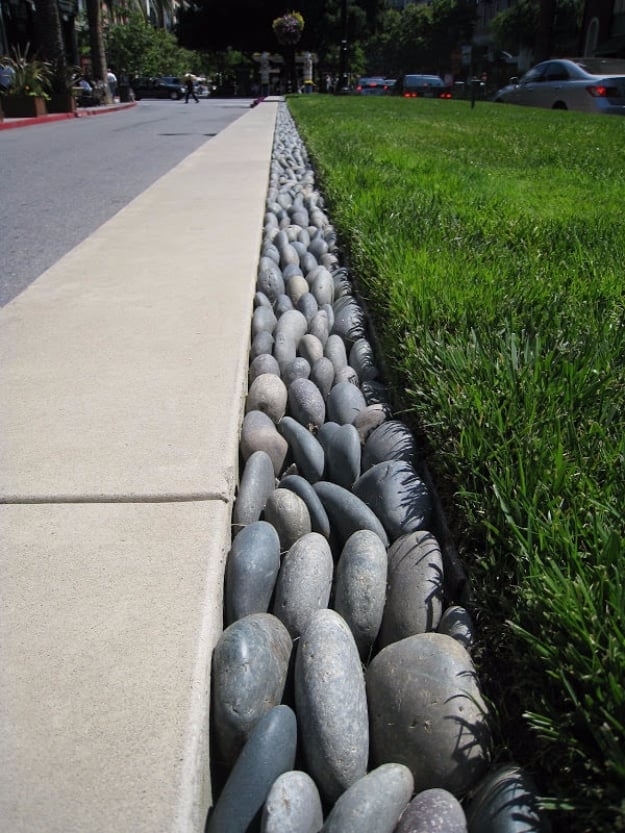
Dig a shallow trench along the border, then fill it with rocks of a similar size. Similar is the word that matters: uniform stones read as a deliberate modern edge and mixed ones read as a pile, and it is the only decision in the whole job. The trench earns its keep twice over, because it doubles as a mowing strip and as a barrier that stops grass creeping into the bed. Use stones you already dug out of the garden, or ask on a local listing site, since people with leftover landscape rock usually want it gone.
Get the full tutorial at The Garden Glove.
23. DIY Outdoor Chess Game
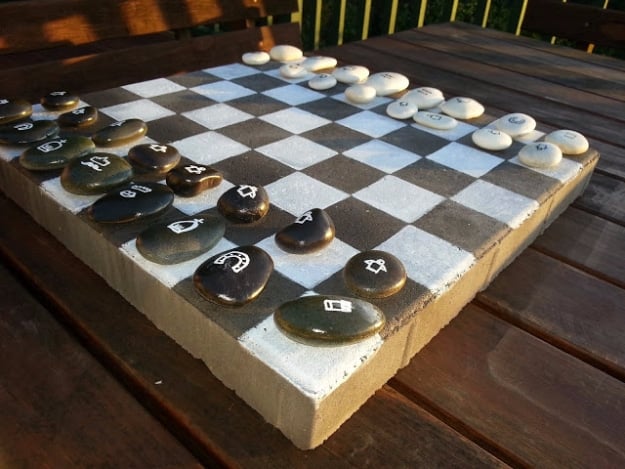
A concrete paver painted in a checkerboard with outdoor paint, using a ruler and a real chess board as a guide so the squares come out square, and smooth pebbles in two tones as the pieces, marked with their symbols in a white paint pen and a Sharpie. Then everything, board and pebbles both, gets two generous coats of clear acrylic spray, which is what carries it through frost and sun without fading. It plays chess or checkers depending on which pebbles you mark, and it lives outside permanently.
Get the full tutorial at My Heart n My Home.
24. DIY Pebble Bath Mat
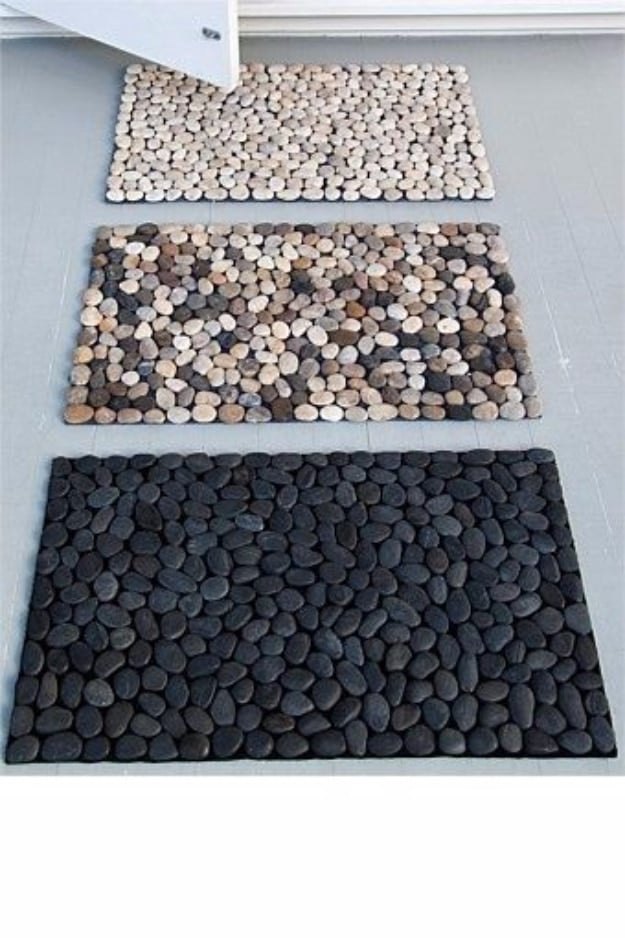
About thirty two dollars all in: a rubber welcome mat at around thirteen, four bags of river rocks at fourteen and a tube of contact cement at five, against fifty four for the shop bought version. Glue the rocks onto the rubber base with the cement, working out from the center, and deliberately avoid straight lines or matched colors, because the organic arrangement is what makes it look natural rather than tiled. Let the glue cure a full twenty four hours before you stand on it. The stones go shiny when they are wet and it feels genuinely lovely.
Get the full tutorial at Curbly.