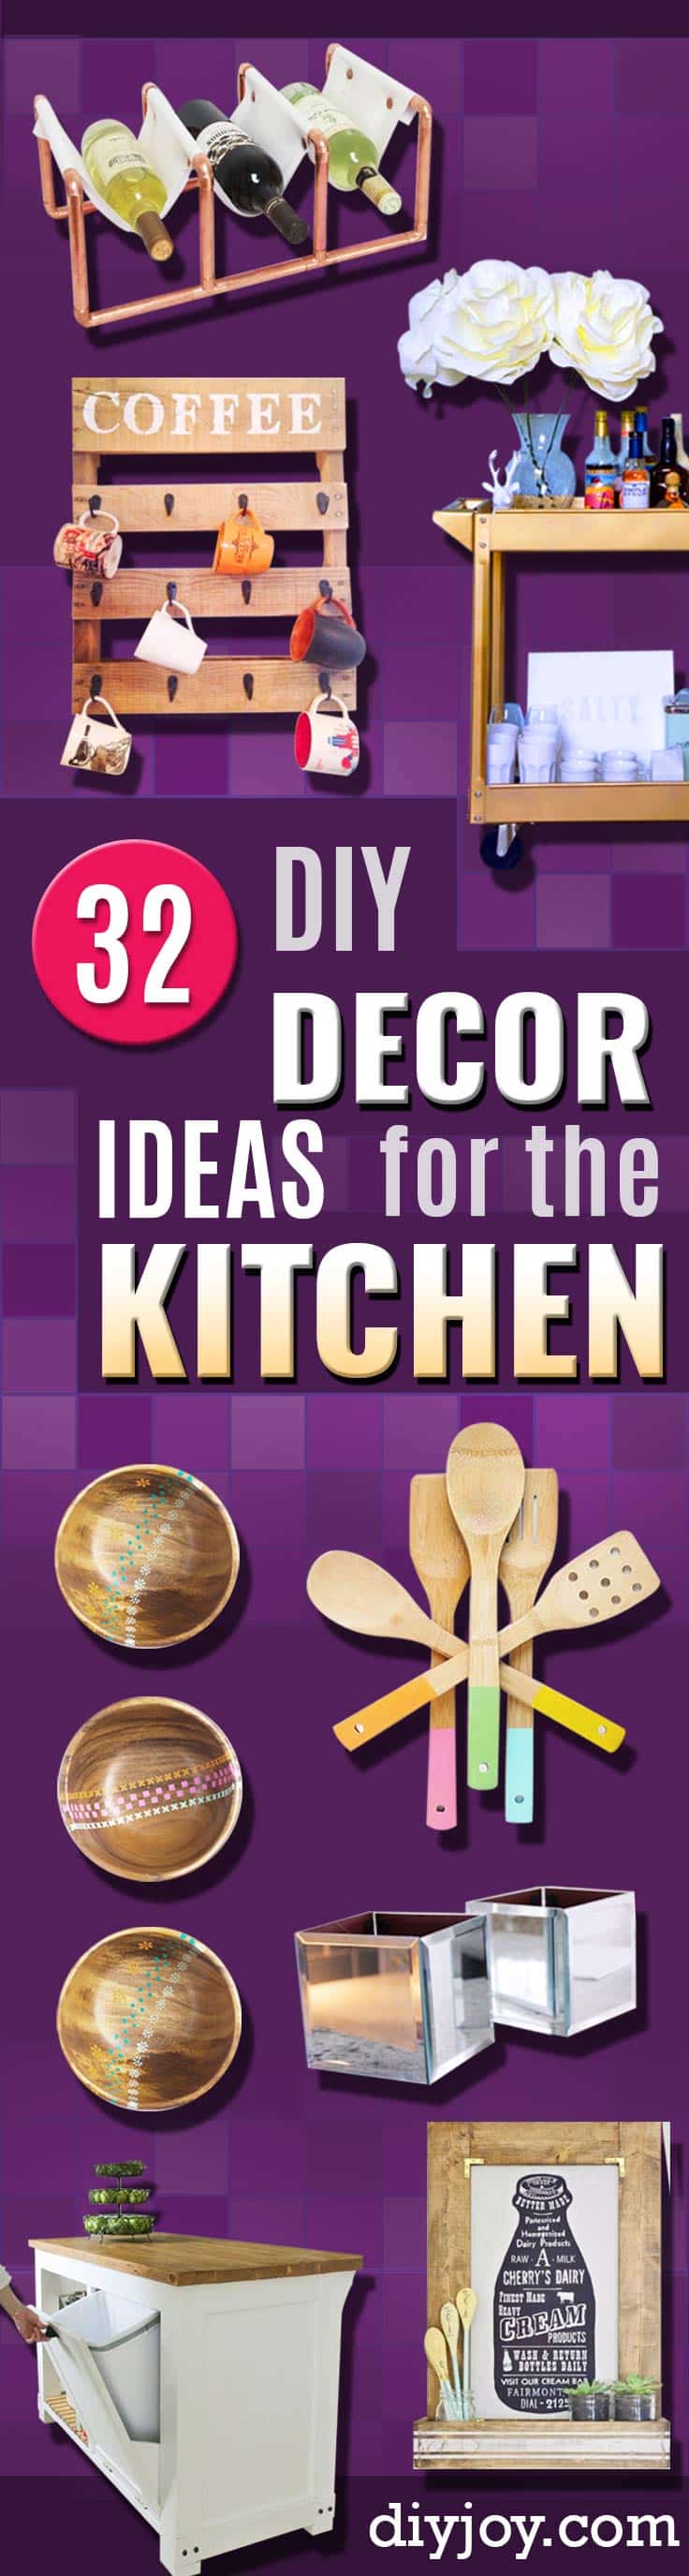
The kitchen is where everyone ends up at a party, so why not give them something fun to look at? These 28 creative DIY kitchen decor ideas dress up walls, counters and tables with projects you can actually finish in a weekend. Kitchen decor covers the pieces that make the room feel like yours: signs and wall art, tea towels and napkins, utensil holders, trays, trivets and little shelves for the things you love. You’ll find quick wins like color dipped wooden spoons and fruit stamped tea towels, plus bigger builds like a painted faux tile backsplash and a copper pipe wine rack. A handful of DIY JOY originals with step by step videos are mixed in too, from felt fruit coasters to an air dry clay egg tray. Pick one that fits your colors and start with the spot you see first every morning, right by the coffee maker!
1. DIY Metal Letter Industrial Kitchen Sign
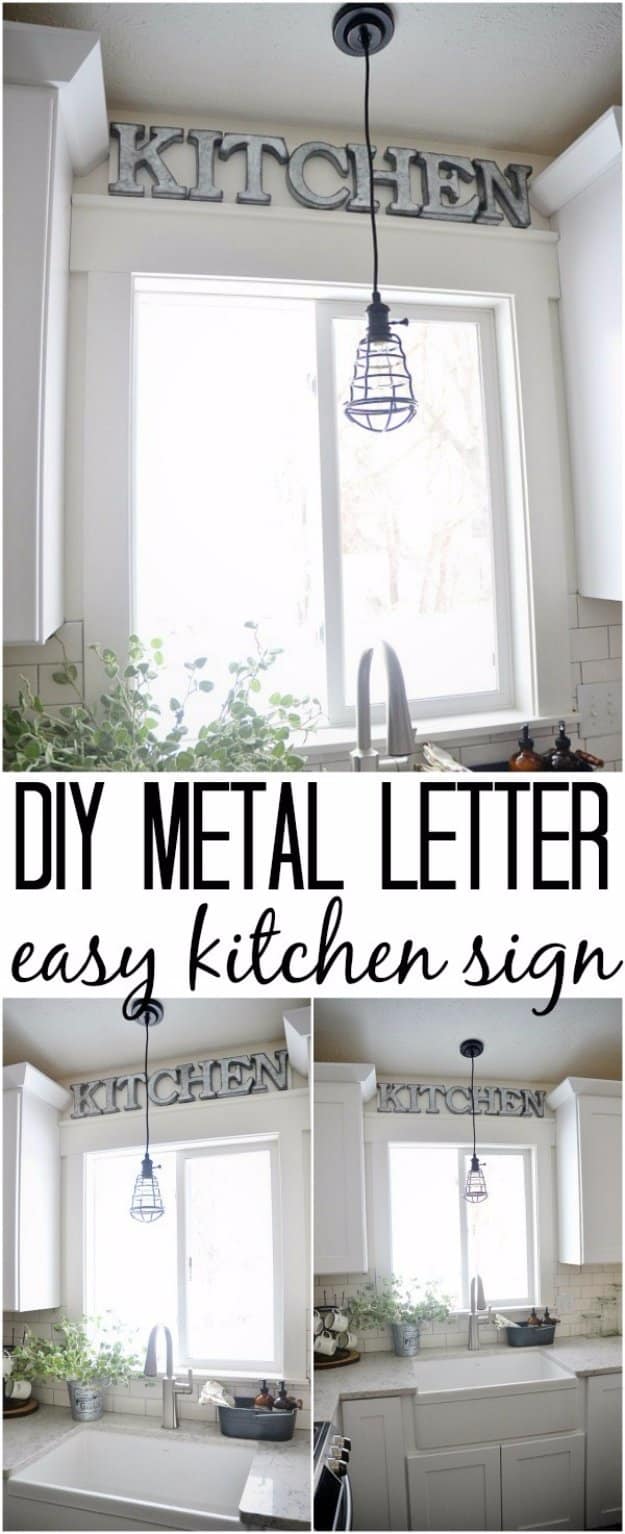
A DIY metal letter kitchen sign is about as easy as wall decor gets, and it gives a plain spot above the sink an industrial farmhouse look. Pick up metal letters at the craft store during a sale, then cut a board to fit the space and the full word. Paint the board to match the wall behind it so the letters seem to float, and mount the letters on the board before hanging. Skip the board and attach the letters straight to the wall if you’d rather. Count your letters in the store first so you aren’t missing one.
Get the full tutorial at Liz Marie Blog.
2. Easy Colorful Clothespin Trivet
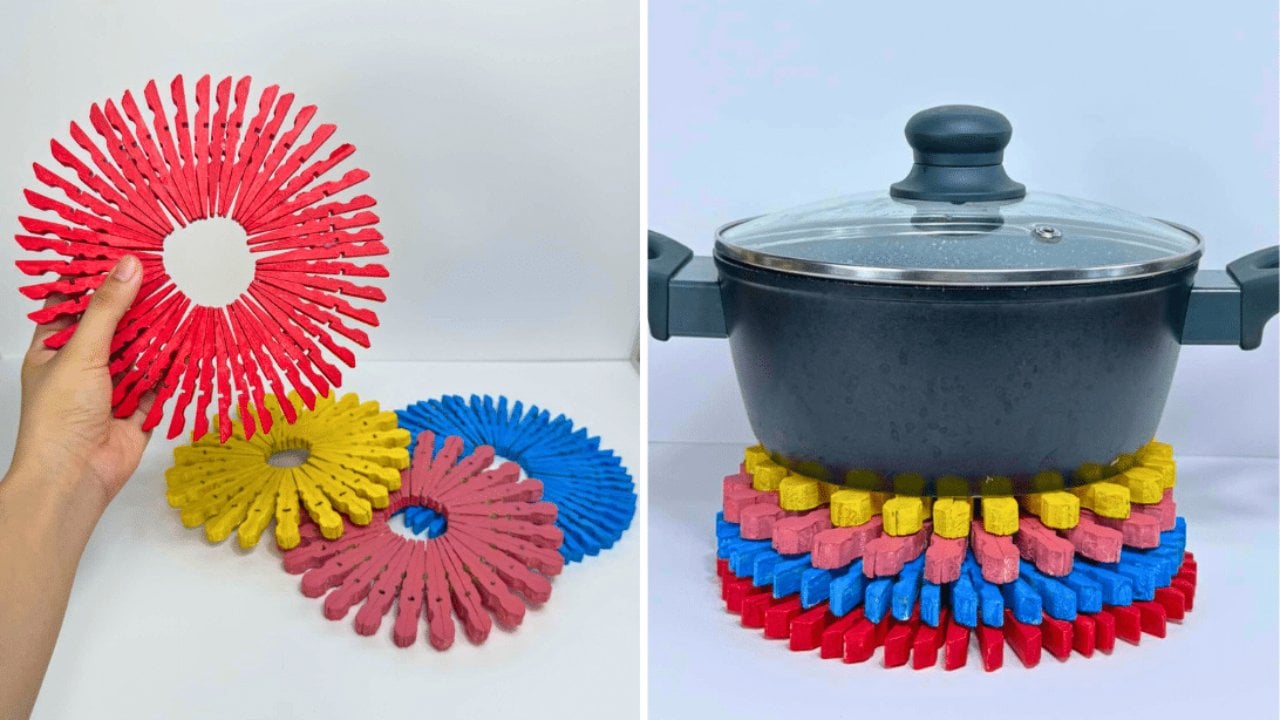
A clothespin trivet turns a bag of wooden clothespins into a bright, heat friendly helper for the stovetop. Pull each clothespin apart and set the metal springs aside. Prime the wooden halves, let them dry, then paint them in any colors you like, adding a second coat if needed. Glue the slanted end of one piece to the back of the next and keep going around until the circle closes. Use wood glue or a heat resistant adhesive if hot pans will sit on it, and add felt pads underneath so it won’t scratch the table.
Get the full tutorial at DIY JOY.
3. No-Sew Felt Fruit Coasters
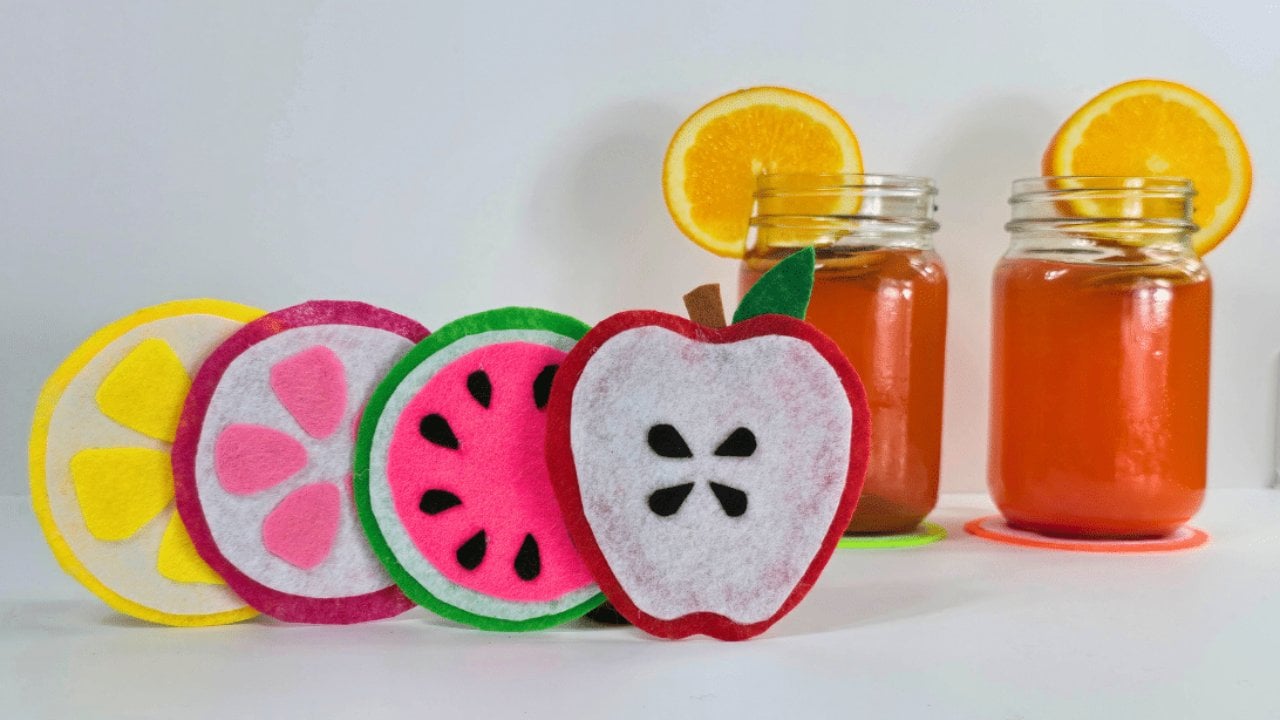
No-sew felt fruit coasters come together in under an hour with felt sheets, sharp scissors and hot glue. For a lemon, glue a white circle onto a larger yellow one and add small yellow triangles for the segments. A watermelon stacks green, white and pink circles with black teardrop seeds. The apple needs a quick paper template, then a white inner shape, a leaf, a stem and a few seeds. Stiff craft felt holds its shape far better than the soft kind, and tailor’s chalk keeps your tracing lines from showing.
Get the full tutorial at DIY JOY.
4. DIY Planter Box Picture Frame
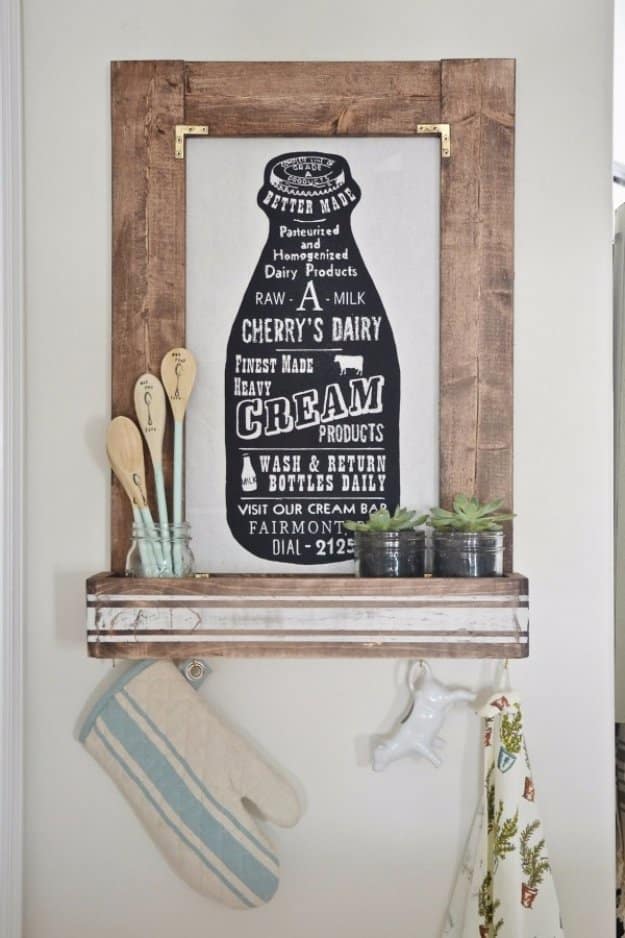
This DIY planter box picture frame works as art and storage in one piece. Build a simple frame from four boards joined with straight cuts, wood glue and gold corner brackets, then stain it. Staple a printed cotton napkin to a cardboard backing for the picture. A small box screwed to the bottom holds mason jars of succulents or wooden spoons, and hooks underneath keep oven mitts and towels in reach. Painter’s tape gives the box its crisp stripes, and a light distressing finish makes it look like it has always been there.
Get the full tutorial at Liz Marie Blog.
5. DIY Air-Dry Clay Egg Tray
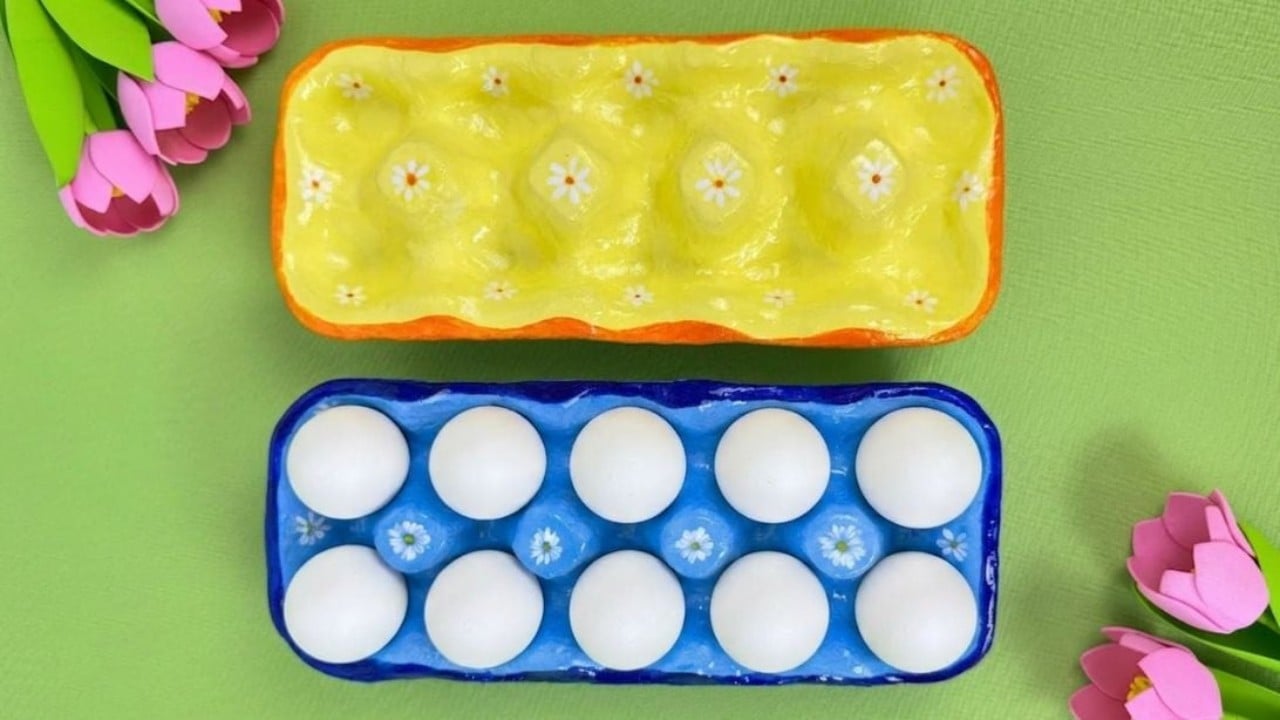
An air-dry clay egg tray is sturdier than a carton and much prettier on the counter, and it needs no kiln or oven. Trim a paper egg carton down to just its base. Roll air-dry clay out with a rolling pin, lay it over the carton and press a real egg into each cup to form the wells, smoothing cracks with a damp finger. Once it’s fully dry, prime it, paint it a bright color and add little flowers or dots. A coat of clear varnish or UV resin seals the design.
Get the full tutorial at DIY JOY.
6. DIY Painted Wood Bowls
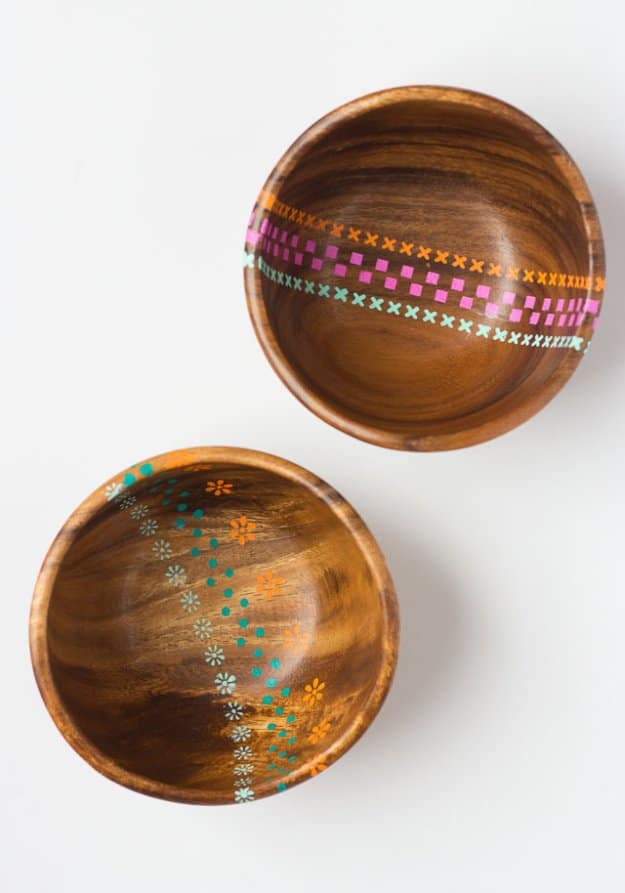
Painted wood bowls are a great use for the vintage wooden bowls that turn up at almost every thrift store for about a dollar. Adhesive stencils make the patterns easy, even on a curved surface. Press the stencil down firmly with a fingernail so paint can’t creep underneath, then dab on a thin coat with a foam brush. Let it dry to the touch, add a second coat and peel. Move the stencil along to build rows of tiny patterns. Lighter paint colors pop best against dark wood, and a damp cotton swab fixes smudges.
Get the full tutorial at Design Improvised.
7. DIY Succulent Planter Centerpiece
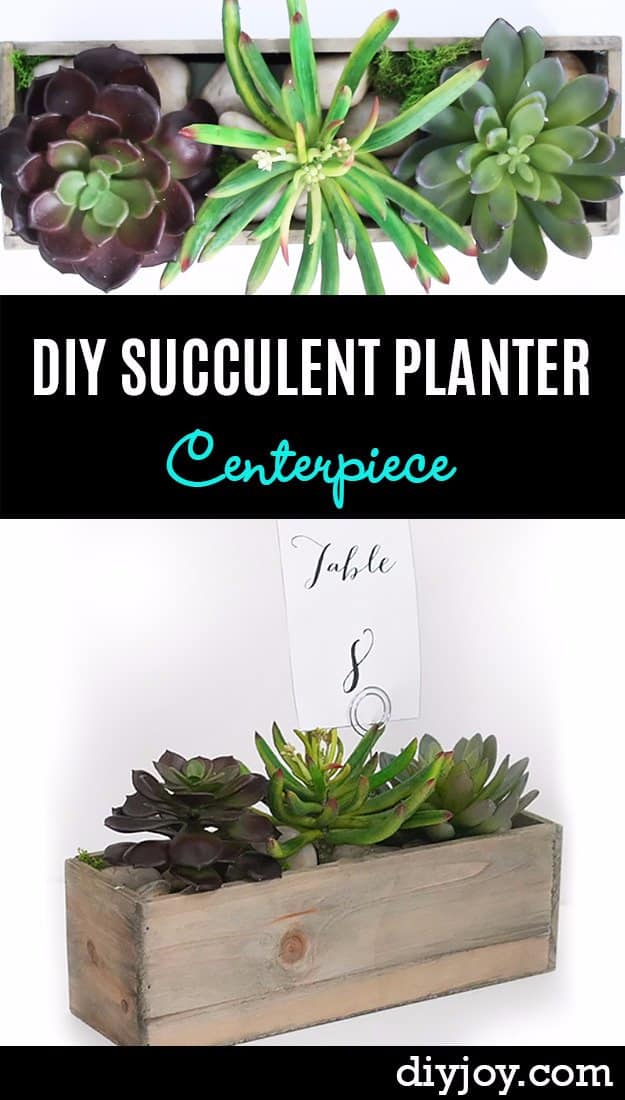
A succulent planter centerpiece is a long rectangular wooden box filled with a mix of small succulents, and it’s an easy last minute table idea. Build or buy a simple box, line it if the wood is untreated, then fill it with cactus potting mix and tuck the plants in close together so it looks full from day one. Mix rosette shapes with trailing ones for texture. A small card holder turns it into a numbered wedding or party centerpiece, and between events it lives happily on a sunny windowsill.
Get the full tutorial at DIY JOY.
8. Stylish Kitchen Labels
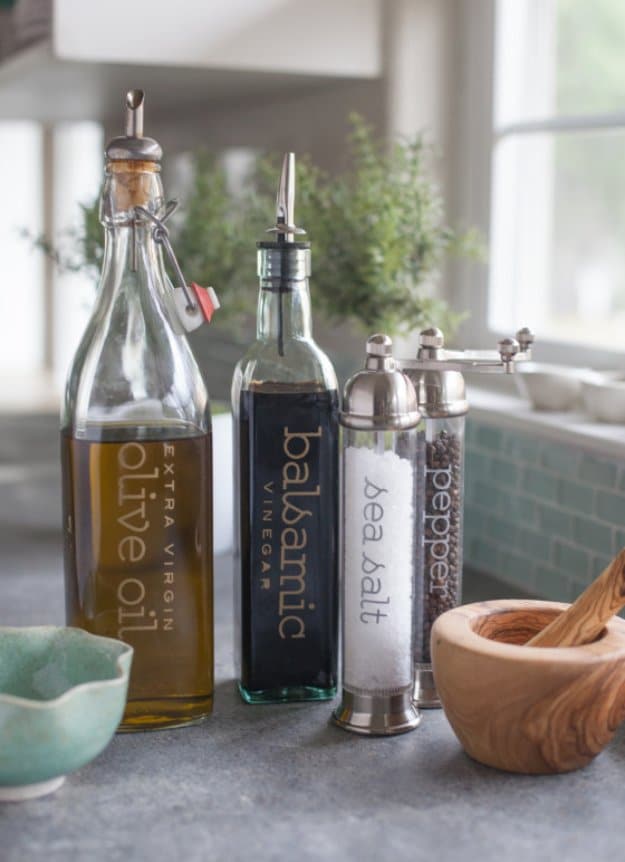
Stylish kitchen labels give plain glass bottles and salt and pepper grinders a clean Scandinavian look. Cut the words from vinyl on a cutting machine and weed away the extra pieces. Lay transfer tape over the design, rub it well and lift so the letters come up in mirror form. Lay the bottle flat, line the design up using the grid on the transfer sheet, then rub with your thumbs, paying attention to every edge, and peel. The full label files on the source are a paid project; the vinyl method works with any font.
Get the full tutorial at Lia Griffith.
9. DIY Raffia Coasters
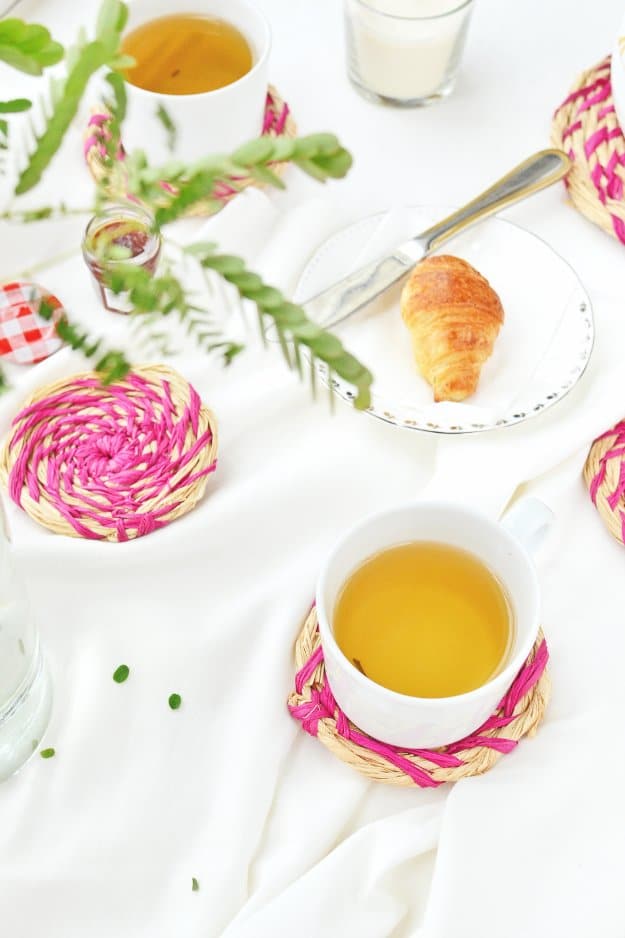
DIY raffia coasters are a beginner friendly coiling project that needs only raffia, a large needle and scissors. Gather about ten strands of natural raffia with three colored ones and wrap the bundle tightly with the colored strands. Fold the wrapped end in half to start a spiral, then keep winding, stitching each round to the one before by poking the needle between the wraps. Add a fresh bundle of natural strands as you run out, tucking the new ends under the wrapping. A 50 gram hank makes several coasters.
Get the full tutorial at DIYs.com.
10. House Shaped Shelf DIY
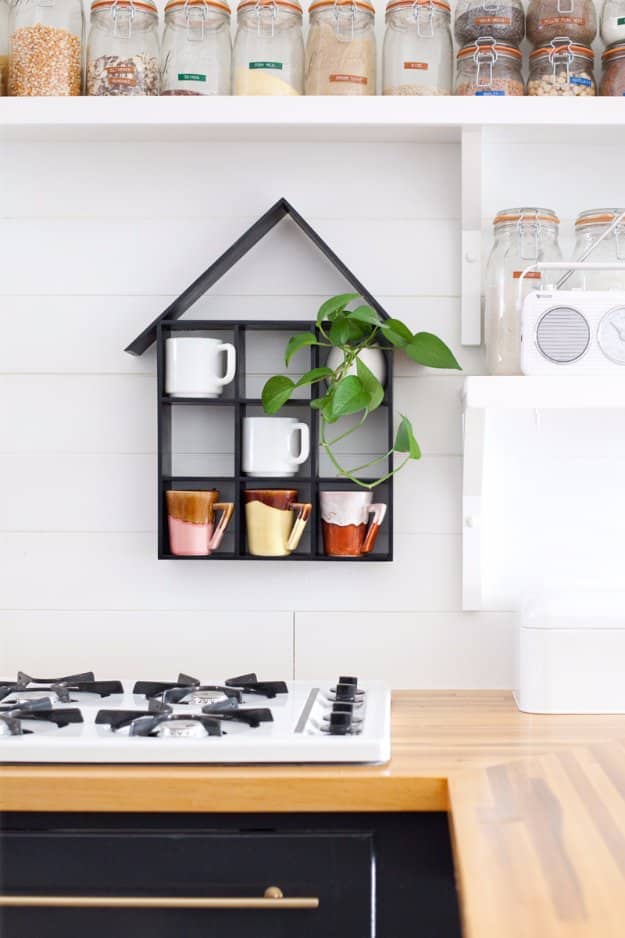
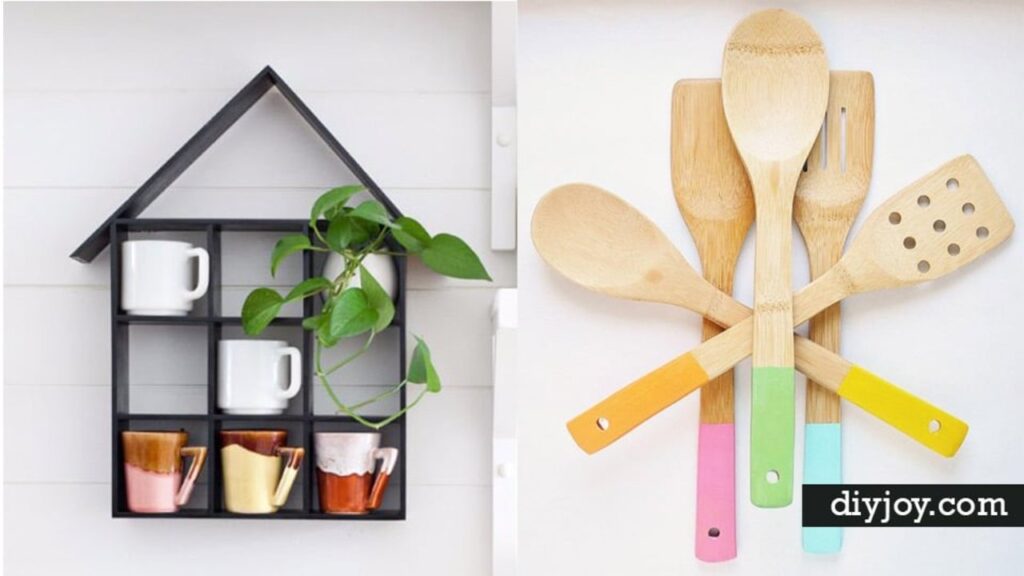
A house shaped shelf is the kind of project that looks custom but is mostly careful cutting. The frame and inner grid are cut from 1/4 inch by 1 inch poplar strips, with 45 degree miters for the roof peak, and joined with wood glue and small wire brads. Have the lumber yard make the cuts if you don’t own a miter saw. Clamp it while the glue sets, sand smooth, then prime and paint it. Sleek black keeps it modern enough for the kitchen, where it holds mugs, mini planters and tiny jars.
Get the full tutorial at A Beautiful Mess.
11. Color Dipped Wood Kitchen Utensils
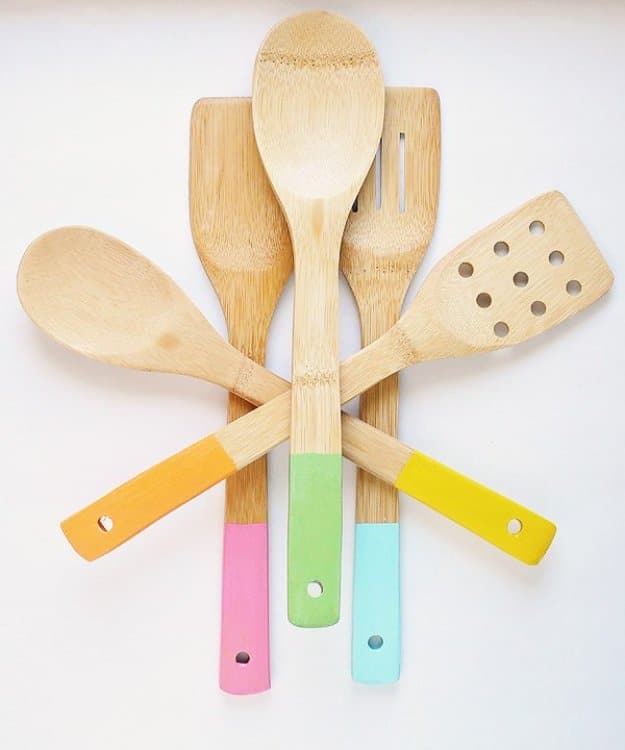
Color dipped wood kitchen utensils are a twenty minute craft that makes a bargain bag of spoons look boutique. Draw a pencil line where the color should start, then paint each handle below the line in a soft sherbet shade, working from the lightest color to the darkest and wiping the brush between colors. Add a second coat once the first is dry. Finish with a coat of clear matte Mod Podge over all the paint. Hand wash them gently, and tie a set together with ribbon for an easy housewarming gift.
Get the full tutorial at Peonies and Pears.
12. DIY Copper Wire Egg Baskets
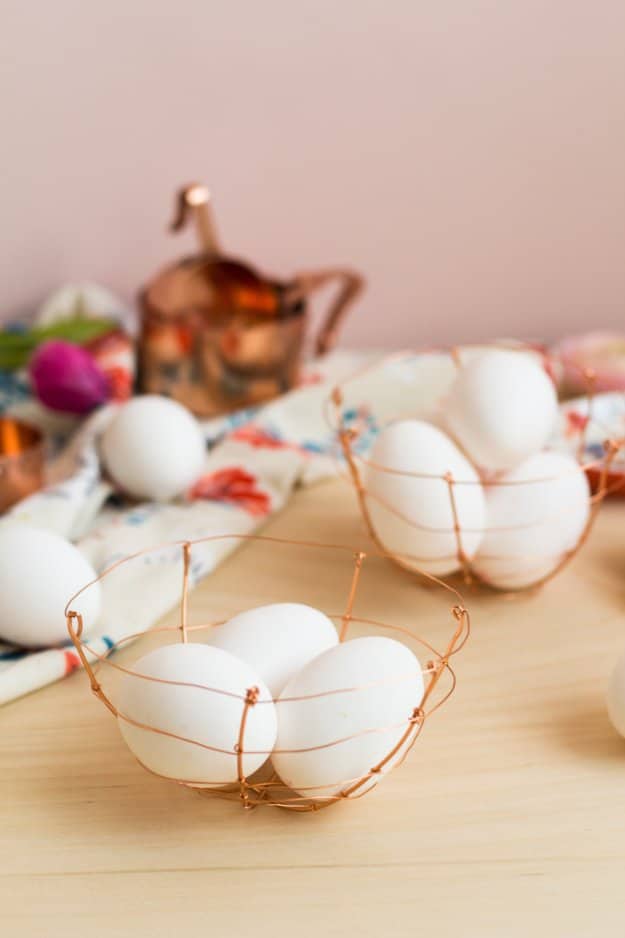
Copper wire egg baskets are woven over an upside down dipping bowl, so they come out perfectly round. Cut three lengths of thick 1.5mm copper wire, lay them across the bowl in a star and tape the center. Bend the spokes down over the rim and tape them in place. Then weave thinner 0.5mm wire over and around each spoke, working up from the base and keeping the tension snug but not tight enough to pull the spokes. Remove the tape, slide the basket off and curl the spoke ends into the rim.
Get the full tutorial at Fall For DIY.
13. DIY Kitchen Peg Board
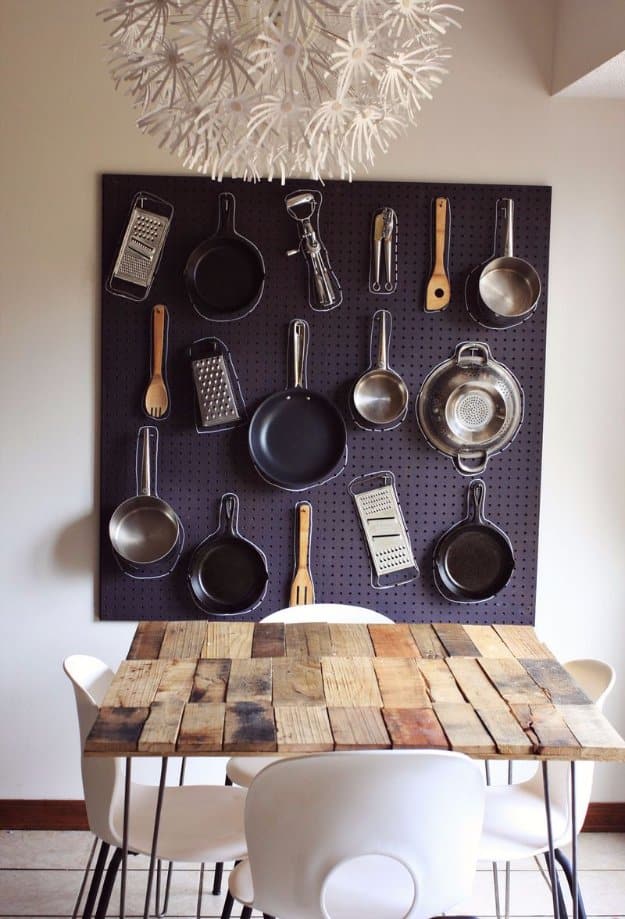
A DIY kitchen pegboard frees up cabinet space by putting pots, pans and tools on the wall. Buy two pegboards and enough bracing wood to frame each one, paint everything to match an accent wall, then screw the bracing into the wall studs and fix the boards to it so hooks have room behind them. Hang each pan where you want it and trace its outline with a white paint pen, simplifying the shape if needed. The outlines show exactly where everything goes back, which keeps it tidy.
Get the full tutorial at A Beautiful Mess.
14. Resin Coaster with Dried Flowers
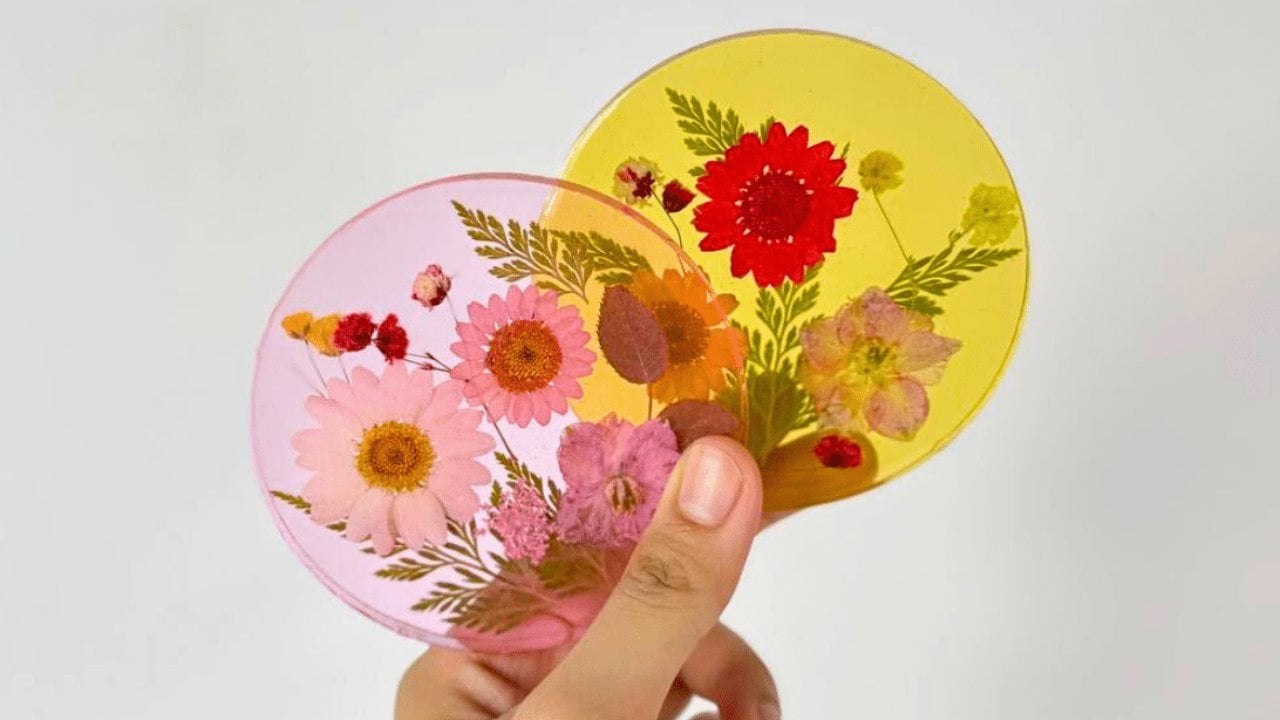
Resin coasters with dried flowers turn pressed blooms into something you can actually use every day. Mix epoxy resin and hardener at the ratio on the bottle (about 3 to 1 here), stirring slowly for five to ten minutes, then tint it with a few drops of pigment. Pour half into a clean round mold, arrange the flowers with tweezers and pour the rest on top, popping bubbles with a lighter. Let it cure overnight, glue the back, then brush a thin coat of UV resin over the front. Always wear nitrile gloves.
Get the full tutorial at DIY JOY.
15. Citrus Print Tea Towels
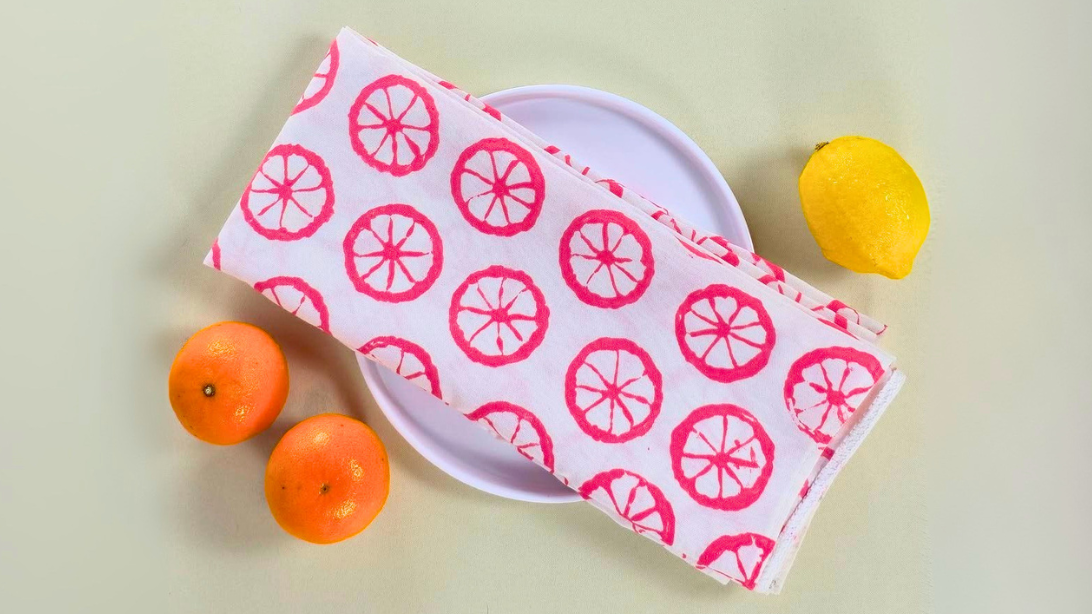
Citrus print tea towels use a lemon or orange as the stamp. Cut the fruit in half, scoop out the pulp without tearing the membrane walls and pat it dry. Mix fabric paint with textile medium, brush a thin layer onto the membranes and rind, and press it onto a plain white towel. Leave gaps in each row so the next row can sit in between, then switch colors or cut wedges for smaller prints. Too much paint blurs the details, so go light. Let it dry fully before the first wash.
Get the full tutorial at DIY JOY.
16. DIY Gold Painted Silverware Mason Jars
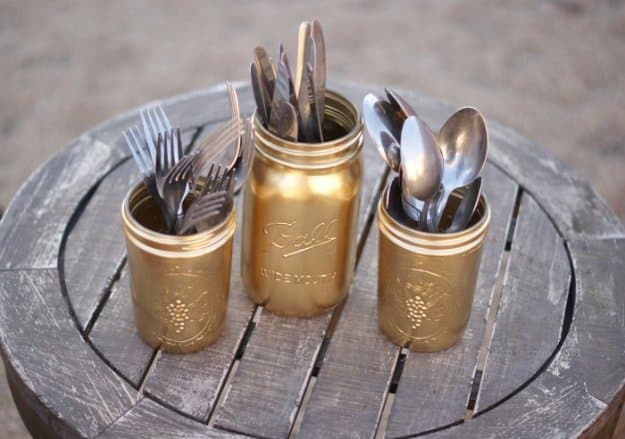
Gold painted mason jars are a quick fix when silverware drawers are full and counter space is short. Turn three wide mouth jars upside down and spray on a generous coat of metallic gold spray paint, letting it dry for about an hour. Add a second light coat for full coverage, and seal with polycrylic if they’ll get handled a lot. Sort forks, spoons and knives into their own jar and line them up on the counter. When company comes, the whole set moves to the table.
Get the full tutorial at Clever Pink Pirate.
17. DIY Copper Pipe and Leather Wine Rack
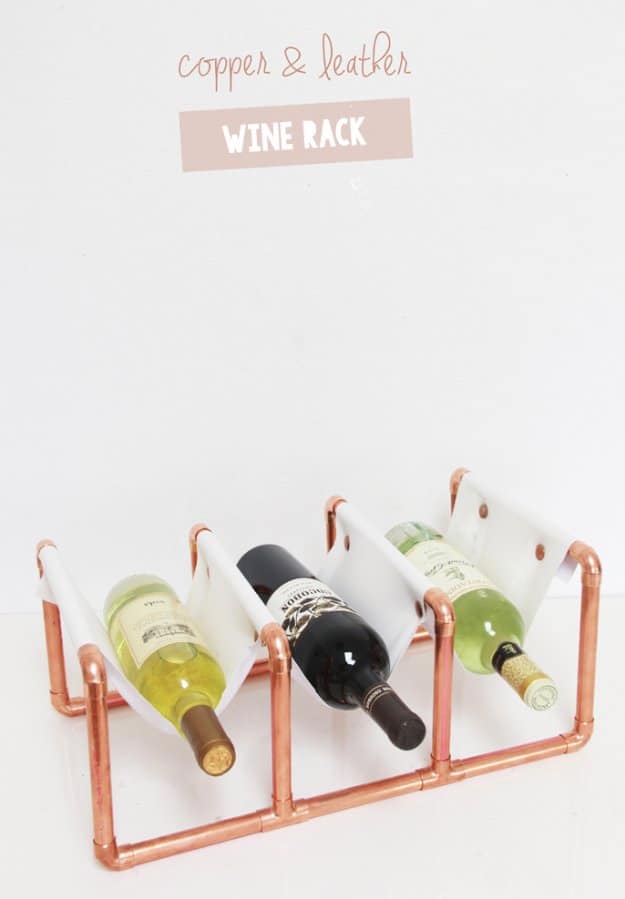
A copper pipe and leather wine rack looks like a boutique piece but starts with a 10 foot length of 1/2 inch copper tubing. Cut it into six 5 inch, eight 6 inch and four 9 inch pieces with a pipe cutter or miter saw. Join the pieces with copper tees and elbows to build two bottom rails and four upright sides. Then cut faux leather strips and snap each into a loop around the top rails to cradle the bottles. A copper leaf pen can color silver snaps to match.
Get the full tutorial at A Bubbly Life.
18. Jute Rope Serving Tray
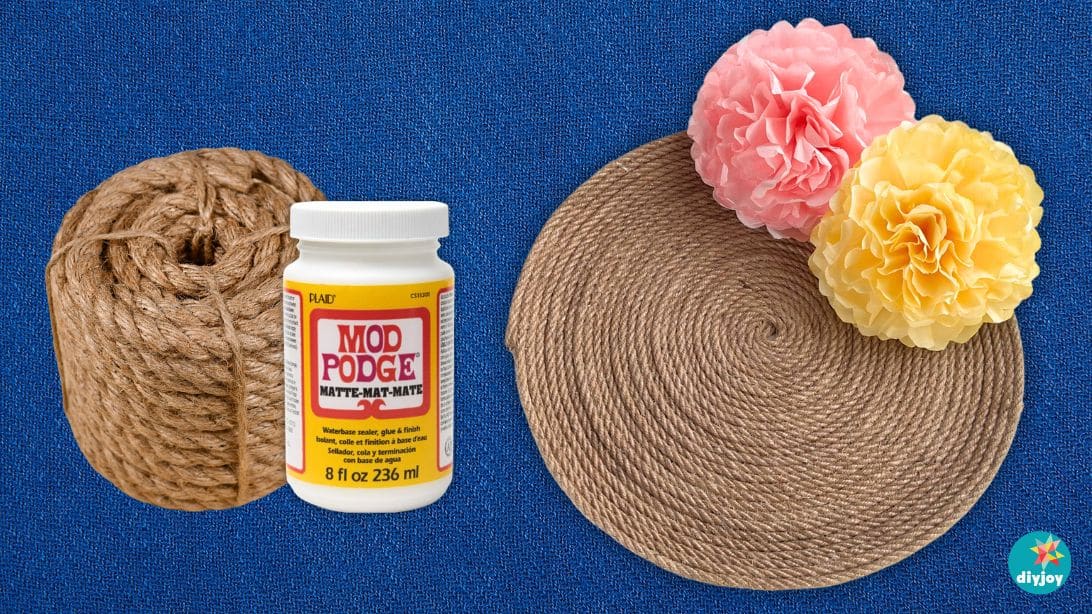
A jute rope serving tray is held together with nothing but Mod Podge. Wrap a flat tray completely in cling wrap so nothing sticks, then brush on a generous layer of Mod Podge. Coil the rope end into a tight spiral and keep winding outward, pressing it flat with your palm and adding glue as you go. Keep the sides low so they hold their shape. Cover everything in more Mod Podge, press it flat, then let it dry under a few weights before peeling it off the cling wrap.
Get the full tutorial at DIY JOY.
19. DIY Tea Towels
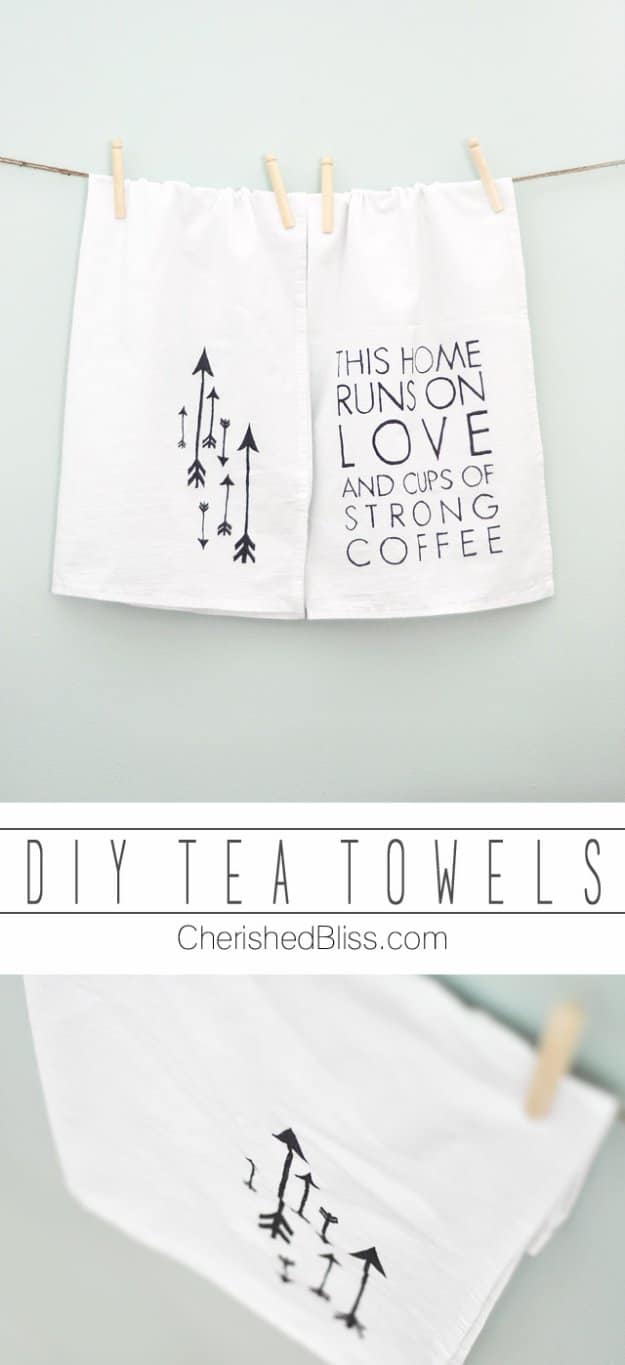
DIY tea towels with a hand traced design need only flour sack towels, a Sharpie and a printable. Wash and dry the towels first, then iron them flat so the lines stay straight. Slide the printed design (cardstock is easiest) under the towel, line it up and trace slowly, letting each line dry before your hand moves over it. Arrows and a short coffee quote fit a kitchen perfectly. Let the ink cure for a few days before washing; it fades a little over time, which only adds to the charm.
Get the full tutorial at The Crafty Blog Stalker.
20. DIY Herringbone Tile Backsplash
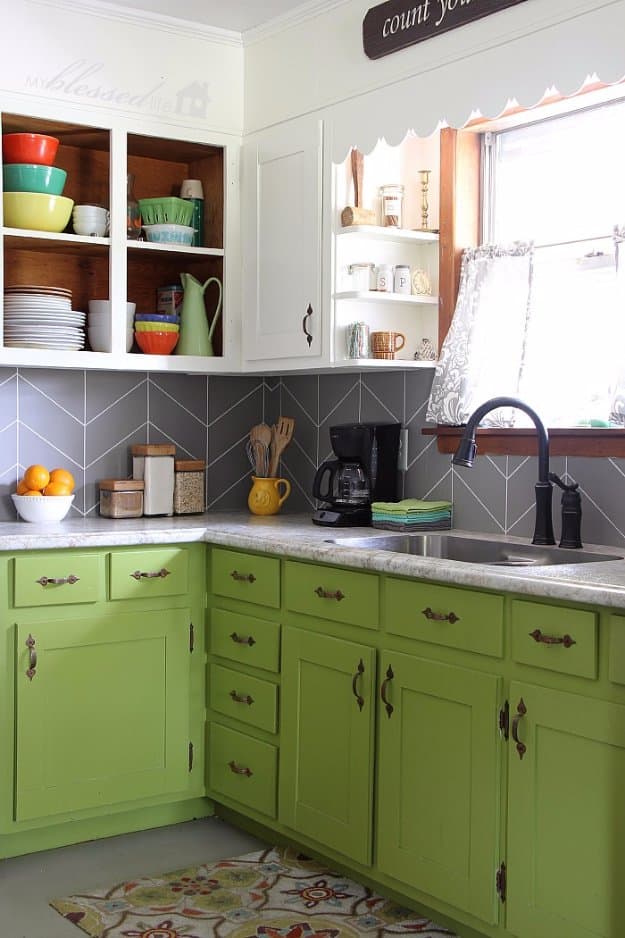
A painted herringbone backsplash fakes the look of tile on plain painted paneling. Paint the whole backsplash gray and let it dry at least 24 hours. Measure and divide the area into equal vertical rectangles, tape them off and paint the white grout lines. Then mark where each diagonal crosses the verticals, tape and paint those lines. Press every tape edge down and dry brush a thin layer of paint along it first to seal it, then pull the tape while the paint is still wet. Setup is slow, but the results are crisp.
Get the full tutorial at My Blessed Life.
21. DIY Mirror Boxes
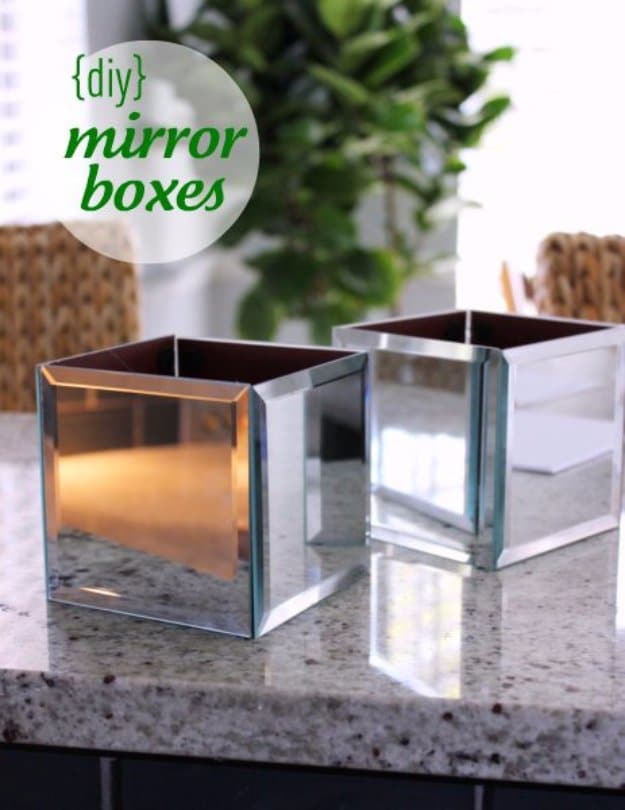
DIY mirror boxes are made from square craft store mirrors and a hot glue gun, and each one takes about two minutes. Beveled mirrors work well for the four sides, with a flat mirror for the base. Run a thin line of glue along the back edge of a side mirror, line it up with the outer edge of the base and hold it until it sets. Repeat on all four sides, then add glue to the inside seams for strength. Cork pads underneath protect the counter, and a small plant hides the inside.
Get the full tutorial at Hi Sugarplum!.
22. DIY Color Block Pattern Napkins
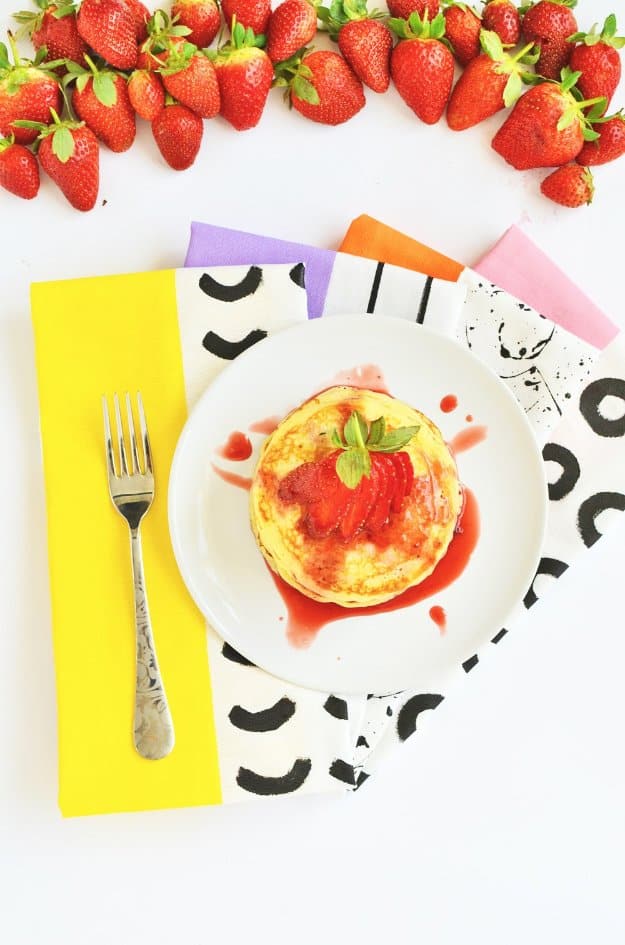
Color block pattern napkins are painted, so they need nothing more than plain white cotton napkins, fabric or acrylic paint, a foam brush and masking tape. Mix each color with an equal part of white for soft pastel shades. Tape off one end of the napkin, paint a solid block of color and add a second coat once the first is dry. Peel the tape, then paint simple black patterns like dashes, arches and speckles on the white side. Let them cure for 24 hours, then heat set them with an iron before washing.
Get the full tutorial at Enthralling Gumption.
23. DIY Mini Pin Boards
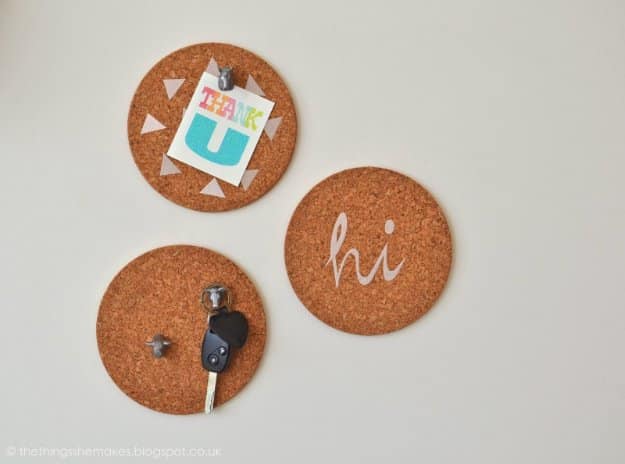
DIY mini pin boards are made from round cork pot stands, so they cost a few dollars for a set of three. Skip paint, which soaks straight into the cork. Use sticky back plastic instead: cut small triangles for a geometric board, draw a short word like hi in reverse on the backing and cut it out with a craft knife, or leave one plain and add animal head pins as hooks. The plastic sticks well but can still be moved. Removable adhesive strips hang them without damaging the wall.
Get the full tutorial at The Things She Makes.
24. Succulent Jar Magnets
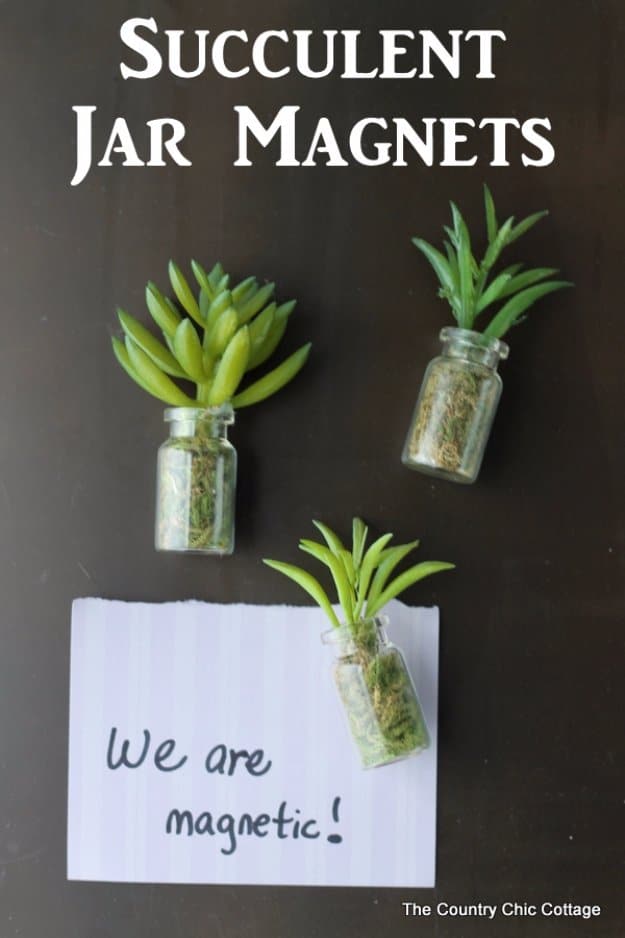
Succulent jar magnets are tiny glass vials filled with moss and a faux succulent, and the whole set takes minutes. Pull the cork from each vial and push in moss with a pencil, firm enough to hold a stem but not packed tight. Dab hot glue on the end of a faux succulent and press it into the moss. No small succulents at the craft store? Snip leaves and short sprigs from a larger faux plant. Hot glue a small magnet to the back of each vial and let it set for a few hours.
Get the full tutorial at The Country Chic Cottage.
25. Jeans Pocket Placemats
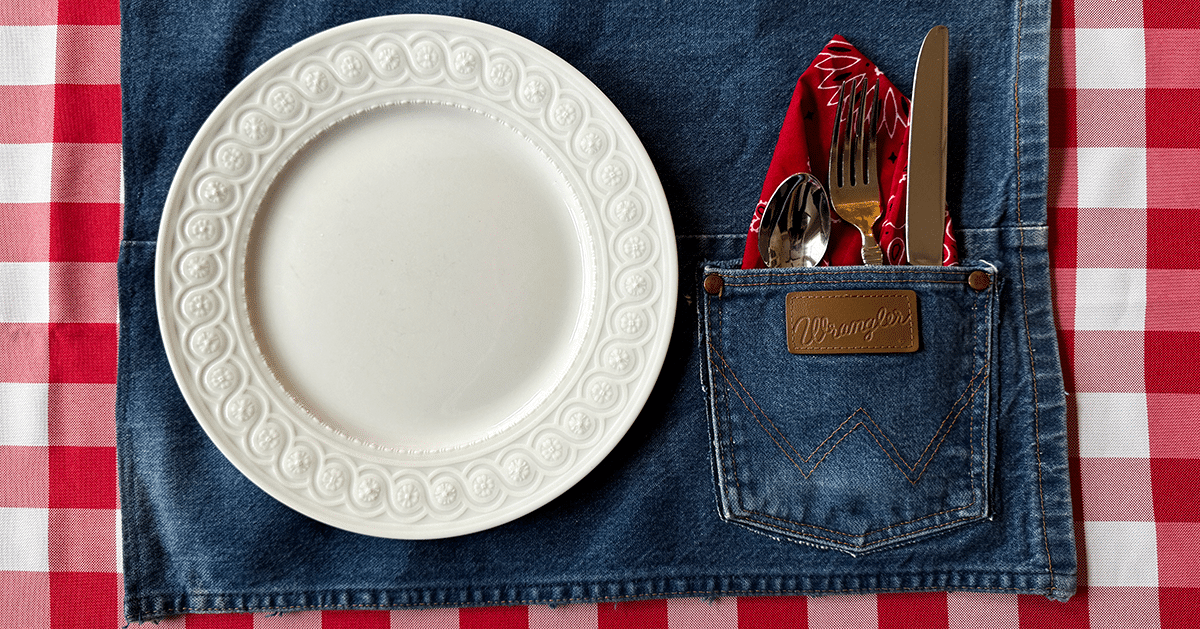
Jeans pocket placemats turn old denim into a table setting with a built in spot for silverware, and there’s no sewing at all. Cut a rectangle from each leg so a back pocket sits in one corner, then fold the raw edges under and hold them with fabric glue and clips until dry. A ruler keeps the edges straight. Use a different pair for each placemat so every pocket looks a little different. Thrift stores are a cheap source of men’s jeans if your own stash runs short.
Get the full tutorial at DIY JOY.
26. Painted Kitchen Stool
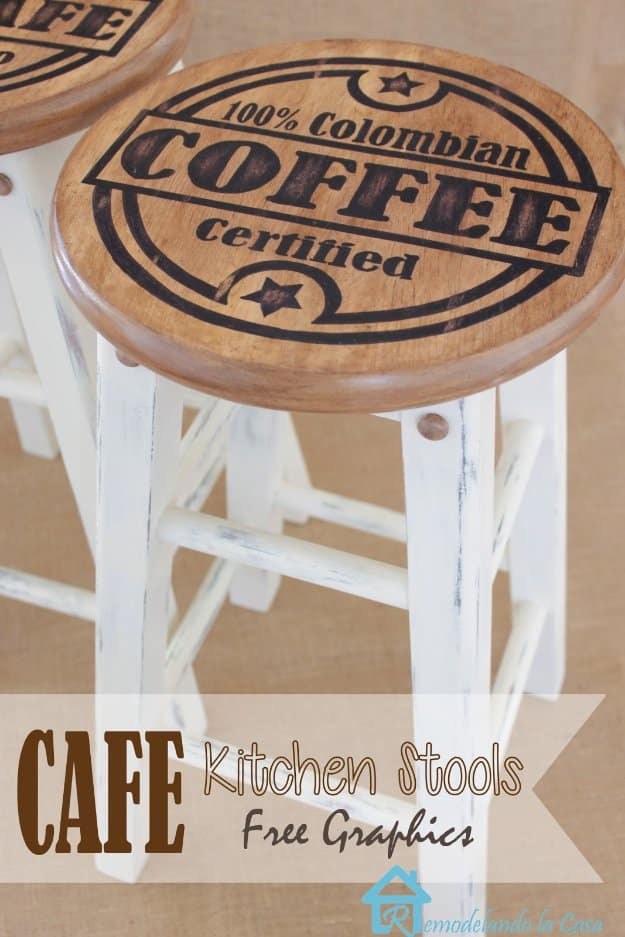
A painted kitchen stool makeover turns a worn old stool into a cafe style seat. Sand it well, then add a little skirt cut from 1×2 boards with pocket screws and wooden screw covers for detail. Spray the legs red and blue, then cover them with black and a final coat of chalk paint, sanding back the edges so hints of color peek through. Transfer a coffee graphic onto the seat with graphite paper, fill it in with a black Sharpie, distress it lightly and finish with two coats of stain.
Get the full tutorial at Remodelando la Casa.
27. DIY Light Up Cafe Sign
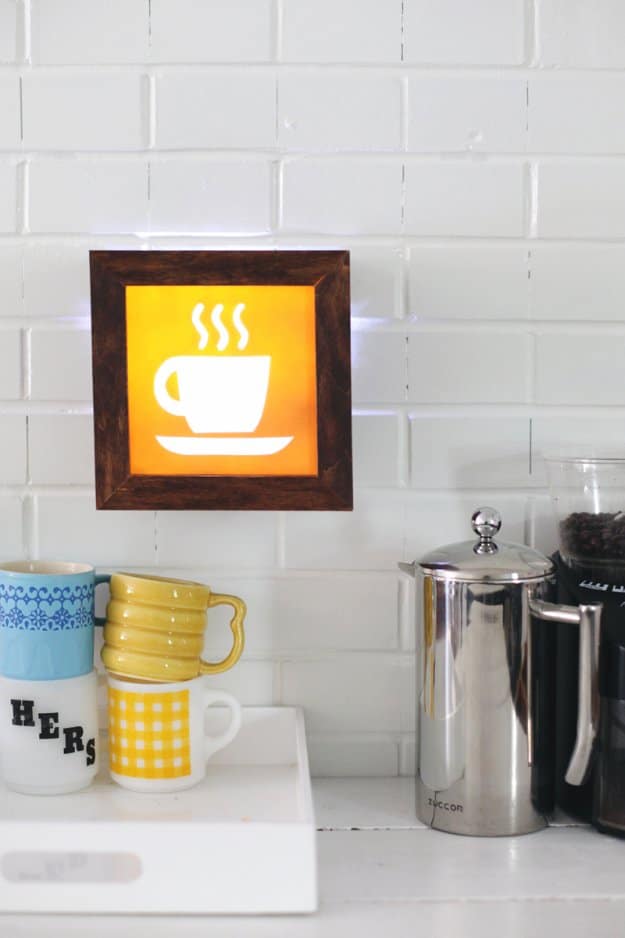
A DIY light up cafe sign brings a little diner glow to a coffee corner for about 22 dollars in supplies. Stain a small, deep shadow box. Cover stencil plastic with contact paper, trace a coffee cup clip art design onto the contact paper and cut it out with a craft blade, then spray the plastic so only the cup stays clear. Frame the front with mitered basswood strips. Tuck a string of tiny LED lights inside and hot glue the panel in place. A miter box saw makes the frame cuts far easier.
Get the full tutorial at A Beautiful Mess.
28. How to Fold a Cloth Napkin into a Rose
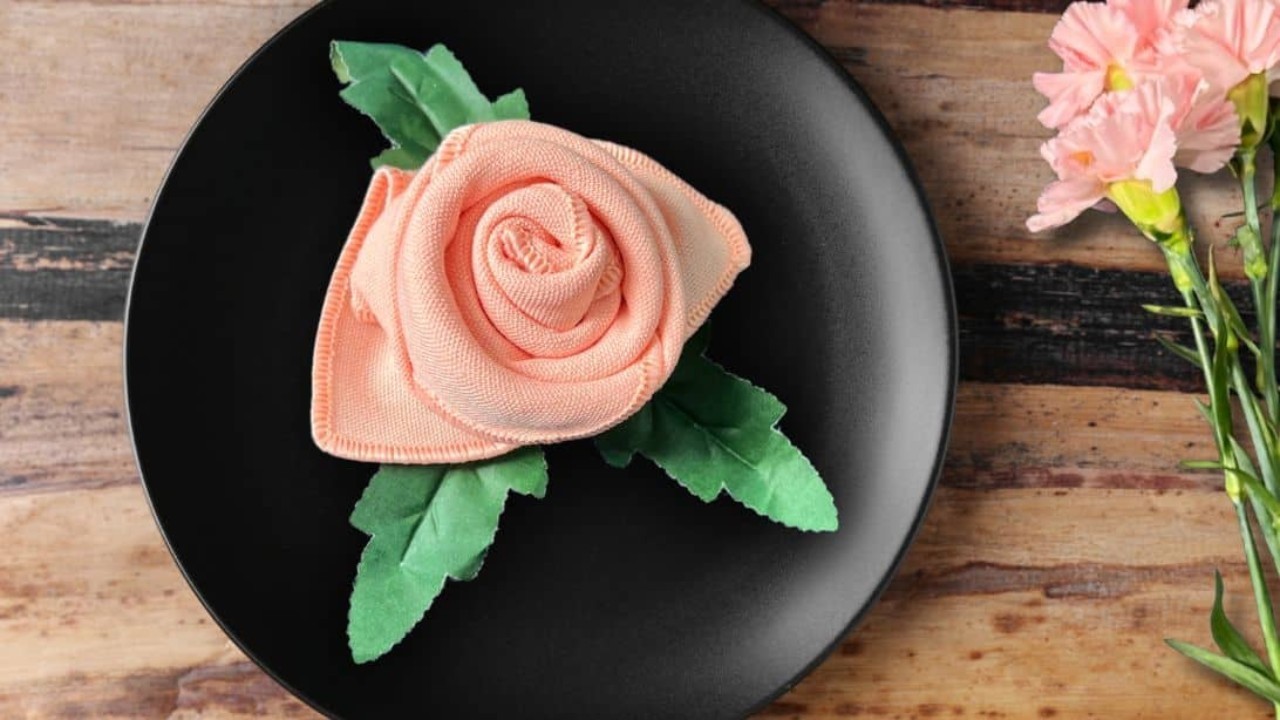
Folding a cloth napkin into a rose takes about a minute and only a square cloth napkin, since paper ones are too thin. Fold it in half into a triangle. Roll from the long straight edge toward the point, leaving about 2 3/4 inches unrolled at the top. Coil the roll from one end to the other, hold it firmly and tuck the tail into the fold with a dull pointed tool. Set it upright, gently fold the top layers down to open the petals and flip it over. Small square towels work too.
Get the full tutorial at DIY JOY.