Phones are great at reminders, but a DIY calendar on the wall is the one the whole family actually looks at (and nobody can swipe it away). A DIY calendar is any planner you build yourself from simple supplies like chalkboard paint, plexiglass, gift tags, paint chips or even an old window, so it fits your space and your style instead of a store’s. These 11 ideas cover big chalkboard wall calendars for busy households, clear acrylic dry erase boards that look straight out of a design shop and tiny flip calendars for a desk that never need replacing. Most come together in an afternoon, and a few start with a thrift store mirror or an old bicycle wheel. Pick one for the kitchen, make a second as a gift and keep the whole year running smoothly.
1. DIY Acrylic Calendar
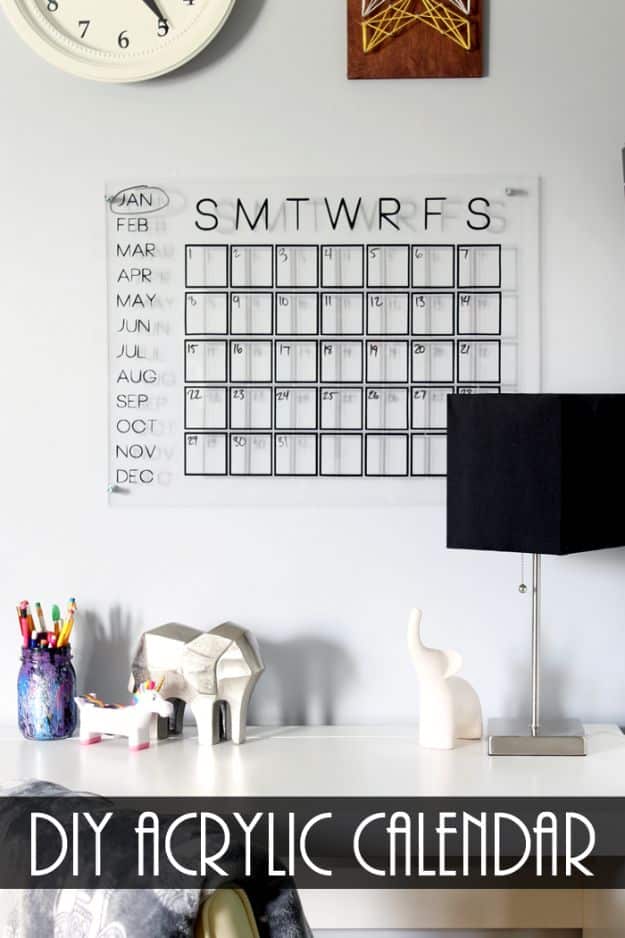
A DIY acrylic calendar is a sheet of plexiglass, about 18 by 24 inches, with a calendar grid cut from black vinyl. A Cricut or similar cutting machine handles the grid, then you weed the vinyl, lift it with transfer tape and smooth it onto the acrylic. Drill a hole in each corner and hang it with screws and metal spacers so it floats off the wall. Plans go on with dry erase markers and wipe away every month. The free calendar cut file arrives by email sign up.
Get the full tutorial at The Country Chic Cottage.
2. Upcycled Giant Wall Calendar

This upcycled giant wall calendar began life as a 40 pane window found by the side of a country road. With the glass removed, the frame was trimmed to 7 panes across and 4 down, then backed with a sheet of half inch plywood painted in chalkboard paint and nailed in place. A border of 1×2 boards finishes the edges, and painted labels across the top carry the days of the week. The whole thing measures roughly 51 by 86 inches, so it suits a big family wall. A stenciled burlap bag holds the chalk.
Get the full tutorial at Thistlewood Farm.
3. Paint Chip Calendar
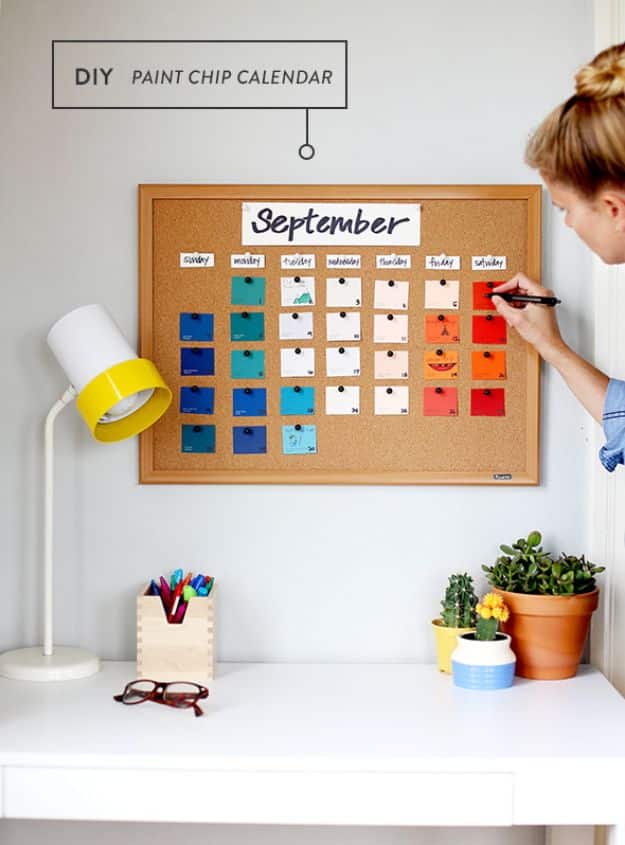
A paint chip calendar turns free paint swatches into a cheerful family schedule on a plain corkboard. Cut the chips into squares and pick a color story for the month, then letter the month, the days of the week and each date onto card stock and chip pieces with chisel tip and fine point markers. Round pushpins hold everything to the board, so squares can be moved or swapped as plans change. Kids can decorate their own days with colored pens. Starting a fresh color scheme each month keeps it a fun little ritual.
Get the full tutorial at Say Yes.
4. Mirror Calendar

A thrift store mirror makes a sturdy base for a chalkboard calendar. Paint the frame with two coats of linen white chalk paint, then tape along the inside edge and roll three coats of chalkboard paint straight onto the glass, letting each coat dry fully. Draw the grid in pencil with a ruler so every box matches, then trace over the lines with a paint marker so they survive every erase. A few sections underneath hold this week, notes and reminders. Plan on one Saturday because of the drying time between coats.
Get the full tutorial at Within the Grove.
5. Bicycle Wheel Chalkboard Calendar

A bicycle wheel chalkboard calendar actually spins. Start with a wheel with no tire, count the inverted triangles between the spokes (this one had nine) and trace one slightly larger onto paper as a pattern. Cut nine plywood triangles, sand them and spray them with chalkboard paint. Chalkboard label stickers across the top carry the days of the week, with the two extra wedges saved for notes. Hot glue the triangles over the spokes, sleeve a bolt through the hub and mount the wheel to a wood back screwed into a stud.
Get the full tutorial at Thistlewood Farm.
6. Perpetual Flip Calendar DIY

A perpetual flip calendar never runs out, so it can sit on a shelf year after year. A wooden tabletop sign makes the base: stain or paint the sides and glue glitter card stock to the back. Small brass cup hooks hold three stacks of blank gift tags, one for the month and two for the date. Print twelve favorite photos to fit the month tags, add the month names with letter stickers and glue them back to back. Number stickers cover 0 to 3 on the first date stack and 0 to 9 on the second.
Get the full tutorial at A Beautiful Mess.
7. Rustic Chalkboard Wall Calendar

A flea market mirror a little larger than 2 by 3 feet becomes a rustic chalkboard wall calendar with two coats of chalkboard paint and a 24 hour cure. Free printable lettering transfers the quote and the days of the week, and the grid uses 4 inch squares. Here is the clever part: draw the quote, the days and the grid lines with a semi permanent chalk pen, then fill in events with plain white chalk. Erase every month and only the plans disappear. Leave room for six rows, since some months need them.
Get the full tutorial at Sincerely, Sara D.
8. DIY Calendar Banner

A DIY calendar banner is about the simplest calendar there is. Print each month on cardstock from a free blank calendar download or a design of your own, then trim the bottom of every page into a point so it hangs like a pennant. Sketch a little drawing and a word or two for each month above the grid. Clip the stack onto a vintage wooden pant hanger, the kind that turns up at thrift stores all the time, and hang it from a nail. It makes a thoughtful handmade gift.
Get the full tutorial at The Merrythought.
9. Calendar Wall Hanger

This calendar wall hanger is a chalkboard you can roll up. Paint the front of a 29 by 21 inch piece of canvas (the blackout shade kind sold on a roll at fabric stores) with two coats of chalkboard paint. Print a template for the lettering, rub chalk on the back and trace it to transfer the words. Mark a grid of 3 inch day squares with a chalk pencil, then trace every line and letter with a white paint marker. A square dowel and twine hang it, and seasoning the paint with chalk first keeps it erasable.
Get the full tutorial at Seamless Days.
10. Super Simple DIY Calendar

A super simple DIY calendar needs four things: a big sheet of white paper, a pencil, a black marker and a ruler. Sketch the grid lightly in pencil, letter the month across the top and run the days down the side, then go over everything in black marker and erase the pencil. A tilted, hand drawn shape keeps it from looking like a store bought planner. Washi or black tape holds it to the wall. The original tutorial is in Polish, and the black and white style borrows from Scandinavian design.
Get the full tutorial at Zakładnicy Codzienności.
11. Acrylic Wall Calendar

This acrylic wall calendar is a 30 by 36 inch acrylic sheet with a month grid cut from adhesive vinyl on a Silhouette Cameo. The decals go on the back, mirrored, so wiping the front each month never touches them. Tape each corner, clamp the sheet to a flat surface so the plastic does not crack, and drill a hole about an inch and a half in from each edge with a 5/16 inch bit. Gold spray painted stainless steel standoffs hold it off the wall, and a chalk marker writes the plans. The finished piece looks like a high end office find.
Get the full tutorial at The House of Wood.