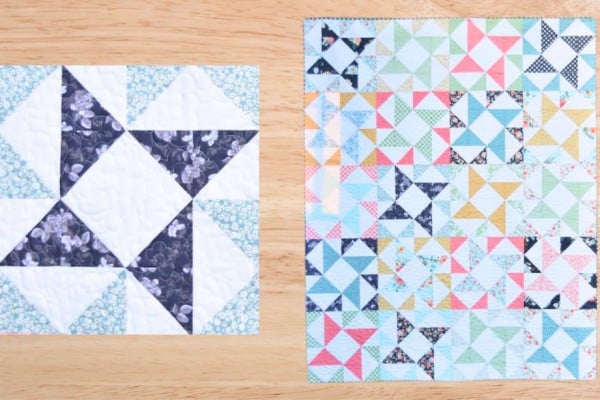
If you love classic quilt patterns but find it hard to match seams, you’ll love this simplified version of the classic blazing star block from Fat Quarter Shop on Youtube. It’s simple, pretty, and beginner-friendly. Even seasoned quilters will enjoy doing this quilt. Watch the video tutorial below to learn the step-by-step instructions.
Materials:
From each two block print:
- 1 – 3 & 1/2″ square – 2 total (fabric A)
- 2 -2 & 7/8″ squares – 4 total (fabric B)
- 8 – 2″ squares – 16 total (fabric C)
- 16 – 1 & 1/2″ squares – 32 total (fabric D)
Background:
- 8 – 3 & 1/2″ squares (fabric E)
- 4 – 2 & 7/8″ squares (fabric F)
- 16 – 1 & 1/2″ x 2 & 1/2″ rectangles (fabric G)
- 8 – 1 & 1/2″ squares (fabric H)
- (click here for the free pattern)
Directions:
Step 1
Take a fabric G rectangle and a fabric D square. Draw a line on the wrong side of fabric D and put it on one side of fabric G. Pin it in place, stitch directly on the line, then trim a 1/4″ away with a small ruler. Press it open. Take another lined square, put it on the other side, pin it, and stitch it. Trim it also and press open. Make eight of these. Now, take a fabric F and fabric B square. Draw a line from corner to corner on your lighter fabric, place these right sides together, pin in place, then stitch 1/4″ away from each side of that line. After stitching, cut directly on the line and press open. Make four of these for each block.

[social_warfare]
Step 2
Now, start putting your pieces together. Take a fabric H square, two flying geese, and one half-square triangle. (To make sure you have everything going the right way – all your darker fabrics should be in the center). Put them together, and stitch with a 1/4″ seam. Press according to your pattern. Make four of these for each block. Moving on to the star point which is the last unit of the block, take a fabric E square and a fabric C square. Place fabric C on the bottom left corner, draw a line from corner to corner and stitch directly on the line. Trim a 1/4″ away and press.
Step 3
Take another square, place it right next to the one you just did, and do the same thing. Make four of these for each block. Now it’s time to put the block together. Put together matching corner units, matching star point units, and your center. Sew them together, and press.

Classic Blazing Star Block Quilt Tutorial