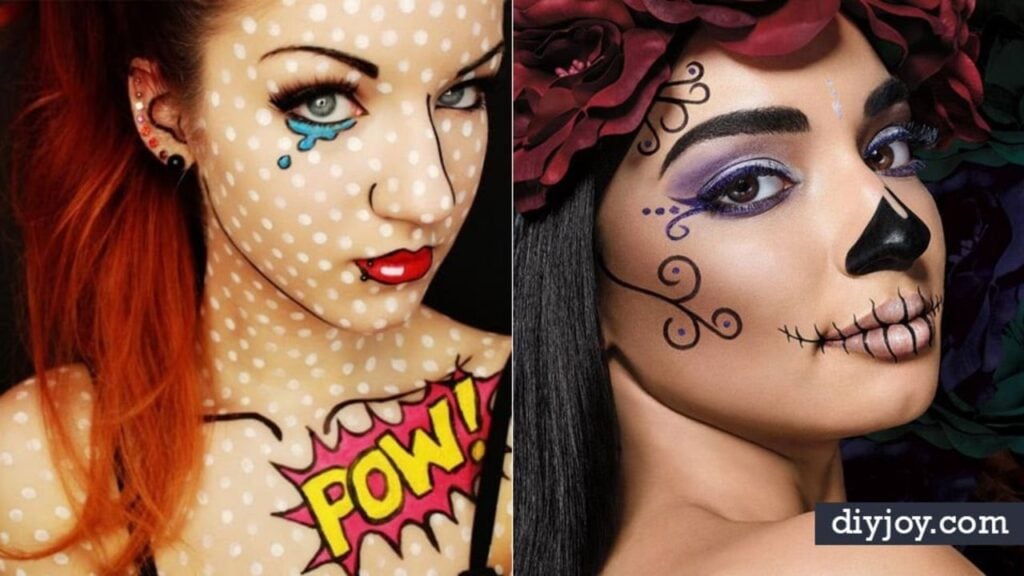
Halloween makeup does what a costume budget cannot, and these 29 DIY Halloween makeup tutorials are the proof. A sugar skull, a weeping nun, a glam skeleton, a butterfly that glows under a blacklight, most of it built from things already sitting in a drawer. Here is my honest position on this one. I am not a makeup artist and have never pretended to be, so what I bring to this list is a maker’s eye for which tutorials you can really finish on a weeknight and which ones quietly want three hours and an airbrush. That is what I sorted for. Some of these are five minutes on one cheek. Others are a slow, satisfying evening of face paint with something good on in the background. Perfect for a last minute costume, a school party, a work party where nobody wants to wear a full outfit, a couples look or the Halloween photo people ask you about for years!
Table of Contents
- Cool Halloween Makeup Ideas
- 1. Harlequin Doll Halloween Makeup
- 2. Easy Pumpkin and Bat Face Paint
- 3. Easy Cat Halloween Makeup
- 4. Sugar Skull Halloween Makeup
- 5. Sparkly Spiderweb Face Paint
- 6. Cute Fox Halloween Makeup
- 7. Black and White Grayscale Makeup
- 8. Totally Doable Glam Skeleton Halloween Makeup
- 9. DIY Pirate Makeup
- 10. Jack Skellington Halloween Makeup
- 11. Lichtenstein Inspired Halloween Makeup
- 12. Mermaid Makeup
- 13. Zombie Cheerleader Makeup
- 14. Frozen Elsa Makeup
- 15. Weeping Nun Makeup
- 16. Blacklight Butterfly Face Paint
- 17. Witch Halloween Makeup
- 18. Zombie Face
- 19. Queen of Hearts Makeup
- 20. Easy Scarecrow Costume and Makeup
- 21. Comic Book Girl
- 22. Cat Face Paint
- 23. Burned Flesh
- 24. Doll Inspired Halloween Makeup
- 25. Creative Bat Eye Makeup
- 26. Skeleton Couple Makeup
- 27. Masquerade Mask
- 28. Baby Doll Lip
- 29. Dr. Seuss’ The Lorax Makeup
Cool Halloween Makeup Ideas
1. Harlequin Doll Halloween Makeup
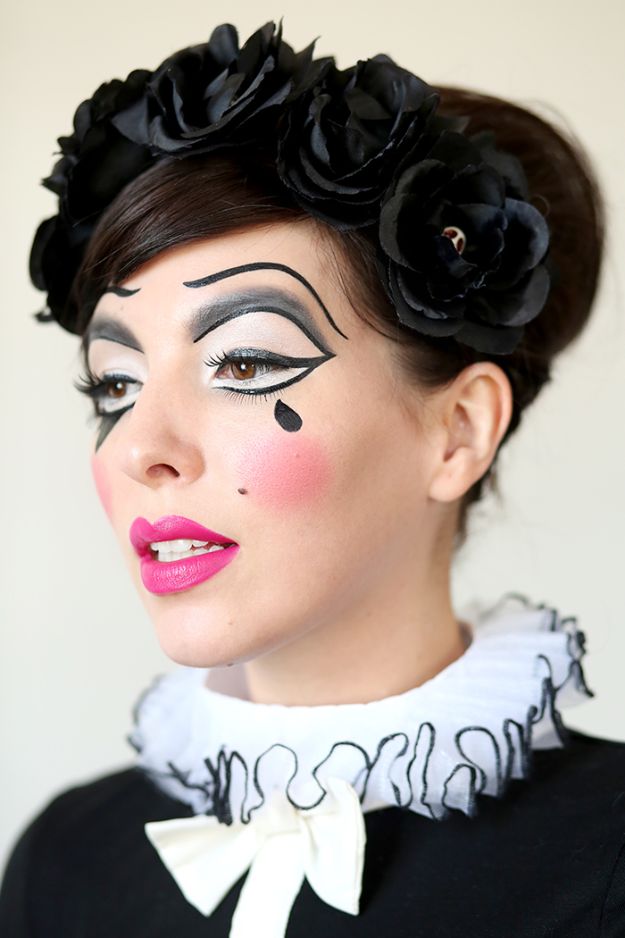
Most harlequin faces white out everything, which flattens the whole look. This one keeps the eyes, lips and cheeks pronounced instead, so it reads as glamorous rather than ghostly. Liquid eyeliner does the diamond shapes around the eyes, pink goes on the lips and cheeks, and the rest is makeup you already own. A good pick if you want a Halloween face that still photographs like you.
Get the full tutorial at Keiko Lynn.
2. Easy Pumpkin and Bat Face Paint
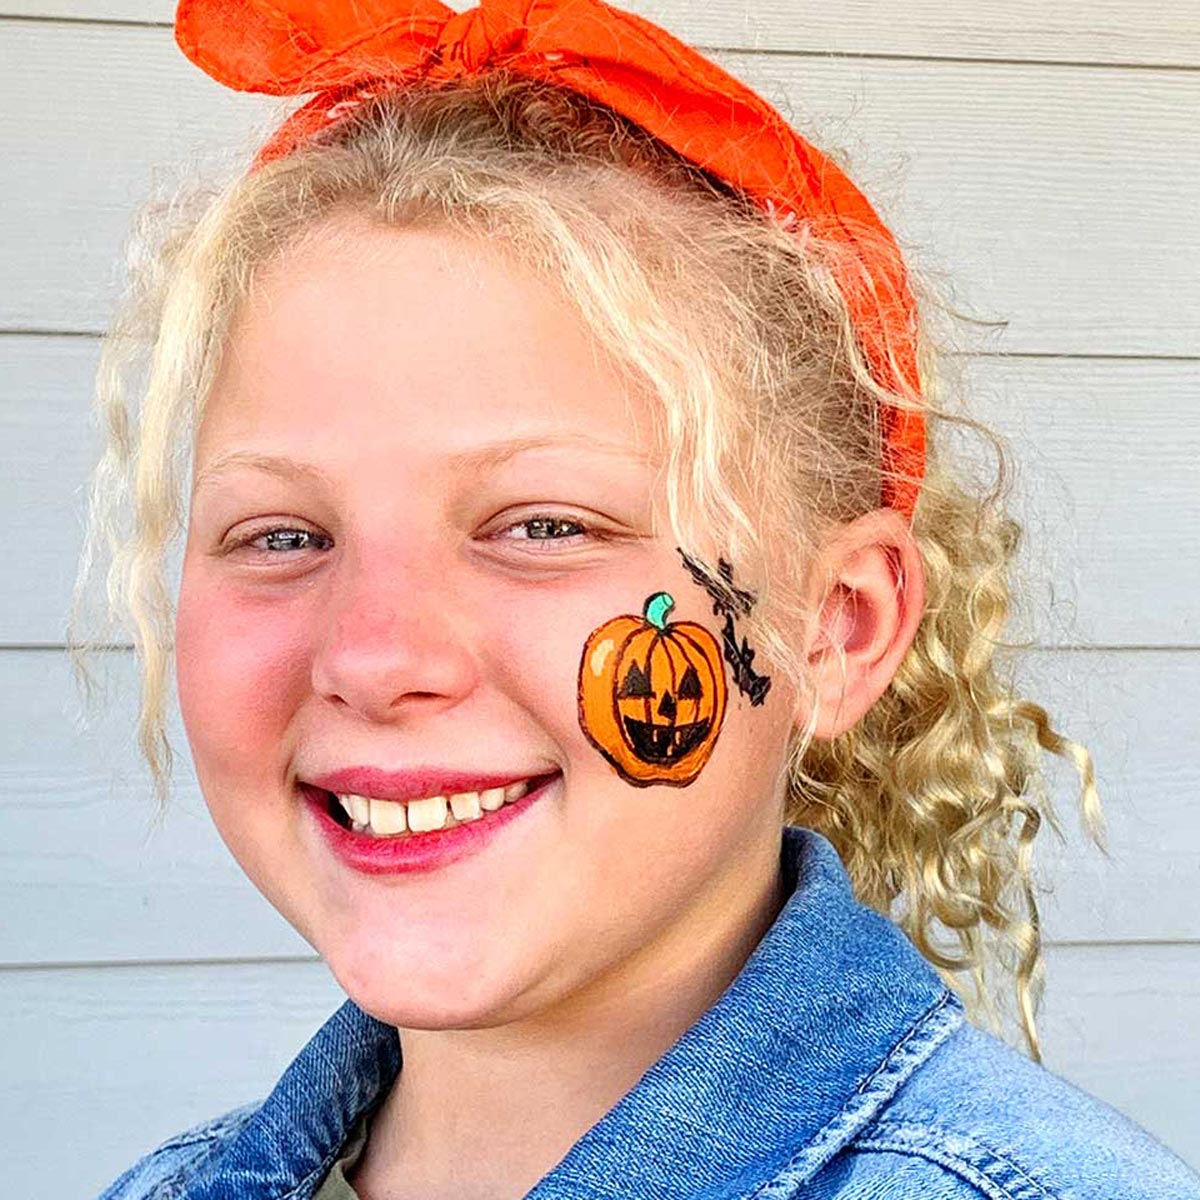
This one is less a full makeup transformation and more a quick face-painting trick, which makes it perfect if you’re short on time or patience with a makeup brush. A small jack-o-lantern and bat painted right on the cheek takes just a couple of minutes and still reads as a real Halloween look for a party or a school event. Shelly built this around simple designs and free templates, so you can trace the shape first if you’re not confident freehanding it. It works just as well as a stand-alone accent on a costume you’ve already got as it does as the main event.
Get the full tutorial at Welcome to Nana's.
3. Easy Cat Halloween Makeup
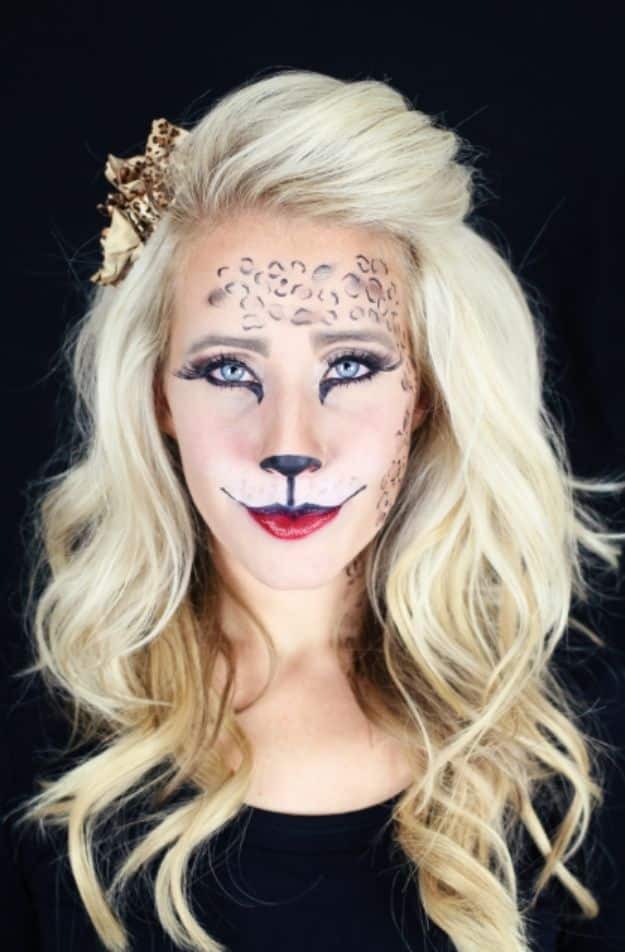
A black nose, drawn whiskers and a little shading is the entire face here, and it is the costume that has rescued more people at 6pm on Halloween than any other. Everything comes out of your own makeup bag. Add ears and a tail, usually about fifteen dollars together at a costume shop, and pull on a black top you already own.
Get the full tutorial at Twist Me Pretty.
4. Sugar Skull Halloween Makeup
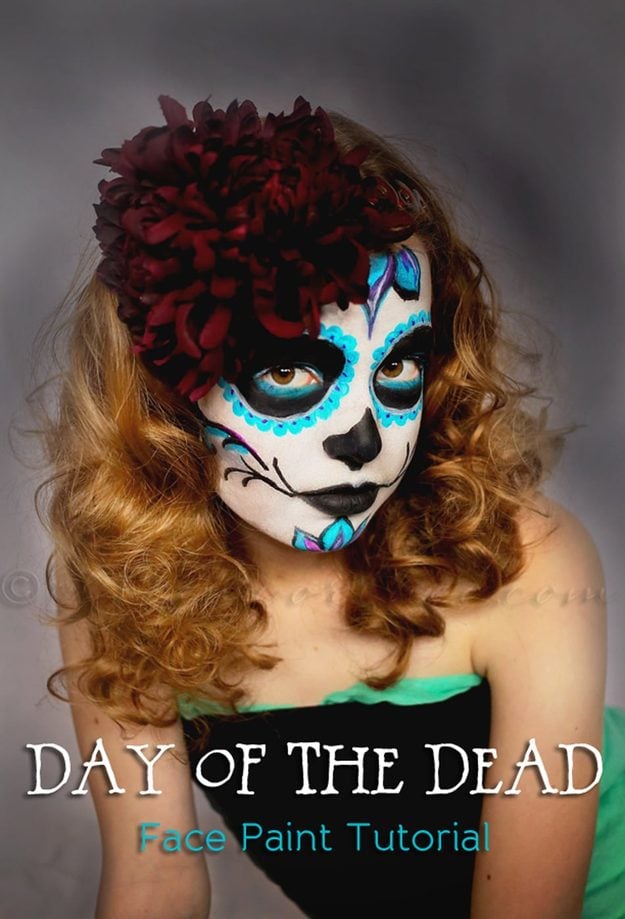
Face paint is the one kind of painting I have barely done, and this is the tutorial that makes me want to fix that. Gina Kleinworth painted this Day of the Dead sugar skull freehand on her older daughter as a practice run before Halloween. It works like watercolor, so you wet a sponge and build up the white base, about four coats to get it that opaque. One coat does not read as a sugar skull, it reads as someone coming down with something, so keep going. Then black blended under the cheekbones and a brush for the eyes, lips and nose. Her daughter picked the turquoise and purple. The detail that makes the whole face snap is the thin line of white between the black and the turquoise around the eyes. Close to two hours of slow freehand work, so start after lunch, not ten minutes before the party.
Get the full tutorial at Kleinworth & Co..
5. Sparkly Spiderweb Face Paint
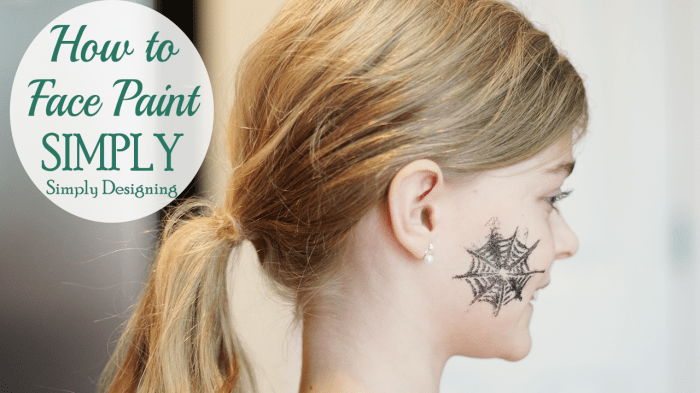
Ashley admits straight up that she’s not great at intricate face painting, and that’s exactly why this one is worth trying if you feel the same way. It’s a glitter tattoo spiderweb done with a Tulip Body Art kit, which basically does the hard part of holding a clean design for you. The whole thing comes together in about 5 minutes, and the glitter finish makes it look a lot more polished than a plain painted web would. It’s a good option for the cheek or the side of the neck if you want something Halloween-ish without committing to a full face of makeup. Her daughter had been asking for face paint for years, and this was finally the easy enough version to say yes to.
Get the full tutorial at Simply Designing.
6. Cute Fox Halloween Makeup
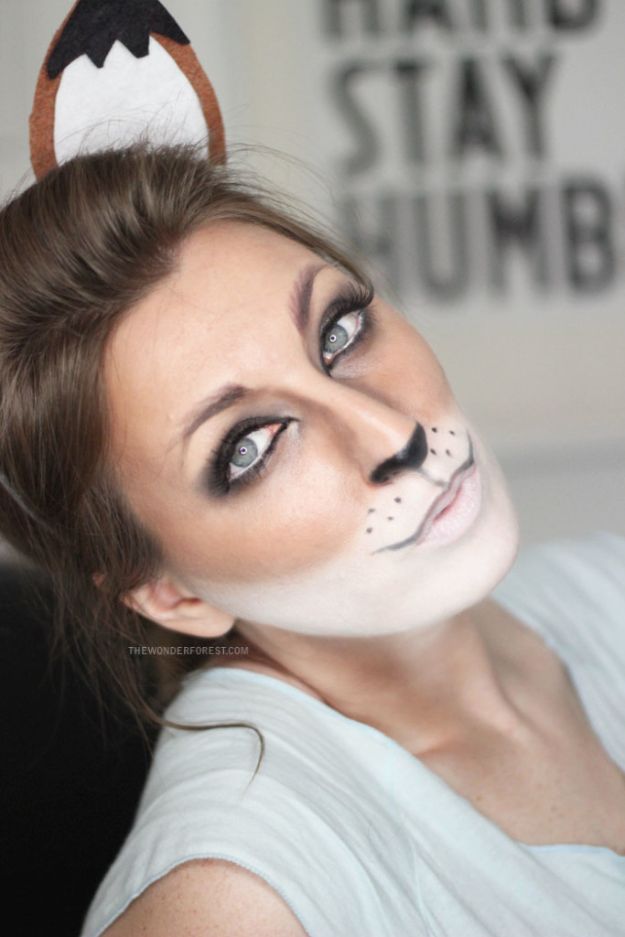
White greasepaint across the muzzle is the one thing you probably have to buy, and it is a few dollars at the craft store. Everything else, the dark nose, the drawn whiskers, the shaded eyes, comes from your own kit. Paper ears glued to a headband will do if you are out of time and money, though a store bought ear and tail set looks sharper.
Get the full tutorial at Wonder Forest.
7. Black and White Grayscale Makeup
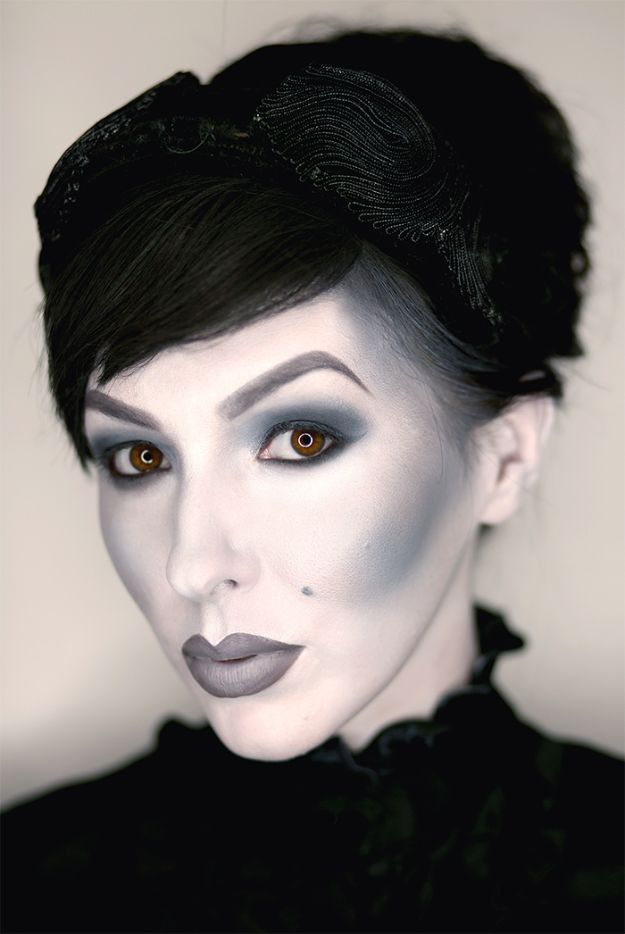
Going grayscale is one of those ideas that sounds simple and stops a room. Clown white gives the flawless base, then gray and black shadow do the contouring, and the trick is treating your whole face like a black and white photograph rather than a costume. It is eerie and glamorous at once, especially with a beaded black dress.
Get the full tutorial at Keiko Lynn.
8. Totally Doable Glam Skeleton Halloween Makeup
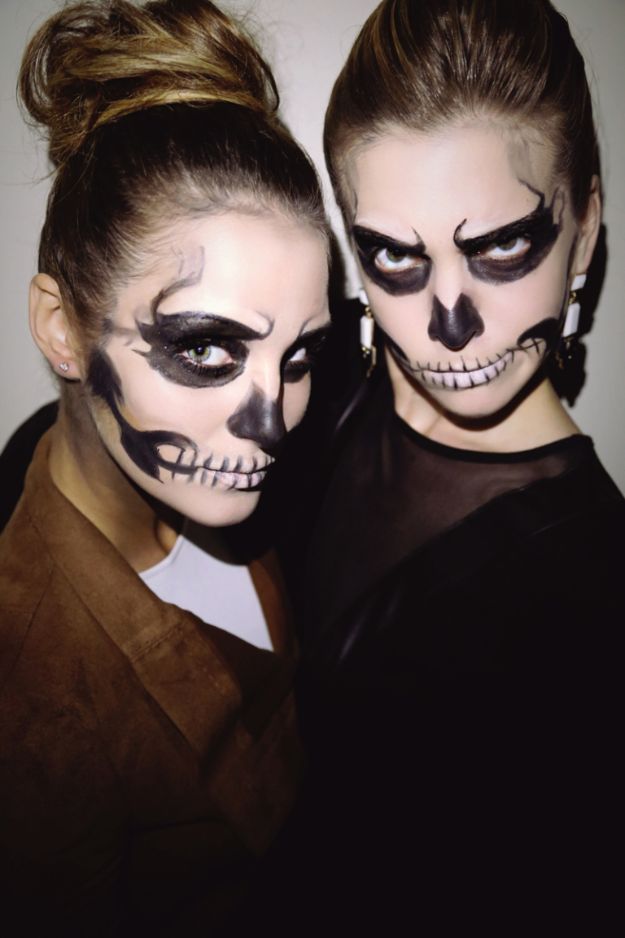
Do not try to make the eye sockets perfect. StyleCaster says outright that the circles look better when they aren’t, which takes the pressure off before you start. Work zone by zone: foundation a shade lighter than your skin over the whole face including your mouth, black liquid liner to outline the sockets, black shadow to fill them, then a letter M drawn across the nose with the sides wrapping your nostrils. A white eyeliner pencil turns your lips into teeth, and vertical lines about half an inch apart do the rest. Nobody is counting them. The detail that sells the whole face is the neck: shade the sides and leave a strip of bare skin down the center so it reads hollow. As Halloween makeup tutorials go this is the forgiving one, and StyleCaster puts the whole costume at about an hour. Nichole Ciotti’s step by step is there.
Get the full tutorial at StyleCaster.
9. DIY Pirate Makeup
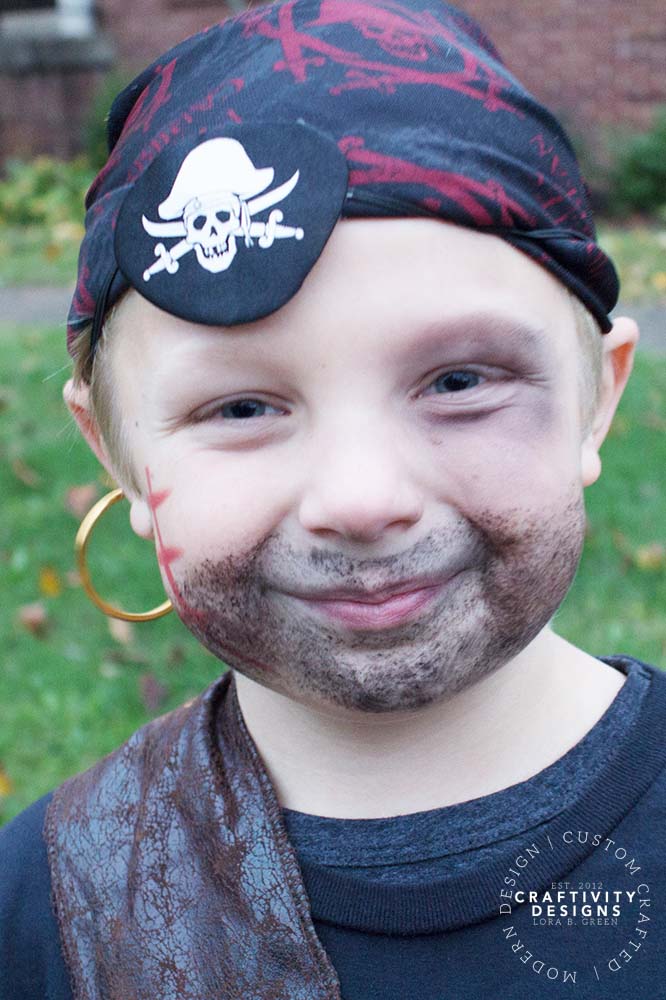
This pirate makeup is really just a scruffy beard built with a stipple sponge, no fine detail work required at all. Dab a stipple sponge into brown bruise makeup and pat it around the mouth, chin and lower cheeks first, then go back over the same area with black to fill the beard in and give it some depth. A red face crayon dragged across one cheek adds a scar that finishes the rough-and-tumble look in seconds. Lora put this together for her son and paired it with a skeleton pirate shirt, an eye patch and a gold hoop earring for the full costume, but the makeup alone would carry a plain black shirt just fine. It’s the kind of makeup a kid can sit still for since it only takes about 20 minutes start to finish.
Get the full tutorial at Craftivity Designs.
10. Jack Skellington Halloween Makeup
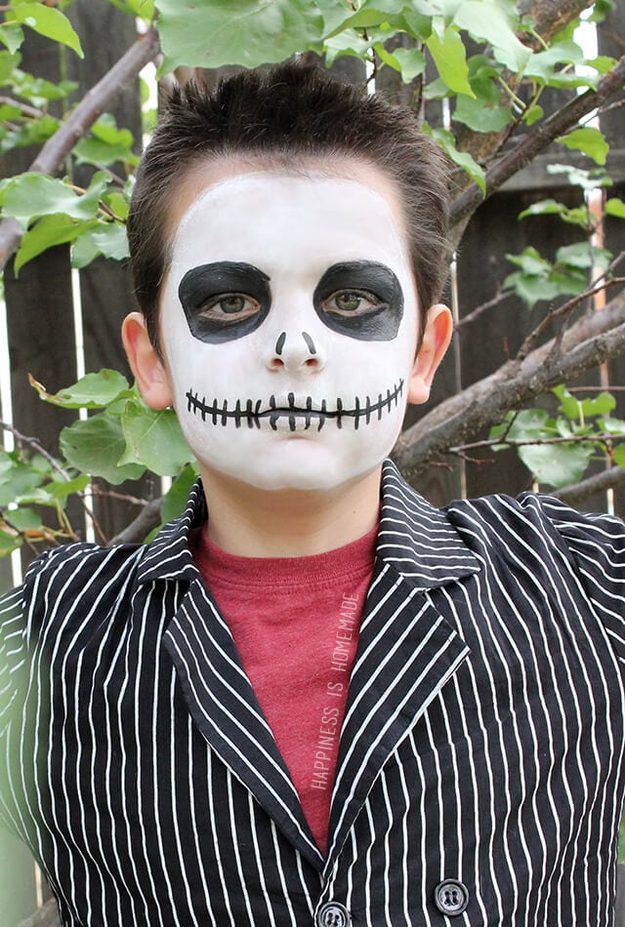
White goes on in three thin coats, not one thick one, with a makeup sponge and a full dry-down between each. Two coats are not solid white. Three are, and that is the difference between a skull and a smudge. The black comes next, the sunken eyes and the stitched grin, painted on with a soft brush in one pass while that last white layer sets. It’s the water-activated kind of face paint you wet like a box of watercolors, and Heidi’s held for four hours on a kid who ate a snack and drank a bottle of water, then came off with soap and water. Fifteen minutes is her ceiling on a child’s patience, and I think that number is the real tip: pick the face you can finish inside it.
Get the full tutorial at Happiness is Homemade.
11. Lichtenstein Inspired Halloween Makeup
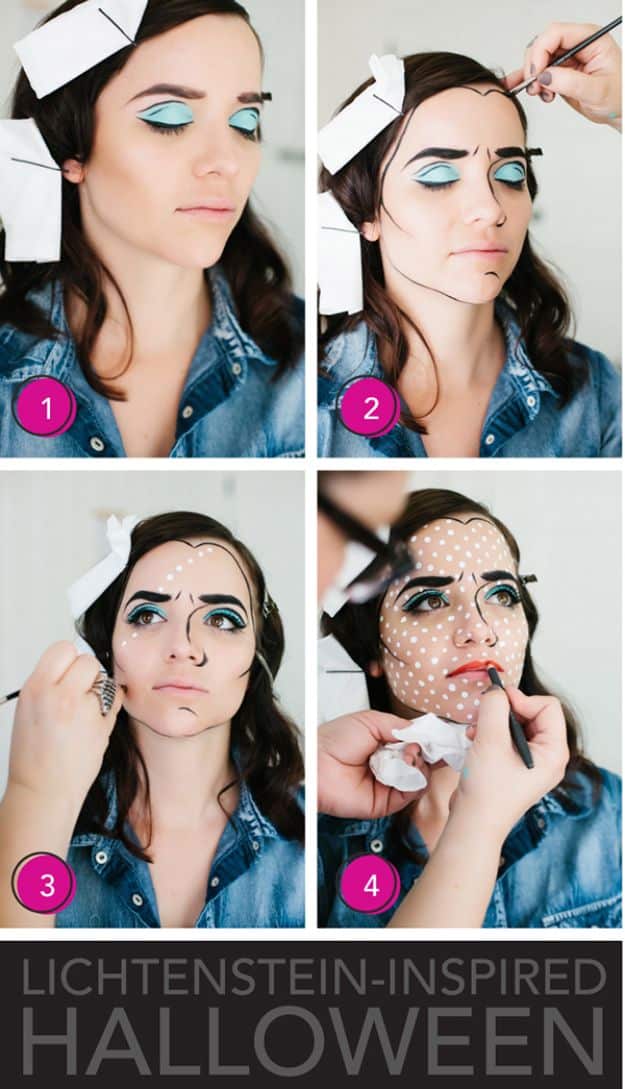
Our own post promises that the only thing you need here is your makeup bag, which is true right up until the neon purple wig. Helen Torsgarden’s supply list tells you the rest of the look: white face crayons and loose powder for the flat base, a face pencil for the outlines, yellow and blue shadow, a pale pencil to open up the eyes, false lashes, lipstick and a pair of space blue crazy contacts. The dots are the Lichtenstein part, and they’re what turn skin into printed comic page. It’s a video, under seven minutes, so watch it through once before you start drawing on your own face.
Get the full tutorial at DIY Joy.
12. Mermaid Makeup
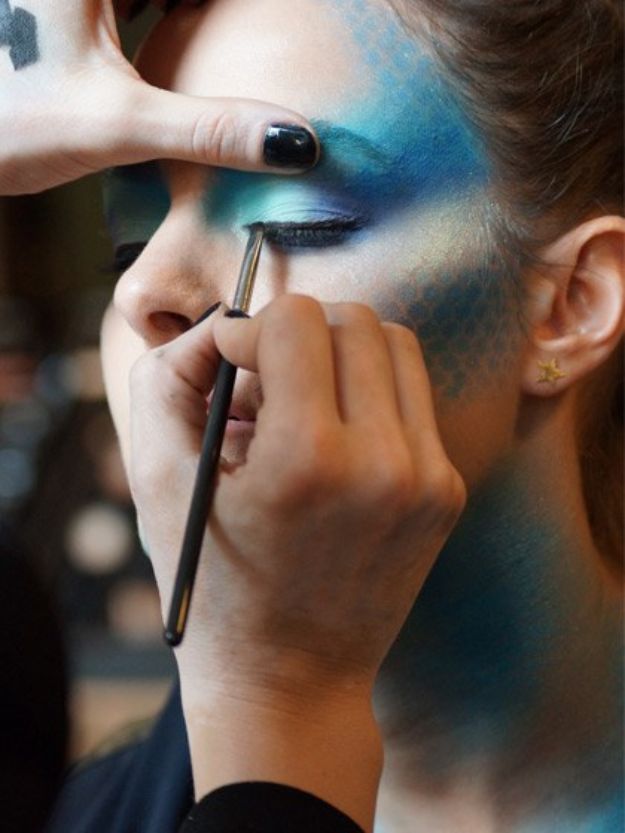
A bag of potatoes is on the supply list, and that is not a typo. MAC senior artist Gina Bettelli widened the hole in the plastic netting, pulled it over Sophia Panych’s head and tapped color through, which is how you get fish scales across the temples, chin and cheek hollows without drawing one. Her rule is cream first, shimmer powder second, because the powder needs something to grip. Any layering rule that starts with so it has something to stick to has my trust. Bottom lashes go on upside down in a straight line with a gap at the outer corners for a gill effect, and craft store sequins glued above the brow arch finish it. Fair warning on format: Allure runs this as a nine slide gallery with a caption under each photo, not as a numbered how to.
Get the full tutorial at Allure.
13. Zombie Cheerleader Makeup
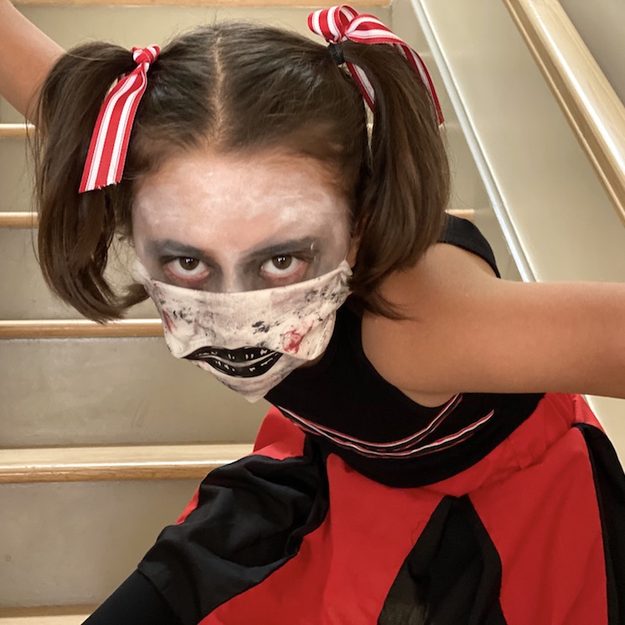
Give the water based face paint a spritz of water, then work it in with a sponge. Go thin, because you can always add more. White areas first, then the black. Sunken cheeks are one drawn line, smudged out. Set it with powder or setting spray, or you’ll wear most of it on your collar. The lower half of the face is a fabric mask, swiped with red, black and white fabric paint and finished with black vinyl lips ironed on. The cheerleader half is a plain tank top with ribbon stripes sewn on, a box pleated skirt and knee socks striped with two black Sharpie lines, a shortcut I would take every time. Marissa kept all of it clean instead of gory so it gets worn again.
Get the full tutorial at Rae Gun Ramblings.
14. Frozen Elsa Makeup

Elsa’s eyebrows are doing more work here than her eyeshadow. Maegan angles them, points the tips and narrows them out, and once they are right the rest of the face falls into place. The eye goes on in layers: white shimmer all over the lid, then a bright matte purple following your crease and fanned out and down under the lower lashes, then deeper purples for depth with hot pink and shimmery rust around the edges, then white shimmer dabbed back onto the center of the lid. Her best tip travels well past this look: draw the cat eye in pencil first, then trace over it with liquid liner, so a shaky hand costs you nothing. loveMaegan has an Elsa Snow Queen DIY costume and a big French braid tutorial too, and the same post ends with a snowfall manicure.
Get the full tutorial at loveMaegan.
15. Weeping Nun Makeup
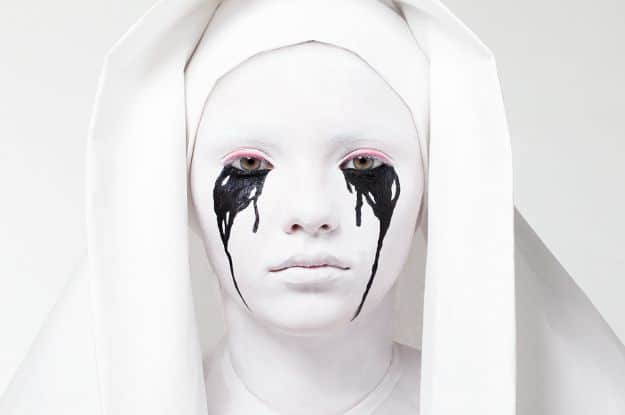
American Horror Story: Asylum is where this one comes from, and a white faced nun weeping black tears stuck with the Beautylish team all year before they rebuilt it. I went to Catholic high school, which makes me either exactly the wrong person to hand you this or exactly the right one. The step people skip is the first: flatten your eyebrows with a nontoxic glue stick applied with a small spatula, let it dry clear, then powder over it. Skip it and you have a nun with eyebrows, which is a different character. White makeup goes over the face, lips and neck with a sponge, set with white powder rather than translucent, because translucent will not cover. Red gel liner tightlined between the lashes makes the eyes raw, and the tears are black liner painted below in drops of different lengths.
Get the full tutorial at Beautylish.
16. Blacklight Butterfly Face Paint
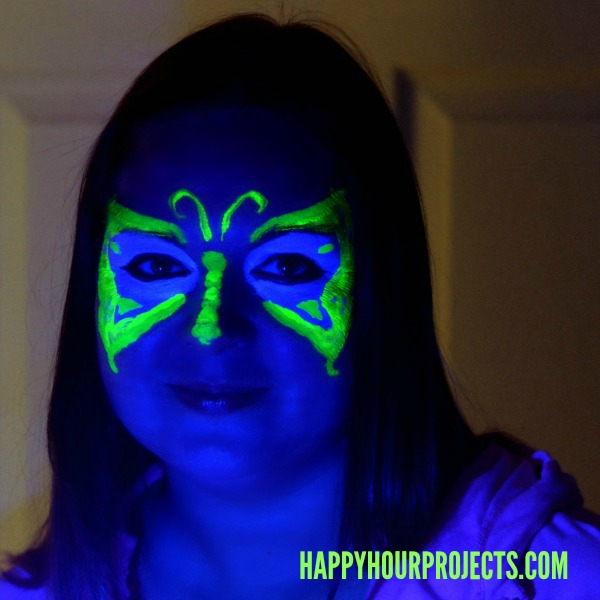
This one only shows its full effect once the lights go down, which makes it a fun pick if your Halloween party has a blacklight or a dark dance floor. It’s a butterfly painted around the eyes with Tulip’s neon face paint, green and blue in this version, and under a blacklight the whole design glows like it’s lit from inside. In regular light it still reads as a solid butterfly face paint, so you’re not stuck waiting for the lights to change before it looks finished. It’s a good one for a grown-up Halloween night out rather than a kids party, since blacklight setups are more of an adult-party thing. The shimmer and neon paints from Tulip are what make the glow actually work, so regular face paint won’t get you the same effect.
Get the full tutorial at Happy Hour Projects.
17. Witch Halloween Makeup
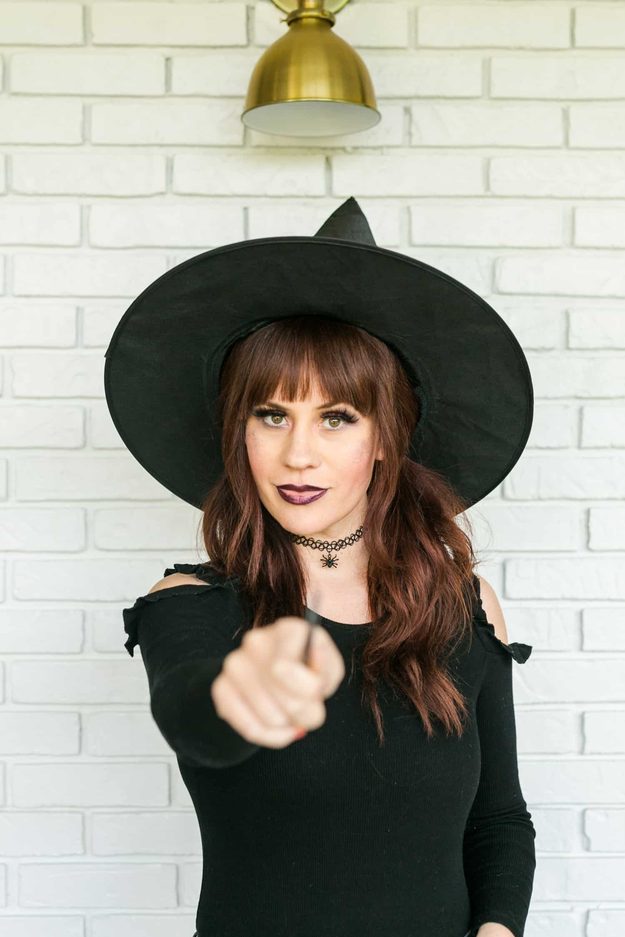
One dark metallic purple eyeshadow does three jobs in this look, which is how it comes together in ten or fifteen minutes. It goes on the lid up to the brow bone. A blush brush picks the same purple up and cuts in under the cheekbones. A little more gets patted into the middle of a very dark lip so the lipstick doesn’t read flat. The black takes the most skill: tap nearly all of it off a small brush, press it into the outer corner, then blend out through the crease in a cat eye shape with a bigger one. Less product, more control. It is not supposed to look clean. She’s a witch. The costume around it is a black hat, a tattoo choker with a spider and a wand.
Get the full tutorial at A Beautiful Mess.
18. Zombie Face
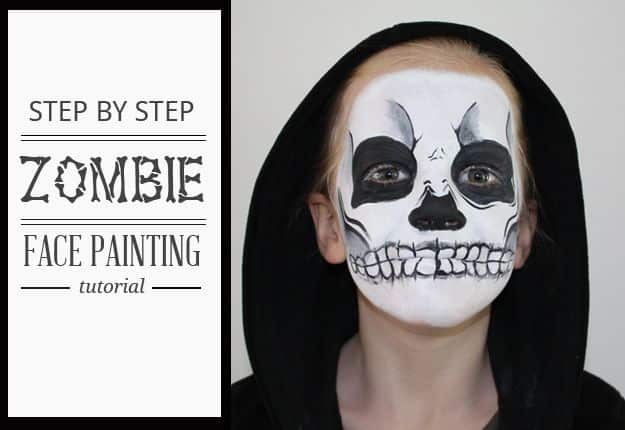
Black and white paint and a few brushes is genuinely the whole supply list on this one, which is why it has been passed around for years as the zombie face parents can manage. The white skull base goes down first, then black hollows out the eye sockets and the nose, and the teeth get drawn straight over the lips. One warning from the comments: it is stubborn to remove, so have a proper remover ready.
Get the full tutorial at Mouths of Mums.
19. Queen of Hearts Makeup
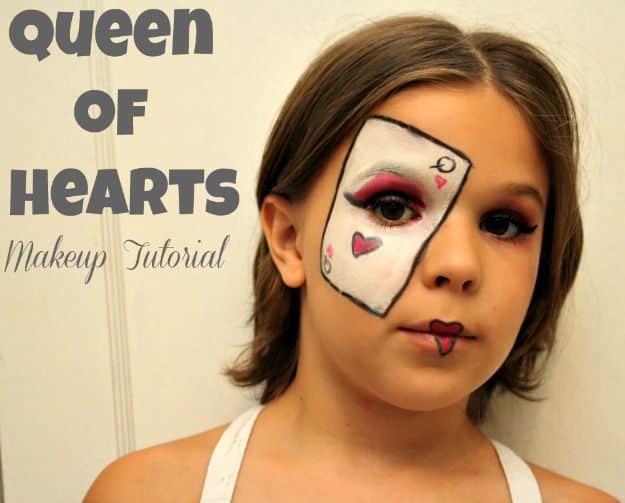
Pull a card out of a regular deck, because that card is the template for the whole face. Outline it in black eyeliner, fill it with white makeup, then go back over the black lines a second time, which is what keeps the outline from going muddy under the white. From there it’s a Q in the top corner, an upside-down Q in the opposite one, and three red hearts drawn in lip liner and re-outlined in black so they read as printed on rather than doodled. Heavier liner than usual on the lid, red shadow over it, and lips outlined into a heart and filled in red. Nell wore this one and Laurie stepped in on the lines, which tells you which part is fussy: straight and truly black takes several passes. Doing this on a small child? Cut your own card a little smaller.
Get the full tutorial at Slap Dash Mom.
20. Easy Scarecrow Costume and Makeup
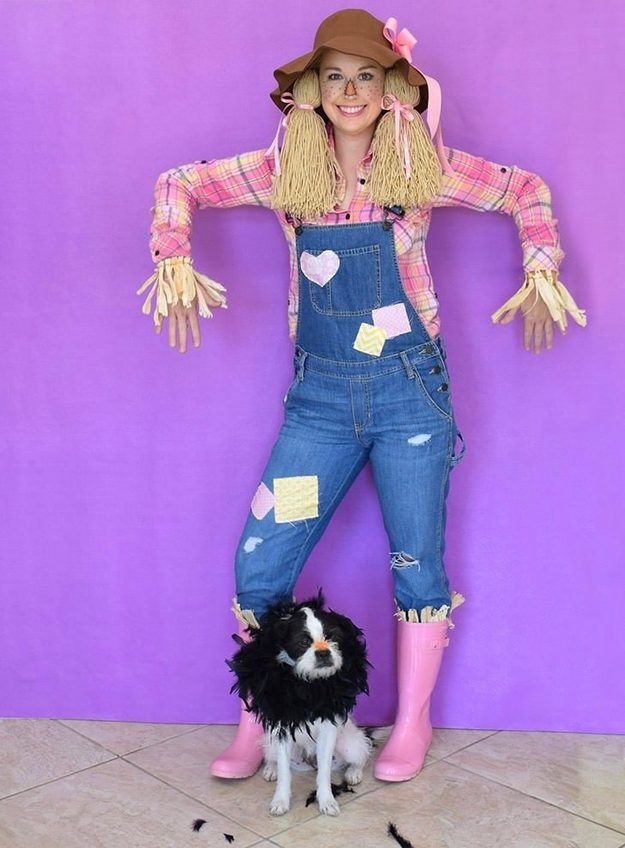
Fair warning on this one: it is a whole scarecrow costume from Allison Murray at Dream a Little Bigger, eight dollars of it from Walmart, and the makeup is a section inside it rather than a how-to of its own. The face is four moves. Two coats of mascara, including the bottom lashes, bright pink lipstick, an orange triangle filled in on the nose with stitches drawn around the sides, then freckles dabbed on with a makeup crayon. She kept it that simple because she rubs her face all night and anything painted on her cheeks would have smudged by nine. The dog is wearing a feather boa, because a scarecrow needs a crow.
Get the full tutorial at Dream a Little Bigger.
21. Comic Book Girl
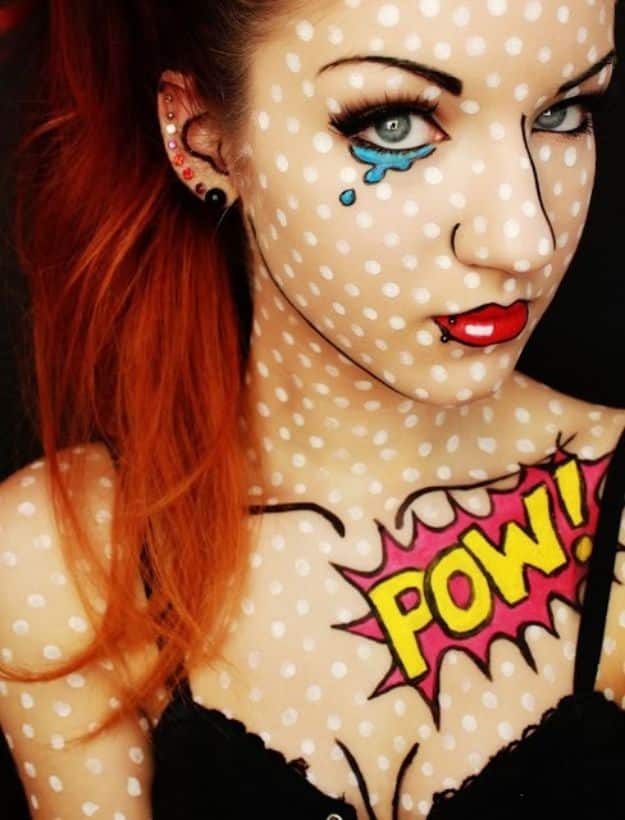
The dots make or break a pop art face, and the tutorial says so in capital letters. Red pencil lip liner is the easiest way to get them, and they have to be even and all the same size, so hold a ruler up as a guide. Everything else is drawing: darker brows, a line down the center of the nose, one along the upper hairline, and a jawline running from earlobe to earlobe under the chin. Bright blue or purple shadow goes to just under the brow bone, gets outlined in black, and the lower lashes are drawn on. Red lips, lined in black, with a dab of white on the bottom lip so it catches the light. The detail I would copy first is the base, because she mixes white face paint into her regular foundation rather than going straight white, so you land at cartoon and not corpse.
Get the full tutorial at Best Halloween Blog.
22. Cat Face Paint
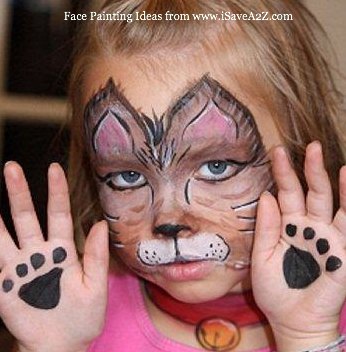
This animal face paint is a cat look, whiskers, ears and a muzzle in warm browns, with matching paw prints pressed onto both hands for good measure. Jen’s tip here is all about the paint quality, not the technique, spend a little more on real face paint like Mehron Paradise or Wolfe Brothers and it won’t crack, peel or wear off halfway through the party the way a bargain kit will. Even her own daughter uses these same paints to face-paint her friends, so it’s genuinely simple enough for a kid to do on another kid. This one works best paired with a full animal costume rather than standing alone as the whole look. If you want to try a different animal face paint yourself, use this as your color and technique starting point.
Get the full tutorial at iSaveA2Z.
23. Burned Flesh
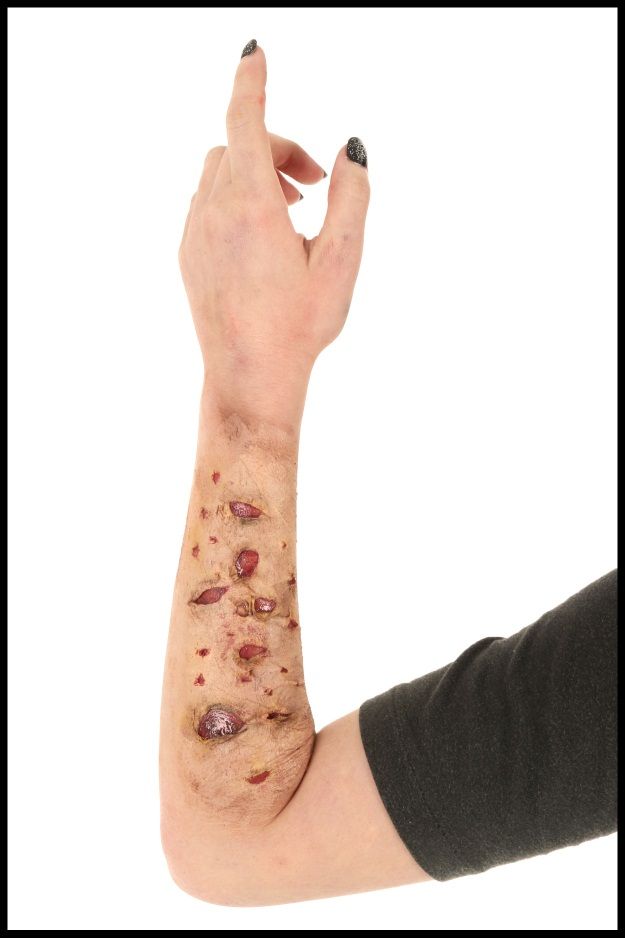
Liquid latex and a plain Kleenex do the entire effect here, which is not what you’d expect from a DIY effect this gruesome. A thin coat of latex goes down, the tissue presses into it, anything that isn’t stuck gets torn away, and it dries completely before you touch it again. Skin tone foundation over the top hides the tissue, and a seam ripper opens small holes in it, which is what turns a lumpy patch into burned skin. Foundation again over the torn edges, yellow inside and around every hole, brown dragged over the whole piece with a stipple sponge for that dirty charred look, then red filling the holes. Clear gloss over the red, and lip gloss counts, is what sells it as a fresh wound. Plan the removal before you start: spirit gum remover, makeup remover or soap and water. HalloweenCostumes.com rates this one three out of five for difficulty and walks all five steps.
Get the full tutorial at HalloweenCostumes.com.
24. Doll Inspired Halloween Makeup
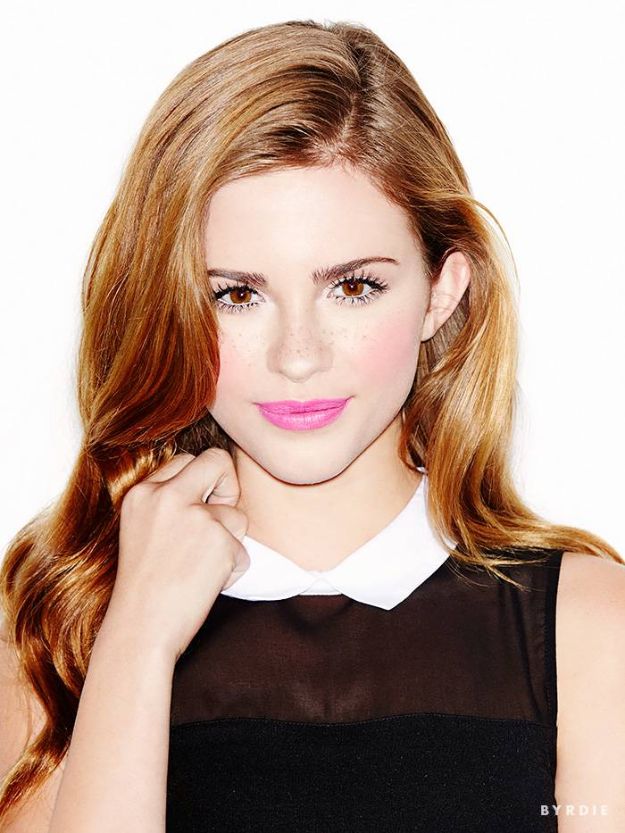
Sweet rather than creepy, which makes this the doll on the list you can wear without frightening somebody’s kid. It starts with a white pencil along the lower waterline and under the eye, and that one cheap product is what makes the eyes read huge and round before a drop of liner goes on. After that it’s heavy winged liner with the lower lashes drawn on one at a time, Eylure falsies up top, a circle of pink blush high on the cheek and a tiny heart of a lip well inside your own lip line. Your costume is a lace top and a puffy skirt from your own closet. Hannah Leigh’s video has over a million views, and her description links a scarier version if you change your mind.
Get the full tutorial at DIY Joy.
25. Creative Bat Eye Makeup
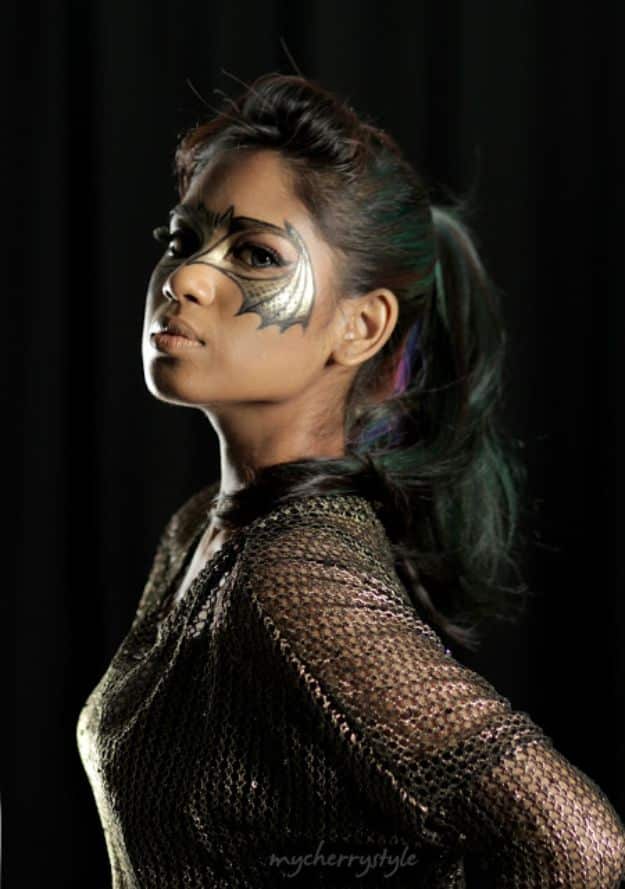
Working from a picture beats freehanding, and that is the real lesson in this one. She pulled up a photo of the Batman mask from The Dark Knight Rises and painted the shape from it, which is why the cowl reads as a mask and not as smudgy black wings. Gel eyeliner and a flat angled brush do the shape, with a neutral eyeshadow palette and one metallic shade rounding it out. An old shawl covers the rest of the costume, and honestly that is my favorite line on the supply list. One thing to know going in: the tutorial is a video and she kept it deliberately short, so watch it twice, once for the shape and once for the order she works in.
Get the full tutorial at My Cherry Style.
26. Skeleton Couple Makeup
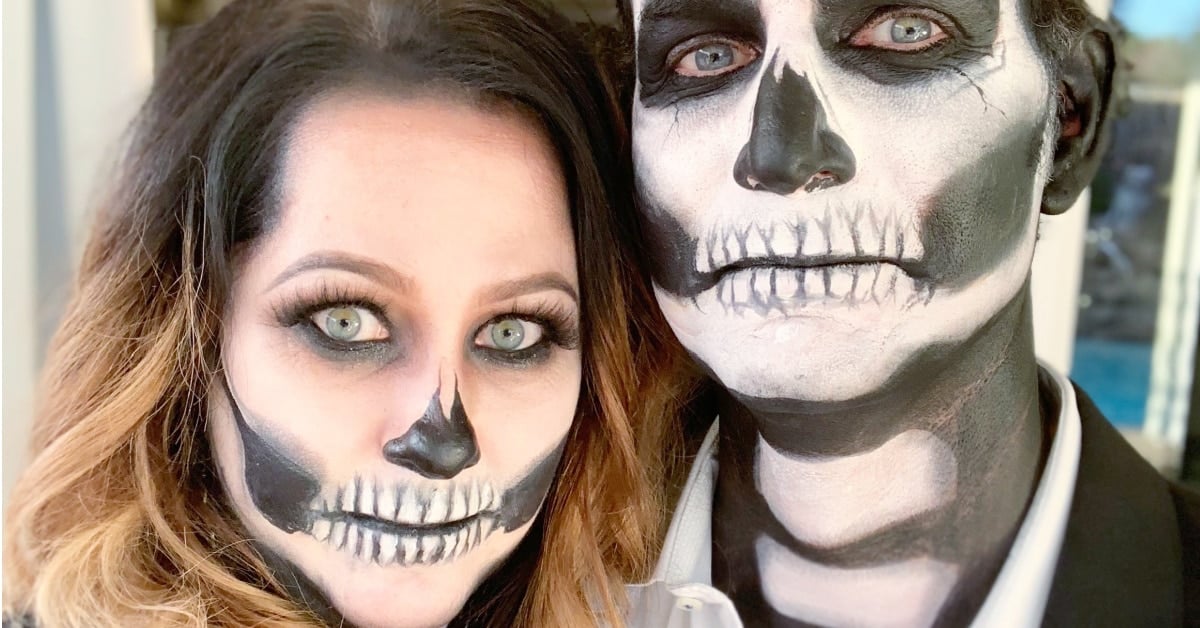
If you want a couples look that’s carried entirely by the makeup, this skeleton face is the one to try. Start with a matte white foundation base, going more solid for a stronger effect or blending it in more if you still want to look a little like yourself underneath. Black eyeliner and shadow build the eye sockets, then more black shadow contours the neck and under the chin to hollow everything out. Stefanie kept a touch of her own color under the white base since she wanted to look pretty along with the skeleton effect, so this doesn’t have to read as purely scary. It pairs with almost anything black in your closet, which is what makes it such an easy costume to build around once the makeup is done.
Get the full tutorial at The Girl Inspired.
27. Masquerade Mask
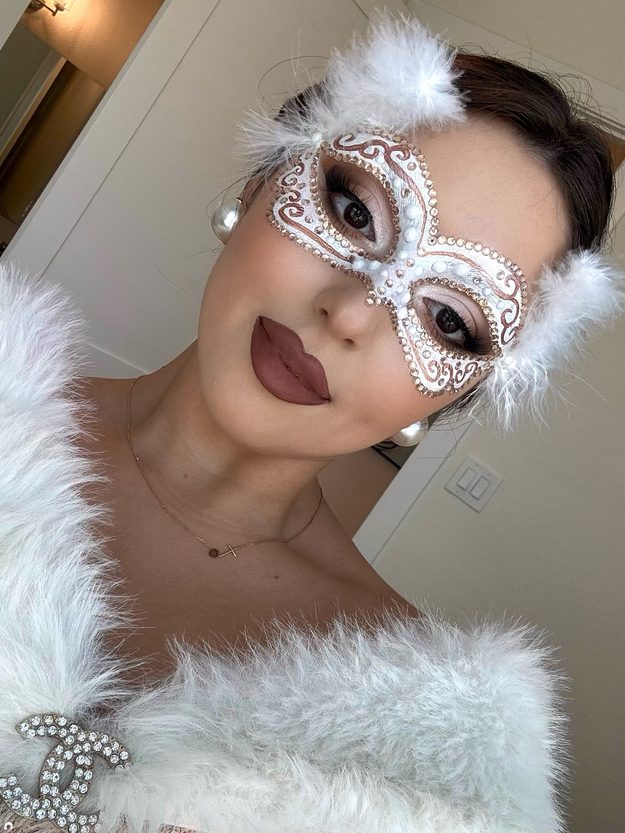
There’s no mask here at all. It’s painted on: a white mask shape over the eyes and the bridge of the nose, gold filigree swirls looped across it, rhinestones set along every edge and around both eye openings, then white marabou feathers framing the top. Nothing ties behind your head, nothing slides down your nose and nothing has to come off when you want to eat. It’s symmetrical, which is the hard part, so paint one side, then check it in the mirror before you match the other. You’re copying a finished look here rather than following steps, so practice it once on a night that isn’t Halloween.
Get the full tutorial at The Mom Love Blog.
28. Baby Doll Lip
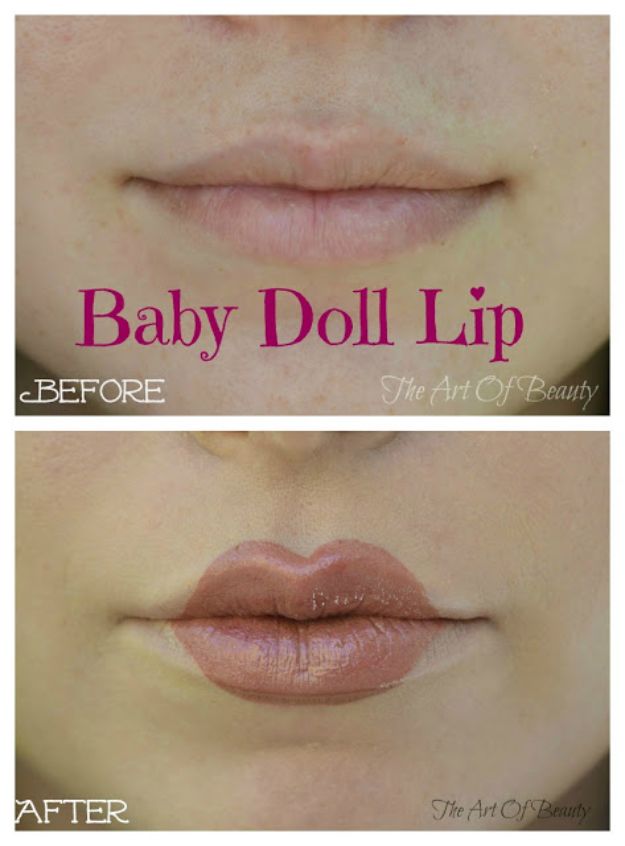
Four steps, and not one of them goes past your mouth. Concealer and foundation over your lips comes first, which erases your natural lip line and is the whole secret, because you can’t draw a new shape until the old one is gone. A lip pencil then draws the shape you want, going above and below where your lip actually sits so it comes out rounder and poutier, and lipstick or gloss fills it in. Black is what she reaches for at Halloween, and black is what turns a pretty lip into a doll face, especially under a wig. If I had ten minutes and one costume to rescue, I would spend them here rather than on eyes, since the mouth is what people read first in a photo.
Get the full tutorial at The Art of Beauty.
29. Dr. Seuss' The Lorax Makeup
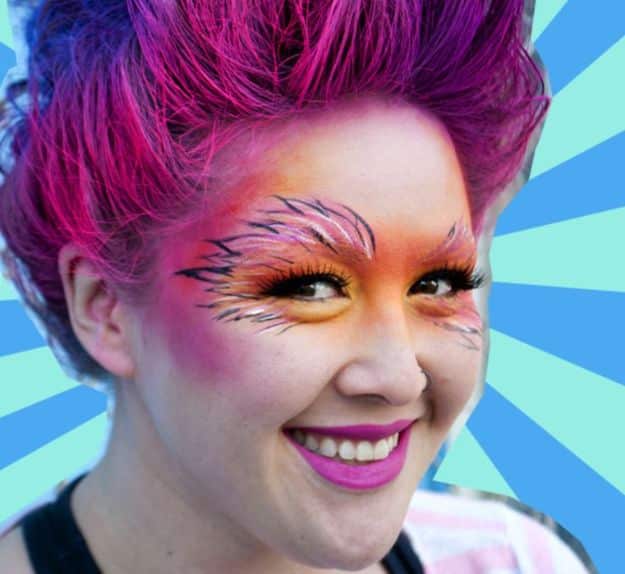
Purple Elmer’s glue on the eyebrows is where this one starts, which tells you plenty about the next three hours. Jasmine built a Lorax out of her own face, primed her hair with white spray and then piled on so much temporary neon color it turned into cotton candy. T he face is orange, layered from theatrical and beauty makeup with soft texture worked in to echo the Truffula trees. Then she went out into San Francisco to see what strangers would do, and what they did was talk to her, which turns out to be the point of the whole piece. Sugarpill, Inglot and Kryolan are the brands she names if you want to chase those colors. Of all the Halloween makeup tutorials gathered up here, this is the one I would send you to for the pictures and the nerve rather than the instructions.
Get the full tutorial at Beautylish.