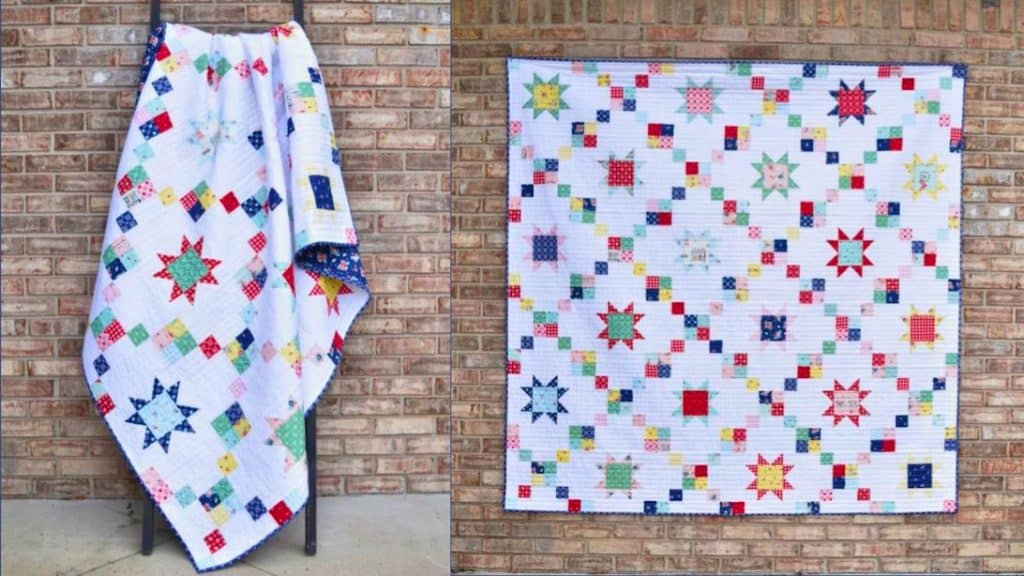
This star chain layer cake quilt by Material Girl Quilts is one of the most fun patterns I have ever made! It is composed of two blocks with different designs. When sewn together alternately, it creates a crisscross pattern with stars in the center of each piece. Watch the video below for full instructions.
Materials
- 1 layer cake or 36 pre-cut 10″ squares
- 4 yards of background fabric
- 4 1/2 yards of backing fabric or 5 yards
- 2/3 yard of binding fabric
[social_warfare buttons=”facebook,pinterest,twitter,whatsapp”]
Instructions
Step 1:
Start by selecting (18) pre-cut 10″ squares and sub-cut each into (16) 2 1/2″ squares. Select 17 pieces for 60″ x 84″ or 18 pieces for 72″ square size pre-cut 10″ squares and sub-cut each into 1 piece of 4 1/2″ square and 12 pieces of 2 1/2″ squares. Next, cut 57 pieces of 2 1/2″ WOF strips from the background fabric, then sub-cut to 144 pieces of 2 1/2″ x 8 1/2″ rectangles, 144 pieces of 2 1/2″ x 4 1/2″ rectangles and 72 pieces of 2 1/2″ squares.
Step 2:
Get 1 piece of 2 1/2″ x 4 1/2″ background rectangle and 2 pieces of 2 1/2″ star point fabric squares. Draw a diagonal line from corner to corner on the back side of the 2 1/2″ squares.
Step 3:
Put one of the squares on one end of the background rectangle, right sides together, with the edges aligned. Sew directly on the drawn line and trim off excess 1/4″ away from the seam line. Press it open toward the star fabric. Do the same for the opposite end. Repeat the process to make 4 flying geese or star point units.
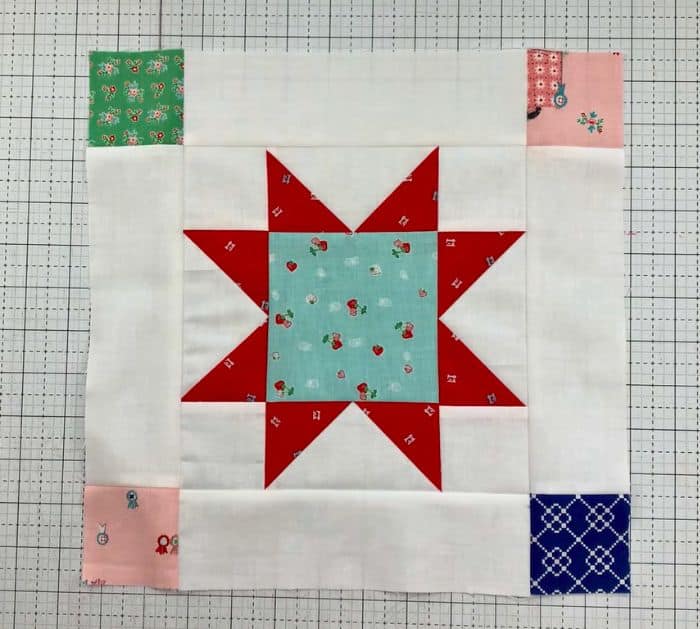
Step 4:
Arrange four of the flying geese, four 2 1/2″ background squares, and one 4 1/2″ center star square as shown below. Sew into rows first, then sew them together to make the star.
Step 5:
Once the star is done, select four pieces of 2 1/2″ x 8 1/2″ background rectangles and four pieces of 2 1/2″ print squares. Put the squares on the corners of the star and the rectangles between each square.
Step 6:
For the chain block. Get four different 2 1/2″ squares and sew them in a four-patch. Sew a 2 1/2″ x 4 1/2″ background rectangle to each side of the four-patch. Next, select two 2 1/2″ squares and sew to each end of a 2 1/2″ x 4 1/2″ background rectangle. Repeat to make two units, then sew them to the top and bottom of the block. Sew a 2 1/2″ x 8 1/2″ background rectangle to each side of the block. Get two 2 1/2″ squares and sew to each end of a 2 1/2″ x 8 1/2″ background rectangle. Repeat to make two units. Lastly, sew them to the top and bottom. See the photo below for reference.
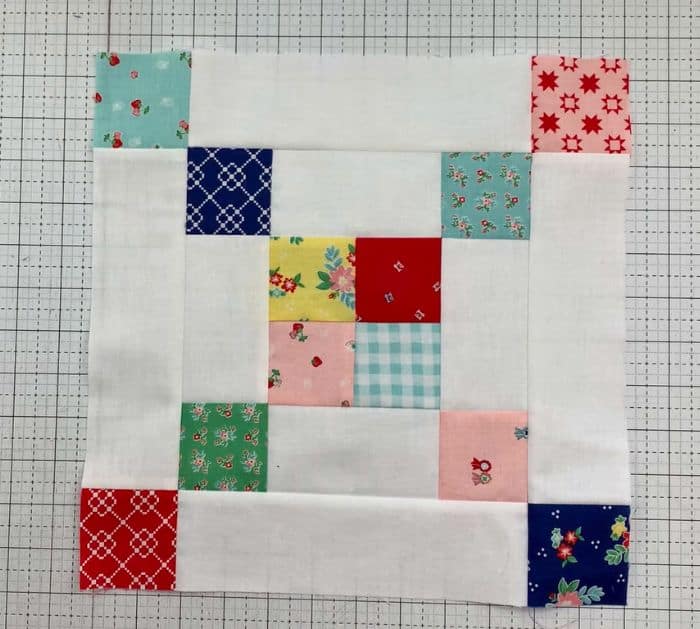
Step 7:
Lay the blocks alternately. Sew them into rows first then sew the rows together.
Star Chain Layer Cake Quilt Pattern


