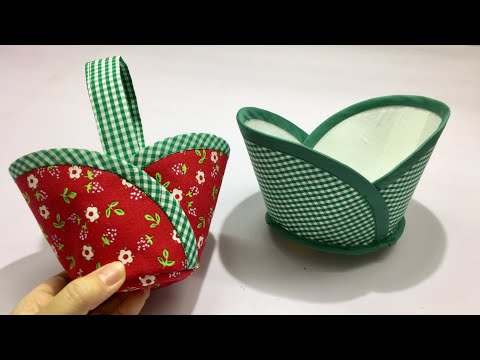
Personalize your festivities and make your easy fabric baskets right on time for Christmas or any holiday. Nothing beats any gift or anything other than something made from your efforts, and you rejoice by saying that it came from your bare hands. Trefa Craft shows you another way to make use of your unused fabric to make a basket bag. This is a perfect gift for space savers out there. Or for those who are looking to organize their stuff but are bored with the usual monochromatic containers.
Materials:
- Craft Paper
- Plate
- Marker
- Ruler
- Scissors
- Fabric
- Lining fabric
- Fabric stiffener plate
- Clothes Iron
- Sewing machine
- Fabric Clips
- Pen
- Double-sided tape
Directions:
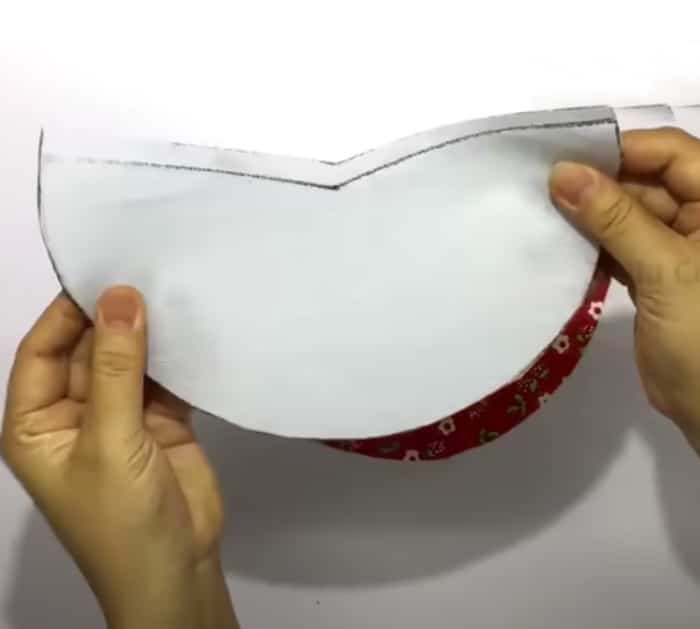
Start by tracing your plate with a measure of 22cm (8.8″) on a sturdy craft paper with your marker. Then, cut it out neatly with your scissors. Fold the circle in half and mark 10cm (4″) from the right edge corner to the center and 10cm (4’) from the right flap to the curve. After that, connect each corner and cut them out; this will serve as your guide for the fabric.
Fold it in half lengthwise with your cut-out guide and your main fabric. As your basis, trace it out on your fabric and cut it. Do the same with your lining fabric and fabric stiffener plate.
On your fabric stiffener plate, mark 1 cm (0.4″) following the V of the fabric. Then, cut it out. Do the same with the other fabric stiffener plate.
Cut out two 5 x 30cm (2″ x 12″) strips from your lining fabric.
Once done, iron out two parts of your main fabric with your fabric stiffener plate. Over the stiffener plate, clip on your lining fabric.
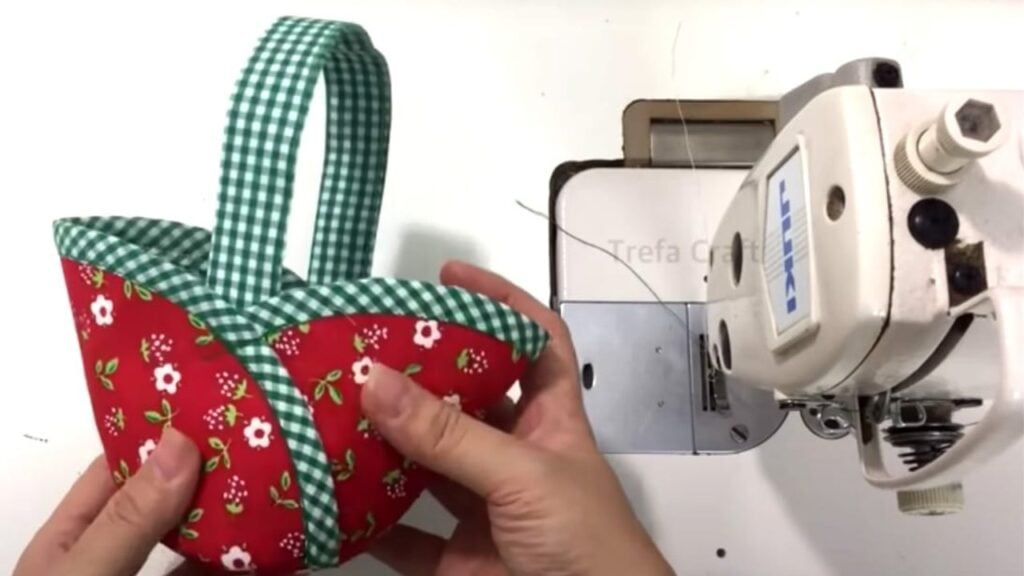
Take out your striped fabric with both main fabrics and sew them onto the curved part of your main fabric. On the other end of the strap, fold it neatly in tune with your lining fabric and iron out both sides. Now iron and sew them all together.
From the central part of the V of one fabric, measure out 2 cm and, from there, align it with your other material. Sew both pieces together.
Lay the attached fabrics out, with your lining fabric facing up. Remember your fabric stiffener plate’s 1 cm cut?Trace it out on both sides of your V fabric with a pen. Following the trace, cut out 11 equal vertical lines.
Sew both edges of the whole fabric, creating a cylinder cone shape.

Taking a break with the whole main fabric, measure and shape a craft paper strip through the bottom end of your basket. Trace out the circle measurement of the craft paper with another piece of your main fabric and a fabric stiffening plate. Keep 1 cm from the circle and cut it out. With another piece of lining fabric, cut out the exact measurements and use double-sided tape to attach it to the fabric stiffener plate.
Now it’s time to attach the cylinder cone shape of the basket to its floor base by sewing it together. For a clean look at the base, sew out the base in a circle motion, fold the edges in, and sew with a fabric lining strip.
Flip over the lining fabric to show off the main fabric.
To make the basket handle, cut out a 7 x 25 (2.8″ x 10″) lining fabric and a 1 cm shorter fabric stiffener plate. Iron them together, then fold them horizontally and iron them again.From the edge, fold it in for a clean look. Sewn on all sides.
Lastly, attach the basket strap to the cone of the basket—and you’re done!
How To Sew These DIY Fabric Baskets