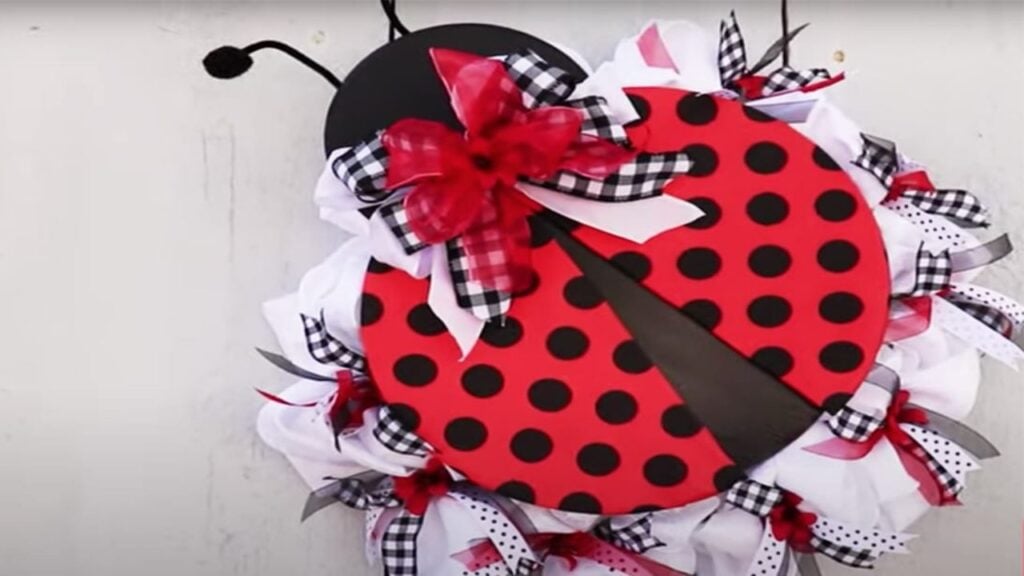
DIY Dollar Tree Ladybug Wreath
Lori Blye DIY on Youtube shares her tutorial on how to make a ladybug wreath using materials from the Dollar Tree. If you love making homemade decor, try this project.
Materials:
- 12-inch love signs from the Dollar Tree
- Wooden 7-inch circles from the Dollar Tree
- Black acrylic paint
- Paintbrush
- mod podge
- white acrylic paint
- Ladybug skirt fabric
- Ladybug headband
- Glue
- Glue gun
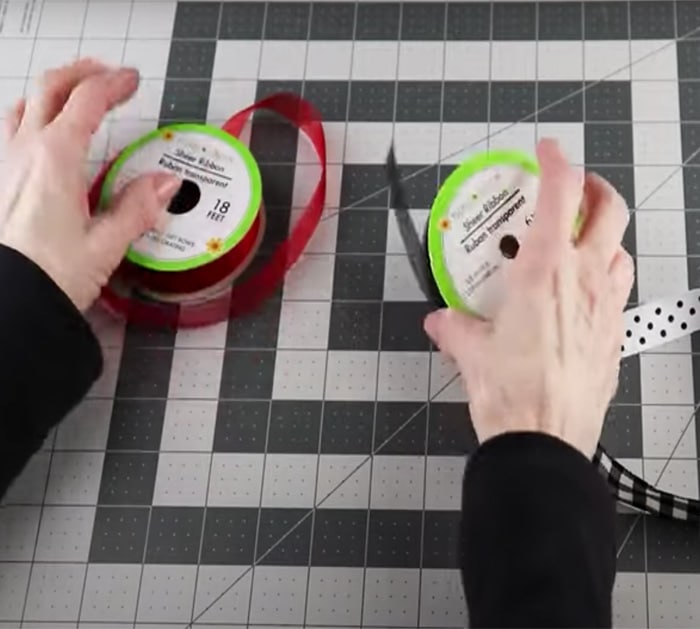
- Buffalo check ribbon
- flowers for the wreath
Directions:
Remove the label and the hangers from the materials. Then use the black acrylic paint to paint a coat on the 12-inch love sign and wooden circles. After you have painted the pieces, give each of them a coat of mod podge. Set aside to dry.

Once the two pieces have set up and dried, use an e600 to attach them together. Then place some on the lower half of the smaller circle. Then decide how large you want the head to be and place the body on top of it. To make the wings for your ladybug, you have to use the second sign. Find the center point and cut the sign in half.
Now, using your white acrylic paint, you give both sides a coat. Wrap the wings with the ladybug skirt that you can buy in the toy department at the dollar tree. And for the antennae, use the ladybug headband. Then you take the skirt apart with a seam ripper and just remove the waistband and the back seam. Once done, iron out the long piece of fabric.
Place one ladybug wing onto the folded fabric and then cut out two pieces. Place one piece of fabric right side down and then place one of the wings on top of it.
Run a line of hot glue along the bottom edge and then fold over the fabric. Run a line of hot glue along the bottom edge and then fold over the fabric. Add some hot glue to the top and fold over the edge of the fabric. Now add some glue to the bottom center, folding over the edge of the fabric, and then from there just work your way around up and over the wing. Add the hot glue and gently pull against the fabric to attach it to the back of the wing. After finishing your first wing, make the second one. Try to match the dots up as closely as possible so when the two wings are put together they look like a perfect set. Add the ladybug wings to the body.
Attach the wings to the body with your glue gun.Now that the wings are in place, add the antennae and simply remove them from the ladybug headband. On the underside of the ladybug head, use your glue gun to attach it into place.
Make a bow to cover where the ladybug’s wings meet and use one and a half inch of ribbon and one white one. With a bowmaker, start with the white and make two six-inch tails and four four-inch loops. This time, give yourself six-inch tails and four three-and-a-half-inch loops. Finish with your red ribbon and then make six-inch tails, but this time make four three-inch loops.
Once done, secure the whole bow together using a piece of floral wire. Then give it a quick fluffing and cut the tails away at an angle. Remove the excess wire and then use the glue gun to attach the back of the ladybug.
When you’re done, hang it up as is, but because it’s a wreath, add a white flower. To make your white flow, start with the 14-inch wire wreath form from the dollar tree. To attach the fabric, use 24 of the white chenille stems and add two per section. Evenly space them and twist them into place. Tighten them as much as possible. Use a glue gun to attach them in place. Complete your flower wreath.
Hang the finished product on your wall.
DIY Dollar Tree Ladybug Wreath


