Charming Quilted Throw Pillow…Easy!
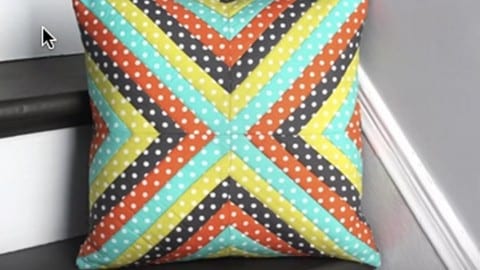
Are you intimidated by quilting? Using a smaller pillow like this is a quick and easy introduction about how to quilt! I have always been intimidated by quilting but after watching this tutorial I was ready to give it a shot and it was easy! Now I feel like I am ready to adventure into bigger quilting projects!
Since making this pillow, I decided to make some of these for gifts to give to friends and family. Everybody loves a and made quilted pillow!
Materials:
Several quilting fabrics
Pencil or marker
Rotary cutter or scissors
Fusible fleece or batting
Printer paper
Zipper and seam ripper (optional)
Ruler
Pins
Thread
Pillow form
Iron
Step 1: Measure and cut the fabric for the back of the pillow, the same size as your pillow, she uses a 16″ x 16″ pillow, adding a seam allowance of 1/2″ all the way around so the finished cover will end up being 1″ smaller. Making covers 1-2″ smaller will make the pillow look nice and full. Next cut two pieces of the fusable fleece, minus the seam allowance, so cut 15″ x 15″. Finally, cut a couple of 1-1/2″ pieces of each of the colors.
Step 2: Sew the front of the pillow cover. Next cut 4 squares of printer paper that are that are each the finished dimensions of your pillow, plus 1-1/4″ divided by 2. For this pillow that’s 8 and 1/8″. Then draw a diagonal line from corner to corner on your paper, then draw lines that are 3/4″ on both sides of the line so it’s the same as the 1-1/2″ strips, place one of the strips between the lines and pin the fabric to the paper, choose your next fabric and place it on top of the strip with the top side facing down, sew throw the 2 fabrics on top of the paper with 1/4″ seam allowance, change the stitch length to 1.4, this will help when taking off the paper later, unfold the two strips and iron. Continue sewing on strips until the paper is covered. The paper acts as a template and also helps stabilize the fabric. Trim the excess fabric and remove the paper. Make 3 more squares, making them all identical with the same order of colors. You can also vary the colors and width of the strips for a more random look. It’s also a good idea to keep the fabric the same for the middle diagonal strip the same color, especially if you’re using this technique to make a quilt. This will give it a stronger overall look for a diamond pattern.
Step 3: Sew the squares together. Arrange the 4 squares how you want them. You can have all the diagonal squares going in the same direction or you can create a diamond or flip them to make an X shape, which is what she’s doing. Take two of the squares and line them up so the right sides are facing, if you have strips that are the same width, pin them because it’s important that the seams are matching up. Then change your stitch and sew the squares together, allowing 1/4″ seam allowance. Then press the seams open.
Step 4: Quilt the fabric. Place one of the pieces of the fusible fleece in the center of the back side of one of the squares and iron it on. Do the same for the back piece. You can quilt the fabric a number of ways, but she “stitches in the ditch” which is sewing right on top of the seams. You can also quilt the back any way you want or you don’t have to quilt it at all. She sews straight lines that are 1/2″ apart.
Step 5: Add the zipper. You can either add a hidden zipper or hand stitch the pillow closed. She does the zipper option so that it’s removable. Then she changes the stitch length to the longest for a basting stitch. Sew with 1/2″ seam allowance and press the seam open. Lay the zipper down on the open seam and pin it down so it’s in the center of the seam. Change the stitch length back to normal. Change the foot to a zipper foot. Sew 1/8-1/4″ away from the zipper on both sides. Use the seam ripper to tear out the basting stitch to reveal the zipper. Make sure to open the zipper.
Step 6: Sew the pillow cover together. Pen the front and back together with the right sides facing together. Sew around the sides with 1/2″ seam allowance. Turn the cover right side out and poke out the corners. Insert the pillow form and the pillow is complete.
Watch this step by step tutorial and learn how to make your very own quilted pillow!
